


The thread for new to 3D printing to ask questions (Page 2 of 7)

|
Originally Posted By -Obsessed-:Wet filament left, dry filament on right. EXACT same roll. EXACT same gcode. https://www.ar15.com/media/mediaFiles/467079/12614_jpg-3724596.JPG Given my tower test looked clean, I can't imagine that my filament is wet. Not to mention that I dried it for 12 and then 24 hours at 65°C. It is possible this is a moisture problem with my filament since I don't have the power adapter for my AMS? I think my next purchase is going to be the Space Pi X4 for sure since I can have stuff drying in it while printing with my AMS. Plus, it goes hotter and dual chambers so I can't do two separate loads. |
Louis L'Amour, “To make democracy work, we must be a nation of participants, not simply observers. One who does not vote has no right to complain.”

|
Originally Posted By turtle2472: Given my tower test looked clean, I can't imagine that my filament is wet. Not to mention that I dried it for 12 and then 24 hours at 65°C. It is possible this is a moisture problem with my filament since I don't have the power adapter for my AMS? I think my next purchase is going to be the Space Pi X4 for sure since I can have stuff drying in it while printing with my AMS. Plus, it goes hotter and dual chambers so I can't do two separate loads. Depends on the ACTUAL temperature of the air in the AMS as it was drying. Just because it says 65ºC doesn't mean that it is. Other things you can tweak are retract speed and distance, and zhop. Zhop naturally increases stringing. You can turn it off so long as you don't have collision issues. Set retract to 1.0, set retract speed to 40mm/s, and set retract before wipe to 100%, wipe to 2mm, and give that a try. Those are my settings for my Sunlu PETG (regular, not HS). Personally, it still looks wet to me. Retract will help, but it's not a silver bullet usually. This is what CAN be done with PETG. These are a couple pics during my calibration process back on my MK3S+ machines. This is Polymaker PETG, straight off the bed. I see two little whisps, and I eventually got it to perfectly clean, but for context, here is the travel path of this print: Attached File Attached File |
|
Someone on the internet said they asked ChatGPT for specs to set for their filament. Well, I have a work account so I asked: { "type": "filament", "name": "SUNLU PETG - P2S AMS 2 Pro Tuned", "inherits": "Generic PETG", "from": "User", "filament_settings_id": "SUNLU PETG P2S AMS 2 Pro Tuned", "setting_id": "SUNLU PETG P2S AMS 2 Pro Tuned", "instantiation": "true", "filament_type": ["PETG"], "filament_density": ["1.27"], "nozzle_temperature_initial_layer": ["245"], "nozzle_temperature": ["242"], "bed_temperature_initial_layer": ["70"], "bed_temperature": ["70"], "fan_min_speed": ["10"], "fan_max_speed": ["25"], "fan_speed": ["20"], "slow_down_for_layer_time": ["1"], "filament_flow_ratio": ["0.95"], "filament_max_volumetric_speed": ["7"], "retraction_length": ["0.4"], "retraction_speed": ["25"] } It also said: For AMS 2 Pro, I’d also set these manually in the print profile if available: Wipe while retracting: on Avoid crossing walls: on Outer wall speed: 80–100 mm/s First layer speed: 25–30 mm/s Most important: dry the PETG before putting it in the AMS 2 Pro. Wet PETG causes way more trouble than the profile does. What tweaks would you recommend to this? This was in response to me asking for a tweaked profile for Sunlu basic PETG and AMS 2 Pro. I will say, as a geek I would far rather tweak my profiles with JSON than a UI. |
Louis L'Amour, “To make democracy work, we must be a nation of participants, not simply observers. One who does not vote has no right to complain.”
|
Well, seems the ChatGPT is missing a bunch. It didn't read in like it was supposed to. It might be due to the missing .info file that would likely be related/paired with the json file. I built a custom profile with Studio just to get a reference with a new one and it has WAY more items listed in it: { "activate_air_filtration": [ "0" ], "additional_cooling_fan_speed": [ "0" ], "chamber_temperatures": [ "0" ], "circle_compensation_speed": [ "200" ], "close_fan_the_first_x_layers": [ "3" ], "compatible_printers": [ "Bambu Lab P1P 0.4 nozzle" ], "compatible_printers_condition": "", "compatible_prints": [], "compatible_prints_condition": "", "complete_print_exhaust_fan_speed": [ "70" ], "cool_plate_temp": [ "0" ], "cool_plate_temp_initial_layer": [ "0" ], "cooling_perimeter_transition_distance": [ "10" ], "cooling_slowdown_logic": [ "uniform_cooling" ], "counter_coef_1": [ "0" ], "counter_coef_2": [ "0.008" ], "counter_coef_3": [ "-0.041" ], "counter_limit_max": [ "0.033" ], "counter_limit_min": [ "-0.035" ], "default_filament_colour": [ "" ], "diameter_limit": [ "50" ], "during_print_exhaust_fan_speed": [ "70" ], "enable_overhang_bridge_fan": [ "1" ], "enable_pressure_advance": [ "0" ], "eng_plate_temp": [ "60" ], "eng_plate_temp_initial_layer": [ "60" ], "fan_cooling_layer_time": [ "30" ], "fan_max_speed": [ "30" ], "fan_min_speed": [ "10" ], "filament_adaptive_volumetric_speed": [ "0", "0" ], "filament_adhesiveness_category": [ "300" ], "filament_bridge_speed": [ "25", "25" ], "filament_change_length": [ "10" ], "filament_change_length_nc": [ "10" ], "filament_cooling_before_tower": [ "0", "0" ], "filament_cost": [ "22.99" ], "filament_density": [ "1.27" ], "filament_deretraction_speed": [ "nil", "nil" ], "filament_dev_ams_drying_ams_limitations": [ "1", "0" ], "filament_dev_ams_drying_heat_distortion_temperature": [ "75" ], "filament_dev_ams_drying_temperature": [ "65", "65", "55", "55" ], "filament_dev_ams_drying_time": [ "12", "12", "12", "12" ], "filament_dev_chamber_drying_bed_temperature": [ "80" ], "filament_dev_chamber_drying_time": [ "12" ], "filament_dev_drying_cooling_temperature": [ "55" ], "filament_dev_drying_softening_temperature": [ "60" ], "filament_diameter": [ "1.75" ], "filament_enable_overhang_speed": [ "1", "1" ], "filament_end_gcode": [ "; filament end gcode \n\n" ], "filament_extruder_variant": [ "Direct Drive Standard", "Direct Drive High Flow" ], "filament_flow_ratio": [ "0.95", "0.95" ], "filament_flush_temp": [ "0", "0" ], "filament_flush_volumetric_speed": [ "0", "0" ], "filament_id": "P413cbd2", "filament_is_support": [ "0" ], "filament_long_retractions_when_cut": [ "1", "1" ], "filament_max_volumetric_speed": [ "14", "14" ], "filament_minimal_purge_on_wipe_tower": [ "15" ], "filament_notes": "", "filament_overhang_1_4_speed": [ "0", "0" ], "filament_overhang_2_4_speed": [ "50", "50" ], "filament_overhang_3_4_speed": [ "30", "30" ], "filament_overhang_4_4_speed": [ "10", "10" ], "filament_overhang_totally_speed": [ "10", "10" ], "filament_pre_cooling_temperature": [ "0", "0" ], "filament_pre_cooling_temperature_nc": [ "0", "0" ], "filament_prime_volume": [ "45" ], "filament_prime_volume_nc": [ "60" ], "filament_printable": [ "3" ], "filament_ramming_travel_time": [ "0", "0" ], "filament_ramming_travel_time_nc": [ "0", "0" ], "filament_ramming_volumetric_speed": [ "-1", "-1" ], "filament_ramming_volumetric_speed_nc": [ "-1", "-1" ], "filament_retract_before_wipe": [ "nil", "nil" ], "filament_retract_length_nc": [ "14", "14" ], "filament_retract_restart_extra": [ "nil", "nil" ], "filament_retract_when_changing_layer": [ "nil", "nil" ], "filament_retraction_distances_when_cut": [ "18", "18" ], "filament_retraction_length": [ "nil", "nil" ], "filament_retraction_minimum_travel": [ "nil", "nil" ], "filament_retraction_speed": [ "nil", "nil" ], "filament_scarf_gap": [ "0%" ], "filament_scarf_height": [ "10%" ], "filament_scarf_length": [ "10" ], "filament_scarf_seam_type": [ "none" ], "filament_settings_id": [ "SUNLU PETG SUNLU_PETG_P2S @Bambu Lab P1P 0.4 nozzle" ], "filament_shrink": [ "100%" ], "filament_soluble": [ "0" ], "filament_start_gcode": [ "; filament start gcode\n{if (bed_temperature[current_extruder] >80)||(bed_temperature_initial_layer[current_extruder] >80)}M106 P3 S255\n{elsif (bed_temperature[current_extruder] >60)||(bed_temperature_initial_layer[current_extruder] >60)}M106 P3 S180\n{endif}\n\n{if activate_air_filtration[current_extruder] && support_air_filtration}\nM106 P3 S{during_print_exhaust_fan_speed_num[current_extruder]} \n{endif}" ], "filament_tower_interface_pre_extrusion_dist": [ "10" ], "filament_tower_interface_pre_extrusion_length": [ "0" ], "filament_tower_interface_print_temp": [ "-1" ], "filament_tower_interface_purge_volume": [ "20" ], "filament_tower_ironing_area": [ "4" ], "filament_type": [ "PETG" ], "filament_velocity_adaptation_factor": [ "1" ], "filament_vendor": [ "SUNLU" ], "filament_wipe": [ "nil", "nil" ], "filament_wipe_distance": [ "nil", "nil" ], "filament_z_hop": [ "nil", "nil" ], "filament_z_hop_types": [ "nil", "nil" ], "first_x_layer_fan_speed": [ "0" ], "from": "User", "full_fan_speed_layer": [ "0" ], "hole_coef_1": [ "0" ], "hole_coef_2": [ "-0.008" ], "hole_coef_3": [ "0.23415" ], "hole_limit_max": [ "0.22" ], "hole_limit_min": [ "0.088" ], "hot_plate_temp": [ "60" ], "hot_plate_temp_initial_layer": [ "60" ], "impact_strength_z": [ "10" ], "inherits": "", "long_retractions_when_ec": [ "0", "0" ], "name": "SUNLU PETG SUNLU_PETG_P2S @Bambu Lab P1P 0.4 nozzle", "no_slow_down_for_cooling_on_outwalls": [ "0" ], "nozzle_temperature": [ "242", "242" ], "nozzle_temperature_initial_layer": [ "245", "245" ], "nozzle_temperature_range_high": [ "280" ], "nozzle_temperature_range_low": [ "230" ], "overhang_fan_speed": [ "90" ], "overhang_fan_threshold": [ "10%" ], "overhang_threshold_participating_cooling": [ "95%" ], "override_process_overhang_speed": [ "0", "0" ], "pre_start_fan_time": [ "0" ], "pressure_advance": [ "0.02" ], "reduce_fan_stop_start_freq": [ "1" ], "required_nozzle_HRC": [ "3" ], "retraction_distances_when_ec": [ "0", "0" ], "slow_down_for_layer_cooling": [ "1" ], "slow_down_layer_time": [ "12" ], "slow_down_min_speed": [ "10", "10" ], "supertack_plate_temp": [ "70" ], "supertack_plate_temp_initial_layer": [ "70" ], "temperature_vitrification": [ "68" ], "textured_plate_temp": [ "60" ], "textured_plate_temp_initial_layer": [ "60" ], "version": "2.5.0.7", "volumetric_speed_coefficients": [ "0 0 0 0 0 0", "0 0 0 0 0 0" ] } The info for it is also sparse, but likely the missing part for the ChatGPT version: sync_info =
user_id = setting_id = PFUSa5xx5a7c4xxxx3 base_id = updated_time = 1772931409 |
Louis L'Amour, “To make democracy work, we must be a nation of participants, not simply observers. One who does not vote has no right to complain.”
I'm FAR from giving up on PETG, but today's shipment of Sunlu PETG has made me realize I have to wait until I get something the actually dry these for certain. Three of the four rolls have a vacuum leak. If there is even a question that my AMS is actually drying them AND there is a finite number of times you can dry a filament, then I'm stuck waiting for a real dryer to get ordered and come in. I just printed this tower and it looks fine*.  *Yes, I printed in the front left corner on purpose. Partially so I can see it in the camera and so I don't "wear out" the middle. |
Louis L'Amour, “To make democracy work, we must be a nation of participants, not simply observers. One who does not vote has no right to complain.”
| How resilient are these printers if the power blips? I’m sitting here with a job going and a rough storm passing overhead. I have Powerwalls, but my network rack would reboot some of my gear when switching from grid to batteries so I had to put an UPS on the rack. |
Louis L'Amour, “To make democracy work, we must be a nation of participants, not simply observers. One who does not vote has no right to complain.”
| Calibration guide posted. It's a work in process, but it's a decent start. |

|
Originally Posted By -Obsessed-: Calibration guide posted. It's a work in process, but it's a decent start. Great guide that I will be implementing here going forward! My prints look decent, but hoping to make them even better On another note for this thread, are you guys worrying about fumes when printing ABS or ASA? I would like to order some but have no way to really externally vent my printer without some work. I was givin a bento box for my P2S from a friend but not sure thats even worth installing honestly. Printer is in the basement near my oil tank, right under my living room 
|
|
Originally Posted By -Obsessed-: Calibration guide posted. It's a work in process, but it's a decent start. Thank you so much for putting the time into that for us. I've bookmarked it and subscribed. I'll be working through my tweaks shortly. There is a ton in there that I didn't even know what a thing. |
Louis L'Amour, “To make democracy work, we must be a nation of participants, not simply observers. One who does not vote has no right to complain.”
|
Originally Posted By plinker8: Great guide that I will be implementing here going forward! My prints look decent, but hoping to make them even better On another note for this thread, are you guys worrying about fumes when printing ABS or ASA? I would like to order some but have no way to really externally vent my printer without some work. I was givin a bento box for my P2S from a friend but not sure thats even worth installing honestly. Printer is in the basement near my oil tank, right under my living room Install the bento box. I was also gifted one from a very kind person and I will be installing it once I have time but sadly work has been crazy. That said the H2D I have has a built in filter system and fumes are almost unnoticeable but still, if I can help even more, I'm going to do it. I plan on shifting primarily to ABS now that it prints as easy as PLA in this machine. I just really like the properties of ABS for everyday prints. The finish is slick with low friction, good springiness like PETG but without the tacky texture, and it prints really clean, and survives decent temps too. Overall just a big fan of it. |

|
Originally Posted By plinker8: Great guide that I will be implementing here going forward! My prints look decent, but hoping to make them even better On another note for this thread, are you guys worrying about fumes when printing ABS or ASA? I would like to order some but have no way to really externally vent my printer without some work. I was givin a bento box for my P2S from a friend but not sure thats even worth installing honestly. Printer is in the basement near my oil tank, right under my living room Yes the styrene fumes are pretty nasty. I just spent a bunch of time and money building internal filtration systems into my core one. It's better for print reliability to filter without venting to keep the chamber temps up, but it's probably better from a safety standpoint to vent the fumes outdoors. Agree with obsessed about ABS. Now that I have filtration I'm going to print it more frequently at home. It's has good properties in many categories. |
|
Originally Posted By turtle2472: Thank you so much for putting the time into that for us. I've bookmarked it and subscribed. I'll be working through my tweaks shortly. There is a ton in there that I didn't even know what a thing. Awesome! I hope you find it useful! |
|
Originally Posted By Blob: Yes the styrene fumes are pretty nasty. I just spent a bunch of time and money building internal filtration systems into my core one. It's better for print reliability to filter without venting to keep the chamber temps up, but it's probably better from a safety standpoint to vent the fumes outdoors. Agree with obsessed about ABS. Now that I have filtration I'm going to print it more frequently at home. It's has good properties in many categories. Originally Posted By Blob: Yes the styrene fumes are pretty nasty. I just spent a bunch of time and money building internal filtration systems into my core one. It's better for print reliability to filter without venting to keep the chamber temps up, but it's probably better from a safety standpoint to vent the fumes outdoors. Agree with obsessed about ABS. Now that I have filtration I'm going to print it more frequently at home. It's has good properties in many categories. Originally Posted By -Obsessed-: Install the bento box. I was also gifted one from a very kind person and I will be installing it once I have time but sadly work has been crazy. That said the H2D I have has a built in filter system and fumes are almost unnoticeable but still, if I can help even more, I'm going to do it. I plan on shifting primarily to ABS now that it prints as easy as PLA in this machine. I just really like the properties of ABS for everyday prints. The finish is slick with low friction, good springiness like PETG but without the tacky texture, and it prints really clean, and survives decent temps too. Overall just a big fan of it. Thank you both for the responses! Ok I will install the bento box and go for it with some ABS. ABS is a very appealing material for me as I don’t really print trinkets, but mostly garage and outdoor things and the current PETG works but could be better. Are there any major printer settings I want to utilize when printing ABS other than the obvious calibration that Obsessed outlined in great detail? Like fan speeds? Etc Thanks for all the help! |
|
Originally Posted By plinker8: Thank you both for the responses! Ok I will install the bento box and go for it with some ABS. ABS is a very appealing material for me as I don’t really print trinkets, but mostly garage and outdoor things and the current PETG works but could be better. Are there any major printer settings I want to utilize when printing ABS other than the obvious calibration that Obsessed outlined in great detail? Like fan speeds? Etc Thanks for all the help! Typically for max strength I run at the upper end of the temp range, so 270, no cooling fan, and speeds around 50mm/s. Chamber temp between 50-55. Layer adhesion is quite good with those settings. |
|
Originally Posted By plinker8: Thank you both for the responses! Ok I will install the bento box and go for it with some ABS. ABS is a very appealing material for me as I don’t really print trinkets, but mostly garage and outdoor things and the current PETG works but could be better. Are there any major printer settings I want to utilize when printing ABS other than the obvious calibration that Obsessed outlined in great detail? Like fan speeds? Etc Thanks for all the help! Pretty much what Blob said. As mentioned in my guide, if you make functional prints, basically as much heat and the least amount of fan you can get away with is the answer. I print 270, no fan (I do use 30% for overhangs if they are steep enough), and I print with a chamber between 55 and 65 depending on size of the part. I haven't personally seen adhesion issues at faster speeds but itay or may not be due to chamber temps, can't say for sure, but I print generally in the 160-175mm/s range. I've printed 254mm long thus far (longest) in ABS with zero warping so far, so it works for sure. Basically with a P2S get it as hot in there as you can. You could alternatively get a Panda Breath to get you a proper heater in the chamber. |
|
I'm a wizard! Don't tell me otherwise. OK, not really, but I did something for the first time and it worked (mostly). My wife wanted a seed starting kit she found on MW (https://makerworld.com/en/models/1277928-seed-starter-lift-spoon-watering). I printed in PETG, though I'm thinking about trying with ABS now, because why not? Especially with the talk of ABS here and I happen to have the colors she wants. Anyway, the wizardry I did was change orientation of the "spoons" and put words on them!    The mostly is because I found the smallest the slicer could do with my .4mm nozzle it seems. My wife is thrilled and it seems like it will do exactly what she's after which makes me happy. For me, I'm just thrilled to have figured out how to change the orientation, add text and it come out decent without reading the wiki yet. The original orientation for the spoons was standing and no text. |
Louis L'Amour, “To make democracy work, we must be a nation of participants, not simply observers. One who does not vote has no right to complain.”

|
Originally Posted By garyd: Using Bambu studios, can you cut a part on 2 planes? For instance let's say you have a 35mm wide by 45mm tall by 108mm long block and you want to cut 10mm off the top. Making the part now 35mm tall. However you want to keep 15mm on one end the full height of 45mm I am trying to cut a M&p full size frame to a compact size but keep the short area the extends to be even with the magazine plate thickness and I am having a hard time figuring out if I can and if so how. Any help appreciated. @garyd Maybe try adding a negative part. |
|
Before I try, can ABS print the words on the spoons like PETG did? I'd like to assume so, and willing to test the filament loss if I don't hear back. I might have to just to text up from 6mm to 7 or 8 and make things fit different. Oh, and what font prints best with this type of job? |
Louis L'Amour, “To make democracy work, we must be a nation of participants, not simply observers. One who does not vote has no right to complain.”
|
Originally Posted By turtle2472: Before I try, can ABS print the words on the spoons like PETG did? I'd like to assume so, and willing to test the filament loss if I don't hear back. I might have to just to text up from 6mm to 7 or 8 and make things fit different. Oh, and what font prints best with this type of job? I forget which fone I settled on but I had this issue not too long ago. I always print my text flush though, vs just sticking up. That said, ABS would probably do better than PETG to be honest. |
|
Originally Posted By -Obsessed-:I forget which fone I settled on but I had this issue not too long ago. I always print my text flush though, vs just sticking up. That said, ABS would probably do better than PETG to be honest. That's good to know! I offered to figure out how to make it flush, but my wife wants it sticking out. She likes the depth it gives. I still want to figure out how to do it flush though. |
Louis L'Amour, “To make democracy work, we must be a nation of participants, not simply observers. One who does not vote has no right to complain.”
| Random observation after printing with ABS for the last 5 hours or so, I don't smell it in the basement. Either the P2S is great enclosed or I just haven't been doing it long enough to smell it yet. I've had to walk by the printer multiple times over though for other jobs I've been doing around the house needing tools/supplies past it. |
Louis L'Amour, “To make democracy work, we must be a nation of participants, not simply observers. One who does not vote has no right to complain.”

|
Originally Posted By turtle2472: Random observation after printing with ABS for the last 5 hours or so, I don't smell it in the basement. Either the P2S is great enclosed or I just haven't been doing it long enough to smell it yet. I've had to walk by the printer multiple times over though for other jobs I've been doing around the house needing tools/supplies past it. My H2D is in my gun room in the basement, if I'm in the room while printing ABS / ASA I can pick up a faint smell.....if I only go down to grab the parts after the print is finished, there is basically zero smell left. Before I got my H2D, I'd read a lot of complaints about the smell, so I had a plan to setup an exhaust fan. After some first hand experience with it, it dropped down the priority list pretty quick. |
EP429: Today's lesson - Don't provoke ARFCOM. People will see your butthole.
|
Originally Posted By fox2008:My H2D is in my gun room in the basement, if I'm in the room while printing ABS / ASA I can pick up a faint smell.....if I only go down to grab the parts after the print is finished, there is basically zero smell left. Before I got my H2D, I'd read a lot of complaints about the smell, so I had a plan to setup an exhaust fan. After some first hand experience with it, it dropped down the priority list pretty quick. That is where I am. I was planning to get the VentoBox for mine but now, eh... maybe. |
Louis L'Amour, “To make democracy work, we must be a nation of participants, not simply observers. One who does not vote has no right to complain.”
|
Originally Posted By fox2008: My H2D is in my gun room in the basement, if I'm in the room while printing ABS / ASA I can pick up a faint smell.....if I only go down to grab the parts after the print is finished, there is basically zero smell left. Before I got my H2D, I'd read a lot of complaints about the smell, so I had a plan to setup an exhaust fan. After some first hand experience with it, it dropped down the priority list pretty quick. Also, something to note, is the latest firmware give you additional control over the filter and exhaust. You can now have it run for a set amount of time after a print to scrub the chamber air before you open the door. I haven't messed with it too much but I was happy to see that feature. My old firmware kept the fan on full blast until I turned it off or printed something that didn't require filtration. |
Question: Is embedded depth where I would recess the text into the spoon so it could be flush? My wife still wants it to stick out more, I just want some in the body of the spoon for longevity sake and less likely to break off whole letters as time goes on. I went with the .8mm depth because I'm using a .4mm nozzle and that puts two passes flush with the body. I think. I'm just assuming/making an educated guess on that actually. I still need to figure out the font. This one with the "a" looking like that isn't a great option. ETA: Went with Futura for the font. Seems to check the boxes I want. |
Louis L'Amour, “To make democracy work, we must be a nation of participants, not simply observers. One who does not vote has no right to complain.”
|
Originally Posted By -Obsessed-: Also, something to note, is the latest firmware give you additional control over the filter and exhaust. You can now have it run for a set amount of time after a print to scrub the chamber air before you open the door. I haven't messed with it too much but I was happy to see that feature. My old firmware kept the fan on full blast until I turned it off or printed something that didn't require filtration. Originally Posted By -Obsessed-: Originally Posted By fox2008: My H2D is in my gun room in the basement, if I'm in the room while printing ABS / ASA I can pick up a faint smell.....if I only go down to grab the parts after the print is finished, there is basically zero smell left. Before I got my H2D, I'd read a lot of complaints about the smell, so I had a plan to setup an exhaust fan. After some first hand experience with it, it dropped down the priority list pretty quick. Also, something to note, is the latest firmware give you additional control over the filter and exhaust. You can now have it run for a set amount of time after a print to scrub the chamber air before you open the door. I haven't messed with it too much but I was happy to see that feature. My old firmware kept the fan on full blast until I turned it off or printed something that didn't require filtration. Good call.....I remember reading that in the firmware notes but completely forgot about it. |
EP429: Today's lesson - Don't provoke ARFCOM. People will see your butthole.
|
Originally Posted By turtle2472: Question: Is embedded depth where I would recess the text into the spoon so it could be flush? https://turtle2472.com/ar15/embeddepth.jpeg My wife still wants it to stick out more, I just want some in the body of the spoon for longevity sake and less likely to break off whole letters as time goes on. I went with the .8mm depth because I'm using a .4mm nozzle and that puts two passes flush with the body. I think. I'm just assuming/making an educated guess on that actually. I still need to figure out the font. This one with the "a" looking like that isn't a great option. You use only the embed. Thickness is basically how much the text gets raised above the surface. Embed is below. So you'd show zero for thickness, and something like 0.6mm (or 3-4 layers) for the embed. You gave me an idea though. I might be overcomplicating the labels file. I may just do this text...I can control spacing directly in the slicer. Appreciate the idea...I usually don't mess with such things in the slicer. 
|
|
Originally Posted By -Obsessed-:You use only the embed. Thickness is basically how much the text gets raised above the surface. Embed is below. So you'd show zero for thickness, and something like 0.6mm (or 3-4 layers) for the embed. You gave me an idea though. I might be overcomplicating the labels file. I may just do this text...I can control spacing directly in the slicer. Appreciate the idea...I usually don't mess with such things in the slicer. See, this is why I try to figure stuff out before reading how they want me to do it. Thanks for the explanation. |
Louis L'Amour, “To make democracy work, we must be a nation of participants, not simply observers. One who does not vote has no right to complain.”
|
Originally Posted By turtle2472: See, this is why I try to figure stuff out before reading how they want me to do it. Thanks for the explanation. Originally Posted By turtle2472: Originally Posted By -Obsessed-:You use only the embed. Thickness is basically how much the text gets raised above the surface. Embed is below. So you'd show zero for thickness, and something like 0.6mm (or 3-4 layers) for the embed. You gave me an idea though. I might be overcomplicating the labels file. I may just do this text...I can control spacing directly in the slicer. Appreciate the idea...I usually don't mess with such things in the slicer. See, this is why I try to figure stuff out before reading how they want me to do it. Thanks for the explanation. Ohhhh.... I just realized a mistake I was making. The .4mm nozzle is the diameter of the outflow... not depth. Rereading your post ("0.6mm (or 3-4 layers)") I realize where I was crossing the streams. It won't matter for this job, but I am grasping these parts better now. Thanks again. |
Louis L'Amour, “To make democracy work, we must be a nation of participants, not simply observers. One who does not vote has no right to complain.”
|
Originally Posted By turtle2472: Ohhhh.... I just realized a mistake I was making. The .4mm nozzle is the diameter of the outflow... not depth. Rereading your post ("0.6mm (or 3-4 layers)") I realize where I was crossing the streams. It won't matter for this job, but I am grasping these parts better now. Thanks again. Found the texts I like, depends on if I need to have a condensed font or not. But I use Calibri Bold (more condensed) or Arial Rounded MT Bold. Verdana Bold also works well on small font but I don't like how wide it is. So I stick to the first two usually. I was also playing around with Consolas (a mono spaced font) with these labels but I'm not loving it. |
What causes ABS to look like this on some of the spoon (these two only) but not others? In the same batch most of them look just fine. These two were rough though. The Cabbage one was close to the door of the printer, as was the Swiss Chard. You can see them in this picture though I swapped Cabbage for Cantaloupe.  I added the fan deflector because it was one of those "must print" things I read about for ABS and figured after seeing the two white ones I might need it. Funny enough, only those two spoons look that bad. The rest look more "normal". 
|
Louis L'Amour, “To make democracy work, we must be a nation of participants, not simply observers. One who does not vote has no right to complain.”
|
Originally Posted By turtle2472: What causes ABS to look like this on some of the spoon (these two only) but not others? https://turtle2472.com/ar15/IMG_1864_2.jpeg In the same batch most of them look just fine. These two were rough though. The Cabbage one was close to the door of the printer, as was the Swiss Chard. You can see them in this picture though I swapped Cabbage for Cantaloupe. https://turtle2472.com/ar15/IMG_1867.jpeg I added the fan deflector because it was one of those "must print" things I read about for ABS and figured after seeing the two white ones I might need it. Funny enough, only those two spoons look that bad. The rest look more "normal". https://turtle2472.com/ar15/IMG_1863.jpeg To me it looks like the corners warped off the plate and the nozzle ran through it. Makes sense with them being the closest to the door. Most plates don't heat evenly and the edges are almost always the coolest areas. My prusas will do a heat soak for about 15 minutes when printing at high bed and chamber temps to let the heat evenly distribute and stabilize the thermal growth. |
|
Originally Posted By turtle2472: What causes ABS to look like this on some of the spoon (these two only) but not others? https://turtle2472.com/ar15/IMG_1864_2.jpeg In the same batch most of them look just fine. These two were rough though. The Cabbage one was close to the door of the printer, as was the Swiss Chard. You can see them in this picture though I swapped Cabbage for Cantaloupe. https://turtle2472.com/ar15/IMG_1867.jpeg I added the fan deflector because it was one of those "must print" things I read about for ABS and figured after seeing the two white ones I might need it. Funny enough, only those two spoons look that bad. The rest look more "normal". https://turtle2472.com/ar15/IMG_1863.jpeg Classic sign of warping. Check the bottom (that rests on the bed), you can usually see where it warped off the bed as it leaves a distinguishable mark and the light also reflects at a different angle. How hot was the chamber? Also, looks like your flow ratio or PA calibration may be off. Did you calibrate the filament? You don't need a fan deflector, just keep the print fan and auxillary fan (if you have one) off. |
|
Originally Posted By Blob:To me it looks like the corners warped off the plate and the nozzle ran through it. Makes sense with them being the closest to the door. Most plates don't heat evenly and the edges are almost always the coolest areas. My prusas will do a heat soak for about 15 minutes when printing at high bed and chamber temps to let the heat evenly distribute and stabilize the thermal growth. Originally Posted By -Obsessed-:Classic sign of warping. Check the bottom (that rests on the bed), you can usually see where it warped off the bed as it leaves a distinguishable mark and the light also reflects at a different angle. How hot was the chamber? Also, looks like your flow ratio or PA calibration may be off. Did you calibrate the filament? You don't need a fan deflector, just keep the print fan and auxillary fan (if you have one) off. I'm going to have to figure out how to make my printer heat up the bed sooner. I haven't looked at that yet. I know it indicates 90°C, but the edges might not be there. Warping makes sense, it is not as flat as I would expect for sure. My chamber was in the 40's from when I've looked. I don't know if the fan is on or not. Mostly because I'm not even sure how to check. I will figure that out though! My wife is thrilled with what she has gotten so far and just gave me another list to work through. So I'm going to update my project and print another 16 with the same blue/white coloring. All that to say, I'll see if I can figure out how to make sure the aux fan is off. I don't know if I have one or not. I'm pretty spoiled by this printer that everything has come out as good as it has. I need to do the proper calibration on the filament still. I did tweak it from the start of this thread. By that I mean, I figured out how to do a custom profile from the BBL ABS and make it for Sunlu with my printer/nozzle combo. Given how good these have come out so far I don't feel as pressed to make it happen yet with the ABS. I have my wife telling me that she needs three more seed starter sets. It is a full day going from tray to cup to spoons. I'll spend the time to calibrate it once I make it through these. |
Louis L'Amour, “To make democracy work, we must be a nation of participants, not simply observers. One who does not vote has no right to complain.”
My bed temp is close to 90°C in the middle, less so on the edge though:  I figured out how to heat the bed at the printer, not sure if I can do it through the software controls before printing. I also figured out in Studio where I can see the fans and I have a "Part" and a "Right (Filter)" option. I just sent the print job and Right(Filter) is on 100% and I'll watch the Part one while printing this batch of spoons. |
Louis L'Amour, “To make democracy work, we must be a nation of participants, not simply observers. One who does not vote has no right to complain.”
|
Originally Posted By turtle2472: My bed temp is close to 90°C in the middle, less so on the edge though: https://turtle2472.com/ar15/20260311T154100.jpeg https://turtle2472.com/ar15/20260311T154247.jpeg I figured out how to heat the bed at the printer, not sure if I can do it through the software controls before printing. I also figured out in Studio where I can see the fans and I have a "Part" and a "Right (Filter)" option. I just sent the print job and Right(Filter) is on 100% and I'll watch the Part one while printing this batch of spoons. With my 5M (without active heating), I would turn the bed on max heat for ~45 minutes before starting a print to build up some chamber heat. You can do the same thing via the Bambu app. If you press on the area that shows 55 on the screen shot it will bring up a box to let you enter a temperature manually. I've got a print running, so I can't change it to you. 
|
EP429: Today's lesson - Don't provoke ARFCOM. People will see your butthole.
|
Originally Posted By fox2008:With my 5M (without active heating), I would turn the bed on max heat for ~45 minutes before starting a print to build up some chamber heat. You can do the same thing via the Bambu app. If you press on the area that shows 55 on the screen shot it will bring up a box to let you enter a temperature manually. I've got a print running, so I can't change it to you. https://www.ar15.com/media/mediaFiles/397309/IMG_0392-3727869.jpg Awesome! Thank you very much. :) I also figured out the fan thing. The wiki has stuff in it. Part fan is the printhead. Right is the chamber fan. Mine is in heating mode for this job so it is recirculating the air rather than pulling from outside of the chamber. This would also explain why I'm not smelling ABS melting in the basement. 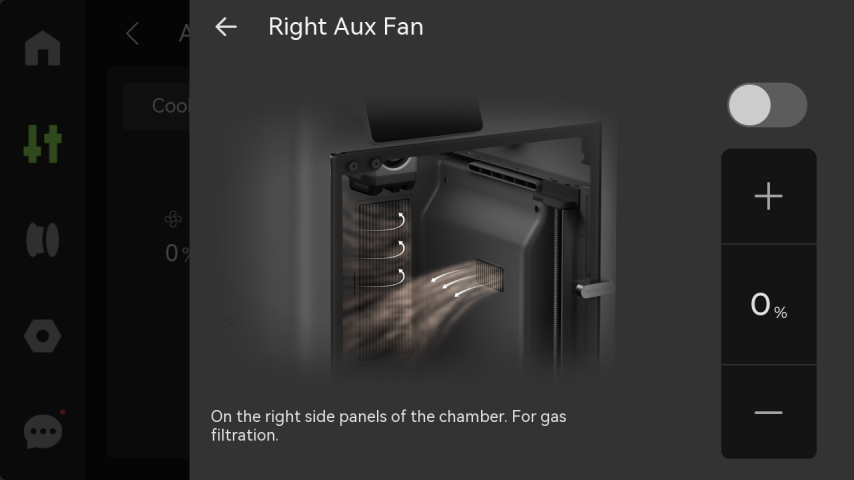
|
Louis L'Amour, “To make democracy work, we must be a nation of participants, not simply observers. One who does not vote has no right to complain.”
|
Yes, you can control the bed temp from the slicer. It's in the filament profile. You will want to increase it to 100. To be clear it's not for the sake of needing a hotter bed, it's for the sake of needing a hotter chamber. You want the auxiliary fan and print fan both off. |
|
Originally Posted By -Obsessed-:Yes, you can control the bed temp from the slicer. It's in the filament profile. You will want to increase it to 100. To be clear it's not for the sake of needing a hotter bed, it's for the sake of needing a hotter chamber. You want the auxiliary fan and print fan both off. Ok, I clearly need a better handle of the profiles. I really hope to dig into those later tonight, but I'm certain it just isn't going to happen yet. I got obligations this evening and will likely not want to mess with this when I get home. I did turn off the aux fan (Right(Filter)) though for the job that is running. The part fan comes and goes. Must be in the profile too. Up to 80% right now. Off in a second. 10% the next... etc. Chamber is up to 47°C now though. I think that might be the hottest I've seen it. ETA: Chamber is at 50 now. Also, my wife is loving the sets!  This was the first ABS batch and the letters were not embedded with 2 for the Thickness. ETA2: I manually set the bed temp to 100°C on the printer. Since the job is already running, it didn't let me make changes in Studio. 
|
Louis L'Amour, “To make democracy work, we must be a nation of participants, not simply observers. One who does not vote has no right to complain.”
|
For now, I'm updating the profile file so my next job will be set for the bed to be 100. "eng_plate_temp": [ "90" ], "eng_plate_temp_initial_layer": [ "90" ], That is my original. Now it is: "eng_plate_temp": [ "100" ], "eng_plate_temp_initial_layer": [ "100" ], I'm assuming these are for the part (print head) fan?: "fan_cooling_layer_time": [ "30" ], "fan_max_speed": [ "60" ], "fan_min_speed": [ "10" ], Those values don't seem right though. I've seen it go to 80%. I just don't see another fan option that would be for this. I'm also not finding the chamber heating mode being set in this profile. "SUNLU ABS Basic @Bambu Lab P2S 0.4 nozzle.json" Click To View Spoiler |
Louis L'Amour, “To make democracy work, we must be a nation of participants, not simply observers. One who does not vote has no right to complain.”
|
Originally Posted By -Obsessed-: Maybe I'll add the filament profile view and settings in my filament calibration guide. I'd love it. As a new guy who is only just barely, slightly more than clueless now, it would be awesome! |
Louis L'Amour, “To make democracy work, we must be a nation of participants, not simply observers. One who does not vote has no right to complain.”
|
Originally Posted By turtle2472: For now, I'm updating the profile file so my next job will be set for the bed to be 100. "eng_plate_temp": [ "90" ], "eng_plate_temp_initial_layer": [ "90" ], That is my original. Now it is: "eng_plate_temp": [ "100" ], "eng_plate_temp_initial_layer": [ "100" ], I'm assuming these are for the part (print head) fan?: "fan_cooling_layer_time": [ "30" ], "fan_max_speed": [ "60" ], "fan_min_speed": [ "10" ], Those values don't seem right though. I've seen it go to 80%. I just don't see another fan option that would be for this. I'm also not finding the chamber heating mode being set in this profile. "SUNLU ABS Basic @Bambu Lab P2S 0.4 nozzle.json" Click To View Spoiler There's another fan speed control: overhangs and external bridges which is usually defaulted to much higher than the normal cooling speeds. After you slice a model you can change the preview to show different settings. One of them is fan speed and will color code the model based on how fast the fan is spinning at each point. Attached File |
|
Originally Posted By Blob:There's another fan speed control: overhangs and external bridges which is usually defaulted to much higher than the normal cooling speeds. After you slice a model you can change the preview to show different settings. One of them is fan speed and will color code the model based on how fast the fan is spinning at each point. https://www.ar15.com/media/mediaFiles/160722/Screenshot_2026-03-11_171743_jpg-3727933.JPG Cool! I set my fan speed to 0% and now in slicer it shows everything being 0%. Nice way to check it! Setting my bed to 100 eventually got my chamber in the upper 50's last I saw. All my spoons from this last batch seem to be better than the last. I also updated my print profile via the GUI and saved it, then verified the json after.    Annoyingly, when I got home I set the bed to 100 again because I'm about to print the next set of cups in ABS. During the time I got other things it timed out and cooled down to 67. Now I'm letting it warm up again, though using the Handy app to do it! |
Louis L'Amour, “To make democracy work, we must be a nation of participants, not simply observers. One who does not vote has no right to complain.”
|
Originally Posted By turtle2472: Cool! I set my fan speed to 0% and now in slicer it shows everything being 0%. Nice way to check it! Setting my bed to 100 eventually got my chamber in the upper 50's last I saw. All my spoons from this last batch seem to be better than the last. I also updated my print profile via the GUI and saved it, then verified the json after. https://turtle2472.com/ar15/IMG_1881.jpeg https://turtle2472.com/ar15/IMG_1885.jpeg https://turtle2472.com/ar15/IMG_1886_2.jpeg Annoyingly, when I got home I set the bed to 100 again because I'm about to print the next set of cups in ABS. During the time I got other things it timed out and cooled down to 67. Now I'm letting it warm up again, though using the Handy app to do it! Brother. You need to get that filament calibrated lol. Your flow ratio looks at least 5 points off.
|
|
Originally Posted By -Obsessed-: Brother. You need to get that filament calibrated lol. Your flow ratio looks at least 5 points off. :hangs head in shame: I know. I hope to get it done tomorrow. I'm done for the night. The cups will look fine as it is.
|
Louis L'Amour, “To make democracy work, we must be a nation of participants, not simply observers. One who does not vote has no right to complain.”
|
:grumble: Printing things in PLA while running job after job for ABS wasn't a good idea.    All three of these (including the dust cover on the bottom) were things I read I should have for my printer. All printed in PLA. I like the idea of the PTFE tube guide to keep it from rubbing on the glass. The aux fan diffuser shouldn't even be being used, but I didn't realize it turned the fan on with the print job anyway even though I thought it was disabled with the print profile. I've since stopped the fan. The lower red diffuser makes logical sense... but shouldn't be used either based on conversations in here. I might print the dust covers in PETG for the bottom later though. |
Louis L'Amour, “To make democracy work, we must be a nation of participants, not simply observers. One who does not vote has no right to complain.”
|
Originally Posted By turtle2472: :grumble: Printing things in PLA while running job after job for ABS wasn't a good idea. https://turtle2472.com/ar15/IMG_1888_2.jpeg https://turtle2472.com/ar15/IMG_1889_2.jpeg https://turtle2472.com/ar15/IMG_1890_2.jpeg All three of these (including the dust cover on the bottom) were things I read I should have for my printer. All printed in PLA. I like the idea of the PTFE tube guide to keep it from rubbing on the glass. The aux fan diffuser shouldn't even be being used, but I didn't realize it turned the fan on with the print job anyway even though I thought it was disabled with the print profile. I've since stopped the fan. The lower red diffuser makes logical sense... but shouldn't be used either based on conversations in here. I might print the dust covers in PETG for the bottom later though. Print them in ABS |
|
Originally Posted By Blob: Print them in ABS Originally Posted By Blob: Originally Posted By turtle2472: :grumble: Printing things in PLA while running job after job for ABS wasn't a good idea. https://turtle2472.com/ar15/IMG_1888_2.jpeg https://turtle2472.com/ar15/IMG_1889_2.jpeg https://turtle2472.com/ar15/IMG_1890_2.jpeg All three of these (including the dust cover on the bottom) were things I read I should have for my printer. All printed in PLA. I like the idea of the PTFE tube guide to keep it from rubbing on the glass. The aux fan diffuser shouldn't even be being used, but I didn't realize it turned the fan on with the print job anyway even though I thought it was disabled with the print profile. I've since stopped the fan. The lower red diffuser makes logical sense... but shouldn't be used either based on conversations in here. I might print the dust covers in PETG for the bottom later though. Print them in ABS Agree….I wouldn’t print anything that was going to live inside the printer out of PLA. |
EP429: Today's lesson - Don't provoke ARFCOM. People will see your butthole.
|
I had another realization today that should be obvious: Reprinting a job from the panel doesn't take into account new and updated filament profiles. I made those changes to my profile last night so I could set the bed temp and fan control. (Not the full calibration yet... maybe today.) Going through my previous print jobs, changing the color and hitting print uses the profile I sent with that job. So I now manually turn off the fan and raise the bed temp. I know it should be obvious, but yet it wasn't to me. I've got one more tray and two more sets of cups I'll print from the previous job but changing the color. Then I'll send new jobs for the spoons because they will have changes for the text. |
Louis L'Amour, “To make democracy work, we must be a nation of participants, not simply observers. One who does not vote has no right to complain.”