


Cabin build thread (Page 4 of 5)

|
Originally Posted By LeadBreakfast: Looking good! Spending a lot of time up there this summer? Yep, use it as my office working from home. 8-5 m-f. It’s been really nice. Pretty much peaks at 80* all summer with a nice breeze. Been low 50s a lot of mornings. Heck last week I went back to wearing pants and a jacket instead of shorts. In august. |
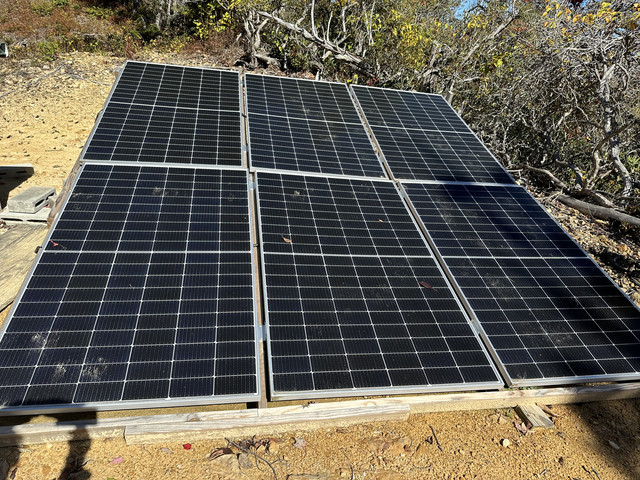 Freakin bear walked across my panel. Looks like he walked up the right side across the top and ran down the left as best I can tell Got a game cam pic of him on the porch lol. Hes pretty young which is good. I don’t think those panels are rated for full grown bears. Got starlink up there now too so should have some better cameras soon |

Born with a low tolerance for bullshit
Joined:
Feb 2007
Posts:
51902
EE: 0% (0)
 KY, USA
|
Originally Posted By taliv: https://i.ibb.co/f9LK3z6/IMG-3248.jpg Freakin bear walked across my panel. Looks like he walked up the right side across the top and ran down the left as best I can tell Got a game cam pic of him on the porch lol. Hes pretty young which is good. I don’t think those panels are rated for full grown bears. Got starlink up there now too so should have some better cameras soon Will that kind of thing damage your panels? (I look at a lot of Schoolie builds, but that's the most I know about solar.) |
Nobody ever wakes me at 2 in the morning telling me that my grass is out on the highway.~~Radiopat
Wine is sunlight held together by water~~Galileo Galilei
Well-behaved women rarely make history~~Marilyn Monroe
Wine is sunlight held together by water~~Galileo Galilei
Well-behaved women rarely make history~~Marilyn Monroe
|
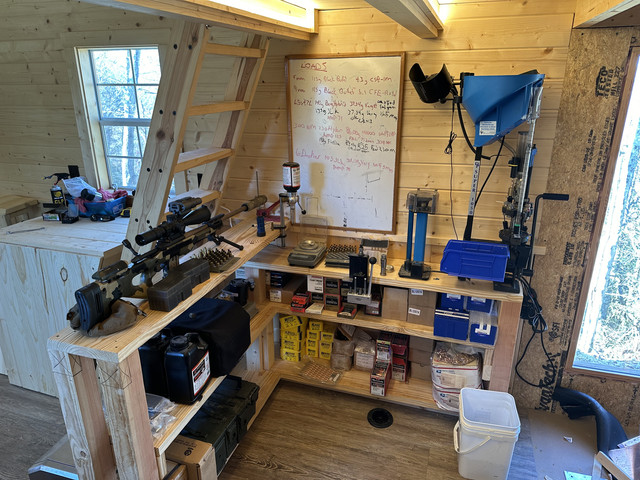
TRIGGER WARNING: if you’re a carpenter just don’t look Seriously I’m by far the worst carpenter in the world But I finally got around to building a cabinet for my tools with a 2x6 workbench top and shelves and t&g sides. I’m trying to use the small cabin space efficiently. So I made it where the sliding ladder stowes beside it. I’m going to continue behind the ladder along the wall with an L shaped reloading bench that is sloped to match the ladder but sticks out into the room a bit more. 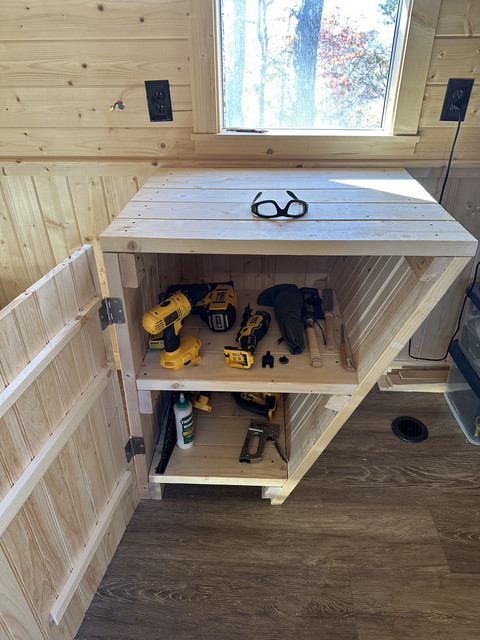 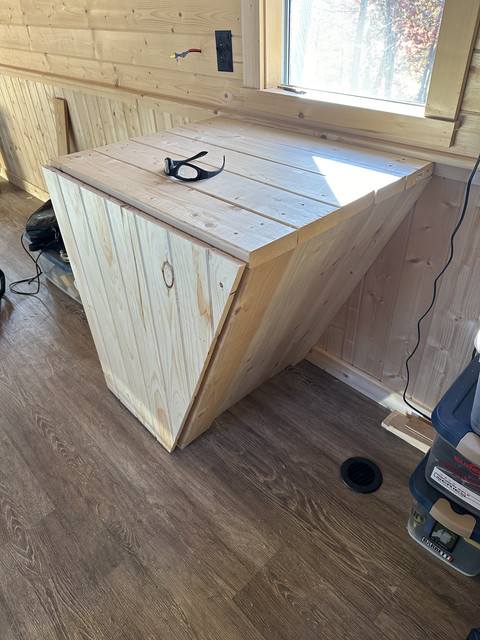  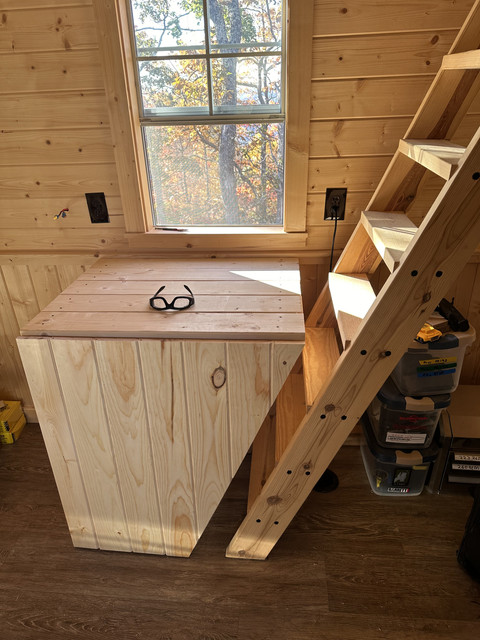 Taking some time with the reloading bench because I’m thinking about how to design in custom spots for the Dillon 1050, co-ax and various gadgets like AMP annealer and giraud case trimmer. I’d like to design it with workflow in mind this time instead of just bolting everything to a bench like I did when I had massive room. |

Born with a low tolerance for bullshit
Joined:
Feb 2007
Posts:
51985
EE: 0% (0)
KY, USA
|
Originally Posted By taliv: Reloading bench complete! And already a mess https://i.ibb.co/FKKSkmm/IMG-3315.jpg Thinking I may take the recipe whiteboard down and put some small shelves up on the wall above the bench with a light strip underneath also, haven't mounted the co-ax press yet Could use the white board as a door for your cabinet and have both. 
|
Nobody ever wakes me at 2 in the morning telling me that my grass is out on the highway.~~Radiopat
Wine is sunlight held together by water~~Galileo Galilei
Well-behaved women rarely make history~~Marilyn Monroe
Wine is sunlight held together by water~~Galileo Galilei
Well-behaved women rarely make history~~Marilyn Monroe

|
Originally Posted By taliv: Reloading bench complete! And already a mess https://i.ibb.co/FKKSkmm/IMG-3315.jpg Thinking I may take the recipe whiteboard down and put some small shelves up on the wall above the bench with a light strip underneath also, haven't mounted the co-ax press yet 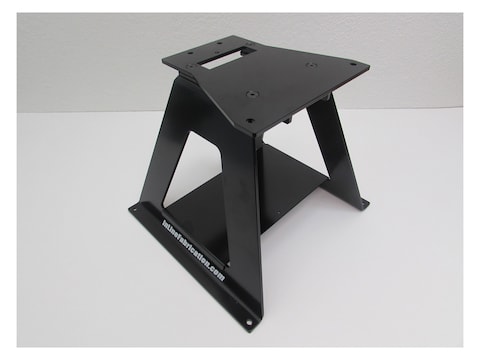 I have an old Franfert arsenal stand with my small RCBS press and my Lyman lead bullet swagger on interchangeable heads. I don’t think they make it anymore. But it’s nice to have a portable press. Before that I used a craftsman portable work clamp. I don’t have any pictures of it. That was before digital photos. |
Chicken Farmer by choice hunter of shade tree's and hiding spots by nature.
|
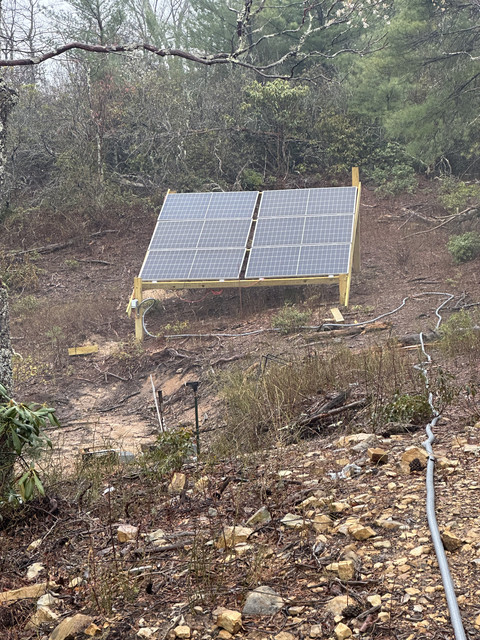
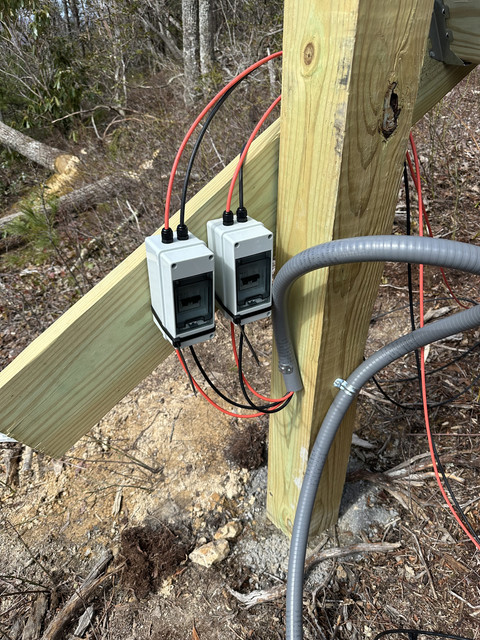
well, storm got me pretty good. we had a wind warning about gusts up to 85 mph "and higher in the mountains" for 36 solid hours. I suspect we had >100mph winds up on top but I wasn't standing around holding the kestrel. we've had a LOT of high winds up there past 3 months but this was crazy. 3 of 6 solar panels trashed. outdoor sink knocked over and 10' away from where it's supposed to be. gutter downspout ripped off. diesel heater duct ripped off. pile of lumber and a vibratory tumbler full of media that was on the deck distributed around the yard. ham antenna down. weboost mast sideways. insulation ripped off water cistern. lot of weird stuff makes me think the wind was coming from all directions. the sink landed on the other side of the chimney so it had to move in a J-shape. one of the solar panels was jammed up against the opposite side of a tree from it's mount, and almost folded in half. so, I'm going to be redoing a lot of stuff and trying to figure out how to fortify it against hurricane winds. i'm also upgrading my battery by almost 600%. |


|
So as I’ve mentioned I’m in the middle of a massive upgrade in electrical systems. Tomorrow I should finish top balancing 80x eve 280k cells and will put them together with 10 bms to make a 72kw 12v battery, upgrading from my current 12kw battery. As I’m also doubling the solar panels, I’m doubling the victron mppt chargers (from 2 to 4) and upgrading some wiring. (I know everyone else would do 48v with inverter, I know). I’m not increasing the load, I just want to go two weeks without sun instead of two days. While top balancing I check the batteries with my pas23 thermal monocular just to make sure nothings super wrong. I decided to peek into my electrical shed with it and post some pics I thought were interesting. Before anyone freaks out, the difference in “hot” and “not so hot” in these pics is prob only a few degrees. Nothing is hot to the touch although much is warm. But ambient is 85 or so and it’s hot in the shed from bright sun. Anyways…I thought I’d share so people can see that cable size makes a difference. 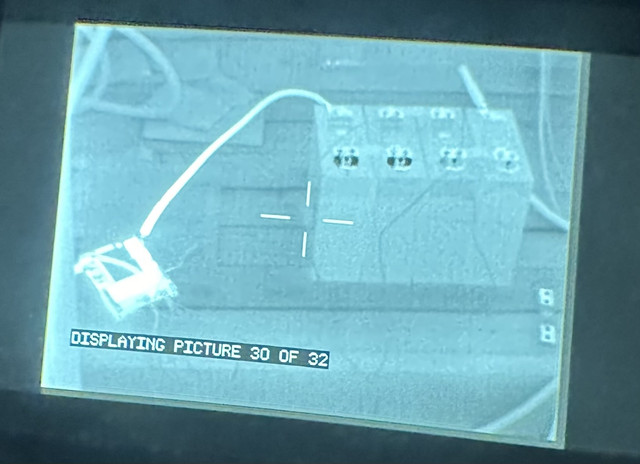 First pic is 4 cells and a bms charging. The cable to left of batteries is negative going to bms. Then negative from bms to mppt can be seen returning to right at bottom of pic. Cable from right rear of battery going right is positive. There are two 450w panels prob putting about 600-700w in. These are completely separate from cabin system. So 40a or so on a 280ah battery is about .15C. 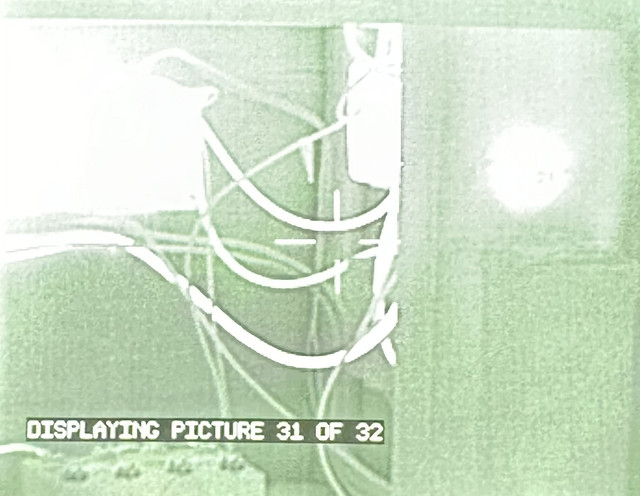 Pic 31 is interesting because it’s the cabin system. 6x 490w panels are putting about 2300w in, and the mppt are turning that into about 150a at 14v to charge the cabin batteries. You can see some fairly large wire is warm and the round item in upper right is the blue sea main switch. Inverter is long hot box in back and one mppt is visible as hot box on right. At the time the only AC load was charging a laptop and starlink router so the inverter is just idling at maybe 200w. It’s definitely not “hot” despite what it looks like in pic. Two smaller hot cables are negative going from mppt to main bus bar, while the larger hot cable below is positive going through main switch. 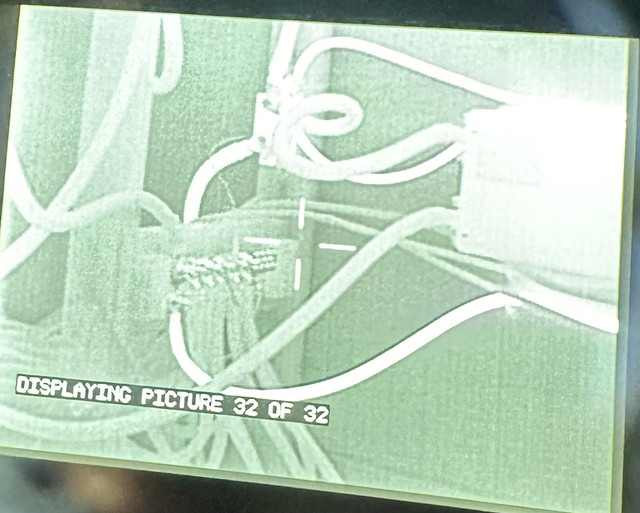 Pic 32 shows the hot cable on bottom going back to positive bus carrying the 150a. Above it you can see the smartshunt which aggregates all the negative wires, including two from mppts. It also shows the 4/0 cable to inverter (where the neg is much hotter than positive) Anyways, when I install the new batteries, I’m going to be adding a second main switch because they’re only rated to 350a and the four mppt could theoretically put out 400a. I’m also doubling the size of those cables. I’ve had the wire laying on the floor ready to go for 3 months. Just waiting on top balancing. Unfortunately, now that it’s warming up, I have to fight hordes of wasps while doing the work. |

|
Well when I’m done I’ll have a max of 400a of charging from solar. And 5600ah of batteries. So my max charge rate is .07C (rated for 1C continuous charge) which is almost like a trickle charge and less than 1/10th of max. It’ll be great for battery longevity. And most days my consumption is maybe 400ah but let’s say 500ah to be conservative. That means I’m not even discharging 10%. But the cells are rated for 8000 cycles (at 8000 they should still hold 80% of the rated capacity, not that they’re just completely unusable.) So net I’m really not cycling them much. They should last a long friggin time. In theory one full cycle per day at 8000 cycles is 22 years. On top of that I’m not going to charge them to 100% or allow them to discharge to 0%. I’ll prob try to take 5-10% off either end. Which again will be good for longevity |
|
of course that's my high level theoretical based on their specs. i don't have experience measuring the cells over long periods of time. who knows how long they will really last? i imagine that over time the chemistry may change slightly affecting internal resistance and causing cells to go out of balance and reduce available capacity of the battery. it wouldn't surprise me at all if say, 5 years from now or 10 years from now, i need to tear the whole thing apart and top balance all the cells again to regain 20-30% of total capacity. but hopefully after "maintenance" like that, they're pretty close to new again |

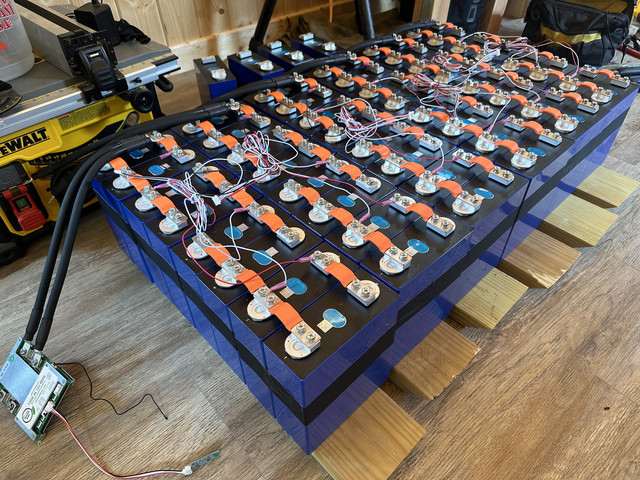 Well it’s taking me forever to get around to it but this is 6 of the 10 batteries, balanced and staged and ready to install. Four more will be done shortly then I can make the swap. These six are nominally 280ah cells but I have two cells in parallel and then 4 pairs in series to make “a 12.8v battery” then ten batteries in parallel to get a total of 5600ah. And the cells are testing over 300ah capacity so theoretically I have a bit of leeway in there. Each battery is 8 cells and has its own BMS (one shown in low left of pic connected by a pair of black 2awg cables and also all the thin bms leads which control balancing. The positive side will be a post fuse and 2/0 red cable going back to bus bar. Each pair of cells is held together with gaffers tape. And thermal sensor will be attached with kapton tape. Each also weighs 100lbs. So yeah, half ton of lifepo4. Each cell is 12lb and then about 4 lbs in wood and cables and bms etc. I don’t want to assemble them in the box so I cut some 2x6 wood sleds to carry them. That way if I need to pull a battery for maintenance I can just slide it out. The orange bus bars are flexible and definitely not structural load bearing. Each bms has a bluetooth connector and thermal sensors. And will be attached to a bar that runs across the top which will allow me to put a sheet of electrical insulator over the top and then 2” insulation board around all of it with an rv tank heater inside. |
|
Major upgrade pretty much complete. Went from 12kwh to 69kwh and made significant upgrades to solar wiring. But it started with an epic battle against the wasps. When it was over I’d removed 9 nests from the box in the pics. On the wiring side I had some 4awg that I upgraded to 2awg, and some 2awg that I upgraded to 2/0. And in anticipation of doubling solar (building a solar carport) I added another main switch. And added post fuses to each. Unfortunately I cut the hole a little large so it doesn’t look great but it works. I’ve been prepping the batteries and planning for 5 months. Finally installed today and yesterday, so two days without power. Pretty big job for me. 320 screws just in the batteries. 900 lbs of lifepo4. (Should have been 1000; see mistake 2). Removing the 1000ah of 2yp lifepo4 batteries and completely taking the old wiring apart and putting it all back together. I made 3 pretty major mistakes and one sparktacular wrench drop but it all turned out ok. Mistake 1 was buying overkill bms. It’s a high quality product and I like it a lot but it doesn’t balance as much as I need. I can live with it though. Mistake 2 was miscalculating space needed on the left side. My insulation was just a bit thicker and so I lacked about 1/2” being able to insert the 6th battery in that side. That means where I had 10 batteries (8 cells, 560ah nominal at 12.8v each) I can only fit 9 in the box which drops me from 5600ah to 5040ah total. I say nominal because the 280ah cells are testing at over 300ah actual capacity. In any event I have another 560ah battery I have no idea what to do with now. (Plus the 10x 100ah batteries I removed). Prob upgrade the camper. Mistake 3 was putting my furring strips straight. I am using tank heaters to keep the batteries warm inside a box of 2” foam board insulation. I don’t want the tank heater pads to touch the batteries or to be squished by them so I put furring strips on either side and then have a 2x6 sled on top that I use to transport the cells. I’d intended to angle the furring strips and forgot until I had about 700 lbs of batteries resting on them when I realized all that weight was concentrated on just two slats in the floor which were bending a bit. Not sure what I’ll do about it. Pretty sure those two slats will warp an inch or so until the sleds contact the other floor slats. Other improvements include adding lexan over all the batteries. And foam board above that (not shown on top and front but you can see it on back and sides). Also building my own batteries with bms means each of the 9 batteries has its own bluetooth connection and is controlled by an app. So I can monitor the voltage and temp of each of the 72 cells and have a great deal of control over settings. It’s particularly nice that I can turn on/off both charging and discharging independently on each battery. Of course that’s a lot of BT now since there’s also 4x victron mppt, 2x victron smartsense, and a victron smartshunt that are all BT so like 16 devices running BT on that box. In fact the only thing NOT running BT is the AIMS inverter. Tomorrow I’m going to put some load on it and check everything out with the thermal camera. Then I’ll tidy up some wiring and insulation. Pics show various stages of assembly. 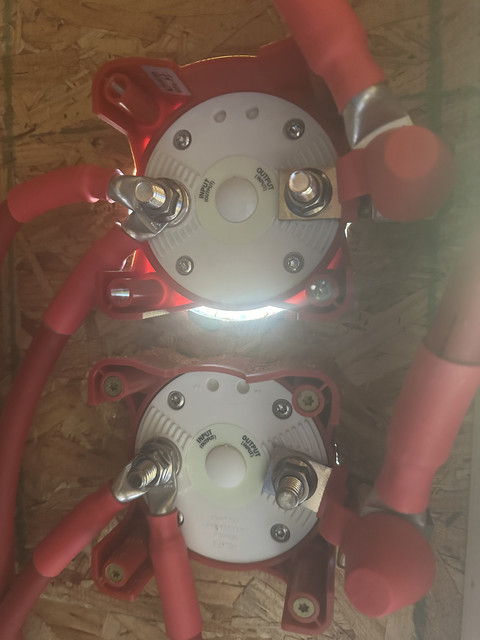 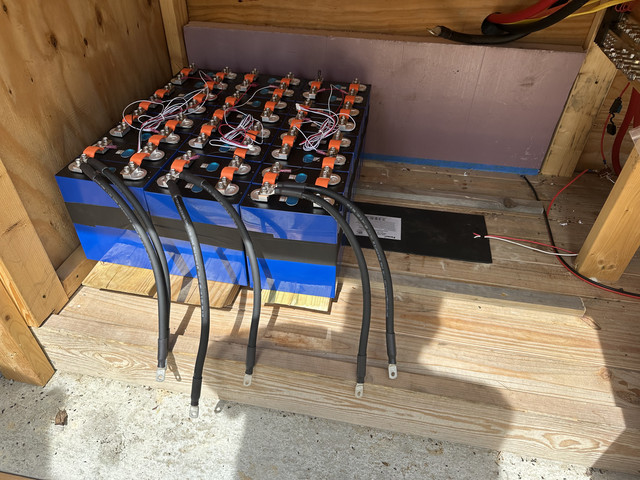   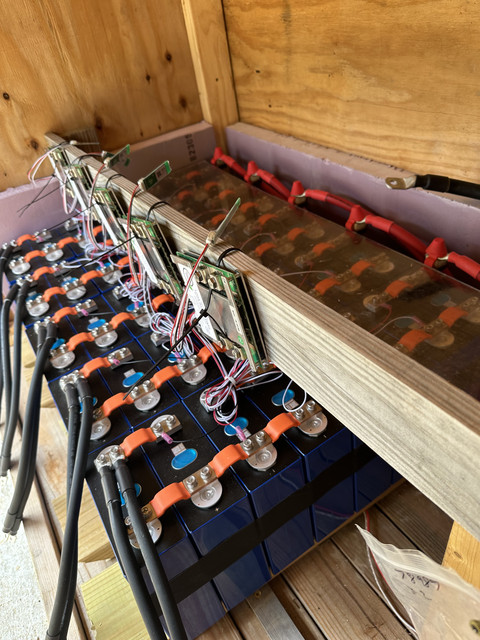 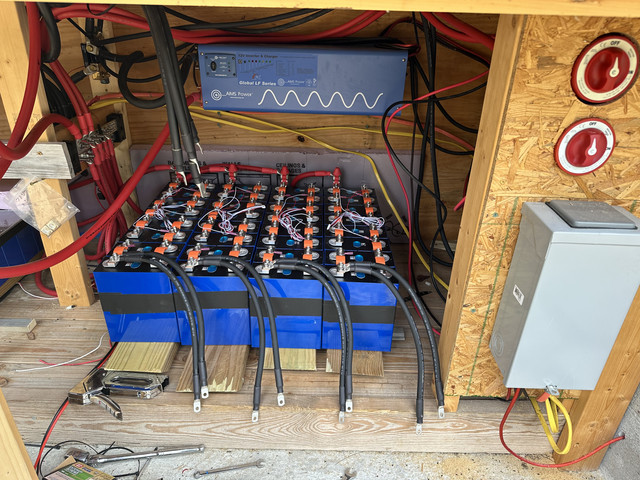  My initial opinions about the EVE lf280k cells (v3 I think) are very positive, but the “bus bars” kinda suck. The orange insulation is in the way and easily prevent a solid connection. They’re also bendable but idk if that changes resistance and they continue to exert some spring pressure on the terminals which I don’t like. I also have a very high opinion of overkill bms despite it not balancing enough. |

|
When I saw the first few thermal wires I said "cut the red wire"....that was some monster upgrade and some down right good photos. The last set of photos let me know that some of the other solar setups I was looking at on a new home had way too few batteries. Tho the place had a dedicated LP tank for the whole house generator. |
The last thing a tyrant wants is their ideas to be judged on the battle field of truth and justice.
|
I took all new thermal pics. They look much better but I didn’t bother posting unless someone is interested. And the thermal exaggerates it. The bright wires are still cool to touch even though they look like they’re about to melt in the thermal. When I build a garage and house I will put 3x to 4x as much battery in and they’ll be 48v. Don’t remember if I’ve mentioned it before but all the loads draw about 150ah overnight so from the time the sun goes down til it starts generating again in the morning my old 1000ah battery would be at 84-86%. But when I check in the morning now it’s 97-98% full. I calculate a 30 hr run on a freeze dryer will pull about half the capacity. I am not addicted to AC so I don’t plan on putting that in the house or garage but I will add washer and dryer which are manual in the cabin today. Add a few other appliances and the fiancés hair dryer and 3-4x battery should be pretty reasonable. |
|
Thus far, too perfect. I check every morning as the sun is coming up and my battery is at 97%. This led me to worry that it might not be good for lifepo4 batteries to spend that much time near “full” even though I am only charging to 3.6 instead of 3.65. I’ve been cooking with an induction cook top in the day but solar keeps up with it and the incinerator toilet no problem. To remedy the situation I’m may need to buy that harvest right freeze dryer I’ve been lusting after. At 1200w, running overnight where solar isn’t charging by my calc it would pull 20% out of the battery which would make me feel better. I’ll throw a tank heater in my cistern in the winter to exercise the batteries a little too. Btw the cells I bought were $95/ea. last I looked they’re $85. $10x80 cells = $800 cheaper |
|
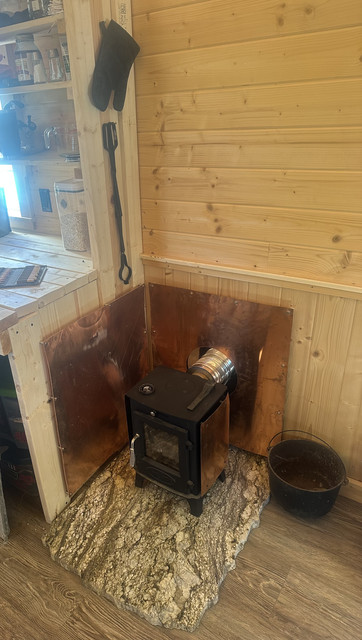
Finally made some progress on kitchen. Takes me a while because of the limited space, I’m taking months to decide how to optimize. Also, I’m lazy and procrastinate. Anyway, built to match my tool cabinet and reloading bench on the other side of the room, I’ve got a roughly 6’ counter top made of 2x6 and some shelving above it. Still need to add the copper heat shield on side for the wood stove. Haven’t built any shelves or cabinet below the counter yet as I’m still deciding whether to put shelves and a door on or just keep things in plastic totes and slide them in and out underneath. And I’ll hang the pots and cast iron stuff in front of the window when I decide what hardware to use. 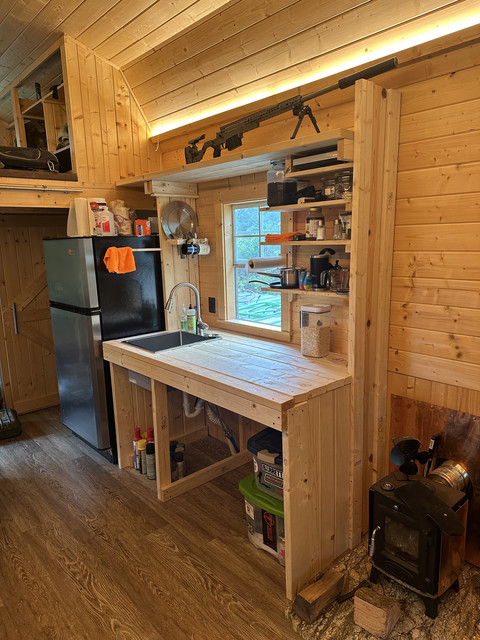 Sink is the deepest I could find to allow for washing clothes and such. Works great but don’t look at my plumbing fubar underneath. 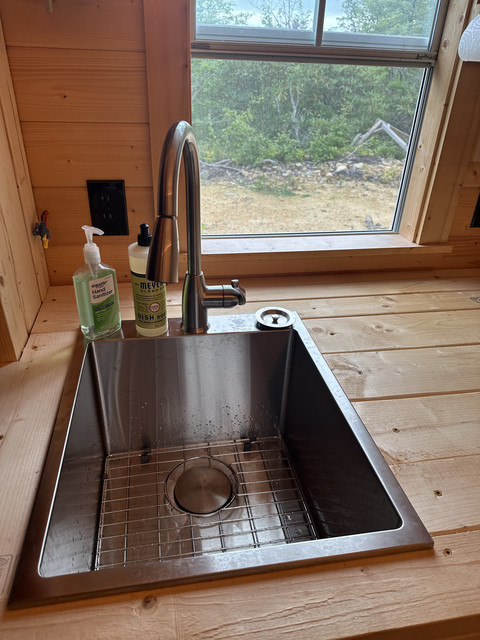 I cut a couple dowel rods and stuck them into the wood to make a plate rack and then drilled some holes to hold utensils. Also made a little towel drying rack (see orange shop towel lol) and a paper towel roll holder. 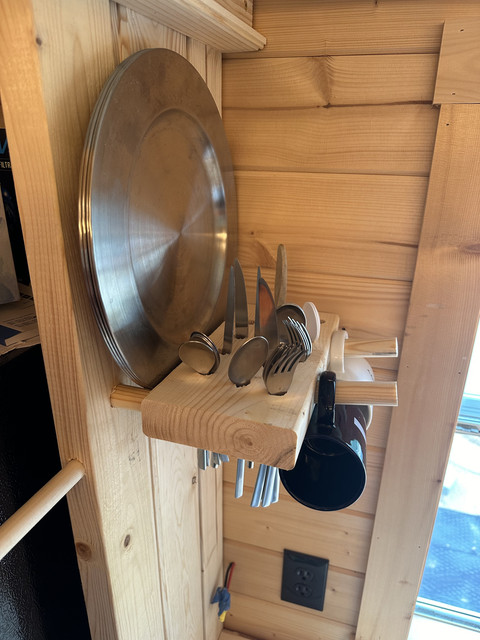 Put a special shelf to fit an induction cook top. Very compact and energy efficient. Now that I have absurd amount of battery cooking with electric is a no brainer. Sustainable and clean. It has been interesting aligning my cookware, to work with both the induction cook top and the woodstove. Also got a couple jars of black Latakia and Mac barren golden extra and English luxury. Gradually adding more food storage which will eventually replace the rifle up top, once I get some glass on it. 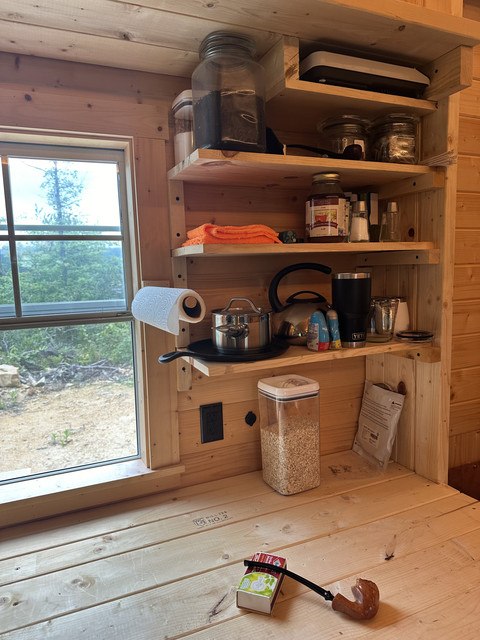 Before it’s finished I’ll micro recess some more strip lights around it to light the shelves and workspace and mount a switch where the dc wires stick out behind the sink. Once I finish the space underneath, my last big project will be the copper surround for the shower. Been pondering that for 2 years and still haven’t made a decision. |


|
Originally Posted By taliv: Finally made some progress on kitchen. Takes me a while because of the limited space, I’m taking months to decide how to optimize. Also, I’m lazy and procrastinate. Anyway, built to match my tool cabinet and reloading bench on the other side of the room, I’ve got a roughly 6’ counter top made of 2x6 and some shelving above it. Still need to add the copper heat shield on side for the wood stove. Haven’t built any shelves or cabinet below the counter yet as I’m still deciding whether to put shelves and a door on or just keep things in plastic totes and slide them in and out underneath. And I’ll hang the pots and cast iron stuff in front of the window when I decide what hardware to use. https://i.ibb.co/9H0MSKR/IMG-4056.jpg Sink is the deepest I could find to allow for washing clothes and such. Works great but don’t look at my plumbing fubar underneath. https://i.ibb.co/G0MmQJB/IMG-4058.jpg I cut a couple dowel rods and stuck them into the wood to make a plate rack and then drilled some holes to hold utensils. Also made a little towel drying rack (see orange shop towel lol) and a paper towel roll holder. https://i.ibb.co/zS1jYnM/IMG-4057.jpg Put a special shelf to fit an induction cook top. Very compact and energy efficient. Now that I have absurd amount of battery cooking with electric is a no brainer. Sustainable and clean. It has been interesting aligning my cookware, to work with both the induction cook top and the woodstove. Also got a couple jars of black Latakia and Mac barren golden extra and English luxury. Gradually adding more food storage which will eventually replace the rifle up top, once I get some glass on it. https://i.ibb.co/N2z24xn/IMG-4060.jpg Before it’s finished I’ll micro recess some more strip lights around it to light the shelves and workspace and mount a switch where the dc wires stick out behind the sink. Once I finish the space underneath, my last big project will be the copper surround for the shower. Been pondering that for 2 years and still haven’t made a decision. Solid use of space |
Carry it, shoot it. (repeat forever)
Swing Your Sword
Swing Your Sword
|
So 5 days ago I decided to start a capacity test. Just went out and turned off solar recharging at 2pm. Everything was showing 100% full. I had calculated based on my normal usage, roughly 9% of battery life per day, meaning I could get 10-11 days out of the batteries. Results are pretty close! Start of Day 2 I was at 91% Day 3 at 83% After 5 days I’m at 61%. But that includes a weekend where my usage was a wee bit light. First pic shows 5d since last full charge and 2200 ah consumed out of ~ 5400ah. (These are marketed as 280ah cells but the mfg claims they test between 300-310ah so I call them 300ah cells, but limit the max charge to 3.6v instead of 3.65 and limit the bottom to 2.8v instead of 2.5v. That basically means the bms is going to shut off somewhere between 10-20% (assuming my calcs are correct) and to get that last 10-20% I’d have to change the voltage cut off in the bms to mfg recommended value instead of my “get more life out of the batteries” value. The app is calc 9 more days of run time but that’s based on current draw which is a little lower than average when I snapped the screenshot. My estimate is 5 more days would drop me to 20% and then I might get one more day or not. So somewhere between 10-11 days total. 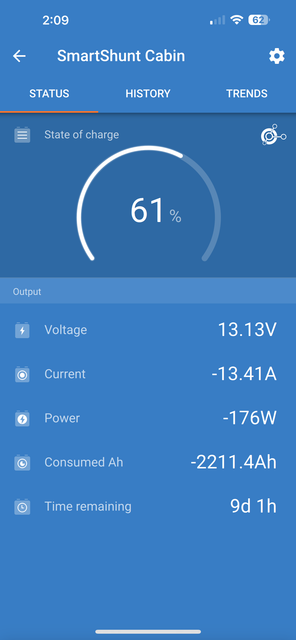 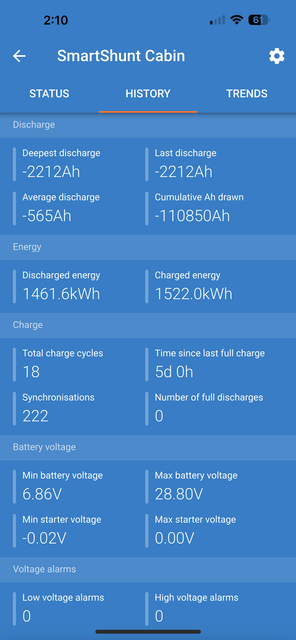 This pic shows a few daily cycles on the left with roughly 4-5 hrs per day of sunlight charging the batteries and 20 hrs/day I get of running off battery. Followed by me turning off solar for 5 days and the battery draining to 60%. 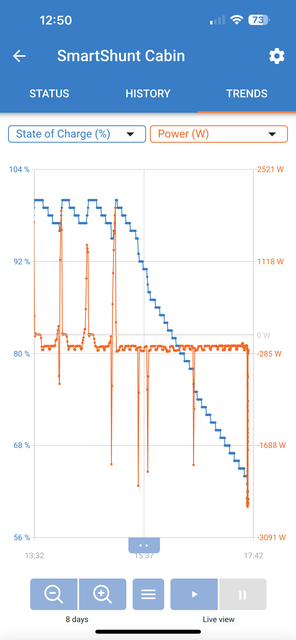 |
|
Originally Posted By taliv: So 5 days ago I decided to start a capacity test. Just went out and turned off solar recharging at 2pm. Everything was showing 100% full. I had calculated based on my normal usage, roughly 9% of battery life per day, meaning I could get 10-11 days out of the batteries. Results are pretty close! Start of Day 2 I was at 91% Day 3 at 83% After 5 days I’m at 61%. But that includes a weekend where my usage was a wee bit light. First pic shows 5d since last full charge and 2200 ah consumed out of ~ 5400ah. (These are marketed as 280ah cells but the mfg claims they test between 300-310ah so I call them 300ah cells, but limit the max charge to 3.6v instead of 3.65 and limit the bottom to 2.8v instead of 2.5v. That basically means the bms is going to shut off somewhere between 10-20% (assuming my calcs are correct) and to get that last 10-20% I’d have to change the voltage cut off in the bms to mfg recommended value instead of my “get more life out of the batteries” value. The app is calc 9 more days of run time but that’s based on current draw which is a little lower than average when I snapped the screenshot. My estimate is 5 more days would drop me to 20% and then I might get one more day or not. So somewhere between 10-11 days total. https://i.ibb.co/L0n40SC/IMG-4209.png https://i.ibb.co/MG2fgHy/IMG-4210.png This pic shows a few daily cycles on the left with roughly 4-5 hrs per day of sunlight charging the batteries and 20 hrs/day I get of running off battery. Followed by me turning off solar for 5 days and the battery draining to 60%. https://i.ibb.co/VQD9Dqs/IMG-4195.png You've got so much juice. Impressive |
Carry it, shoot it. (repeat forever)
Swing Your Sword
Swing Your Sword


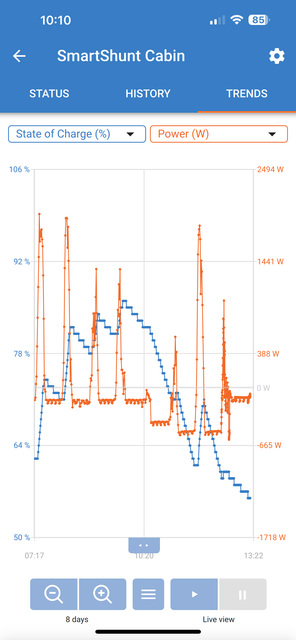 Well, 14 days since full charge. Been very cloudy past two weeks, with two snow events and rain. And I’m drawing a lot of energy with the heaters. 10 day forecast has one sunny day and lots of clouds and snow. Kinda disappointing. I think I’m going to have to rely on some diesel heat. Really was hoping to avoid that. This won’t be a problem when I build an off grid house as I will bury both the battery and water. Dang |
|
Well I gave up on trying to use electric heat. This winter has kicked my ass. Extremely cold. The electric stuff worked until the temp got into single digits. Couldn’t keep up after that. Everything froze again and I have to replace the pump and a valve again. So I decided to go nuclear  I have 100% confidence that this will keep water at 180 degrees, which will provide the following Hot water via my homemade instant hot water heater. 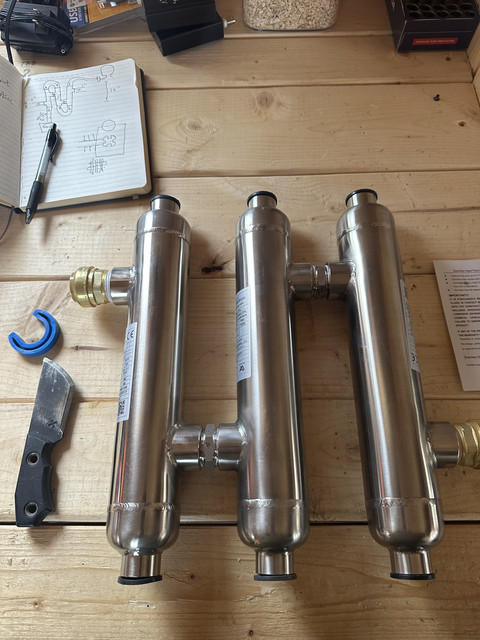 i took three 55k BTU water to water heat exchangers that are primarily used to heat pools. Hooked them in serial. So I should have 165k BTU to heat water for sink and shower. My calc is that each one will raise water temp as much as 30*. So if water outside in cistern is 40* it will still raise the temp up to 130* at a 3.5gal/min flow rate. i took three 55k BTU water to water heat exchangers that are primarily used to heat pools. Hooked them in serial. So I should have 165k BTU to heat water for sink and shower. My calc is that each one will raise water temp as much as 30*. So if water outside in cistern is 40* it will still raise the temp up to 130* at a 3.5gal/min flow rate. Hot air in cabin using https://altheatsupply.com/products/unit-heater-hydronic-100-000-btu-dragon-breath-wood-boiler-high-quality And hot air in my battery shed by radiant heat off the 1” pex. Maybe I’ll add a homemade heat exchanger. I’ll also run the pex circuit around the cistern and outdoor plumbing to keep them from freezing. Unfortunately I think this is a fragile system now. Lots of single points of failure. The wood boiler runs on AC which means it relies on batteries and the inverter. Until now the inverter was mostly a convenience. Nothing more important than starlink and a toilet and induction hot plate was running on it. So now I need to figure out how to make it redundant. The batteries and plumbing all rely on the boiler to keep from freezing and breaking. The boiler should be pretty reliable but it does have a pump that could fail and some electronics for managing the water temp that could fail. And of course, something could happen to me and I might not be able to feed the fire every day. Anyways, major upgrade in progress |


|
That stove should be more than plenty for you! I have a 5036, and use radiant heat to heat my 2000 sq ft house and 200 sq ft sauna, a homemade water to air exchanger smaller than the one you linked to heat my 768 sg ft garage with full living quarters upstairs, and all domestic hot water. In northern MN. I'm interested to see how your on demand water heater works. Hopefully it transfers heat quickly enough to keep water decently warm indefinitely |
|
Originally Posted By bansil: Lol, now I understand. Do you have connections quick or not to use the heat other places like radiators I am using shark bite connectors so I can undo and reconfigure them if it’s not working. I’ll put some three way connectors with valves in so I can take a loop in and out of service I think. Maybe. But there’s no shut off on the water to air radiator. There’s a thermostat on the fan so you can control how much air blows through it but you can’t stop it from radiating |
|
Originally Posted By loon_138: That stove should be more than plenty for you! I have a 5036, and use radiant heat to heat my 2000 sq ft house and 200 sq ft sauna, a homemade water to air exchanger smaller than the one you linked to heat my 768 sg ft garage with full living quarters upstairs, and all domestic hot water. In northern MN. I'm interested to see how your on demand water heater works. Hopefully it transfers heat quickly enough to keep water decently warm indefinitely How do you like your 5036? How much wood do you use? Do you use glycol? Yeah I’m hoping it works. I’m optimistic. |
|
Originally Posted By taliv: How do you like your 5036? How much wood do you use? Do you use glycol? Yeah I’m hoping it works. I’m optimistic. I've used it here for a dozen years, it works well for us, though it's a 2008 model, so I would like to upgrade soon. This winter has been mild, probably end up only burning 10 or so cords of soft wood (spruce). Would be less of oak. Most winters are 12-14. No glycol, just keep it hot. But we love here, so it's easier than a cabin |
|
I thought the outdoor boilers were historically inefficient? Or is that no longer the case? Did you choose an outdoor boiler more for space reasons, or do they have other advantages? Are there any other models of wood or pellet stove that can also be tied into a radiant system? Have you seen the radiant systems where they use their house main water tank as a giant thermal battery? Is there any chance you could do that with your water tank? |
|
Originally Posted By GTLandser: I thought the outdoor boilers were historically inefficient? Or is that no longer the case? Did you choose an outdoor boiler more for space reasons, or do they have other advantages? Are there any other models of wood or pellet stove that can also be tied into a radiant system? Have you seen the radiant systems where they use their house main water tank as a giant thermal battery? Is there any chance you could do that with your water tank? They might be inefficient but not that bad. The new ones are prob better and I’m sure it varies by brand. The main reasons are lack of internal space and 80 acres of woods. Half this county is national forest. I’d say 90% is wooded. There’s no shortage of wood here. Being sustainable is important to me. I’d like to minimize the propane and diesel I rely on. It sure is convenient though. The other reason is one tool that will heat three spaces and the water and I can run a circuit to a greenhouse when I build one. I don’t actually have radiant floors in the cabin. It’s just a shed. So I haven’t looked into those options much |

|
Update on boiler and plumbing Made a diagram of plumbing  Water to air heat exchanger to heat the air in cabin. Wired with a thermostat. 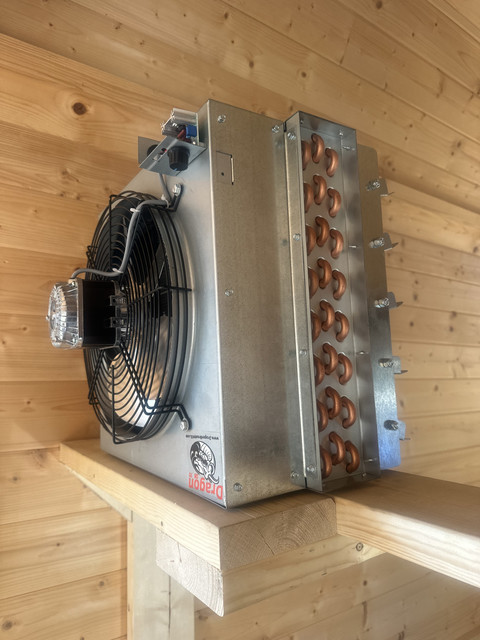 Got the boiler lit for first time 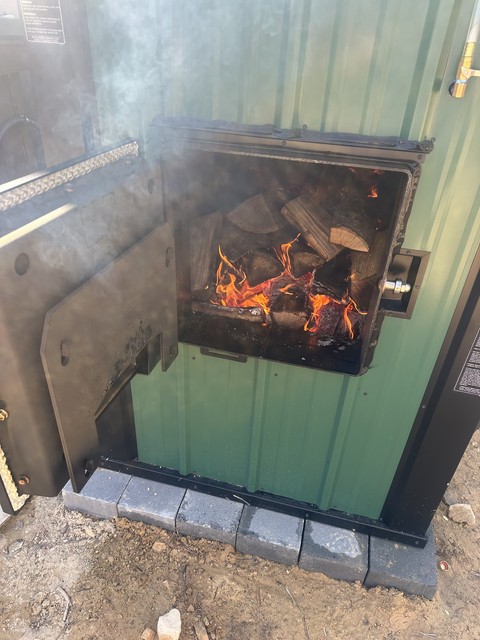 Steel thing is water to water heat exchanger to keep the cistern from freezing. Pump below pulls water from cistern and pushes it through the heat exchanger and just dumps it back in top of tank (white pex). Flow rate is 1-2 gal/min. Flow and heat should both keep it and the pvc from freezing. Red 1” pex is the boiler circuit 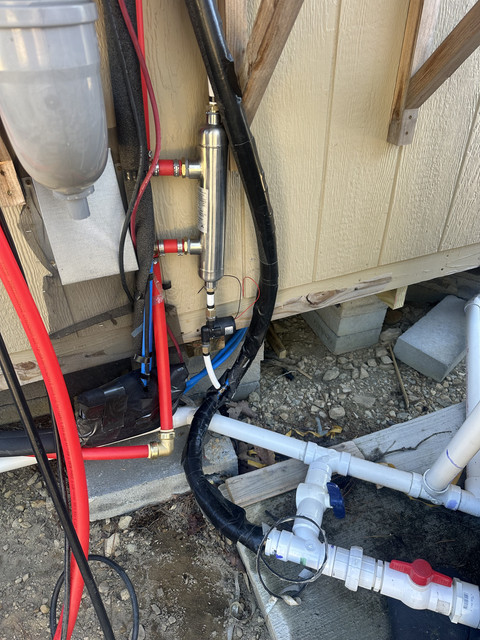 Plumbing and pump at the boiler. 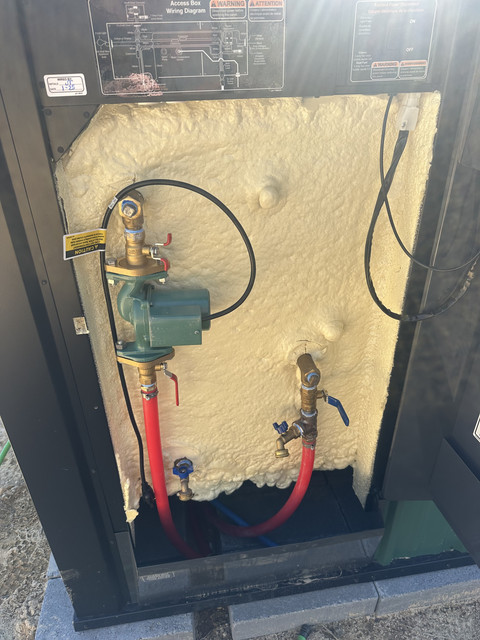 |
|
Another update. You guys were right about this being inefficient. it's not the end of the world but I was really hoping to get more time out of the boiler, but it does look like 12 hours is about it before i have to refill the wood. kind of a bummer. working on insulation and such as i finish the build that will hopefully make it more efficient. in fairness, i do have a pretty high heat load. i am kind of impressed with the insulation on the boiler itself. the water temp is 185* and there is still snow on the roof of the boiler. i'm still learning to build and manage fires in it. probably a bit of a learning curve. maybe running it cooler like 175 max would help as well the 70k btu water to air exchanger in the pic above with the upside down dragon sticker does indeed put out some heat. however, i have a severe temp gradient in the cabin now. the floor is 55* and the loft with the bed is 85*. wish i could have mounted it lower. gotta figure out how to direct the heat lower |
|
Finally! After 3 yrs I made some progress on the shower. It’s almost finished. Just a bit of trim work and to finish putting some cedar etc on the floor. And a bunch of silicon caulking. I originally wanted all copper. It turned into just too much of a PITA so I decided to do copper on the floor and ceiling and the wall where the head and diverter valve is and cedar on the walls. Took a lot of planning and getting the copper water jet cut. And driving across the state to a cedar mill. Built the pan back in November. Cut the floor out and dropped it a few inches. Built a raised platform for the copper and a drain around it. The left area is also waterproof and will have a cedar floor. Maybe a sauna style chair or bench. Mortared over all the cement board with some really expensive orange paper. Then put drylock on it. Wasn’t completely happy with the drylock so put flex seal on top of that. 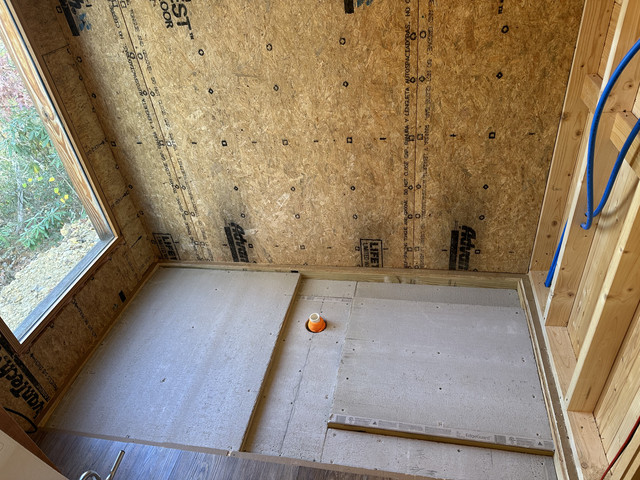  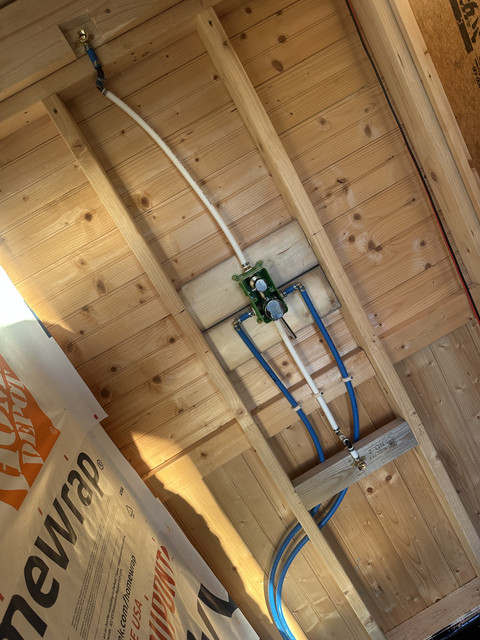 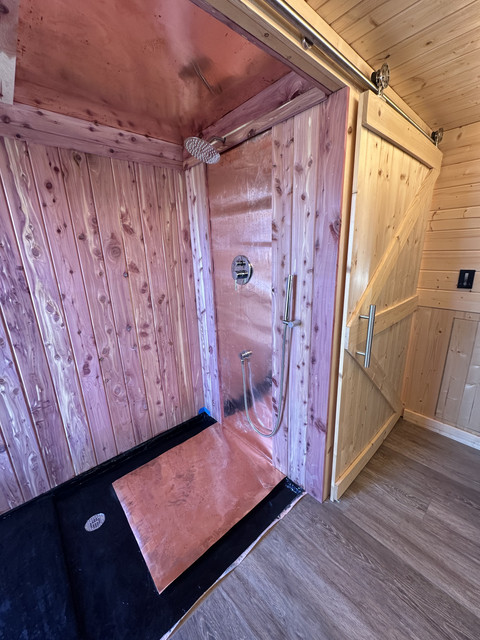 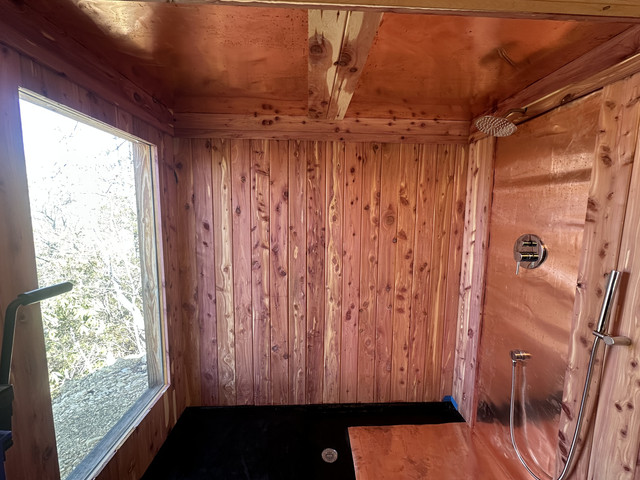 Anyways it may not last as long as the copper or be as low maintenance but I like the way it looks. Pretty happy how it is turning out. None of the black on the floor will be visible when complete. |