


OFFICIAL Post NFA 3D Printing Thread (Page 4 of 6)

|
Originally Posted By memsu: The FTN6 looks to use a fender washer to help it wear better. Well, my thinking at the time was that a plastic suppressor with a ceramic washers for blast baffles wouldn’t show up on a metal detector… |
Never make another person a priority when they merely see you as an option...
"Some People Are Like Slinkies. They're Not Really Good For Anything, But They Bring a Smile To Your Face When Pushed Down The Stairs."
"Some People Are Like Slinkies. They're Not Really Good For Anything, But They Bring a Smile To Your Face When Pushed Down The Stairs."

There is nowhere left to go... this is it.
Joined:
May 2004
Posts:
16404
EE: 100% (191)
 USA
USA

|
Damnit, had a filament issue that stopped my print over night. Got it cleared up (tangled on the spool) but what should have fin8shed printing by now won't be down for 3 more hours. I hate lost time like that. |
"Fully-loaded, safety off. This here is a recipe for unpleasantness." - Malcom Reynolds
"He's a precision-guided asshole who only deploys on deserving targets." - Grok
"He's a precision-guided asshole who only deploys on deserving targets." - Grok



|
Originally Posted By memsu: Using 300BlkFDE print settings. That's how he rolls hot and slow. I'm using a 0.4 nozzle too. The flow version does add time because it's larger. Originally Posted By memsu: Originally Posted By Blob: Why the hell your rimfire cans taking so long? My slicer preview says around 5 hours with 0.6nozzle at 30mm/s. Using 300BlkFDE print settings. That's how he rolls hot and slow. I'm using a 0.4 nozzle too. The flow version does add time because it's larger. @memsu Can you share the settings he/you are using for the PA6-CF, I just purchased a roll of Polymaker CF20. What are you using? I have been making a few 2a items with PLA+, slowing speeds down around 30-50, raised the heat about 5 degrees, dropped layer height to .15 or .12, and I think 1.1 on the flow. Those came from Google Ai, but seem to put out a pretty good product. |
|
Originally Posted By Amped: https://www.ar15.com/media/mediaFiles/179056/IMG_2138_jpg-3812763.JPG Printed in PLA+ translucent That's F'ing AWESOME. now I have to try that! |
|
Originally Posted By Amped: https://www.ar15.com/media/mediaFiles/179056/IMG_2138_jpg-3812763.JPG Printed in PLA+ translucent that's pretty fuckin cool |
|
How about 3d trigger kickers from PA6. I'm working to adapt one for a 9mm Extar but the issue is cutting the bolt just right as it's a blow back, being able to adjust a 3d kicker lends a whole new ability for those without metal working skills/tools. I need to find a Machinist in SW Fl. for the bolt. Once I get proof of concept working, I'll flatten a metal one. |

|
Originally Posted By TheOtherDave: Well, my thinking at the time was that a plastic suppressor with a ceramic washers for blast baffles wouldn't show up on a metal detector Originally Posted By TheOtherDave: Originally Posted By memsu: The FTN6 looks to use a fender washer to help it wear better. Well, my thinking at the time was that a plastic suppressor with a ceramic washers for blast baffles wouldn't show up on a metal detector |
|
Originally Posted By bmarshall1: How about 3d trigger kickers from PA6. I'm working to adapt one for a 9mm Extar but the issue is cutting the bolt just right as it's a blow back, being able to adjust a 3d kicker lends a whole new ability for those without metal working skills/tools. I need to find a Machinist in SW Fl. for the bolt. Once I get proof of concept working, I'll flatten a metal one. ETA: in surprised someone hasn't released a trigger kicker sticker. Slap it on some sheet metal and get to work. Single bend could be labeled with a line and an angle |

|
Originally Posted By D_Man: I will warn that it's going to be a bit of a learning curve for anyone wanting to just jump into printing 2A stuff. These are not quite appliance level things, you will need to read and learn, do some testing and trial and error prints to dial in your machine and the filament. In the 3D2A space, it's usually recommended that you test and learn on little trinkets and calibration prints first before you get into real functional parts. And for cans, the better filaments to use like PA6-CF/GF, PPA-CF, and other nylon types all have important considerations for needing a printer that can heat to at least 300C at the nozzle, and you need equipment to toughly dry the spool of nylon BEFORE you print, or else you'll just get a mess. Nylon is very hydroscopic, and if "wet" filament goes through the extruder in a printer, it comes out as a foam because the water flash boils. The main take away in all this, if you want to get into 3D printing to make your own cans and gun frames, understand it's going to be a new hobby and require work on your part to dial things in. It's not a "buy this, download this file, press a button and you're done" kind of thing.  No man. NO! I want freaking buy once, cry once, printer go brrrrrrrr...... This is GD. Get out of here with your well thought out and complete replies  (smiley added for those that are sarcastically challenged. (smiley added for those that are sarcastically challenged.
|
I dont think this is a brains type of operation.
|
Originally Posted By bmarshall1: @memsu Can you share the settings he/you are using for the PA6-CF, I just purchased a roll of Polymaker CF20. What are you using? I have been making a few 2a items with PLA+, slowing speeds down around 30-50, raised the heat about 5 degrees, dropped layer height to .15 or .12, and I think 1.1 on the flow. Those came from Google Ai, but seem to put out a pretty good product. Originally Posted By bmarshall1: Originally Posted By memsu: Originally Posted By Blob: Why the hell your rimfire cans taking so long? My slicer preview says around 5 hours with 0.6nozzle at 30mm/s. Using 300BlkFDE print settings. That's how he rolls hot and slow. I'm using a 0.4 nozzle too. The flow version does add time because it's larger. @memsu Can you share the settings he/you are using for the PA6-CF, I just purchased a roll of Polymaker CF20. What are you using? I have been making a few 2a items with PLA+, slowing speeds down around 30-50, raised the heat about 5 degrees, dropped layer height to .15 or .12, and I think 1.1 on the flow. Those came from Google Ai, but seem to put out a pretty good product. Go to guncadindex dot com and search for 300BlkFDE print settings. There is a .3mf file and it will set all your settings for you. I opened it in both Bambu studio and OrcaSlicer and cross referenced all the settings. My QIDI Plus4 can print to higher temps than my Bambu P1S, so I'm using the QIDI Plus 4 for that. I also referenced google and it brought up a reddit post on 3D2A group with the filament settings. I'm using Polymaker Polymide PA6-CF which is now their Fiberon version I think. Printing at 300C and basically no fans. My enclosed printer looks to have settled out at 58C chamber temp. I do have a chamber heater but it only kicks in if bed temp is over 70C. Polymaker says print at 40-50C bed temp. If I was using Sunlu filament I could run a higher bed temp and use my chamber heater. I still ran all the flow rate and pressure advance testing through OrcaSlicer to dial the filament in. Sitting at 0.9702 flow and 0.035 pressure advance. I also dried my filament for over 24 hours in my cheap food dehydrator that only goes to 70C, but then moved it to my Sunlu S2 filament dryer for the print at 70C as well. I have to say I should have been printing PA6-CF or GF all along. It looks amazing and the prints are tough. |
|
Originally Posted By HappyCamel: If it doesn't work because they break, just use it to make a casting. ETA: in surprised someone hasn't released a trigger kicker sticker. Slap it on some sheet metal and get to work. Single bend could be labeled with a line and an angle Originally Posted By HappyCamel: Originally Posted By bmarshall1: How about 3d trigger kickers from PA6. I'm working to adapt one for a 9mm Extar but the issue is cutting the bolt just right as it's a blow back, being able to adjust a 3d kicker lends a whole new ability for those without metal working skills/tools. I need to find a Machinist in SW Fl. for the bolt. Once I get proof of concept working, I'll flatten a metal one. ETA: in surprised someone hasn't released a trigger kicker sticker. Slap it on some sheet metal and get to work. Single bend could be labeled with a line and an angle 3d printed work, they also break. Mine broke mainly due to the geometry of my bolt. But once the bolt is cut correctly I will see how long it lasts. I bet the part that goes under the safety will get ground down before it breaks. I like the sticker idea, unfortunately people will simply make them in quantity and undercut Hoffman. One or two for home use....meh. Setting up your own ebay shop, people will do it. Plus, like most people here, I would rather support Hoffman and keep his good ideas rolling (and fund the lawsuit against RareGreed). |
|
Originally Posted By memsu: Go to guncadindex dot com and search for 300BlkFDE print settings. There is a .3mf file and it will set all your settings for you. I opened it in both Bambu studio and OrcaSlicer and cross referenced all the settings. My QIDI Plus4 can print to higher temps than my Bambu P1S, so I'm using the QIDI Plus 4 for that. I also referenced google and it brought up a reddit post on 3D2A group with the filament settings. I'm using Polymaker Polymide PA6-CF which is now their Fiberon version I think. Printing at 300C and basically no fans. My enclosed printer looks to have settled out at 58C chamber temp. I do have a chamber heater but it only kicks in if bed temp is over 70C. Polymaker says print at 40-50C bed temp. If I was using Sunlu filament I could run a higher bed temp and use my chamber heater. I still ran all the flow rate and pressure advance testing through OrcaSlicer to dial the filament in. Sitting at 0.9702 flow and 0.035 pressure advance. Originally Posted By memsu: Originally Posted By bmarshall1: Originally Posted By memsu: Originally Posted By Blob: Why the hell your rimfire cans taking so long? My slicer preview says around 5 hours with 0.6nozzle at 30mm/s. Using 300BlkFDE print settings. That's how he rolls hot and slow. I'm using a 0.4 nozzle too. The flow version does add time because it's larger. @memsu Can you share the settings he/you are using for the PA6-CF, I just purchased a roll of Polymaker CF20. What are you using? I have been making a few 2a items with PLA+, slowing speeds down around 30-50, raised the heat about 5 degrees, dropped layer height to .15 or .12, and I think 1.1 on the flow. Those came from Google Ai, but seem to put out a pretty good product. Go to guncadindex dot com and search for 300BlkFDE print settings. There is a .3mf file and it will set all your settings for you. I opened it in both Bambu studio and OrcaSlicer and cross referenced all the settings. My QIDI Plus4 can print to higher temps than my Bambu P1S, so I'm using the QIDI Plus 4 for that. I also referenced google and it brought up a reddit post on 3D2A group with the filament settings. I'm using Polymaker Polymide PA6-CF which is now their Fiberon version I think. Printing at 300C and basically no fans. My enclosed printer looks to have settled out at 58C chamber temp. I do have a chamber heater but it only kicks in if bed temp is over 70C. Polymaker says print at 40-50C bed temp. If I was using Sunlu filament I could run a higher bed temp and use my chamber heater. I still ran all the flow rate and pressure advance testing through OrcaSlicer to dial the filament in. Sitting at 0.9702 flow and 0.035 pressure advance. Curious, why reduce flow rate? I was under the impression increase it to sort of mash it into the layer below it and the layer beside it. I'm running a Prusa MK4s, no enclosure except a cardboard box I put over it. I do have Orca and will test the settings on my printer. I have the Polymide as well ETA: @Blob @_Obsessed_ do you agree with these settings or do you run something different. I will give them a try and run a calibration test, this seems like a good place to start. |

|
Originally Posted By bmarshall1: Curious, why reduce flow rate? I was under the impression increase it to sort of mash it into the layer below it and the layer beside it. I'm running a Prusa MK4s, no enclosure except a cardboard box I put over it. I do have Orca and will test the settings on my printer. I have the Polymide as well The flow ratio will be different for every person's printer. You should calibrate your own to determine the appropriate amount for your machi. |
|
Originally Posted By bmarshall1: Curious, why reduce flow rate? I was under the impression increase it to sort of mash it into the layer below it and the layer beside it. I'm running a Prusa MK4s, no enclosure except a cardboard box I put over it. I do have Orca and will test the settings on my printer. I have the Polymide as well Originally Posted By bmarshall1: Originally Posted By memsu: Originally Posted By bmarshall1: Originally Posted By memsu: Originally Posted By Blob: Why the hell your rimfire cans taking so long? My slicer preview says around 5 hours with 0.6nozzle at 30mm/s. Using 300BlkFDE print settings. That's how he rolls hot and slow. I'm using a 0.4 nozzle too. The flow version does add time because it's larger. @memsu Can you share the settings he/you are using for the PA6-CF, I just purchased a roll of Polymaker CF20. What are you using? I have been making a few 2a items with PLA+, slowing speeds down around 30-50, raised the heat about 5 degrees, dropped layer height to .15 or .12, and I think 1.1 on the flow. Those came from Google Ai, but seem to put out a pretty good product. Go to guncadindex dot com and search for 300BlkFDE print settings. There is a .3mf file and it will set all your settings for you. I opened it in both Bambu studio and OrcaSlicer and cross referenced all the settings. My QIDI Plus4 can print to higher temps than my Bambu P1S, so I'm using the QIDI Plus 4 for that. I also referenced google and it brought up a reddit post on 3D2A group with the filament settings. I'm using Polymaker Polymide PA6-CF which is now their Fiberon version I think. Printing at 300C and basically no fans. My enclosed printer looks to have settled out at 58C chamber temp. I do have a chamber heater but it only kicks in if bed temp is over 70C. Polymaker says print at 40-50C bed temp. If I was using Sunlu filament I could run a higher bed temp and use my chamber heater. I still ran all the flow rate and pressure advance testing through OrcaSlicer to dial the filament in. Sitting at 0.9702 flow and 0.035 pressure advance. Curious, why reduce flow rate? I was under the impression increase it to sort of mash it into the layer below it and the layer beside it. I'm running a Prusa MK4s, no enclosure except a cardboard box I put over it. I do have Orca and will test the settings on my printer. I have the Polymide as well Mainly because that's what the filament flow calibration showed I needed to be. If you have too much flow your dimensions get off and it's the same if you go too low. Measuring the wall method doesn't work because each layer may not lay down exactly on top of each other. In OrcaSlicer you'll run at least 3 flow tests, the first one does a wide range from like -20% to +20%. Pick the one that looks best but might be a little too much flow. The 2nd run adjusts down from there in 1% increments and that's where you pick the one that's the smoothest of them all, but could still be a little too much flow. The 3rd one is the YOLO and that's narrowing it down in 0.01 flow increments. Here's a guide I've used a long time, but now most of it is built into OrcaSlicer. https://ellis3dp.com/Print-Tuning-Guide/articles/extrusion_multiplier.html 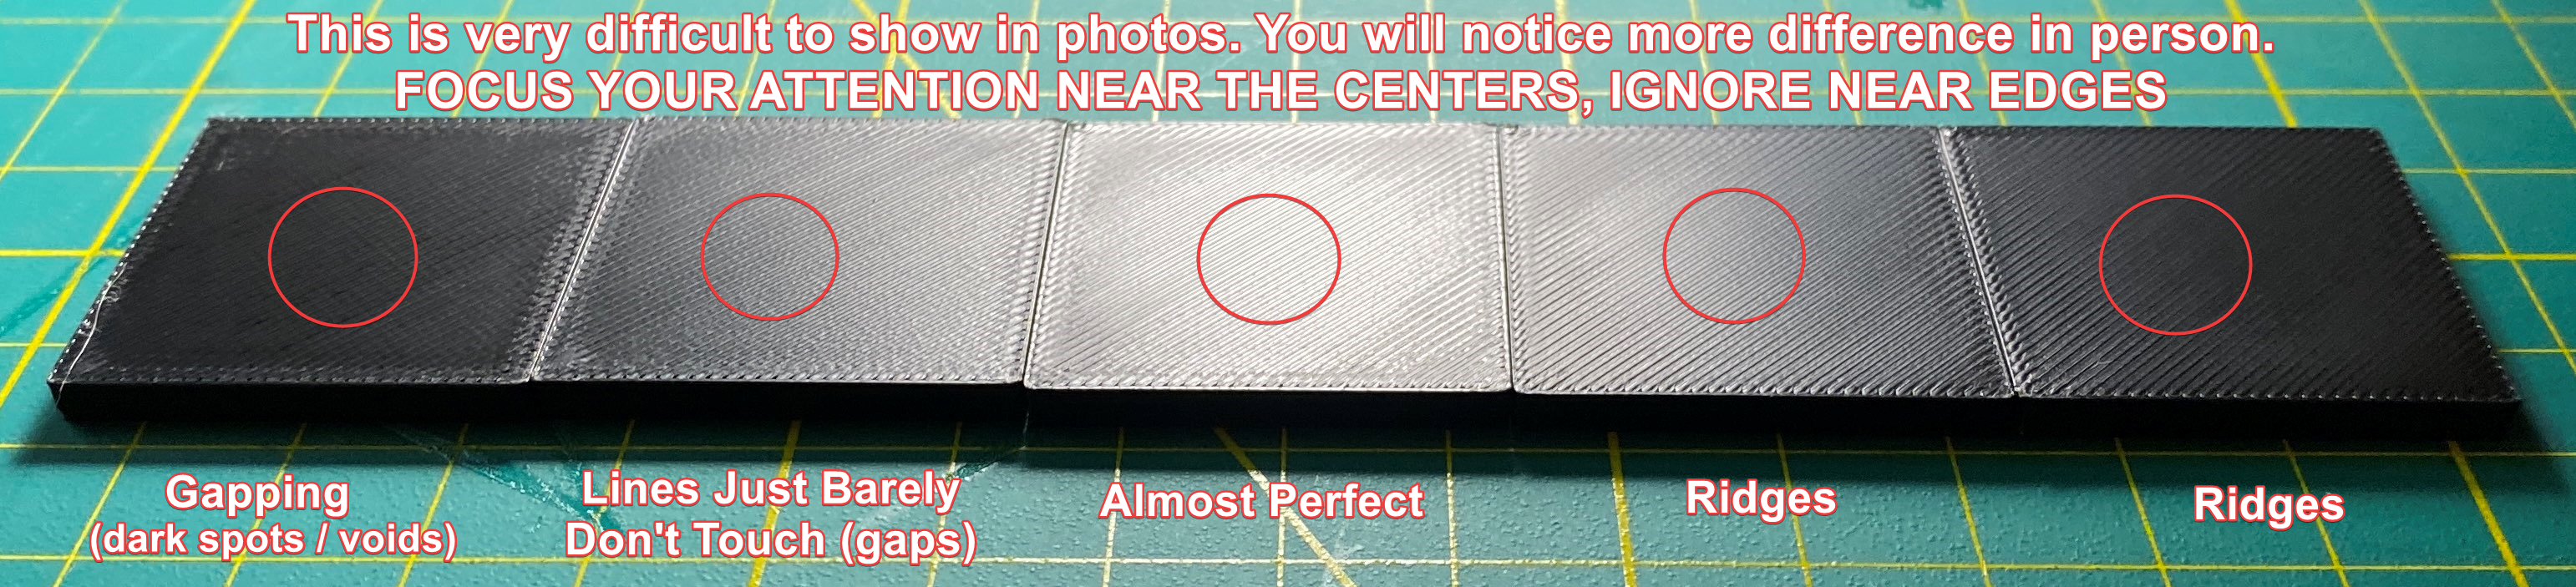 Here's the Wiki on the OrcaSlicer flow calibration. https://www.orcaslicer.com/wiki/calibration/flow_ratio_calib 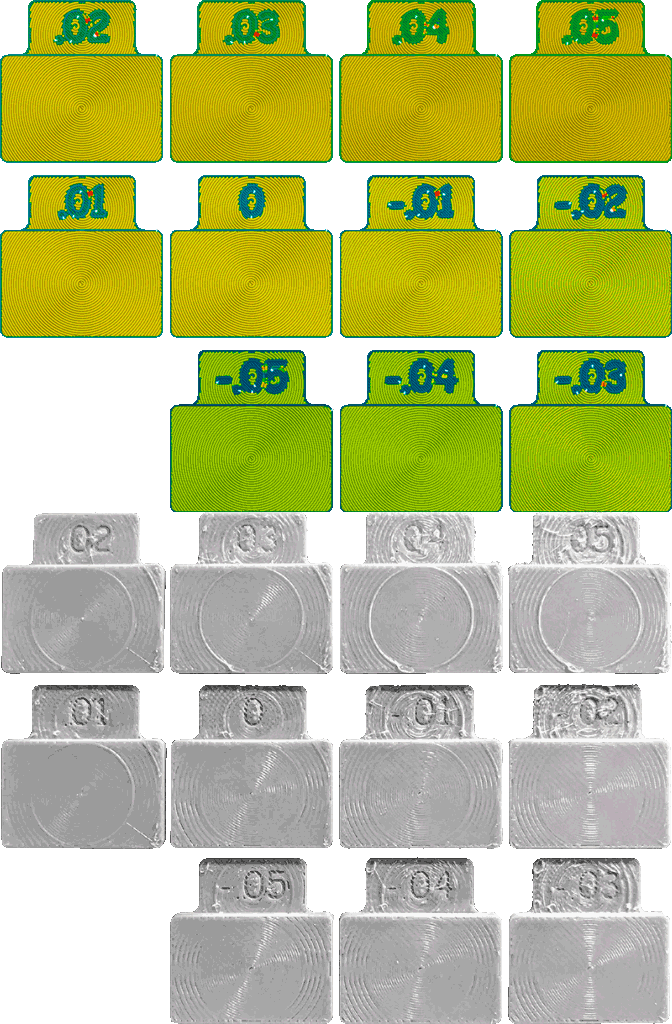 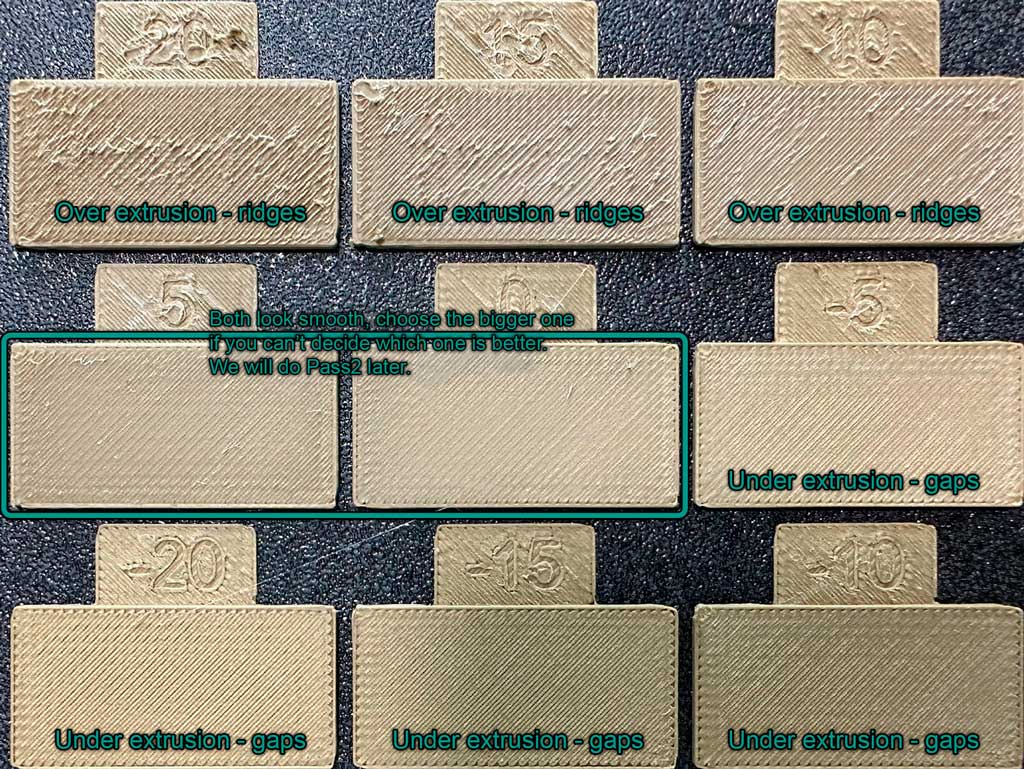
|

|
Originally Posted By bmarshall1: Huh, there's still a LOT I don't know. Time to learn. Does the above go along with the calibration thread or is this a different type of calibration? The calibration thread is relevant here. Main difference in regards to printing suppressors and guns specifically is that I would skip the temp tower test and go straight to the max temp to get the strongest layer adhesion possible. Flow ratio and pressure advance are the most important to get as good as possible IMO. |

|
Originally Posted By bmarshall1: How about 3d trigger kickers from PA6. I'm working to adapt one for a 9mm Extar but the issue is cutting the bolt just right as it's a blow back, being able to adjust a 3d kicker lends a whole new ability for those without metal working skills/tools. I need to find a Machinist in SW Fl. for the bolt. Once I get proof of concept working, I'll flatten a metal one. |
|
Originally Posted By D_Man: If you want to 3D print an FRT, I've tried a few designs and the best I've found is the U-DIS distribution pack based on the Kabuto design. The pack has variants for different triggers and I like the one paired with the Schmid 2-stage type trigger because it has a good, wide "shelf" for the FRT to push on, but there are versions for G$ triggers, milspec triggers, etc that just use a different pusher part to interface with the trigger tail. It's just 4 printed parts and it drops right in the lower. Add a printed 3-pos safety or the KAK Ind. Safe-Semi-Semi safety and it becomes a 3 position FRT. Originally Posted By D_Man: Originally Posted By bmarshall1: How about 3d trigger kickers from PA6. I'm working to adapt one for a 9mm Extar but the issue is cutting the bolt just right as it's a blow back, being able to adjust a 3d kicker lends a whole new ability for those without metal working skills/tools. I need to find a Machinist in SW Fl. for the bolt. Once I get proof of concept working, I'll flatten a metal one. I think I know what my next print will be while I have PA6-CF loaded in printer. Awesome that it works with Larue triggers because I have a few of those. Looks like the Schmid might work for my Rock River 2 stage triggers too. |
|
Originally Posted By bmarshall1: That's F'ing AWESOME. now I have to try that! Horrible lighting, but worked pretty good. I will say after a couple rounds you can see the chambers where they get a little dirty but still pretty neat. i’m probably gonna be shooting it tonight and seeing how it looks. Attached File |
|
Originally Posted By oulufinn: I wonder how many improvements/advancements there'll be in 3D printers, programs, etc., simply due to (Hopefully!) the large number of 2A folks jumping in with both feet. A million, a few million, newbies chomping at the bit? If I was a betting man. You won’t be buying cans in the coming years. You will just print them with near same reliability |
|
Originally Posted By memsu: I got 20 hours left on my FTN5 Rimfire Flow. I got to say PA6-CF is some tough stuff. I decided to cancel my first print 4 hours in because I saw it was struggling printing the overhangs and I had some bits not adhere to the next layer when it was going in a circle movement on the overhang. So, stopped the print then redid my slicer settings and that seemed to fix the issue. Anyway I tried some destruction testing and got to say I'm impressed. Let me start with I know nothing. But would printing it upside down work better? Now you're not making a funnel that goes down, but a funnel that goes up |
I dont think this is a brains type of operation.
|
Originally Posted By ENGCPT: Let me start with I know nothing. But would printing it upside down work better? Now you're not making a funnel that goes down, but a funnel that goes up But yes, in the case of most suppressors with tapered baffle designs, if you print them on an end it's the front/muzzle/bullet exit end that's on the build plate. |
|
Here is where I am at currently for $43 in material. Just got the threads on the pistol cans chased and threaded adapters screwed in to check fit. Need to get some epoxy to permanently attached the adapters then they are done. 
|
"Fully-loaded, safety off. This here is a recipe for unpleasantness." - Malcom Reynolds
"He's a precision-guided asshole who only deploys on deserving targets." - Grok
"He's a precision-guided asshole who only deploys on deserving targets." - Grok
|
Originally Posted By VacaDuck: Here is where I am at currently for $43 in material. Just got the threads on the pistol cans chased and threaded adapters screwed in to check fit. Need to get some epoxy to permanently attached the adapters then they are done. https://www.ar15.com/media/mediaFiles/102931/3737-3813065.jpg 
|

|
Originally Posted By scul: FYI, new revision of the FTN.6 release... deletes the large lettering on the side. Well, looks like the pistol booster cans I print next will be clean. |
"Fully-loaded, safety off. This here is a recipe for unpleasantness." - Malcom Reynolds
"He's a precision-guided asshole who only deploys on deserving targets." - Grok
"He's a precision-guided asshole who only deploys on deserving targets." - Grok

|
Originally Posted By scul: I did the same last night! But the print then failed...  https://www.ar15.com/media/mediaFiles/376127/PXL_20260818_003729292_MP-3813070.jpg Did you set the brim gap to 0? If not then it's not doing much. |
|
Originally Posted By ENGCPT: Let me start with I know nothing. But would printing it upside down work better? Now you're not making a funnel that goes down, but a funnel that goes up Originally Posted By ENGCPT: Originally Posted By memsu: I got 20 hours left on my FTN5 Rimfire Flow. I got to say PA6-CF is some tough stuff. I decided to cancel my first print 4 hours in because I saw it was struggling printing the overhangs and I had some bits not adhere to the next layer when it was going in a circle movement on the overhang. So, stopped the print then redid my slicer settings and that seemed to fix the issue. Anyway I tried some destruction testing and got to say I'm impressed. Let me start with I know nothing. But would printing it upside down work better? Now you're not making a funnel that goes down, but a funnel that goes up I'm printing it the way the how to guide recommended. |
|
Well my FTN5 Rimfire Flow print failed in the last few layers (not quite to where the washer goes, but close). Print came loose off the build plate. So, I'm starting print over, but this time higher bed temp and no glue layer on the PEI. Also, at the 70C bed temp I can run chamber heater at 65C. This Nylon is impressive stuff though. I tried breaking off the molten glob of plastic to look down the bore, and couldn't break it free. |
|
Originally Posted By memsu: Well my FTN5 Rimfire Flow print failed in the last few layers (not quite to where the washer goes, but close). Print came loose off the build plate. So, I'm starting print over, but this time higher bed temp and no glue layer on the PEI. Also, at the 70C bed temp I can run chamber heater at 65C. 25mm brim with zero gap and some glue stick will help a lot. |

|
FTN6 Boosterless 9mm. 12 more hours. Bambu PA6-CF using the 300blk settings. Bambu X1C with original AMS and EIBOS 4 chamber Heater/Dryer. Attached File Attached File |
|
Originally Posted By Blob: 25mm brim with zero gap and some glue stick will help a lot. Originally Posted By Blob: Originally Posted By memsu: Well my FTN5 Rimfire Flow print failed in the last few layers (not quite to where the washer goes, but close). Print came loose off the build plate. So, I'm starting print over, but this time higher bed temp and no glue layer on the PEI. Also, at the 70C bed temp I can run chamber heater at 65C. 25mm brim with zero gap and some glue stick will help a lot. I had a 25mm brim. From what I've read the glue stick with PA6-CF is mainly to help it release from the PEI. I'm risking ripping my PEI off the build sheet supposedly. |
|
Originally Posted By MaNiAc55: FTN6 Boosterless 9mm. 12 more hours. Bambu PA6-CF using the 300blk settings. Bambu X1C with original AMS and EIBOS 4 chamber Heater/Dryer. https://www.ar15.com/media/mediaFiles/104672/IMG_5033_png-3813078.JPGhttps://www.ar15.com/media/mediaFiles/104672/IMG_5034_png-3813079.JPG What brand filament you using? I'm trying to figure out if it's a Polymaker thing recommending bed temps of 40-50C for their PA6-CF. Everyone else list way higher bed temps. I have no issues printing ABS with 90C bed. |
| I need to look at the FTN.6 PCC cans. And I guess I need to buy a .22 with a threaded barrel. Probably a TX22 Toro. |
"Fully-loaded, safety off. This here is a recipe for unpleasantness." - Malcom Reynolds
"He's a precision-guided asshole who only deploys on deserving targets." - Grok
"He's a precision-guided asshole who only deploys on deserving targets." - Grok
|
FTN6 rimfire in hex, PET-GF @300 on the K1 max. For the life of me I can’t figure out why they’re calling for an adapter to 5/8-24 when 3/4-16 is so common. And I have a bag of 3/4 adapters. Gonna have to order a few new adapters to run these. I’ll probably do a booster less 9mm after this 
|
|
Originally Posted By Blob: Did you set the brim gap to 0? If not then it's not doing much. I had 0.05mm and MagigooPA. I think the z height was slightly off... the first layer's extrusion lines weren't fully squished and it warped off the plate. The muzzle face is convex... ) On the next iteration that I'm drying a new spool for right now, I remixed it to adjust the fillet on the muzzle to be better, and delete the pattern on the face of the muzzle also. I'll drop the brim gap to 0, also. |
post_count += 1
PGP: 912E3E9A194DED4E47DA0BA9D593AD70C8C12B9C
PGP: 912E3E9A194DED4E47DA0BA9D593AD70C8C12B9C
|
Originally Posted By memsu: What brand filament you using? I'm trying to figure out if it's a Polymaker thing recommending bed temps of 40-50C for their PA6-CF. Everyone else list way higher bed temps. I have no issues printing ABS with 90C bed. The reason they recommend low bed temp is because they have an additive in their material to slow the crystallization of the material which reduces warpage. Using a high bed temp is basically annealing which kick starts the crystallization process. |
|
Originally Posted By KELBEAST: FTN6 rimfire in hex, PET-GF @300 on the K1 max. For the life of me I can’t figure out why they’re calling for an adapter to 5/8-24 when 3/4-16 is so common. And I have a bag of 3/4 adapters. Gonna have to order a few new adapters to run these. I’ll probably do a booster less 9mm after this https://i.ibb.co/mVBB2xFK/Screenshot-2026-08-17-at-7-59-27-PM.jpg The first paragraph of the readme says why they switched to 5/8. |
|
Mines all done 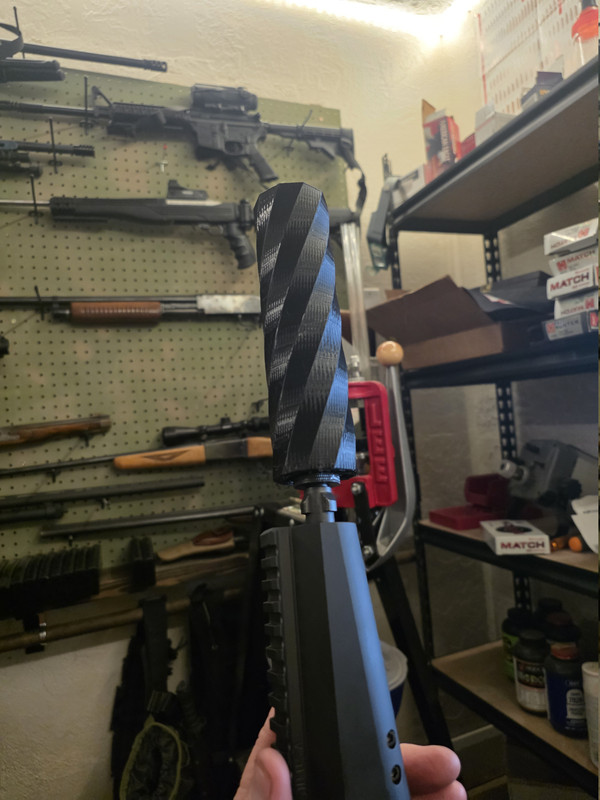
|
|
Originally Posted By KELBEAST: To keep things light weight. But I’ve never had any problems with my own designs (using Aluminum 3/4-16 adapters) cycling on a p229 22lr conversion slide.  You could print an FTN5 or 5 Slim, or fire up Solidworks and design one to your liking. |