|
[#1]
Originally Posted By ReefRaider: Years ago we talked about putting a series of sensors on the 1050. To monitor certain functions. Like a open case neck in station #2 before the tool head would come down and some other things. It became apparent early on that this would be rather expensive and some what complicated to set up. It would also have to be removed and set up again everytime the press was down to be maintained. When using the bullet feeder I'm now in the habit of watching the powder bar move out . While no were near 100% . It has served me well so far. Yeah knew I would loose the powder check but to be honest I wasn't that impressed with it, seemed fiddly to get just right, and even then it still chirped every now and then. I guess it's good for no charge/double charge but had to much room for tolerance to detect minor charge differences. Manually placing the bullet is one station closer forward, so was easy to see powder anyway. But using MBF it's now one station back and hard to see - I had neglected to pick up on that little detail lol. On the 550 the power station is forward, so easy to see. Anyway, with Dillon's modern PM's with all the fail safes it's likely a non-issue, I just like seeing powder though :). Plus I'm sure it will have other handy uses. Anyway I'll post back when it arrives and setup and how well it works, etc. I actually use older Dillon PM's on the 550, one doesn't even have the ability to use the fail safe rod, and none have that new dual crank setup...I don't actually use the fail safe rods on the 550 anyway, just run double springs and look at the case. My only other issue at the moment is the MBF powder funnel sticks a bit...annoying. Of course I was only using test cases that were lubed over a week ago, so maybe with fresh lubed brass and a full shellplate it won't stick so much. |
|
|
|
TX, USA
|
[#2]
Originally Posted By 78Staff:
Yeah knew I would loose the powder check but to be honest I wasn't that impressed with it, seemed fiddly to get just right, and even then it still chirped every now and then. I guess it's good for no charge/double charge but had to much room for tolerance to detect minor charge differences. Manually placing the bullet is one station closer forward, so was easy to see powder anyway. But using MBF it's now one station back and hard to see - I had neglected to pick up on that little detail lol. On the 550 the power station is forward, so easy to see. Anyway, with Dillon's modern PM's with all the fail safes it's likely a non-issue, I just like seeing powder though :). Plus I'm sure it will have other handy uses. Anyway I'll post back when it arrives and setup and how well it works, etc. I actually use older Dillon PM's on the 550, one doesn't even have the ability to use the fail safe rod, and none have that new dual crank setup...I don't actually use the fail safe rods on the 550 anyway, just run double springs and look at the case. My only other issue at the moment is the MBF powder funnel sticks a bit...annoying. Of course I was only using test cases that were lubed over a week ago, so maybe with fresh lubed brass and a full shellplate it won't stick so much. Originally Posted By 78Staff:
Originally Posted By ReefRaider:
Years ago we talked about putting a series of sensors on the 1050. To monitor certain functions. Like a open case neck in station #2 before the tool head would come down and some other things. It became apparent early on that this would be rather expensive and some what complicated to set up. It would also have to be removed and set up again everytime the press was down to be maintained. When using the bullet feeder I'm now in the habit of watching the powder bar move out . While no were near 100% . It has served me well so far. Yeah knew I would loose the powder check but to be honest I wasn't that impressed with it, seemed fiddly to get just right, and even then it still chirped every now and then. I guess it's good for no charge/double charge but had to much room for tolerance to detect minor charge differences. Manually placing the bullet is one station closer forward, so was easy to see powder anyway. But using MBF it's now one station back and hard to see - I had neglected to pick up on that little detail lol. On the 550 the power station is forward, so easy to see. Anyway, with Dillon's modern PM's with all the fail safes it's likely a non-issue, I just like seeing powder though :). Plus I'm sure it will have other handy uses. Anyway I'll post back when it arrives and setup and how well it works, etc. I actually use older Dillon PM's on the 550, one doesn't even have the ability to use the fail safe rod, and none have that new dual crank setup...I don't actually use the fail safe rods on the 550 anyway, just run double springs and look at the case. My only other issue at the moment is the MBF powder funnel sticks a bit...annoying. Of course I was only using test cases that were lubed over a week ago, so maybe with fresh lubed brass and a full shellplate it won't stick so much. Believe the recommendation for the MBF (or any brand) funnel is to polish it to a mirror shine. maybe spin it in some 0000? You could also try some Hornady one shot on brass. Are you wet cleaning brass? It may stick more since every bit of oil/residue is removed. |
|
|
|
[#3]
Originally Posted By djryan13: Believe the recommendation for the MBF (or any brand) funnel is to polish it to a mirror shine. maybe spin it in some 0000? You could also try some Hornady one shot on brass. Are you wet cleaning brass? It may stick more since every bit of oil/residue is removed. Originally Posted By djryan13: Originally Posted By 78Staff: Originally Posted By ReefRaider: Years ago we talked about putting a series of sensors on the 1050. To monitor certain functions. Like a open case neck in station #2 before the tool head would come down and some other things. It became apparent early on that this would be rather expensive and some what complicated to set up. It would also have to be removed and set up again everytime the press was down to be maintained. When using the bullet feeder I'm now in the habit of watching the powder bar move out . While no were near 100% . It has served me well so far. Yeah knew I would loose the powder check but to be honest I wasn't that impressed with it, seemed fiddly to get just right, and even then it still chirped every now and then. I guess it's good for no charge/double charge but had to much room for tolerance to detect minor charge differences. Manually placing the bullet is one station closer forward, so was easy to see powder anyway. But using MBF it's now one station back and hard to see - I had neglected to pick up on that little detail lol. On the 550 the power station is forward, so easy to see. Anyway, with Dillon's modern PM's with all the fail safes it's likely a non-issue, I just like seeing powder though :). Plus I'm sure it will have other handy uses. Anyway I'll post back when it arrives and setup and how well it works, etc. I actually use older Dillon PM's on the 550, one doesn't even have the ability to use the fail safe rod, and none have that new dual crank setup...I don't actually use the fail safe rods on the 550 anyway, just run double springs and look at the case. My only other issue at the moment is the MBF powder funnel sticks a bit...annoying. Of course I was only using test cases that were lubed over a week ago, so maybe with fresh lubed brass and a full shellplate it won't stick so much. Believe the recommendation for the MBF (or any brand) funnel is to polish it to a mirror shine. maybe spin it in some 0000? You could also try some Hornady one shot on brass. Are you wet cleaning brass? It may stick more since every bit of oil/residue is removed. Dry tumble, using one shot but lubed it over a week ago, so thinking a fresh coat might help. DA suggests also make sure the swager/expander die is setup to fully expand, which I believe it is but will double check as well. |
|
|
|
|
[#4]
Originally Posted By 78Staff:
Dry tumble, using one shot but lubed it over a week ago, so thinking a fresh coat might help. DA suggests also make sure the swager/expander die is setup to fully expand, which I believe it is but will double check as well. Got a recommendation on BE Forums that for the 1050 to just use the Dillon PM, the MBF one isn't required due to the swaging/expander die station - so I switched back and haven't had any issues. |
|
|
|
|
[Last Edit: 78Staff]
[#5]
Originally Posted By 78Staff:
I ordered a entry level Whistler handheld inspection camera, vs one of those cheap phone/tablet borescopes. It was bit more of course, but has a rigid cable and a removable 3" monitor. Plan is to setup the rigid cable/camera angled just outside the toolhead in some way, looking down at brass hopefully able to see the powder. The monitor has a magnetic bracket which I think should work fine on the CF upright. Anyway, hopefully it works as I have it drawn up in my head lol. https://www.amazon.com/Whistler-WIC-3509P-Wireless-Inspection-Camera/dp/B0087WRRPE/ref=sr_1_1?ie=UTF8&&tag=vglnk-c102-20;qid=1480440432&sr=8-1&keywords=Whistler+WIC-3509P+Wireless+Inspection+Camera+Kit Whistler Inspection Camera arrived today, I have to say for $60 it's pretty dang nice. Comes with a nice rigid case, and the camera cable is very rigid but still flexible enough to route, so setting it up/positioning it should be pretty easy. Charging it up now, but did a quick test of the camera/monitor and am pleased - quick cell phone pic below. Also the Magnetic bracket will allow the removable monitor to mount easily to the CF upright as well... 
|
|
|
|
|
[#6]
That looks like it worked out pretty well, I'll be waiting to hear the results.
|
|
|
|
|
[Last Edit: 78Staff]
[#7]
Originally Posted By ChevelleDave:
That looks like it worked out pretty well, I'll be waiting to hear the results. After some testing, changed things up a bit. The wireless the monitor worked OK, but would get some banding/interference sometimes, so hooked it back up to the pistol grip with direct connection and just zip-tied the whole assembly to the CF upright - picture is much nicer this way. Still have to clean up the cable routing, and would like to condense the camera cable a bit more if possible (it comes in a small coil, so I know it can we wound pretty tight), but that's just aesthetics, really. It's very stiff so doesn't move unless you want it to. Overall I'm pleased - the monitor is AC powered but also has an internal rechargeable battery that is supposed to give 2-4 hours. It also has zoom, record, save to SD card all the usual stuff. The image is also clearer than the pic below, must be due to cell phone camera and monitor freq that makes it appear grainy in the image. The camera/led lights run of 4 AA's in the handle, which I was unaware of when I ordered, but i have plenty of rechargeable eneloops around and they work fine. Once I get the camera cable routing down, I can improve the angle a bit, but even now it's easy to see powder in the case. Anyway, for $60, I like it. Sure it's more than a cheap andorid/iphone bore-scope cable but you don't have to provide a phone or tablet, and it's pretty much ready to go out of the box, unlike the "backup camera" setups, plus it's a pretty tidy setup once you get the cables routed and organized. 

|
|
|
|
|
[#8]
For the money, that looks like a good way to work passed not having a powder ck.
|
|
|
|
|
[Last Edit: NH_Patriot]
[#9]
Do you guys know if this tool head works with the Dillon Trim/Size Die? GSI Tool Head
I'm hoping to use this Tool head with a Dillon Trim/Size Die and the Honey Badger Trimmer. I'm afrid it will only work with the GSI Dies and I don't think they size. |
|
|
|
IL, USA
|
[#10]
Originally Posted By NH_Patriot:
Do you guys know if this tool head works with the Dillon Trim/Size Die? GSI Tool Head I'm hoping to use this Tool head with a Dillon Trim/Size Die and the Honey Badger Trimmer. I'm afrid it will only work with the GSI Dies and I don't think they size. The GSI dies have the chip port in the same spot as every other die manufacturer that I've tried. It should work just fine. |
|
|
|
[#11]
Originally Posted By NH_Patriot:
Do you guys know if this tool head works with the Dillon Trim/Size Die? GSI Tool Head I'm hoping to use this Tool head with a Dillon Trim/Size Die and the Honey Badger Trimmer. I'm afrid it will only work with the GSI Dies and I don't think they size. I've been eye balling that trimmer. Would like to hear more from someone that has one . I can get + - .002 out of the Dillon trimmers. Can the same be said about those router motors ??? |
|
|
|
|
[#12]
Originally Posted By ReefRaider:
I've been eye balling that trimmer. Would like to hear more from someone that has one . I can get + - .002 out of the Dillon trimmers. Can the same be said about those router motors ??? So I'm thinking of doing a 2 step .300BO brass processing system. I own a 650 and 2 1050's. STEP 1 GSI 650 .300BO tool head Universal Decapper Empty Empty GSI rough trim die, that sizes and trims almost to .300BO spec. & Honey Badger (for the bulk of the trim) Empty Obviously, I would use this for converting .223 to .300BO only. STEP 2 GSI 1050 .300BO Toolhead (or a Dillon) Universal Decapper Dillon Swage Die Empty Empty Dillon Carbide Size/Trim Die w/Dillon RT-1500 (for final/precision trimming) Empty This Toolhead would be for factory and previously converted brass processing. |
|
|
|
|
[#13]
Originally Posted By ReefRaider:
I've been eye balling that trimmer. Would like to hear more from someone that has one . I can get + - .002 out of the Dillon trimmers. Can the same be said about those router motors ??? I believe it's all in the die set up, the bigger trim motor was brought along to deal with making 300 brass in one pass. |
|
|
|
|
[#14]
I prefer not to do it in 2 steps. Am I making more out of this than I have to?
Should I just do a single step process using: GSI 1050 .300BO Toolhead Universal Decapper Swage Empty Empty Dillon Size/Trim with Honey Badger Empty Empty |
|
|
|
|
[#15]
Originally Posted By NH_Patriot:
I prefer not to do it in 2 steps. Am I making more out of this than I have to? Should I just do a single step process using: GSI 1050 .300BO Toolhead Universal Decapper Swage Empty Empty Dillon Size/Trim with Honey Badger Empty Empty A lot of people have done just that with great success. Don't overthink it, I know, I do it ALL the time. |
|
|
|
TX, USA
|
[#16]
Originally Posted By NH_Patriot:
I prefer not to do it in 2 steps. Am I making more out of this than I have to? Should I just do a single step process using: GSI 1050 .300BO Toolhead Universal Decapper Swage Empty Empty Dillon Size/Trim with Honey Badger Empty Empty Dillon size die doesn't set neck tension right IMO (too tight - since there is no expander). You may want some type of expander in either your last step or better yet.. during the reloading process. I put a lyman M die in the swaging station during reloading since sometimes I want a slight flare of the case (for SP or cast bullets) and sometimes I just want proper expansion. |
|
|
|
[#17]
Absolutely, forgot that, none of the trimmer dies expand, so Lyman M die is the way to go.
I have run the M die in station 2, instead of a de-capper, when I had some brass that wasn't expanded. |
|
|
|
|
[Last Edit: 78Staff]
[#18]
Man this is getting confusing - I think the 300BO bits are throwing me off :).
Going to start doing 223, wasn't originally but finally decided to do it. Have 550 and 1050. I don't need any special toolheads, correct? To save on buying another 1050 toolhead I figured I would process brass on 550 then move to 1050 for loading steps, if possible, since I already have a few extra 550 toolheads. Of course I lose the CaesFeed for processing steps, unless I do the 223 modification to my 550 CaseFeeder... Similar to what this guy does...  Working with the Dillon 550 as prep and 1050 for loading. So figure Process on 550 Universal decap Dillon Trimmer/Size M Die / X-die? (or do as step 1 on 1050?) Loading on 1050 for Bulk/Range 55gr ammo Do I need size/expanding die here again? M Expander Die? X-Die? Swage Primer Powder Bullet drop Seat Crimp Will do match/precision 77gr on Coax, so maybe I should move 1050 size/expanding step 1 to last step on 550? Then could do all brass prep on 550 them move brass to 1050 if bulk loading or to Coax for precision work. May not make sense...rifle loading is new to me. Pistol loading I've done for years though. Need to get my head around the different/additional steps for rifle I guess. EDIT - sorry just realized this probably isn't the thread for this, just got caught up in the toolhead discussion and went off on a tangent :). |
|
|
|
|
[Last Edit: NH_Patriot]
[#19]
Originally Posted By ChevelleDave:
Absolutely, forgot that, none of the trimmer dies expand, so Lyman M die is the way to go. I have run the M die in station 2, instead of a de-capper, when I had some brass that wasn't expanded. On .223 Case Prep, What if I Use the Dillon Size/Decap Die instead of the universal Decap Die? The Size/Decap Die has an expander Ball on the Decap Pin. I'm assuming for .300BO I still need the M Die AFTER the Trim/Size Die, since .223 cases being converted won't have a neck to expand until after Trim/Size. Or I could use Decap/Size in station 1 on the Loading Head? Also, if I'm not using an auto drive, is there an advantage to using the Level10 Delrin Guide Rods?? |
|
|
|
|
[#20]
Originally Posted By ChevelleDave:
I'm thinking there's end play in the bearings too. Seeing as that router is the plunge type maybe this is not an issue. I believe it's all in the die set up, the bigger trim motor was brought along to deal with making 300 brass in one pass. |
|
|
|
TX, USA
|
[Last Edit: djryan13]
[#21]
Originally Posted By NH_Patriot:
On .223 Case Prep, What if I Use the Dillon Size/Decap Die instead of the universal Decap Die? The Size/Decap Die has an expander Ball on the Decap Pin. I'm assuming for .300BO I still need the M Die AFTER the Trim/Size Die, since .223 cases being converted won't have a neck to expand until after Trim/Size. Or I could use Decap/Size in station 1 on the Loading Head? Also, if I'm not using an auto drive, is there an advantage to using the Level10 Delrin Guide Rods?? I like expanding AFTER the sizing/trim.. I am afraid the trim die may actually tighten up the neck tension too much. Really, it will also depend on bullet type. If you do expand before sizing, make sure you don't full length size completely. The trim die works best on unsized cases (so they dont spin in die). That comes from Dillon. Edit: this is why I dont buy Dillon and Lee rifle die... can't remove decap pin without removing expander. With other brands, I can place the die after trim die. |
|
|
|
[Last Edit: ReefRaider]
[#22]
Originally Posted By NH_Patriot:
So I'm thinking of doing a 2 step .300BO brass processing system. I own a 650 and 2 1050's. STEP 1 GSI 650 .300BO tool head Universal Decapper Empty Empty GSI rough trim die, that sizes and trims almost to .300BO spec. & Honey Badger (for the bulk of the trim) Empty Obviously, I would use this for converting .223 to .300BO only. STEP 2 GSI 1050 .300BO Toolhead (or a Dillon) Universal Decapper Dillon Swage Die Empty Empty Dillon Carbide Size/Trim Die w/Dillon RT-1500 (for final/precision trimming) Empty This Toolhead would be for factory and previously converted brass processing. I would decap and swag them on the 1 st tool head. Then anneal them and finish . |
|
|
|
|
[#23]
There's three ways that we know of to make .300 Blackout with the 1050. Two of those ways will work well, the other, not so much in the long run.
1. In this order, Decap, Swage, Trim, Full Length Resize and Neck Tension. This, while saving time, does not produce good results, as the cutter engages the brass before the brass fully engages the die. We have also seen people who try to full length resize/decap first, which then gives the brass even less tension on the trim die. 2. On the first toolhead, decap and swage. Then, on a second toolhead, use a Dillon RT1500 trimmer at what is normally the swage station, then use a Honey Badger to final trim on the other side of the toolhead, and finally full length resize/neck tension. You cannot run two Honey Badger's on a single toolhead due to the size of the Bosch motor. We have a customer in TX who does this with great results. 3. This is how we produced our brass. Decap, Swage, and rough trim to 1.42" on toolhead 1. Final Trim and full length resize/neck size on toolhead 2. There's my $0.002 cents. |
|
|
|
|
[Last Edit: ChevelleDave]
[#24]
Originally Posted By djryan13:
I like expanding AFTER the sizing/trim.. I am afraid the trim die may actually tighten up the neck tension too much. Really, it will also depend on bullet type. If you do expand before sizing, make sure you don't full length size completely. The trim die works best on unsized cases (so they dont spin in die). That comes from Dillon. Edit: this is why I dont buy Dillon and Lee rifle die... can't remove decap pin without removing expander. With other brands, I can place the die after trim die. Originally Posted By djryan13:
Originally Posted By NH_Patriot:
On .223 Case Prep, What if I Use the Dillon Size/Decap Die instead of the universal Decap Die? The Size/Decap Die has an expander Ball on the Decap Pin. I'm assuming for .300BO I still need the M Die AFTER the Trim/Size Die, since .223 cases being converted won't have a neck to expand until after Trim/Size. Or I could use Decap/Size in station 1 on the Loading Head? Also, if I'm not using an auto drive, is there an advantage to using the Level10 Delrin Guide Rods?? I like expanding AFTER the sizing/trim.. I am afraid the trim die may actually tighten up the neck tension too much. Really, it will also depend on bullet type. If you do expand before sizing, make sure you don't full length size completely. The trim die works best on unsized cases (so they dont spin in die). That comes from Dillon. Edit: this is why I dont buy Dillon and Lee rifle die... can't remove decap pin without removing expander. With other brands, I can place the die after trim die. I would just run a universal de-capping die, swage die,and then the trimmer, followed by the M die. And you will need the notched toolhead from Dillon. |
|
|
|
|
[Last Edit: NH_Patriot]
[#25]
Originally Posted By FastAndFriendlyBrass:
3. This is how we produced our brass. Decap, Swage, and rough trim to 1.42" on toolhead 1. Final Trim and full length resize/neck size on toolhead 2. There's my $0.002 cents. This was my original idea. Looks like I'm going to try rough trim on the 650 and final trim/prep on the 1050. (Just because the 650 toolheads are so much cheaper) I like to use carbide sizing/trim dies. GSI makes a 2 die trimming/sizing kit for .300BO, but they're not carbide. Am I better off just getting 2 dillon carbide dies and adjusting them differently, or is this not a big deal? |
|
|
|
|
[#26]
Originally Posted By NH_Patriot:
This was my original idea. Looks like I'm going to try rough trim on the 650 and final trim/prep on the 1050. (Just because the 650 toolheads are so much cheaper) I like to use carbide sizing/trim dies. GSI makes a 2 die trimming/sizing kit for .300BO, but they're not carbide. Am I better off just getting 2 dillon carbide dies and adjusting them differently, or is this not a big deal? The Dillon carbide dies are pricey, but worth every penny. They can easily produce millions of rounds before needing replacing. |
|
|
|
|
[#27]
Who all has changed out the casefeed plunger cam plate on their 1050?
I was able to get the press set up, but I have been having a little bit of jamming with the .308 brass. Wasn't really an issue when I was just sizing, but now it is a little different as I actually am loading. I got the feed ramp to shellplate height set perfectly level, and it feeds fine if I slowly actuate the casefeeder. But with the stock Dillon cam it is just too fast it seems. Looking at the one on Ebay, and YouTube, I see how it slows down the speed of the case entering the shellplate. |
|
|
|
IL, USA
|
[#28]
Originally Posted By ChevelleDave:
Who all has changed out the casefeed plunger cam plate on their 1050? I was able to get the press set up, but I have been having a little bit of jamming with the .308 brass. Wasn't really an issue when I was just sizing, but now it is a little different as I actually am loading. I got the feed ramp to shellplate height set perfectly level, and it feeds fine if I slowly actuate the casefeeder. But with the stock Dillon cam it is just too fast it seems. Looking at the one on Ebay, and YouTube, I see how it slows down the speed of the case entering the shellplate. It's not the plunger, it's the spring. Take a 12lb recoil spring from a 1911 and cut it in half. Works like a charm. |
|
|
|
[#29]
Kool, thanks for the tip. I'll hit up My LGS tomorrow.
But iff'n that don't work, I'ma gonna go looking for the guy who sold me this fancy dancy shellplate. |
|
|
|
|
[#30]
Originally Posted By ReefRaider:
For the money, that looks like a good way to work passed not having a powder ck. Meant to post this earlier but realized I posted it in the What did you do thread instead... Loaded 750 rounds of 45acp on the 1050 with the MBF and inspection camera setup to view powder drop... All in all a quantified success. Had one bullet drop upside down but I suspect it might have fallen down the chute as I was adding bullets mid-session. The RF-1000 got a good workout as well :), that baby is worth it's weight in gold.  Failed To Load Title Here's a better (albeit shaky, one handed phone operator :) view of the camera/monitor... The camera angle darkened the view, in person it's brighter and very easy to see the powder.  Failed To Load Title |
|
|
|
TX, USA
|
[#31]
Originally Posted By Brassaholic13:
It's not the plunger, it's the spring. Take a 12lb recoil spring from a 1911 and cut it in half. Works like a charm. Originally Posted By Brassaholic13:
Originally Posted By ChevelleDave:
Who all has changed out the casefeed plunger cam plate on their 1050? I was able to get the press set up, but I have been having a little bit of jamming with the .308 brass. Wasn't really an issue when I was just sizing, but now it is a little different as I actually am loading. I got the feed ramp to shellplate height set perfectly level, and it feeds fine if I slowly actuate the casefeeder. But with the stock Dillon cam it is just too fast it seems. Looking at the one on Ebay, and YouTube, I see how it slows down the speed of the case entering the shellplate. It's not the plunger, it's the spring. Take a 12lb recoil spring from a 1911 and cut it in half. Works like a charm. Interesting.. |
|
|
|
[Last Edit: ChevelleDave]
[#32]
Originally Posted By Brassaholic13:
It's not the plunger, it's the spring. Take a 12lb recoil spring from a 1911 and cut it in half. Works like a charm. I been thinking about it, how can the spring rate change the speed at which the plunger comes in at? Are you saying that with the lighter spring it will not follow the cam profile, and the roller will come off the cam slightly upon re-entry? In my search's, I found where 4-5 years ago you mentioned liking the cam profile skip is selling. I'm a thinking I might just get ahold of a spring And tery it out. As well as trying to cut a Lexan cam that I can adjust the rate if need be. Get a profile that works, and I think I know where I can have one cut with a water jet. My friend was telling me they can laser scan pieces and cut from that. I got a piece of Lexan I would like to get out and cut off a piece anyhow, I wanna try that wet tumbler divider idea. |
|
|
|
|
[Last Edit: NH_Patriot]
[#33]
I've never used the Lyman M-Dies before, but now that I'm reading your toolhead setups, it makes a lot of sense to me, so I'm going to get them.
Are the correct dies the following?: .223 - .22 Caliber Short 7342097 .308 - .30 Caliber Long 7349002 .300BO - .30 Caliber Long 7349002 Also, has anyone used the Level10 Primer Magazine Extension Kit?? |
|
|
|
|
[#34]
Originally Posted By NH_Patriot:
I've never used the Lyman M-Dies before, but now that I'm reading your toolhead setups, it makes a lot of sense to me, so I'm going to get them. Are the correct dies the following?: .223 - .22 Caliber Short 7342097 .308 - .30 Caliber Long 7349002 .300BO - .30 Caliber Long 7349002 You want the 30 cal short (30 Carbine) for 300 blk. Also, has anyone used the Level10 Primer Magazine Extension Kit?? |
|
|
|
|
[Last Edit: NH_Patriot]
[#35]
Originally Posted By dryflash3:
Originally Posted By dryflash3:
Originally Posted By NH_Patriot:
I've never used the Lyman M-Dies before, but now that I'm reading your toolhead setups, it makes a lot of sense to me, so I'm going to get them. Are the correct dies the following?: .223 - .22 Caliber Short 7342097 .308 - .30 Caliber Long 7349002 .300BO - .30 Caliber Long 7349002 You want the 30 cal short (30 Carbine) for 300 blk. Also, has anyone used the Level10 Primer Magazine Extension Kit?? Yes, Thank you. For Anyone with the same question, the Lyman Part Numbers are as follows: .223 - .22 Caliber Short 7342097 .308 - .30 Caliber Long 7349002 .300BO - .30 Caliber 30M1 Carbine 7349004 |
|
|
|
|
[#36]
Personally don't see any advantage to extending the primer magazine. I prefer the primers to be the limiting factor, rather then the powder.
|
|
|
|
|
[Last Edit: ReefRaider]
[#37]
Originally Posted By ChevelleDave:
Who all has changed out the casefeed plunger cam plate on their 1050? I was able to get the press set up, but I have been having a little bit of jamming with the .308 brass. Wasn't really an issue when I was just sizing, but now it is a little different as I actually am loading. I got the feed ramp to shellplate height set perfectly level, and it feeds fine if I slowly actuate the casefeeder. But with the stock Dillon cam it is just too fast it seems. Looking at the one on Ebay, and YouTube, I see how it slows down the speed of the case entering the shellplate. Made one of my own. I see two things going on there. One is the case moving out from under the case above it. The case above pulls at the neck of the case below that's moving to go into the shell plate. This seems to cause a wabble in the case. The wabble can also be affected by how your tool head is set up. Expanders coming out of case necks can cause the tool head to jump when going up , this adds a vibration if you will to the wabble the case already has. If you change the profile of the cam so it rapidly moves the case out from under the other then creates a slight pause before the case moves into the shell plate. |
|
|
|
|
[#38]
Originally Posted By NH_Patriot:
Yes, Thank you. For Anyone with the same question, the Lyman Part Numbers are as follows: .223 - .22 Caliber Short 7342097 .308 - .30 Caliber Long 7349002 .300BO - .30 Caliber Long 7349004 Think you got a typo, 300 blk should use the short 30 cal. |
|
|
|
|
[#39]
Originally Posted By dryflash3:
Think you got a typo, 300 blk should use the short 30 cal. Thank you, I changed it. It's actually 30M1 Carbine according to Lyman. |
|
|
|
|
[#40]
Originally Posted By ReefRaider:
Personally don't see any advantage to extending the primer magazine. I prefer the primers to be the limiting factor, rather then the powder. I tend to agree with this... I had though about it, but 100 rounds is a good pause point to double check a few things, gauge a few cases, etc. Also a oft-suggested tip is to pull rounds out every time you load primers, so if you do happen to have an issue, ie suspected double charge or squib or incorrect powder settings, etc you can limit it to 100 round lot vs having a bin full of 5-600 rounds and being f***ed. |
|
|
|
|
[#41]
Originally Posted By 78Staff:
Meant to post this earlier but realized I posted it in the What did you do thread instead... Loaded 750 rounds of 45acp on the 1050 with the MBF and inspection camera setup to view powder drop... All in all a quantified success. Had one bullet drop upside down but I suspect it might have fallen down the chute as I was adding bullets mid-session. The RF-1000 got a good workout as well :), that baby is worth it's weight in gold.  https://www.youtube.com/watch?v=2iTQuWfvMds https://www.youtube.com/watch?v=2iTQuWfvMds
Here's a better (albeit shaky, one handed phone operator :) view of the camera/monitor... The camera angle darkened the view, in person it's brighter and very easy to see the powder. https://www.youtube.com/watch?v=i7yqyNpX-tgDid some cable cleanup - here's a final view. Tidied up the Monitor, MBF, and LED power cables also. Tweaked the borescope camera angle and zoom a bit as well to get better view as well... 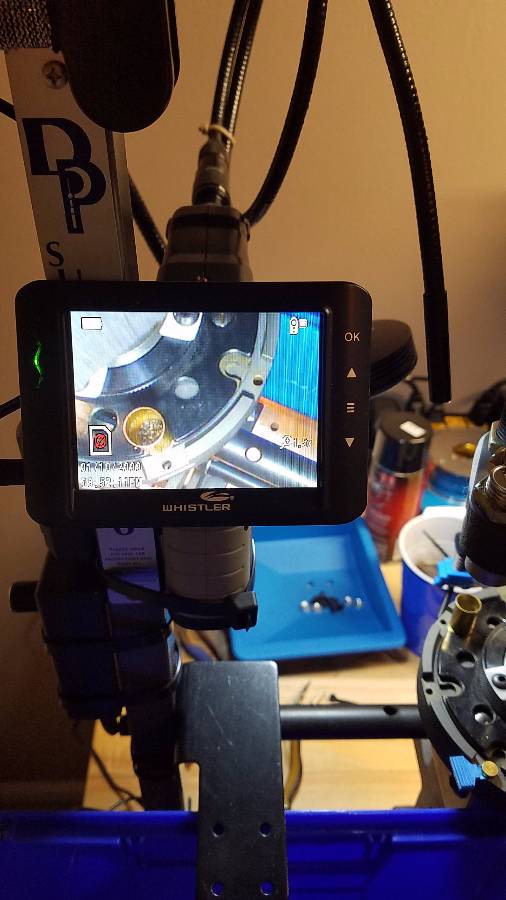
|
|
|
|
|
[#42]
Originally Posted By 78Staff:
I tend to agree with this... I had though about it, but 100 rounds is a good pause point to double check a few things, gauge a few cases, etc. Also a oft-suggested tip is to pull rounds out every time you load primers, so if you do happen to have an issue, ie suspected double charge or squib or incorrect powder settings, etc you can limit it to 100 round lot vs having a bin full of 5-600 rounds and being f***ed. Not sure what you handle pullers do but. Since the auto drive has a forward and reverse. I never stop to add components unless the shell plate is empty. If there's a malfunction of any kind the shell plate gets emptied for that too. While this adds some time to the process. I still feel it a necessary evil. |
|
|
|
IL, USA
|
[#43]
Originally Posted By ReefRaider:
Personally don't see any advantage to extending the primer magazine. I prefer the primers to be the limiting factor, rather then the powder. Ever seen 100 primers detonate? If so, why would you want more? If not, don't add more capacity until you see 100 go poof. |
|
|
|
[#44]
Originally Posted By ReefRaider:
Made one of my own. I see two things going on there. One is the case moving out from under the case above it. The case above pulls at the neck of the case below that's moving to go into the shell plate. This seems to cause a wabble in the case. The wabble can also be affected by how your tool head is set up. Expanders coming out of case necks can cause the tool head to jump when going up , this adds a vibration if you will to the wabble the case already has. If you change the profile of the cam so it rapidly moves the case out from under the other then creates a slight pause before the case moves into the shell plate. Reef Raider, do you have a picture of your modified cam profile? I picked up some steel plate today, I'm going to try to build my own. Kind of curious to see what you've got. I can kinda see how the profile was changed by the one for sale on eBay, it looks like he just brought the case in a little gentler. Kind of curious what you're saying about getting the case out quicker. From what I'm kind of getting from what you're saying, you would remove some of the profile at the top of the cam, and increase the profile towards the bottom to bring the case into the shell plate slower. I'm going to go out and mess around with it right now. Put an empty tool head on and get a good hard look at what's actually happening with the stock cam, and figure out where to go from there. Might be a good candidate for get in the plasma cutter out. 
|
|
|
|
TX, USA
|
[#45]
Originally Posted By Brassaholic13:
Ever seen 100 primers detonate? If so, why would you want more? If not, don't add more capacity until you see 100 go poof. Never heard of it in 1050.. I have detonated a couple on 1050.. No impact to tube primers. Keep on truckin.. I agree though.. 100 is enough. |
|
|
|
[Last Edit: ReefRaider]
[#46]
Originally Posted By ChevelleDave:
Reef Raider, do you have a picture of your modified cam profile? I picked up some steel plate today, I'm going to try to build my own. Kind of curious to see what you've got. I can kinda see how the profile was changed by the one for sale on eBay, it looks like he just brought the case in a little gentler. Kind of curious what you're saying about getting the case out quicker. From what I'm kind of getting from what you're saying, you would remove some of the profile at the top of the cam, and increase the profile towards the bottom to bring the case into the shell plate slower. I'm going to go out and mess around with it right now. Put an empty tool head on and get a good hard look at what's actually happening with the stock cam, and figure out where to go from there. Might be a good candidate for get in the plasma cutter out. I'm sent I had some aluminum plate from a BMW fender. I used that to make a temporary one. That gets bolted in behind the OEM one. This allowed me to remove it and trim it down to fine tune it. The top 1/3 stays the same . This allows the case to move out from under the ones above it. From that point on it rounds out to slow the feed into the shell plate. The one I made is for .223. |
|
|
|
|
[#47]
Originally Posted By Brassaholic13:
Ever seen 100 primers detonate? If so, why would you want more? If not, don't add more capacity until you see 100 go poof. If the primer magazine has the proper shielding. I don't see what that matters. ???? |
|
|
|
|
[#48]
78Staff, that looks really nice, should be a good addition.
RR, Thank You. On my way home from a Dr.'s apt, I swung buy the LGS, forgot they are closed on Monday.  I'll call tomorrow and see if the have the spring. I'll call tomorrow and see if the have the spring.
|
|
|
|
|
[#49]
Your doing .308 I can see that needing a stronger spring , possibility. But try changing the profile of the cam first. It made a world of difference for me when processing .223
|
|
|
|
IL, USA
|
[#50]
Originally Posted By ReefRaider:
If the primer magazine has the proper shielding. I don't see what that matters. ???? You're right, it shouldn't... Do you want to be the one that it does matter on? 
|
|
|
 Win a FREE Membership!
Sign up for the ARFCOM weekly newsletter and be entered to win a free ARFCOM membership. One new winner* is announced every week!
You will receive an email every Friday morning featuring the latest chatter from the hottest topics, breaking news surrounding legislation, as well as exclusive deals only available to ARFCOM email subscribers.

AR15.COM is the world's largest firearm community and is a gathering place for firearm enthusiasts of all types.
From hunters and military members, to competition shooters and general firearm enthusiasts, we welcome anyone who values and respects the way of the firearm.

Subscribe to our monthly Newsletter to receive firearm news, product discounts from your favorite Industry Partners, and more.
Copyright © 1996-2024 AR15.COM LLC. All Rights Reserved.
Any use of this content without express written consent is prohibited.
AR15.Com reserves the right to overwrite or replace any affiliate, commercial, or monetizable links, posted by users, with our own.


