


Armory Sponsor
Pinestraw strikes again...now with brief TUTORIAL. (Page 5 of 11)

|
Question for you guys. I used the Krylon ultra-flat tan and brown to test how this works on a couple of AR mags, but the tan didn't show up as lightly as it does in the pictures below. Any suggestions?
How do you think these guys did it? Tan base coat- how did they get the vegetation to look so good? 
|

|
Originally Posted By FrankSL:
Question for you guys. I used the Krylon ultra-flat tan and brown to test how this works on a couple of AR mags, but the tan didn't show up as lightly as it does in the pictures below. Any suggestions? How do you think these guys did it? Tan base coat- how did they get the vegetation to look so good? http://i217.photobucket.com/albums/cc295/B055H0GG/ODApaintedrifles.jpg?t=1241283161 Krylon tan should be light enough to look like the rifles in your pic. The only thing I can think of is that maybe you used too much brown or not enough cover/vegetation. At the start of this thread I posted some pics of a flashlight with different amounts of pine needles to illustrate the different ways the color would transfer. You can also change the distance you hold the can from the parts and change the sharpness of your lines. The closer the can the sharper the lines. The same goes for the pine needles. If they are held tight against the stock then you will have sharper lines. BTW - Where is that picture from? 
This is my EMOD where I striped it out OD and brown krylon holding the can less than 6" from the stock with a fairly solid amount of pine needles on it. 
Here is another up against a tree...also using pinestraw as a pattern. 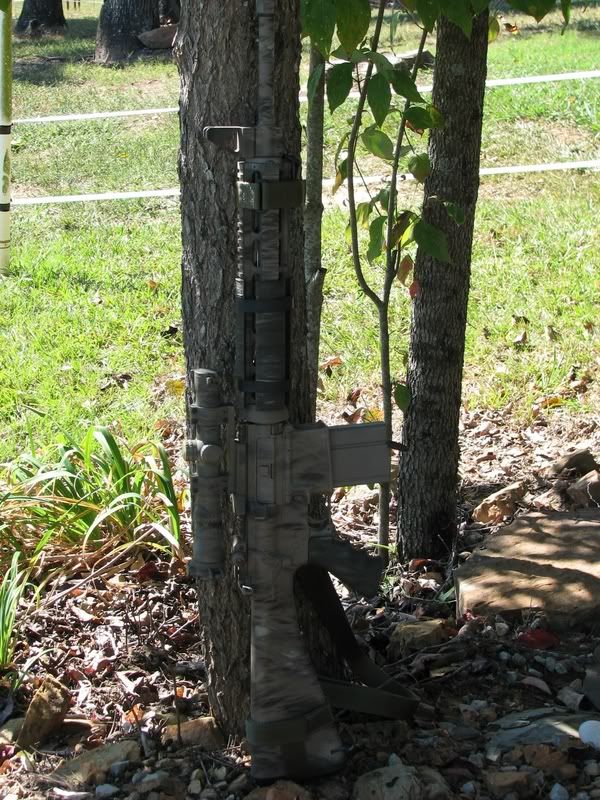
|
|
Originally Posted By bjwar10:
Originally Posted By FrankSL:
Question for you guys. I used the Krylon ultra-flat tan and brown to test how this works on a couple of AR mags, but the tan didn't show up as lightly as it does in the pictures below. Any suggestions? How do you think these guys did it? Tan base coat- how did they get the vegetation to look so good? http://i217.photobucket.com/albums/cc295/B055H0GG/ODApaintedrifles.jpg?t=1241283161 Krylon tan should be light enough to look like the rifles in your pic. The only thing I can think of is that maybe you used too much brown or not enough cover/vegetation. At the start of this thread I posted some pics of a flashlight with different amounts of pine needles to illustrate the different ways the color would transfer. You can also change the distance you hold the can from the parts and change the sharpness of your lines. The closer the can the sharper the lines. The same goes for the pine needles. If they are held tight against the stock then you will have sharper lines. BTW - Where is that picture from?
This is my EMOD where I striped it out OD and brown krylon holding the can less than 6" from the stock with a fairly solid amount of pine needles on it. http://i106.photobucket.com/albums/m248/bjwar10/IMG_5951.jpg Here is another up against a tree...also using pinestraw as a pattern. http://i106.photobucket.com/albums/m248/bjwar10/ar10a.jpg Bjwar10- that's an ODA at the Andrews AFB air show. I thought those paint jobs looked great. SOCOM almost has their own hangar  Which is justified, considering they have to hold their own against the likes of the F-22 Raptor, Blue Angels, T-Birds, etc. Which is justified, considering they have to hold their own against the likes of the F-22 Raptor, Blue Angels, T-Birds, etc.
Thanks for all the info in this thread. What I found is that when I held the Krylon can too close it blew the pine needles out of the way. |
Here are some mags I painted yesterday with Krylon ultra-flat "deep forest green" and tan. Unfortunately we don't have any really long pine needles around. I need to pick up some brown Krylon, and figure out how to make the tan lighter.

|
|
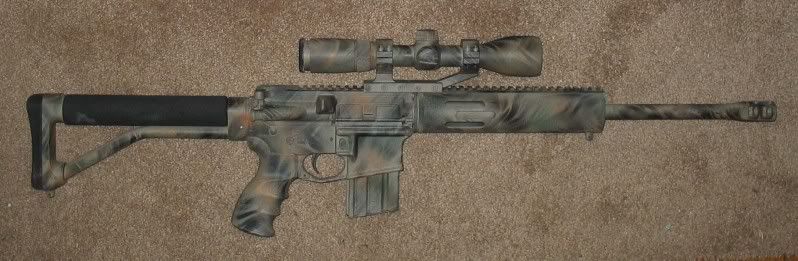
I went ahead and decided to try the Duacoat on a rubberized type of armor coating. The first object to do was a set of Bushnell 10x42 scout binocs. I shot a base coat of Duracoat Magpul FDE with some of the flex additive, let that dry overnight. This afternoon I shot the Pinestraw.camo onto it. Tomorrow I will shoot some matte clear onto it.
This morning I played around with the lens covers and the Duracoat flex additive seems to really allow the paint to flex! Here it is before the clear 
|

|
Great information on here. Here are my Before and After Pics.
Rem. Model 700 SPS-V .308 Before: 
After: 
|
"Is life so dear, or peace so sweet, as to be purchased at the price of chains and slavery? Forbid it, Almighty God! I know not what course others may take; but as for me, give me liberty or give me death!" - Patrick Henry
|
Here is the same group of mags I've been experimenting on. Note the Crusader "Deus Vult" cross on a couple of them.
Mag 3 (green and tan only; no brown) would probably be my choice once I decide to paint a rifle. I used a mix of "linear" pine straw and some random local vegetation. 
|

|
Originally Posted By FrankSL:
Question for you guys. I used the Krylon ultra-flat tan and brown to test how this works on a couple of AR mags, but the tan didn't show up as lightly as it does in the pictures below. Any suggestions? How do you think these guys did it? Tan base coat- how did they get the vegetation to look so good? http://i217.photobucket.com/albums/cc295/B055H0GG/ODApaintedrifles.jpg?t=1241283161 
Looks like they started with light tan, added vegetation, sprayed khaki, added vegetation, and sprayed brown. Looks like they might have went back and added khaki in a few spots. I think breaking it up with the larger brown areas really helps. I especially like the bottom one. |
[NO TEXT]
|
A Question for all you who use Duracoat... Is the finish sticky like the krylon paint? I want to camo my gun but I dont want it to be sticky like the krylon finish gets especially in the sun. Also what color Duracoat matches Magpul FDE?
Thanks for the advice in advance |

|
Originally Posted By FrankSL:
Question for you guys. I used the Krylon ultra-flat tan and brown to test how this works on a couple of AR mags, but the tan didn't show up as lightly as it does in the pictures below. Any suggestions? How do you think these guys did it? Tan base coat- how did they get the vegetation to look so good? http://i217.photobucket.com/albums/cc295/B055H0GG/ODApaintedrifles.jpg?t=1241283161 Could be the Krylon. I have 2 cans of Ultra Flat Khaki that are 2 totally different colors. The Walmart can looks like Khaki, The Ace can is a darker grayish color. Bad QC? |
This is the closest place I can find to a BRD support group. But you are all enablers.

|
Originally Posted By rpriest22:
A Question for all you who use Duracoat... Is the finish sticky like the krylon paint? I want to camo my gun but I dont want it to be sticky like the krylon finish gets especially in the sun. Also what color Duracoat matches Magpul FDE? Thanks for the advice in advance I'm not sure what you mean by sticky. If the finish has been given enough time to cure, it shouldn't feel sticky/tacky at all. I've used both Duracoat and Krylon without any problems. |
Have you visited your Hometown Forum today?
http://www.ar15.com/forums/board.html?b=8
"Site Staff remembers when you could buy a keg of musket balls for $1.75"
http://www.ar15.com/forums/board.html?b=8
"Site Staff remembers when you could buy a keg of musket balls for $1.75"


|
Originally Posted By savageoneseven:
Thanks for the inspiration. My Mossy Maverick: http://i402.photobucket.com/albums/pp101/savageoneseven/cimg1094.jpg That looks great...got any more pics? 
|


FUCK OBAMA AND HIS HORSES-ASS VP!!!!!!!
Joined:
Mar 2007
Posts:
2191
EE: 100% (5)
 TX, USA
|
My Newest Pinestraw creation.
PASGT Goodness. Criticisms Welcome. The colors are, Primer Black-Italian Olive (Satin)-OD Green (Flat)-Brown (Flat)-Desert Tan (flat). 


What says the hivemind, Should I leave it as is or do some fine tuning? sw1217 |
Thank You Trigger - for giving all to take care of our Boys ... you will always be remembered..RetMAC
Supreme Allied Sharkling Commander, Lonestar Command & PRO
Proud member of "Ranstad's Militia" The FANTASTIC BASTARDS
Supreme Allied Sharkling Commander, Lonestar Command & PRO
Proud member of "Ranstad's Militia" The FANTASTIC BASTARDS

|
So, I took the plunge. First ever attempt at painting a rifle. Here's some pics, gonna go find some grass or something to put in for effect... As was.  Primered  Base Coat (686 Tan CARC - Military finish for vehicles)  Finished product   How'd I do? ETA: In the "wild". Closest I could find was some dead grass and weeds in the alley behind my neighbors house.    |
happycynic: Most things that are awesome are also stupid.

|
Originally Posted By ragedracer1977:
So, I took the plunge. First ever attempt at painting a rifle. Here's some pics, gonna go find some grass or something to put in for effect... [snip] Damn, really good job. 
|
happycynic: "I couldn't care less about spelling on the internet. Feel free to be my secretary and correct my typos if you like."
Rogue-Sasquatch: "For ever Qassam rocket that comes over from Gaza, they launch a beat up Buick back in
|
Originally Posted By rizzo1318: How'd I do? Man, that looks great - especially for your first try! I'd also like to know if there a local place that sells CARC paint. CARC can be bought from Sherwin Williams (special order). They are the ones that make and sell it to the military. It used to be very bad for you, toxic as hell. There new formulation is water-based and much safer to work with. I had a little left over from painting my M1009 and just used it. You can also get CARC substitute (looks and feels the same, without the chemical agent protection) from several places. rapcoparts.com sells the substitute, either by the gallon, or premixed in spray paint cans. |
happycynic: Most things that are awesome are also stupid.
|
Originally Posted By perimedik:
Thanks for the inspiration. Wanted to keep the wood grain, I thought it would add to the character keep it unique, and it did. When I was spraying it, god damn canadian geese kept flying over head mocking me
ETA outdoor pics http://i240.photobucket.com/albums/ff170/perimedik/100_1152.jpg http://i240.photobucket.com/albums/ff170/perimedik/100_1149.jpg Nice I saw a guy who did similar with his AK and thought it looked really nice. 
|



|
Originally Posted By splitbolt:
http://i186.photobucket.com/albums/x120/pokethru/zca15.jpg http://i186.photobucket.com/albums/x120/pokethru/zca20.jpg http://i186.photobucket.com/albums/x120/pokethru/zca22.jpg What colors did you use? I have been waiting to take the plunge! Yours is one of the nicer ones I have seen.. great job incorporating black. I was considering finishing mine with with a light spray of black in certain places. |
I will not submit.
<font size=3>
كافر </font id=s3>
<font size=3>
كافر </font id=s3>
|
Originally Posted By Intimdtr77:
Originally Posted By splitbolt:
http://i186.photobucket.com/albums/x120/pokethru/zca15.jpg http://i186.photobucket.com/albums/x120/pokethru/zca20.jpg http://i186.photobucket.com/albums/x120/pokethru/zca22.jpg What colors did you use? I have been waiting to take the plunge! Yours is one of the nicer ones I have seen.. great job incorporating black. I was considering finishing mine with with a light spray of black in certain places. Thank you.
I used Krylon Fusion khaki, brown, black and olive. A lot of the pinestraw jobs I saw looked 2-dimensional to me. I wanted some shading and depth...kind of like a hardwoods pattern. It took some practice on some ammo cans to come up with the effect I was looking for. It's basically two parts; a background and a foreground. The background contains most of the color fade while the foreground contains most of the shape. First a khaki base coat, then olive, then brown, and finally black. I move the pinestraw between each color working smaller sections instead of the whole gun. Then I went back and added blending and accents here and there in all four colors, paying close attention to where I wanted to spray. I found some colors sprayed over others didn't look right... I think the black really makes it "pop". It also has the added effect of turning khaki into a gray color. I'm just saying, there was a bit of technique involved. I didn't just spray and pray. |
"What we have done for ourselves alone dies with us; what we have done for others and the world remains and is immortal"
|
Originally Posted By splitbolt:
Originally Posted By Intimdtr77:
Originally Posted By splitbolt:
http://i186.photobucket.com/albums/x120/pokethru/zca15.jpg http://i186.photobucket.com/albums/x120/pokethru/zca20.jpg http://i186.photobucket.com/albums/x120/pokethru/zca22.jpg What colors did you use? I have been waiting to take the plunge! Yours is one of the nicer ones I have seen.. great job incorporating black. I was considering finishing mine with with a light spray of black in certain places. Thank you.
I used Krylon Fusion khaki, brown, black and olive. A lot of the pinestraw jobs I saw looked 2-dimensional to me. I wanted some shading and depth...kind of like a hardwoods pattern. It took some practice on some ammo cans to come up with the effect I was looking for. It's basically two parts; a background and a foreground. The background contains most of the color fade while the foreground contains most of the shape. First a khaki base coat, then olive, then brown, and finally black. I move the pinestraw between each color working smaller sections instead of the whole gun. Then I went back and added blending and accents here and there in all four colors, paying close attention to where I wanted to spray. I found some colors sprayed over others didn't look right... I think the black really makes it "pop". It also has the added effect of turning khaki into a gray color. I'm just saying, there was a bit of technique involved. I didn't just spray and pray. I fear this is what I am going to do. I do plan on doing up some cans first. My plan is to do a old Viper 22 I have laying around first, then maybe, just maybe an AR. 
There are a few rust dimples on the cans, is steal wool then spray the entire can with brake clean acceptable? I would love to see you method done in a bunch of pic's
|
I will not submit.
<font size=3>
كافر </font id=s3>
<font size=3>
كافر </font id=s3>
|
Originally Posted By Intimdtr77:
I fear this is what I am going to do. I do plan on doing up some cans first. My plan is to do a old Viper 22 I have laying around first, then maybe, just maybe an AR.
There are a few rust dimples on the cans, is steal wool then spray the entire can with brake clean acceptable? I would love to see you method done in a bunch of pic's
If it's heavier rust, I recommend one of those sanding pad watchmacallits...looks kind of like a Scotch Brite pad. I think 3M makes it. I find them in the paint dept. at Walmart I prepped my rifle with brake cleaner, wiped it down with denatured alcohol, and hit it with compressed air for lint. Give me a week and I'll have a tutorial put together. |
"What we have done for ourselves alone dies with us; what we have done for others and the world remains and is immortal"
|
Originally Posted By splitbolt:
Originally Posted By Intimdtr77:
I fear this is what I am going to do. I do plan on doing up some cans first. My plan is to do a old Viper 22 I have laying around first, then maybe, just maybe an AR.
There are a few rust dimples on the cans, is steal wool then spray the entire can with brake clean acceptable? I would love to see you method done in a bunch of pic's
If it's heavier rust, I recommend one of those sanding pad watchmacallits...looks kind of like a Scotch Brite pad. I think 3M makes it. I find them in the paint dept. at Walmart I prepped my rifle with brake cleaner, wiped it down with denatured alcohol, and hit it with compressed air for lint. Give me a week and I'll have a tutorial put together. Awesome, I'm really looking forward to it. The rust is only some minor pitting that I have found so far. I plan on painting it as one piece and not taking it apart. |
I will not submit.
<font size=3>
كافر </font id=s3>
<font size=3>
كافر </font id=s3>
|
This is my take on pinestraw camo.
Stuff I used...Daisy BB gun with khaki basecoat. 
This is about how much pinestraw I use. The wood is there to hold the straw tight to the surface for nice sharp lines. Notice how it subtly fans out from the grip area. Try to spray in the direction the straw is laying when spraying completely across. I did this one in thirds... 


Here it is after all the olive has been applied. 
I like to spray the brown along the green/khaki borders laying the straw in the same general direction as the previous step. I try not to cross it more than 15 degrees, otherwise, I end up with "X"s. Spray with the straw if you want a 'branch' effect...spray across the straw if you prefer 'spots'. I mostly sprayed with the straw on this one. I tend to lay the straw a little thicker for the remaining steps. 

After all the brown... 
After some black... For the 'branch' effect, I like to apply this to one side or the other of a khaki/brown or khaki/olive border leaving a 'band' of khaki exposed. Again, lay the straw in the same direction as the previous steps, spray with the straw for a 'branch' effect or across it for a 'spots' A little goes a long way here. 

After some khaki highlights... I don't go all the way across with any of these, just spots or small strips of it here and there. If you applied too much brown or black in the previous steps you can knock it back down a little. 
All done...on this side. On the other side I will use more of the 'spot' technique and update this post. 


|
"What we have done for ourselves alone dies with us; what we have done for others and the world remains and is immortal"


|
I've painted a few guns, but hadn't tried the pinestraw yet. Had some free time so today I grabbed my 10/22, broke some branches off the pine tree outside, and went to work.
I tried a few different base coat colors and designs on these AR mags: 
Once I saw those, I decided on a Krylon Khaki base coat, then followed it with the Krylon Green and Krylon Brown stripes. Once I had applied Brown, I thought it looked pretty cool but wanted more color and a better breakup, so I stuck to the plan and added Green: 


I really like the way it turned out, so I did a mag, too: 
This whole process is pretty fast, easily done inside of an hour, including taping off and all the prep. I use this shotgun and AR for predator hunting, so I've put some camo on them. The Krylon holds up really well - I'm not very nice to my weapons and this camo has been on almost 3 years, with no touchups. Here's how the pinestraw compares: 
|
Can I hunt it? No? Not interested.


|
Originally Posted By rizzo1318:
Well I blooded in the new camo job! Shot a couple rabbits this morning, and while I was out I decided to put in some brush to check the pattern - might be a little dark . . . . http://i79.photobucket.com/albums/j137/rizzo1318/10%2022%20Refinish/in_brush.jpg i spy... |
|
Well so I was kinda bored on a Sunday afternoon and the gun show was crap so I decided to re-paint my scope and mount. Why you ask? Because I did a really shotty job the first time and it had some major chippage action. The first time I didn't prep properly and applied way too much paint and worked way too fast in between coats, chip central. I knew gun scrubber and or brake cleaner would take this paint off, it worked, kinda, with a toothbrush, some major scrubbing, and some automotive bug and tar remover.
Before: 
(if you look close you can see some chips on the scope, it was like that in numerous places, I am sure the coyote didn't notice but it looked bad to me) Step 1. Cleaned the "parts" 

2. Base Coat 
3. Brown 

4. Green 

5. All together now! 
There are some chips on my barrel from the first attempt at painting it, same mistakes as the scope first time. Probably going to just leave it for now tho, unitl it starts bothering me. |


|
(Reposted here for posterity per bjwar10)
Once upon a time (3 years ago) I did a very, very bad job at prepwork and laid a very ugly ACU pattern of Duracoat, which began chipping almost immediately. I covered the abomination with black and tan spray paint, and in the past few months tried and mostly succeeded in stripping it clean. Of course, since then I've read through the Pine Straw thread repeatedly, and decided spray paint couldn't be harder to remove than DuraCoat, so I went ahead and took the plunge. Went with Rust-Oleum products, primer then Nutmeg (249070), decided it was "too brown" and resprayed a Fossil (249080) base and added textured Dark Olive (241253) and camouflage Earth Brown (1918). I don't think it's too shabby, but I may continue to tinker in the future, just on GP. 
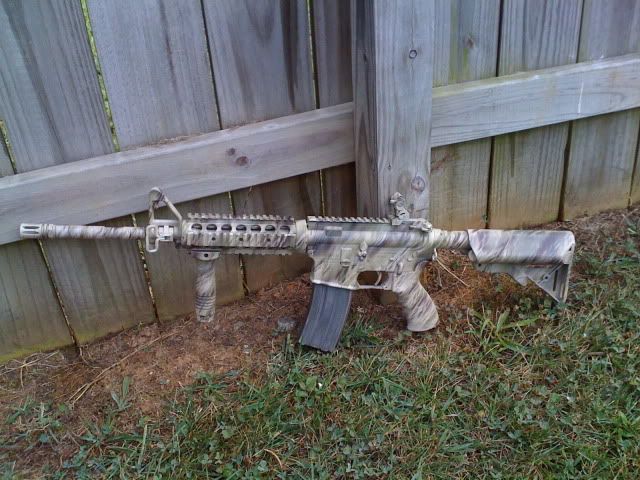
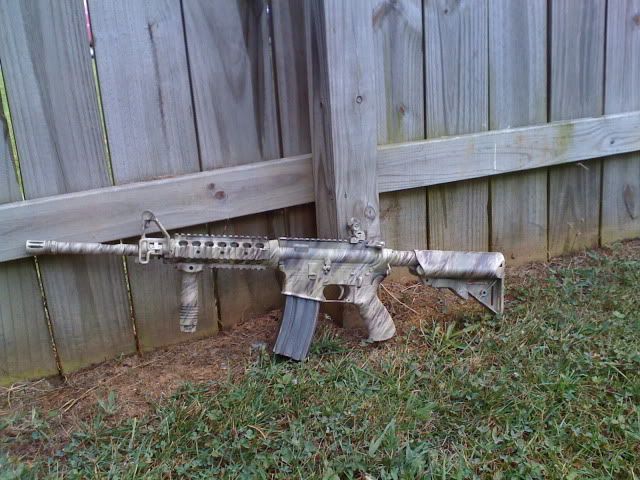

I just realized something which kinda makes me go "erps". I went at an angle, which I think gives the weapon slightly racier lines than straight up and down. Problem is, I wasn't consistent, and I've got it angled forward on one side, and backward on the other. Much like car rims, you can't see what's going on with the other side and technically it shouldn't matter, but it is something I didn't realize at the time of spray, and was unintentional. I went through a lot of testing before I broke out the pinestraw, and I'd like to relate what I found: In the tacked thread there are different methods of application, some people use wood to hold the needles at a set distance. When I did this I didn't get the defined "needle" pattern I was looking for, especially along the rounded edges of the rifle, . So, what I ended up doing was taking my pine needles (and I used a lot less than most) and holding them roughly in a line between my index and middle finger, which formed a thin broom-type bunch of needles. Then by holding these needles as close to the rifle as possible (if not touching outright) I laid on my spray at a distance of just a few inches, 6 or so tops. The only reason I didn't just flop them down on the rifle itself is because I have a limited amount of needles, wanted to be able to pull them off and observe what I was doing as I was doing it, and I was concerned that the buildup of paint on the needles would transfer through as blobs. I hit the rifle with green in stripes, then filled in with brown, then green again, and a little tan toward the end to give just a bit of highlight. The great thing is you can just keep alternating colors until you get it where you want, if you have a bit much of any one just keep mixing them up until you get what you're after. Worst case scenario is reapply the base coat and start over, or if too thick stripping it back down and really starting over. Regards, hw78 |
"Most people don't spend their lives planning how to survive the end of the world and then be able to fuck up small military units single-handedly on top of it". -Frost7
|
Originally Posted By halloween78:
(Reposted here for posterity per bjwar10) Once upon a time (3 years ago) I did a very, very bad job at prepwork and laid a very ugly ACU pattern of Duracoat, which began chipping almost immediately. I covered the abomination with black and tan spray paint, and in the past few months tried and mostly succeeded in stripping it clean. Of course, since then I've read through the Pine Straw thread repeatedly, and decided spray paint couldn't be harder to remove than DuraCoat, so I went ahead and took the plunge. Went with Rust-Oleum products, primer then Nutmeg (249070), decided it was "too brown" and resprayed a Fossil (249080) base and added textured Dark Olive (241253) and camouflage Earth Brown (1918). I don't think it's too shabby, but I may continue to tinker in the future, just on GP. http://i302.photobucket.com/albums/nn99/crownvic1983/Pinestraw001.jpg http://i302.photobucket.com/albums/nn99/crownvic1983/Pinestraw002.jpg http://i302.photobucket.com/albums/nn99/crownvic1983/Pinestraw003.jpg http://i302.photobucket.com/albums/nn99/crownvic1983/Pinestraw004.jpg I just realized something which kinda makes me go "erps". I went at an angle, which I think gives the weapon slightly racier lines than straight up and down. Problem is, I wasn't consistent, and I've got it angled forward on one side, and backward on the other. Much like car rims, you can't see what's going on with the other side and technically it shouldn't matter, but it is something I didn't realize at the time of spray, and was unintentional. I went through a lot of testing before I broke out the pinestraw, and I'd like to relate what I found: In the tacked thread there are different methods of application, some people use wood to hold the needles at a set distance. When I did this I didn't get the defined "needle" pattern I was looking for, especially along the rounded edges of the rifle, . So, what I ended up doing was taking my pine needles (and I used a lot less than most) and holding them roughly in a line between my index and middle finger, which formed a thin broom-type bunch of needles. Then by holding these needles as close to the rifle as possible (if not touching outright) I laid on my spray at a distance of just a few inches, 6 or so tops. The only reason I didn't just flop them down on the rifle itself is because I have a limited amount of needles, wanted to be able to pull them off and observe what I was doing as I was doing it, and I was concerned that the buildup of paint on the needles would transfer through as blobs. I hit the rifle with green in stripes, then filled in with brown, then green again, and a little tan toward the end to give just a bit of highlight. The great thing is you can just keep alternating colors until you get it where you want, if you have a bit much of any one just keep mixing them up until you get what you're after. Worst case scenario is reapply the base coat and start over, or if too thick stripping it back down and really starting over. Regards, hw78 Lookin' good  ... ...
I don't think it's such a bad thing the lines go in different directions...otherwise you would have a bunch of Xs on top and/or bottom. |
"What we have done for ourselves alone dies with us; what we have done for others and the world remains and is immortal"
|
Originally Posted By Wormydog1724:
http://i416.photobucket.com/albums/pp247/wormydog1724/IMG_0159.jpg http://i416.photobucket.com/albums/pp247/wormydog1724/IMG_0165.jpg http://i416.photobucket.com/albums/pp247/wormydog1724/IMG_0161.jpg Repainted my barrel and painted my harris bipod today. Very pleased. Not too happy with the scope now, looks too much green blobby.? Hey Wormy, that's nice grass and all, but what's with the picture of your yard?
|
Can I hunt it? No? Not interested.
We must find a solution to this Obamanation
Joined:
Feb 2005
Posts:
2675
EE: 100% (18)
TN, USA
|
Originally Posted By bloodsport2885:
For those that used Krylon, could you report on the long term durability of the paint, especially if a matte clear coat is added? I put pics of my shotgun and AR and my 10/22 all painted with Krylon above in my post, but I'll mention my AR specifically. I painted this rifle almost 3 years ago and I use it every year for predator hunting. I beat it up pretty good and it gets pushed through thick brush and such and it only has a few big scratches. I don't have a clear coat on it, and it is rubbing off on the back of the rubber pistol grip where my gloves rub on it a lot, but the metal paint is holding up strong. The best part is that if I need to touch it up it takes like one minute and I'm ready to roll. I haven't ever touched it up though . . . . 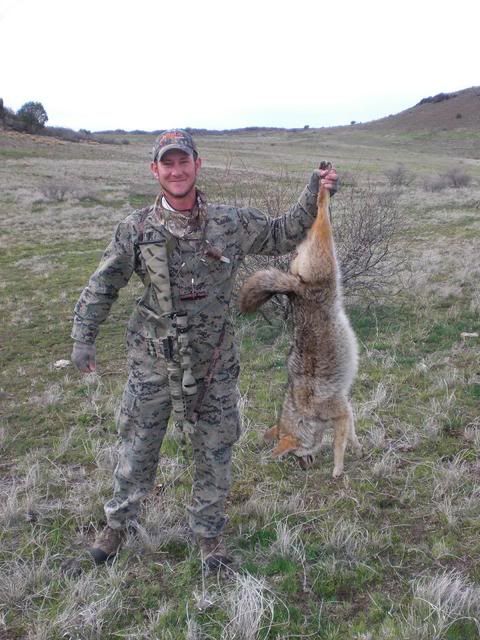
|
Can I hunt it? No? Not interested.
Pinestraw strikes again...now with brief TUTORIAL. (Page 5 of 11)
Armory Sponsor