NY, USA
|
[Last Edit: perimedik]
[#1]
Thanks for the inspiration.
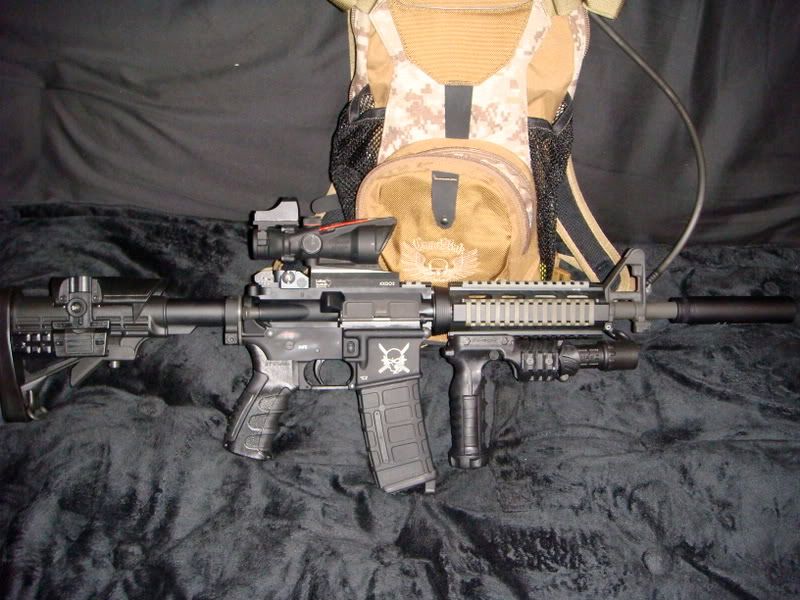
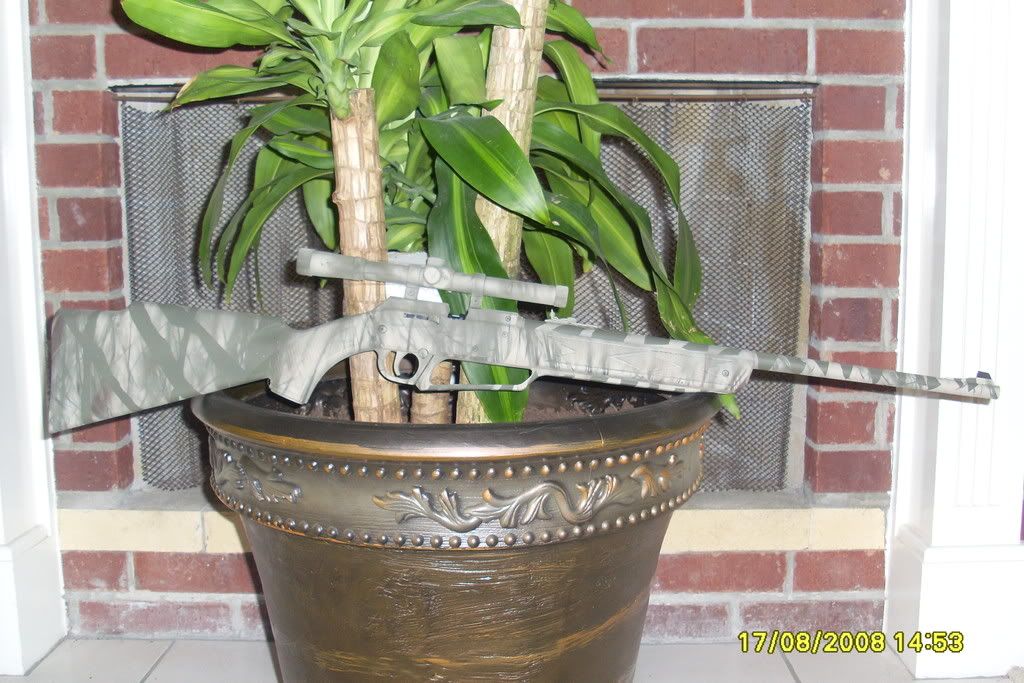
Wanted to keep the wood grain, I thought it would add to the character keep it unique, and it did. When I was spraying it, god damn canadian geese kept flying over head mocking me  ETA outdoor pics 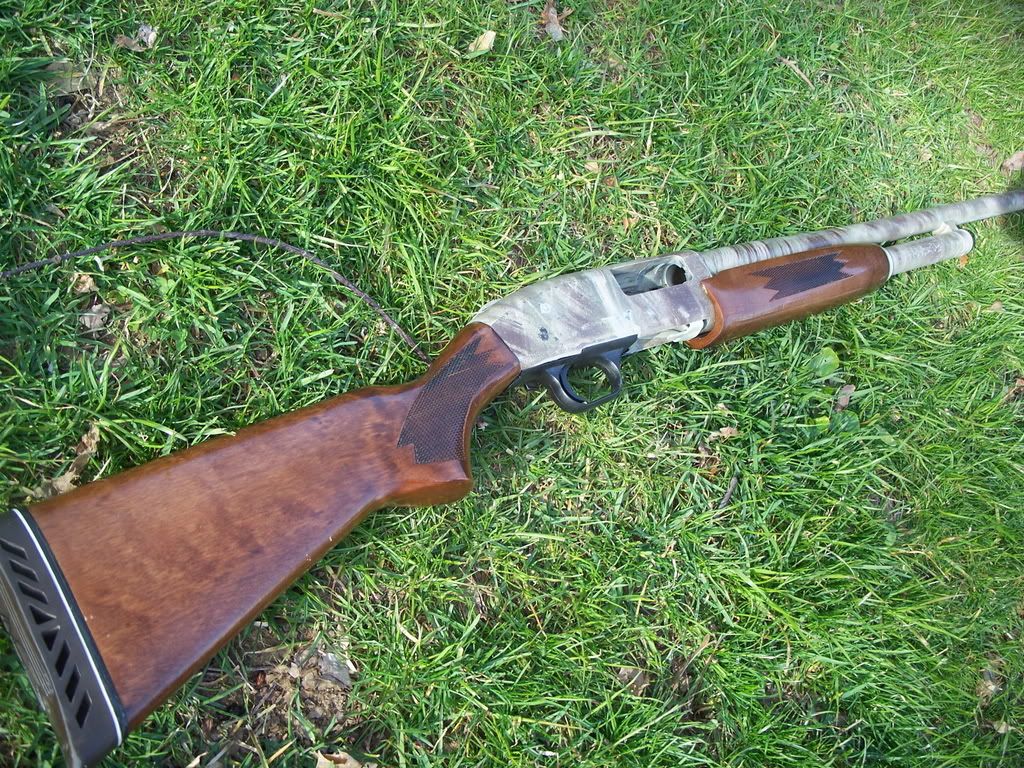 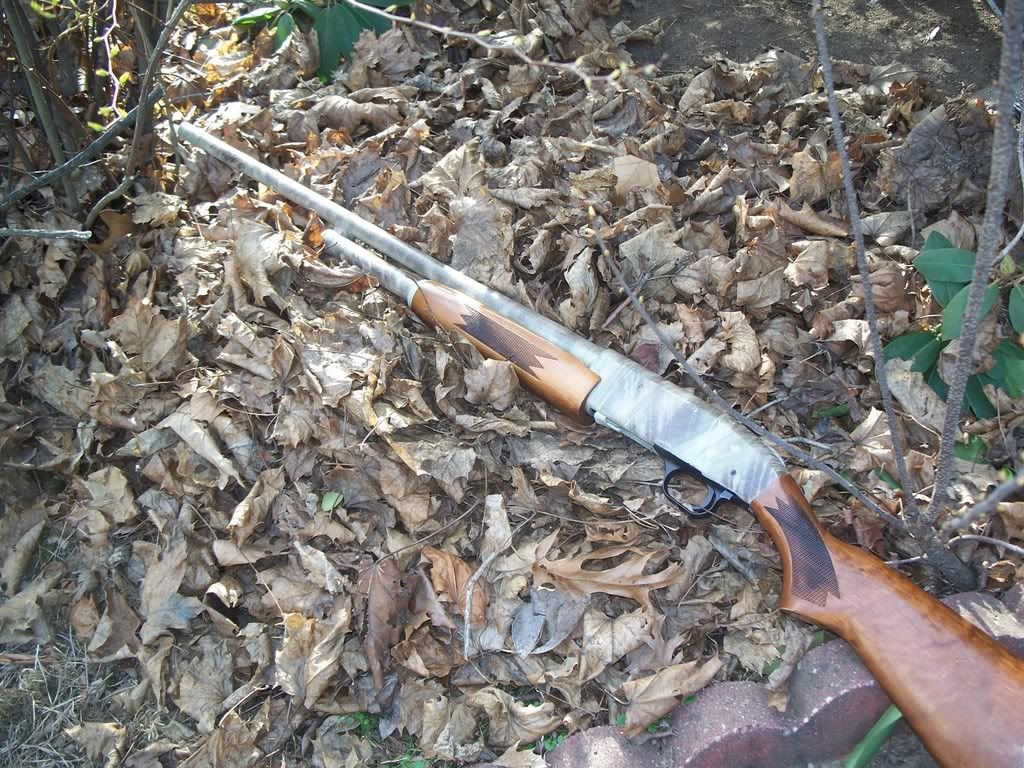 |
|
|
OH, USA
|
[#2]
OK, so I decided to try this out on a wood gun before I try it on my real gun.
Please tell me what you think.     |
|
|
AL, USA
|
[#3]
Just my preference but I think you have too much color...from a distance it will most likely be a dark blob. You might try this. I assume you are using the tan as a base coat. After putting the pine needles (or whatever you used) on the rifle, make a stripe with your OD then next to the OD make your brown stripe then skip a stripe width and then hit it with the OD again. Repeat until you get to the end. I also like to start with a good bit of pinestraw. If I need/want some more color, I can always remove some pine needles and hit it again or simply add a few more stripes. One more thing to think about...if you want the rifle to be mostly OD for example, then use OD as a base coat and stripe it out with the tan and brown. I made a few practice tries with OD as my base coat but it turned out very dark...darker than I wanted so I went with the FDE as a base. Lastly, as long as you are happy with it and it does the job you want, it will be fine. This is the VLTOR that I just did. If you connect the dots you can see direction of the stripes I made.   |
|
|
|
|
[#4]
bjwar you are the man...plain and simple 
|
|||
|
|
|
[#5]
I agree. More color than I would use, but I'm by no means an expert. Tan base coat with light coats of green and brown at varying angles. I did some light overspray/misting of OD to give it more of a green appearance, but it isn't overwhelming. My practice runs looked nothing like the stock on my Mini. They looked like blobs of color.
|
|
|
|
NY, USA
|
[#6]
Went to the range today with the painted shotgun. It was fun and had no function problems however i will have to clean it a bit. I completely disassembled the gun and did all the parts when i painted it.
I'm cleaning it tonight but I am going to strip paint off of the slide bar (sticks a little, no longer smooth), the cartridge stop, extractor, elevator and the inside of the receiver. The bolt and bolt slide work fine (didn't paint them) but you can see some paint on them from the friction. Keep that in mind if you are going to completely disassemble to paint.
|
|
|
OH, USA
|
[#7]
thanks for the inspiration guys, i painted my savage 10FP .308 last week and my buddies stevens 200. here are some pics of my savagehttp://inlinethumb32.webshots.com/23839/2413601610057938534S600x600Q85.jpg
http://inlinethumb48.webshots.com/43119/2740350100057938534S600x600Q85.jpg http://inlinethumb27.webshots.com/42714/2122045640057938534S600x600Q85.jpg http://inlinethumb49.webshots.com/42288/2503839100057938534S600x600Q85.jpg |
|
|
|
[#8]
I've got a 10FP in .223. Resisting...must...paint...it!
|
|
|
|
NY, USA
|
[Last Edit: perimedik]
[#9]
Did this a few weeks ago and it all peeling up.
Krylon Paints after about 25 rounds and took it home to clean. I Was very careful about powder solvents and the CLP to lube. Dunno, 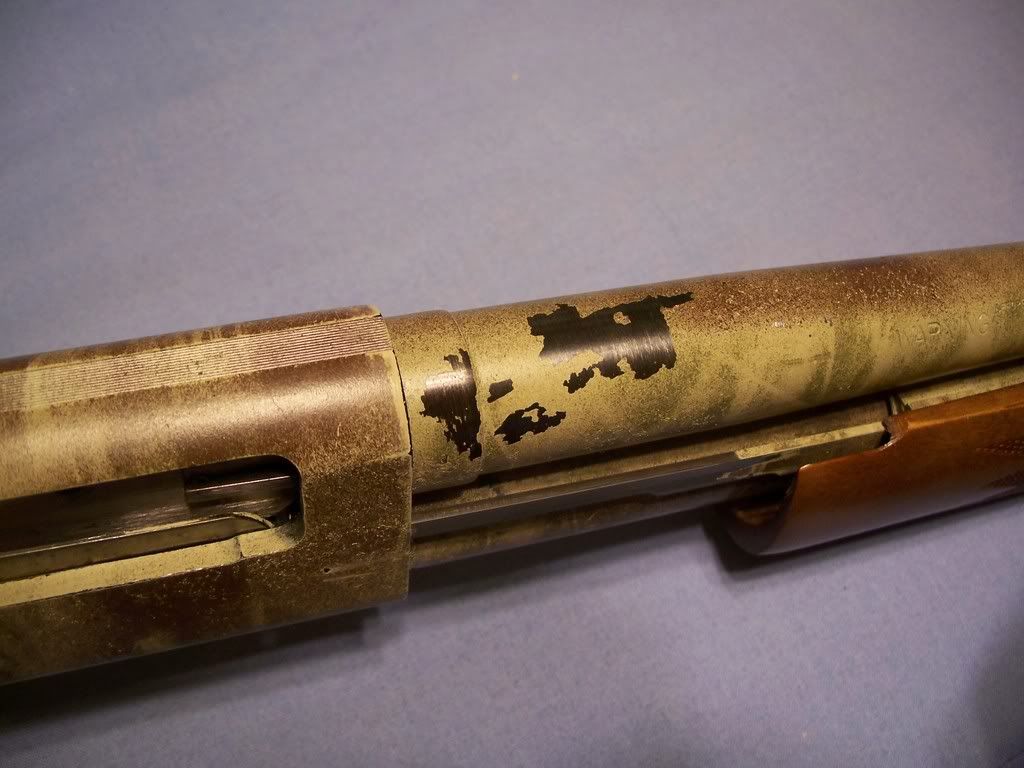 Thoughs? Looks like I'll have to strip it down and buy some more Duracoat. |
|
|
|
[#10]
These are all very cool jobs, everyone. Nice work. Has anyone tried the same pattern but in urban camo colors?
|
|
|
|
AL, USA
|
[#11]
My krylon wears a little but I don't really notice it since the Norrell's base coat is still there and it is very easy to touch up the krylon. Have you thought about putting a flat clear coat over the camo? I've never tried it but I've seen/heard of guys here doing it and saying that it helps the durability. |
|
|
|
KY, USA
|
[#12]
Here is a 410 I did for a friend of mine's son. Colors are duracoat. Base was Magpul FDE, then Aug Green, dark brown mix, and combat green.

|
|
|
TX, USA
|
[#13]
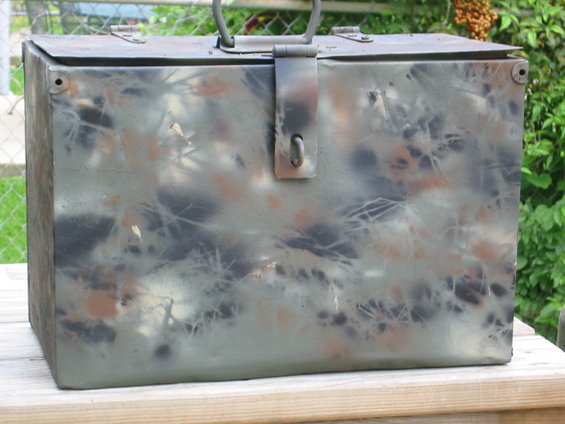
okay, so idunno if I can post these up since it isn't a rifle. But I thought I would try to get in some kylon practice in today with my ammo cans. Not exactly wha tI wanted, but I picked up some lighter tan to throw in there and tomorrow I will take pictures before dark so they don't look like ass.
I used some hay I had, sticks and shruggery from arround my yard. suggestions/help very welcome.   I ahve two more ammo cans to practive on, a lock box for gun powder and maybe an icecehst before I decide to hit a rifle up. |
|
|
PA, USA
|
[#14]
Thanks to OP bjwar10 for his very helpful tutorial and photos. Here's my test mag shot with Krylon Camouflage Khaki, Brown and Olive using pine needles.
  Next comes the carbine! |
|
|
AL, USA
|
[#15]
You're welcome...good looking mag. Don't foget to post some pics of your rifle here when you finish it. |
|
|
|
AL, USA
|
[Last Edit: bjwar10]
[#16]
As I mentioned in your other thread, some lighter colors would help break up the outline instead of it looking like a dark blob. Honestly there is no right or wrong way to do it. It simply depends on what look you are going for. Post more pics when you have the chance to spray some other stuff. |
|
|
|
TX, USA
|
[#17]
 that any better? Looking for more things to spray. Kinda running out of cans. I might hit a tool box next or just order more ammo cans. I can always use more I guess. |
|
|
AL, USA
|
[#18]
You got any pieces of cardboard? During my experimental stage I cut out some cardboard in the shape of my rifle and sprayed those. |
|
|
|
MI, USA
|
[Last Edit: kchamp84]
[#19]
I figured I'll add an AK to the pinestraw club...
I like it...  Before/After:  Thanks for the insp. |
|
|
|
[#20]
I went turkey hunting this morning (outwitted again!) and was looking at a small scratch I had gotten on my new Browning BPS 3 1/2". I really don't want to duracoat it.
|
|
|
|
|
[#21]
Totally awesome AK !!!
|
|
|
|
MI, USA
|
[#22]
Thanks! |
|
|
|
FL, USA
|
[#23]
As promised. M1a Broomstraw finished. (Minus optics, BUIS, and Bipod)
http://farm4.static.flickr.com/3130/2522771597_771b70831c.jpg?v=0 |
|
|
AL, USA
|
[#24]
That looks great!! How about a few more pics...close ups and some outside possibly... |
|
|
|
FL, USA
|
[#25]
Thanks BJWAR here are some closeups. I will be away from home for a few months playing in sand if you know what I mean and won't be able to get some outside pics. Here are the closeups. Thanks again for your ideas and creativity!
http://farm4.static.flickr.com/3055/2523682823_d359284ddd.jpg?v=0 http://farm4.static.flickr.com/3238/2524505728_0199963d5c.jpg?v=0 I made some changes to the original color. I didn't care for the white color and went back over it with some light tan. Can't wait to shoot it when I get back home! roldog |
|
|
AL, USA
|
[#26]
Again, very good looking work. Stay safe... |
|
|
|
|
[#27]
Hello,
I was just looking through the refinishing forum and I saw the pic of your AK. Those are perfect colors for what I am trying to do. Would you mind telling me what colors and brand you used? Also, maybe a few pointers on your technique? That pattern and colors would be perfect cammo for the area I live in. Thanks, Jeff |
|
|
|
NY, USA
|
[#28]
here is a savage .223 I did for a friend
http://i168.photobucket.com/albums/u192/Mosin-Lover/005-2.jpg |
|
|
FL, USA
|
[#29]
before
 after 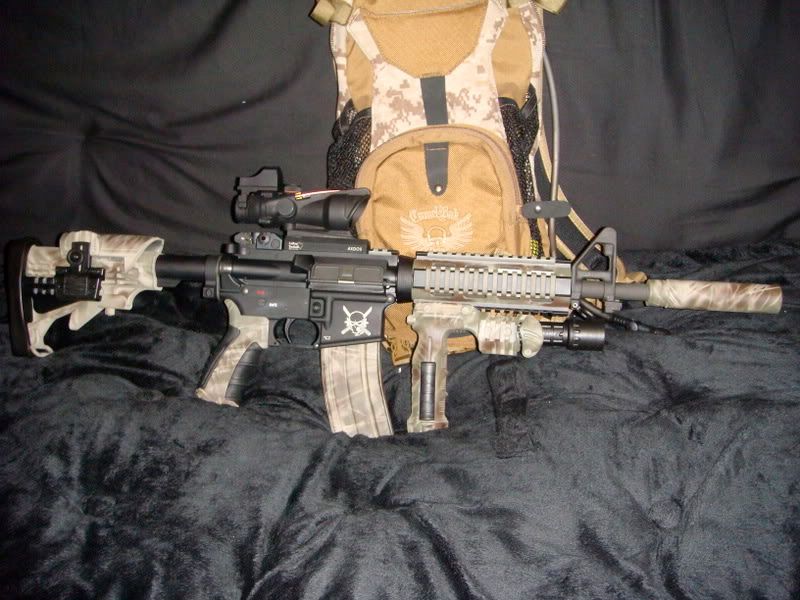 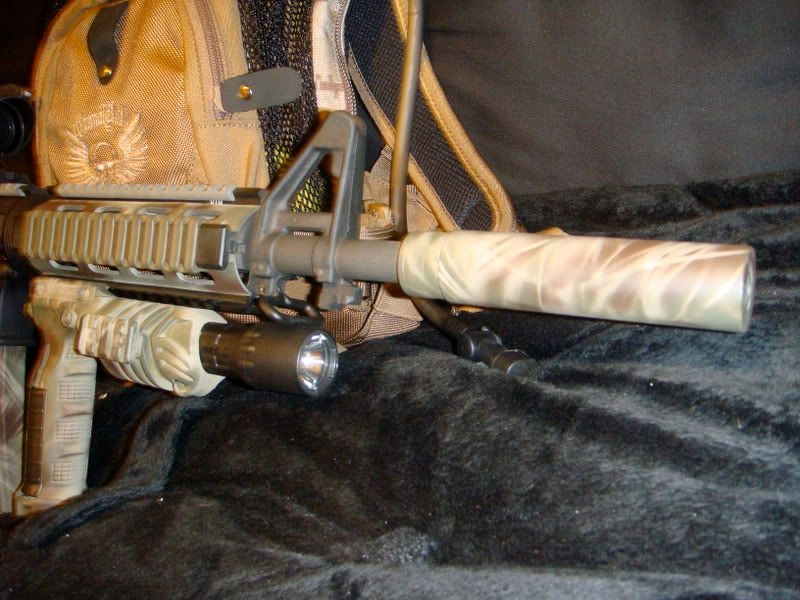
|
|
|
TX, USA
|
[#30]
How do you like that VFG/light ? |
|
|
|
FL, USA
|
[#31]
rock solid! No wobble. Storage for 2 batteries. The price- You can't beat it. Only problem is changing batteries in light. Need allen wrench to get light out. Must carry one with you at all times. Other than that, works great.
|
|
|
MO, USA
|
[#32]
Just finished her 2 nights ago, what do you all think?
http://i304.photobucket.com/albums/nn192/deltaARman/Armalite/ar10T002.jpg http://i304.photobucket.com/albums/nn192/deltaARman/Armalite/ar10T001.jpg |
|
|
AL, USA
|
[#33]
Looks good to me... 
|
|
|
|
|
[#34]
Had another Member Lawman734 did base in duracoat OD green...then I got the rattle can out...1st time paiting a gun
   
|
|
|
|
|
[#35]
Here's my pinestraw(ish) paint job. I used local brush and twigs and stuff instead of pine nedles or broom straw. I am really happy with the result. I've got this posted in a couple other places but it belongs here too.
Before:  After: 
|
|
|
|
|
[#36]
Here is my rifle after pine straw/corn broom method. I used the corn broom from Walmart.

|
|
|
|
TX, USA
|
[#37]
A little off topic, but not too far.
I am building a HEAVY DUTY mail box. Been some punk kids knocking mail boxes over in the area. I Welded up a mailbox out of Sched 80 pipe (8") and some 1/4" plate and stuck it on a big ass pipe. It looks on the outside like a normal mailbox. I am considering applying this technique to that project. Probably going to use some pompas grass for the pattern. Has anyone applied this technique to larger flatter surfaces such as I will face on this project? Are there any special considerations to working with a flatter area? |
|
|
AL, USA
|
[#38]
When I was experimenting on cardboard, I found that spraying 2"-3" wide stripes in a diagonal with alternating colors looked the best to me. I tried some random splotches but didn't really care for it. I guess it boils down to the "look" you are going for. I would think the larger blades of pompas grass should work well on larger surfaces and maybe call for stripes wider than 2-3 inches. When all else fails, practice on some templates...good luck. |
|
|
|
|
[#39]
bump
sw1217 |
|
|
|
|
[#40]
tagged for future project.
|
|
|
|
|
[#41]
Pictures of my son and his Newly camo'd air rifle. BTW He wanted me to let Y'all know he helped paint it.
  And him with his rifle and a special message to Obarryama ~N~ Joe Bidin-his-time  We used rattle can OD Green, Desert Tan, & a hint of Ultraflat Brown. I painted the base coat W/ OD and let him stick pieces of painter's tape on the Buttstock, Pump, and Barrel. Then I cut up a broom and let him do his thing. Everything except the basecoat is his doing. Not bad for a ten year old. sw1217 |
|
|
|
TN, USA
|
[#42]
He did a great job! Good looking air rifle. Now he can hide in the bushes and when they come for your guns he can shoot em in the lower area where the dangely things are. LOL, you go boy!
|
|
|
|
[#43]
 When I read that to him he looked like the cat that could not wait to eat the canary. Thanks for the kind words for my son. sw1217 |
|
|
|
TX, USA
|
[Last Edit: P220C]
[#44]
Khaki Basecoat (cheap rustoleum/Krylon)
OD Green (regular rustoleum) Flat Brown (regular rustoleum) Pompas Grass instead of pine straw Getting my Mossberg 835 ready fro dove season...     |
|
|
|
[#45]
Your pine needle camo works great! Tried it on my S&W 3000 shotgun and it came out great. I'll post pictures as soon as I get it reassebled (did the pump hand guard separate so I could get a better pattern on the mag tube and barrel).
Tom |
|
|
|
AL, USA
|
[#46]
|
|
|
|
TX, USA
|
[#47]
couple pages back has a few ammo cans and a powder pox i did. just rattled it out using hay, some leafs and grass. i screwed up and started with the wrong base coat though. so I am not sure it will be a good representation. |
|
|
|
|
[#48]
Yeah, I think I am going to give this method a try in the near future.
|
|
|
|
|
[#49]
Thanks to this post. I was able to do a couple of stocks below.
 
|
|
|
|
TN, USA
|
[#50]
 Well, not pinestraw, just straw. Basecoat, straw, and three other colors |
|
|
 Win a FREE Membership!
Sign up for the ARFCOM weekly newsletter and be entered to win a free ARFCOM membership. One new winner* is announced every week!
You will receive an email every Friday morning featuring the latest chatter from the hottest topics, breaking news surrounding legislation, as well as exclusive deals only available to ARFCOM email subscribers.

AR15.COM is the world's largest firearm community and is a gathering place for firearm enthusiasts of all types.
From hunters and military members, to competition shooters and general firearm enthusiasts, we welcome anyone who values and respects the way of the firearm.

Subscribe to our monthly Newsletter to receive firearm news, product discounts from your favorite Industry Partners, and more.
Copyright © 1996-2024 AR15.COM LLC. All Rights Reserved.
Any use of this content without express written consent is prohibited.
AR15.Com reserves the right to overwrite or replace any affiliate, commercial, or monetizable links, posted by users, with our own.


