


Armory Sponsor


DIY Annealing Machine (Page 6 of 17)

|
wow dave your video really shows how far off the two motors are! looks good. |

|
Originally Posted By tstuart34:
wow dave your video really shows how far off the two motors are! looks good. Originally Posted By tstuart34:
wow dave your video really shows how far off the two motors are! looks good. Looks like you have it running great. I found if the case feeder is just one or two numbers lower than the pan motor it won't catch up and double feed. Eventually it may miss a case, but that is better than feeding two at one time and trying to fish it out of the hot ones. |

|
Some progress while waiting for parts.
Fitted bushing to be epoxied in. 
Fitted coupling with super stepped hub. 


Super stepped hub allows to install .200 Lexan spacer without changing pans, made to 4.75 inch diameter. Lexan will not touch pan. Made with a .182 step that will allow the use of .300BLK cases with a standard reloading die nut. Lee aluminum in this case. This puts the .300BLK case out the same distance as the .223/5.56mm case without havin to remove and change pans. 


Lexan backing plate 
|
|
Originally Posted By RLR350:
Nice job on the bushings. I'm not quite getting the lexan spacer and one pan. I guess I'll have to wait to see it installed with a pan. The bushings are great. It solves the problem I had with the flexing coupler. Looking forward to the end product. Originally Posted By RLR350:
Originally Posted By Flashbang1:
Some progress while waiting for parts Nice job on the bushings. I'm not quite getting the lexan spacer and one pan. I guess I'll have to wait to see it installed with a pan. The bushings are great. It solves the problem I had with the flexing coupler. Looking forward to the end product. Yah, you and me both will have to wait and see. It all works out on paper. The numbers workout perfect with a 1.25 depth pan that will do .223/5.56mm, .308, 30-06, 22-250 and similar that will hold the case mouth no less than .500ths of a inch from the edge of the pan. A .300BLK case is .382ths of a inch shorter than the shortest case listed above (.223/5.56mm). To close to the pan edge (.118ths of a inch past the edge) to anneal. A shorter pan will correct this or a spacer in the back of the pan that reduces the depth of the pan by .382ths of a inch will have the same effect. This puts the .300BLK case mouth the same .500ths of a inch past the pan edge as the .223/5.56mm case. The pan gets sandwiched between the super stepped hub and the fitted coupling and bolted through with a 5/16 bolt to be never removed in theory. The super stepped hub has a built in .182ths of a inch deep step and is 1.500 in diameter. The lexan is .200ths of a inch. Add that plus the step it sits against and you have a total of .382ths The bore diameter of the lexan is 1.25 and the shelf on the super stepped hub it sits on is just under the thickness of the lexan so the large 7/8x14 reloading die nut can keep it sandwiched snugly. Look at the photos and it should make sense. Hard to show without the pan. Hope this help out. |
|
Got it painted and back together. When I was at the Hardware store, I got some pretty screws for the face. Torch holder should be here shortly, I hope. One of the motors locked up on Me. got it to free up, think I will order a spare or two.
I'd like to thank RLR for all the help, and the OP and El Skippo for the idea. I was trying to figure if I could justify the expense of a Giraud, or Benchsource, couldn't get Myself to drop that kinda coin. But, problem solved. I'll put together a parts list for Anyone Who is interested. Like I say, a 5/16th threaded coupler, 8mm drill bit, worked awesome for the pan coupler. I'll get some pic's of it. Turned out to be a cheap and easy fix for Me. 

Got the switch wired in. 

|
|
Short list of goods I needed to order. Everything else was sourced local. I used only to vendors Mcmaster-Carr which has the best prices even on tempilac and Amazon. All goods shipped from the states except the motors.
Amazon Unique Goods - 6V/12V/24V/30V Digital Display LED DC Motor Speed Controller PWM Stepless Speed Control Switch HHO RC Regulator- Black CCM5D $12.69 Fat Daddio's Anodized Aluminum Round Cake Pan, 5-Inch x 3-Inch $6.78 DSHL supply Generic High Torque 12V DC 25 RPM Gear-Box Stabilivolt Electric Motor Replacement $8.98 ea. 2 for $17.96 free shipping. Received in 8 calendar days from China, which included a Holiday. Not bad. Mcmaster-Carr 3261K93 Temperature Indicating Liquid, 750 Degrees Each $17.10 8572K27 White Delrin (R) Acetal Resin Rod, 1-3/4" Diameter, 1' Length 1 Foot Per Foot $13.77 30565A305 Metric Black&gold Oxide High-Speed-Steel Jobbers Drill Bit, 8.0MM, 114MM Oal, 79.8MM Drill Depth, 135 Degree Point Each $5.19 8982K88 Multipurpose 6061 Aluminum, 90 Degree Angle, 1/8" Thick, 1" X 2" Legs, 2' Long Each $6.58 8974K22 Multipurpose 6061 Aluminum Rod, 1/4" Diameter, 2' Long Each $2.55 |
|
Looks great ChevelleDave.
A few more minor things and you will be done. Good luck with it - I think the whole thing is pretty simple and inexpensive in comparison, while still accomplishing the same thing. Now that there are several builds, and in anticipation of the future builds, this thread covers just about everything for others to replicate without any problems. The nice thing is even going all out on parts it is still right around $150, give or take. I think I will be following your lead on the coupler. You ended up using the one from the link you posted right? I like what Flashbang did, but it's too complicated for me to build without the tools or experience (although I did get a lathe for Christmas; a little late for this project.) TStuart - thanks again and I sent that torch holder out today via USPS. |
|
This,
Threaded rod coupler All I did was drill one end out halfway through with an 8mm drill bit, drilled and tapped it to land the set screw on the flat, and the pan bolt screw's in the other end. I held the back side with a wrench and tightened the pan bolt with a socket. Probably not necessary, but I won't be changing it very often. |


|
Thanks for all the vids and pics. I am sourcing the parts and hope to build one in the coming months.
I emailed a few local plastics companies and found a local source for delrin rod for $10.50 a foot |
-There are old reloaders and careless reloaders, but there are no old, careless reloaders-

|
Originally Posted By ChevelleDave:
I had the back off Today working on the pan depth, took this shot of My homemade coupler. http://i1302.photobucket.com/albums/ag124/71metbu/DAVE-PC/Reloading/IMG_20150108_125521074_zpsmxzozubs.jpg One of My Motors is crapping out, something in the gear drive, ordered two spares.  Image not showing up. V |

|
The first post has a stupid Photobucket message that says you moved or deleted your image. I can see the second one just fine. I've been having trouble with Photobucket this week too. It did that to one of my older videos in another forum the exact same way. So I reposted the video and suddenly it reappears just fine in both posts, making me look like an idiot.
Something's not working normal with Photobucket right now. |
|
Originally Posted By aztroop:
Guys, I've ordered my electronic parts from China and I'm waiting for them to arrive. I'm not an electronics guy. How hard is it to do the wiring? It's simple. I'll draw up a wiring diagram and post it in the near future. To get you started you will need a three prong plug. You can cut one from an old appliance or computer. You also need some small gauge wire. I bought a roll of four wire intercom cable from Radio Shack. Since it is all together it keeps things a little easier to follow and neat. However, any single strand small wire will work. Intercom wire Here is a video on the power supply. What he hooks up to the controller will go to the well marked power inputs on your controllers. The motors are hooked up to the output of each controller. Power Supply Hook Up |
Here you go. Watch the video for the power supply to hook up the power cord. The controllers are clearly marked "power" and "motor". The switches are connected to the controllers when they arrive. Don't pay attention to the coloring of the wires in the diagram, they are different colors so you can follow their path.

|
|
Originally Posted By RLR350:
Here you go. Watch the video for the power supply to hook up the power cord. The controllers are clearly marked "power" and "motor". The switches are connected to the controllers when they arrive. Don't pay attention to the coloring of the wires in the diagram, they are different colors so you can follow their path. http://i369.photobucket.com/albums/oo134/rlr350/Wiring_zps59751d74.jpg Thank you! Can't wait for my parts to get here. |
|
Remember,
Before you attempt to wire the CCM5D DC Motor Speed Regulator controller, make sure power is off. WARNING: DO NOT REVERSE POSITIVE AND NEGATIVE POWER LOADS.THIS WILL DAMAGE THE CONTROLLER. Little progress. 
Back side clearance cuts for feeder drum motor mounting plate and screws. 
I used spacers to keep pan motor square to board. 
|
|
Originally Posted By Flashbang1:
Remember, Before you attempt to wire the CCM5D DC Motor Speed Regulator controller, make sure power is off. WARNING: DO NOT REVERSE POSITIVE AND NEGATIVE POWER LOADS.THIS WILL DAMAGE THE CONTROLLER. Little progress. http://i697.photobucket.com/albums/vv337/flashbang1/annealer/04F8EAC2-3C98-4183-A2F3-ADE5D05AF27E.jpg Back side clearance cuts for feeder drum motor mounting plate and screws. http://i697.photobucket.com/albums/vv337/flashbang1/annealer/250D60E0-19ED-4316-9EB3-A2EF1CB02519.jpg I used spacers to keep pan motor square to board. http://i697.photobucket.com/albums/vv337/flashbang1/annealer/5EAD3FD6-DF95-4A04-9D98-AEA9884EE66C.jpg Thanks for the warning. I'll make sure I don't reverse the polarity. |
|
I bought some red and white garage door wire. Very easy to wire, red to red to positive, white to white to negative.
I also put connectors between the motor and speed controller so I can remove the control panel without having to unhook the wires from the controller. |
|
Just about finished. This is my slimed down nasty version. Holds 210 .223/5.56mm cases. Enough for me.
Pan rough cut 
Finish cut 1.25" 
Lexan cut out 
Lexan painted. Like a dumb ass rushing I mistakenly painted the outside of the control panel lexan. It will do. Edit to add remade plate and painted proper side (OCD strikes again). 
Feeder backer board and shot of custom torch holder and bracket. Also custom heat sink for case rest rod that is adjustable and easily removeable with thumb screw. 
Inside quick connection plugs. 
All together 


I shall call her Little Blue Nasty Thank you OP for the idea and all the rest of the contributors here. |
|
Originally Posted By RLR350:
Excellent Flashbang1! Looks really good. What are you going to do to hook the torch up? The hose and side carrier I found at Home Depot and Lowes cost about $20 total, but make the unit self contained. Thank you. Going with the extension hose kit from Home Depot from your idea. I'm also going Ghostbusters style with the tank carriers I bought at Lowes. Mounting duel carriers on the back and a small box to hold the Tempilac bottle. Haven't figured out what box to make or use yet for the Tempilac bottle. Open to suggestions. I found the perfect torch with the perfect angle and knob setup I want to get but can't get past the price yet. It's called a swivel torch, here is a pic of one. 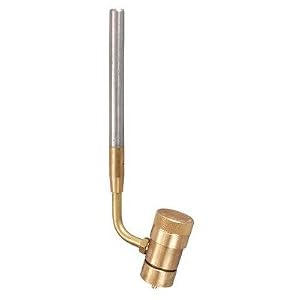
I'll update as time allows. Thanks again to your help and ideas and everyone else's input here, I could not of done this without this forum. As a note to all: I have more photos but I do not want to hijack the OP's thread and clutter it up. I can not figure out how to make the pics smaller with my photobucket app I use or I would. If the pics are to big or too many let me know and I can remove them as I don't want to stomp all over the thread. Any questions, ask away as I'm sure I'll have more. |
|
Originally Posted By chrisben:
So how long are you guys figuring that the smaller propane canisters are going to last? I'm wondering if it's worth hooking up to a 20lb grill tank. A full smaller propane cylinder should last for several hundred cycles. Also you can buy an adapter that will allow you to refill a smaller cylinder from a 20lb cylinder. V |

Global Warming Hoax Skeptic before it was cool
Joined:
Jun 2007
Posts:
33102
EE: 100% (1)
 WA, USA
|
Originally Posted By Vinny302: A full smaller propane cylinder should last for several hundred cycles. Also you can buy an adapter that will allow you to refill a smaller cylinder from a 20lb cylinder. V Originally Posted By Vinny302: Originally Posted By chrisben: So how long are you guys figuring that the smaller propane canisters are going to last? I'm wondering if it's worth hooking up to a 20lb grill tank. A full smaller propane cylinder should last for several hundred cycles. Also you can buy an adapter that will allow you to refill a smaller cylinder from a 20lb cylinder. V What I'm using and where I got mine, http://www.harborfreight.com/propane-bottle-refill-kit-45989.html Mine works fine. |
Selling agent for Algores carbon credit scam.
Shooting and Reloading, one hobby feeds the other.
Shooting and Reloading, one hobby feeds the other.

|
A little bit better.
Other swivel torch head This might be the ticket, I think I will just get started with what I got though. Amazon Bernzomatic |
I cut My pan down to 1", feeds both .223 and 300 Blackout fine. I need to thread more of the rod, so I can tuck it in some. I like Flashbang's exterior adjustment method, need to look into that. I need to thread more of the rod, so I can tuck it in some. I like Flashbang's exterior adjustment method, need to look into that.
Feeding .223 Feeding 300 Blackout |
|
My case rest rod is 1/4 aluminum and it gets screaming hot on my test run of about 10 minutes. My heat sink aluminum block gets hot also.
I can adjust it in towards the pan a little closer but the sweet spot to hold cases is not there. I found I get about 1 in a hundred .223/5.56mm cases pop sideways if I'm in too much and speed is up. I'm shooting for 100% because I have been cursed with OCD and I hate it sometimes. At 12VDC a setting of 42% on the pan pot just melts the 750 degree tempilaq with my torch setup. I found the rod has to be contacting the case body fully to the point where it meets the shoulder for 100% function. Because of the radius at the bend, the apex on the outside of the bend will be at or slightly past the case mouth for the rod to contact the full body of the case. It hasn't deformed but I may change over to a steel rod. I am still experimenting with the setup but set like this I get my 100% function and can sleep at night. Below is a pic of full body contact as a visual aid as I may not be the best of explaining things. The red dot is the outside apex of the bend. 
|
|
Originally Posted By Flashbang1:
All together http://i697.photobucket.com/albums/vv337/flashbang1/annealer/55D08503-349D-4ABB-8E1F-5B1A933819F0.jpg Can you tell me what size angle stock you used for the feed ramps/funnel? It looks perfect! |
|
I'm all finished except for a power switch.
*Edit to add power is complete. Using a 12vdc 500mA wal wart. Bought female M socket and male M plug from Radio Shack. Drilled female socket in lower back panel. Looks perfect. Questions to answer. Yes, good idea, maybe a SS case holder rod is the way to go if I can source one locally cheap. The aluminum one seems to be holding up so far. The aluminum angle I used s 1/16 thick 2X1/2inch. The 1/8 inch thick aluminum was just too thick for me and unnecessarily heavy for the job it does. I bought a 1/16 inch thick 2 X 2 inch piece of aluminum angle at Home Depot and cut the one side down to half inch. Some pics of the torch setup and Ghostbusters style tank holders. Please note I'm not a professional photographer and lighting is poor. 


|


DIY Annealing Machine (Page 6 of 17)
Armory Sponsor