


Armory Sponsor

DIY Annealing Machine (Page 7 of 17)



|
Originally Posted By rcav8r:
Let me rephrase that...position the torch holder behind the head. That way the won't spread so quickly on the holder. I don't think that would matter. It is behind the flame and doesn't heat up that much on mine. The case holder rod that Flashbang showed does heat up, especially if there isn't a case in the drum. I don't think it matters much, but after running it for awhile we will all find out I guess. |
|
Flashbang1. Pretty neat upgrades. Where did you get the angled adapters for the torch hoses? Do you have a lot of hose rolled up inside the unit?
I'm curious from a metal working point of view, how did you cut the angle iron (tool, blade)? That was the limitation I had. I preferred not using the thickness that I did, but it's all I could find that didn't have to be cut. |
|
Originally Posted By RLR350:
I don't think that would matter. It is behind the flame and doesn't heat up that much on mine. The case holder rod that Flashbang showed does heat up, especially if there isn't a case in the drum. I don't think it matters much, but after running it for awhile we will all find out I guess. Originally Posted By RLR350:
Originally Posted By rcav8r:
Let me rephrase that...position the torch holder behind the head. That way the won't spread so quickly on the holder. I don't think that would matter. It is behind the flame and doesn't heat up that much on mine. The case holder rod that Flashbang showed does heat up, especially if there isn't a case in the drum. I don't think it matters much, but after running it for awhile we will all find out I guess. This is correct. Placement of the torch clamp wouldn't effect the flames direct path to the case holder rod. The torch holder clamp doesn't get much more than warm. |
| So if memory serves, the hottest part is going to be just in front of the visible flame, right? Do we have any welders or plumbers in the house that could speak to that? Perhaps backing the torch off so that the heat is starting to drop off a bit before it hits the case holder? |
|
Originally Posted By RLR350:
Flashbang1. Pretty neat upgrades. Where did you get the angled adapters for the torch hoses? Do you have a lot of hose rolled up inside the unit? I'm curious from a metal working point of view, how did you cut the angle iron (tool, blade)? That was the limitation I had. I preferred not using the thickness that I did, but it's all I could find that didn't have to be cut. Torch hose adapter fittings were modified street brass 1/8MIP X 1/8FIP. Extension hose is the key also. Depot sells the same brand same model number but some are not threaded on both ends. I had to go back and get the double threaded one. Yes, hose is coiled inside box. Yes indeed, the problem lies in the dimensions with the thickness. I have the thicker angle aluminum but decided against it since my box is a smaller slimed down nasty version. I don't think it would look good. Nothing wrong with the bigger stuff, just personal preference. I cut it with a bandsaw quite quickly and easy. Could be done with a wiz wheel or hacksaw also but slower. |


Global Warming Hoax Skeptic before it was cool
Joined:
Jun 2007
Posts:
33162
EE: 100% (1)
 WA, USA
|
Originally Posted By olekennyroy: Any reason for having two motors vs one and a belt drive? IIRC, it was easier to control motor speeds.
|
Selling agent for Algores carbon credit scam.
Shooting and Reloading, one hobby feeds the other.
Shooting and Reloading, one hobby feeds the other.

|
Originally Posted By RLR350:
Flashbang1. Pretty neat upgrades. Where did you get the angled adapters for the torch hoses? Do you have a lot of hose rolled up inside the unit? I'm curious from a metal working point of view, how did you cut the angle iron (tool, blade)? That was the limitation I had. I preferred not using the thickness that I did, but it's all I could find that didn't have to be cut. Depending on if You have a table saw, and/or quality, You can rip it with an old blade easy. I got an old Dewalt table saw and chop saw I use for framing. That's how I made all My cuts. I found My piece in the rem bin at My local steel shop, good enough for Me. |
|
Originally Posted By chrisben:
So if memory serves, the hottest part is going to be just in front of the visible flame, right? Do we have any welders or plumbers in the house that could speak to that? Perhaps backing the torch off so that the heat is starting to drop off a bit before it hits the case holder? The hottest part of the flame is at the tip of the inner blue cone. |
|
Originally Posted By Flashbang1:Torch hose adapter fittings were modified street brass 1/8MIP X 1/8FIP. Extension hose is the key also. Depot sells the same brand same model number but some are not threaded on both ends. I had to go back and get the double threaded one. Yes, hose is coiled inside box.
What do You mean by modified? I found that the extension hose You want will have brass fitting nuts on both ends of the hose. Too bad, My hose has only one. |
|
Originally Posted By ChevelleDave:
What do You mean by modified? I found that the extension hose You want will have brass fitting nuts on both ends of the hose. Too bad, My hose has only one. Originally Posted By ChevelleDave:
Originally Posted By Flashbang1:Torch hose adapter fittings were modified street brass 1/8MIP X 1/8FIP. Extension hose is the key also. Depot sells the same brand same model number but some are not threaded on both ends. I had to go back and get the double threaded one. Yes, hose is coiled inside box.
What do You mean by modified? I found that the extension hose You want will have brass fitting nuts on both ends of the hose. Too bad, My hose has only one. The threads are not standard ips or standard sae on the hose ends. I don't know what they are and exhausted the Internet looking for a answer. They also use o-ring seals which is odd for pipe threads. Maybe some propritory hybrid design. The 1/8 ips street elbows I used will thread in but partinaly only, maybe two threads. Not good enough for a safe seal. I used a 3/8x24 sae die on the male threads about halfway down. This made a less than perfect thread engagement but I got the full amount of threads in the fittings. They are not sloppy and tightened up very snug. I used #242 thread locker as a seal. Soap test the joints and no leaks. The tank bottle end with the valve has a small orfice in the bottom of the female thread bore. With the fittings I used it is a little thicker and goes in deeper. Too deep. I would bottom out of the thread bore and block the little orfice hole. I hade to shave off some of the length of the male end of the elbow so it would not block the orfice hole. Maybe .100 thousands. When complete it is 100% safe and leak free. Edit to add videos: Test run videos of Little Blue Nasty in full operation: http://youtu.be/91oy4ZSCuzQ http://youtu.be/HJFH-KBm55U |
|
Well, My local HD clerk probably thinks I'm freaking g Loco. We went through 4 different boxes of hoses and they were all the same. They were all only threaded on one end.
It's all right though, He reloads.  . I had to tell Him all about the DIY Annealing machine though. . I had to tell Him all about the DIY Annealing machine though.
|

|
Originally Posted By Flashbang1:
I'm all finished except for a power switch. *Edit to add power is complete. Using a 12vdc 500mA wal wart. Bought female M socket and male M plug from Radio Shack. Drilled female socket in lower back panel. Looks perfect. Questions to answer. Yes, good idea, maybe a SS case holder rod is the way to go if I can source one locally cheap. The aluminum one seems to be holding up so far. The aluminum angle I used s 1/16 thick 2X1/2inch. The 1/8 inch thick aluminum was just too thick for me and unnecessarily heavy for the job it does. I bought a 1/16 inch thick 2 X 2 inch piece of aluminum angle at Home Depot and cut the one side down to half inch. Some pics of the torch setup and Ghostbusters style tank holders. Please note I'm not a professional photographer and lighting is poor. http://i697.photobucket.com/albums/vv337/flashbang1/annealer/EFC02F49-4519-4579-8DE2-ECFBF28BE0C0.jpg http://i697.photobucket.com/albums/vv337/flashbang1/annealer/A36099DB-031A-47DC-85D9-FB6A926C56B9.jpg http://i697.photobucket.com/albums/vv337/flashbang1/annealer/0D88BA6D-8E31-43F5-9FF6-CB0A7FB4B2C0_1.jpg http://i697.photobucket.com/albums/vv337/flashbang1/annealer/E604E22D-22BD-45CE-9874-E67A595D2B0A.jpg http://i697.photobucket.com/albums/vv337/flashbang1/annealer/60B51397-C78E-48B6-AF68-95B68B9C71BB.jpg http://i697.photobucket.com/albums/vv337/flashbang1/annealer/2CE196D9-FCFD-4EC4-A19D-55162019609B.jpg http://i697.photobucket.com/albums/vv337/flashbang1/annealer/ABAD2E52-4216-4408-84E8-1724781E342D.jpg From your pictures, it looks like the case "ramp" (the part that drops the cases into the cake pan) is positioned close enough to the torch for the ramp to get pretty hot too. Does it get really hot from the torch? Using a stand-alone torch, I was able to tune the flame to be very short and still get plenty of heat on the case, just by keeping the case close enough to the flame. I would think that your burner end could be moved closer to the case, which would allow you to reduce the size of the flame and thus also reduce the heating of other components. Just "thought experiment" stuff here, but I'm curious. |
"--you can't conquer a free man; the most you can do is kill him."
Heinlein
NRA Life Member
Glock Certified Armorer
Certified AR15 Armorer
Certified M1911 Armorer
Heinlein
NRA Life Member
Glock Certified Armorer
Certified AR15 Armorer
Certified M1911 Armorer
|
Originally Posted By GHPorter:
From your pictures, it looks like the case "ramp" (the part that drops the cases into the cake pan) is positioned close enough to the torch for the ramp to get pretty hot too. Does it get really hot from the torch? Using a stand-alone torch, I was able to tune the flame to be very short and still get plenty of heat on the case, just by keeping the case close enough to the flame. I would think that your burner end could be moved closer to the case, which would allow you to reduce the size of the flame and thus also reduce the heating of other components. Just "thought experiment" stuff here, but I'm curious. The ramp is unnecessarily long and I may cut it. It does not get hot at all. The flame really cannot be adjusted. The center blue flame tip should just touch the case and it does. For consistency sake I turn on the gas full throttle. That way it will be the same every time more or less, dependent on bottle gas level. (That's a whole nother subject with regulators to add and such). In any event I ran 200 cases straight through then immediately followed by with another 100 cases. Nothing went on fire or smoked. Case rod holder and heat sink got hot but no distortion. Pan got hot but no ill effects. Pan super coupling got quite warm, but heat was dissipated enough by motor at the cooling groves I cut into the super coupling. End result, everything works 100% as is built. I am happy. Check out the videos of it in action in the posts above. |
|
Flashbang:
Runs great. About the ramp: It wasn't on the original version. I put it on mine to help adjust the pan. It probably isn't even necessary. On your videos the feeder speed was almost half (I think) as slow as the pan If you turn up the feeder to about 3-5 numbers less then the pan it will feed the cases fast enough to have one waiting after each annealed one drops. I see two advantages. First, there is almost always a case in front of the flame preventing the metal rod from heating up as much, if it ever matters. Second, it will almost cut in half the time it takes to anneal all of the case - the time in flame is not effected. |
|
Originally Posted By RLR350:
Flashbang: Runs great. About the ramp: It wasn't on the original version. I put it on mine to help adjust the pan. It probably isn't even necessary. On your videos the feeder speed was almost half (I think) as slow as the pan If you turn up the feeder to about 3-5 numbers less then the pan it will feed the cases fast enough to have one waiting after each annealed one drops. I see two advantages. First, there is almost always a case in front of the flame preventing the metal rod from heating up as much, if it ever matters. Second, it will almost cut in half the time it takes to anneal all of the case - the time in flame is not effected. Thank you. I included the ramp for insurance when the case "jumps" to the pan it can not fall out on higher speeds. Your probably right, not necessary at all or just to long.* *I have since cut it down. It's about 1/2 of a inch long from the bend. Your correct, the feeder speed should of been setup faster. I just was checking the process and didn't want a double feed in the pan. I will increase feeder speed just to before a double feed on the ramp. As a side note: These are my findings on the case rod holder, which I find to be the single most static part that controls reliability. If the machine is not reliable or repeatable it is undependable and useless, to me anyways. The case rod holder is key to 100% function. Like I mentioned in posts above, full or real close to it, case body contact is the first setup to be accomplished. Second is to have the case rod holder height as high as possible with out the case going under it. This is as equally important as full body contact. With the case rod holder setup up as mentioned above, the cases never "jump the rod" or bounce of it and wind up sideways. This is with .223/5.56mm cases, however it should follow through with reasonably comparative cases. Yes, this put the outside apex of the *case holder rod in a direct path of the flame and gets screaming hot, but is seems to be doing just fine with no ill effects. Edit to add: *Sadly the aluminum case holder rod has failed during 300BLK test run. The little guy hung on as long as it could and gave up and drooped down onto the pan during a torture test. It might have of survived under normal operations with a case in front of it quickly enough, but no guarantee on how long. Good news is I replaced it with a low carbon steel rod and it does not heat up my adjustable aluminum heat sink as much as the aluminum rod did. Ran a good long torture test on it. Apex got dull red for at least ten minutes in direct flame. No droop and heat sink was warm but not screaming hot. |
|
I noticed in a few vids that the case stopper/holder was quite long in some of the vids. Mine is about 1-2mm from the drum, leaving a bit of room for the flame to pass and not heat up the steel rod. My case stoppers are made from 304 stainless m5 rod. No issues on my end :)
Apart from that, theres been some good builds, congrats guys :) |
|
This looks like an interesting build, Youtube
I need to thread more of My rod, after I cut the pan down, I haven't moved it in. |
|
I finally got My torch holder block from China, got it modded up. Had a hose made up and found the right fittings at Hardware Sales, got the time to get it running.
Need to get some cases done up with Tempilaq, get the timing set up, and go to town. 
Annealer in action |
Global Warming Hoax Skeptic before it was cool
Joined:
Jun 2007
Posts:
33295
EE: 100% (1)
WA, USA
|
Looks good ChevelleDave!
I got my fittings at Homedepot. Do yourself a solid and get a desk grommet like I did for the hole where the hose goes through the box. 
Made a aluminum adapter plate for 300BLK cases as the lexan one started to show signs of heat fatigue. Holes in plate double as lighting cuts and dissipate heat from pan. 

Some action videos: http://youtu.be/91oy4ZSCuzQ http://youtu.be/HJFH-KBm55U http://youtu.be/JawSvm5eL2Q http://youtu.be/qCqGIBvVAkA |
|
Here is a list of things I used for My torch, I couldn't find a dual threaded like Flashbang found.
Torchhead fitting Bottle fitting Then I also got 2 brass 90's in 1/4". A local Hardware store to Me has a hose shop, I had them make up a 2' 1/4" hose with male swivel fittings on each end. Just tell them it is for compressed air, not flammables, if They even ask. I suppose You could get 1/4" to 1/8" reducing 90's and use 1/8th hose if You chose, I just went 1/4". I will also be adding a valve like this, Ball Valve So this was My way of getting the hose run the way I wanted. A little more spendy, I know, but I like it this way better. |
|
FlashBang, Now that I know what size holes I drilled, I will be picking up some grommets to finish it off.
Also going to cut a pan to 1 1/4" for .223, what You saw in the video was the 1" pan for .300 Blackout, I think the .223 will hit the pan a little more stable with the deeper pan. |
|
Originally Posted By ChevelleDave:
FlashBang, Now that I know what size holes I drilled, I will be picking up some grommets to finish it off. Also going to cut a pan to 1 1/4" for .223, what You saw in the video was the 1" pan for .300 Blackout, I think the .223 will hit the pan a little more stable with the deeper pan. I can not tell from your video but my findings over extensive testing may help you and others out. Take it for what its worth. The cut out notch in the pan should be cut flush to the bottom of the pan. In other words there should be no lip on the cut. Cut is filed/sanded flush with the bottom inside of the pan. The pic below shows the horizontal cut on the bottom between the two green vertical lines that is flush with the back inside of the pan. 
My pan is actually a little shy of 1.25" measured from the inside and does just fine with 22-250 and 30-06 cases. Another finding that is helpful is to have the pan adjusted so the inside back of the pan is just below flush of the feeder board. Too much rearward gap here and the cases get more "air" time to bounce off the back of the pan and flop around before getting stable at the case rod holder. And have your case rod holder/stop set as high off the pan wall as possible without the cases rolling under, and to help stop the bounce. Shoot for full case body contact. Pic below shows full case body contact against case rod holder/stop in my pan. 
Heat is the enemy of the machine. Things get hot including the pan on long runs. This can transfer to the motor which isn't to fond of heat and most likely has plastic gears. Keep your necks as far out of the pan as possible while still maintaining stability. Combining all the above you may not have to switch pans. Good luck. |
|
Wow, what an excellent thread. I signed up on the forum specifically for this thread.
tstuart34, great idea and great work. Fantastic diagrams and wonderful ingenuity being displayed here. Also, NE Nebraska? 
Flashbang1, I think I actually ended up finding your videos on youtube which brought me here. I also saw you were fighting an issue with your aluminum case rod holder/stop. Did you consider moving your torch to angle up more towards the spindle of your case annealing drum, and thereby taking the case rod holder/stop out of the direct line of the torch? Just a thought. Anyway, again I just wanted to thank everyone involved here. I'll be getting a parts list together and ordering things soon! |
|
Originally Posted By Cantonious:
Wow, what an excellent thread. I signed up on the forum specifically for this thread. tstuart34, great idea and great work. Fantastic diagrams and wonderful ingenuity being displayed here. Also, NE Nebraska?
Flashbang1, I think I actually ended up finding your videos on youtube which brought me here. I also saw you were fighting an issue with your aluminum case rod holder/stop. Did you consider moving your torch to angle up more towards the spindle of your case annealing drum, and thereby taking the case rod holder/stop out of the direct line of the torch? Just a thought. Anyway, again I just wanted to thank everyone involved here. I'll be getting a parts list together and ordering things soon! Welcome aboard! Yes, to answer your question. It's not really practical to move the torch angle up as the hose end of the torch would be to low and the heat would be directed and trapped into the pan. With the change over to the low carbon steel case holder rod from the aluminum one, I have not had any heat issues and the aluminum heat sink that holds the rod actually runs cooler now. Good luck with your build. |

|
Originally Posted By Deepjet:
 https://www.youtube.com/watch?v=cRk3iWxarN4 https://www.youtube.com/watch?v=cRk3iWxarN4
Not sure how to post pics or I would. http://s288.photobucket.com/user/Deepjet/slideshow/ Nice, I went with a steel box too, I hope to be get time to finish it this weekend , already have some thoughts on changes so it might be version #1 |
I have never received a pizza I did not order, and every pizza I have ordered, I recieved. Can't the police be expected to be as competent as delivery drivers?
|
Go to your bucket on Photobucket
Dbl. click on a picture On the right you will see the "Share Links" list Click on "Direct" (it will then say "copied") Then in your AR15.com post click the picture icon in the "Insert Tags" list Click control-V and voila! it will paste the copied picture in your post. (like the one below) NICE Job! btw!
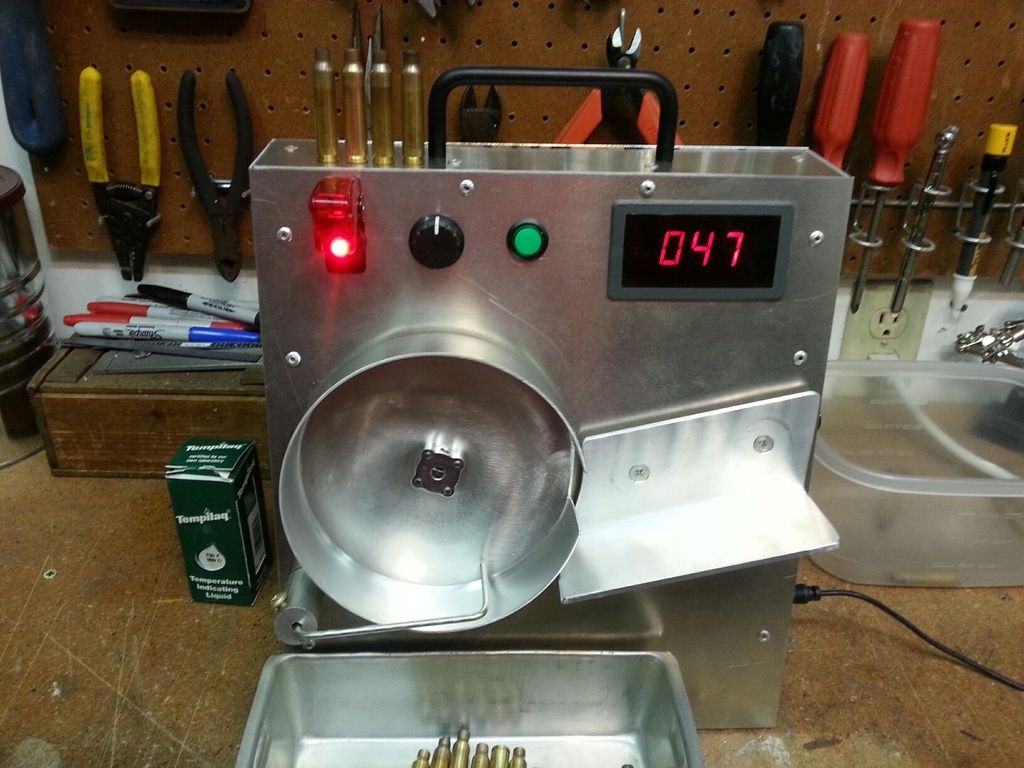
|
|
Thanks...and thanks for the tip
I'm working on a new design that is smaller and simpler yet. Anyway.... The auto feed is faster but not by much and costs quite a bit more to build. No matter if it is hand feed or self feed you still have to monitor the machine open flame and all that. It takes 33 min. to do 500 cases of 5.56 with auto feed and 35 min..ish...to do the same hand feeding to machine. It takes about 4 sec. for the rotor to make one rev so...500cases X 4seconds = 2000 seconds / 60 = 33.333 minutes. This time difference is mostly due to missing a rotor rotation now and again to take a sip of coffee or take a bio break. One of the benefits (for me anyway) of hand feeding is it's one more time to inspect the case. Right now I give the smaller annealer a duty cycle of 500 cases then a 10 min cool down cycle and is fan cooled. The annealer case and rotor are aluminum so it cools very fast and the motor shaft is steel so most of the head stays with the rotor....my wife says I'm rambling...I need my meds. Shooting is a drug and reloading is a side effect so says my better half. 
|
|
Originally Posted By Deepjet:
Thanks...and thanks for the tip
I'm working on a new design that is smaller and simpler yet. I have a patent lawyer looking into some questions I have then possibly will make a "DIY Kit" for something very similar. Everything for the machine will be included and all holes will be pre-drilled. 750 tempilaq will also be available as will the UL2317 torch head, short and long rotors. The set up will come with the mid leangth rotor that will do 5.56 to 338 win mag. If you want to anneal shorter or longer cases you will need the corresponding case rotor. I figured an annealing machine as a DIY kit would save $$$ for the reloader plus its fun. This is the plan for now and I am not trying to sell anything at this point...just some info and plans for the future...I will purchase advertising space here and on other sites. Shut up and take my money! 
Awesome work. That brushed steel is a looker. |
Global Warming Hoax Skeptic before it was cool
Joined:
Jun 2007
Posts:
34473
EE: 100% (1)
WA, USA
|
Originally Posted By SloppyBrassJobs: Shut up and take my money! Awesome work. That brushed steel is a looker. Originally Posted By SloppyBrassJobs: Originally Posted By Deepjet: Thanks...and thanks for the tip I'm working on a new design that is smaller and simpler yet. I have a patent lawyer looking into some questions I have then possibly will make a "DIY Kit" for something very similar. Everything for the machine will be included and all holes will be pre-drilled. 750 tempilaq will also be available as will the UL2317 torch head, short and long rotors. The set up will come with the mid leangth rotor that will do 5.56 to 338 win mag. If you want to anneal shorter or longer cases you will need the corresponding case rotor. I figured an annealing machine as a DIY kit would save $$$ for the reloader plus its fun. This is the plan for now and I am not trying to sell anything at this point...just some info and plans for the future...I will purchase advertising space here and on other sites. Shut up and take my money! Awesome work. That brushed steel is a looker. Just in case folks are not up on the rules on this site, and to head off any future problems, this is from the Conduct Code, SPECIFIC TO SALES
|
Selling agent for Algores carbon credit scam.
Shooting and Reloading, one hobby feeds the other.
Shooting and Reloading, one hobby feeds the other.
Global Warming Hoax Skeptic before it was cool
Joined:
Jun 2007
Posts:
34485
EE: 100% (1)
WA, USA
|
Originally Posted By Deepjet: Wasn't my intention to cross the "selling" line. My apologies if I went too far as rules are rules. thanks for the heads up. No worries, just wanted to head off a problem. |
Selling agent for Algores carbon credit scam.
Shooting and Reloading, one hobby feeds the other.
Shooting and Reloading, one hobby feeds the other.
|
After reading my post it DID in fact sound like a sales pitch...I edited my post and removed that portion. I appreciate dryflash3 for moderating and keeping things inline or guys like me would run a muck, I am not qualified to run a muck. 
|
Global Warming Hoax Skeptic before it was cool
Joined:
Jun 2007
Posts:
34488
EE: 100% (1)
WA, USA
|
Originally Posted By Deepjet: After reading my post it DID in fact sound like a sales pitch...I edited my post and removed that portion. I appreciate dryflash3 for moderating and keeping things inline or guys like me would run a muck, I am not qualified to run a muck. No biggie, we all make mistakes. It's what you do afterwards that separate men from "the unsavory element". Sorry, just finished watching a Sherlock Holmes movie.  |
Selling agent for Algores carbon credit scam.
Shooting and Reloading, one hobby feeds the other.
Shooting and Reloading, one hobby feeds the other.
Yeah Dryflash3 is always on the watch tower, keeping track of divergents like me! However selling my ideas are the furthest things from my mind. I'm too old to care about things like entrepreneurships. I just want to retire and can't! 
"run a muck"??? Sounds like both of you like Sherlock!. I've been wondering if a person could figure out a way to use a Lee case shaker converted like mine to load tubes full of bottleneck rifle, and then dropping them on a ramp just like yours in the picture, using a funnel of some kind?????? Been keeping me up at night. I just don't care for the funnel on most of these including the Giraud. Seems slow to fill. My tube filler takes less than a minute to fill 4 36" tubes......that's a lot of cases.
|
|
That last simpler/smaller one appeals enough I ordered the motor and controller. For $20, one of the several pc power supplies I have and one of the DW's old cake pans (shhhh) I figured why not. I've been doing the powered screwdriver, socket to anneal and while it works I'd prefer something more consistent than me going "1 elephant, 2 elephant". :) I don't mind hand feeding them and my boys can certainly use more tasks to earn their allowance.
Thanks to everyone in this thread. |
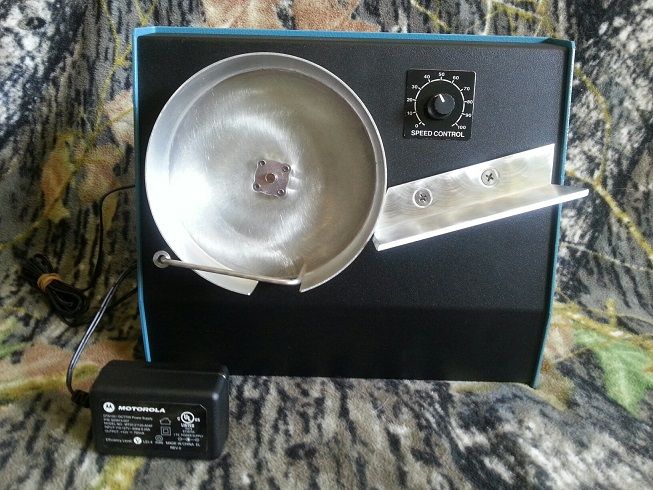
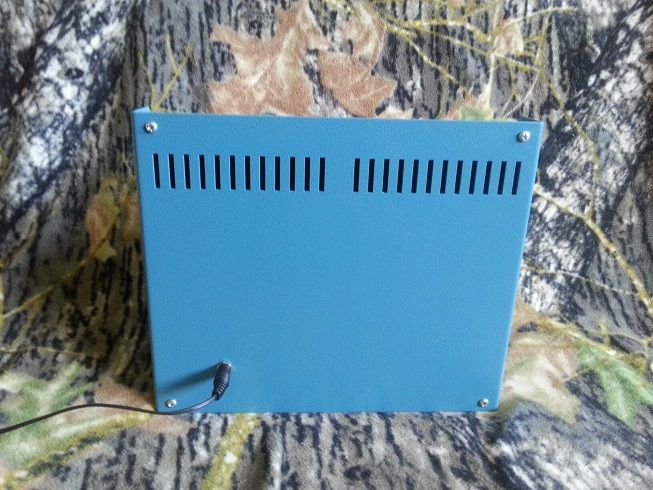
|
Hi Deepjet,
I like the look of your version the best and I actually have some of these power adapters laying around. Do you happen to have pictures of how the circuitry is connected to the motor and the list of parts you used? And then I have a question for the group. First of all I admire the collective talent of everybody here. I want to try and make the simplest version because I only have a drill and hand tools available. I plan to make this as much as I can with what I already have available. The frame will come from a wooden box or from a metal paper horizontal file holder. Drill holes and then attach 1 motor for the cake pan. This will just be the manual one at a time cartridge feed. I noticed that a lot of you have the angled front, is this important to the design? then to attach the motor to my frame what kind of drill bit would I use for the hole that the motor drive would go through? Is attaching the drive shaft pretty straightforward? Since I only reload .308, what would the height of the pan need to be? would a tuna can work? Thanks, braindoc |

|
Originally Posted By braindoc: <snip> I noticed that a lot of you have the angled front, is this important to the design? then to attach the motor to my frame what kind of drill bit would I use for the hole that the motor drive would go through? Is attaching the drive shaft pretty straightforward? Since I only reload .308, what would the height of the pan need to be? would a tuna can work? Thanks, braindoc My guess is that the angle keeps the case seated against the bottom of the pan so that the neck is always aligned the same to the torch for each case. |
O Lord, bless this thy hand grenade that with it thou mayest blow thine enemies to tiny bits, in thy mercy.
| I'd agree that the backward angled front keeps the cases from sliding forward and off the front of the machine. It looks like that's why Doug Giraud used a similar angle on his machine. |
"--you can't conquer a free man; the most you can do is kill him."
Heinlein
NRA Life Member
Glock Certified Armorer
Certified AR15 Armorer
Certified M1911 Armorer
Heinlein
NRA Life Member
Glock Certified Armorer
Certified AR15 Armorer
Certified M1911 Armorer
DIY Annealing Machine (Page 7 of 17)
Armory Sponsor