|
[#1]
Laser bore-sighter, carry-handle upper with rear sight centered. I don't go nuts with the barrel nut, but I do make it kinda tight. I have a lapped upper that I use for this, but have done several with unlapped uppers.
Sight laser off the furthest white wall you can find and still see, and shift FSB around until it's on target. A clamp or some vise grips with padding across the FSB at the barrel to lock it in place. Verify it's still aligned and set it up in the mill/drill of your choice (properly fixtured, natch). I even spin my laser bore sighters while they're chambered, as I watch said wall, to insure that they're not slightly canted. |
|
|
|
[#2]
I've seen the other members jig you mention and it looks slick. Here's another idea. The index pin and the gas port should be in alignment. The gas passage between the gas port and the gas tube of the FSB is drilled from the bottom under and forward of the sling swivel. Dimple the barrel with a jig, tap the access hole and use a set screw to align the gas passage with the gas port. If everything was made to spec, it should be mechanically correct, but you could check with that jig mentioned.
|
|
|
|
[#3]
|
|
|
|
[#4]
Quoted: LINK |
|
|
|
[#5]
Best method is to mail it to John Thomas at Retro Arms Works.
|
|
|
|
[#6]
Quoted: Best method is to mail it to John Thomas at Retro Arms Works. Solid suggestion. |
|
|
|
[#7]
Quoted: Best method is to mail it to John Thomas at Retro Arms Works. or ADCO. Truing the upper receiver face will increase the chance that your rear sight will be close to centered after barrel installation. |
|
|
|
[#8]
Quoted: Solid suggestion. Quoted: Quoted: Best method is to mail it to John Thomas at Retro Arms Works. Solid suggestion. I support this advice. |
|
|
|
[#9]
I tap the hole in the back ring with a 8/32 tap. I then adjust the sight by setting the screw in place and eyeballing until it appears level. Another trick is to place the rear sight on the upper and then turn it upside down and tighten the screw and check for levelness.
Once you are happy with how it looks you can either drill (1/8") and tap the front ring with a 8/32 on both sides and use them as set screws to set the sight. You can also just drill the hole through the ring and barrel and use taper pins. Once the front ring is set, you can remove the bottom set screw and and either drill and tap the back ring or use taper pins. Most of the folks that I help prefer the set screw method because they can adjust the cant to what they think is level. Then you use a little blue loctite on the rings and cinch it down. I always drill and tap the back ring because it will hold the sight in place regardless whether taper pins or set screws are used. |
|
|
|
[#10]
I made a setup using some blocks bored to the .997 dia of the extension, cross drilled for the center pin and support blocks for the rest of the contour of the barrel, these were made on my lathe and mill and are pretty damned close to at at least .0005. I'll take a pic of it later once I get home since I have a 16" to pin along with a 20" A1 pencil barrel for a retro build. The FSB was pretty easy, they already have a threaded hole at the 1" centerline(I used 2" blocks) so I made a threaded pilot that was .375 and fit into the hole Where the front sight post threads into.
|
|
|
|
[#11]
Quoted: Best method is to mail it to John Thomas at Retro Arms Works. if you have a carry-handle upper, or a flat-top with a carry handle that you want it aligned with, then you need to send him that also. otherwise, the alignment may vary depending on which upper, rear sight you happen to use when you home-assemble. |
|
|
|
[#12]
I hadn't thought about rotating the bore sight to verify its accuracy. I can see that working out pretty well even if the bore sight was off a touch and you had to average out the center.
Several mentions to tap it for a set screw. As a permanent solution that' won't cut it, I want the reliability taper pins provide. I do like the idea of using that as a temporary setup to establish a zero before pinning it. @greasysnipe No access to a mill and lathe (yet!) but I would love to see some pictures of your setup. Sounds similar to some of the pricey jigs available. I hope I have the equipment and ability to make stuff like that in the future. As for having someone like ADCO or Retro Arms Works do it, I can't argue with that advice. For sure the "best" method, but I enjoy doing this sort of stuff. I'm capable of the work, just wanted ideas to help me towards the most accurate outcome I'm capable of. I'll look further into them after I bung up my FSB and/or barrel!  Thanks a bunch for the suggestions, some great ideas! |
|
|
|
[#13]
Quoted: snip .... Several mentions to tap it for a set screw. As a permanent solution that' won't cut it, I want the reliability taper pins provide. I do like the idea of using that as a temporary setup to establish a zero before pinning it. .... snip After you do the set screw and are happy, you drill and install the front taper pin. Then you remove the set screw, drill and install the rear taper pin. If you dimple, it can be shallower than you would for a set screw only gas block. |
|
|
|
[#14]
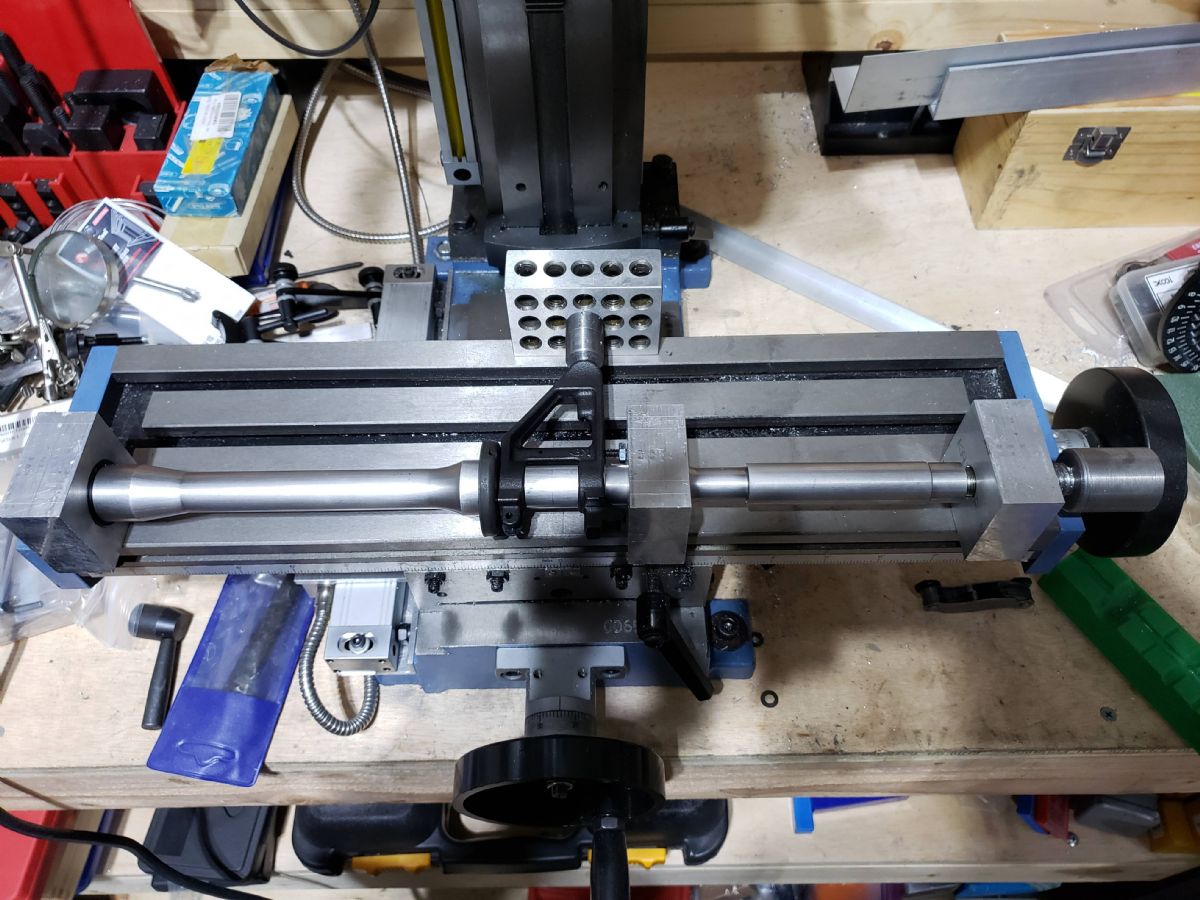
This is my set up, its just an example. DO NOT LOOK AT THE DIRT! I need to clean, I know I'm a heathen for such a sloppy shop but I was [insert excuse here]. Anyways, here is what I use to setup an FSB for alignment. I used 2" blocks that were bored to various diameters to accommodate the barrel profiles to hold them to specs, the left block is bored to the extension housing and cross drilled to align the pin, the right block goes to the bore and presses it back to the left block. The center block pushes back and applies force to the fsb and the 123 block centers the fsb to the gas port which I verified with a bore scope. I threw this together just to give you an idea of what I use, I am in no way drilling right now without the baseplate I normally use..
|
|
|
|
[#15]
Quoted: This is my set up, its just an example. DO NOT LOOK AT THE DIRT! I need to clean, I know I'm a heathen for such a sloppy shop but I was [insert excuse here]. Anyways, here is what I use to setup an FSB for alignment. I used 2" blocks that were bored to various diameters to accommodate the barrel profiles to hold them to specs, the left block is bored to the extension housing and cross drilled to align the pin, the right block goes to the bore and presses it back to the left block. The center block pushes back and applies force to the fsb and the 123 block centers the fsb to the gas port which I verified with a bore scope. I threw this together just to give you an idea of what I use, I am in no way drilling right now without the baseplate I normally use.. https://www.ar15.com/media/mediaFiles/511735/20220510_001646-2378576.jpg I guess that might work in a pinch. Nice jig. |
|
|
|
[#16]
Quoted: This is my set up, its just an example. DO NOT LOOK AT THE DIRT! I need to clean, I know I'm a heathen for such a sloppy shop but I was [insert excuse here]. Anyways, here is what I use to setup an FSB for alignment. I used 2" blocks that were bored to various diameters to accommodate the barrel profiles to hold them to specs, the left block is bored to the extension housing and cross drilled to align the pin, the right block goes to the bore and presses it back to the left block. The center block pushes back and applies force to the fsb and the 123 block centers the fsb to the gas port which I verified with a bore scope. I threw this together just to give you an idea of what I use, I am in no way drilling right now without the baseplate I normally use.. Wow! That is brilliantly simple. Just a few blocks that are precisely sized with a precisely placed/sized hole. I will definitely be saving that for reference should I ever find a mill, that setup wouldn't be difficult to duplicate.I like how you sized it all to make use of a standard 123 block to align the fsb. I also really like they fact you have the center block set up to firmly seat the fsb against its shoulder, the high dollar jigs available I've seen do not do that. Do you clamp the fsb against the barrel when drilling to help prevent it from trying to rotate or is that a non-issue with the setup? What exactly is your base plate? Just a flat sheet that lets you mount everything to or more to it than that? Thanks for sharing! |
|
|
|
[#17]
Yes to answer your question. I make sure nothing moves or has a chance to move. I left the clamps off and the backing plate to show the blocks. All in total the aluminum blocks cost me around $35 and the time to measure the contours of the barrels- Btw you really find out how many of the cheaper barrels deviate from specs, It reinforces what others say about spending the cash for the good barrels. for the 123 block attachment, I machined the part to fit into the FSB's existing hole for the sight post and there is a stud threaded into it, the tool (made of 4150)is machined pretty close to eliminate any movement The base plate is a flat plate that I cut and drilled for the table t slots as to facilitate securing it down on the mill and so I can get the blocks secured to the table, I'm still refining the baseplate though.
|
|
|
|
[#18]
Quoted: Best method is to mail it to John Thomas at Retro Arms Works. LOL ... I just dropped a package in the mail yesterday for him. |
|
|
|
[#19]
I thread the hole in the botttom of the FSB with a tap, so I can use an allen head screw to hold the FSB in postion, once I get it set vertically.
To set the FSB vertically, I put the barrel in the upper and rotate it clockwise as far as it will go in the index slot (the same direction it will turn while being torqued). I remove the front sight post, and thread a couple pieces of USGI cleaning rod segments into the threaded front sight hole. Yes--a standard USGI metal cleaning rod is threaded to the same pitch as the front sight, so now you have a 16" tall wand standing vertically in the front sight base. Level the upper receiver, and clamp it in place. Tie a socket or wrench (for weight) to a 6' piece of white string, and hang that from the shop cieling. Drywall screws work good. Loosen the allen head bolt under the front sight base, and adjust the FSB until the cleaning rod sections coincide with the perfectly vertical 6' string--and tighten the allen head snug. Make an index mark on the barrel and the front sight base, to mark alignment. After you drill your first hole, check your alignment mark. If it looks good--put a spare drill bit into the hole that you drilled, and drill the next hole. Check your alignment marks. Put the barrel back in the level receiver and make sure that everything still looks good. Check your allen head for tightness, keep 1 drill bit in place in the drilled hole while reaming the other. Should work out just fine for you. |
|
|
|
[#20]
You can set up in a lathe, locate the center of your gas port then run down to the fsb/gb journal shoulder and run the tool to scribe a line. Scribe a line at center of your fsb and match them up. Your alignment will be as perfect as possible.
|
|
|
|
[#21]
Quoted: You can set up in a lathe, locate the center of your gas port then run down to the fsb/gb journal shoulder and run the tool to scribe a line. Scribe a line at center of your fsb and match them up. Your alignment will be as perfect as possible. NoDakSpud did a mounting tutorial back in 2017 that was pretty good in the post below, but I think the images were lost in the photo bucket fiasco. I saved the write up along with the images to a pdf, but I do not have anywhere to host it. I could email it to someone if they had somewhere to host it for others to download. https://www.ar15.com/forums/ar-15/FSB_mounting_tutorial/123-470461/ |
|
|
|
[#22]
Quoted: I thread the hole in the botttom of the FSB with a tap, so I can use an allen head screw to hold the FSB in postion, once I get it set vertically. To set the FSB vertically, I put the barrel in the upper and rotate it clockwise as far as it will go in the index slot (the same direction it will turn while being torqued). I remove the front sight post, and thread a couple pieces of USGI cleaning rod segments into the threaded front sight hole. Yes--a standard USGI metal cleaning rod is threaded to the same pitch as the front sight, so now you have a 16" tall wand standing vertically in the front sight base. Level the upper receiver, and clamp it in place. Tie a socket or wrench (for weight) to a 6' piece of white string, and hang that from the shop cieling. Drywall screws work good. Loosen the allen head bolt under the front sight base, and adjust the FSB until the cleaning rod sections coincide with the perfectly vertical 6' string--and tighten the allen head snug. Make an index mark on the barrel and the front sight base, to mark alignment. After you drill your first hole, check your alignment mark. If it looks good--put a spare drill bit into the hole that you drilled, and drill the next hole. Check your alignment marks. Put the barrel back in the level receiver and make sure that everything still looks good. Check your allen head for tightness, keep 1 drill bit in place in the drilled hole while reaming the other. Should work out just fine for you. Quoted: I thread the hole in the botttom of the FSB with a tap, so I can use an allen head screw to hold the FSB in postion, once I get it set vertically. To set the FSB vertically, I put the barrel in the upper and rotate it clockwise as far as it will go in the index slot (the same direction it will turn while being torqued). I remove the front sight post, and thread a couple pieces of USGI cleaning rod segments into the threaded front sight hole. Yes--a standard USGI metal cleaning rod is threaded to the same pitch as the front sight, so now you have a 16" tall wand standing vertically in the front sight base. Level the upper receiver, and clamp it in place. Tie a socket or wrench (for weight) to a 6' piece of white string, and hang that from the shop cieling. Drywall screws work good. Loosen the allen head bolt under the front sight base, and adjust the FSB until the cleaning rod sections coincide with the perfectly vertical 6' string--and tighten the allen head snug. Make an index mark on the barrel and the front sight base, to mark alignment. After you drill your first hole, check your alignment mark. If it looks good--put a spare drill bit into the hole that you drilled, and drill the next hole. Check your alignment marks. Put the barrel back in the level receiver and make sure that everything still looks good. Check your allen head for tightness, keep 1 drill bit in place in the drilled hole while reaming the other. Should work out just fine for you. This sounds like a good idea and doable with what I have (ie: no lathe or mill Quoted: NoDakSpud did a mounting tutorial back in 2017 that was pretty good in the post below, but I think the images were lost in the photo bucket fiasco. I saved the write up along with the images to a pdf, but I do not have anywhere to host it. I could email it to someone if they had somewhere to host it for others to download. https://www.ar15.com/forums/ar-15/FSB_mounting_tutorial/123-470461/ I found this post when researching the topic, I think it is the same one from Mike at NoDakSpud but still has the pictures. https://www.ar15.com/forums/industry/funny-name-serious-lower-FSB-MOUNTING-TUTORIAL-INSIDE-Pictures-back-up/245-157069/ |
|
|
|
[#23]
Quoted: I found this post when researching the topic, I think it is the same one from Mike at NoDakSpud but still has the pictures. https://www.ar15.com/forums/industry/funny-name-serious-lower-FSB-MOUNTING-TUTORIAL-INSIDE-Pictures-back-up/245-157069/ Yes, that's the one. |
|
|
 Win a FREE Membership!
Sign up for the ARFCOM weekly newsletter and be entered to win a free ARFCOM membership. One new winner* is announced every week!
You will receive an email every Friday morning featuring the latest chatter from the hottest topics, breaking news surrounding legislation, as well as exclusive deals only available to ARFCOM email subscribers.

AR15.COM is the world's largest firearm community and is a gathering place for firearm enthusiasts of all types.
From hunters and military members, to competition shooters and general firearm enthusiasts, we welcome anyone who values and respects the way of the firearm.

Subscribe to our monthly Newsletter to receive firearm news, product discounts from your favorite Industry Partners, and more.
Copyright © 1996-2024 AR15.COM LLC. All Rights Reserved.
Any use of this content without express written consent is prohibited.
AR15.Com reserves the right to overwrite or replace any affiliate, commercial, or monetizable links, posted by users, with our own.


