


Armory Sponsor

Posted: 9/15/2009 2:34:34 AM EDT
[Last Edit: AeroE][Edited]
|
I haven't seen one of these yet so I figured since I was starting out my operation, I would snap some pics and publish my schematics.
These are basic plans for building a rock solid 2x4 foot 3-layer reloading/work bench at a comfortable height to use a 29" bar stool. *NOTE––I recommend using a proportionate amount of beer to measuring tools according to your level of woodworking skill. Basic plans: 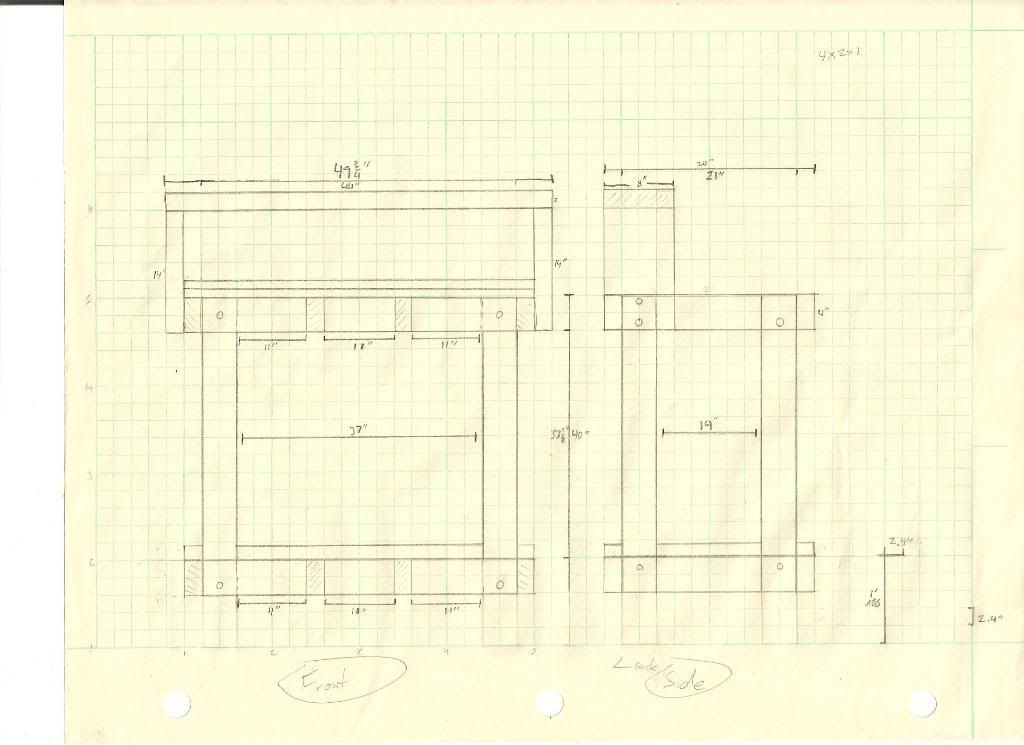
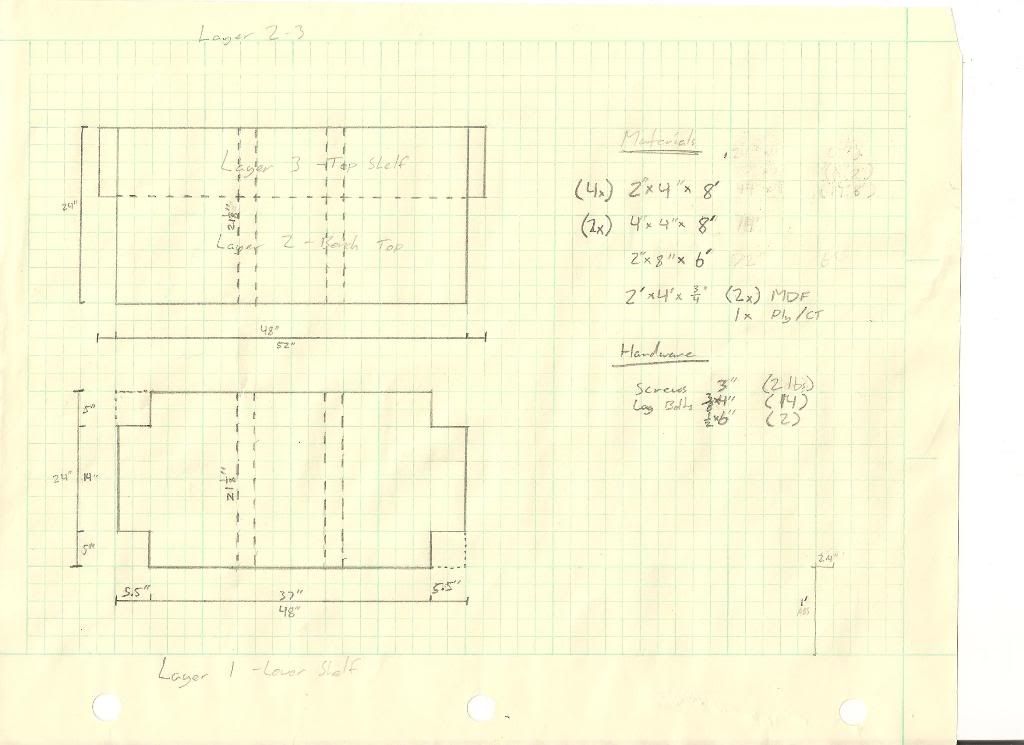
Redrawn and donated by a member that wants to remain anonymous. AeroE : 
Materials: (4x) 2"x4"x8' (2x) 4"x4"x8' (1x) 2"x8"x6' (3x) 2'x4'x 3/4" plywood or MDF (2lbs) 3" drywall screws (14x) 3/8"x4" lag screw w/washers (2x) 3/8"x6"lag screws w/washers Recommended Tools: Power Miter Saw Drill Framing Square Level Tape Measure 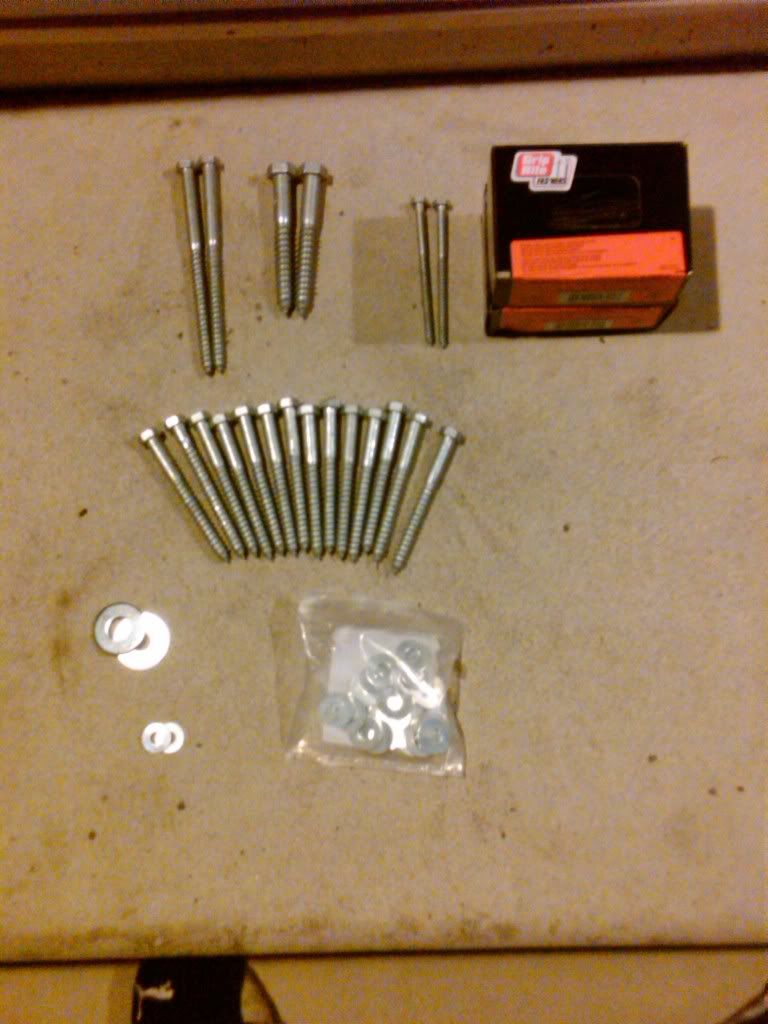
Get everything measured and cut to make the upper and lower frames 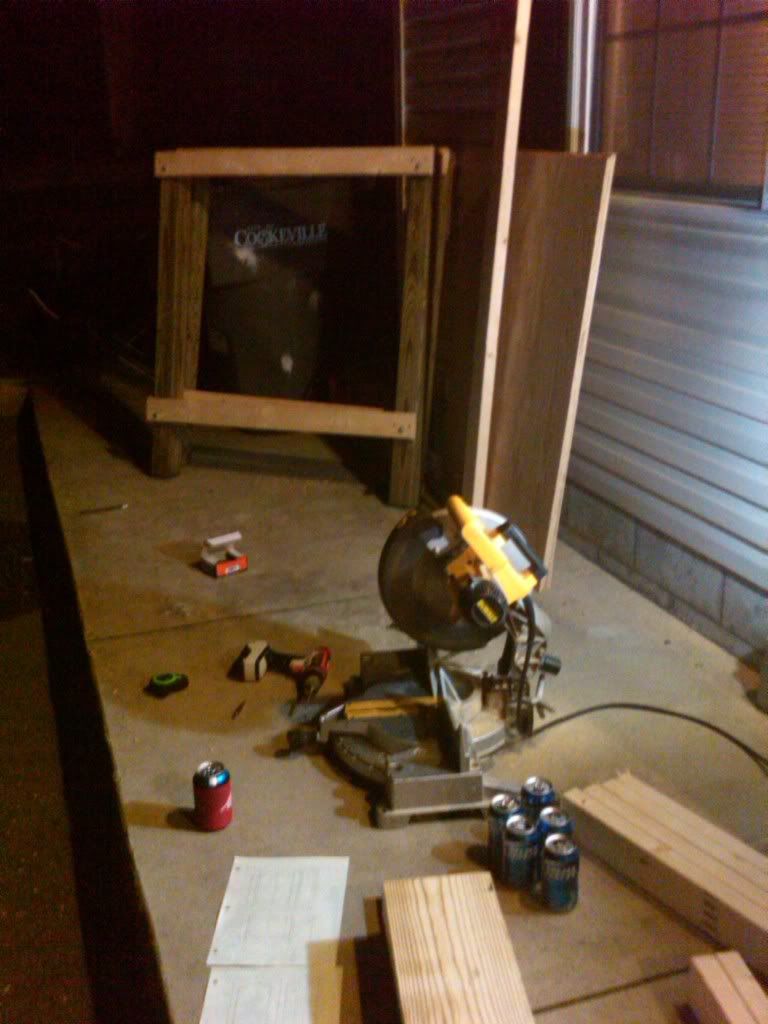
Assemble upper and lower frames using 3" screws. Be sure to use a framing square on hard level surface (I assembled these on the cement porch) 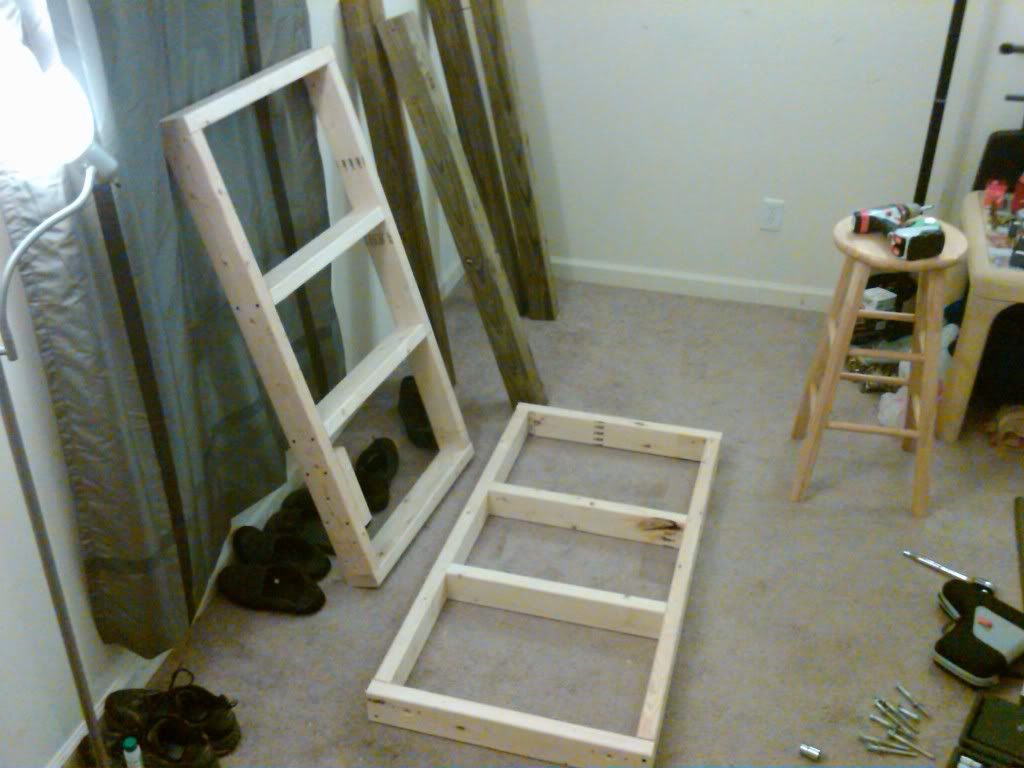
Attach frames to corner posts with 4" lag screws. Drill pilot holes and use washers. Again, use a square and level so everything comes out strait. (note extra block attached where press will be mounted) 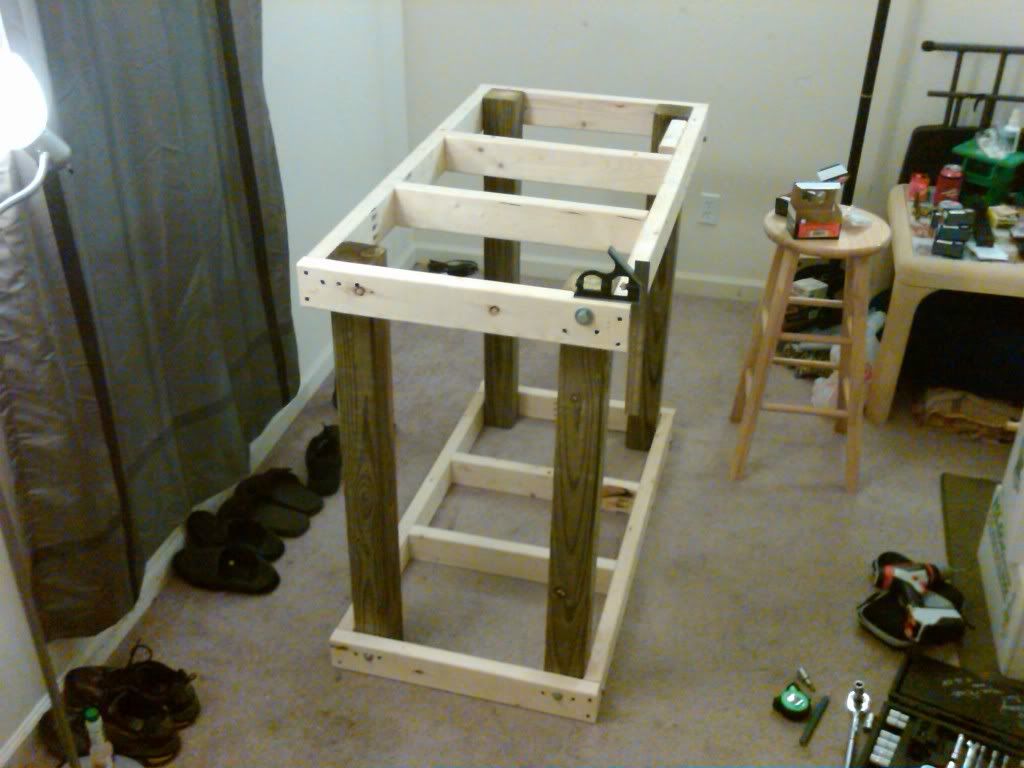
Attach shelf risers with 6" lag screws. Square up and secure with 3" screws. Level and attach shelf with 3" screws 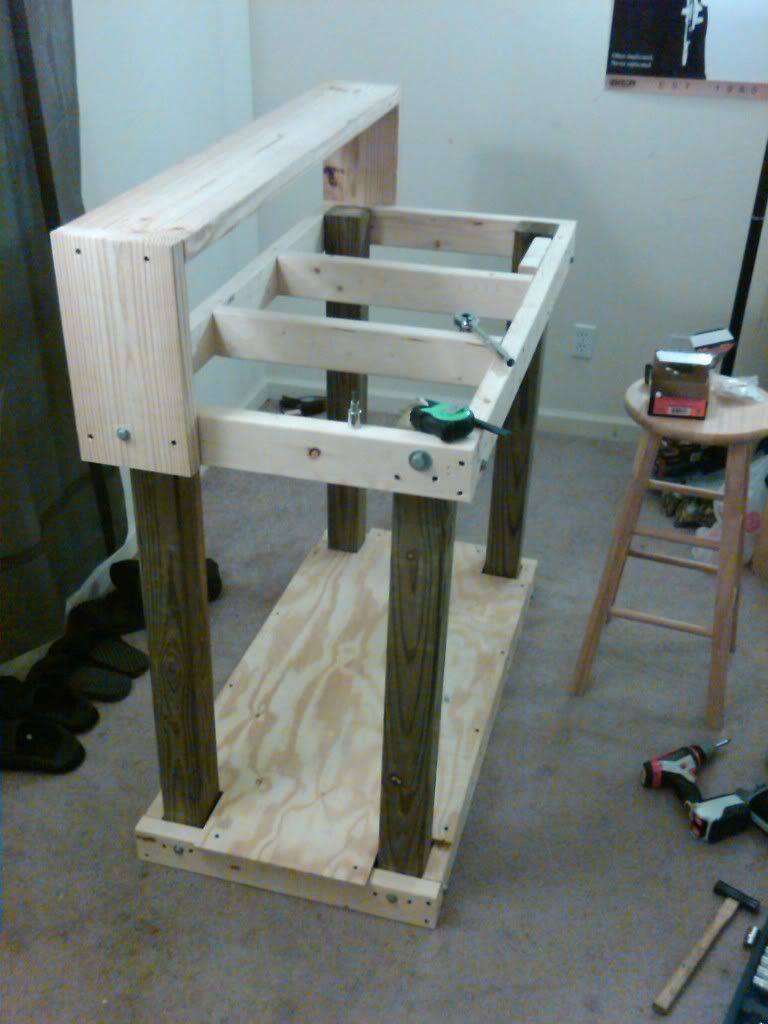
Square up and attach lower and upper ply/MDF surfaces. I used 3/8" rough plywood for the lower and 3/4" rough plywood for the upper. Then I laminated a piece of smooth sanded 3/4" birch plywood on the top for the work surface. 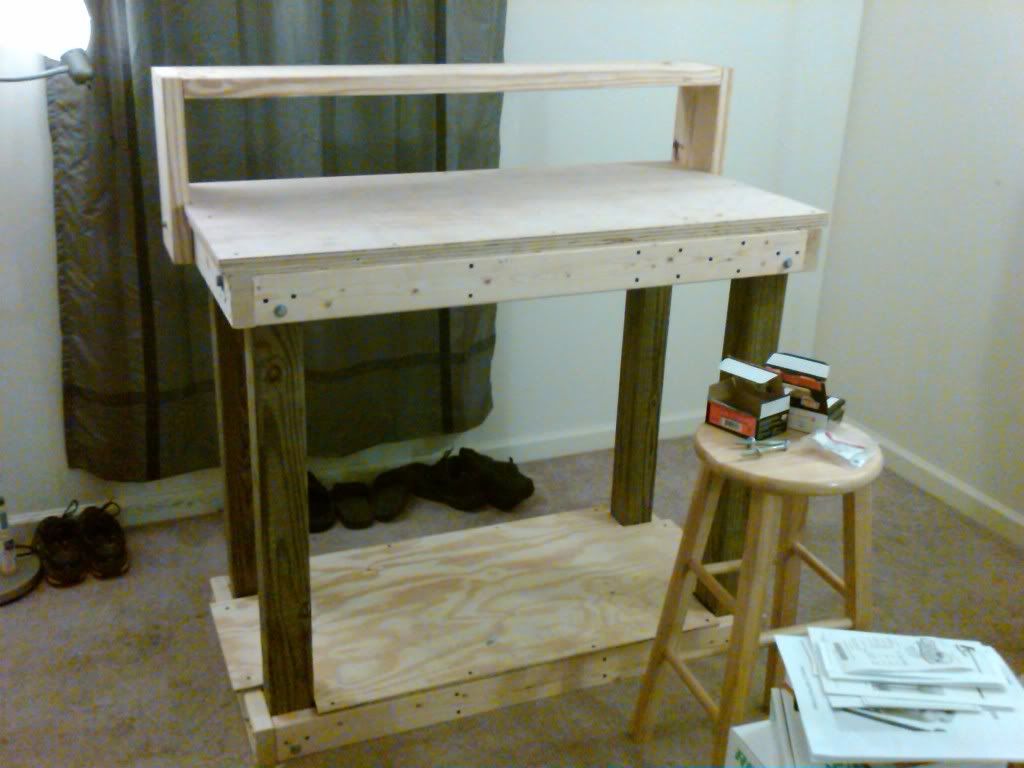
Now just attach your favorite accessories and load up with supplies. If necessary, secure to wall studs with lag screws to eliminate any wiggle during resizing operations on large calibers. 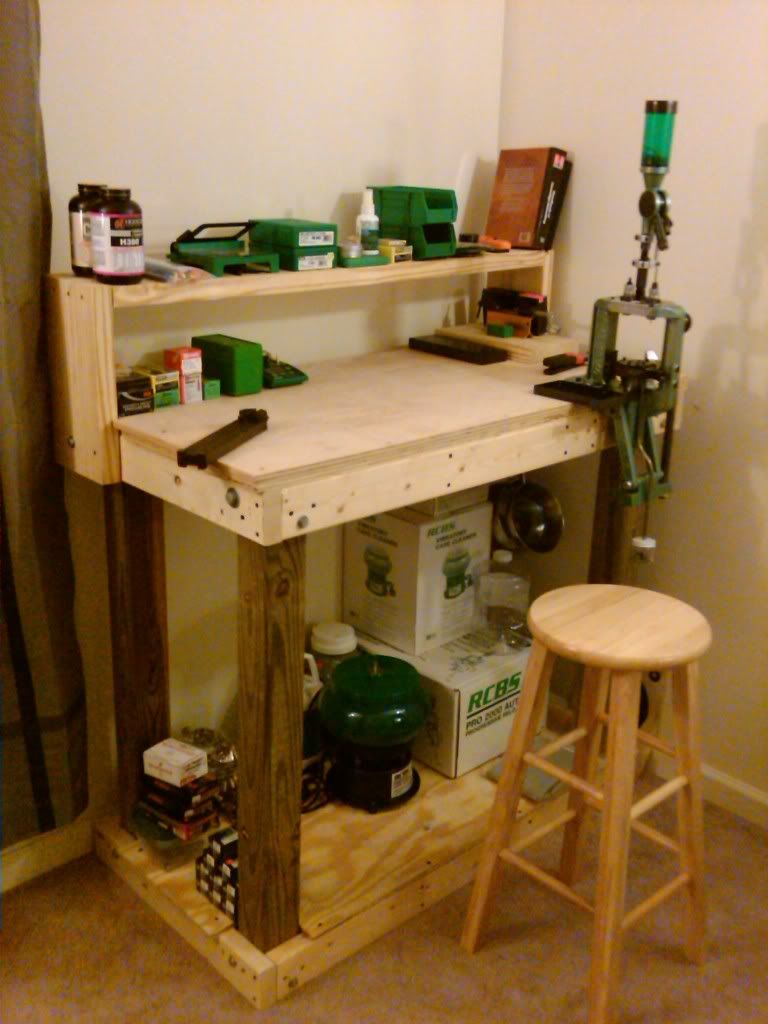
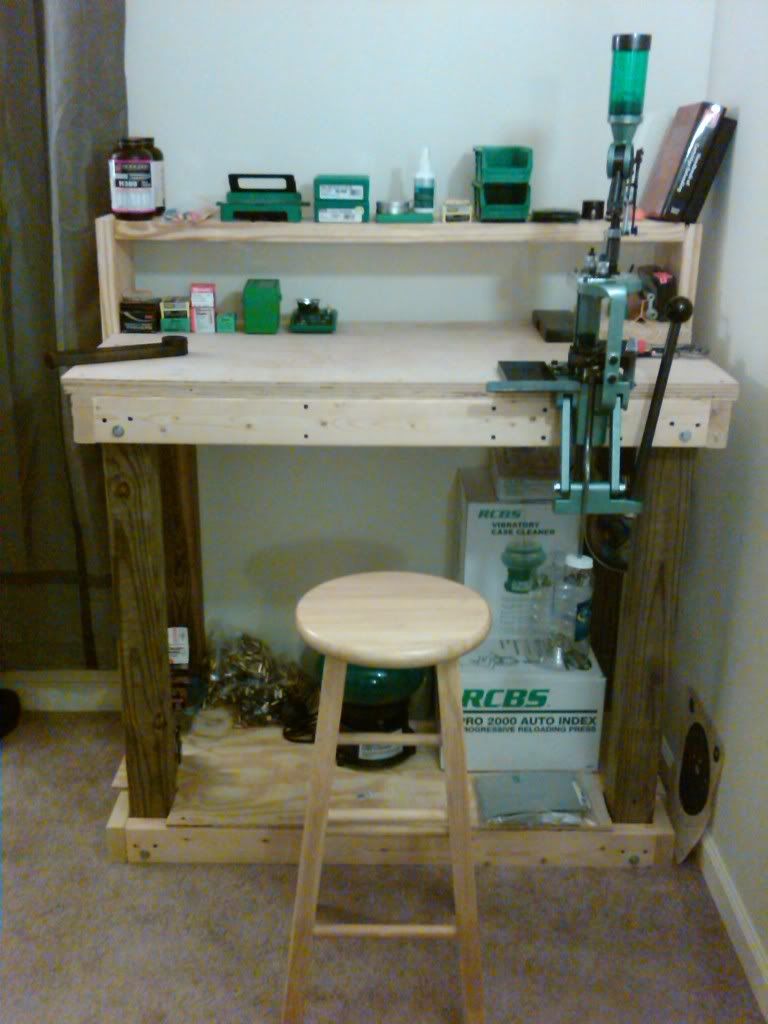
|

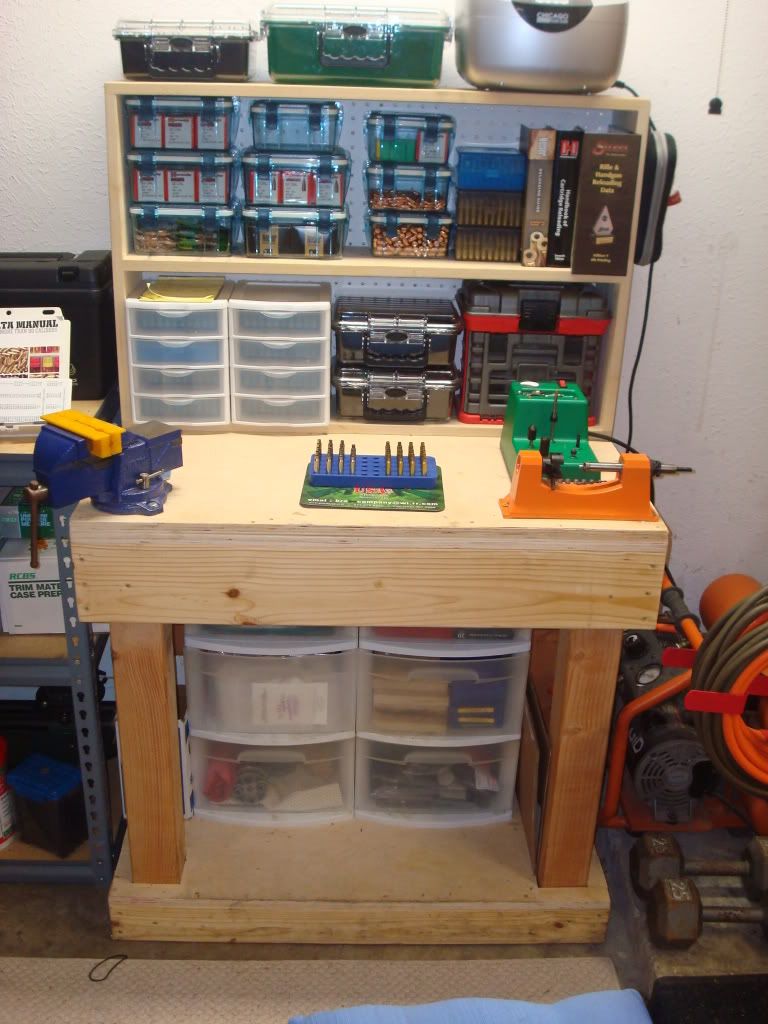
Very similar to the benches I built except I banded the top with 2"x6"'s instead of 2"x4"s and I went about the shelves a little different and used duel 2'x4' sheets of 3/4" a/c plywood for the bench tops for added strength. Here is a photo of a similar bench but built 2'x3' for storage and case prep beside the one I use to load on.
|
Good setup––I'm sure I will find myself adding shelves and maybe even pegboard sometime in the future to make more room. I wanted to get some 3/4" melamine to use as a bench top but I had trouble tracking it down here locally. I have heard of people using old counter tops, steel plate, and even acrylic plexyglass as work surfaces so its pretty much builder's choice when it comes to that; although I'm not too sure how the plexy would hold up to chemical exposure (cleaners, solvents, oils, etc.), and the metal plate would be a major PITA when it came to mounting new equipment 
|
|
Originally Posted By Crazy_Harry:
I wanted to get some 3/4" melamine to use as a bench top but I had trouble tracking it down here locally. I have heard of people using old counter tops, steel plate, and even acrylic plexyglass as work surfaces so its pretty much builder's choice when it comes to that; although I'm not too sure how the plexy would hold up to chemical exposure (cleaners, solvents, oils, etc.), and the metal plate would be a major PITA when it came to mounting new equipment I made my benchtop with laminations. Two laminates of 5/8" CDX plywood, one layer of 3/4" particle board, and a top layer of 1/8" hardboard. Glue and screw the plywood and particle board together. Apply the hardboard top with contact cement. Solid and over 2" thick for about $20.00. |

|
Good writeup.
Now, add a post with a link in the Gateway thread tacked at the top of the forum. The toggle is set to keep the thread out of the archive. |
It's true, Obama is the Leader of Fools deluded to believe, "Everything is going to change now".
As for me, I will embrace what is Right more tightly than ever.
1 lbf = 32.174 lbm-ft/sec^2
As for me, I will embrace what is Right more tightly than ever.
1 lbf = 32.174 lbm-ft/sec^2
|
I left mine open at the bottom - used leftover 2X6's, 3/4" OSB, and masonite. Fastened with 3" decking screws and tapcons to the masonry. Less than $20 in material.
ETA - I also mounted a 48" shoplight above it, and utilized the racking for component and toolhead storage. 
|

| It's so much easier to go to SEARS and buy a sheet metal workbench with a wood top. Mine has been more than adequate for 7 years now.... has drawers, shelves, etc. Dillon strong mount bolts right to it and you're done. |
We need to get over the romance of carrying a 1911 pistol, and get on to the business of shooting smelly bad guys in the face with a modern handgun.

|
Originally Posted By markm:
It's so much easier to go to SEARS and buy a sheet metal workbench with a wood top. Mine has been more than adequate for 7 years now.... has drawers, shelves, etc. Dillon strong mount bolts right to it and you're done. Yes, though I'm betting you'd have a very difficult time getting Sears to alter the size of the workbench to match your specific space requirements. |

I would need to up size that by quite a bit. I've got 4x shotgun presses, 4x single stage presses, and a dillon 650. I'll have to look this thread up after I build my shop. 
|
Originally post by 2theLeft: If done right, there is no taste, because it goes right down the throat..
|
Originally Posted By markm:
It's so much easier to go to SEARS and buy a sheet metal workbench with a wood top. Mine has been more than adequate for 7 years now.... has drawers, shelves, etc. Dillon strong mount bolts right to it and you're done. I guess if you aren't into building than the flimsy work benches would be OK, and cost way more than a solid wood bench built custom to your needs. |
You did a great job on your bench. I hope it's in a "man" room. My wife doesn't allow such things in spaces we share. Not even pink paint would help. Not even pink paint would help.
–I recommend using a proportionate amount of beer to measuring tools according to your level of woodworking skill. It appears you didn't need the beer. Your cuts and fit look great.
|

|
Originally Posted By GWhis:
You did a great job on your bench. I hope it's in a "man" room. My wife doesn't allow such things in spaces we share. Not even pink paint would help.
–I recommend using a proportionate amount of beer to measuring tools according to your level of woodworking skill. It appears you didn't need the beer. Your cuts and fit look great.
Ha well the only other place it would fit is the kitchen and that wasn't happening 
––nothing beats a miter saw for keeping things strait I almost felt like I was cheating
|

|
It looks like your 4X4 lumber is pressure treated. Be sure to use approved fasteners (hot dip galvanized, stainless steel, etc) when using pressure treated wood products. This will reduce the possibility of your fasteners failing.
Nice article explaining why using the right fastener is important Hope this helps jonblack *edited for speeling typo! Yeah I know, I misspeeled "spelling." |
|
Moved the image to the first post.
Pretty cool, eh? |
It's true, Obama is the Leader of Fools deluded to believe, "Everything is going to change now".
As for me, I will embrace what is Right more tightly than ever.
1 lbf = 32.174 lbm-ft/sec^2
As for me, I will embrace what is Right more tightly than ever.
1 lbf = 32.174 lbm-ft/sec^2


|
I don't feel TOO bad posting to this thread since it's been dug up fairly recently.
I'm about to build another reloading bench, and my current one (which is not at all rock solid) moves just enough with every stroke of a press that whatever is stacked on it slightly shifts, eventually causing an avalanche. I was going to actually isolate the bench itself from any shelves to prevent this sort of thing from happening, but from all the above posts, movement seems to be a non-issue as long as the bench is sturdily built. I assume this is the issue or people would be actively solving it. Can anybody confirm that a bench built in the ways described in this thread won't cause the issues I've described? Thanks, all. |

Nickname: Doc. Came with wild hair and a DeLorean
Joined:
Apr 2010
Posts:
5007
EE: 100% (45)
 OH, USA
|
Originally Posted By 50BMGdoesitforme:
I don't feel TOO bad posting to this thread since it's been dug up fairly recently. I'm about to build another reloading bench, and my current one (which is not at all rock solid) moves just enough with every stroke of a press that whatever is stacked on it slightly shifts, eventually causing an avalanche. I was going to actually isolate the bench itself from any shelves to prevent this sort of thing from happening, but from all the above posts, movement seems to be a non-issue as long as the bench is sturdily built. I assume this is the issue or people would be actively solving it. Can anybody confirm that a bench built in the ways described in this thread won't cause the issues I've described? Thanks, all. If you have access to a decent drill press and a hacksaw or metal-cutting bandsaw, I would grab some short pieces of angle iron, and use them to anchor your table to your studwalls. If you can put the table in a corner and do so to two walls, you can easily turn a not-so-solid setup into something extremely solid. |
"We're all new here, kid. The old ones are either dead or in the hospital. What the hell did you expect, a two week pass to Paris? Get in line and do what you're told, or you'll be dead before sunup."

|
I can`t post a pic right now but in my shop I built a HUGE reloading bench. Two 650`s plus a Redding turret plus a ton of other stuff. I then put it on four "car rollers" so I can move it around. When I`m not using it I roll it in front of a matching component steel warehouse style storage rack which houses my Sartorius scale along with all my tipping & trimming stuff. When I "unfold " it the entire work area is 16 ft. long. By doing this I am able to cover the entire operation with a single tarp for dust reasons ( all of it is inside my work shop). By adding a roll around portable air conditioner along with portable heaters I can now work anytime during the year comfortably.
I`m using salvaged cabinets for powder storage (multiple types) and the steel shelving allows me to store hundreds of lbs. of projos and brass. The steel rack is way to heavy ( loaded) to move around but the reloading bench is a cinch. One hand rolling on concrete! It saves me sooooo much space by doing this. I have a permanent power supply mounted on the back of the reloading bench with all cords from all equipment funneling under the bench to it. This allows me to start reloading almost immediately with only a minute or two of set up time. The only other equipment not included in this set up is my Giraud trimmer and annealer along with my tumblers all of which I have in a different area for safety and clean up reasons. I`ll try and get some pics soon. Satellite internet sucks but the trade off is not living in the city. |

Global Warming Hoax Skeptic before it was cool
Joined:
Jun 2007
Posts:
28397
EE: 100% (1)
WA, USA
|
Originally Posted By 50BMGdoesitforme: I don't feel TOO bad posting to this thread since it's been dug up fairly recently. I'm about to build another reloading bench, and my current one (which is not at all rock solid) moves just enough with every stroke of a press that whatever is stacked on it slightly shifts, eventually causing an avalanche. I was going to actually isolate the bench itself from any shelves to prevent this sort of thing from happening, but from all the above posts, movement seems to be a non-issue as long as the bench is sturdily built. I assume this is the issue or people would be actively solving it. Can anybody confirm that a bench built in the ways described in this thread won't cause the issues I've described? Thanks, all. Simple as that. Wood glue is something non wood workers need to learn about. Yes it makes a big difference.
|
Selling agent for Algores carbon credit scam.
Shooting and Reloading, one hobby feeds the other.
Shooting and Reloading, one hobby feeds the other.
|
Just built one of these lovely things for my honey for our anniversary. He was using a table he made out of old wood he found at his parents place before they moved and downsized, which forced him to need to move his stuff. The one that he had would flex so bad when he would punch primers he would have to use one hand to hold the press in place to keep it from flexing so much. there are wear marks on his press from his hands. He was pretty excited about this one when we picked it up. I work in a lumber yard and was able to get this stuff for pretty cheap but this is what we used:
(1) 1/4" Hickory Plywood (4) 2X4X96 Pine (2) 4X4X96 Fir Post's (20) 3/8" Oak Plugs (mostly because the other ones we had for whatever reason were smaller than 3/8") (1) 3/4" x 33" x 96" Hickory Countertop Material (butcher block look) (20') 1 X 6 Hickory S4S Lumber (30') Hickory Outside Corner Molding (?) 9 X 3" T20 bit Screws Wood Glue Wood Filler Impact Driver We predrilled and countersunk everything so we wouldnt split the hickory. I used hickory because not only is it beautiful (after all it is going to be furniture in my house) but it is also very very tough. This thing is so sturdy that NOTHING moves on the rest of this bench when he uses it. Thank you for the plans! 


|
Global Warming Hoax Skeptic before it was cool
Joined:
Jun 2007
Posts:
31344
EE: 100% (1)
WA, USA
Welcome to Arfcom and the Reloading Forum. What kind of finish do you plan on putting on your beautiful bench? To all, the approve image thing at the end of the above post; Something new at Arfcom to cut down on spammers that effects new members. OP (Origional Poster in the post above) has done nothing incorrect, he is just a new member. Search for the thread in GD to explain it. edit, here it is, http://www.ar15.com/forums/t_1_75/1658196_NEW_USER_SPAM_PROTECTION___HOW_YOU_CAN_HELP___WHAT_ARE_THESE_WEIRD_LINKS_IN_POSTS.html |
Selling agent for Algores carbon credit scam.
Shooting and Reloading, one hobby feeds the other.
Shooting and Reloading, one hobby feeds the other.
Armory Sponsor