


AR Sponsor
[ARCHIVED THREAD] - Bushmaster Buffer Tube Thread (Page 1 of 2)
Posted: 10/10/2005 11:28:33 AM EDT
|
I'm hoping to start the "Definitive" thread on use of the Bushmaster Buffer tube. It's getting cold now, and I finally dug out the horizontal bandsaw to chop my carrier. If anybody notes any mistakes, please IM me and I'll edit my posts. Thanks. History: The AR-15 system, as designed by Gene Stoner and developed further by Colt, consists of a bolt carrier assembly that serves several functions. It serves as a cylinder for the gas operation of the weapon channeling gas from a port in the barrel, through a gas tube, and into a chamber formed in the front portion with the bolt acting as the piston. The rear of the bolt carrier is elongated and rests on the buffer assembly and buffer spring. These parts are located flush with the rear of the receiver so that the gun may be ‘shotgunned’ open for cleaning and maintenance. To make a pistol, we must simply take the stock off of the gun. Well, that’s easy to do and requires a screwdriver and removal of one screw. Now the gun is essentially a long barreled pistol. Various shorter barrels are available, generally in 16”, 14.5”, 11.5”, 10.5”, and various in the 6-8” range. Short barrels are available and a realistic limit exists at about the 6.5” length. But how do we shorten the buffer tube? The simplest way is to buy an off-the-shelf pistol buffer. There are several flavors. The most popular option seems to be the CAR-15 buffer developed originally by Colt for their XM177 carbine. This is simply a shorter buffer and buffer spring. This seems to be the shortest length possible with a conventional bolt carrier and the ability to easily break the gun open. It runs about 7.5” beyond the rear of the lower receiver. The next option is some way of telescoping the spring assembly into the bolt carrier. Model “1” Sales sold an assembly like this for years. It used a long 1911 style spring and telescoped into the rear of the bolt carrier. It stuck out about 4” beyond the rear of the lower receiver which is about the functional limit with a conventional bolt carrier. Great… problem solved! Well, not really. I’ll explain.  Above is the Model "1" Sales telescoping spring system (Don't call it a buffer) that uses a standard AR-15 bolt carrier. The reason we all call the buffer tube a “buffer” tube is because the bolt carrier on the AR-15 system needs to be buffered somehow. Sure, the telescoping spring system worked sometimes, but more often than not problems are encountered with what we call “Bolt Bounce.” Bolt bounce is the bolt carrier bouncing when it slams home and not allowing the hammer to fall on the firing pin. This was the subject of years of study by the Army and TCC, but the final consensus was that this type of operating system requires a ‘buffer’ to keep the bolt carrier in battery. To do this, they used the concept of the dead blow hammer. Place a series of weights in spring guide that strike the rear of the carrier after it slams home. Take the buffer out and tap it against some metal surface. It doesn’t bounce that well, does it!? So, what happens when you don’t have a buffer? Can it work without it? Sure. You can easily strike a balance between a fairly heavy spring and greater gas pressure (larger hole in the barrel) and lots of tweaking. You’ll get it to work soon enough. But why mess with years of engineering, testing, and results that work? Professional Ordnance was a company that came up with a solution. Through several versions, they devised a buffer that worked better. It required a shorter bolt carrier and therefore needs to have its buffer removed each time, but it works well. The problem was that they used a plastic upper and lower of dubious quality as well as a proprietary thread pitch so standard parts just didn’t work. So, they didn’t sell many and those they sold were not satisfactory (to me at least).  Here's the first attempt by Professional Ordnance. The 'buffer' part is shot inside the fat portion of the red buffer. Ahead of it is the spring tube that telescopes into the bolt carrier. The bolt carrier must be shorter as is evident. Enter Bushmaster. They bought Professional Ordnance and set about improving the quality control and making changes. One change for the better was changing to a standard buffer tube pitch. That means that modern Bushmaster parts for the “Carbon 15” are interchangeable with those of the standard AR-15. That means that we can use Bushmaster parts to build a pistol that’s half a pound lighter and 3-4” shorter than we can build with the ‘standard’ CAR-15 buffer assembly. In the next post, I’ll explain how.  This is the current version. Notice the smaller nub on the front of the buffer. The buffer contains much more shot. This shot slaps against the front of the buffer AFTER the bolt goes home, neutralizing any bolt bounce. Cool, eh? |
|
How-to: First, you must decide what route you want to go. You can order most of the parts you need from Bushmaster, but something more will have to go into it. Bolt carrier options: Bushmaster will sell you their bolt for a reasonable price. This has advantages and disadvantages. First, you won’t need to cut anything. Second, it’s pretty much drop-in at this point. That’s cool. Finally, it’s a quality bolt carrier… well built from a quality supplier. BUT, it doesn’t operate the ejection port cover and your forward assist will be useless. The solution to this is to build your upper with a DPMS low-pro upper that lacks the forward assist AND the now useless ejection port cover. But, some of us like the port cover. You can also cut your bolt carrier. This involves more than just a hacksaw. You must bevel the inside of a cut carrier so that your buffer will fit conveniently into it. You must also cut it slightly longer and add some sort of spacer to your buffer tube to allow for that extra bit of travel. The reason it must be longer should be obvious if you look at where it needs to be cut. It just happens that the solid portion on the top of the carrier ends EXACTLY where your cut should be. If you cut it there, you end up with a two tines, or a “Tuning Fork” as the chief engineer at Bushmaster called it when I spoke to him. Somebody mentioned the spacer can be made with PVC pipe, but my brother cut me some Aluminum spacers on the lathe, so I didn’t need the PVC. Takedown pin detent spring keeper: When you take the stock off the AR-15, you’ll probably note that little spring sticking out the rear of the lower receiver. That spring keeps pressure on the detent that keeps the rear takedown spring captive. There are four options for keeping this operable. 1) The standard method is finding something that will bear against this spring and hold it there. I think that ACE makes a clamp-like device that fits over the buffer tube and keeps the spring in place. Nice… IF you didn’t have to take the buffer tube off every time you disassemble the gun. 2) Bushmaster uses a little plate that screws into the rear of the receiver. You must drill a hole and tap it to 10/32, but you can use this for a sling swivel. I thought this would be the best option, but then I looked at the plate and it just seemed cheesy. It takes care of the sling swivel issue, but doesn’t look right. 3) You can also just take the whole assembly out and use a non-captive pin of some sort. You know, those pins with a ball detent on one end. They stick out the side of the receiver, but they work. 4) The preferred method is to tap the spring hole and install a set screw to keep the spring in. Use a 4/40 tap and corresponding set screw in most cases, but I’ve heard that this didn’t work for some. You’ll have to cut a few loops of the spring and check for proper operation of the takedown detent, but this is clean, quick, and cheap. Some final thoughts: You’ll need to discard the buffer retainer and spring. These will pop out when you take the factory buffer out, so restrain them. To disassemble the gun, you simply grasp the buffer tube and screw it off. Pull the spring and buffer out the rear and you can finish the disassembly the standard way now. Next post, I’ll give you the part numbers and a price list. |
|
Now, you should take notice that Bushmaster does NOT have these parts listed online or in their catalog currently, but you can call and order them. Simply explain that you are building a pistol, read this thread on ARFCOM, and tell them the part numbers below. Here's what you need: #AZ15078 -- $7.95 -- Buffer Tube #AZ15009 -- $16.95 -- Buffer #AZ15998 -- $2.95 -- Buffer Spring #AZ15267 -- $75.95 -- Stripped Bolt Carrier w/Key installed (or just cut yours and make a spacer) End Cap Options: #AZ15307 -- $7.95 -- End Cap either #AZ15029 -- $.50 -- Screw (10/32) for End Cap or #AZ15644 -- $1.95 -- Swivel Stud (replaces #AZ15029 Screw) or ... you can just tap it and put a 4-40 seet screw in to hold the spring. That's what I ended up doing. Either way you have to tap a hole, so why not? Other Supplies you'll need depending on what options you end up using are as follows: Cutting device: Either a horizontal bandsaw like I used or a hacksaw and miter box. You'll have to dress up the end of the bolt carrier and bevel the inside. This is hard metal, so I'd suggest a grinding wheel on a dremmel and some time. Don't hack it up too much. You can file, but plan on it taking a while. Tap: Mine required a 4/40 tap. Set Screw: Of course, a 4/40 set screw. You can get these at any hardware store. LockTite: I used the blue stuff so I can remove it later if desired. Buffer Spacer: You'll need this if you cut your own bolt carrier. It needs to be the exact width of the web on the top of your cut bolt carrier. I chose 1/16" for a thick enough web. I'd suggest not making it longer as your buffer tube will have progressively less thread contact the wider this spacer is. Notice how cheap this option is, too. Some have expressed how they are worried about the plastic buffer tube stripping out. Fair enough, buy two! They're cheap enough, so why not have a spare or two lying around? Others criticize the fact that you have to unscrew the buffer each time you take apart the gun... So? It takes me 10 seconds to do. That's absurdly little time for the added convenience of 3.5" less length. I also get the, "Why not just buy the Olympic Arms pistol. It's 4" shorter than your gun with the Bushy Buffer!" Okay, you're right, but it lacks a buffer system and uses a cheesy looking proprietary charging handle. It's MUCH more expensive, you can't use a forward assist, you can't build it youself, etc. If you want that 4" extra, go for it! I'll buy another upper for the extra money you're going to spend on your Oly. 
|
|
Glad this information is finally compiled in one thread. Searching through many pages of the large AR Pistol Information thread, I followed these directions for the Bushmaster Buffer System (BBS as I call it) when I built my pistol in March and I'm real happy with it! I keep wondering if the Bushy inards would work in the metal Model 1 Sales metal buffer tube? JR 
|
| I'm pretty sure that the Bushy spring, buffer, and bolt carrier will work in the Model 1 Sales Tube. The Model 1 Sales tube has the advantage of using the CAR-15 spring keeper so you don't have to thread your reciever. Mounting a single-point sling should also be easier... just use the spring keeper mounts. The M1S tube is heavier. Not sure if M1S will sell just the tube and cap though. |
|
I've found a new product that might solve the spacer issue when you cut your own bolt. To review, if you want to use a standard bolt carrier instead of the Bushmaster bolt carrier, you'll have to cut it at the rear. You cut it about 1/16" longer than standard if you don't want a tuning fork. Because it's longer, you need more travel room in your buffer tube. You must therefore use a spacer of some sort. I used aluminum turned and cut on a lathe. Some have suggested PVC. I just found a solution to this and two other problems. DPMS sells a stock sling adapter for the A2 stock which looks like it will work. This is intended to slip between the A2 stock and the receiver, but MIGHT also slip between the Bushy buffer tube and the receiver. It solves three problems: 1) Adds space so your cut carrier will function properly. 2) Retains your takedown detent and spring. 2) Provides a sling swivel. There is a catch though. If you do this, you'll be putting pressure on the plastic threads. I doubt the gun can take the pressure, but it's worth a try if somebody is willing to take the chance. If you don't want to take the chance, you can still drill a hole through the lower part and tap a hole in the reciever. It will become a captive part of the receiver but can be removed, if desired, for access to the takedown pin detent and spring. Heck, somebody has to think this is a good idea. Anyhow, it's $40 bucks from DPMS. Their part # is BS-ADP and I'll put the link and picture below: Link: www.dpmsinc.com/10Expand.asp?ProductCode=BS-ADP 
|
|
I have wondered if the Bushmaster bolt carrier and spring system would work in the Model 1 Sales early short metal buffer tube so I finally found one on the EE board and bought it. The Bushy inards will work in the M1S buffer assembly. Shot a few rounds and everything functioned correctly. The picture below shows the plastic Bushmaster 1 piece buffer and metal Model1Sales multi-piece buffer tube parts for comparison. The M1S is slightly shorter than the Bushy. Where the spring guide rod is molded inside the Bushy buffer, the M1S guide rod is a separate piece from the tube and end cap. I used J-B Weld to "glue" the guide rod to the center of the end cap. The M1S receiver lockplate was so enlarged it wouldn't secure the tube to the receiver and it couldn't be used. I threaded the tube in the receiver and end cap on the tube to match the overall length of the Bushy buffer with the Bushy bolt carrier and spring inside. I need another receiver lockplate and Castle nut to lock the tube and cap at the correct lengths. Will post a picture when the parts arrive JR  |
|
First, NO, I am not cutting down a full-auto carrier. I'll have to get pictures of the carrier and spacer later as well as an overall length. Can't find my dial calipers for some reason. I think one of the kids might have taken it to play with it. The Carrier is cut slightly longer than the Bushmaster carrier and the spacer allows enough travel on the carrier for reliable function. You can solve all of these problems by just getting the Bushy bolt carrier, but if you want to cut your own carrier, I'll show you how. There is really no need to measure, though. The length of the Bushy carrier is EXACTLY the same as the standard carrier up to the end of the opening on top of the carrier. Look at the pciture with the two carriers side-by-side. Not the standard carrier on top. Look at the end of the carrier on the bottom and note how it lines up perfectly with the END of the opening on the carrier on top. That's where you would normally cut, but on a standard carrier you'd end up with a "Tuning Fork." Instead, cut behind it about an eighth of an inch. That will leave a web equal to the width of the web on the Bushy carrier. That's also the size of your spacer. Now, the spacer should slip over the buffer tube before you screw it onto the receiver. I'll get some photos and post them. I measured my cut 1/8" behind the end of the opening. I'll see if I can't get a more precise measurement later for ya. |
COuld you just use another buffer tube castle nut and extend the endcap out a bit? <----- still has car tube and buffer on ar pistol |
| I've been told that the Model 1 Sales buffer tube does work. What you're suggesting is to use another castle nut on the back end to limit the travel of the endcap. You might have missed something. You'd need a jam nut to keep it in the same position every time. It might be easier to make a plastic sleeve that would span the distance between the front castle nut and the front of the rear cap. PVC Again? I would rather somebody just make a double-ended tube just a little longer. The endcap could also be a little more elegant, IMO. When I get some time, I'll draw up something and maybe have a few made for sale on EE. |
More along the lines of gaining a little more travel. It seems that the trouble with bolt bounce can be fixed with a little more room to travel. You could use a spacer like the ones found in stack style suppressor and move the encap back a bit. Yes a new tube would be great but hey, I would like to make the one I have work better. If it doesnt work then a few minute on the lathe and a new one will be had. Thaks for all the info in this thread. Been very handy! CH |
<----- still has car tube and buffer on ar pistol Yes, That's what i did and it works great, I'll post a picture soon. The extra weight of the metal M1S buffer bothers me some, guess I'm just used to the lightweight plactic Bushy buffer. JR |
hmm thought it would work.... THanks Will get right on it!!! CH |
Extra weight ? JR - is your M1S tube and end cap steel ? My M1S parts are all alum. and so is the unit from G.S.E. I can't tell any difference in weight at all. |
|
I have yet to take this out and shoot it again with the new, cut carrier but here is a pictorial of what I did to cut the carrier. I started by measuring the web on the Bushmaster Carbon 15 carrier. It was .125” wide. I decided that this was a good width to make the web on the cut carrier. I cut it a little long on a horizontal bandsaw. For those of you who don’t have a horizontal bandsaw, you can use a hacksaw but be careful to cut it long enough that you can come back and file or sand it square. Next I squared up my bench belt sander and sanded it down slowly to 5.225” overall length as you can see below. If you don’t have a belt sander, a sharp file will do, but it will take you some time. The carrier is hard metal. The next step was to debur the outside of the carrier. I just spun it around at about a 45-degree angle on the belt sander, but you can do it with a file just as easy. Just take off enough metal so you can run your fingers over it and it will feel smooth. The final step is to chamfer the inside of the carrier. I took a cone-shaped grinding wheel to it with my Dremmel. Sure, it’s easy for me because I’m an expert, but this was the hardest step. See the pictures for a better view of how I did it. Now you have to make a spacer. I have a brother with a lathe, so he cooked me up some. I’ve heard that you can use PVC pipe. Measure the outside diameter of the threaded portion of the buffer tube. This will be the inside diameter of your spacer. Now, measure the outside diameter of the buffer tube. This should be the MINIMUM outside diameter of your spacer. You can make it bigger like I did to match the contour of the lower receiver. Some thoughts here. DON’T GET CUTE on the width of your spacer. It should be as close to exactly .125” as possible. If you make it too wide, your carrier can contact the rear of the receiver doing damage. There is very little difference between just right and a damaged receiver, don’t play games here. home.gci.net/~shuler/BushyCut/SmallARpistolBufferCut3.JPG Partially unscrewed buffer tube. Notice that the threads end before the rear of the threaded portion. This means that even though the spacer moves the threads back .125”, you will still have full thread contact with the receiver, therefore no loss in strength. This also describes where to put the spacer. home.gci.net/~shuler/BushyCut/SmallARpistolBufferCut4.JPG Here you get a better view of how much needs to be cut off the Carrier. Notice the cut portion in the rear. If you look at how the carriers line up, you’ll notice the difference in length. Also, you can see here the wall thickness of the spacer and the fact that the rear portion of the buffer tube where it inserts into the upper receiver is unthreaded. Again as I stated earlier, this means you don’t lose strength. home.gci.net/~shuler/BushyCut/SmallARpistolBufferCut5.JPG This is a very good view of the difference in the Bushy Carbon 15 Carrier and the cut carrier. Notice the cam slot in the cut carrier. This opens the ejection port cover when it moves back. The Bushy carrier lacks this and also lacks the notches for your forward assist. Also note that the cut carrier removed most of the rearmost forward assist notch. Don’t worry, this notch doesn’t get used. home.gci.net/~shuler/BushyCut/SmallARpistolBufferCut6.JPG This shot clearly shows that the bottom/rear of the carrier is open. There’s more than enough meat here to support the buffer though. home.gci.net/~shuler/BushyCut/SmallARpistolBufferCut7.JPG Perfectly lined up here, you can see that the spacer is exactly the width of the extra length needed. Remember, this extra length is so that there will be a web on top to join and support the sides of the carrier. This also more clearly shows what happens to the forward assist notch when it gets cut. home.gci.net/~shuler/BushyCut/SmallARpistolBufferCut8.JPG Notice the relief cuts on the inside diameter of the bolt carrier. This is necessary because the front of the buffer has a radius and the bolt carrier must also have this radius. I cut this carefully with a cone-grinder on my Dremmel and dressed it up with needle files. home.gci.net/~shuler/BushyCut/SmallARpistolBufferCut9.JPG Another view of the chamfer at the rear of the carrier. Notice how the Carbon 15 carrier has a rather aggressive chamfer. You don’t need quite that much. Also, you can see here that the cold-blue I used to touch up the back of the carrier doesn’t look great, but it’ll do. home.gci.net/~shuler/BushyCut/SmallARpistolBufferCut10.JPG Here you see that the Bushy carrier is exactly 5.100” long from the face of the carrier to the rear. Please remove the bolt to measure so you’re not tempted to measure from the front of the bolt instead! home.gci.net/~shuler/BushyCut/SmallARpistolBufferCut11.JPG And now you see the cut carrier. It’s exactly 5.225” long. Now, a little simple math means that I cut it .125” longer than the Carbon 15 carrier. That’s 1/8” for you woodcutters out there. I like nice, round numbers. I’m an expert, but the way I did it was to cut it a little longer and then square and dress the cut on the belt sander that was squared up immediately prior to the exercise. The most important thing to remember is to keep it PERFECTLY square. home.gci.net/~shuler/BushyCut/SmallARpistolBufferCut12.JPG Okay, it’s not done yet. I had my brother lathe me these spacers and I haven’t dressed up the end of it yet. Better longer on the spacer than shorter. For the record, it’s .131” wide, or about .006” too long. Ooohhh, the machinist gods are frowning on me. home.gci.net/~shuler/BushyCut/SmallARpistolBufferCut13.JPG This final shot shows the installed buffer tube, spacer, and clearly shows the stainless steel plug screw that I used to retain the takedown pin. |
|
I built a similiar system without having any knowledge of the carbon/bushy system. Shortened a carrier, made my own shortened buffer and used a shortened Car recoil spring. The buffer tube was a unit I bought from someone at a gun show - not the run of the mill pistol buffer tubes all the parts suppliers sell (they dont work). I suspect the tube is from a preaban pistol. When I tested the pistol the buffer system it worked well - the gas system still needed fine tuning though. I hope to get back to the pistol project soon - Who makes the best pistol barrel length upper? I made my own barrel for my test upper |
| The metal on the last carrier I cut was VERY hard. A hacksaw wouldn't do it. The trick is to cut it slightly long and square it up with a belt sander, taking care to cool it often so it doesn't get heat-treated. If you get a tuning fork, you won't need the spacer and I don't think there would be any serious problems. I just wanted the extra meat. |
Consider one sold if you do make them. Also will you offer to cut our bolt carriers? |
No. The 9mm requires much more weight. Remember that the 9mm version of the AR-15 is not a locked breech. It relies on the weight of the bolt carrier and buffer to retard the opening of the action. You should NEVER mess with the factory weight of a 9mm carrier or any other blowback bolt carrier save for maybe ADDING weight and hoping it will still function. Subtracting weight is asking for trouble. Bushmaster thought so. Look at their new 9mm with a standard length buffer. |
|
Here's an idea; Take one of the pistol buffer tubes that RB Precision is selling here, cut it down to the correct length needed for your cut buffer, thread the back portion of it and screw on the cap from the old style M1S buffer tube. This pistol buffer screws in like an entry/rifle length tube but has enough length on the threads to sandwich a CAR style receiver plate. You could even get fancy and add a plate that has sling loops on and not have to worry about damaging the threads because the tube is metal... Just a thought... |
Only one problem I can see. You cut off the end of the tube and you have nothing to tighten it down with. What you need is to cut off and thread BOTH ends so you can use an end-cap on one end and a plate and castle nut on the other. You also need the CAR slot so that the index tab from your plate will have somewhere to go. |
Good point. I suppose a strap wrench and/or some blue loctite should do it.
Which would basically turn it into a slightly longer M1S tube... These new tubes are designed to have the CAR end plate between the receiver and the tube (They're long enough to retain the buffer detent pin with it on). Hmm I'm not mechanicaly inclined but I think I'm going to try it. |
|
I have a couple of questions. First off could you add the part numbers for the M1 Sales metal pistol buffer tube and components. Also i assume an M16 carrier could also be cut down which would result in the full circle carrier like the one pictured from BM, adding more strength not that you'd need it but as a piece of mind thing.Thanks for all the information. I'm a little confused though. If you take an RB Precision tube and cut off both ends and rethread??Isn't that just cutting the threads off you already have on the tube and then just putting them back on. If it's a length issue as far as receiver plate and castle nut could you not just add a few threads to the receiver end already threaded? David |
Model 1 Sales does not sell their short pistol tube anymore. Somebody does, though. The Model 1 Sales tube is shorter than the Bushy tube. Won't work with a cut carrier. Yes, you could cut the M16 carrier down, just make sure you're aware of possible legality issues.
The RB Precision tube has a shoulder on it that would need to be turned off to thread that end. It would be easier to cut and thread, IMHO, but you could turn off that shoulder and thread it further up the tube, I suppose. There is enough length to this tube to just cut it, though, and that would involve less machining operations. One thing that WASN'T mentioned is that you'll still need a spring guide rod. The Bushy buffer tube has an integral one. |
I wouldn't cut off the end that screws into the receiver as it will hold the CAR back plate (and your pin and detent) on it. I would just cut off length from the back so it's about 1/8 in longer than the M1S tube, thread that end and put a cap on it. |
Is there a difference in the diameter of the buffer tubes? The RBP tube is the same as the M1S, is the Bushmaster thinner? With a cut bolt, Bushmaster buffer and spring I don't see why it won't work on the modified RBP tube. |
It's not as simple as that. For the rear cap to be functional for take-down purposes, the tube must be SECURELY attached to the lower receiver. You could PROBABLY do this with a strap wrench if you desired.
I think you're getting a little confused. The Bushy tube is plastic and, yes, it's thicker than the aluminum tubes. It has a molded guide-rod that the recoil spring rides over. This is basically a 'pin' inside. The RB Precision tube is nothing but a carbine-length buffer tube taken from an entry-sized stock. Take the A2 stock off your gun and imagine it shorter, that's exactly what you're getting. The reason the cut bolt and Bushy buffer won't work with the RB Precision tube (cut or not) is that you'll be missing a guide rod and the spring will kink in the tube. You'll need either a Model 1 Sales style spring guide or something similar. If anybody's trying this, remember: The length of the tube is critical. Make sure it's not too long or your bolt carrier will damage your upper and/or lower receiver at the end of its travel. |
I was wondering if there is someone on ARFC that sells the Bushmaster pistol buffer parts that would accept PayPal. I have some money in there so i can buy AR stuff without having to explain to my wife why i need it.. Thanks for all the help you've been answering my questions. David |
OK that explains everything! This is just making me even more determinded,,, 
|
Not quite. The M1S tube is shorter. By how much, I don't know. Yes, if you buy the Bushmaster bolt carrier you will not need to cut anything or use any spacer. Why not just use the inexpensive Bushmaster tube, though? |
Refixed it!
|
Eh... that would be too easy. Seriously though I like the idea of metal on metal and a receiver plate with a sling loop on it. Plus I don't want to have to modify the receiver in any way and it's a little side project to pass some idle time. My 2 cents. |
|
More knowledge needed. I'm building, or trying too , a 9mm pistol and this is all new to me. I purchased a pistol buffer assembly sight unseen which turned out to be the M1S style you have pictured in your opening post. What can i do to use this with a 9mm upper? I know i might have to file 13 the spring and internal assembly but can i still use the buffer tube. I'm just having trouble figuring out what i'll need especially since the .223 buffer is hollow so to speak and the RRA buffer i have is solid on the end.Any replies will be greatly appreciated. David [email protected] |
|
Well, my pistol worked fine with a carbine tube, but I got tired of the Chicken Little "that is illegal!" criess so I cut down my bolt carrier, cut downa standard buffer, and cut down a spring per the Archived explanation Tommy15 gave on modding his 9mm AR. Althgouh the pistol would fire, it was suffering from bolt bounce which I couldn't solve. So I up and spent the $20 on a Bushmaster buffer and spring. I now have my bolt carrier cut down, the Bushmaster buffer and spring, and my Model 1 Sales shorty tube that I have assembled. After doinga little experimentation, it looks like I can have about 1/2" of thread engagment on the rear screw-off portion of the tube. As BadgerArms said, the Model1Sales shorty tube appears to be maybe 1/2" to 3/4" of an inch shorter than the Bushmaster tube. This leaves me with three options as I see it if I want to use the Model1Sales tube: 1. Leave as is (which I will do for intial test). I don't dare have any less thread engagment on the rear tube, but if my memroy serves only the first 3 threads are actually bearing in a threaded fastener and the rest are just "gravy". For a "stop" I am going to temporarily blue loctite on a spare castle nut I have laying around. (BTW, if anyone knows a place to buy just castle nuts instead of a whole carbine tube assembly, pease let me know). I will only fire a few shots and check after each one for unthreading of the buffer cap. If the pistol works I will probably move on to step 2: 2. Chop down the bolt carrier into "tuning forks" so I can screw the tube on more. The one problem I am seeing with this is that at some point the Bushamster buffer is going to interfere with the hammer drop, i.e. the hammer will hang up on the Bushmaster buffer if it sits too far forward to to the "tunning forks" being too short. This will involve some math, but should work in the end. hell, I already "ruined" the carrier, might as well keep experimenting, right? 3. Possibly back off the buffer tube in the reciever 1 or 2 turns to get equal thread engagment on buffer-reciever and buffer-rear cap. 4. (least desirable, but maybe safest.) Screw the rear cap in more and accept that there won't be any bolt lockback function ebcause the bolt won't celar the bolt hold-open. OK, anyone see any flaws with this plan? One thing I have been thinking is that the Bushmaster buffer tube is only plastic and only has 4-5 threads, and it is bearing the force of the loading/unloading cycle from the spring, so maybe 1/2" engagement with 5-6 threads on the rear cap isn't really a problem. Sounds like JackRipper did this and hasn't had any problems either. [ETA] I played around with the assembly a bit, and it looks like an additional 1/2" or so (call ist 3/8" to be safe) could be removed from the back of the carrier to shorten it up a bit more. LOL, I measured my pistol against a carbine receiver, and the pistol buffer really is only saving about 2" in length (although it keeps things a lot safer for a legal standpoint...) |
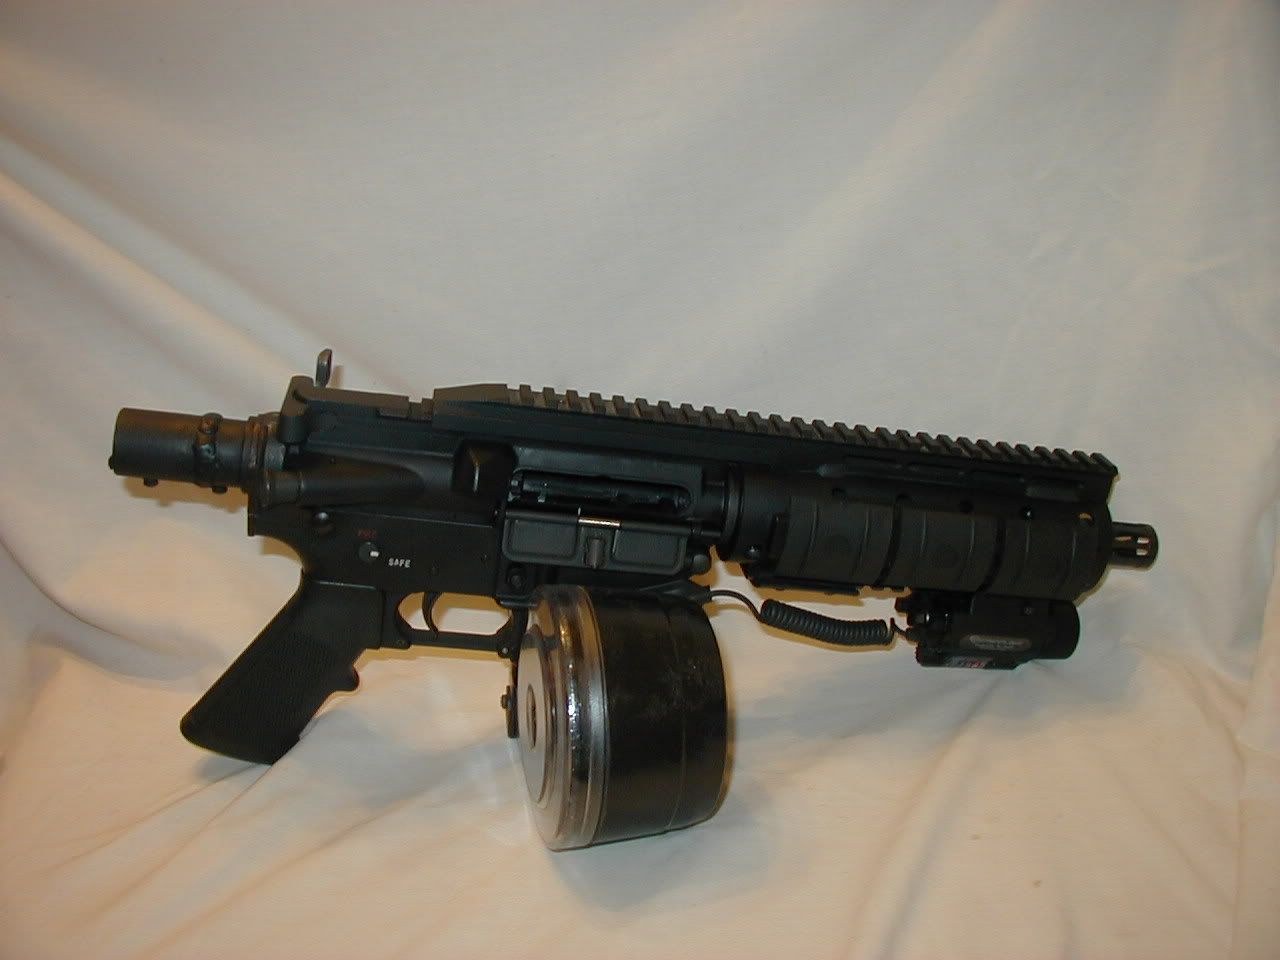 This is my system. Looks exactly like the BM system. (I did not know this when I designed it). This is a rough prototype, that usses a flat wire spring. Please note that the welds on the tube are not on final product. This is a ROUGH prototype. Im tooling up to do a limited rune on these. They will feature a slightly larger in diameter tube, with some sort of sling attatchment. Let me know what you think. By thye way. I have concured the "bounce back" issue, the use of a more powerfull recoil spring. |

[ARCHIVED THREAD] - Bushmaster Buffer Tube Thread (Page 1 of 2)
AR Sponsor