


machinist and highly agitated observer
Joined:
Jul 2006
Posts:
19977
EE: 100% (9)
 TX, USA
Posted: 6/23/2010 11:25:21 PM EDT
[Last Edit: machinisttx][Edited]
|
I got free for a bit today, so I grabbed the newer Coleman generator with the OHV type B&S engine. I bought this one used, and not running, really cheap. It has numerous problems, one of which was excess valve clearance. I'll be showing you how to fix this. Please note that this applies to single cylinder, OHV, non Vanguard series B&S engines ONLY. The older side valve engines will have different clearances, and the Vanguard may as well.
You're going to need a basic selection of hand tools. A set of SAE wrenches, a set of 3/8 drive deep sockets, a leaf type feeler gage set, etc.. The only thing that threw me for a loop on this was the requirement for a T40 Torx driver, which I had(surprisingly). If you want to know that the fasteners are properly torqued, you'll need a torque wrench that reads in inch pounds. Really handy is a factory service manual for the specific type of engine you plan to work on. You can probably pick one up at your local mower shop, or you can order them online. You'll probably want to get a gasket and some black RTV silicone too. How do you know what type of engine it is? All of the OHV motors will have the "OHV" rocker arm cover as will be pictured later on. If it doesn't have this, it's an older side valve type engine. The other things to look for are the model, type, and code number. Here is the OHV rocker arm cover, shiny and marked "OHV": 
On the OHV engines, the model/type/code will be on the side/top of this cover, depending on orientation of the engine. On this one, it's on the side. 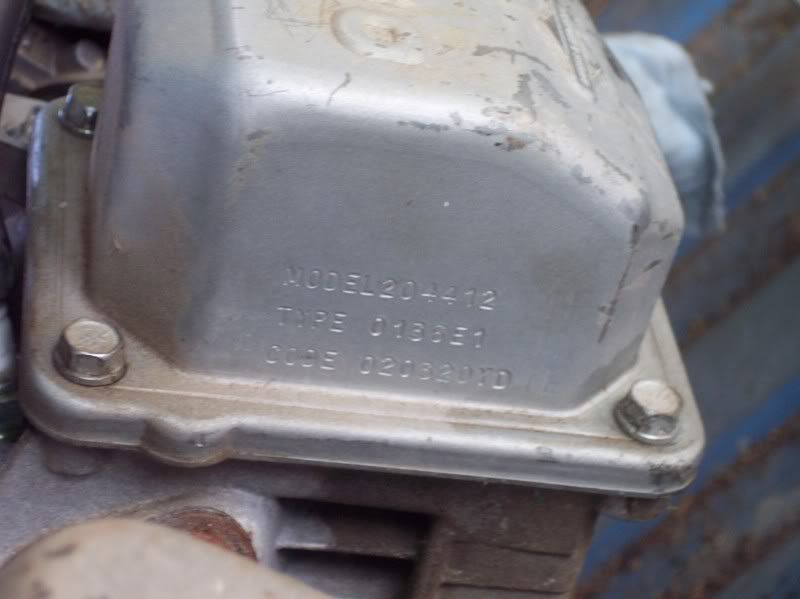
Those numbers are important because they are what you'll use when ordering parts, gaskets, etc. The first two digits of "code" are the year of production. This one happens to be a 2002 model. A factory service manual: 
Note the list on the back cover: 
Now, lets open the book and find what we need to do in the contents section. 
And go to the correct page. Notice that a couple of engine models are excluded from this exact procedure. They're listed elsewhere in the manual. Also notice the bolded "Note" just below that. The model I'm working on is a 204000 and it's cold, so I'm good to go. 
At the bottom of the instructions in the previous pic, it said to go to section XX for proper clearance listings. Here we are. 
Zoomed in for a better view. Clearance on both valves should be .004" to .006". This is the main reason to buy the factory manual. Side valve engines have larger clearances, so my engine wouldn't have run properly if I set the valves with clearances for those engines, as opposed to the correct ones 
We're ready to break out the tools now. Safety first dictates unplugging the spark plug wire, as well as making sure any switches are in the "stop" position. I had a brainfart and forgot to unplug the wire before removing the rocker arm cover. Mine required use of a 3/8" socket to remove the bolts. 
Then it dawned on me to remove the plug wire: 
Now, it's easy to tell if I've rolled the motor over to top dead center(TDC) on the compression stroke, as required, because I can see the operation of the pushrods and rocker arms. Remember that the manual wanted the piston about 1/4" past TDC on the compression stroke. To get there, slowly pull the starter rope and watch the rocker arms. You'll see them rocking back and forth as the engine spins through a complete cycle. The first stroke will be intake, and the rocker closest to the carb will move. The intake valve is held open by the camshaft lobe as the piston moves away from the head, which draws a fresh air/fuel mix into the cylinder. The next thing that happens is the piston moves back toward the head on the compression stroke. At the appropriate time, usually slightly before TDC, spark from the ignition system will ignite the fuel/air mix. Now we're at the "power" stroke. The fuel/air mix has been ignited and the expansion of gasses forces the piston back down. Finally, we come to the exhaust stroke. The piston travels back toward the head while the cam lobe holds the exhaust valve open to force out the waste gasses. Ok, enough typing...getting to the point. As you slowly roll the engine over with the starter, you'll notice the sequence of the valves opening and closing. You'll also notice a point in the cycle where neither valve moves. This is the compression stroke and no pressure should be applied to the valves at TDC. The manual stated 1/4" past TDC on the compression stroke, so stick in a screwdriver or a piece of wire, whatever, and roll the motor slowly until the piston has dropped 1/4". 1/4" past TDC, I check it with a screwdriver I had handy and checked clearance too. Note the leaf size I'm using. I wasted my time with this leaf, the clearance was much more, and far out of tolerance. 
As I said earlier, this engine had/has quite a few problems. One of those was that when I got it, the intake pushrod had popped loose from under the rocker. Houston, we have a problem. Someone may have purposely popped it loose(employee didn't want to work that day maybe), or it had excess clearance and just came loose of it's own accord. Either way, the rocker arm had way too much wiggle by feel. I forgot to check what the actual clearance was before resetting it. Setting the clearance. A 1/2" box end was used to hold the lock nut, while the T40 Torx driver was used to turn the rocker ball setscrew. The manual calls for the rocker ball setscrew to be torqued to 45 inch pounds. As you can see, I didn't use a torque wrench. I didn't have a proper one handy...and my hand torquing always seems to pass the torque wrench test anyway. I'd advise using one if you aren't experienced with a wrench, or just want to be sure though. 
It took two tries to get it right. I wanted .005" clearance, so I checked with .005", a .006", and a .007" leaves. To get it right, the .005" should just "fall through", meaning no resistance at all. The .006" should have light drag, and the .007" should be tight. With the intake side done, I might as well check the exhaust side too. The .007" in place: 
Repeating on the exhaust side: 

Also, it's a good idea to follow the manual's instructions to roll the motor over fully and check again to be sure it's right. In this case, it was correct on both valves. With both valves set to the proper clearance, all that's left is reassembly. Scrape the old gasket off if necessary...it may just pull off. Clean up your bolt threads with a wire brush or a wire wheel on a bench grinder if necessary. Use carb cleaner or brake cleaner to remove ALL oil from both the inside of the rocker arm cover gasket surface and the mating surface on the block. Dab a little of the RTV on both sides of the gasket and set it in place. Reinstall the rocker arm cover and the job is done. 
|
Originally post by 2theLeft: If done right, there is no taste, because it goes right down the throat..
IM me to find out about SSA's poor customer service
IM me to find out about SSA's poor customer service
machinist and highly agitated observer
Joined:
Jul 2006
Posts:
19978
EE: 100% (9)
TX, USA
|
Part 2 is clearing up any potential ignition problems from improper storage of a pushmower. In this case, it's a self propelled Sears with a 6HP engine. I think this is a tecumseh engine, but I haven't cross referenced it yet. In any case, it ran when it was parked due to a leaking float bowl on the carburetor and has sat outside since then. I think dad bought this mower for $5 at a garage sale. He used it, but decided the leak was excessive, and didn't want to mess with it or replace the belt for the self propelled feature.
I didn't even bother checking to see if it had spark before pulling it apart. I knew the magnets and the coil legs would both be rusty, and in all probability, that the clearance between the coil legs and the magnets would be excessive(IMO). Electronic ignitions are not as strong as the older points type, so rust combined with a lot of clearance causes more problems. The mower: 
Engine tag, found after removing the plastic cowling: 
Mower tag: 
With this mower, I'll have to get parts for both the engine and the mower deck, so I'll have to use the information on both tags as required. If I go to the small engine repair shop to get parts for the engine, the mower deck info will be useless. The plastic cowling was held on with four screws through the top, into the sheet metal of the starter housing. You can see the hole for one of them in the mower pic. The two on the sides are kind of hard to make out. I think they had 5/16" heads on them. After removing the plastic cowling, I still need to remove the sheet metal starter housing to access the flywheel and coil. On this engine, there were four bolts holding it on, along with one screw that attached the upper end of the dipstick tube to it. I had to use a 3/8" on two bolts, a 5/16" on two bolts, and a 1/4" for the one on the dipstick tube. Note on top of the flywheel, warning you that bad things will happen if you over rev the engine too much: 
Bad picture of the excessive gap...yep, it's rusty.  PSA: Don't store your mower outside, uncovered. The rusty portion on the flywheel is the magnet. The two legged device with the round black object in the middle, to the left of the flywheel) is the coil. I didn't check the gap, but my semi well trained micrometer eyeball said it was .020" or a little more. Some clearance is required to keep things from rubbing, but too much means that the coil won't get quite as good a signal to send spark to the plug. Note the two screws that hold the coil on, one through each leg. PSA: Don't store your mower outside, uncovered. The rusty portion on the flywheel is the magnet. The two legged device with the round black object in the middle, to the left of the flywheel) is the coil. I didn't check the gap, but my semi well trained micrometer eyeball said it was .020" or a little more. Some clearance is required to keep things from rubbing, but too much means that the coil won't get quite as good a signal to send spark to the plug. Note the two screws that hold the coil on, one through each leg.

I rotated the flywheel to better access the magnet, and used some 400 grit(200-300 would have been better) sandpaper to clean up one side of it. It doesn't need to be spotless, but it does need to be free of rust or other contaminants. 
Now I've cleaned up both sides. 
Time for the coil. Remove both screws(5/16" head, IIRC) and set them to the side where they won't get lost. Yep, the faces of it were rusty too. Shine them up with sandpaper, just like the magnet. 
Now, put the coil back in place and run the screws down until they're just snug. Chances are, the magnet will grab whichever side it's closest to and suck it down to no gap, assuming the magnet is oriented correctly. Don't worry about this. If the magnet isn't in the correct position, rotate the flywheel slightly to put it there. Find a .006" to .010" leaf in your feeler gage set and insert it between the coil leg and the magnet. Snug up the screw on that side a bit more and pull the leaf out. Repeat for the other side, adjusting the position of the flywheel/magnet as required. At this point, it's very likely that the gap on the first side has changed, so check it and adjust as necessary. Repeat for the second side. Go back and forth between the legs until your feeler gage leaf fits the same on both sides. Now rotate the flywheel one full rotation to make sure nothing drags anywhere. You'll also want to make sure the crankshaft doesn't have any sideplay which would cause the flywheel or magnets to rub the coil. Gap set on both sides, much smaller now. 
All that's left is putting the starter housing and cowling back on, along with reattaching the dipstick tube. At this point, if there are ignition problems, the coil may be bad, or the stop switch is grounded when it shouldn't be. In any case, I've ruled out rust and/or foreign debris as a problem with this engine and it will probably start right up after I rebuild the carb and fill it with gas.
|
Originally post by 2theLeft: If done right, there is no taste, because it goes right down the throat..
IM me to find out about SSA's poor customer service
IM me to find out about SSA's poor customer service
machinist and highly agitated observer
Joined:
Jul 2006
Posts:
19979
EE: 100% (9)
TX, USA
|
Part 3, carb rebuild on the Tecumseh engine in part 2. Hopefully I'll get time to get parts and mess with them tomorrow.
This is a gravity feed fuel system, the fuel tank is higher than the carb. Ok, I got time to work on this one Friday afternoon/evening. In fact, this one wanted to be contrary, so it was the only one I got to work on. I'm not sure yet exactly what the problem is, but I may have gotten a bad needle or seat...or the carb itself may be cracked. Anyway, it runs great now, but leaks fuel from the carb when it isn't running. Essentially, the needle isn't sealing against the seat, which is allowing fuel to continue coming through the line into the bowl. The fuel then overflows the bowl and comes up through the jets into the body of the carb, where it either runs out into the air filter, or runs directly into the cylinder and ends up in the crankcase(thins the oil, bad).
So, let's get started. You're going to need a carb rebuild kit, a gasket(carb to manifold, carb to block, or manifold to block, dependent on your machine), a few basic hand tools, and some carb cleaner or gasoline. Nice to have would be an open topped plastic tub like an oil drain pan to keep parts from getting lost and wash up the carb. You might also want to pick up a new float, just in case the existing one has been damaged or leaks. Where to start? First, have a look at the carb itself and make sure to note anything that looks out of the ordinary. Everything looks fine on this one. 
Remove the spark plug wire and make sure any stop switches are set to "stop". I took the plastic/sheet metal "make it look good" parts off the top for better access to bolts and the governor linkage. It also became clear that removing the carb from the manifold wasn't possible while the manifold was bolted to the engine. Governor linkage, note the air filter below. Pay very close attention to where and how the rod and spring attach to the governor arm AND the butterfly shaft(or other places) on the carb itself. If you hook it up wrong, the engine may run poorly, or over rev, or not get above idle speed. 
It was fairly apparent on this engine that the muffler was in the way of removing the bottom bolt for the manifold. I had to remove both the muffler and the manifold. 
Now, carb/manifold and carb kit. 
Better view of the kit. 
The parts of the kit are: needle, seat, bowl gasket, spring hanger thingy for the needle(  ) and a gasket for the center nut that holds the bowl on. Some tecumseh carbs will also have a push button drain on them and kits for them may or may not include replacement parts for that. ) and a gasket for the center nut that holds the bowl on. Some tecumseh carbs will also have a push button drain on them and kits for them may or may not include replacement parts for that.
I took a couple of minutes to clean the outside of the carb and manifold with carb cleaner. This one was pretty clean so it didn't take much work. Some will have caked on oil/dirt/etc. and it may take a few minutes to clean it up. Doing a good job of cleaning the outside up will make everything easier later on. Bottom of the float bowl, noting the orientation of the step. 
And then this nasty reddish stuff runs out. 

Bowl off the carb, bleh. 
Might as well clean up as we go. You can use a wire brush(toothbrush size) to scrub out the bowl. I couldn't find mine, so I used some sandpaper. This doesn't need to be shiny spotless, just get the gunk off and make sure nothing will fall out and clog up the jets. 
Then I pull out the pin that holds the float in place, and set it in the float bowl. 
Now to look at the carb and float. 
This is what happens when engines are left out in the weather with no cover. The carb gets full of water, steel corrodes, and the aluminum body corrodes. This, in turn, plugs up the tiny passages in the carb. Then I take the float out, along with the needle. Here it is sitting on top of the engine, the same way it would be when the carb is bolted on the engine. Notice the brass tab between the two ears. This is how float height is regulated...more on that later. 
Let's have a look at the carb body. 
The hole in the center is the main jet. Use some small diameter wire and shove it through here to clean out any crud. Blow this out with carb cleaner and compressed air to be sure it's clean. To the right of it is the hole for the needle and seat. This is where fuel comes into the carb. The seat is the little white donut looking object in the carb kit pictured earlier. The old one needs to come out. The easiest way to get it out is with a blower nozzle on an air compressor––-stick the nozzle to the fuel line nipple and give it a blast of air.. Barring that, use a small screwdriver or dental pick to fish it out...it may be stubborn. Assuming you've got the carb body cleaned up and the seat out, this can be set aside for a few minutes. Carefully examine your float. Shake it to make sure nothing sloshes inside. This one was cracked in several places. hard to make out, but it's there. 
another crack on the other side. 
If this float is not replaced, the symptoms I described at the beginning of this thread will be the result. The float should be sealed, containing air. When the fuel level rises in the float bowl, the float is pushed up. The float in turn pushes the needle up against the seat to shut off the flow of fuel into the bowl. When the float has holes, it fills with fuel and sinks, preventing the needle from shutting off the flow of fuel into the bowl. The last thing to check is the screw that holds the float bowl on. This one had a small hole drilled all the way through the diameter, near the head of the screw. These holes need to be cleaned with a piece of small diameter wire, carb cleaner, and compressed air. There was another hole down through the center of the screw that intersected the other two holes. This hole was completely plugged and didn't want to open up. I finally got it cleaned out. Your tecumseh may be made the same, it might not...look at yours to be sure. Now that everything is cleaned up and inspected, we can start the process of putting it all back together. The first thing to do is to open the kit and get the seat. Observe that one side has a ring, and the other side is smooth. The smooth side will be installed down(facing away from you). It's best to use the flat end of a drill, or a large solid wire to shove this to the bottom of the hole. I had flat ended allen wrenches handy, so that's what I used. You'll feel it stop, don't try to force it in any further. Goes in this hole. 
Shoved down to the ledge it stopped on. 
Now to make sure the needle in the kit looks like the one that came out, minus the corrosion. 
Clip the needle onto the wire hanger. I didn't get a good pic, but it's self evident how the two go together. 

Now it's time to make sure the old float and the new float match, minus the smashed in portions and cracks/leaks.

The needle/hanger assembly is now installed on the float. The straight portion of the wire hanger just sets on the tab of the float. It doesn't matter which way the open end of the hanger faces. Sorry about the blurry pic. 
Dropping the needle/float assembly into place. 
Starting the float retaining pin. 
Retaining pin fully installed, and an important step before finishing assembly.... Hold the carb up and look across the float, then look across the gasket surface. The float should set level OR the side opposite the hinge should sit slightly higher(when viewed in this manner). This one is pretty level. It's actually better to have the "free" side of the float a little higher IMO. 
If the free side of the float is low, remove the retaining pin and pull the float back off. Insert a screwdriver between the tab and the float, and ever so slightly widen the gap...then reinstall and check again. After that's done, put on the new bowl gasket. 
Orient the bowl the same way it came off. 
Drop it on, and make sure it seats all the way around. There shouldn't be any gasket sticking out to get pinched when the bowl is tightened down. 
Put the new bowl screw gasket on the bowl screw. 
Reinstall the screw and tighten. The threads are pretty fine, so you can't put much torque on it. Finger pressure on the wrench will be sufficient. If you bear down on it, the threads will strip. You will feel the gasket compressing slightly, and then the screw will stop turning. Stop tightening.... Shove the two manifold bolts through the appropriate holes, then slide the gasket on over the bolts to hold it in place. The bolts don't have to be super tight. If you want to use a torque wrench, about ten ft/lbs will be plenty. Reinstall the muffler, if necessary, and it's done. 
This is only one type of carburetor. The carbs on the two B&S push mowers that will be done in the next part are quite a bit different, and virtually none of this will apply to that style of carb. UPDATE: I bought another carb kit and replaced the seat. Problem solved. Evidently I nicked the seat while installing it or it was just plain old defective. |
Originally post by 2theLeft: If done right, there is no taste, because it goes right down the throat..
IM me to find out about SSA's poor customer service
IM me to find out about SSA's poor customer service
machinist and highly agitated observer
Joined:
Jul 2006
Posts:
19980
EE: 100% (9)
TX, USA
Part 4 Carb rebuilds on a couple of B&S pushmower engines. Hopefully I'll get time to mess with them Monday.

Model/type/code on one of the B&S engine mowers. 
Model/type/code on the other B&S engine mower. They almost managed to hide it under the plastic. 
Both of the B&S mowers very likely use the exact same rebuild kit. Alright...I got up early this morning and got started on one of these before it got hot. Both of them do use the same carb rebuild kit, which cost me about $4 each tax and all. If the mower is pretty clean, it'll take about 20 minutes to get things apart, put the new parts in, and reassemble everything. Here's the one I'm starting with, it's a 2001 model. It was missing the air filter housing when I got it(free). I bought a used air filter housing from the scrapyard for fifty cents. A new one from Briggs & Stratton is $9.85.

Getting started, I've already taken off the air filter housing. and I'm taking the two bolts loose that hold the tank/carb assembly on the engine block. One is at the front, where that dime size rusty spot is, and the other is covered up by my ratchet/socket. 
Better view of the second bolt. 
Now, pull directly toward you and wiggle a little. The side of the carb has an O ring that seals it to the intake pipe. You'll wind up with something like this. 
Note the position of the wire in the throttle shaft. You'll have to rotate the carb/tank assembly and wiggle that wire out of the hole. Now, it's free. 
Remove the screws that hold the carb on the tank, this one has five. 
Then you can remove the carb from the tank. Be careful not to damage the wire screen or break the fuel pickup pipe. 
better view. Don't lose that spring.... 
Looking at it from the bottom, with the first "gasket" removed. The two wire screens are the fuel filters. More on why there are two later. 
Another view, both screens have crap on them. Need to clean everything up and remove that second gasket. 
Second gasket removed. 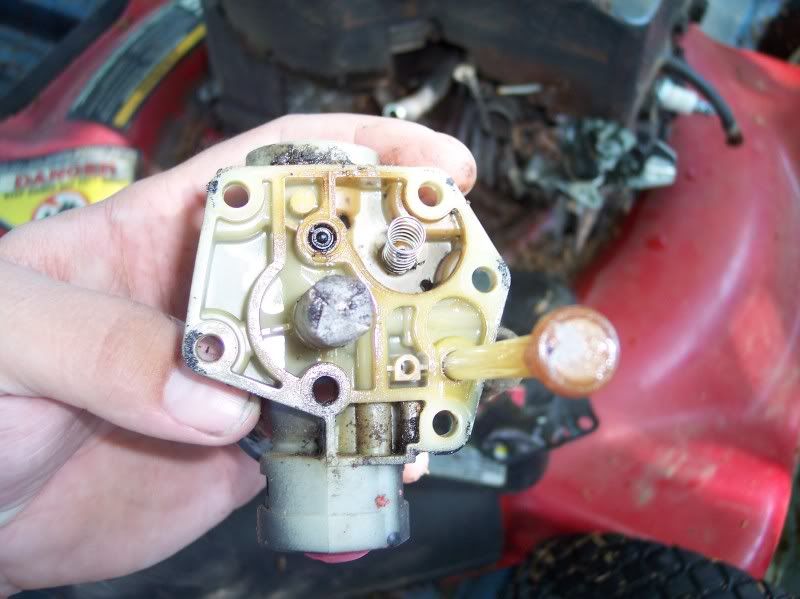
You might have noticed that the primer bulb was dry rotted, I'm going to replace that too. There are two tabs that hold it in place, one is visible in this pic, the other is on the opposite side. Push in with a screwdriver and then pry(carefully, everything is plastic ) it out.

And it's out. Here's what was behind it..not much to look at. 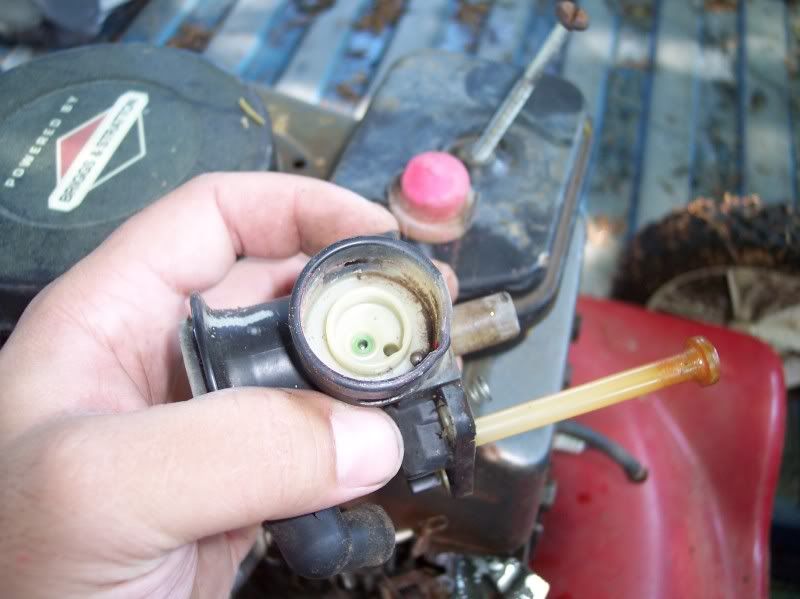
All the primer bulb really does is pump fuel up from the tank into the venturi(bore) of the carb body. Now, the carb body is stripped and relatively clean. Pull the large wire screen off and shoot some carb cleaner up through the hole beneath it to be sure it's clear. Do the same for that hole next to the long pickup tube at the bottom right in this pic. Also, carefully scrape or scrub off any gasket material that's left. 
Here's the O ring that seals the carb body to the intake tube. Under the sheet metal portion of the throttle shaft(what that wire was hooked to earlier), there is a gasket to seal the throttle shaft. Make sure it's in good condition. If it's rotted, you'll need to replace it...otherwise you'll have an air leak and the engine will run lean, and poorly, as well as a point where dirt will get sucked into the engine. This one was good, so I didn't replace it. 
If you do have to replace that little gasket, note how the throttle shaft is oriented to the carb body. Then remove the two tiny screws that secure the butterfly(the disc) to the throttle shaft. Remove the butterfly and then pull the throttle shaft out. Replace the gasket, then put the throttle shaft back in the same way you removed it. Turn it to the "closed" position(where it closes off the bore), and reinstall the butterfly. Open and close the throttle several times to be sure the butterfly doesn't drag on the bore. Picture of the big wire screen removed. 
Carb kit, pretty simple with just two gaskets. 
Lay the thick gasket on the carb body. It will only go on one way. 
Then the thin one. 
The thin "gasket" has a couple of functions. The first is obviously to seal everything up. The second is that it functions as a diaphragm fuel pump. The diaphragm portion sits over the spring and moves back and forth with the vacuum pulses from the engine's intake stroke. This is also where you'll see why there are two fuel pickup tubes and two filters. Here is the tank. Note that there is one hole completely through and then there is a "cup". The cup is dirty and needs to be cleaned out 
The long pickup tube pulls fuel up from the tank by force of the diaphragm pump and deposits it into the cup. There is an overflow hole in the side of the cup to drain excess fuel back into the tank. I wiped out the cup with a rag. It doesn't need to be spotless, just get all the loose stuff out. 
Then I scraped off what was left of the gasket, and cleaned out the tank. This one had dirt and rust in it, so I poured in some regular old bb's with some carb cleaner and shook it around for about five to ten minutes. 
Here's the bb's and liquid funk that came out. 
here's the new primer bulb in the package with the old one in the background. 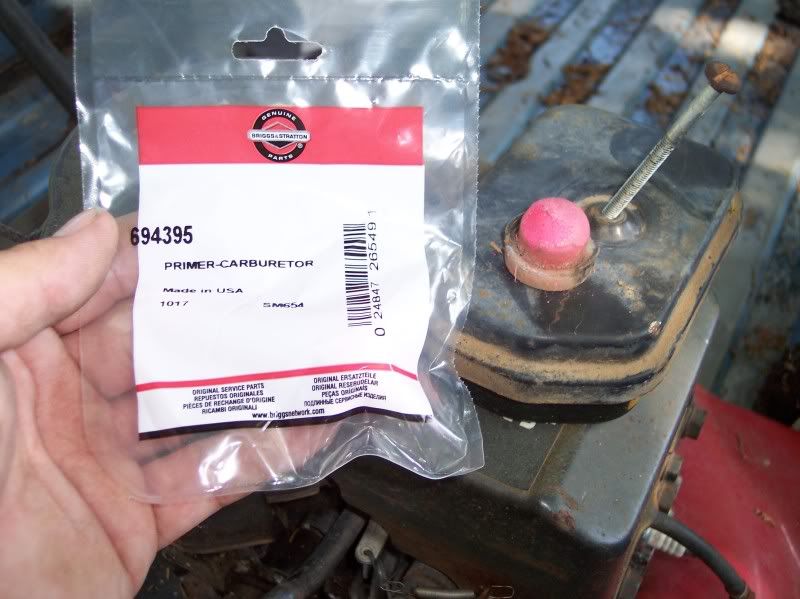
The new one out of the package, by itself. 
Slip the ring that came with the new over the primer bulb with the tabs toward you, then set it in place in the carb body. 
Make sure it's lined up, then use a flat blade screwdriver to shove the ring down until the tabs click into place. 
Reinstall the carb on the tank. I found it easiest to remove the thin gasket from the carb and lay it in the proper position on the tank. Be sure you don't damage it. Put in a screw on one side(but don't tighten yet), then one on the other side, etc., all the way around until you have them all in, to be sure the gasket is properly positioned. Then snug up the screws, and finally tighten them, alternating sides. Again, be careful when tightening so you don't overtighten and break the plastic carb body.

One last thing to check and/or replace. There is a rubber boot that connects the carb to the valve access cover. If the boot is dry rotted or cracked, it needs to be replaced. This one is cracked, so I'll have to replace it. 

Here is where the boot goes. You can see why it needs to be replaced...air will get sucked in here, along with dirt. 
Here is a different angle, you can see the pipe the boot connects the carb to. 
That's all there is to it. Make sure everything is hooked up properly, install the air cleaner(clean and oil the filter too), reconnect the spark plug wire, fill the tank, and start 'er up. It'll probably run like new for a total cost of $5(carb kit only) and a half hour's time. I need to get a new filter(bought the wrong one) and replace that boot, plus I had to buy a new plug, so I'll probably have $20 in this engine. Compared to $140(?)+ for a new pushmower, I think it's money well spent. 
|
Originally post by 2theLeft: If done right, there is no taste, because it goes right down the throat..
IM me to find out about SSA's poor customer service
IM me to find out about SSA's poor customer service
machinist and highly agitated observer
Joined:
Jul 2006
Posts:
19981
EE: 100% (9)
TX, USA
machinist and highly agitated observer
Joined:
Jul 2006
Posts:
19982
EE: 100% (9)
TX, USA
machinist and highly agitated observer
Joined:
Jul 2006
Posts:
19983
EE: 100% (9)
TX, USA

machinist and highly agitated observer
Joined:
Jul 2006
Posts:
20000
EE: 100% (9)
TX, USA
|
Originally Posted By surveyor3:
Excellent post. I have a few mowers I may get a chance to work on this weekend. This will probably help. Thanks.
If they have the older style side valve(L head) engines, the valve clearance will not be adjustable. The clearance is set when the engine is assembled or rebuilt by grinding away material from the bottom of the valve stem(if there is not enough clearance). The coil/magnet info should be very similar if not nearly identical for several brands and types of engines. The carb info, however, will be variable depending on the brand of engine, and even from one type engine to another in some cases. I think most of the new/newer engines will have plastic floats, so setting the height wouldn't be necessary, for example. The carbs on the pictured B&S mowers above don't even have floats. A different brand might or might not have a separate seat like the tecumseh carb. If there isn't a separate seat, the needle itself will have a rubber tip. |
Originally post by 2theLeft: If done right, there is no taste, because it goes right down the throat..
IM me to find out about SSA's poor customer service
IM me to find out about SSA's poor customer service


|
A quick fix (sometimes) for the older L head engine with non adjustable valves is to de-carbon the engine with Sea Foam. The stuff works, I prefer the aerosol can just spray into the carburetor while the engine is running (if it will run), and then drown the engine out with the spray. Let it sit overnight and then start the engine. You would be amazed how this removes carbon and in some cases will help the valves seal again. You can get Johnson's Sea Foam at most Napa or major brand parts stores. It also softens and helps to ease removal of carbon on AR15 bolts.
|
11/04/08 Never underestimate the stupidity of the American people.

machinist and highly agitated observer
Joined:
Jul 2006
Posts:
20007
EE: 100% (9)
TX, USA
|
Originally Posted By nct:
Very nice. Thanks for the detailed information. How long would it have taken you to fix the sears carb if you were not taking pictures? Just curious. Thanks, nct It's nothing to spend thirty minutes just cleaning the gunk off the outside. This one was pretty clean outside, but nasty inside. Thirty or forty minutes maybe, less if everything is clean. |
Originally post by 2theLeft: If done right, there is no taste, because it goes right down the throat..
IM me to find out about SSA's poor customer service
IM me to find out about SSA's poor customer service
machinist and highly agitated observer
Joined:
Jul 2006
Posts:
20008
EE: 100% (9)
TX, USA
|
Originally Posted By inop:
I rebuilt a L head 12 horse just before this thread was made. I rebuilt a 6 hp Tecumseh, an old one with points, about a month ago. Wish I had gotten pics of that. |
Originally post by 2theLeft: If done right, there is no taste, because it goes right down the throat..
IM me to find out about SSA's poor customer service
IM me to find out about SSA's poor customer service

| I've been doing some searching for a factory repair manual for a generator I bought a while back. The Honda engine has many parts missing, so I'm going to have to piece it back together. Anyway, I happened upon a site with factory service manuals for Honda generators(and other power equipment too). Here is the link, apparently they have a ton of manuals for other brands of engines, etc. as well. Helm Incorporated |
|
Ditto, excellent thread. Thank you for the info.
I have a Tecumseh post hole digger that Sears books say has a discontinued carb kit. I bought the next similar sized kit and had a shop put it in. Afterwards I found out the shop stinks and the motor doesn't run much better. Any hints on rebuilding a carb that has a discontinued kit? Any resources that are better than Sears (it's an old Craftsman named product). |
|
Originally Posted By machinisttx:
Is there something in particular that you guys want to see? The only engine I have right now that needs a complete rebuild is already in pieces, and pointless to rebuild unless I can find another gas tank for it($80 new I think). It's not really "survival gear", but if you want to foray into the 2-cycle world, I have a Craftsman weedeater that has been sitting at my local shop for over a month now because the recoil starter spring is either broken or disengaged. My pull cord is now stuck hanging about 6' out from the engine body, so I can't start the thing. I tried blindly disassembling it, but couldn't get very far, so I dropped it at the shop, but he keeps putting me off. Starting to get impatient, as the weeds I need eaten are now 16" high. If something doesn't break loose soon, Imma hafta go buy a new one. If you could do something along those lines, I'll go get my weedeater back and try to fix it myself. Mine is an easy-pull type Craftsman with auto-choke, if that matters. 
|
|
Originally Posted By tenOC:
Ditto, excellent thread. Thank you for the info. I have a Tecumseh post hole digger that Sears books say has a discontinued carb kit. I bought the next similar sized kit and had a shop put it in. Afterwards I found out the shop stinks and the motor doesn't run much better. Any hints on rebuilding a carb that has a discontinued kit? Any resources that are better than Sears (it's an old Craftsman named product). Tecumseh is out of the small engine business, but I am still seeing quite a few tecumseh branded replacement parts. My carb kits were not branded as tecumseh...they were "house branded" and obviously bought through some parts house the mower shop orders from. It's possible that there simply aren't any more parts for that engine, but more likely(IMO) is that sears just stopped carrying the parts. Many of the carbs use the same needle and seat, as far as I can tell anyway. Do you have the engine model number? You can try looking on the Stens website, but it's a pain to navigate IMO. There is also partstree.com(I think that's the right one) and a few others. I just punched in "carburetor" on the search box and selected tecumseh from the dropdown menu and got several carb kits on the stens site. The partstree.com site will allow you to search by brand and model number. What are the symptoms? |
|
Originally Posted By Canoer:
Originally Posted By machinisttx:
Is there something in particular that you guys want to see? The only engine I have right now that needs a complete rebuild is already in pieces, and pointless to rebuild unless I can find another gas tank for it($80 new I think). It's not really "survival gear", but if you want to foray into the 2-cycle world, I have a Craftsman weedeater that has been sitting at my local shop for over a month now because the recoil starter spring is either broken or disengaged. My pull cord is now stuck hanging about 6' out from the engine body, so I can't start the thing. I tried blindly disassembling it, but couldn't get very far, so I dropped it at the shop, but he keeps putting me off. Starting to get impatient, as the weeds I need eaten are now 16" high. If something doesn't break loose soon, Imma hafta go buy a new one. If you could do something along those lines, I'll go get my weedeater back and try to fix it myself. Mine is an easy-pull type Craftsman with auto-choke, if that matters. ar jedi has promised a two stroke repair thread this weekend. He also reminded me that I made the mistake of *assuming* that folks already knew how to diagnose a problem  , so I'll be adding a troubleshooting section when I get time next week. Check youtube for recoil spring replacement/starter rope rewinding videos...They're probably better than anything I could post in pics and text. , so I'll be adding a troubleshooting section when I get time next week. Check youtube for recoil spring replacement/starter rope rewinding videos...They're probably better than anything I could post in pics and text.
|
|
Originally Posted By warlord:
Thanks for sharing the pics. BTW: I have a B&S lawn mower engine that doesn't want to start. Where should I start to look. I am not that familiar with these small engines, I am familiar with car engines though. First check for spark, then for fuel. If there is spark, but it's weak, then check it out per part 2 in this thread. Also check to make sure the shutoff wire(assuming your mower has a safety handle) hasn't grounded out...and that the handle is retracting the mechanism far enough. You can actually unplug the shutoff wire from the mechanism and test that way too. Won't hurt to put in a new plug, set to the proper gap(varies somewhat, I normally set them at .025"). Champion brand plugs suck, get autolite if possible. Spark, no fuel....carb problems or a plugged line. Spark/fuel and it still won't start, check the compression. I don't know off hand what it should be...what I'm finding right now says 120-180 ft/lbs...but that seems high. If the compression is low, you might have a stuck valve or a piece of carbon on one of the valve seats. The coil could also be weak... More or less, the same stuff you'd check on an automotive engine. It's just smaller.
|

|
I have a bit of a problem with my riding mower.
Bought it used from a friend of the family for $300. Guy apparently repairs near everything and sells it. He did the brakes on the wife's car while I was in Iraq and we now see how well that turned out 
Anyways the Gibson riding mower with a B&S engine (I think it is 18HP) twin cyclinder worked great when I test drove it, so I snagged it. Within a few weeks I found it was harder and harder to start, requiring differing choke positions and sometimes killed the battery while trying to start. I had been using "non-oxygenated" fuel as the guy told me to "only" use. Said all the other gas would kill the engine in a heartbeat. Funny cause I grew up using 87 octane normal gas for every small engine without any problems. And I only know of one gas station in town that sells the "non-oxygenated" fuel, and it's a 45min round trip.
Anyways I left fuel in it over the winter. It wouldn't start at all this spring, so I got the carb cleaner and the polar starting spray and cycled new fuel in. Will only start with the starting spray in the carb. I replaced the air filter and oiled it as directed, squeezing excess oil out. Replaced the fuel filter and the spark plugs. I took off the carb cover plate and cleaned it up and put it back on. Same issue, won't start without use of the starting spray. Once started it runs fine, and if I shut down and start back up with say half an hour it starts fine. By now I've gone through 2 jugs of new 87 octane gas. I leave for Army training for a month, show the wife how to start it with the spray, etc. Come home and the wife mentions that she hit a pole with the mower. I figure she meant that she hit the small lightpole by the driveway with the mower deck, I've done it before. I go to mow the lawn and as I try to put the hood down I can't get it to fall into place. After looking at it, she had somehow ran into a telephone pole! Striking the mower right in the center of the hood/grill. Anyways I get it started with the spray and it immediately revs out of control. If choked it revs very very fast, if not choked it sputters, backfires, and heaves like it is starved for gas. If half-way it does the sputtering at a high speed. The throttle has little impact on the speed while it is choked. It backfires a lot now. Never did before. I tried some Sea Foam this afternoon, per the directions inducing some into the air intake, and I put about 2oz in the fuel tank. I also sprayed some carb cleaner around the outside of the carb, but not into the air intake, and this seemed to create a stalling effect. I looked at the air filter assembly and it appears that when my wife drove into the telephone pole the energy was transfered through the hood, to the head lights, which then pushed into the air filter assembly. I am thinking something got pretty messed up / cracked. That said... 1. How important is this "non-oxygenated" fuel? 2. Any ideas for what else I can do to troubleshoot or fix these problems? Starting and now the normal running? - I am not going to spend much money on this old POS. Might be a sign to retire it and invest in a new riding mower. Was going to do that next year, but might be necessary. |
|
Non oxygenated fuel, as I understand it, is just standard pump gas. IOW, no ethanol/methanol/etc., just gasoline. The ethanol blended stuff is "oxygenated". I don't have a clue what I'm using in my mowers...I presume it's ethanol blended. Anyway, to answer your question, the carb rebuild kits all state "not for use with ethanol blended fuels", at least from the places I'm familiar with. The problem with the blended crap is that it breaks down faster, the alcohol dries out rubber gaskets/needle seats/etc., and it seems to attract more water than standard gas. My old mower(1994 model) started up just fine this spring after having fuel(no stabilizer either) in it all winter. I don't think it's as bad as it's hyped to be, nor do I think the fuel stabilizer pimps have the only solution.
I think your main trouble is from either a cracked carb/intake(not the air filter "intake") manifold, or bad gaskets between the carb/intake and the block. You described it as acting like it was starving for fuel without the choke––––if more air enters, more fuel must enter too. A cracked carb/intake or bad gasket would let more air in, creating a lean condition. Another clue is that the speed changed when you sprayed carb cleaner/starting fluid on it. One other clue is that it won't start without additional fuel being added(carb cleaner/starter fluid). Lastly, if your wife hit a pole hard enough to damage the air filter housing, she was going pretty fast, and it probably cracked the carb/intake manifold then(I'm not saying she caused 100% of the problem though, since you said the trouble started before then). The only other possibility is that the bolts(that hold the carb or intake manifold on) weren't tight enough and vibration loosened them up––-I think this is a good possibility since it ran fine when you got it. As far as the throttle position not making much difference, the brackets/etc. may have gotten bent, or the clamp that holds the throttle cable in place may have been loose enough for it to slip. Another thing to check is the idle speed adjustment screw. The idle speed adjustment screw will interfere with the opening and closing of the throttle shaft...it's nothing more than an adjustable stop to hold the butterfly open at the desired position. If it's gotten out of adjustment(or something got bent), the throttle won't close far enough for a low idle. I'll try to get some pics(might have included some in a post above and not described it adequately?) of the screw....but I'll have to look at my 18 hp rider to remember exactly how the carb is set up on it. The first thing I would do is remove the hood and whatever else is necessary to get good access to the carb and intake manifold(it may all be cast as one piece...I don't remember from working on my 18 hp twin B&S). Work the throttle(if possible) while watching the carb to see if the throttle shaft is turning properly(it should move about 90 degrees from idle to full throttle). See if the carb/intake manifold is loose on the block, or if the carb is loose on the intake manifold(again, it may be one piece, I don't remember). If everything is tight, you can try replacing the gaskets(block to intake manifold to carb), which should be a couple of bucks each. If the carb is cracked, you'll have to replace it. If the intake manifold(again, not the air filter housing) is a separate piece, it may be cracked too––-but it may be possible to have the crack welded up if it isn't too bad. |
|
Thank you for your information regarding my problem and the question about fuel. It was very insightful and helpful.
I went to mow the lawn today, and now it won't shift. Linkage moves properly from the shift lever to the transmission under the seat, so I think the problem is inside the transmission. I think it's a sign to cut my losses and buy a new one
Just not worth sinking time and money into... |
machinist and highly agitated observer
Joined:
Jul 2006
Posts:
20380
EE: 100% (9)
TX, USA
|
Originally Posted By UMDRanger:
Thank you for your information regarding my problem and the question about fuel. It was very insightful and helpful. I went to mow the lawn today, and now it won't shift. Linkage moves properly from the shift lever to the transmission under the seat, so I think the problem is inside the transmission. I think it's a sign to cut my losses and buy a new one
Just not worth sinking time and money into... Actually, that's a pretty common problem. Most mowers use a variable speed pulley that separates or closes(there are two halves) depending on where you set the set lever. The pulley shaft will get a little rust or grit on it, which prevents it from moving freely. Usually, you can spray some good penetrating oil on the pulley shaft and get it working again without much trouble. If it actually has a transmission, I can't be of much help...I haven't worked on a mower with one. |
Originally post by 2theLeft: If done right, there is no taste, because it goes right down the throat..
IM me to find out about SSA's poor customer service
IM me to find out about SSA's poor customer service
|
Originally Posted By machinisttx:
Originally Posted By tenOC:
Ditto, excellent thread. Thank you for the info. I have a Tecumseh post hole digger that Sears books say has a discontinued carb kit. I bought the next similar sized kit and had a shop put it in. Afterwards I found out the shop stinks and the motor doesn't run much better. Any hints on rebuilding a carb that has a discontinued kit? Any resources that are better than Sears (it's an old Craftsman named product). Tecumseh is out of the small engine business, but I am still seeing quite a few tecumseh branded replacement parts. My carb kits were not branded as tecumseh...they were "house branded" and obviously bought through some parts house the mower shop orders from. It's possible that there simply aren't any more parts for that engine, but more likely(IMO) is that sears just stopped carrying the parts. Many of the carbs use the same needle and seat, as far as I can tell anyway. Do you have the engine model number? You can try looking on the Stens website, but it's a pain to navigate IMO. There is also partstree.com(I think that's the right one) and a few others. I just punched in "carburetor" on the search box and selected tecumseh from the dropdown menu and got several carb kits on the stens site. The partstree.com site will allow you to search by brand and model number. What are the symptoms? It's been a couple of yrs since I tried it, so I don't remember. I'll have to dig it out and try it again to update the symptoms. |
|
Bought a carb rebuild kit and in the process of getting the old carb off, found that the intake manifold was cracked at the joint with the carb, right at the mounting bolt. Don't know how I didn't see it before. Musta been covered by grim and poor light in the shed.
Replaced the gaskets, cleaned up the carb, and am waiting for the new manifold from B&S. Hopefully this solves the problem. |
machinist and highly agitated observer
Joined:
Jul 2006
Posts:
22377
EE: 100% (9)
TX, USA
|
It's hard to work on anything in poor light or with gunk and grime all over it. The manifold should fix the problem. Rebuilding the carb can't hurt either, as long as the float is set properly. |
Originally post by 2theLeft: If done right, there is no taste, because it goes right down the throat..
IM me to find out about SSA's poor customer service
IM me to find out about SSA's poor customer service
|
Originally Posted By machinisttx:
Originally Posted By warlord:
Thanks for sharing the pics. BTW: I have a B&S lawn mower engine that doesn't want to start. Where should I start to look. I am not that familiar with these small engines, I am familiar with car engines though. First check for spark, then for fuel. If there is spark, but it's weak, then check it out per part 2 in this thread. Also check to make sure the shutoff wire(assuming your mower has a safety handle) hasn't grounded out...and that the handle is retracting the mechanism far enough. You can actually unplug the shutoff wire from the mechanism and test that way too. Won't hurt to put in a new plug, set to the proper gap(varies somewhat, I normally set them at .025"). Champion brand plugs suck, get autolite if possible. Spark, no fuel....carb problems or a plugged line. Spark/fuel and it still won't start, check the compression. I don't know off hand what it should be...what I'm finding right now says 120-180 ft/lbs...but that seems high. If the compression is low, you might have a stuck valve or a piece of carbon on one of the valve seats. The coil could also be weak... More or less, the same stuff you'd check on an automotive engine. It's just smaller. The compression for small lawnmowers isn't much. When I worked on these a long time ago for a living, we always wanted to see a min of 50PSI. Rarely saw much over 75PSI for the very small engines. If you had 50PSI, the engine should start and run assuming everything else was working. Quick test to determine a fuel or spark problem is to spray WD40 or carb cleaner down the air filter opening at the carb and crank it. If the spark is working, you should get at least a bang or two. If it does, you have a fuel problem for starters. If no fire, then you started with the ignition circuit. |
|
Originally Posted By machinisttx:
Originally Posted By UMDRanger:
Thank you for your information regarding my problem and the question about fuel. It was very insightful and helpful. I went to mow the lawn today, and now it won't shift. Linkage moves properly from the shift lever to the transmission under the seat, so I think the problem is inside the transmission. I think it's a sign to cut my losses and buy a new one
Just not worth sinking time and money into... Actually, that's a pretty common problem. Most mowers use a variable speed pulley that separates or closes(there are two halves) depending on where you set the set lever. The pulley shaft will get a little rust or grit on it, which prevents it from moving freely. Usually, you can spray some good penetrating oil on the pulley shaft and get it working again without much trouble. If it actually has a transmission, I can't be of much help...I haven't worked on a mower with one. Good info if you have a variable speed pully drive system (I hate them). They also have a transaxle and that transaxle can develop problems too. They just have fewer gears....maybe 1 forward and 1 reverse depending on the model. If you have a regular gear transmission, they are filled with regular grease. The two halves of the transmissions do not have any seals or gaskets and so moisture gets inside eventually. If the grease dries out (and it will) it will no longer keep the moisture out and you'll eventually have a seized transmission....very common with the Peerless transaxles. (I'm not sure if Peerless is still making them or not but they used to be the most common transmission out there) It's not a fix but if you have the sealed transaxle, the best thing that you can do is to drill into the case (the bottom is usually the best but don't drill into anything important!! You want to just punch a small hole. Then, screw in a grease zerk. Once at the start of the summer, pump in a few pumps of grease. Repeat middle of the summer and again at the end of the mowing season. If you do that, you'll probably never have a problem with the transfer case. I've rebuilt a number of them over the years. The #1 problem hands down is the grease drying out and water getting inside. The grease actually fills the case and keeps the water out that way. The problem with them is almost always rust on moving parts. You have to take it apart, wirebrush everything and replace anything too rusted, and then repack grease in and reassemble. Parts rarely break inside transaxles. |
|
Well after figuring out that I had re-assembled the fuel pump wrong (the illustration I was using wasn't clear on the spring locations, so I found a better one), used some starting spray to help the engine start given that the battery was near dead, it started. Started it a few times over the course of an hour without any starting spray, then moved it out of the garage and covered with a tarp for the winter.
Thanks for the help. Your picture how-to-guide was very helpful. |

|
OK, maybe you can help me! I have a 2 year old Craftsman snowblower that I bought from Sears new, but it was a "Bring Back" The problem is that the exhaust stinks and it makes me smell and makes me cough when I am done. It also sounds like it is running rough. I think the carb needs adjusted, but I don't know how to do it. Any ideas? |
machinist and highly agitated observer
Joined:
Jul 2006
Posts:
22928
EE: 100% (9)
TX, USA
|
Originally Posted By kjk200: OK, maybe you can help me! I have a 2 year old Craftsman snowblower that I bought from Sears new, but it was a "Bring Back" The problem is that the exhaust stinks and it makes me smell and makes me cough when I am done. It also sounds like it is running rough. I think the carb needs adjusted, but I don't know how to do it. Any ideas? Sounds like it's running rich. Pull the plug and see if it smells like fuel. Check to make sure the choke is operating properly, especially if it's one of the stupid "automatic" types. You might need to try a hotter plug, but more likely is that the main jet in the carb is a size or two large. What engine does it have? Pics? |
Originally post by 2theLeft: If done right, there is no taste, because it goes right down the throat..
IM me to find out about SSA's poor customer service
IM me to find out about SSA's poor customer service
|
Originally Posted By machinisttx: I don't know about the engine, but here are some pics:Originally Posted By kjk200: OK, maybe you can help me! I have a 2 year old Craftsman snowblower that I bought from Sears new, but it was a "Bring Back" The problem is that the exhaust stinks and it makes me smell and makes me cough when I am done. It also sounds like it is running rough. I think the carb needs adjusted, but I don't know how to do it. Any ideas? Sounds like it's running rich. Pull the plug and see if it smells like fuel. Check to make sure the choke is operating properly, especially if it's one of the stupid "automatic" types. You might need to try a hotter plug, but more likely is that the main jet in the carb is a size or two large. What engine does it have? Pics?     When the choke is all the way to the right (up in the above picture), it SOUNDS better but doesn't really run great. After it warms up and the choke is moved to the middle it works better, but when it idles it sounds like it is going to stall! PS I have the owners manual in PDF that I can email to you if you think that might help––-just send me your email. |
machinist and highly agitated observer
Joined:
Jul 2006
Posts:
22990
EE: 100% (9)
TX, USA
|
The engine looks like a Briggs and Stratton, but the sears site shows MTD. I'm thinking that MTD is making their own engines now... IIRC, most power equipment comes with two manuals –– one for the engine and a second for the machine it's mounted to. Look through the manual you have and see if it lists spark plug gap. It's probably supposed to be set at around .025" to .030"(you'll need a feeler gage set or a $2 ring type gage from the parts store to check the plug). Oh, champion plugs are crap, buy autolite if possible. 1. Pull the plug and check it. The electrode should be clean and have a nice even brown color. If it's really dirty, replace it with a properly gapped new plug. If it has a ton of carbon built up on it, then it's running rich and the carb needs a smaller main jet. Also see below. 2. Use a spark checker like these http://www.oreillyauto.com/site/c/search.oap?keyword=spark+tester to check the ignition. If the coil is set too far from the flywheel, you won't get good spark and the engine will run poorly. You should get a crisp blue color spark. I'm not 100% certain, but MTD engines are probably very similar to other small engines in how the ignition is set and operates. Check page 1(I think I put it in this thread?) for how to set them. 3. How old is the fuel? Is there an inline filter? The fuel bowl on that carburetor has a drain screw. The one through the center of the bowl is what attaches it to the carb, the one on the side is the drain. If you drain the bowl(clear container, preferably) and trash comes out, you definitely need a filter(good policy to use one anyway) and you may need to rebuild the carb. http://www.searspartsdirect.com/partsdirect/part-number/Mtd-Parts/Snow-removal-equipment-Parts/951-10948/0071/247/Model-31A2M1A799/0736/1507200?keySuffixId=A&productTypeId=x&searchModelNumber=31A2M1A799&subCompDesc=Engine&brandDesc=MTD&modelDesc=SNOW-THROWER&blt=11 If it just sounds like the idle speed is low, adjust the idle speed screw shown on the diagram here: http://www.searspartsdirect.com/partsdirect/part-model/Mtd-Parts/Snow-removal-equipment-Parts/Model-31A2M1A799/0736/1507200/P0902049/00003?blt=06&prst=&shdMod= |
Originally post by 2theLeft: If done right, there is no taste, because it goes right down the throat..
IM me to find out about SSA's poor customer service
IM me to find out about SSA's poor customer service
|
Originally Posted By UMDRanger:
I have a bit of a problem with my riding mower. Bought it used from a friend of the family for $300. Guy apparently repairs near everything and sells it. He did the brakes on the wife's car while I was in Iraq and we now see how well that turned out
Anyways the Gibson riding mower with a B&S engine (I think it is 18HP) twin cyclinder worked great when I test drove it, so I snagged it. Within a few weeks I found it was harder and harder to start, requiring differing choke positions and sometimes killed the battery while trying to start. I had been using "non-oxygenated" fuel as the guy told me to "only" use. Said all the other gas would kill the engine in a heartbeat. Funny cause I grew up using 87 octane normal gas for every small engine without any problems. And I only know of one gas station in town that sells the "non-oxygenated" fuel, and it's a 45min round trip.
Anyways I left fuel in it over the winter. It wouldn't start at all this spring, so I got the carb cleaner and the polar starting spray and cycled new fuel in. Will only start with the starting spray in the carb. I replaced the air filter and oiled it as directed, squeezing excess oil out. Replaced the fuel filter and the spark plugs. I took off the carb cover plate and cleaned it up and put it back on. Same issue, won't start without use of the starting spray. Once started it runs fine, and if I shut down and start back up with say half an hour it starts fine. By now I've gone through 2 jugs of new 87 octane gas. I leave for Army training for a month, show the wife how to start it with the spray, etc. Come home and the wife mentions that she hit a pole with the mower. I figure she meant that she hit the small lightpole by the driveway with the mower deck, I've done it before. I go to mow the lawn and as I try to put the hood down I can't get it to fall into place. After looking at it, she had somehow ran into a telephone pole! Striking the mower right in the center of the hood/grill. Anyways I get it started with the spray and it immediately revs out of control. If choked it revs very very fast, if not choked it sputters, backfires, and heaves like it is starved for gas. If half-way it does the sputtering at a high speed. The throttle has little impact on the speed while it is choked. It backfires a lot now. Never did before. I tried some Sea Foam this afternoon, per the directions inducing some into the air intake, and I put about 2oz in the fuel tank. I also sprayed some carb cleaner around the outside of the carb, but not into the air intake, and this seemed to create a stalling effect. I looked at the air filter assembly and it appears that when my wife drove into the telephone pole the energy was transfered through the hood, to the head lights, which then pushed into the air filter assembly. I am thinking something got pretty messed up / cracked. That said... 1. How important is this "non-oxygenated" fuel? 2. Any ideas for what else I can do to troubleshoot or fix these problems? Starting and now the normal running? - I am not going to spend much money on this old POS. Might be a sign to retire it and invest in a new riding mower. Was going to do that next year, but might be necessary. The spraying, oiling the filter, playing w/ the choke, is just like a doc checking your reflexes instead of taking out your appendex when it's real infected. What you need to do is grab a few tools and take the carb apart and clean it. Then you won't have to waste a lot of $$$ buying a new mower, -maybe. |
|
Originally Posted By machinisttx: If it just sounds like the idle speed is low, adjust the idle speed screw shown on the diagram here: http://www.searspartsdirect.com/partsdirect/part-model/Mtd-Parts/Snow-removal-equipment-Parts/Model-31A2M1A799/0736/1507200/P0902049/00003?blt=06&prst=&shdMod= I will check the plug and stuff when I get a chance––-since I already have an NGK plug, wrench and gap gauge I might just go ahead and change it. I bought all the stuff earlier when I couldn't get it started––-then right before I was going to tear into it, it started on the very first pull. Please forgive this "city boy", but I can't seem to find the Idle screw in the diagram. Please give me some more direction as to which screw it is, and which way I should turn it. Thanks, and those link will be very helpful. |
machinist and highly agitated observer
Joined:
Jul 2006
Posts:
22997
EE: 100% (9)
TX, USA
I didn't look close enough..the diagram doesn't have an exploded view of the carburetor.  There will be a shaft, usually vertical, running through the carburetor. The visible end of the shaft will have a piece of stamped steel attached to it that the throttle cable attaches to. Somewhere along that piece of stamped steel, there will be a "leg" that sticks out and serves as a point for the idle adjustment screw to bear on. You'll probably have to detach all the plastic junk from around the carb to even see it. Turning the screw clockwise(in) will raise the idle speed. Run down any other possible problems before adjusting or working on the carb. I *think* it's running rich and needs a smaller main jet from your earlier description, but it's possible that something else is causing the problem, like a plugged air filter or faulty ignition. |
Originally post by 2theLeft: If done right, there is no taste, because it goes right down the throat..
IM me to find out about SSA's poor customer service
IM me to find out about SSA's poor customer service