|
Posted: 10/28/2003 8:51:39 PM EDT
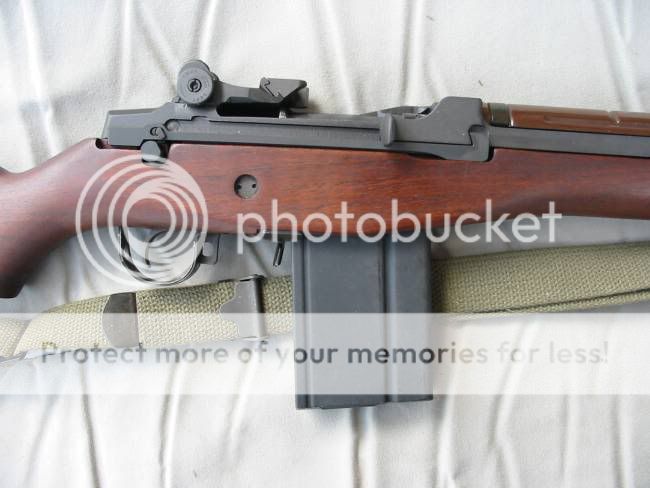
Built up a semiauto M14 on a Chi-Com receiver. I had to turn in my USGI Springfield M14NM rifle back in 1995, and I had really started to miss her. Went with the Chi-Com receiver because they are a drop forging. The only other commercial drop forged receiver available when I started the project was the MK-S receiver, those are now being collected up by the BATFE. At this point LRB is making a receiver from a drop forging.
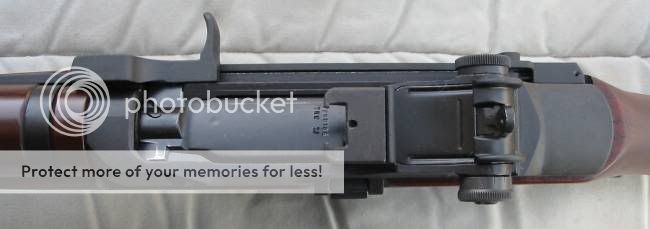
For the rest of the parts went with USGI save a Brookfield spring guide, and gas piston. Got dern lucky and found the Brookfield parts at a gun show. TRW only made 11 parts for the M14 during their production run. So all the parts marked by the manufacturer are TRW, save the rear sight elevation and windage knobs, TRW farmed those out. Building a M14 is not the same thing as slapping together a Garand, simply because you can get a USGI receiver (or equivalent, i.e. Beretta) for a Garand, but not for a M14. Could not get the like new TRW op rod to fit the receiver slot, the connector pin would not fit in the receiver, nor would a bolt fully lock. The op rod was an easy fix, I sold the like new op rod, and got a wore out TRW in on trade (smart thinking huh?). Had a guy at work drill the connector hole out (don't have a drill press, yet), he broke two bits doing it, so much for the receiver being soft huh? The bolt was another story, I tried several bolts, and none fit, so stuck with the new TRW bolt I had. Not much difference between bolts any who because of the tighter manufacturing tolerances, not like the older Garand where you can get some where swapping bolts around. Purchased a Brownell’s bolt lapping set up, and some Aluminum Oxide lapping compound. The lapping tool keeps the bolt properly aligned, and applies rearward pressure to the bolt. Started out by lapping in a used, busted, and wore bolt I had on hand. Figured it would be best to lap another bolt in first, would end up lapping two bolts in, this would end up taking more off the receiver, so that if I ever replaced the bolt it would not be such a big job (like I would ever wear out a new TRW bolt, am funny that way). So then went to lapping, and lapping, and some more lapping (dang, for a “soft” receiver this sure is a lot of work), and gave up on the 600 grit and went to 300 and lapped some more, and on and on for about two months of free time on the week ends. Finally got the bolt to lock (ever wonder why Ron Smith charges $500 and up?). Then lapped in the TRW bolt, did not take as long with the second bolt, only about a week or free time. So guys, don't even think of asking me to do this for you, like the local smith says; “I only make $5.00 an hour, BUT I get to work ALL I want”. Here is a picture of the lapping set up:  Now comes the “easy” part right? Screwing on the barrel. So stick the barrel in the Wilcox barrel vise with Brownell’s aluminum barrel blocks and the barrel hand stops at about 10:00, which is in spec. I check headspace at this point (barrel hand tight), bolt locks on a “1.631 and not on a “1.635. Just like on Garands, I relieve the barrel shoulder, just to make it easier to align the barrel. With the barrel torqued at say 100 pounds, I have a hard time making 1 or 2 degree changes while lining everything up. Since I don't have a lathe I use a sand paper disc between the barrel and the receiver, rough part facing the barrel. Did not have to take much off. Here is the receiver on the barrel, and a sand paper disc in between:  Have tried the Brownell’s barrel alignment gauges, and found them to not be any better for me then just using two rods. Barrel timing is more art then science any who. Barrel timed with rods:  Once I got a warm and fuzzy that the barrel was on true, dropped my “1.631” headspace gauge in the chamber and tried to lock the bolt. No good. Tried the busted and wore bolt I had on hand, no good. Was wanting headspace to be within USGI specs, which is “1.6355-1.6385. At this point, figured that going for a .308 Winchester chamber was the way to go. Kuhnhaussen recommends a “1.632 chamber for .308 Winchester, and “1.636 for 7.62 NATO. So ordered me up a “1.632 gauge, took the barrel off, put the receiver in a vise, lapped, and lapped, and lapped some more, screwed it back together, checked headspace, won't lock on the “1.632, so off come the barrel, lap, lap, and lap lap, and some more and more lapping, then lapped some more. Screwed it back together, and bingo, it locks on a “1.632! Finished assembling the rifle, you know, those Brownell’s castle nut pliers are a weak sister. The unitized gas cylinder was also real piece of work. One of the screws was offset and made contact with the barrel shoulder, so had to grind it down flush. Then I had trouble getting a upper handguard to fit, turns out the band was crushed to a point an upper won't fit, here is a picture of that fine piece of work (Springfield Inc, in case ya was a wondering):  So I filed the upper guard inletting so it would fit, shimmed the gas cylinder for a tight fit, have to use a wrench to take it on and off, so the gas cylinder, and front band are not going to be shifting around. Did not bed the stock, am using an as new take off USGI walnut stock I got from RMLAMEY. Did not have the flash reamed, decided to see if I could squeak by on that one. The next step was a test fire, the fun part. Shot a round, went low, checked brass, be looking good. Put up target, shot three, low, cranked up the sight, shot low, cranked some more, low, and some mo, low, and mo, and mo. Gee whiz, got the sight way up there, like I am shooting 800 yards. Took a peak at the flash hider, oh yeah, bullets hitting the top of the hider. Bummer, so went back home. Worked the handguard over so it does not touch the stock. Turns out that the flash hider had shoot loose. This explained why I had to keep adding elevation. Before I tightened it as far as I could go with the weak sister Brownell's castle nut pliers, but it had a wee bit a wiggle. After shooting it got real loose, even though the setscrew stayed put. Here is a picture of the bullet contact on the flash hider:  So I tightened it back up and went back to the range. Much better, had it zeroed with only six rounds, only had to drift the front sight a wee itty bitty bit to get the windage dead on. Just love it when a barrel is on straight, let me tell ya.   |
|
|
|
[#1]
At this point the receiver, rear sights, and op rod needed refinished. They were all used and did not look right with the as new stock. Had gotten the flash hider from MKS a ways back, and it was done up with a real light gray park, so it need a park job too. I prefer a dark gray park and a dark tight grained walnut stock with a touch of red when it comes to M1/M14s. I now use Brownell’s pre-dip blackener and zinc phosphate for Garands and M14s. Brownell’s manganese is to light for my tastes, besides zinc is cheaper, and “cooks” mucho cleaner (no mess, no fuss). The Chi-Com receiver had sharp corners on the rear heal of the receiver, was wanting to round those off so as to look like a real M14 receiver before Parkerizing, but took awhile to get up the nerve to start on it. You know, comes off easier then it goes on, and that sucker is not exactly butter you know. Here is a picture of the receiver with sharp corners, and a TRW stub I used for a guide:
 Well, gave up on the India stone, barely put a scratch on it. So I got the biggest bastard file I have and went to town on that sucker. Hey, that worked real well, then cleaned it up with the India stone:  Don’t have a blast cabinet and compressor (yet). Was going over to the local smith’s to help him with a FAL project and blasted the receiver, rear sights, flash hider and op rod while there. He had #6 glass beads in the cabinet, those don’t “cut” well, but leave a nice smooth surface, so took about an hour to blast em. Aluminum oxide cuts real well and makes quick work but leaves a very non-factory look (what M1/M14 manufacturer carefully blasted each and every part by hand with coarse grit before parking, NOT). Took the parts back home to park. Well hmm, cleaned up some real nasty AK-47 parts kits in my SS cleaning tank a few nights before, was afraid I would contaminated the freshly blasted parts with oil if I attempted to clean them up. Gee, figured I would cheat and just go ahead and park them. Have done that in the past, but been awhile. So, dipped the flash hider in the Brownell’s pre-dip blackener (acid, stout, kinda of stuff that if you sniff it, the floor will come up fast and tag you on the nose) and then into the zinc park solution it went. So about this time while standing there holding the wire that suspended the flash hider in my chili pot on the stove (don’t use my gas burning tank much, big mess that thing makes) I glance over at the kitchen table and spot the girl’s cat sitting in a chair eyeing the awaiting windage/elevation knobs with her tail a twitching (this is the high drama part of the story). Looked back at the fizzing flash hider, not even close to done. Grabbed up my plastic mixing spoon with my free “weak hand” and hurriedly sent it sailing with enough kinetic energy to reinforce my verbally barked NOOOOOOOOO! The missile (spoon) hit the chair and deflected off the cat and spent it’s remaining energy spinning across the room. The cat saw this as only a momentary distraction and batted the windage knob across the floor whilst in hot pursuit. I tossed the flash hider in the boiling water post rinse tank (pot), and aggressively advanced on the cat and recovered the prey from it’s clutches. With this situation well in hand I removed the flash hider from the rinse tank. Hmm, mighty splotchy and just yucky looking. Well, won’t hurt to dip again. So in it when, and it started to fizz right away, very good sign. After it was done fizzing I rinsed it off and inspected, all right, looks good. So, went ahead and parked the rest of the parts. Rest of it went without incident, all though pouring the zinc solution from the chili pot into the longer fibo tank is always fun. Need to do this to park the op rod. Oh yeah, and the windage knob came out fine. Here they are fresh out of the post park oil soak (WD-40 & 10W-40 mix).  Then reassembled the rifle. Since this was the final assembly I masked off the receiver ring with electrical tape to prevent marring of the finish with the receiver wrench. The Brownell’s wrench is purdy good about not leaving a mark, but did it just in case. Used a brand new USGI bolt stop instead of the Chi-Com one that was on it. The Chi-Com bolt stop pin came right out when I took it apart, but the USGI one took a pounding to get it in. The pin and stop don’t fit well together. Turns out they don’t work together either, the pin is stuck in the stop and they rotate together rather then the stop rotating on the pin. So, going to have to take it back apart, going to be fun trying to pound that pin out. So here it is after the refinish:    So, had to pound the pin out to replace the USGI bolt stop with the Chinese one I just happened to still have. With the Chi-Com bolt stop it worked great, but the finish on the stop was dreadful. So had to blast and park it too. Decided I could live with an all USGI rifle, save receiver and bolt stop. Any body want a USGI bolt stop? It was brand new when I took it out of the wrap, will part with it for $5.00. At this point I really needed a Hawk fake selector do dad. Just did not look right to me without one. Was building this rifle on a budget, and could not get Hawk to do a trade on one of his set ups, so in every ad I ran on the net I had a want list, and in the list was a Hawk fake selector do dad. After about 6 months I got to thinking, maybe no body wants to part with theirs. Well finally, got one. Took a bit of fitting to get it mounted. The base that mounts in the stock had squared edges that would not allow it to mount close enough to the wall of the stock. So had to file the edges round to get it to mate flush with the wall of the stock. The connector rod was already modified so did not have to do any work on it. Any who, this is what it looks like with the Hawk do dad on there:   Think I am going to have to refinish the Hawk do dad. By now, you know me, and for some reason I have gotten the real urge to stick the action in a desert camo fibo stock and stick an Aimpoint CompM-XD on top of it. Gee, then I would need another Hawk set up. Does it ever end? Many thanks to Fultan armory, Brownell's, and CMP for the cool parts and tools, Kuhnhausen for the indispensable shop book, and to Hatchet Joe and Lazerus2000 for lots of tips and moral support. No thanks to all the nay sayers that suggested I have a “pro” do the work (you know who you are). |
|
|
|
[#2]
Came out beautiful. Great job Ekie.
|
|
|
|
[#3]
That's one fine looking rifle. Excellent write up as well, I enjoyed reading it.
|
|
|
|
[#4]
Thanks guys. Was a fun project, not sure I want to do it again though, hehehe.
|
|
|
|
[#5]
Outstanding job and a great read, thanks.
|
|
|
|
[#6]
Wow, man!!!!!! Sweeeeettt!!!!
|
|
|
|
[#7]
Now that right there is a beautiful looking rifle!
|
|
|
|
[#8]
great job!
this is a project i need to do. |
|
|
|
[#9]
Went ahead and refinished the Hawk selector do dad:
|
|
|
|
[#10]
That is real nice Ekie! I seen one(Chicom) at a local shop yesterday and I started to get it...er put moey down on her but I walked out with a .45 instead. I thought to me self, only one project at a time. So maybe next year I might start on a project like this.
Do you think their would be any problems mounting an A.R.M.S. scope mount to the Chicom rec? |
|
|
|
[#11]
You could go with a Smith Enterprise or Sadlak Industries scope mount. These models have the cam bolt that will self adjust as you tighten the mounting bolt. To be fair though Bill Ricca states that the Chicom receivers usually are very good at accepting scope mounts. The Federal Ordnance and Springfield Armory receivers are a maybe with the ARMS mount. The problem is not the ARMS mount or any other steel M14 mount, it is the receiver geometry. Even H&R USGI M14 receivers did not always accept the ARMS mount when they were tested by the U. S. Army.
|
|
|
|
[#12]
Great post!
|
|
|
|
[#13]
Absolutely prehistoric engineering on the M-14, compared to an AR.
Which is why I'm having mine put together by a professional gunsmith :) |
|
|
|
[#14]
Really great write up!
Really love to see people that do their own work! Loved reading it! Thanks! |
|
|
|
[#15]
Very nice, thank you! Did you use the ChiCom Barrel?
|
|
|
|
[#16]
Congrats on the great looking rifle. Very nice pics and write up. Thanks!
|
|
|
|
[#17]
Thanks guys, the write up was all most as much work as building the rifle, well not quite.
|
|
|
|
[#18]
Ekie,
This was a nice read. I am going to do the same thing myself except I am going to pay someone to rework my receiver. I do not have the tools or the time to do it. Your work inspired me to get my Polytech done.  max |
|
|
|
[#19]
The Ekiemiester rides high again!!!
|
|
|
|
[#20]
Look, look, a very rare HatchetJoe post, and in a "grasshopper" post no less.
|
|
|
|
[#21]
Ekie,
Are those Hawk fake selector do dads available anywhere that you know of? I'd sure like to have one for my M14. It's always looked "naked" on that side of the receiver. |
|
|
|
[#22]
|
|
|
|
[#23]
Thanks, Ekie!
|
|
|
|
[#24]
Hey sure is a nice looking rifle and a good write-up.
Oh, excuse me. [Marine Drill Instructor] Where the HELL is the GREASE ON THAT RIFLE SON??!!?? PUT some GODDAMMED GREASE in the OP-ROD CHANNEL and ON THE BOLT ROLLER NUMBNUTS! DO YOU WANT TO HAVE A MAJOR MALFUNCTION? I WANT TO SEE A SHINE ON THOSE PARTS THAT'S SLICKER N' A PIMP'S HAIR ON SATURDAY NITE! [/Marine Drill Instructor] Yes, that's a mighty fine job of workmanship there you can be proud of. Uh, say, did you hear sumptin'? |
|
|
|
[#25]
Yep, no grease in those pictures. Cleaned the rifle up for photographical purposes ya know.
|
|
|
|
[#26]
What was the total cost incl. tools, parts, etc. and not labor?
Nice job and great read, I am considering doing a build also. |
|
|
|
[#27]
Sorry CsMfU2, did not notice your post till just now. Did not end up having anything in the rifle, I had purchased about $10,000 worth of parts, hand picked the ones I wanted, and sold the rest off at a profit to pay for the entire project. I can tell you that the tools totaled up at $569.62. Most of them are also usable on the M1 Garand though.
|
|
|
|
[#28]
Wow, beautiful rifle. Wish I had the knowledge to built that......
ON a scale of one to ten, how hard was it to build this, compared to an AR15? Ben |
|
|
|
[#29]
Well, don't get any easier then putting a AR-15 together, those are like legos, don't recall ever having to hand fit a part, other then when using custom parts. I understand that there is some hand fitting involved if you use cheap Brand X parts though, never tried that, have enough problems as it is.
My experience is limited to putting together AR-15, AR-10, FAL/L1A1, M1 Garand, and M14 rifles (now starting on the Kalashnikov family). I also rate them in that order in terms of difficulty of assembly. There is a big jump in terms of difficulty when going from the FAL to the Garand, and another going up to the M14. Best bet is to practice with putting together a Garand before graduating to the M14. Would not be so bad with the M14 if you could get a Govt Spec receiver for one, like you can a Garand. All of the M14 receivers available are no more then "look alike" type parts, and require hand fitting. Oh yeah, and if you want a accurate M14, well that is another story...... |
|
|
|
[#30]
Did you build the M14 to keep as a show peice, or as a hunting rifle or possibly a SHTF rifle? I Know many Special forces and sniper squads in the military still use it as a battle rifle and sniper rifle, although it probably is a tad on the heavy side.
Ben |
|
|
|
[#31]
I simply missed the M14NM that I was issued for a few years. Plus needed one to round out my Cold War collection.
|
|
|
|
[#32]
Sounds like a good reason to me! Issued? Ex military? Ben |
|
|
|
|
[#33]
Good reason? Maybe, but I don't think I need one, hehe. Yes, I served as a 11B in the 35th ID, and was issued a M14NM for three or four years while I was on the rifle team.
|
|
|
|
[#34]
Hmm. Nuff of a reason for anybody. Ben |
|
|
|
|
[#35]
nice job Ekie, i finally got mine together , bought some South African ammo and a few weeks ago hit the range, started to get some good groupings going when my bolt roller clip broke, made another out of some coil spring but havent gone back shooting yet, wish i had the money to put an ACOG on it . ( SGT ROCK )
|
|
|
|
[#36]
Well I just got my Polytech back from Warbird. It looks nice and now sports all USGI parts. It is good to go. I'll shoot it and post a range report. My only complaint is that I got a crappy USGI synthetic stock. Luckily I have a few nice stocks stashed away.
Max |
|
|
|
[#37]
Hey there SGT ROCK, you using a Springfield Inc receiver? On some of the commerical receivers the bolt roller contacts the receiver at the bottom of the roller as it locks up. This is hard on the roller. Good to hear you got yours up and running. |
|
|
|
|
[#38]
i noticed on my op rod were the roller sits there is a small ledge it has to ride over when the bolt is locking , is this normal ? Im thinking it will wear down a little and the roller will run easier inside the op rod channel. Yep got the Springfield reciever, im happy with the way it went together, i used a garand wrench and a barrel fixture, my dad had a neighbor make it for him , it doesnt use pressure on the barrel it uses a short lip that fits in the barrel groove and keeps it from turning when you tighten the barrel, it worked out great, but getting the sites aligned was a bitch, over all it looks great. I figured my headspace is a tight 1.632, all i have is go and no go guages. the SA ammo shot ok in it. Ill be lookin for a fiberglass stock next.
|
|
|
|
[#39]
Super great looking rifle! Thank you very much again for the excellent threads on AK47.net on converting Bulgy AK74 bolts to use in Romy SAR3s!
|
|
|
|
[#40]
Wow, that thing is beautiful.
|
|
|
|
[#41]
Ekie,
nice work REgards Gavin |
|
|
|
[#42]
Probably need a picture to see what you mean about this ledge.
Thanks guys, gee those SAR3 posts are old.
Nice compliment, especially considering the source. |
||||
|
|
|
[#43]
Beautiful Rifle, You made the right choice with the Chi-Com Receiver; There are only 2 correct ways to go with M14s Chi-com or LRB.
|
|
|
|
[#44]
Ekie about how much money and time did you invest into this project? it turned out great
|
|
|
|
[#45]
sorry about that post didnt notice there was a 2nd page
|
|
|
|
[#46]
Elfie, that's beautiful. You took your time and did your own rifle and it came out just awesome. I'd love to have a rifle like that for myself. Even more I'd like to know how to work on my own rifle the way you do. That's really cool. Congratulations on a great job, salud.

|
|
|
|
[#47]
Well thank you, I sure like it............
|
|
|
|
[#48]
That is one sweet rifle. There is just something about a good ole steel and wood 30 caliber that makes you smile.
|
|
|
|
[#49]
Excellent job Ekie. How well does it perform on the range?
|
|
|
|
[#50]
Runs fine. Accuracy is typical, shoots about 2.5 MOA with ball ammo. |
|
|
|
 Win a FREE Membership!
Sign up for the ARFCOM weekly newsletter and be entered to win a free ARFCOM membership. One new winner* is announced every week!
You will receive an email every Friday morning featuring the latest chatter from the hottest topics, breaking news surrounding legislation, as well as exclusive deals only available to ARFCOM email subscribers.

AR15.COM is the world's largest firearm community and is a gathering place for firearm enthusiasts of all types.
From hunters and military members, to competition shooters and general firearm enthusiasts, we welcome anyone who values and respects the way of the firearm.

Subscribe to our monthly Newsletter to receive firearm news, product discounts from your favorite Industry Partners, and more.
Copyright © 1996-2024 AR15.COM LLC. All Rights Reserved.
Any use of this content without express written consent is prohibited.
AR15.Com reserves the right to overwrite or replace any affiliate, commercial, or monetizable links, posted by users, with our own.


