|
Posted: 12/30/2013 7:48:20 PM EDT
I received a Hornady LNL AP for my birthday. I have read a great deal about the care and feeding of these machines, and the trials and tribulations that some experienced. My press ran well for me after the initial setup, but there was one issue that bothered me. At index on the downstroke of the ram(handle moving up), the shellplate would jump the last few degrees as the balls went home into the detents. No amount of tuning with the pawls would cure the abnormal movement. Closer examination showed that the shell plate was riding slightly above the sub-plate until the balls started to ramp into the detents. As the balls tried to go home the shellplate would leap forward and then sit down onto the sub-plate. This was not so bad except for the fact that I was loading .40S&W and the flake powder would occasionally hop out of the cases. I went looking for a solution. I took the shellplate off and then removed the sub-plate, exposing the drive hub and drive shaft. Seeing the relationship of the parts showed that the height of the drive hub and the height of the sub-plate set the clearance for the shellplate against the sub-plate. I called Hornady CS and described my problem. They sent a new drive hub but it was identical to the one in the press.
What follows is my solution to this problem. I started by measuring the height of the drive hub and the height of the sub-plate. I found that the drive hub was .014" taller than the sub-plate. This difference is what allowed the shellplate to float above the sub-plate during indexing. I am a machinist and I knew the issue could be solved on a milling machine, but I wanted to come up with a no-cut solution. The drive hub is 1" in diameter and the ram area that it sits in has a 1.562" bore. I began to search for a shim set that would work and found one without to much trouble or cost. Now to the good part. This is the shim assortment, with sizes from .001 to .125". 1"ID and 1.5"OD. $7.90 to my door from eBay. 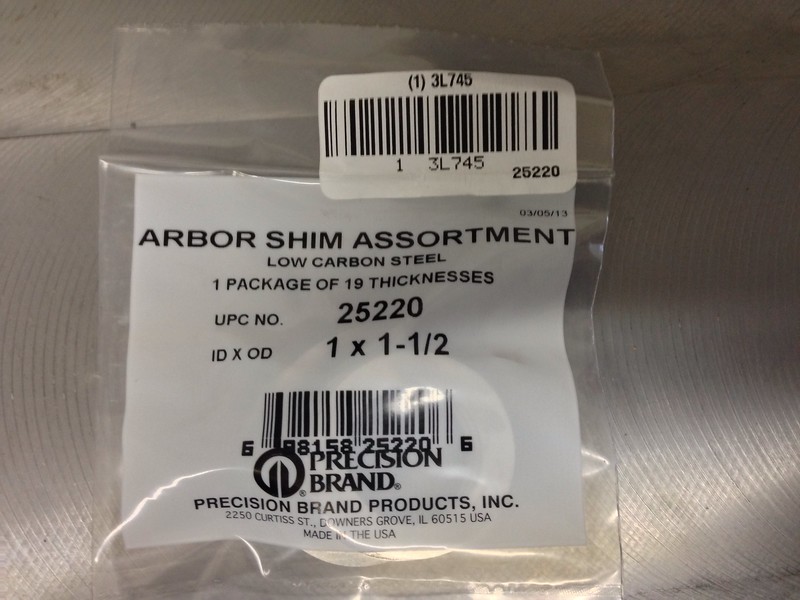
Untitled by zweitakt250, on Flickr Here you can see the drive hub sitting on the drive shaft. 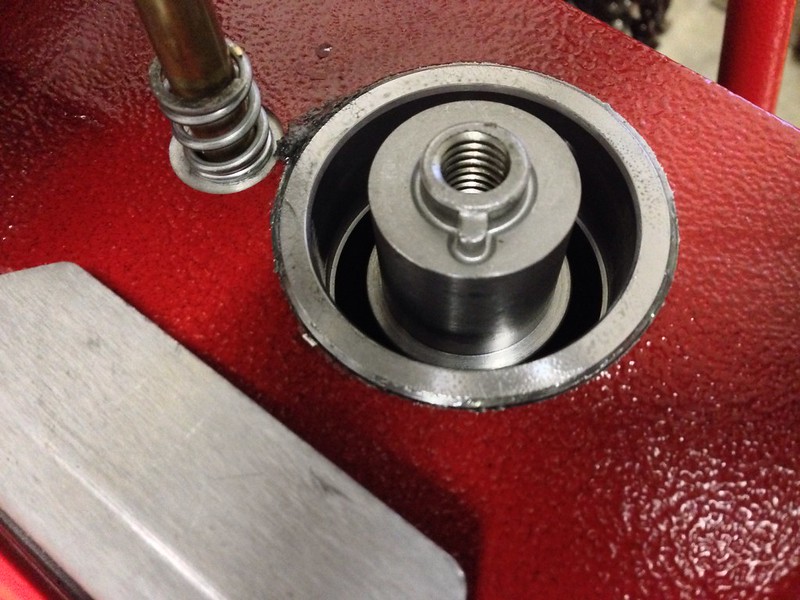
Untitled by zweitakt250, on Flickr Measuring the drive hub from shoulder to face shows that its critical dimension is .942" 
Untitled by zweitakt250, on Flickr Measuring the sub plate shows a height of .928" 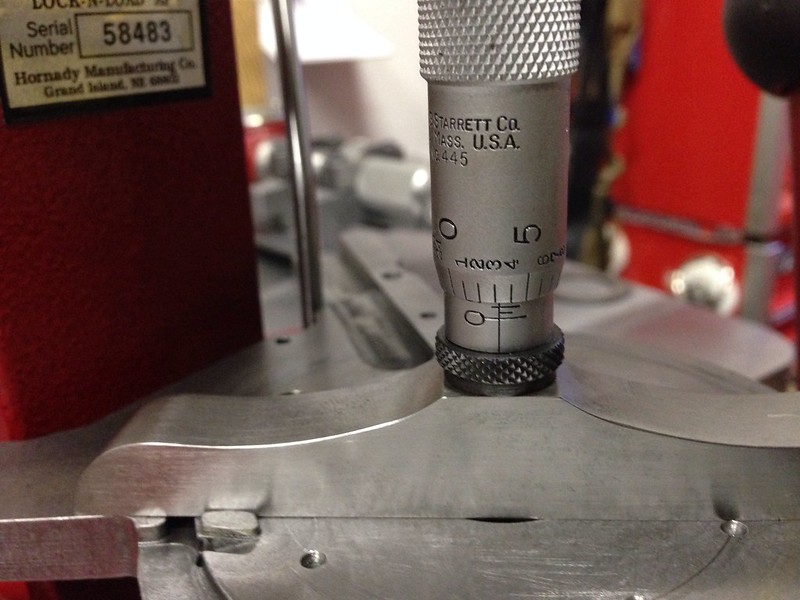
Untitled by zweitakt250, on Flickr This results in a .014" clearance. I knew it needed to be less. I decided to try a .004" clearance. Using the .01" shim showed great improvement, but I thought the clearance could go to .003". No .011" shim is provided so I made a stack out of a .005 and .006" shims. Checking the stack. 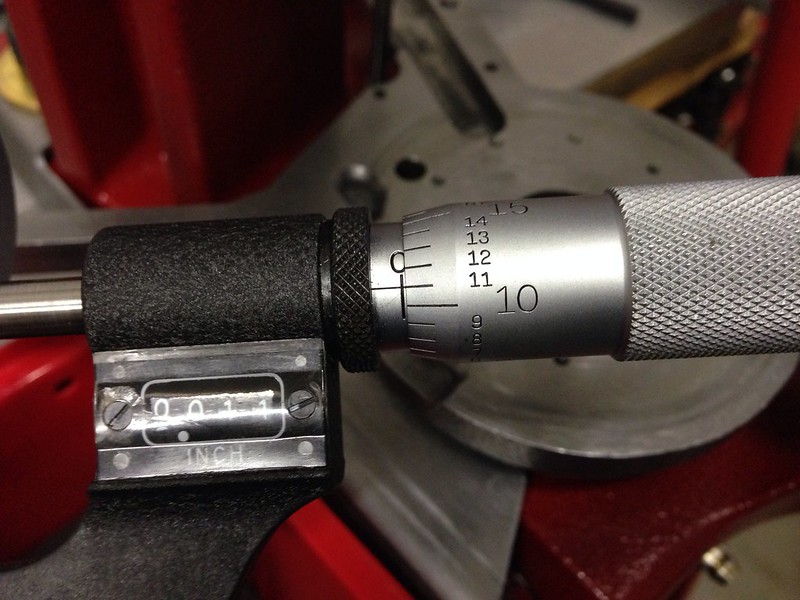
Untitled by zweitakt250, on Flickr The shims in place on the drive hub. 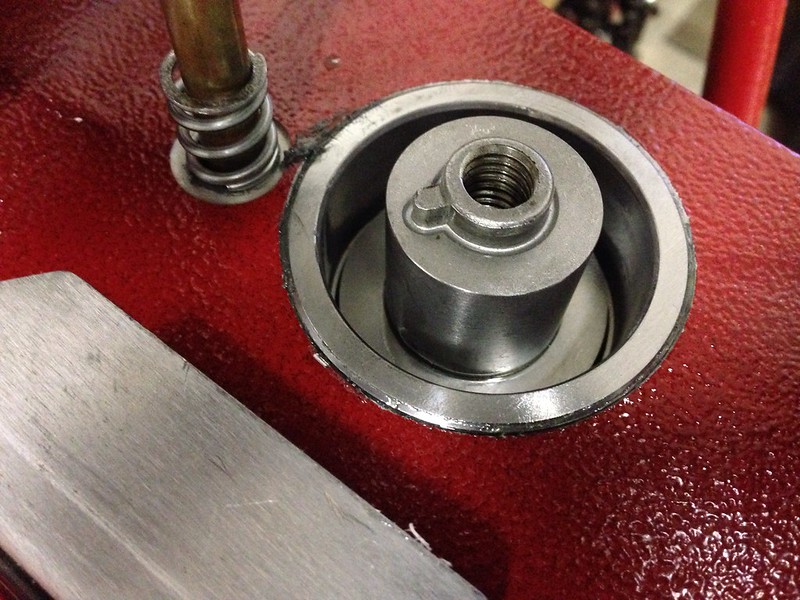
Untitled by zweitakt250, on Flickr Now when the shell plate is tightened the drive hub will be pulled barely above flush, keeping the shellplate in contact with the sub-plate and making the indexing of the press ultra smooth. 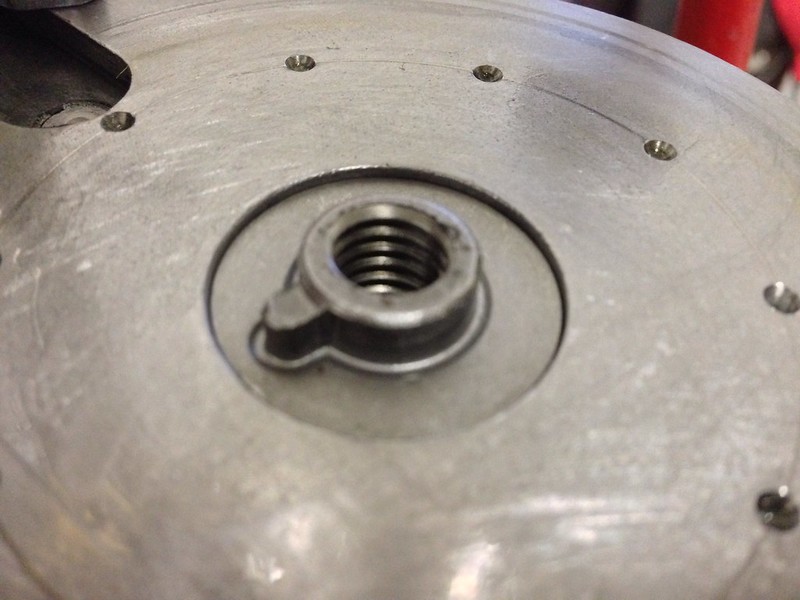
Untitled by zweitakt250, on Flickr If you read much at all about the AP you will find many that complain about the lack of ability to seat primers below flush. My first run of 100 rounds resulted in two high primers, the rest just flush. I determined that this was also a result of the shellplate rising from the sub-plate. Pushing harder on the handle only resulted in the primer punch housing bottoming against the frame. Now with the clearance set the press will seat primers below flush with ease. I hope that this thread will help those with a Hornady AP to create better ammo and be able to enjoy their press even more. Thanks for looking! |
|
|
|
|
[Last Edit: edgephoto]
[#1]
Originally Posted By xdmikey:
edgephoto, I removed the C clip w/o issue, ran the threaded end across a file a few times and thought I had it but when I screwed it back together the primer slide still hung up on the primer punch. Where to go next: file the bottom(as opposed to the top)of the primer punch? My major issue on my LNL is the failure to get primers seated deep enough and consistently, along with hangups at the case kicker/last point on the hub. Any and all comments welcome. If the punch is getting caught on the primer shuttle you have a timing issue. Assuming the punch is moving freely and the spring is working to retract the punch. Also the bin bracket was hitting the press on the downstroke. I had to bend that bracket so it did not interfere. To time the primer shuttle unscrew the shield tube and pull the handle so press is on full upstroke. Look through the primer base and you primer hole in the shuttle should be just a little toward the rear of the hole. Use the Allen bolt to adjust this. Second you are having ejection issues, right? First what are you loading that is giving you trouble? And what exactly happens at that ejection spot? EDIT: I had a primer issue too at first. I polished the shuttle and waxed the grove and all these tricks. I was loading .223 and had swaged the pockets using the Dillon tool . Once I started reaming them I had great consistency. |
|
|
|
|
[Last Edit: xdmikey]
[#2]
Thanks edgephoto. I can't wait to try this.
The cases are all reamed. The ejection is almost less than 20% failure rate. The problem children are 223 & 9. |
|
|
|
|
[#3]
I scoot d the wire back as far as it would allow and the "eye" of the primer shuttle close to the back looking down the primer feed tube.
Should I be able to slide the primer shuttle back(as in picking up another primer)when the plate is at rest/down? It hangs moving toward primer feed tube and when moving forward(at rest)the primer puncher will not move all the way forward. Is this an issue or not really when verything is moving? Thanks |
|
|
|
|
[#4]
Originally Posted By xdmikey:
Thanks edgephoto. I can't wait to try this. The cases are all reamed. The ejection is almost less than 20% failure rate. The problem children are 223 & 9. |
|
|
|
|
[#5]
I adjusted the primer slide wire to the back and it was terrible; the shellplate was loose and after three pulls it completely missed the primer opening.
I took the shellplate off, set the detent balls down and adjusted the pawls and it ran great and ejected well for 100 rounds. Thanks edgephoto and Mr Porter. |
|
|
|
AL, USA
|
[#6]
Originally Posted By xdmikey:
I adjusted the primer slide wire to the back and it was terrible; the shellplate was loose and after three pulls it completely missed the primer opening. I took the shellplate off, set the detent balls down and adjusted the pawls and it ran great and ejected well for 100 rounds. Thanks edgephoto and Mr Porter. Solved all my loose shell plate issues. |
|
|
|
[#7]
The other thing is if you get spilled powder under the shell plate it also causes ejection problems.
Timing is 90% of the issues I had when I first got this press. The other 10% were me. Much like you squeeze, not slap a trigger, you need to be smooth when running your press. What I did to get my timing perfect was start by pushing the detent balls flush so they were not going to do anything. Then I adjusted the pawls until the shell plate indexed perfectly. I would screw things up and do this over and over until I could do it easily and almost without thinking. Once I had this working perfectly I then pushed the detent balls so they just held the plate in position. You do not want the detent balls to pull it into position. When operating it empty the shell plate should be perfectly smooth with no jumping into position. Once I got this all my issues went away. After getting the shell plate timed then check your primer adjustment. It should not change buy best to check. I did have an issue that caused me to buy a Dillon 650 because I got so frustrated and the Dillon fan boys will have you believing that press works perfect with no issues. They could not be more worng. That press had different frstrating issues which made me like the Hornady again. I figured out my shell plate for .223 was out of spec. I was having priming issues, ejection issues and cases hitting the edges of the dies. Turns out the opening where the rim fits on the plate was a tiny bit small. I bought another shell plate to try and it solved my problem. A call to Hornady got them to replace it no charge. |
|
|
|
|
[#8]
400 rounds of 223 loaded yesterday and today: a first.
|
|
|
|
|
[#9]
Originally Posted By edgephoto:
..snip.. I figured out my shell plate for .223 was out of spec. I was having priming issues, ejection issues and cases hitting the edges of the dies. Turns out the opening where the rim fits on the plate was a tiny bit small. I bought another shell plate to try and it solved my problem. A call to Hornady got them to replace it no charge. I have issues more related to a different situation. It seems to me that Hornady is doing what I'd call "ongoing product improvement" on the whole LnL system. So sometimes, if you get an accessory or shell plate, it may be from "revision 004" while your press is at the "revision 010a" level. That can mean tolerances stack wrong, accessories don't quite fit the way the instructions say, etc. The problem is that I don't know of a way they are letting the user community know about these design changes, and that's a problem. An example of this is my case feeder, which is really old. It has a clear plastic front where current models have black plastic except for the case funnel. The case funnel looks like it may have been altered too. My feeder's bowl seems to be slightly smaller in diameter than newer models, too, so if I have to replace a shell plate, I am not 100% confident that a new one will fit the way I expect it to. I understand that at one point Hornady changed the angle of the feeder to allow longer cases line .357 Magnum to feed more quickly, by keeping the cases from falling out of the slots in the shell plate. I only know about that because I've found discussions of it online. My feeder's power and cut-off switches are in the usual place, but the top of the control panel is open, and I've had feed issues where cases fell into these openings...dropping a brass case onto wires that carry 110VAC is not my idea of a good time. I know they updated the primer cam retainer to allow it to break away, because I saw it mentioned here. I contacted Hornady and they sent an upgrade kit for free. I ordered the plastic end cap for the case dropper (the one that keeps cases from bouncing off the sub plate) from Midway, but Hornady probably would have sent one for free if I'd asked. That gets me to the point: they send upgrade parts to users for free, but why don't they let users know about the upgrades in the first place? Is it because they are afraid that a ton of users will ask for replacements of parts that are working just fine just because the upgrades are "upgrades"? It's something I am going to ask their tech people about, once I get the email polished and looking the way I want it to. |
|
|
|
|
[#10]
Originally Posted By GHPorter:
Everybody has a part that doesn't quite meet spec now and then. Tooling wears, the QC test system grabs the part before the out-of-spec part so the bad one goes on to packaging, etc. It's part of manufacturing in the real world. And fortunately, you were able to figure out your problem in a very concrete way so the fix was obvious, and Hornady made it right. I have issues more related to a different situation. It seems to me that Hornady is doing what I'd call "ongoing product improvement" on the whole LnL system. So sometimes, if you get an accessory or shell plate, it may be from "revision 004" while your press is at the "revision 010a" level. That can mean tolerances stack wrong, accessories don't quite fit the way the instructions say, etc. The problem is that I don't know of a way they are letting the user community know about these design changes, and that's a problem. An example of this is my case feeder, which is really old. It has a clear plastic front where current models have black plastic except for the case funnel. The case funnel looks like it may have been altered too. My feeder's bowl seems to be slightly smaller in diameter than newer models, too, so if I have to replace a shell plate, I am not 100% confident that a new one will fit the way I expect it to. I understand that at one point Hornady changed the angle of the feeder to allow longer cases line .357 Magnum to feed more quickly, by keeping the cases from falling out of the slots in the shell plate. I only know about that because I've found discussions of it online. My feeder's power and cut-off switches are in the usual place, but the top of the control panel is open, and I've had feed issues where cases fell into these openings...dropping a brass case onto wires that carry 110VAC is not my idea of a good time. I know they updated the primer cam retainer to allow it to break away, because I saw it mentioned here. I contacted Hornady and they sent an upgrade kit for free. I ordered the plastic end cap for the case dropper (the one that keeps cases from bouncing off the sub plate) from Midway, but Hornady probably would have sent one for free if I'd asked. That gets me to the point: they send upgrade parts to users for free, but why don't they let users know about the upgrades in the first place? Is it because they are afraid that a ton of users will ask for replacements of parts that are working just fine just because the upgrades are "upgrades"? It's something I am going to ask their tech people about, once I get the email polished and looking the way I want it to. I wish Hornady would offer "an upgrade package" to bring older stuff up to current standards. If something is redesigned for a product improvement we should be able to see these improvements on their support website and buy the parts. I would not expect them to send these for free. Some things were changed because a vendor may have changed or it made for a better shipping package. I think the case feeder stand is now two piece to make it easier to package. I do have to say while I was running the Dillon side by side with the LnL the Dillon case feeder is really quiet. My Hornady feeder is loud. The motor is loud but the brass and plastic makes a lot of noise. The Dillon uses a different plastic and it dampens the noise. Wish Hornady would do the same. |
|
|
|
|
[#11]
Originally Posted By edgephoto:
I wish Hornady would offer "an upgrade package" to bring older stuff up to current standards. If something is redesigned for a product improvement we should be able to see these improvements on their support website and buy the parts. I would not expect them to send these for free. Some things were changed because a vendor may have changed or it made for a better shipping package. I think the case feeder stand is now two piece to make it easier to package. I do have to say while I was running the Dillon side by side with the LnL the Dillon case feeder is really quiet. My Hornady feeder is loud. The motor is loud but the brass and plastic makes a lot of noise. The Dillon uses a different plastic and it dampens the noise. Wish Hornady would do the same. I've done all sorts of things to try to quiet my case feeder. The most effective trick was to put a soft cover on it, held with elastic - basically a really big shower cap. It was still loud, but less harsh sounding. But that doesn't work at all with stuff stuck on the sides to look into the bowl or manipulate cases inside, etc. Much of the case feeder seems to be structural foam, which is pretty hard. That makes it sturdy, but it also makes it echoey, and that's one factor in the noise issue. The shell plates are also structural foam, so they add to the echo issue. I think the thing would be a little quieter if the bowl were lined with HDPE (milk jug plastic), particularly in the back where the cases all fall on each other. Gee...what about a one=piece bowl liner made of HDPE that incorporates a wedge to upright and un-jam cases... Just stick it in, put in the shell plate, and rock on! Of course that would only work if all bowls were shaped exactly the same way, but it's an idea. |
|
|
|
|
[#12]
Originally Posted By GHPorter:
I'm 100% behind your suggestion. I've done all sorts of things to try to quiet my case feeder. The most effective trick was to put a soft cover on it, held with elastic - basically a really big shower cap. It was still loud, but less harsh sounding. But that doesn't work at all with stuff stuck on the sides to look into the bowl or manipulate cases inside, etc. Much of the case feeder seems to be structural foam, which is pretty hard. That makes it sturdy, but it also makes it echoey, and that's one factor in the noise issue. The shell plates are also structural foam, so they add to the echo issue. I think the thing would be a little quieter if the bowl were lined with HDPE (milk jug plastic), particularly in the back where the cases all fall on each other. Gee...what about a one=piece bowl liner made of HDPE that incorporates a wedge to upright and un-jam cases... Just stick it in, put in the shell plate, and rock on! Of course that would only work if all bowls were shaped exactly the same way, but it's an idea. |
|
|
|
|
[#13]
Late to the party. Just got the LNL press and had the case snap issue with 9mm and .223. Turns out our barrel nut shims are just the right size. I used 3 shims at 2 thou thickness each.
https://bisonarmory.com/shim-sets/ The AR-15 shims turn out to be exactly the right size, which is cool. ANY AR-15 barrel nut shim should work, not just ours. |
|
|
|
|
[#14]
Not late, just in time.
This is one of those threads that has been saved from the archives so it came back to life when needed. Like all the threads from midway thru page 9 thru page 12. |
|
|
|
|
[#15]
Originally Posted By dryflash3: Not late, just in time. This is one of those threads that has been saved from the archives so it came back to life when needed. Like all the threads from midway thru page 9 thru page 12. Using my AP last week I thought to myself how glad I was that I took the time to tweak the setup. I hope others have found value here. |
|
|
|
|
[#16]
Since this thread has been "revived" let me just add that on the off chance you shear a drive hub lug (because you were teaching someone to reload on your machine and before you got to the "don't power through a stoppage" part he had a primer fail to eject and...well, you know...) and have to replace your drive hub you will very likely have to go through the process of measuring and shimming again. All of you who tossed or gave away the "extra" shims may be in the market for a new package.
|
|
|
|
|
[#17]
Recently got a LNL AP and it seems all I do is tinker, but I am getting closer and closer. Things I've learned in the past two weeks that I'd thought I'd pass on....
I was having one hell of a time getting brass to cleanly go into an FCD in station 5. Addressing the stack of the hub, carrier, and shellplate corrected this. AR15 barrel shims are the exact ID and OD needed to shim the drive hub. It is incredibly easy to get to the drivehub, I'd start here as opposed to hammering on your shellplate detents. Adjusting the shellplate detents is treating a symptom, not the cause. I started with .023" of shims and worked my way down to .005". It was a balancing act of eliminating slop, but having enough room to properly tighten the shellplate without binding up the drive. Also be sure to check all shellplates – they are NOT all flat. You’ll never notice a not flat shellplate by eye, but on a surface plate you will find they are not flat. When we’re dealing with increments of 003-005” it makes a huge difference, so be sure to check the function of all shellplates after you shim the hub. The PTX setup - completely ignore the instructions. They are vague and worded in a way to send you chasing your tail. Honestly, they are complete crap instructions and even the tech at Hornady said so himself. Not only is the setup initially extremely painful trying to decipher the instructions, but the expanders themselves are awful. The RCBS PTX inserts are a drop in and are excellent. They can be an M-die or traditional Bell, all depends how deep you go. RCBS also includes instructions of how to set it up, this is beneficial since the RCBS drop is identical to the Hornady. The RCBS instructions actually make sense. Bottom line, let the meter screw hit the casting, who cares? Throw on the PTX stop and just put enough pressure on it to take some force out of the linkage. If you don't, nothing bad will happen, just some wiggle. I would have saved hours of frustration by completely ignoring the instructions initially and just listening to my brain, but I’ve broken enough things over the years thinking my way was better…. Back to shellplates… They should be firmly mounted, but to an extent. In my opinion there needs to be give for when the dies inevitably try fighting back. I think this is why from the factory the plate has quite a lot of wiggle even when snugged hard. I am currently trying multiple methods of holding force on the plate, but letting the plate hardware yield to let the dies have their way. Method one is a big fat rubber washer or o-ring – it will hold tight, but give when needed. Finding the right durometer is part of the game. Method two is using a conical spring between the bolt head and shell plate. Again, finding the spring rate is a work in progress, however, I think this method will be the most successful. A split-lock washer is all or nothing, unless you want to introduce an unequal force on the shellplate. Flattening a 3/8” split lock takes a bit of torque, unless you’re using Chinese shit hardware from lowes/homedepot/etc. In my opinion it’s not needed. Remember, by shimming the hub, our plate is only a few thou off the deck, there’s no reason to try hamfisting it down. I’m sure many of these things are well-known, it’s not like the LnL is new, but if it helps one person or spurs an idea for someone who has been using an LnL for 10 years then I’m happy. I’ll post more as I go. Hopefully you find something in here helpful. |
|
|
|
USA
|
[Last Edit: JACKDWACK]
[#18]
Originally Posted By SDMF_Rebel: Recently got a LNL AP and it seems all I do is tinker, but I am getting closer and closer. Things I've learned in the past two weeks that I'd thought I'd pass on.... I was having one hell of a time getting brass to cleanly go into an FCD in station 5. Addressing the stack of the hub, carrier, and shellplate corrected this. AR15 barrel shims are the exact ID and OD needed to shim the drive hub. It is incredibly easy to get to the drivehub, I'd start here as opposed to hammering on your shellplate detents. Adjusting the shellplate detents is treating a symptom, not the cause. I started with .023" of shims and worked my way down to .005". It was a balancing act of eliminating slop, but having enough room to properly tighten the shellplate without binding up the drive. Also be sure to check all shellplates – they are NOT all flat. You’ll never notice a not flat shellplate by eye, but on a surface plate you will find they are not flat. When we’re dealing with increments of 003-005” it makes a huge difference, so be sure to check the function of all shellplates after you shim the hub. The PTX setup - completely ignore the instructions. They are vague and worded in a way to send you chasing your tail. Honestly, they are complete crap instructions and even the tech at Hornady said so himself. Not only is the setup initially extremely painful trying to decipher the instructions, but the expanders themselves are awful. The RCBS PTX inserts are a drop in and are excellent. They can be an M-die or traditional Bell, all depends how deep you go. RCBS also includes instructions of how to set it up, this is beneficial since the RCBS drop is identical to the Hornady. The RCBS instructions actually make sense. Bottom line, let the meter screw hit the casting, who cares? Throw on the PTX stop and just put enough pressure on it to take some force out of the linkage. If you don't, nothing bad will happen, just some wiggle. I would have saved hours of frustration by completely ignoring the instructions initially and just listening to my brain, but I’ve broken enough things over the years thinking my way was better…. Back to shellplates… They should be firmly mounted, but to an extent. In my opinion there needs to be give for when the dies inevitably try fighting back. I think this is why from the factory the plate has quite a lot of wiggle even when snugged hard. I am currently trying multiple methods of holding force on the plate, but letting the plate hardware yield to let the dies have their way. Method one is a big fat rubber washer or o-ring – it will hold tight, but give when needed. Finding the right durometer is part of the game. Method two is using a conical spring between the bolt head and shell plate. Again, finding the spring rate is a work in progress, however, I think this method will be the most successful. A split-lock washer is all or nothing, unless you want to introduce an unequal force on the shellplate. Flattening a 3/8” split lock takes a bit of torque, unless you’re using Chinese shit hardware from lowes/homedepot/etc. In my opinion it’s not needed. Remember, by shimming the hub, our plate is only a few thou off the deck, there’s no reason to try hamfisting it down. I’m sure many of these things are well-known, it’s not like the LnL is new, but if it helps one person or spurs an idea for someone who has been using an LnL for 10 years then I’m happy. I’ll post more as I go. Hopefully you find something in here helpful. I could be wrong, but the shims I have for barrels are too big. |
|
|
|
[#19]
Originally Posted By JACKDWACK: I could be wrong, but the shims I have for barrels are too big. Originally Posted By JACKDWACK: Originally Posted By SDMF_Rebel: Recently got a LNL AP and it seems all I do is tinker, but I am getting closer and closer. Things I've learned in the past two weeks that I'd thought I'd pass on.... I was having one hell of a time getting brass to cleanly go into an FCD in station 5. Addressing the stack of the hub, carrier, and shellplate corrected this. AR15 barrel shims are the exact ID and OD needed to shim the drive hub. It is incredibly easy to get to the drivehub, I'd start here as opposed to hammering on your shellplate detents. Adjusting the shellplate detents is treating a symptom, not the cause. I started with .023" of shims and worked my way down to .005". It was a balancing act of eliminating slop, but having enough room to properly tighten the shellplate without binding up the drive. Also be sure to check all shellplates – they are NOT all flat. You’ll never notice a not flat shellplate by eye, but on a surface plate you will find they are not flat. When we’re dealing with increments of 003-005” it makes a huge difference, so be sure to check the function of all shellplates after you shim the hub. The PTX setup - completely ignore the instructions. They are vague and worded in a way to send you chasing your tail. Honestly, they are complete crap instructions and even the tech at Hornady said so himself. Not only is the setup initially extremely painful trying to decipher the instructions, but the expanders themselves are awful. The RCBS PTX inserts are a drop in and are excellent. They can be an M-die or traditional Bell, all depends how deep you go. RCBS also includes instructions of how to set it up, this is beneficial since the RCBS drop is identical to the Hornady. The RCBS instructions actually make sense. Bottom line, let the meter screw hit the casting, who cares? Throw on the PTX stop and just put enough pressure on it to take some force out of the linkage. If you don't, nothing bad will happen, just some wiggle. I would have saved hours of frustration by completely ignoring the instructions initially and just listening to my brain, but I’ve broken enough things over the years thinking my way was better…. Back to shellplates… They should be firmly mounted, but to an extent. In my opinion there needs to be give for when the dies inevitably try fighting back. I think this is why from the factory the plate has quite a lot of wiggle even when snugged hard. I am currently trying multiple methods of holding force on the plate, but letting the plate hardware yield to let the dies have their way. Method one is a big fat rubber washer or o-ring – it will hold tight, but give when needed. Finding the right durometer is part of the game. Method two is using a conical spring between the bolt head and shell plate. Again, finding the spring rate is a work in progress, however, I think this method will be the most successful. A split-lock washer is all or nothing, unless you want to introduce an unequal force on the shellplate. Flattening a 3/8” split lock takes a bit of torque, unless you’re using Chinese shit hardware from lowes/homedepot/etc. In my opinion it’s not needed. Remember, by shimming the hub, our plate is only a few thou off the deck, there’s no reason to try hamfisting it down. I’m sure many of these things are well-known, it’s not like the LnL is new, but if it helps one person or spurs an idea for someone who has been using an LnL for 10 years then I’m happy. I’ll post more as I go. Hopefully you find something in here helpful. I could be wrong, but the shims I have for barrels are too big. Then you have shims that wouldn't work on an AR or a wierd hub in your press. I have a bin full of shims, all fit. |
|
|
|
USA
|
[#20]
Originally Posted By SDMF_Rebel: Then you have shims that wouldn't work on an AR or a wierd hub in your press. I have a bin full of shims, all fit. Well color me stupid I grabbed the ar10 shims I had... |
|
|
USA
|
[Last Edit: JACKDWACK]
[#21]
So I added about .004 worth of shims, really tightened up my .45 shell plate nicely. Unfortunately, my 9mm and .223 shell plates arent as tight.. my guess is the detents have some variation between shellplates and the .45 ones are a thousandth or so lower.
If I add another .001 shim, the 45 plate becomes too difficult to turn. So looks like this is the best I can get. My mechanical understanding is by shimming the shellplate, you're preloading the detents until they're basically maxed out between indexing. |
|
|
|
[#22]
Originally Posted By JACKDWACK: My mechanical understanding is by shimming the shellplate, you're preloading the detents until they're basically maxed out between indexing. In part you’re preloading the detents. But since the shaft and subplate can have some tolerance issues sometimes, the first thing the shims do is get the working part of the shaft somewhere near where the detents can do their jobs at all. To some extent that’s what I got, at least for a couple of my shellplates. Once you get in the ballpark, you can start comparing shellplates for smoothness. You might find a workable middle ground where you use a tight split lock washer for some plates and just a flat washer for others. Some folks have used a punch to UNload the detents on overly tight shellplates, which may be an option for you. |
|
|
|
USA
|
[Last Edit: JACKDWACK]
[#23]
Originally Posted By GHPorter: In part you’re preloading the detents. But since the shaft and subplate can have some tolerance issues sometimes, the first thing the shims do is get the working part of the shaft somewhere near where the detents can do their jobs at all. To some extent that’s what I got, at least for a couple of my shellplates. Once you get in the ballpark, you can start comparing shellplates for smoothness. You might find a workable middle ground where you use a tight split lock washer for some plates and just a flat washer for others. Some folks have used a punch to UNload the detents on overly tight shellplates, which may be an option for you. I started messing around with the detents today. I'm going to see if I can get the tight plate (45) to loosen up a bit by driving them a little deeper. And add more shims if so to get more uniformity from all the plates. I tried to punch the 9mm plates detents out a little and they didn't seem to budge with moderate force. I will have to play around with them all and see if a middle ground can be found. My biggest goal is to get the 9mm plate smooth because I tend to kick powder out of cases on the down stroke when the detent pops into place. |
|
|
USA
|
[Last Edit: JACKDWACK]
[#24]
Just to update, I spent all night smoothing out the plates so they are all consistent. Process...
I took note of which plate moved with the least resistance with the minum amount of clearance. My 45 plate was the worst, completely seized. .223 plate was OK with one rotation that dragged a bit Plate 8 was good, and had minimal to no tilt with a .004 spacer Using a sharpie I marked the outer 5 rails for the spring support, and filed each one until there was uniform wear. Took a while because I went slow on the filing making sure not to over do it. I also wanted to make sure that the cartridge still fit and I wasn't removing too much. All plates are now significantly better and rotate smoothly, but I was amazed at how much the .45 was out of spec compared to the others. I did notice the shell plates dragged the most at the 3 o'clock spot between station 2 and 3. Not sure if that is the reason for the issue at station 5 with case tilt |
|
|
|
[#25]
I’m glad you were able to get things working better. I never had that much difficulty with any plate, but it’s easy to see that there are a whole lot of places that one snag can goober up the whole press.
One thing I’ve done to make everything flow better is to polish the sub plate. For one thing, there were machine marks - not where the cases ride, but maybe in the way of the detents? Anyway, I got out the Flitz and used plenty of elbow grease until the thing was shiny. Not mirror shiny, but clearly very smooth. Then I applied Johnson’s Paste Wax to the whole upper surface of the sub plate, let it sit for a while, then carefully buffed it out. I’ve redone this step a few times, including once heating it up with my heat gun - just enough to make it warm throughout - before applying the wax. The paste wax acts as a powder-safe lubricant for the cases and shell plates, which keeps things moving smoothly. I had considered getting my sub plate trued, but it seems to be pretty flat according to my engineer’s scale. |
|
|
|
|
[#26]
The freaking spring keeps popping off all of my shellplates. By popping off I mean it is coming out of the channel where the cases feed. Does it on all my shellplates.
|
|
|
|
|
[#27]
Does it come off UNDER the plate or over it?
If under, your shell plate isn’t properly secured to the shaft. Push the shell plate down firmly on the shaft, then make sure it doesn’t move while you snug down the bolt to hold it in place. This is where a split lock washer helps a lot. If it’s coming off OVER the plate, then there’s something catching it as the shell plate rotates. Take the shell plate off, clean the sub plate really well, and see if you can feel anything rough or out of place. |
|
|
|
|
[#28]
Originally Posted By GHPorter: Does it come off UNDER the plate or over it? If under, your shell plate isn’t properly secured to the shaft. Push the shell plate down firmly on the shaft, then make sure it doesn’t move while you snug down the bolt to hold it in place. This is where a split lock washer helps a lot. If it’s coming off OVER the plate, then there’s something catching it as the shell plate rotates. Take the shell plate off, clean the sub plate really well, and see if you can feel anything rough or out of place. Neither. It's just coming out of the channel. I polished everything in hopes it would resolve, no dice. |
|
|
|
|
[#29]
As a side note on springs. Has anyone been able to repair a damaged one? Maybe out of two?
|
|
|
|
|
[#30]
Unless the spring is just snagged a little, I've never gotten one to work after it started giving me problems. I've just bought backups to have on hand. And of course, since I had the parts on hand, I haven't had a problem with one in a long time.

|
|
|
|
|
[#31]
Originally Posted By GHPorter: Unless the spring is just snagged a little, I've never gotten one to work after it started giving me problems. I've just bought backups to have on hand. And of course, since I had the parts on hand, I haven't had a problem with one in a long time. Same. I bought a half dozen springs. I think I’ve used one of them. |
|
|
|
FL, USA
|
[#32]
My LNL used to seat the primers too high. The shell plate had too much wobble and was not keeping the case tight against the sub plate.
I called Hornady and described the problem, they sent me a new drive hub with a thicker flange at the bottom, best I can remember it was about 0.010" thicker. Whatever the thickness of the flange was, it acted as if I had added an arbor shim on the old hub, pulling the shell plate tighter against the sub plate and not allowing the case that was getting primed to rise. To get rid of the shell plate wobble the relationship between the drive hub and sub plate needs to be changed. You cant lower the drive hub, so you raise the sub plate by either replacing the drive hub with one that has a thicker bottom, or shim the old one. I prefer the Hornady method, they shipped the drive hub fast and free. One other thing, I greased the drive hub exterior before installation. |
|
|
|
[#33]
Originally Posted By nramanA1: My LNL used to seat the primers too high. The shell plate had too much wobble and was not keeping the case tight against the sub plate. I called Hornady and described the problem, they sent me a new drive hub with a thicker flange at the bottom, best I can remember it was about 0.010" thicker. Whatever the thickness of the flange was, it acted as if I had added an arbor shim on the old hub, pulling the shell plate tighter against the sub plate and not allowing the case that was getting primed to rise. To get rid of the shell plate wobble the relationship between the drive hub and sub plate needs to be changed. You cant lower the drive hub, so you raise the sub plate by either replacing the drive hub with one that has a thicker bottom, or shim the old one. I prefer the Hornady method, they shipped the drive hub fast and free. One other thing, I greased the drive hub exterior before installation. |
|
|
|
|
[#34]
Hornady's made incremental advancements in the LnL design over the years, but they haven't really advertised them to existing owners. I found out about the EZ-Ject system when I saw an ad for the LnL, years after I'd bought mine. A quick email to Hornady tech support got me instructions for ordering a retrofit kit (this wasn't something they could just send free, it's a whole new subplate), and once I installed it, (and got my old shell plates modified), running the press was much nicer, AND it got me a more useful station 5 in the process.
Shimming the hub and subplate fit helps with a lot of things. I did mine to reduce problems with shell plate indexing. Priming was never an issue for me, but I'm still watching the press frame where the priming punch hits it for signs that it's time to attach a shim there. |
|
|
|
FL, USA
|
[Last Edit: nramanA1]
[#35]
The "punching" referred to is about driving the locating balls in the bottom of the shellplate back up into the bores in which they travel. This moves the backing plugs that hold the springs upward. The net effect is to reduce the spring preload on the balls which in turn gives the balls less force to apply while trying to go home into the detents. Punching the balls can make the shellplate operation smoother and prevent the spilling of powder. Unfortunately it can also cause high primers. With the balls not filling the subplate holes, the shellplate is not positioned accurately for priming. Primer to primer pocket is a tight fit, if the two are not aligned exactly the primer can have a hard time seating and may end up sticking up. I think that eliminating wobble by shimming or getting a new drive hub from Hornady (there are at least two different sized hubs available) for free, can solve both the looseness and high primers if the shellplate balls are functioning properly. |
|
|
|
[#36]
Well, glad I found this thread.
I've been using an RCBS Pro2000 for 22 years. Still going strong with just a few minor issues. I'm giving it to my oldest son so I ordered a Hornady Lock-N-Load AP to replace it. This tread initially made me second guess the decision to buy one. Hopefully current production LNL presses are sorted out. If not I'll be back.
|
|
|
|
|
[#37]
I picked up an LNL AP in September for pretty dang cheap. Brand new and never setup. With life and moving I haven't had much time to set it up until recently. I can't seem to get any shim set to make an appreciable difference in the shell plate jumping. When I got it to smooth, it was with 2 - .004 shims, and the rotation of the plate was a bit tight. It also would not go fully into position every time when pushing the lever handle forward. Went back to a .004+.002+.001 and the shell plate feels a little tight still, but less so. Shell plate still jumps into the detent both forward and back on the handle. Tried messing with the pawls and that didn't seem to do anything. I dropped to the .004+.002 today and tried punching the detents in. That made a difference, but also made each position weak. I did incrementally punch them in.
I need to figure something out. I tested it the other night with the 2 .004 shims and shell plate bolt just finger tight (no allen key on it), and powder definitely jumps out of 300 blk cases. I do have calipers, but no other measuring tools. I will also try to read back through every page (I did 4-5 months ago) to see if I missed anything. At least my 3D printed case feeder works well! Oh yeah, H110 is all sorts of stuck to my powder drop. I used the Hornady cleaner per the instructions, and I do not believe my wife uses dryer sheets. Any other ideas for that? |
|
|
|
|
[#38]
I am now running the o ring instead of the spring and that has eliminated all of my jumping. It adds just enough tension to slow down the shell plate so it doesn't float at all. I removed all of my shims after I went to the o ring.
|
|
|
|
|
[#39]
Originally Posted By DUX4LIFE: I am now running the o ring instead of the spring and that has eliminated all of my jumping. It adds just enough tension to slow down the shell plate so it doesn't float at all. I removed all of my shims after I went to the o ring. I was just reading about that today. I think I'll try that. |
|
|
|
|
[#40]
Originally Posted By spyderboy03: I picked up an LNL AP in September for pretty dang cheap. Brand new and never setup. With life and moving I haven't had much time to set it up until recently. I can't seem to get any shim set to make an appreciable difference in the shell plate jumping. When I got it to smooth, it was with 2 - .004 shims, and the rotation of the plate was a bit tight. It also would not go fully into position every time when pushing the lever handle forward. Went back to a .004+.002+.001 and the shell plate feels a little tight still, but less so. Shell plate still jumps into the detent both forward and back on the handle. Tried messing with the pawls and that didn't seem to do anything. I dropped to the .004+.002 today and tried punching the detents in. That made a difference, but also made each position weak. I did incrementally punch them in. I need to figure something out. I tested it the other night with the 2 .004 shims and shell plate bolt just finger tight (no allen key on it), and powder definitely jumps out of 300 blk cases. I do have calipers, but no other measuring tools. I will also try to read back through every page (I did 4-5 months ago) to see if I missed anything. At least my 3D printed case feeder works well! Oh yeah, H110 is all sorts of stuck to my powder drop. I used the Hornady cleaner per the instructions, and I do not believe my wife uses dryer sheets. Any other ideas for that?  Get some powdered graphite, I use an acid brush dipped in the graphite to coat the inside of the hopper. Acid brush in the pic. Then tap out, carefully, graphite can be a mess. There will be a light coat of graphite inside the hopper, what you want. Most powder is coated with graphite, so it won't affect your powder, and the static will be gone. |
|
|
|
|
[#41]
Originally Posted By dryflash3: @spyderboy03 https://i.imgur.com/xKVA7wml.jpg Get some powdered graphite, I use an acid brush dipped in the graphite to coat the inside of the hopper. Acid brush in the pic. Then tap out, carefully, graphite can be a mess. There will be a light coat of graphite inside the hopper, what you want. Most powder is coated with graphite, so it won't affect your powder, and the static will be gone. Awesome, thanks! |
|
|
|
|
[#42]
Originally Posted By spyderboy03: I picked up an LNL AP in September for pretty dang cheap. Brand new and never setup. With life and moving I haven't had much time to set it up until recently. I can't seem to get any shim set to make an appreciable difference in the shell plate jumping. When I got it to smooth, it was with 2 - .004 shims, and the rotation of the plate was a bit tight. It also would not go fully into position every time when pushing the lever handle forward. Went back to a .004+.002+.001 and the shell plate feels a little tight still, but less so. Shell plate still jumps into the detent both forward and back on the handle. Tried messing with the pawls and that didn't seem to do anything. I dropped to the .004+.002 today and tried punching the detents in. That made a difference, but also made each position weak. I did incrementally punch them in. I need to figure something out. I tested it the other night with the 2 .004 shims and shell plate bolt just finger tight (no allen key on it), and powder definitely jumps out of 300 blk cases. I do have calipers, but no other measuring tools. I will also try to read back through every page (I did 4-5 months ago) to see if I missed anything. At least my 3D printed case feeder works well! Oh yeah, H110 is all sorts of stuck to my powder drop. I used the Hornady cleaner per the instructions, and I do not believe my wife uses dryer sheets. Any other ideas for that? I haven't tried the o-ring mentioned by others, but my fix for the shellplate jumping was to push the bearings on the plate back just a couple thousandths. Use a punch and very carefully press them from the bottom of the plate towards the top. It helped that I had several plates and only a couple "jumped" so I compared the ball detent depth on those compared to the smooth ones. |
|
|
|
|
[#43]
Originally Posted By ishootglocks: I haven't tried the o-ring mentioned by others, but my fix for the shellplate jumping was to push the bearings on the plate back just a couple thousandths. Use a punch and very carefully press them from the bottom of the plate towards the top. It helped that I had several plates and only a couple "jumped" so I compared the ball detent depth on those compared to the smooth ones. That helped mine yesterday, but it also seemed like the amount I had to push them in to get things "smooth," cause the detents to just barely engage with the holes. That resulted in the shell plate easily moving by hand. |
|
|
|
|
[#44]
Originally Posted By spyderboy03: Oh yeah, H110 is all sorts of stuck to my powder drop. I used the Hornady cleaner per the instructions, and I do not believe my wife uses dryer sheets. Any other ideas for that? Mix up some soapy water with dish soap. Dip the plastic part of the powder measure into the water then set aside to let dry. I did this with plastic powder funnels and with my RCBS powder measure. It worked. |
|
|
|
|
[#45]
Originally Posted By cb4017: Mix up some soapy water with dish soap. Dip the plastic part of the powder measure into the water then set aside to let dry. I did this with plastic powder funnels and with my RCBS powder measure. It worked. So I went with the graphite.....instant fix. https://www.amazon.com/dp/B09HZ62W26?tag=arfcom00-20 Not hard to find. |
|
|
|
|
[#46]
Lighting under the AP press is poor for me. I have desk lamps that bounce light on the shell plate..
also a LED taillight in the center hole. Recently I took a e shell plate chucked it up in my lathe and spun it at 2000 rpm. with 1500 and 2000 wet/dry paper. Caution use small 2X2 inch pieces as there are a lot of sharp edges. Dont use shop rags for the same reason. I finished the polish f with a 2 inch cleaning patch with .3 micron alundium . light trans mission was noticeably improved. If you have a dry tumbler it maybe possible to polish with it. |
|
|
|
USA
|
[#47]
My LNL AP just keeps rolling along smoothly. I did the $28 Bullet Feeder for a long time but recently broke down and bought the Mini Mr. Bullet Feeder. Fantastic addition, easy to set up. Little pricey but worth it to me.
I am on my second light strip, went with THIS ONE after the smaller, old one burned up. This is very bright and if it dies, disappears, whatever, I would buy again. |
|
|
|
[#48]
Originally Posted By DUX4LIFE: I am now running the o ring instead of the spring and that has eliminated all of my jumping. It adds just enough tension to slow down the shell plate so it doesn't float at all. I removed all of my shims after I went to the o ring. @DUX4LIFE can you post or PM the o-ring you used? Thanks much! |
|
|
|
|
[#49]
This is what I ordered. Still no regrets...
https://www.amazon.com/gp/product/B00NQWLHKG/ref=ppx_yo_dt_b_search_asin_title?ie=UTF8&psc=1 Here is a video.  Hornady LnL AP Indexing Snap Fix |
|
|
|
|
[#50]
I gotta call Hornady. I really need to get some current gen parts for my pivot block/cam wire mechanism. It’s a much older generation and is currently inoperable and such a POS. Horrid design.
|
|
|
|
 Win a FREE Membership!
Sign up for the ARFCOM weekly newsletter and be entered to win a free ARFCOM membership. One new winner* is announced every week!
You will receive an email every Friday morning featuring the latest chatter from the hottest topics, breaking news surrounding legislation, as well as exclusive deals only available to ARFCOM email subscribers.

AR15.COM is the world's largest firearm community and is a gathering place for firearm enthusiasts of all types.
From hunters and military members, to competition shooters and general firearm enthusiasts, we welcome anyone who values and respects the way of the firearm.

Subscribe to our monthly Newsletter to receive firearm news, product discounts from your favorite Industry Partners, and more.
Copyright © 1996-2024 AR15.COM LLC. All Rights Reserved.
Any use of this content without express written consent is prohibited.
AR15.Com reserves the right to overwrite or replace any affiliate, commercial, or monetizable links, posted by users, with our own.


