


Armory Sponsor


[ARCHIVED THREAD] - Clipped and Pinned (Page 1 of 2)
Posted: 4/19/2006 10:14:54 PM EDT


|
+1 This was a much more understandable explanation than the more technical info at hkpro: www.hkpro.com/hkconversions.htm I own a few H&K's and clones, and still can't figure out what it will take to switch trigger packs/sears around  Black Fox |
That’s not a bad idea, but the main reason for this post is to take care of a question that many of us are tired of answering. Maybe you should write a how to in order to supplement this post. |
|
Good stuff. Now here's another one for the H&K experts I have an O-1 metal frame on my 91, if I want to go with a Pictrogram "Navy" grip frame in plastic, can I use the same trigger pack and selector once the lower housing has been "Clipped and Pinned" or simply put? How I can I tell if my Trigger pack is Compatible with my lower housing/ selector? |
|
Question I got a guy that wants to sell me a navy housing and trigger pack for my 94. He says it is all original if I buy this will I be in violation of the law since the trigger pack is for a FA? I don't intend to use the TP but he will not sell it broken up. Thanks |
Get the whole thing and convert the Trigger Pack!! It's simple!! Thed the Trigger Group to Adam Webber (HKForever) and there's tons of folkd that can Covert that trigger pac to fit the shelf in your 94!! Y |
Next time I C&P one I will. Something like this: HK USC To UMP Conversion Guide I also rescind my previous -1 as I thought I was in the HK handgun forum, just realized this is the Armory. |

|
Installing a paddle release in a semi requires you drilling a hole through one side of the receiver shelf and partly into the other side approx 1/8" dia. Doing that allows you to install a pin with an over size bushing for the paddle to pivot on. Once you have done that, you reweld the hole you just made (lest you create a new machine gun), mill it flush and refinish. If you have a auto sear, you have it installed in a single pack and move it from gun to gun changing out the hammer, spring, ejector as needed depending on caliber of the host weapon. AFA modding a host gun, it really depends on what you're talking about. If you have a registered sear not married to the host weapon; as soon as you separate the sear from the host, the host reverts back to title one status and has to follow all the rules that apply to non-NFA (i.e. barrel length, stocks on pistols ect.). If you have a married sear/host or a RR gun, the proverbial sky is the limit. |
|
Thank you MPfiveengineer for the nice pics. Sorry to see you catch flak over it. My SEF gun was modified this way along with the paddle mag release. It's my third child. I have flirted with the idea of having my Fleming sear put in a Navy lower, but, I'm assuming that (along with the mod you mentioned ) I'd have to use a different "pack" with just my sear installed because the Navy allows for 3 rd burst as well where mine doesn't, right? Not that I can't get off just two or three rds if I want. I like both plastic lowers. My buddy has the older RR metal lower and compared to mine, it just looks plain ugly. Mine had the 3 lug treatment as well which I'm dying to try out with my new SWR Trident 9. Can anyone show me some setups on another HK thread of scoped or Red dots mounted on MP5s? Bill Fleming is a friend of mine. I'm lucky to have one of his .22 kits that works for it. |
|
Quoted:
Anyone have a How To to supplement this post? Here is a step-by-step guide on how to clip-and-pin your Coharie/Navy FBI-style trigger housing: Materials needed: Dremmel tool Small cut-off wheel Small file #11 blade or hobby knife 1/8" Drill bit 1/4" Drill bit Extra MP5 handguard pin 1) To clip-and-pin a Coharie/Bobcat-type grip housing, you must leave the grip housing on the weapon. Take a machinist's square and place one edge along the receiver rail, and the other intersecting the center of the magazine release button. Mark the lower grip housing in the middle of the "ear" even with where the square crosses it (This is essentially where the pivot-pin hole would be in the receiver). Because of the dimensions of my Coharie grip housing, I had to mark my grip housing a little furthur back to ensure that the pin would center itself in the ear of the grip housing. It's not enough to notice. 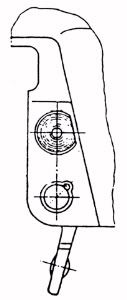 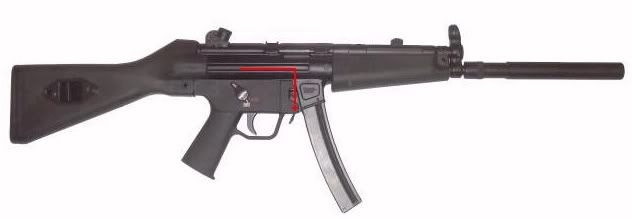
2) Remove the grip housing from the weapon and disassemble it, removing the trigger pack to prevent foreign material entering it during drilling and construction. Place a 1/8" bit in a drill press and drill a pilot hole through both ears. Next, place a 1/4" drill bit in the drill press and proceed to open the holes SLOWLY. 3) Once a hole has been drilled through both ears, use a hobby knife or #11 blade to remove any rough edges/flash from around the holes. Insert a new handguard pin through the holes. It should be snug. Using a machinist's scribe, scribe a line around the new handguard pin from the inside of the grip housing. Remember to scribe both ends of the new handguard pin. 4) Remove the new handguard pin from the grip housing. Using a Dremmel cut-off wheel, cut the new handguard pin on the lines. Be careful not to loose the little piece of spring wire from the end of the pin when you cut it. After each end is cut, test fit them through the holes in the grip housing's ears. The pin pieces should be flush with the inside of the grip housing's ears. Since the ears are tight to the semi-auto shelf, the pins MUST be flush with the insides of the grip housing. 5) Once you are sure the pins are flush with the insides of the grip housing, remove the pin pieces. Mix equal parts of 5-minute epoxy and apply a small amount to the inside of the hole you drilled on one ear. Insert the larger "flanged" pin into the hole, rotating it while it is inserted to ensure the epoxy contacts both the grip housing and the pin. Wipe any residual epoxy from the inside of the grip housing. Apply a small amount of epoxy to the inside of the other half of the pin to make sure the spring wire won't eventually fall out. Let the epoxy set up. When the epoxy for the first half of the pin is set up, do the other side in the same way, inserting the pin until the spring wire rests on the outside of the grip housing. 6) When both sides are done and the epoxy has dried, test-fit the grip housing to the receiver. File or Dremmel away any residual epoxy that interferes with the proper installation of the grip housing. There you go, now your CA94fs looks like a supressed MP5 SFA2. Before: 
After: 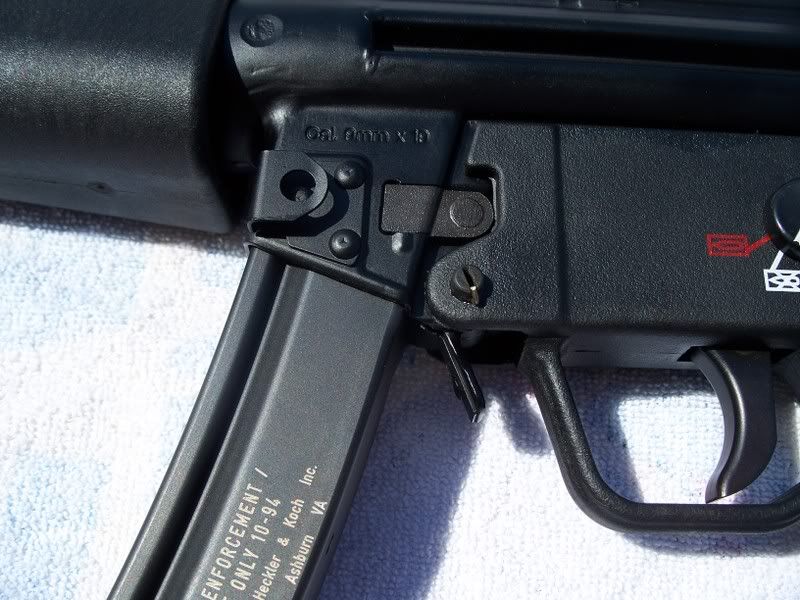
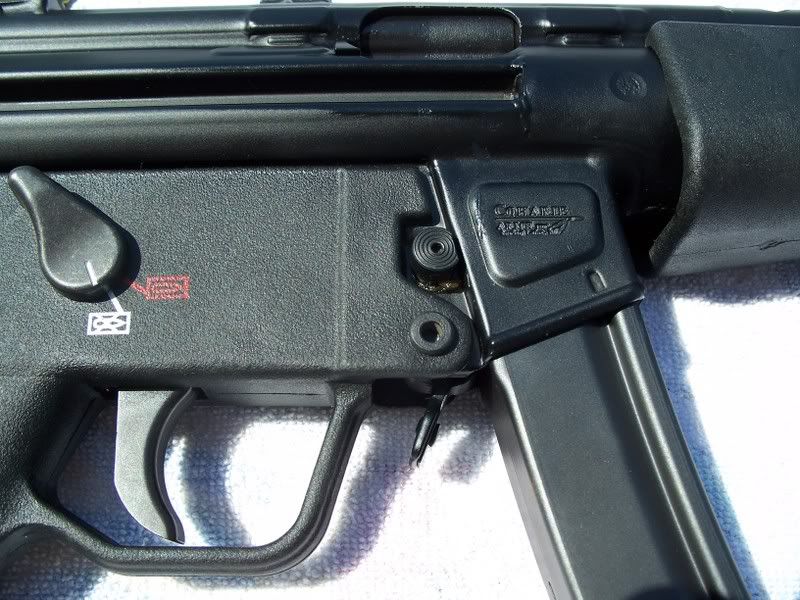
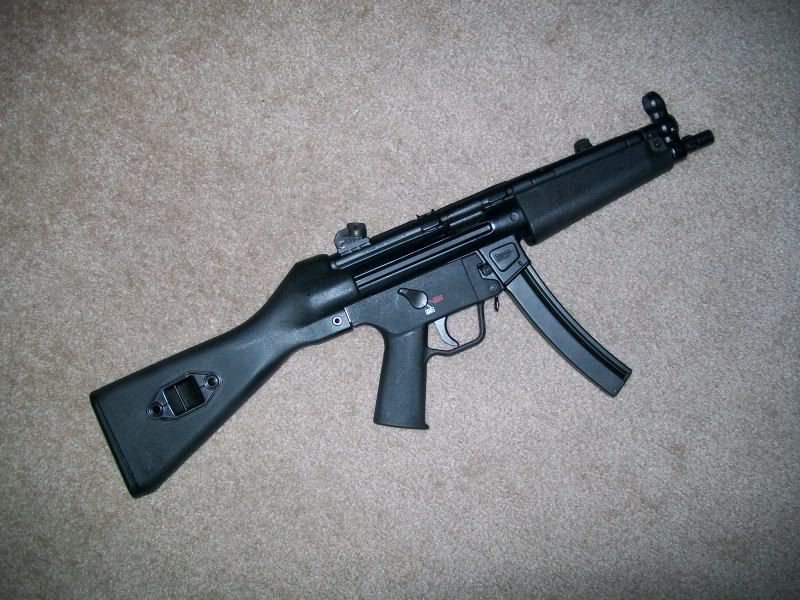
MP5 SFA2 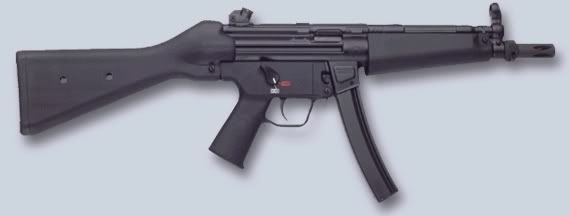
If you want to clip-and-pin a FA grip housing, you will have to file-and-fit the insides of the ears on the grip housing, as well as open up the space in the front of the housing to make room for the semi-auto shelf. Remove small amounts of material at a time, to ensure a snug fit when assembled. Then fit a handguard pin through the pivot-pin holes, and scribe the pin as instructed above. Then follow steps 4-6. Hope this is clear and helpful. |
|
Question for you guys.... I was thinking about a new project.... buy some G3 flats and some g3 kits and fab them up. Now, I will plead ignorance on the G3 Rifle.... but why on earth must you go through all this non sense of clipping and pinning? The Reciever is just a reciever. The trigger pack and trigger are semit auto.... put them together.... semi auto rifle. Right? In order for it to be a full auto... you have to install an auto sear inside the trigger pack, correct? Maybe someone can give me a run down on how exactly the HK91/G3 system works. |
The reason for clipping and pinning is purely cosmetic if you want a semi-auto (so it looks like the real thing), but necessary if you want a full-auto. In order to install a registered sear, one must obtain a machinegun SEF/Navy trigger housing so that it has the FA position and accepts the FA trigger pack. 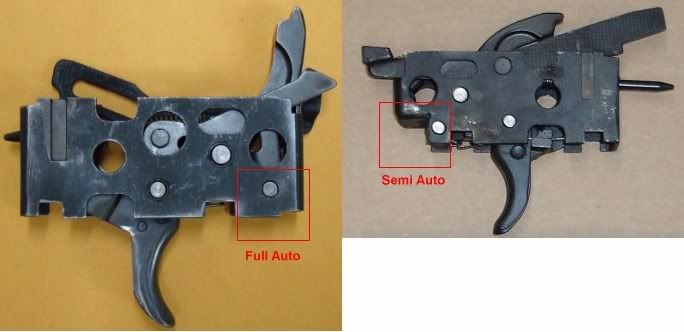 The semi-auto grip housing is designed as to not allow the installation of a full-auto trigger pack (there is a big chunk of metal in the way), and the semi-auto shelf welded onto the receiver is designed in such a way as to prevent a FA trigger housing from attaching to the weapon - hense the "clipping" or opening up of the grip housing's ears as to fit around the shelf. The "pinning" part is just cosmetic. |
|
Quoted:
Doing that allows you to install a pin with an over size bushing for the paddle to pivot on. Once you have done that, you reweld the hole you just made (lest you create a new machine gun), mill it flush and refinish. Why does this make it a machine gun? |
| A registered sear is made for a semi lower actually not a full auto. You need to send your registered sear and sem pack to a good HK smith to install it. Other than the trigger pack you will need a full auto bolt carrier , about $250-300 and of course around $12000 for the sear. |
| The semi trigger pack is the same as a full-auto pack except for 3 things. The semi pack has a trigger stop that needs to be removed, the sear pivot pin is relocated, and the front of the pack is cut to clear the shelf. An experienced HK 'smith can prep the pack for use with a registered sear. What allows the use of the FA setting is the selector switch, which costs anywhere from $10 to $179 depending on wheter you want to usa a steel grip/trigger housing or the ambi picto lower. |
|
So If I understand this all correctly, and please comment if I'm right or wrong...
I have a PTR91, that has the Semi Shelf on the Reciever (like most do) I really like the Paddle mag release better than the push button. If I grind the Shelves away and drill the hole for the paddle mag release, the BATFE considers that creating a Machine gun, no different than drilling the 3rd holes on an AR or AK. The solution to this is : Drill the hole install paddle release, WELD over both sides. I'm not wanting or care about the clipped and pinned look, just wanting the paddle mag release. |

[ARCHIVED THREAD] - Clipped and Pinned (Page 1 of 2)
Armory Sponsor