|
Posted: 5/6/2014 2:54:52 PM EDT
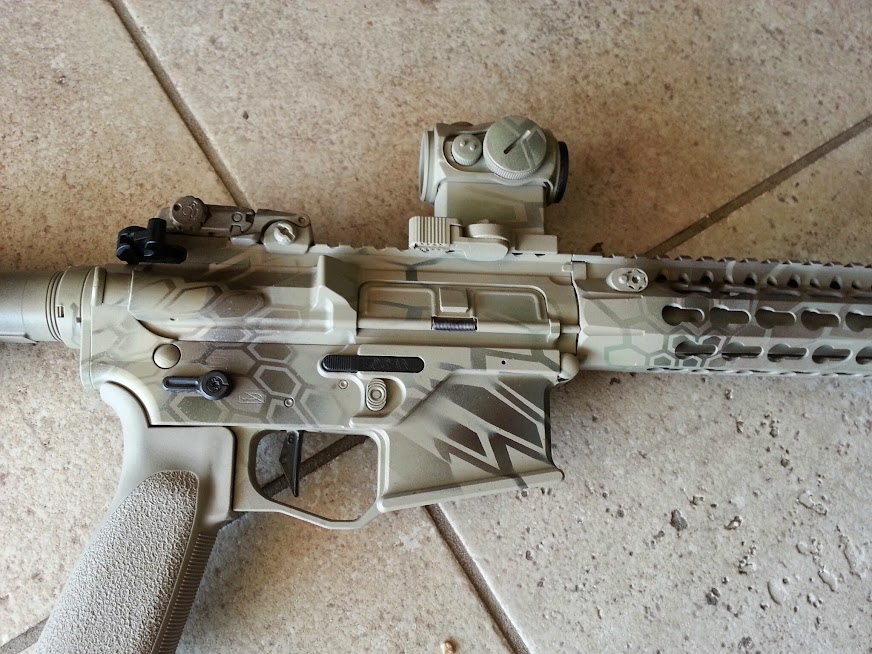
Decided to put some paint on my sbr to blend in with my desert surroundings a bit better. And to give it a different look.
Paint used was Rustoleum flat camo line with a flat clear coat on top. This is my first paint job on my first AR build on my first SBR. I'm pretty happy how it turned out. Enjoy! 10.5" Noveske CQB BCM KMR 10 Rainier UltraMatch Billet upper Hogan Guns Billet lower 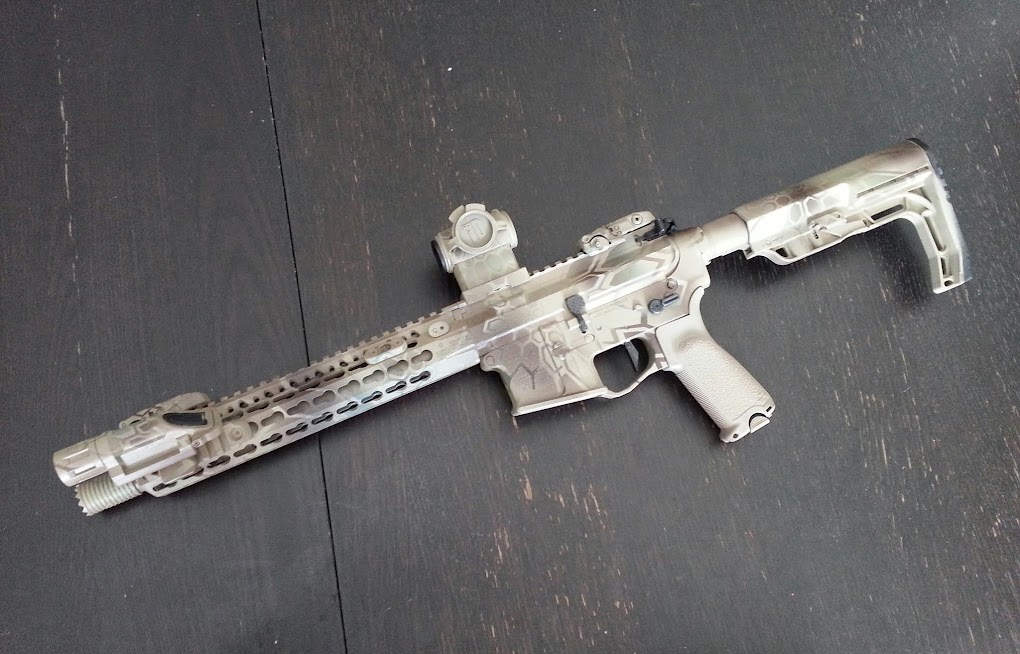

EDIT: Added simple walkthrough. 5/7/14 Preface: I am no paint expert. I simply researched and followed directions from others that had the finish I desired. The following is the steps I followed. Patience and preparation is key to paint (so I've learned). Also, make sure to have plenty of ventilation and/or wear a mask, the fumes are crazy! 1.) Remove all accessories you do not want painted. 2.) Tape off optics, light lens, and inside of the receivers so overspray doesn't get in. And tape off barrel end. I used blue painters tape. 3.) Clean and degrease. I made sure to thoroughly clean any carbon or dirt on the surface. After that I hung it up in my garage and hosed down the entire gun with degreaser (I used a simple household degreaser from Home Depot). If you have an air compressor to blow out the nooks and crannies that would be best. I did not, so I let time do its thing. Try not to touch the surface at this point. Any oils transferred from your hands can affect proper adhesion. Dry Time: 1 day 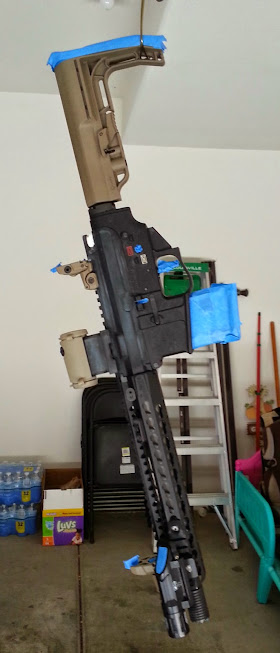
4.) I used Rustoleum flat camo khaki to get a good base coat. Start with light passes dusting the entire gun. Let a few minutes pass before applying new coats. I used almost a whole can to achieve a good base. 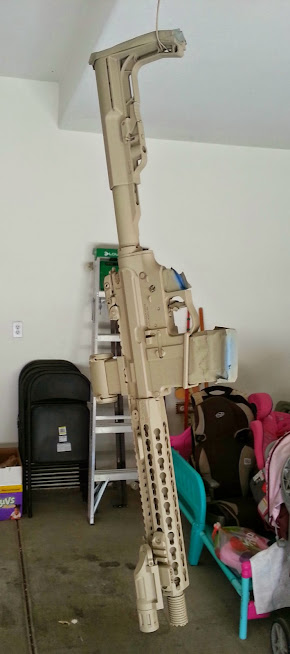
5.) Next, I applied light streaks and passes of Rustoleum camo colors, Army Green, Deep Forest Green, and Earth Brown. Allow a sufficient time to dry for the stencil step. Dry Time: 2 days.  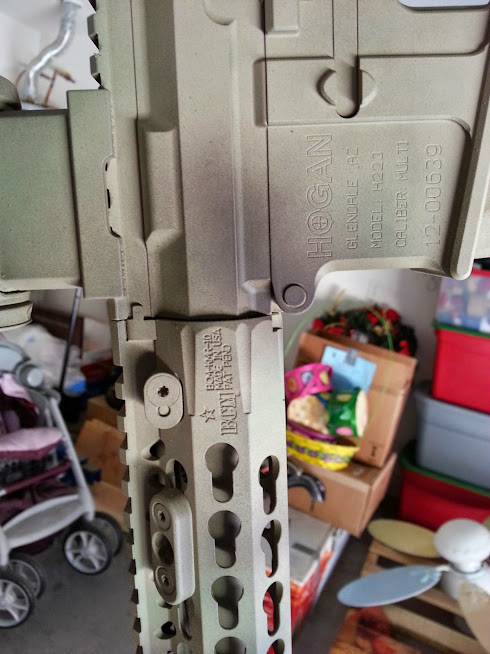
6.) I used stencils from Point3Airsoft for the next step. There are others found on ebay and various sites. I like this design best, however, I disliked how little adhesive the stencils had which made the application of it very tedious. This step take ALOT of patience. I purchased their 8 pack but actually only used 6 stencils. Try to start on a flat surface while slowly pulling away the backing. After, remove some of the inner diamonds to allow for contrast. Also, it helps to use rubber gloves to avoid getting any oils between the adhesive and the surface. A hobby knife is extremely helpful applying these stencils. Application Time: Several Hours 
7.) Next, spray a base coat over the entire gun and stencils. I wanted a lighter version of Kryptek Highlander so I went back over with Khaki. After a few minutes, I added some more contrast with the other colors. Dry Time: 1 day 8.) I began removing all the stenciling carefully minding the paint. At this point, you can make touch ups. Keep it light so as not to lose too much of the design. I went back lightly over with khaki on some areas that were darker than I liked. Again, gloves and a hobby knife keeps the surface clean from oils and helps with removal. 9.) Optional: I desired my hard work to last a bit longer. While I know a rattle can job wont hold up forever, a clear coat will help slow the erosion process. If you like that 'distressed' look, I would skip this step. Spray over the entire gun with a matte/flat clear coat. I used Rustoleum's matte clear for this. Apply in the same way as your base coat. Start with light passes and end with several coats of clear. Allow plenty of time for drying before reassembly. Dry Time: 3 days 10.) Lastly, remove all tape and begin assembly. Proper drying time will allow paint to hold up well to handling. 11.) Sit back and enjoy your hard work. Take lots of pictures! Thanks for listening and I appreciate all the kind words. |
|
|
|
[#1]
Damn, that turned out nice!
|
|
|
|
[#2]
Nice, more details on the process you used por favor...
|
|
|
|
[#3]
That looks awesome.
|
|
|
|
[#4]
|
|
|
|
[#5]
Fucking fantastic!
I'm subscribing in hope OP details the process so I can poorly replicate it. |
|
|
|
[#6]
you make me want to rattlecan, and that's not even my thing
|
|
|
|
[#7]
Wow that looks a whole lot like the real thing. I'd be interested in your process as well.
|
|
|
|
[#8]
Quoted:
Damn, that turned out nice! Will you do my SBRs for me? 
|
|
|
|
[#9]
You did a great job. I'd love to hear your method or see a tutorial. The Kryptek pattern is growing on me every day...
|
|
|
|
[#10]
Very nice!
|
|
|
|
[#11]
That is quality work
|
|
|
|
[#12]
OP updated with walkthrough.
Thanks all! |
|
|
|
[#13]
Excellent work!
|
|
|
|
[#14]
Great job!
You've inspired me to try the stencil kit. |
|
|
|
[#15]
looks awesome. great job. thanks for sharing.
|
|
|
|
[#16]
You did a great job on that, looks fantastic! Gonna try my hand at doing Typhon, thanks for the inspiration!
|
|
|
|
[#17]
Looks sharp! What stock is that? I've seen it in a few pics but haven't seen anyone say what it is.
|
|
|
|
[#18]
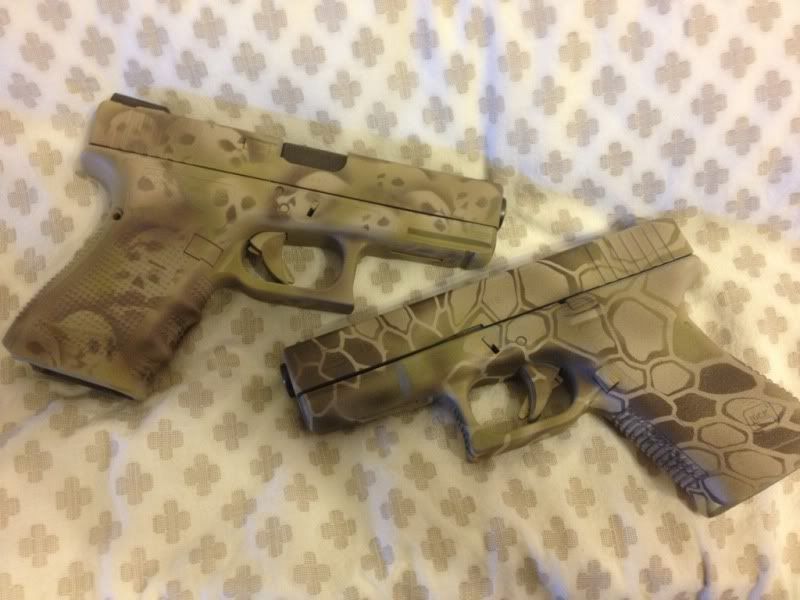
A few I have done. Nice work op. Kryptek is definitely a tough one to get right. |
|
|
|
[#19]
Quoted:
Looks sharp! What stock is that? I've seen it in a few pics but haven't seen anyone say what it is. Thank you. Its the Battlelink Minimalist Stock. I really like it. Its super light and feels like it balances this lightweight build well. |
|
|
|
[#20]
Quoted:
http://i89.photobucket.com/albums/k213/sksmedic/FC6456BA-8D2C-4D25-9260-263228199C2B-50334-00000E091DAE9FFA_zps1c8b3897.jpg http://i89.photobucket.com/albums/k213/sksmedic/49A41EE7-D368-4231-90AE-722D441F11A5-68006-000003D3A34CF973_zps4604e754.jpg A few I have done. Nice work op. Kryptek is definitely a tough one to get right. Nice! I want to do my handguns also. But yeah i need a break haha. Where did you get your stencils? Those seem closer to the actual Kryptek pattern. |
|
|
|
[#21]
I make them myself. I run a small duracoat shop. Some other users had expressed interest in my stencils so I had an ad on EE but I wasn't a dealer so I was forced to take it down.
|
|
|
|
[#22]
Quoted:
I make them myself. I run a small duracoat shop. Some other users had expressed interest in my stencils so I had an ad on EE but I wasn't a dealer so I was forced to take it down. Well, when I do my next gun I'm coming to you! |
|
|
|
[#23]
That paint is insane.
|
|
|
|
[#24]
Looks great, it makes me want to paint one of mine.
|
|
|
|
[#25]
Strong work.
|
|
|
|
[#26]
Kinda glad I spent that past couple days stripping old krylon off one of mine now that I've seen this. i think i'm gonna give this a whirl in the not too distant future.
|
|
|
|
[#27]
Frickin.
Awesome. |
|
|
 Win a FREE Membership!
Sign up for the ARFCOM weekly newsletter and be entered to win a free ARFCOM membership. One new winner* is announced every week!
You will receive an email every Friday morning featuring the latest chatter from the hottest topics, breaking news surrounding legislation, as well as exclusive deals only available to ARFCOM email subscribers.

AR15.COM is the world's largest firearm community and is a gathering place for firearm enthusiasts of all types.
From hunters and military members, to competition shooters and general firearm enthusiasts, we welcome anyone who values and respects the way of the firearm.

Subscribe to our monthly Newsletter to receive firearm news, product discounts from your favorite Industry Partners, and more.
Copyright © 1996-2024 AR15.COM LLC. All Rights Reserved.
Any use of this content without express written consent is prohibited.
AR15.Com reserves the right to overwrite or replace any affiliate, commercial, or monetizable links, posted by users, with our own.


