


Armory Sponsor


Posted: 3/11/2012 1:54:53 PM EDT
|
I've decided that after building more AR15's than I can count from available parts that I would like to try going the 80% route on future builds. I have done a lot of reading and come to the conclusion that Tactical Machining will be my source for jigs and 80% receivers. I understand that many have done this with a drill press and a X,Y axis table. I have a nice industrial grade drill press but think a small mill would better suit my needs.
So my question for those who would know is, what is a good mill doing this kind of small project? I don't mind paying for a quality machine but then again I don't want something that's completely overkill either. This will be for my shop at home and I am an electrical contractor so power requirements are not an issue. I've never machined any thing in my life but I would like to learn and have a real version of a " build it yourself AR". Thanks in advance for any and all replies. RC |
|
Would this model be enough to the finish work on a 80% lower-
Link |
|
Should be. I went this route, beefed up the rear column, replaced the torsion bar with a counterweight system, then adapted it to CNC. Cuts through aluminum plenty quick & accurate. Either way, you can mod the mill yourself to improve it, if you've got a bit of design skill. The key is to take light passes and go slowly on a machine this small. 80% lowers from TM only require you to mill out the FCG pocket and drill the FCG holes, so there's not a whole lot of work to be done - the problem is, you can get a finished PSA stripped lower for the same price.
If I had the money, I'd get a bunch of 30% lowers, a threading tool to do the buffer tube thread, and write a set of cnc programs to finish them up with a few jigs. If nothing else, it'd be quite a bit of fun. Unfortunately, my financial position means this won't even be near a possibility for me for the next few years. |
|
Quoted:
Should be. I went this route, beefed up the rear column, replaced the torsion bar with a counterweight system, then adapted it to CNC. Cuts through aluminum plenty quick & accurate. Either way, you can mod the mill yourself to improve it, if you've got a bit of design skill. The key is to take light passes and go slowly on a machine this small. 80% lowers from TM only require you to mill out the FCG pocket and drill the FCG holes, so there's not a whole lot of work to be done - the problem is, you can get a finished PSA stripped lower for the same price. If I had the money, I'd get a bunch of 30% lowers, a threading tool to do the buffer tube thread, and write a set of cnc programs to finish them up with a few jigs. If nothing else, it'd be quite a bit of fun. Unfortunately, my financial position means this won't even be near a possibility for me for the next few years. I appreciate the link, that gives me something else to look at. I understand what your saying about a lot of work/money when PSA lowers are $79. I bought 5 PSA's when they were $59. I want to try the 80% route and then eventually do one from scratch. I enjoy the AR platform a lot, but after I've built just about every incarnation of the rifle from different vendors/forged/billet/etc. I look at tying to learn to do some of my own machining as the next evolution. |
|
Quoted:
Quoted:
Should be. I went this route, beefed up the rear column, replaced the torsion bar with a counterweight system, then adapted it to CNC. Cuts through aluminum plenty quick & accurate. Either way, you can mod the mill yourself to improve it, if you've got a bit of design skill. The key is to take light passes and go slowly on a machine this small. 80% lowers from TM only require you to mill out the FCG pocket and drill the FCG holes, so there's not a whole lot of work to be done - the problem is, you can get a finished PSA stripped lower for the same price. If I had the money, I'd get a bunch of 30% lowers, a threading tool to do the buffer tube thread, and write a set of cnc programs to finish them up with a few jigs. If nothing else, it'd be quite a bit of fun. Unfortunately, my financial position means this won't even be near a possibility for me for the next few years. I appreciate the link, that gives me something else to look at. I understand what your saying about a lot of work/money when PSA lowers are $79. I bought 5 PSA's when they were $59. I want to try the 80% route and then eventually do one from scratch. I enjoy the AR platform a lot, but after I've built just about every incarnation of the rifle from different vendors/forged/billet/etc. I look at tying to learn to do some of my own machining as the next evolution. I'm right there with you. Making something from nothing is really rewarding. |
|
The biggest drawback I see is the limited Z travel, by the time you put your forging in a vise on the table the top deck is 4" from the table. The little machine shop hobby mill says it has 9.8" Z travel leaving you 5.8" to work with; that's not near as much as it sounds like. Posted Via AR15.Com Mobile |
|
Quoted:
The biggest drawback I see is the limited Z travel, by the time you put your forging in a vise on the table the top deck is 4" from the table. The little machine shop hobby mill says it has 9.8" Z travel leaving you 5.8" to work with; that's not near as much as it sounds like. Posted Via AR15.Com Mobile Totally agreed. The one drawback is drilling things in the vise requires either short drills, short stock, or a workaround. My workaround was to make a tooling plate, and I do all my workholding on the plate - it gives me another 2.5-3 inches of z, usually. Also, workholding closer to the table with bolts tends to make the setup a good bit stiffer, which allows me to speed up a bit. |
|
Unless you're using really short reamers, there isn't really room to use them even if you do get them chucked up. When I'm using the tooling plate and my set of super-secret shortened-shank (yes, I cut them off) reamers, I don't have much of a problem. In the vise, drilling will only work with short stock, but these are the known limitations of such a machine. I don't have the room or power type for a lagun knee mill. |
|
You can complete an 80% using the various jigs available with next to nothing for tools. If you think you will want to complete something less than an 80% and/or get into other machining projects I wouldn't recommend anything smaller than a Seig X3 small bench mill (Grizzly G0463) if you are tight on shop space, or preferably a full sized Bridgeport.
I have a Seig X2 mill (Harbor Freight 44991) converted to CNC and while it is great for engraving my lowers and similar, I wouldn't want to actually machine a lower on one due to the very small travels and lack of rigidity to handle anything like a boring head or heavy roughing in the FCP or magwell areas. I use a full sized Bridgeport for the actual machining. With a decent mill you also don't need to buy the jigs sold for the 80%s and can just machine your own fixture plates. In any case realize that once you get a mill, it is like 10% of the investment and all the tooling, fixturing and measuring equipment is the other 90% of the cost. A used Bridgeport will run $1-3K or so depending on specs and condition, vise, angle plate, 123 blocks, parallels, boring head, boring bars, end mills, drills, reamers, center drills, edge finders, test indicators, protractors, calipers, micrometers, etc. will be where the real cost is, and you will need essentially the same tooling for any mill. |
|
Quoted:
You can complete an 80% using the various jigs available with next to nothing for tools. If you think you will want to complete something less than an 80% and/or get into other machining projects I wouldn't recommend anything smaller than a Seig X3 small bench mill (Grizzly G0463) if you are tight on shop space, or preferably a full sized Bridgeport. I have a Seig X2 mill (Harbor Freight 44991) converted to CNC and while it is great for engraving my lowers and similar, I wouldn't want to actually machine a lower on one due to the very small travels and lack of rigidity to handle anything like a boring head or heavy roughing in the FCP or magwell areas. I use a full sized Bridgeport for the actual machining. With a decent mill you also don't need to buy the jigs sold for the 80%s and can just machine your own fixture plates. In any case realize that once you get a mill, it is like 10% of the investment and all the tooling, fixturing and measuring equipment is the other 90% of the cost. A used Bridgeport will run $1-3K or so depending on specs and condition, vise, angle plate, 123 blocks, parallels, boring head, boring bars, end mills, drills, reamers, center drills, edge finders, test indicators, protractors, calipers, micrometers, etc. will be where the real cost is, and you will need essentially the same tooling for any mill. The travel on my LMS X2 is 10.5" x 4.4" x 10" (xyz), i.e.: plenty to do the 3" x 3/4" x 1-1/4" pocket an 80% lower. Also, machine a backplate or something similar for the z-column, and you can make the machine plenty rigid to do all sorts of work: 
As long as you're not taking 0.100" deep cuts, you can do just about anything with this machine. The key is to know its limitations, and work within that. Does it take longer? Sure. Can I hog out 2.5" holes 1" deep, and hold the tolerances close enough to press fit? I can, and have - quite easily, I might add. |
|
Quoted:
Quoted:
You can complete an 80% using the various jigs available with next to nothing for tools. If you think you will want to complete something less than an 80% and/or get into other machining projects I wouldn't recommend anything smaller than a Seig X3 small bench mill (Grizzly G0463) if you are tight on shop space, or preferably a full sized Bridgeport. I have a Seig X2 mill (Harbor Freight 44991) converted to CNC and while it is great for engraving my lowers and similar, I wouldn't want to actually machine a lower on one due to the very small travels and lack of rigidity to handle anything like a boring head or heavy roughing in the FCP or magwell areas. I use a full sized Bridgeport for the actual machining. With a decent mill you also don't need to buy the jigs sold for the 80%s and can just machine your own fixture plates. In any case realize that once you get a mill, it is like 10% of the investment and all the tooling, fixturing and measuring equipment is the other 90% of the cost. A used Bridgeport will run $1-3K or so depending on specs and condition, vise, angle plate, 123 blocks, parallels, boring head, boring bars, end mills, drills, reamers, center drills, edge finders, test indicators, protractors, calipers, micrometers, etc. will be where the real cost is, and you will need essentially the same tooling for any mill. The travel on my LMS X2 is 10.5" x 4.4" x 10" (xyz), i.e.: plenty to do the 3" x 3/4" x 1-1/4" pocket an 80% lower. Also, machine a backplate or something similar for the z-column, and you can make the machine plenty rigid to do all sorts of work: http://i927.photobucket.com/albums/ad111/RocketmanOU/DSC06448Small.jpg As long as you're not taking 0.100" deep cuts, you can do just about anything with this machine. The key is to know its limitations, and work within that. Does it take longer? Sure. Can I hog out 2.5" holes 1" deep, and hold the tolerances close enough to press fit? I can, and have - quite easily, I might add. The Z axis of the X2 (and X1) are the greatest challenge to overcome, which is why I don't recommend anything under the X3, particularly to a machining newbie. If you are an experienced machinist you know how to work around a machines limitations to produce precision work, a newbie doesn't even know how to do the operation on a fully capable machine and will get very frustrated with an inadequate one. Of course as Cole has noted, once you catch the machining bug (a bit like BRD), your current machine is never big enough. |
|
Quoted:
Quoted:
Quoted:
You can complete an 80% using the various jigs available with next to nothing for tools. If you think you will want to complete something less than an 80% and/or get into other machining projects I wouldn't recommend anything smaller than a Seig X3 small bench mill (Grizzly G0463) if you are tight on shop space, or preferably a full sized Bridgeport. I have a Seig X2 mill (Harbor Freight 44991) converted to CNC and while it is great for engraving my lowers and similar, I wouldn't want to actually machine a lower on one due to the very small travels and lack of rigidity to handle anything like a boring head or heavy roughing in the FCP or magwell areas. I use a full sized Bridgeport for the actual machining. With a decent mill you also don't need to buy the jigs sold for the 80%s and can just machine your own fixture plates. In any case realize that once you get a mill, it is like 10% of the investment and all the tooling, fixturing and measuring equipment is the other 90% of the cost. A used Bridgeport will run $1-3K or so depending on specs and condition, vise, angle plate, 123 blocks, parallels, boring head, boring bars, end mills, drills, reamers, center drills, edge finders, test indicators, protractors, calipers, micrometers, etc. will be where the real cost is, and you will need essentially the same tooling for any mill. The travel on my LMS X2 is 10.5" x 4.4" x 10" (xyz), i.e.: plenty to do the 3" x 3/4" x 1-1/4" pocket an 80% lower. Also, machine a backplate or something similar for the z-column, and you can make the machine plenty rigid to do all sorts of work: http://i927.photobucket.com/albums/ad111/RocketmanOU/DSC06448Small.jpg As long as you're not taking 0.100" deep cuts, you can do just about anything with this machine. The key is to know its limitations, and work within that. Does it take longer? Sure. Can I hog out 2.5" holes 1" deep, and hold the tolerances close enough to press fit? I can, and have - quite easily, I might add. The Z axis of the X2 (and X1) are the greatest challenge to overcome, which is why I don't recommend anything under the X3, particularly to a machining newbie. If you are an experienced machinist you know how to work around a machines limitations to produce precision work, a newbie doesn't even know how to do the operation on a fully capable machine and will get very frustrated with an inadequate one. Of course as Cole has noted, once you catch the machining bug (a bit like BRD), your current machine is never big enough. Good point. If anything, it's forced me to be more creative, and I've learned a lot since I started working with it. Probably my biggest problem with the design (which is simply a function of the low cost of the machine) is the fixed quill, but it's usable once you get used to it. Someday I'll have my own workspace and some extra cash, and then I can upgrade to something really fun :-D There is a guy out there using one of these... 
to make watches. No joke. |
I posted this pic in another thread, but oh well. Here's why a nice tall column rock, notice the amount of the vertical slideway showing behind the table:
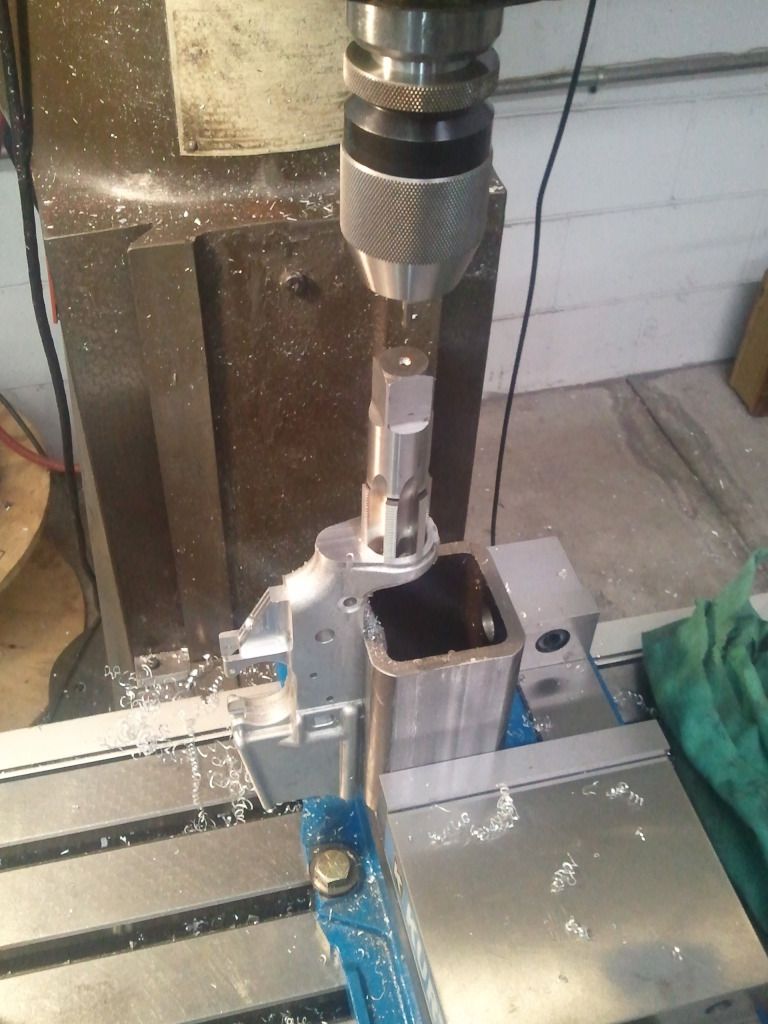
Hint: All of it. Ya, I could have spun the drill in a collet. But I didn't have to. Posted Via AR15.Com Mobile |
|
Quoted:
I posted this pic in another thread, but oh well. Here's why a nice tall column rock, notice the amount of the vertical slideway showing behind the table: http://i1151.photobucket.com/albums/o639/Cole2534/WP_000502.jpg Hint: All of it. Ya, I could have spun the drill in a collet. But I didn't have to. Posted Via AR15.Com Mobile Now that is beautiful. |
|
Quoted:
I posted this pic in another thread, but oh well. Here's why a nice tall column rock, notice the amount of the vertical slideway showing behind the table: http://i1151.photobucket.com/albums/o639/Cole2534/WP_000502.jpg Hint: All of it. Ya, I could have spun the drill in a collet. But I didn't have to. Posted Via AR15.Com Mobile Do you have a spring loaded tap centering tool? |
|
Quoted: Should be. I went this route, beefed up the rear column, replaced the torsion bar with a counterweight system, then adapted it to CNC. Cuts through aluminum plenty quick & accurate. Either way, you can mod the mill yourself to improve it, if you've got a bit of design skill. The key is to take light passes and go slowly on a machine this small. 80% lowers from TM only require you to mill out the FCG pocket and drill the FCG holes, so there's not a whole lot of work to be done - the problem is, you can get a finished PSA stripped lower for the same price. If I had the money, I'd get a bunch of 30% lowers, a threading tool to do the buffer tube thread, and write a set of cnc programs to finish them up with a few jigs. If nothing else, it'd be quite a bit of fun. Unfortunately, my financial position means this won't even be near a possibility for me for the next few years. What did it cost you adapt it to CNC if you don't mind? |
|
Bare bones, you need a computer to run the controller, a controller, power supply, and motors. It doesn't make much sense to go to that length and use the stock acme screws (although you can do screwmapping in Mach3 and get pretty good results if you have external DRO's on the machine), so it's common to upgrade to a set of ballscrews as well, since you're going to have the mill apart. I also highly recommend using a set of mechanical DRO's to supplement the encoder-based DRO on Mach3, as it's very useful to know the actual position of the table, as opposed to what Mach3 thinks it is. Here's the cost breakdown:
Motors: At least 270 oz-in steper, single shaft, NEMA 23 face ~$40 each * 3 axes = $120 (example) Gecko G540 Controller + 48V/7.3A Power Supply ~ $550 (example) Already had a computer lying around and parallel cables Mach3 License (if you're running code under 500 lines, you can use the free version) - ~$175 (example) CNCfusion 3-axis ballscrew kit + extended screws for LMS machine ~ $640 Total: $1485 + shipping plus original mill for the basic kit. This will get you going pretty well once you get the hang of it. Personally, I added these because of my specific wants/needs: Glass DRO precise down to 0.0002" - $800 here CamBam Plus License $150 Various and sundry electrical/mechanical hardware upgrades: $250 Grand Total: $2685 + shipping, plus original mill You need to be prepared to do a lot of soldering of your own DB9 connectors, and you should be able to figure out the wiring pretty well on your own - there are some good write-ups out there, but there's a lot of work involved. It took me a solid three days to get everything built, put together and wired, and another day or two of tuning mach3 to get it where I wanted it. For me, it was well worth it, but if you're faint of heart, I've heard good things about the Sieg kx3 unit for $500 more: http://littlemachineshop.com/products/product_view.php?ProductID=3501&category=1241045623. |
|
Quoted:
Quoted:
I posted this pic in another thread, but oh well. Here's why a nice tall column rock, notice the amount of the vertical slideway showing behind the table: http://i1151.photobucket.com/albums/o639/Cole2534/WP_000502.jpg Hint: All of it. Ya, I could have spun the drill in a collet. But I didn't have to. Posted Via AR15.Com Mobile Now that is beautiful. Yep, I've got a Bridgeport clone sitting in my shop, done several 80%'s on it. The newer styles usually have the buffer tower already tapped though, that was the biggest headache of the process. |
|
Quoted: Bare bones, you need a computer to run the controller, a controller, power supply, and motors. It doesn't make much sense to go to that length and use the stock acme screws (although you can do screwmapping in Mach3 and get pretty good results if you have external DRO's on the machine), so it's common to upgrade to a set of ballscrews as well, since you're going to have the mill apart. I also highly recommend using a set of mechanical DRO's to supplement the encoder-based DRO on Mach3, as it's very useful to know the actual position of the table, as opposed to what Mach3 thinks it is. Here's the cost breakdown: Motors: At least 270 oz-in steper, single shaft, NEMA 23 face ~$40 each * 3 axes = $120 (example) Gecko G540 Controller + 48V/7.3A Power Supply ~ $550 (example) Already had a computer lying around and parallel cables Mach3 License (if you're running code under 500 lines, you can use the free version) - ~$175 (example) CNCfusion 3-axis ballscrew kit + extended screws for LMS machine ~ $640 Total: $1485 + shipping plus original mill for the basic kit. This will get you going pretty well once you get the hang of it. Personally, I added these because of my specific wants/needs: Glass DRO precise down to 0.0002" - $800 here CamBam Plus License $150 Various and sundry electrical/mechanical hardware upgrades: $250 Grand Total: $2685 + shipping, plus original mill You need to be prepared to do a lot of soldering of your own DB9 connectors, and you should be able to figure out the wiring pretty well on your own - there are some good write-ups out there, but there's a lot of work involved. It took me a solid three days to get everything built, put together and wired, and another day or two of tuning mach3 to get it where I wanted it. For me, it was well worth it, but if you're faint of heart, I've heard good things about the Sieg kx3 unit for $500 more: http://littlemachineshop.com/products/product_view.php?ProductID=3501&category=1241045623. wow, good to know. I appreciate the time you took to write all of that up. |
|
Quoted:
Quoted:
Quoted:
I posted this pic in another thread, but oh well. Here's why a nice tall column rock, notice the amount of the vertical slideway showing behind the table: http://i1151.photobucket.com/albums/o639/Cole2534/WP_000502.jpg Hint: All of it. Ya, I could have spun the drill in a collet. But I didn't have to. Posted Via AR15.Com Mobile Now that is beautiful. Yep, I've got a Bridgeport clone sitting in my shop, done several 80%'s on it. The newer styles usually have the buffer tower already tapped though, that was the biggest headache of the process. Real men start with a 0%, pussy. Posted Via AR15.Com Mobile |
|
Quoted:
Quoted:
Quoted:
Quoted:
I posted this pic in another thread, but oh well. Here's why a nice tall column rock, notice the amount of the vertical slideway showing behind the table: http://i1151.photobucket.com/albums/o639/Cole2534/WP_000502.jpg Hint: All of it. Ya, I could have spun the drill in a collet. But I didn't have to. Posted Via AR15.Com Mobile Now that is beautiful. Yep, I've got a Bridgeport clone sitting in my shop, done several 80%'s on it. The newer styles usually have the buffer tower already tapped though, that was the biggest headache of the process. Real men start with a 0%, pussy. Posted Via AR15.Com Mobile 
|
|
Quoted:
Quoted:
Quoted:
Quoted:
Quoted:
I posted this pic in another thread, but oh well. Here's why a nice tall column rock, notice the amount of the vertical slideway showing behind the table: http://i1151.photobucket.com/albums/o639/Cole2534/WP_000502.jpg Hint: All of it. Ya, I could have spun the drill in a collet. But I didn't have to. Posted Via AR15.Com Mobile Now that is beautiful. Yep, I've got a Bridgeport clone sitting in my shop, done several 80%'s on it. The newer styles usually have the buffer tower already tapped though, that was the biggest headache of the process. Real men start with a 0%, pussy. Posted Via AR15.Com Mobile Go make a magwell... 
|
|
Quoted:
Quoted:
Quoted:
Quoted:
Quoted:
Quoted:
I posted this pic in another thread, but oh well. Here's why a nice tall column rock, notice the amount of the vertical slideway showing behind the table: http://i1151.photobucket.com/albums/o639/Cole2534/WP_000502.jpg Hint: All of it. Ya, I could have spun the drill in a collet. But I didn't have to. Posted Via AR15.Com Mobile Now that is beautiful. Yep, I've got a Bridgeport clone sitting in my shop, done several 80%'s on it. The newer styles usually have the buffer tower already tapped though, that was the biggest headache of the process. Real men start with a 0%, pussy. Posted Via AR15.Com Mobile Go make a magwell... http://i241.photobucket.com/albums/ff206/devtucker/AR%20Pistol/AR45.jpg Nice! Is that an uzi mag? |

|
Quoted:
Quoted:
I've never machined any thing in my life but I would like to learn and have a real version of a " build it yourself AR". RC Be careful what you wish for. There is no turning back. You have been warned. What's a 80% receiver anyways???? http://img.photobucket.com/albums/v82/Highpwr/Machining%20a%20receiver/P8080090.jpg Rig up your shop vac to pull the chips away from the cutter. It makes a niced, clean workplace. Posted Via AR15.Com Mobile |
|
Quoted:
Quoted:
Quoted:
I've never machined any thing in my life but I would like to learn and have a real version of a " build it yourself AR". RC Be careful what you wish for. There is no turning back. You have been warned. What's a 80% receiver anyways???? http://img.photobucket.com/albums/v82/Highpwr/Machining%20a%20receiver/P8080090.jpg Rig up your shop vac to pull the chips away from the cutter. It makes a niced, clean workplace. Posted Via AR15.Com Mobile Just did this in reverse - The output tube of my shop vac now blows the chips away from the tool - much cleaner cutting ensued, and the tool and spindle motor are getting cooling. Should translate to better tool life too. |
|
Quoted:
Quoted:
Quoted:
Quoted:
Quoted:
Quoted:
Quoted:
I posted this pic in another thread, but oh well. Here's why a nice tall column rock, notice the amount of the vertical slideway showing behind the table: http://i1151.photobucket.com/albums/o639/Cole2534/WP_000502.jpg Hint: All of it. Ya, I could have spun the drill in a collet. But I didn't have to. Posted Via AR15.Com Mobile Now that is beautiful. Yep, I've got a Bridgeport clone sitting in my shop, done several 80%'s on it. The newer styles usually have the buffer tower already tapped though, that was the biggest headache of the process. Real men start with a 0%, pussy. Posted Via AR15.Com Mobile Go make a magwell... http://i241.photobucket.com/albums/ff206/devtucker/AR%20Pistol/AR45.jpg Nice! Is that an uzi mag? Grease Gun, .45ACP |
|
Quoted:
Quoted:
Quoted:
Quoted:
I've never machined any thing in my life but I would like to learn and have a real version of a " build it yourself AR". RC Be careful what you wish for. There is no turning back. You have been warned. What's a 80% receiver anyways???? http://img.photobucket.com/albums/v82/Highpwr/Machining%20a%20receiver/P8080090.jpg Rig up your shop vac to pull the chips away from the cutter. It makes a niced, clean workplace. Posted Via AR15.Com Mobile Just did this in reverse - The output tube of my shop vac now blows the chips away from the tool - much cleaner cutting ensued, and the tool and spindle motor are getting cooling. Should translate to better tool life too. Chip is evacuation is a huge factor in tool life and surface finish. Posted Via AR15.Com Mobile |
Armory Sponsor