|
[#1]
Here's another one to add to the list of successful builds. A lot of the pictures in this thread disappeared when Photobucket went stupid on us, so I improvised a bit on some things. It still turned out very similar to most other versions though. All of the electronics came from Amazon, along with the pans and RC propeller hub/shaft adapters for the motors.. The acetal rod, tempilaq and 1/4" 309SS case stop rod and 1/2"x2"x6" long chunk of aluminum bar were from McMaster-Carr, and the rest was Menards plywood and lexan. I wound up at about $135 in materials...if you don't count the drill press I bought at Menards since I have been looking for an excuse to get one for quite a while now.
Everything works pretty well. I ran about 100 junk .223 cases through it last night and had about 5 or 6 that went mouth first into the pan, so I'll have to mess with the cutout shape a little bit more I think. My main use will be for .308, .243 and 6.5CM though and those seem to feed fine. Here you can see the hub adapter for the motor. Amazon Link 


|
|
|
|
|
[#2]
Nice !
|
|
|
|
HI, USA
|
[Last Edit: Renn]
[#3]
Figured it out.
Got a 1 1/3/4 hole saw with arbor and cut into a 2x4. Used that for the case feeder drum |
|
|
GA, USA
|
[Last Edit: robpiat]
[#4]
Seems like alot of these components would prefer being mounted to a thin metal plate vs thick plywood. Anyone think about using a cookie sheet or similar for the front panel?
|
|
|
|
[#5]
Originally Posted By robpiat:
Seems like alot of these components would prefer being mounted to a thin metal plate vs thick plywood. Anyone think about using a cookie sheet or similar for the front panel? Pop rivet all the joints, screws for the back plate. I might have to make spacers for some of the components, but that's a case-by-case basis. |
|
|
|
|
[#6]
People will build with what ever they have and are comfortable working with.
As a machinist my first thought was to use 1/8" 5052 or 6061 sheet for the main front plate. On second thought I'm looking at maybe a 1/4" plastic so as to not conflict with the prox switch. A friend of mines father worked for the city before retiring and used to give me signs they had made that got FUBAR during silk screen and were not caught before the paint had dried beyond a cure point and would be too much work to fix. These were AL sheet .077" to .16" depending on size. Not sure what the material was but it worked well for many small fabs when you didn't care about the existing paint. |
|
|
|
GA, USA
|
[#7]
Has anyone found an off the shelf solution for the torch holder or does it have to be fabricated?
|
|
|
|
[#8]
Originally Posted By robpiat:
Has anyone found an off the shelf solution for the torch holder or does it have to be fabricated? |
|
|
|
GA, USA
|
[#9]
One of these?

|
|
|
|
[Last Edit: RLR350]
[#10]
And turn it into this with a hack saw and drill press.
ETA: It's a little fabricating, but not much in comparison to the entire build. |
|
|
|
CA, USA
|
[#11]
Originally Posted By rcav8r:
It's buried in the thread somewhere, a part off ebay that clamps around the torch. eBay linear rail shaft support bracket |
|
|
GA, USA
|
[#12]
Any wisdom on what it took to bend the contours in the 8mm / 5/16 steel rod? Its stouter than I expected. Did you heat it or just use a vise and some planning?
|
|
|
|
[#13]
I used a little heat and a bench mounted vise
|
|
|
|
USA
|
[Last Edit: tomgcruz]
[#14]
found this site while i was researching for a case annealer build. I just ordered parts I found referenced on this site. thanks for the info. it helped alot.
I found a reference to using an arduino and stepper motors for the small rotor control. I have access to a pic controller but my thoughts are going to a relay control direction. I was thinking of using two prox switches set up as a start/ stop circuit driving a relay. I am an electrician and work with motor controls regularly. this too me if it works could be a bit simpler. would have to insert a metal button on the back of the small rotor to trigger the off sensor. since I ordered two NC switches I may have to add a transistor or two. it would be obviously easier with a NC and a NO switch. But I have many transistors on hand. Just wondering if anyone has tried this method edit - changed my mind and ordered a NO switch. save the transistors for another project. will let you know how it goes |
|
|
USA
|
[#15]
some of these prox switches can be flush mounted to a metal plate. some need a space around the tip. I see several of these switches on this site that appear to be flush mounted.
|
|
|
|
[#16]
Welcome to Arfcom and the Reloading Forum.
If you post a question to a poster and they don't see it in this thread, let me teach you a little trick. Post @screenname of the poster you want to ask a question of. Goes without saying, don't abuse this site feature. Type out name exactly. Example someone left out the 3 on my screen name and it didn't work. Use caps if screen name has them. The next time the poster you "mentioned" logs on or refreshes the page he will get the mention and answer back. @tomgcruz |
|
|
|
NY, USA
|
[#17]
Thanks for that, I missed the addition of the mention feature in the upgrade!
|
|
|
|
[#18]
Originally Posted By chrisben:
Thanks for that, I missed the addition of the mention feature in the upgrade! |
|
|
|
CA, USA
|
[#19]
I'm ready to wire this thing up... are folks adding a fuse to their box or just hoping for the best?
Where would be the logical place to fuse and what amperage type fuse holder have been used? Below is my proposed wiring diagram. The counter wiring I picked up from another post. My understanding of electrical is basic, so help is appreciated. 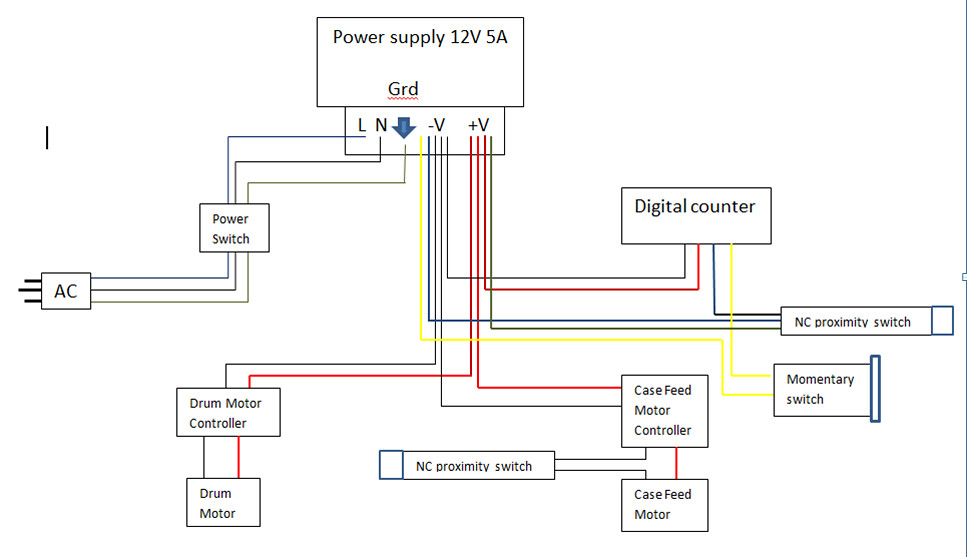
|
|
|
OH, USA
|
[#20]
I went simple... plywood, and single load because I wouldn't want to leave it on it's own anyway. Used it for .223, .308. and .444 so far. Works like a champ.

|
|
|
|
[#21]
Originally Posted By Blowout:
I'm ready to wire this thing up... are folks adding a fuse to their box or just hoping for the best? Where would be the logical place to fuse and what amperage type fuse holder have been used? Below is my proposed wiring diagram. The counter wiring I picked up from another post. My understanding of electrical is basic, so help is appreciated. https://farm5.staticflickr.com/4521/37680217415_fe67cf17da_b.jpg To figure out what size fuse you need, look at the maximum current listed for each part (motor controllers and their motors, digital counter circuit, etc.). Let’s say the motor controllers pull 0.75 A each with their motors under full load, and that the digital counter pulls 0.03A. Both motor controllers can be running at the same time, so that’s 1.50 A, plus 0.03 A for the counter. That adds up to 1.53 A. Add 25% to that, which gives you 1.9125 A. Now round up to the next standard fuse size; here you’d go with a 2.0 or 2.5 A fuse. Fuses and fuse holders are cheap. The simple, small glass cartridge fuses are probably the best choice, since they’re cheap and reliable, so just get a fuse holder to match them. You can find panel mount holders at auto parts stores. |
|
|
|
CA, USA
|
[#22]
@GHPorter
Thank you for the input! A panel mounted fuse holder like this spliced into the line side should work then. fuse holder Much appreciated! |
|
|
USA
|
[Last Edit: Flashbang1]
[#23]
@Blowout
Another neat fuse/switch option would be a fuseable receptacle that uses a standard PC power cord. 

|
|
|
|
[#24]
@Blowout
Your choice is a fine one, but the combination modular cord/fuse holder/switch unit that Flashbang1 suggests kills a bunch of birds with a single part. And don’t forget that a combination part like this saves you a bunch of hassle wiring in a separate cord, fuse holder and switch. Trust me, simpler is better on this sort of thing! |
|
|
|
CA, USA
|
[#25]
@Flashbang1
Thanks for the integrated fuse/switch/cord receptacle suggestion. I already have a AC rocker switch. Just picked up a panel mount fuse holder at O'Reilly's on the way home today and mounted it on the box. |
|
|
CA, USA
|
[Last Edit: Blowout]
[#26]
Another functioning DIY machine.
Just need to receive the correct proxy switch for the case drum motor and paint the thing to finish up. Everything functioning reliably otherwise. Ran 100 cases through without a mishap. One issue still remaining is 308 cases will form a bridge over the case drum and not fall into the drum slot. Seems I just happened to distance the sides of the hopper just right to enable that to occur. Need to figure out a simple fix for this. 
Lessons learned: Used 12"x24" 16ga sheet metal from HD for the front, top and bottom. I don't have the proper tools for bending sheet metal, but wanted to try anyway. Next time would make the bottom and top out of wood and get 12"x18" sheet metal for the front and cut to 12" x 15" size. Would have saved a good amount of time and had better looking results. Easy to cut 16ga with a jigsaw and metal blade. Used a separate piece of sheet metal to make the case hopper and welded the sides on. Next time would extend the sheet metal backing of the hopper all the way down to the bottom of the feed ramp to have a single piece to form a continuous back plane. This unit has 2 pieces and makes alignment more difficult. Make the ramp with L bend so the attachment screws are underneath the ramp. This will allow for easier placement of proxy switches and eliminates chance of interference with cases contacting the ramp screw heads. Add a deflector shield to the side of the case drum to ensure the case rolled past the proxy switch for the counter. The cases would jump past the proxy switch without this. Otherwise the ramp would need to be made longer moving the case drum/motor further to the right. Attaching proxy switches - used JB Weld to fix one of the nuts to the inside of sheet metal. Tried to tack weld, but the wire welder on low was too hot and destroying the nut. The sheet metal doesn't seem to have any negative effect on the proxy switch functioning correctly. Case stop rod - tried using all 5/16" allthread, but it snapped too easily when bending. Found some 5/16" solid rod at Ace and it worked much better. Edit: Final wiring diagram with 3 wire proxi switch for case feed motor. Function tested and everything working correctly. 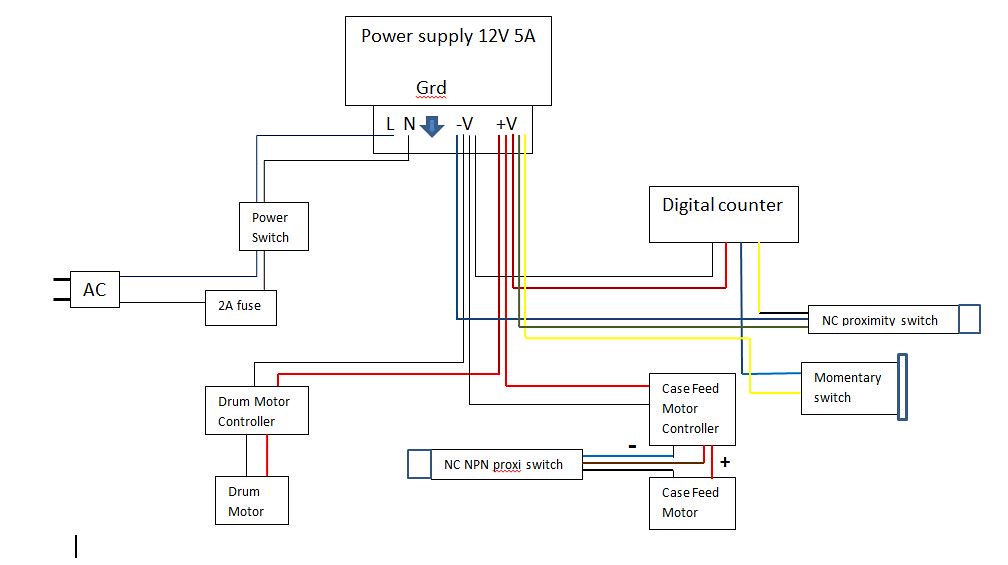
|
|
|
|
[#27]
Whats with 2 proximity switches?
|
|
|
|
|
[Last Edit: Gage]
[#28]
Originally Posted By rcav8r:
Whats with 2 proximity switches? One for the case feed drum. |
|
|
|
|
[Last Edit: tysonu74]
[#29]
Quick question. How large are the cut outs for the digital display and how large to drill switch and pot holes. I'm trying to get mine finished up and want to cut them out but my parts are tied up in shipping
Found it. 76mm x 39.5mm. I just need the hole sizes |
|
|
|
CA, USA
|
[#30]
OD of each. Not the hole size.
Pot - 0.270" Switch - 0.615" |
|
|
|
[Last Edit: tysonu74]
[#31]
So a .281 and .625 should do nicely.
|
|
|
|
CA, USA
|
[#32]
Had to make some more changes to get 300blk work. The small case would drop into the annealing drum case mouth first and either drop out of the shallow pan or end up perpendicular to the case rod 50% of the time.
Spaced the hopper further out with 2 more washers and made the feed ramp separate and adjustable. Added a larger back plate that's even with the hopper and made a case rod with a shorter arm to keep it out of the flame. Still more tweeking to do to get it 100% reliable. 
|
|
|
|
[Last Edit: tysonu74]
[#33]
|
|
|
|
|
[#34]
@tysonu74
You may need to add sponges to the large holes in your upper feed roller. In an extended run that steel might heat up enough to start softening the case heads. - Or remake the upper roller in something like G10 or a phenolic. But seriously a great variation! Just for giggles, how much does that unit weigh without the propane bottle? |
|
|
|
|
[Last Edit: tysonu74]
[#35]
I ran 500 .223 cases today in one go. With the torch head pointed outwards away from the wheels when I finished I could still very comfortably grab ahold of them.
The unit weighs in at a tank like 42 pounds. The main plate is a 21x12x1 piece of aluminum. It was repurposed from an abandoned project at work. The red plate on front is .076 steel that is recessed flush into the alum plate. It was needed to cover holes from the previous use of the plate. The case is made from the same .076 steel. All that alum is a hell of a heatsink. |
|
|
|
AUS
|
[#36]
Some great builds and modifications to the annealer.
Some serious hard core builds and some cheap builds all doing the same task and achieve the same result. Good effort fellas Skip |
|
|
TX, USA
|
[Last Edit: dryflash3]
[#37]
Wish I'm this handy...great job guys! <removed> no WTB in threads. See COC,
SPECIFIC TO SALES <ol style="padding-left: 0px; font-size: 12.8px; background-color: rgb(189, 189, 189);"> |
|
|
USA
|
[Last Edit: cyclepath3]
[#38]
Heres my build after coming across this subject. Thanks for the ideas!
https://www.youtube.com/watch?v=3_QKMTFcEYA&feature=share |
|
|
PA, USA
|
[Last Edit: DaveSinPA]
[#39]
I just completed an annealing machine similar to the ones on this thread. I have a problem with the cake pan motor coming to a stop during annealing after about 100 cases. I notice the motor starts slowing down after many cases. I had it set on a 1 revolution every 5 seconds and then it gets close to 6 seconds and then it will stop. I give it a little push and it will make another revolution and then stop in the same spot again. I assume it is because of the heat from the propane torch. The cake pan gets up to about 150 deg, Using a infrared thermometer the shaft in the cake pan is about 120 deg and the motor case is about 90 deg. Anyone else have any similar problems ? Any suggestions?
Edit to add: I used motors like this. https://www.ebay.com/itm/High-Torque12V-DC-25RPM-Gear-Box-Stabilivolt-Electric-Motor-Replacement-Industry-/322380545630?var=&hash=item4b0f60be5e Thanks, Dave |
|
|
CA, USA
|
[#40]
I haven't had the issue. After a single run of 250 cases there was no symptoms like your seeing. I use a different type, but your motor seems to be fine.
Can you post a picture of your machine to help diagnose the issue? I cut my pans a bit short and cut the guide rod short and routed inside the drum to keep everything but the case out of the direct flame. 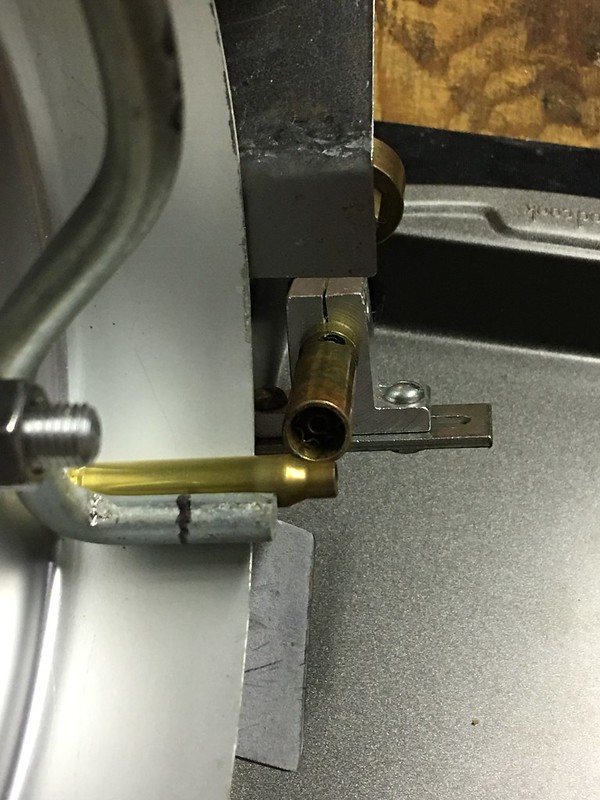
|
|
|
PA, USA
|
[Last Edit: DaveSinPA]
[#41]
Thanks for the reply, Blowout. I can't post a picture without a digital camera. Maybe if my son comes by next weekend. But mine looks exactly like what I see in your pic. I cut my pan as short as possible for .223, just under 1 inch from 1.3" figuring that would help but it did not help much. From your picture it looks like I have much more of the brass shell exposed away from the pan which keeps my flame further away from the pan than yours. I think I will swap motors, which are the same, between the pan and feed roller and see if that makes a difference.
I run the pan on about 26% for about 5 seconds of heat on the brass with the torch set so that the flame is as low as it can be and stay lit. What motors are you using? If the swap does not work I need to find a new type motor maybe with higher torque. My motor has a 8mm shaft. Thanks for your help. |
|
|
USA
|
[#42]
Originally Posted By DaveSinPA:
I just completed an annealing machine similar to the ones on this thread. I have a problem with the cake pan motor coming to a stop during annealing after about 100 cases. I notice the motor starts slowing down after many cases. I had it set on a 1 revolution every 5 seconds and then it gets close to 6 seconds and then it will stop. I give it a little push and it will make another revolution and then stop in the same spot again. I assume it is because of the heat from the propane torch. The cake pan gets up to about 150 deg, Using a infrared thermometer the shaft in the cake pan is about 120 deg and the motor case is about 90 deg. Anyone else have any similar problems ? Any suggestions? Edit to add: I used motors like this. https://www.ebay.com/itm/High-Torque12V-DC-25RPM-Gear-Box-Stabilivolt-Electric-Motor-Replacement-Industry-/322380545630?var=&hash=item4b0f60be5e Thanks, Dave That said, there are two options. Search for a quality high Torque gear box Motor, or keep it cool. I keep mine cool with a heat sink aluminum coupling I made [you can buy them], and a computer 12v fan mounted on standoff. Works great at 200 or so continuous runs. Make sure you have enough air opening on bottom of box and same on top. Mean time in searching for a better Motor. 

|
|
|
PA, USA
|
[#43]
Thanks for the reply, Flashbang1. I ordered a gear drive motor today.
This one: https://www.amazon.com/gp/product/B01MQNHXON It mounts differently and has a 6mm shaft instead of 8mm but this type works in a friends annealer without any problems. We shall see. Thanks for your help. |
|
|
CA, USA
|
[Last Edit: Blowout]
[#44]
@DaveSinPA
The motor your getting is very similar to what I have, except I have the 25 rpm version. The 35 rpm should be fine though. My Motor I used something like this to couple the motor shaft to the drum: coupler This aluminum coupler doesn't seem to conduct much heat to the motor shaft. I've seen where one person added a heat deflector shield to their machine to reduce over heating. Ran 500 cases of 7.62x39 through it without stopping and didn't have an issue so I haven't taken this step. Heat deflector FYI: My box has a closed back panel with no ventilation. Hopefully the motor change will do it for you. |
|
|
PA, USA
|
[#45]
Blowout,
Thanks for the follow up and the tips. I considered the lower rpm motor but my friend is using the 35 rpm with good results so I stuck with that. Interesting idea on the heat deflector. I hope I don't have to go that route. I considered something like that but figured a better motor was the way to go. I do wonder how many people had success with the original type motor verse those that had problems? Thanks again. |
|
|
CA, USA
|
[Last Edit: Blowout]
[#46]
Not sure how many had issues with the original motor. I selected a worm drive because of the torque this type mechanism can produce and it seemed easier to mount at the time.
Just went back to check the torque rating on the 2 motors. Your original motor is 2.33 kg.cm and the new worm drive motor is 5 kg.cm, so over twice the torque. One thing I learned, if a case gets jammed in the mechanism, there is no way to manually rotate the mechanism backwards. I have both the drum and the case feeder able to slide on the motor shaft and didn't secure them tight with the allen screws provided. Just tightened the screws enough to have them key into the D shaped motor shaft. That way they can be easily pulled straight off the motor shaft if a jam occurs. This saved my butt more than once and haven't experienced a down side to doing it this way. This motor uses 3mm diameter screws for the 4 mounting locations on the side. I found those at the local Ace Hardware. HD didn't have them. Good luck with getting it running. |
|
|
PA, USA
|
[#47]
Blowout,
Thanks for the tips. |
|
|
CO, USA
|
[#48]
Built mine 2 years ago, and have expreanced the motor overheating. I used a 1/2 bolt for the pan shaft axle, with a wing nut to change pans and spacers easier. I see the better motor, and propeller aluminum shaft will give that a try.
Blowout, please what counter did you use? Thanks |
|
|
|
[#49]
I had the same issue with mine during the last run of 150 or so .223 cases that I did. Eventually mine just stopped altogether. I ordered a couple more $9 motors from China to replace that one and have a spare. That was 3 weeks ago, so they should be here soon...I hope...
These are the ones I used.  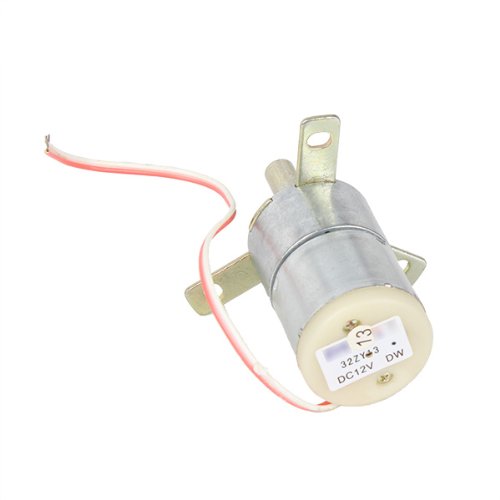
Originally Posted By DaveSinPA:
I just completed an annealing machine similar to the ones on this thread. I have a problem with the cake pan motor coming to a stop during annealing after about 100 cases. I notice the motor starts slowing down after many cases. I had it set on a 1 revolution every 5 seconds and then it gets close to 6 seconds and then it will stop. I give it a little push and it will make another revolution and then stop in the same spot again. I assume it is because of the heat from the propane torch. The cake pan gets up to about 150 deg, Using a infrared thermometer the shaft in the cake pan is about 120 deg and the motor case is about 90 deg. Anyone else have any similar problems ? Any suggestions? Edit to add: I used motors like this. https://www.ebay.com/itm/High-Torque12V-DC-25RPM-Gear-Box-Stabilivolt-Electric-Motor-Replacement-Industry-/322380545630?var=&hash=item4b0f60be5e Thanks, Dave |
|
|
|
CA, USA
|
[#50]
|
|
|
 Win a FREE Membership!
Sign up for the ARFCOM weekly newsletter and be entered to win a free ARFCOM membership. One new winner* is announced every week!
You will receive an email every Friday morning featuring the latest chatter from the hottest topics, breaking news surrounding legislation, as well as exclusive deals only available to ARFCOM email subscribers.

AR15.COM is the world's largest firearm community and is a gathering place for firearm enthusiasts of all types.
From hunters and military members, to competition shooters and general firearm enthusiasts, we welcome anyone who values and respects the way of the firearm.

Subscribe to our monthly Newsletter to receive firearm news, product discounts from your favorite Industry Partners, and more.
Copyright © 1996-2024 AR15.COM LLC. All Rights Reserved.
Any use of this content without express written consent is prohibited.
AR15.Com reserves the right to overwrite or replace any affiliate, commercial, or monetizable links, posted by users, with our own.


