OH, USA
|
[#1]
Seems like most folks are using 2 motors/controllers instead of single motor with 2 pulleys/timing belt design. Is the pulley/timing belt concept abandoned?
|
|
|
|
[#2]
Originally Posted By HankC:
Seems like most folks are using 2 motors/controllers instead of single motor with 2 pulleys/timing belt design. Is the pulley/timing belt concept abandoned? yes. the 2 motors (with 1 controller and 1 prox sensor) is easier to setup. also lets you change it on the fly when you change cases a lot easier |
|
|
|
|
[#3]
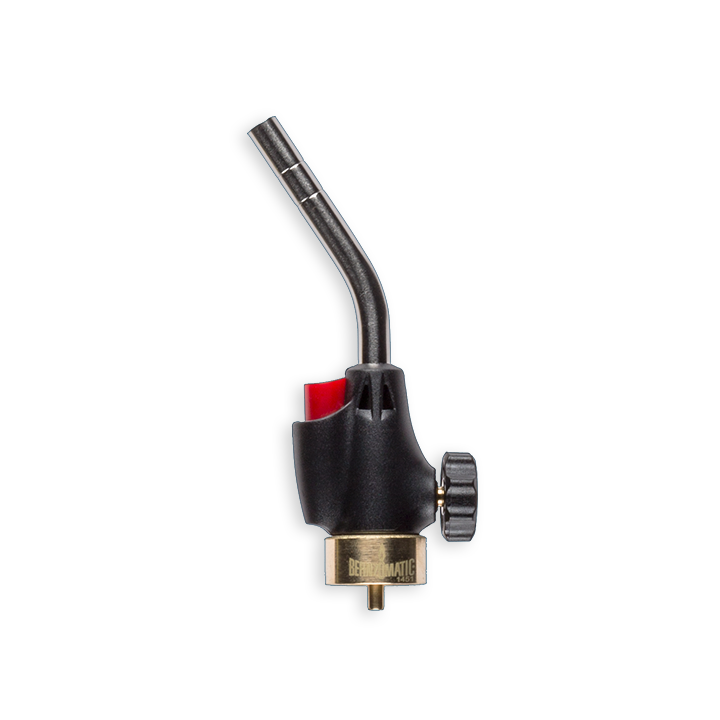
FYI, don't get this torch style https://www.amazon.com/Bernzomatic-BZ4600SW-Swirl-Flame-Brazing/dp/B00834RCGK/ref=sr_1_39?ie=UTF8&qid=1478060845&sr=8-39&keywords=bernzomatic+propane+torch
I got it and wish I didn't. I am going to have to add 4 inches to the width of the annealer to accommodate it (I want the propane hose to wrap up inside of the annealer). plus here are some cheaper ones on amazon now that I didn't see when I got it. |
|
|
|
VA, USA
|
[Last Edit: tzzler44]
[#4]
***edit*** Question answered in PM, nvm.
|
|
|
|
[#5]
What is the best way to trim down these cake pans? I bought one of the 5x2s off amazon. The side walls feel thick.
|
|
|
|
|
[#6]
I used a method posted here: took a dremel and a tiedown strap, stapped the dremel to a post, put the cakepan flat on the ground, and slowly turned it. I did use the newer style quick change cutting disks on the dremel though
|
|
|
|
VA, USA
|
[Last Edit: tzzler44]
[#7]
That's what I did too.
I just ordered a new cake pan. I need to make a center-finder to get a better center on this one. The one I currently have wobbles a bit too much for my taste. Also need to make a new feed ramp, like an idiot I rushed cutting the aluminum and made it too short. [youtube]https://youtu.be/L3YCKJESrP4[/youtube] |
|
|
|
[#8]
The method of tracing the bottom of the pan on paper, then cutting it out, and then folding the cutout in half different way works pretty good.
|
|
|
|
|
[Last Edit: corruptor]
[#9]
Originally Posted By mattf26:
What is the best way to trim down these cake pans? I bought one of the 5x2s off amazon. The side walls feel thick. I put a Dremel cutoff wheel in my drill press, set the drill press table at the appropriate height, and then forced the pan into the cutoff wheel. It's slower than using a mounted Dremel as described by others (lower RPM), but it worked well enough and (at least in my mind) was less apt to go awry. I cut the slot after cutting to the appropriate height. |
|
|
|
TX, USA
|
[Last Edit: downrivertrash]
[#10]
I was going to do the drill press also but used a hacksaw instead. Followed the line around and came out nice and straight much to my surprise! I may have cut the notch just a little too wide but seems to be working.
One more thing, I used a 2 inch hole saw and cut out a nice 2 inch diameter plug from a 2x4. I dremeled out a small grove and used a round file that's almost the same diameter as a .223 and finished out the groove. I intend to anneal more .223 than anything else so I don't need to cut the groove any wider. |
|
|
VA, USA
|
[#11]
Anyone have any good tips on an adapter to anneal shorter brass like 300blk? I've got mine set up and running perfectly with 7.62x54r, 308, .30-30, and 223. It'll feed 300blk just fine but my pan has enough depth that there's barely a lip of 300blk sticking out and I'm afraid that cutting the pan shorter will let some of the longer stuff fall out. I'm hoping to get a .270 soon and that brass is way longer than the .308.
I saw one post with a piece of brass tubing soldering to a piece of brass shim stock that looked promising but wanted to see if anyone had any other proposals. I have access to a 3D printer if that helps, but i'm thinking that printable material so close to the flame may be a bad thing. |
|
|
AUS
|
[#12]
Originally Posted By tzzler44:
Anyone have any good tips on an adapter to anneal shorter brass like 300blk? I've got mine set up and running perfectly with 7.62x54r, 308, .30-30, and 223. It'll feed 300blk just fine but my pan has enough depth that there's barely a lip of 300blk sticking out and I'm afraid that cutting the pan shorter will let some of the longer stuff fall out. I'm hoping to get a .270 soon and that brass is way longer than the .308. I saw one post with a piece of brass tubing soldering to a piece of brass shim stock that looked promising but wanted to see if anyone had any other proposals. I have access to a 3D printer if that helps, but i'm thinking that printable material so close to the flame may be a bad thing. Mate, the simplest method that I do is cut another pan, that is to be used for the smaller cases like the 22 hornet and 300 black etc. I've tried ways of bushings etc, at the end of it all, was easier to go back to swapping drums out. It takes a few seconds to swap over main drums. That was the main principle I made the machines have a angle. To keep cases from walking out and the case head ( where the weight is of the case ) to hug the wall of the drum. Skip |
|
|
TX, USA
|
[#13]
There's a thread somewhere that shows using a thick plate that fits in the pan to push cases out farther. I think it's for 300 blk.
|
|
|
VA, USA
|
[#14]
Skip has spoken lol. I guess I'll be ordering a new pan.
|
|
|
|
[#15]
I would try this first. I am making one using a cut up breidian primed 308 case
|
|
|
|
USA
|
[#16]
Originally Posted By downrivertrash:
There's a thread somewhere that shows using a thick plate that fits in the pan to push cases out farther. I think it's for 300 blk. 
Although I have the equipment to make the plate, most do not. It's just as effective to make another shorter pan. |
|
|
VA, USA
|
[#17]
Yeah making that plate would be a bit beyond my current shop's abilities, unfortunately. I've got a new pan on the way, should be here tomorrow. I'll just cut that one up for 300blk and call it a day.
|
|
|
NE, USA
|
[#18]
I'm not around here much anymore but I was going to look into oring belts. I could not find pulleys that I liked though. I might try and 3d print some if I ever get to revisit this project in the future. I'm glad this took off. I have seen it on several other forums.
|
|
|
VA, USA
|
[#19]
Ok i cut a new pan for 300blk but I've run into another problem. Every 3rd or 4th 300blk case will fall in sideways. I thought maybe my cut in the side of the pan was too narrow, just under 1.5" wide, and allowing the following edge to hit the brass on the way downs so i cut it a bit more and the problem just got worse. I took a video in slow motion and it looks like the problem is indeed the following edge is hitting the brass and popping it up.
I think the gap between the ramp and the pan is too much and the brass is falling too far outside the lip. If I'm correct A new ramp with the downturn at a much more acute angle closer to the pan should fix it, right? Slow motion video of the problem, keep in mind these cases have been cut from 223 but not yet formed - https://youtu.be/gXhuB9RPFmY?t=3m |
|
|
AUS
|
[#20]
My 300 blackout pan the cutout slot is 20mm.
Also is the case feeder backing/stand off plate proud of the back off the main drum. The reason the is the main drum ( original concept ) was the motor to be mounted on threaded/bolts. Thus the motor and pan can be adjusted, so the pan hugs close to the feed ramp without touching and that the main drum is just shy of the case. So when the case falls into the pan. The rim didn't hit the back rim of the slot that has been cut out. Have a look back at my vids. Don't know how to past links here, but should be easy to find. |
|
|
VA, USA
|
[#21]
I wish I wasn't 3 hours away from my shop or I'd post pictures that help better illustrate my build. The feed drum plate and ramp do stand proud off the backing plate. The ramp edge which is in contact with the faceplate is just barely in front of the floor of the pan so that case head doesn't rub the floor of the pan when it falls in.
I do have my pan motor mounted on threaded screws and it can be adjusted in and out, but not side to side. |
|
|
|
[#22]
Why don't you just make a small shim adapter like what was posted earlier I the thread? I am in the process of making one for mine. I cut the head off a Berdian primed 308 case.
|
|
|
|
AUS
|
[Last Edit: El-Skippo]
[#23]
Originally Posted By tzzler44:
I wish I wasn't 3 hours away from my shop or I'd post pictures that help better illustrate my build. The feed drum plate and ramp do stand proud off the backing plate. The ramp edge which is in contact with the faceplate is just barely in front of the floor of the pan so that case head doesn't rub the floor of the pan when it falls in. I do have my pan motor mounted on threaded screws and it can be adjusted in and out, but not side to side. From the look of your other video you have posted on your channel. It looks like you have built it with no angle of the main box. This can give you trouble as I found out with my other trial builds. Until I can up with the angle that kept the head of the case to fall and hug the main drums back wall. You won't have to rebuild your machine. Just a couple of bolts in the base, and a kick stand to stop it from falling over. Just a observation from what I see. Honestly my builds that I have sold to fellow Aussies, Inc my own. ( I'm still using black Betty ) all just change out the main drum and feeder depending on calibre. As posted above, you could make one of those brass shims that a member posted long ago. Your problem will get sorted out for sure. Just got to find the right fix. I still think the slot you have made in the main drum is too large. I've just gone out to my shed to measure my 300blk drum. ( the wall is cut to 20mm ) this didn't mater to you, as I use the drum for other small cases like the hornet. The slot for the case is 20mm. None of my anneal/s I have built and sold have a bent feed ramp at the lip of the feeder. Yours looks to not be gently rolling into the drum. But falling quick due to the ramp and then due to the slot getting kicked up. Plenty of folks have built these some with there own twists. Hell even a bloke has built one to acomadate the 20mm case. |
|
|
VA, USA
|
[#24]
A 20mm case?! That's awesome haha.
May not look like it in the videos but the front plate actually has an angle of 13 degrees. The body is actually cut to your specs from the shootingaustralia.net forum, Skip. Someone changed the values to inches and that's what I followed - https://docs.google.com/document/d/1bb_cm10J8urCM2PtKql8VyHtGlovTeI3RnAj7xa0eX0/edit I'll get more angle aluminum and cut another ramp a little closer and cut another pan to 20mm, hopefully that solves my problems |
|
|
AUS
|
[Last Edit: El-Skippo]
[#25]
Originally Posted By tzzler44:
A 20mm case?! That's awesome haha. May not look like it in the videos but the front plate actually has an angle of 13 degrees. The body is actually cut to your specs from the shootingaustralia.net forum, Skip. Someone changed the values to inches and that's what I followed - https://docs.google.com/document/d/1bb_cm10J8urCM2PtKql8VyHtGlovTeI3RnAj7xa0eX0/edit I'll get more angle aluminum and cut another ramp a little closer and cut another pan to 20mm, hopefully that solves my problems V2.0 of bb was angled a bit more. Due to the blkout and a couple of other small case issues. I'll have to get back to you on exact angle. Edit: v2 is 18* angle. The chap that built one for his 20mm  Oerlikon Case Annealer MOV |
|
|
VA, USA
|
[Last Edit: tzzler44]
[#26]
That is an awesomely huge build. Your plans have really taken off!
I can change the angle of my faceplate, I did actually install two elevator bolts on the bottom-front of my annealer so I could change the angle. Seemed to actually make the problem worse with the 300blk when I changed the angle but I think I need to fix the ramp and drum first. That'll be my project for new year's weekend I suppose. *Edit* In response to your 18* face incline, with the elevator bolts installed in the bottom front of my base I bet my incline is closer to 20*. If it matters I'll have to measure when I'm back in the shop but that won't be until Friday |
|
|
|
[#27]
Originally Posted By El-Skippo:
V2.0 of bb was angled a bit more. Due to the blkout and a couple of other small case issues. I'll have to get back to you on exact angle. Edit: v2 is 18* angle. The chap that built one for his 20mm Oerlikon Case Annealer MOV |
|
|
|
|
[#28]
I've been reviewing this thread in preparation for actual build, after all this time.
Is there anyway the first 3 messages in thread could be updated to include the latest info? the 2nd and third messages are just placeholders. I realize there are still a lot of variations that everyone makes to their own machines, but little things like the cake pans, the optical sensor, etc, in one spot would be handy. |
|
|
|
|
[#29]
Originally Posted By rcav8r:
I've been reviewing this thread in preparation for actual build, after all this time. Is there anyway the first 3 messages in thread could be updated to include the latest info? the 2nd and third messages are just placeholders. I realize there are still a lot of variations that everyone makes to their own machines, but little things like the cake pans, the optical sensor, etc, in one spot would be handy. That has to be done by the poster of that post. Or Quote post, and do whatever editing you want to do. Best to make edits in blue to show things were changed. |
|
|
|
|
[#30]
Originally Posted By Brassaholic13:
Chain over belt. Doesn't have to be tight like a belt, and a really small chain could be used. For that matter, with all the more load it'll have, you could use an o-ring for a belt. Have the motor drive the case dropper, then use the o-ring to drive the spinning mechanism. But yes, I agree with you. They would need to be timed, and trying to screw around with two variable speed motors would be frustrating. Originally Posted By Brassaholic13:
Originally Posted By drfroglegs:
Maybe I'm thinking about this wrong, but do you really need 2 controllers and two motors? Think about it, you only want one case to fall from the right motor every time the left motor drops it's case. These two should be timed perfectly (why you have two motors/controllers). So why don't you just have one motor and a belt? This will make sure they are both timed the same every time no matter what speed you set. It may take some R&D to get exactly the right belt/distance so that they are timed perfectly, but it seems like it would make the build much easier in the long run? Chain over belt. Doesn't have to be tight like a belt, and a really small chain could be used. For that matter, with all the more load it'll have, you could use an o-ring for a belt. Have the motor drive the case dropper, then use the o-ring to drive the spinning mechanism. But yes, I agree with you. They would need to be timed, and trying to screw around with two variable speed motors would be frustrating. If you get them timed they will not stay timed with separate motors. Smooth belts will not stay timed. You need at least a cogged (synchronous) belt and a light open wire chain would be better. |
|
|
|
AUS
|
[#31]
^^^
The original concept of the diy auto annealer was to keep it simple and as plug n play as it could be, not too mention cheap as possible. The inductive Prox sensor was a good cheap addition to the original build that only added a hole, 3wires and about 10min to install which negated the whole " gosh turning a knob is hard work " fantastic addition. ( bigbore ) came up with that. Nozzles came up with the better case stopper arm. Now I've seen a hell of a lot of posts on/in different places, mentioning the same old thing about gears and belts etc and how it's going to make this annealer easier and less frustrating to turn a knob 1-2 times per 100 cases. Now after all this talk about it over the years. I am yet to see one "1" build done with these belts and pulleys etc. wonder why that is? Costs more? Takes more time? Extra work involved in building it? Who knows. If people want to go that route, go for it. It's diy after all, your time and money. I'm just yet to see one in the flesh in the 2+ years the builds been going. Plenty of talk about it but nothing coming from it. Original BB 1.6 was built in about 4 hours with no plans, just winged it as I went along. With basic tools to prove the concept ( prior concepts cost me literally $0 in the fact it was all scavenged ) that you didn't need to spend mega $$$$$, to own your own auto annealer. My main reason in building a auto annealer to begin with. Was the fact I didn't live in the USA and that guraid ( how ever it's spelt ) wouldn't ship over seas to Australia, one of your country's allies. So I built my own and passed it on to the world. Too tell you it's come a long way from its beginning days. ( it's a bloody understatement ) there has been some ripper builds from the most basic to the complex from the cheapest to the most expensive. That's the thing about DIY " worlds your oyster " Sorry for the ramble, guess I've seen too much talk about gears and belts..... but no "proof in the puddin" |
|
|
NM, USA
|
[Last Edit: GWhis]
[#32]
Have to agree with you.....what you came up with was great.....and I saw it only week after I had bought a "saw" for the other really nifty home-built design. Unfortunately, keeping a business going midst a lot of alligators, has prevented me from making my own of either design.....yet. Not giving up, mind you. I for one am really impressed with the simplicity of the cake pan design you made.....no sense in overthinking it and turning it into a money trap.
Happy New Year!........and thanks for sharing your passion!--Greg |
|
|
NM, USA
|
[Last Edit: GWhis]
[#33]
Over on THR.org, Saggins has come up with a low budget "cake pan" annealer spending less than $50. Cake pan is an empty paint can. Case is an old computer case. He uses the existing computer power supply. Pretty resourceful IMO.
Here's the link for people with small budgets or just want to look. He added adjustable legs to tilt the case. Simple....... Congrats Saggins! |
|
|
|
[Last Edit: corruptor]
[#34]
Originally Posted By El-Skippo:
^^^ The original concept of the diy auto annealer was to keep it simple and as plug n play as it could be, not too mention cheap as possible. The inductive Prox sensor was a good cheap addition to the original build that only added a hole, 3wires and about 10min to install which negated the whole " gosh turning a knob is hard work " fantastic addition. ( bigbore ) came up with that. Nozzles came up with the better case stopper arm. Now I've seen a hell of a lot of posts on/in different places, mentioning the same old thing about gears and belts etc and how it's going to make this annealer easier and less frustrating to turn a knob 1-2 times per 100 cases. Now after all this talk about it over the years. I am yet to see one "1" build done with these belts and pulleys etc. wonder why that is? Costs more? Takes more time? Extra work involved in building it? Who knows. If people want to go that route, go for it. It's diy after all, your time and money. I'm just yet to see one in the flesh in the 2+ years the builds been going. Plenty of talk about it but nothing coming from it. Original BB 1.6 was built in about 4 hours with no plans, just winged it as I went along. With basic tools to prove the concept ( prior concepts cost me literally $0 in the fact it was all scavenged ) that you didn't need to spend mega $, to own your own auto annealer. My main reason in building a auto annealer to begin with. Was the fact I didn't live in the USA and that guraid ( how ever it's spelt ) wouldn't ship over seas to Australia, one of your country's allies. So I built my own and passed it on to the world. Too tell you it's come a long way from its beginning days. ( it's a bloody understatement ) there has been some ripper builds from the most basic to the complex from the cheapest to the most expensive. That's the thing about DIY " worlds your oyster " Sorry for the ramble, guess I've seen too much talk about gears and belts..... but no "proof in the puddin" I took a similar approach on my first build since I already had some small chain and all of the necessary sprockets, bearings, and other miscellaneous hardware. The single drive worked great for me, but I could never get the case to reliably drop into the pan. Too many bounce-outs, sideways cases, etc. I thought I had it licked, but longer run times and lots of cases proved me wrong. Had I NOT already owned all of the necessary hardware, I'd have gone with the two motor setup to make my life a little easier. Anyhow, I shelved it for a while, only to pick it up again last weekend after realizing it would be simpler to roll the case on top of the cake pan and let it drop through the slot when finished rather than trying to ramp it into the pan and hope it comes to rest properly at the bottom. This will make for a taller unit, but that's not really a big deal to me. Hand powered testing was successful, so now I have to figure out how to adjust for different case depths (I'm looking to work with .300 Blackout, .223, .308, and .30-06). Varying case diameters will be handled in the feed wheel using a couple of plastic shims. ETA: I forgot to say thank you for getting this ball rolling! Without your inspiration and tstuart34's original post in this thread, I'd have never gotten started on this! 
|
|
|
|
TX, USA
|
[#35]
Where are y'all applying the 750 temp paint to the case to ensure temperature? Inside the case neck? Heat until it gets runny?
I'm looking to find the speed/ temp ratio via several test cases for each cal, then record the speeds so I can plug and play. |
|
|
|
[#36]

Just a dot inside the case neck. Heat 3-4 seconds and the dot will turn transparent, stop heating then as temp was reached when dot "melted". |
|
|
|
|
[#37]
need some help with the torch setup.
I got this torch: https://www.amazon.com/dp/B00834RCGK?tag=vglnk-c102-20 and it sucks. after getting it set and running, 3 cases in the tip will start to glow red and then the flame goes red. also can not get a good blue "tip" to the flame what torch should I replace it with? either of these 2 or something else? https://www.amazon.com/dp/B000692UYE?tag=vglnk-c102-20 https://www.amazon.com/dp/B00008ZA0C?tag=vglnk-c102-20 |
|
|
|
|
[#38]
Originally Posted By ws-6:
need some help with the torch setup. I got this torch: https://www.amazon.com/dp/B00834RCGK?tag=vglnk-c102-20 and it sucks. after getting it set and running, 3 cases in the tip will start to glow red and then the flame goes red. also can not get a good blue "tip" to the flame what torch should I replace it with? either of these 2 or something else? https://www.amazon.com/dp/B000692UYE?tag=vglnk-c102-20 https://www.amazon.com/dp/B00008ZA0C?tag=vglnk-c102-20 |
|
|
|
|
[#39]
|
|
|
|
USA
|
[#40]
Originally Posted By ws-6:
need some help with the torch setup. I got this torch: https://www.amazon.com/dp/B00834RCGK?tag=vglnk-c102-20 and it sucks. after getting it set and running, 3 cases in the tip will start to glow red and then the flame goes red. also can not get a good blue "tip" to the flame what torch should I replace it with? either of these 2 or something else? https://www.amazon.com/dp/B000692UYE?tag=vglnk-c102-20 https://www.amazon.com/dp/B00008ZA0C?tag=vglnk-c102-20 |
|
|
|
[#41]
So I have read every page and see people making their own torch nozzle holders and case holder. For us non handy with tools to make those is there a place to pick them up?
I have serched on Amazon and other sights but I am sure what I am using to search is not the correct name. Love this thread and idea BTW!!! Thank you all!!! |
|
|
|
IL, USA
|
[#42]
I made my own a year or so ago from the plans that I found on the internet it works great.
https://youtu.be/TPSOJ8Jx1Eo |
|
|
MO, USA
|
[#43]
Originally Posted By mlr052869:
So I have read every page and see people making their own torch nozzle holders and case holder. For us non handy with tools to make those is there a place to pick them up? I have serched on Amazon and other sights but I am sure what I am using to search is not the correct name. Love this thread and idea BTW!!! Thank you all!!! Link It wasn't "perfect" but with a little cutting and sanding to open up the mouth, it worked for me. |
|
|
|
[#44]
Thank you both for the info and ideas..
Now to order the list and wait to build. Thank you everyone again for a great DIY! |
|
|
|
TX, USA
|
[#45]
Bringing this back from the dead. Im interested in this type of project. I dont have the tooling or machine shop to do it though. At this point, has their been any innovations to do the idea that i can complete in my garage? Anyone tried putting something togethet with the inexpenive chinese induction boards?
|
|
|
|
[#46]
This is a simple project, you don't need to have a fancy metal case. The annealer has been made with wood by many people. Lots of the parts people are using are chinese made, mostly motors and speed controllers.
|
|
|
|
|
[#47]
Originally Posted By BravoSierra:
Bringing this back from the dead. Im interested in this type of project. I dont have the tooling or machine shop to do it though. At this point, has their been any innovations to do the idea that i can complete in my garage? Anyone tried putting something togethet with the inexpenive chinese induction boards? |
|
|
|
NM, USA
|
[#48]
It's good to see this thread is enjoying yet another new audience. It's a great idea, from "downunder" and shouldn't die. I hope the many pictures stolen by PhotoBucket finds a way back.
|
|
|
TX, USA
|
[#49]
Originally Posted By dryflash3:
Read thru the first 5 pages or so for a better idea of the different ways to build one of these. |
|
|
|
[#50]
This thread has the archive toggle set, so it may go to the back pages, but not slip into the archives.
The last 2 pages of this forum are where you will find toggled threads. Some very good threads there. |
|
|
|
 Win a FREE Membership!
Sign up for the ARFCOM weekly newsletter and be entered to win a free ARFCOM membership. One new winner* is announced every week!
You will receive an email every Friday morning featuring the latest chatter from the hottest topics, breaking news surrounding legislation, as well as exclusive deals only available to ARFCOM email subscribers.

AR15.COM is the world's largest firearm community and is a gathering place for firearm enthusiasts of all types.
From hunters and military members, to competition shooters and general firearm enthusiasts, we welcome anyone who values and respects the way of the firearm.

Subscribe to our monthly Newsletter to receive firearm news, product discounts from your favorite Industry Partners, and more.
Copyright © 1996-2024 AR15.COM LLC. All Rights Reserved.
Any use of this content without express written consent is prohibited.
AR15.Com reserves the right to overwrite or replace any affiliate, commercial, or monetizable links, posted by users, with our own.