|
[#1]
I need to get drunk enough to try it, but not mess it up. Looks great.
|
|
|
|
|
[#2]
Just do it.
|
|
|
|
|
[#3]
Originally Posted By 71montess:
I need to get drunk enough to try it, but not mess it up. Looks great. Get a plan, follow the plan, enjoy the fruits of the accomplished plan. Repeat on every firearm you own. |
|
|
|
|
[#4]
Originally Posted By 71montess:
I need to get drunk enough to try it, but not mess it up. Looks great. I just did it quick and simple. Cleaned the rifle very well Masked off what I didn't want painted Sprayed everything with flat camo tan and let it dry for a day Used a cheap wal-mart mesh laundry back to add some "texture" and sprayed alternating flat brown and flat olive green on the rifle from 12" away or so. Cracked open a beer and let it dry for a few minutes, then misted over it with a little bit of a flat foliage green for just a little more "depth" It isn't as fancy as some, and actually now has a lot of "battle worn" look to it from several range trips and packing into the woods for deer hunting (upper is used on a pistol lower for hunting w/o vertical grip and light. Don't over think it of you will talk yourself out of it. Another one I did. |
|
|
|
|
[#5]
Originally Posted By Gambel_02:
I was there once. Then I realized how bad it may turn out and how it would of turned me off from doing it ever again. Get a plan, follow the plan, enjoy the fruits of the accomplished plan. Repeat on every firearm you own. Originally Posted By Gambel_02:
Originally Posted By 71montess:
I need to get drunk enough to try it, but not mess it up. Looks great. Get a plan, follow the plan, enjoy the fruits of the accomplished plan. Repeat on every firearm you own. |
|
|
|
|
[#6]
Originally Posted By jblomenberg16: If you are really worried you might mess up, paint a few PMAGs or an old handguard or stock for practice. I've done a couple now + a shotgun for duck hunting and honestly it isn't very hard to do. I think where some people might have trouble is trying to get too exact with a certain pattern or color combo they want to do. I just did it quick and simple. Cleaned the rifle very well Masked off what I didn't want painted Sprayed everything with flat camo tan and let it dry for a day Used a cheap wal-mart mesh laundry back to add some "texture" and sprayed alternating flat brown and flat olive green on the rifle from 12" away or so. Cracked open a beer and let it dry for a few minutes, then misted over it with a little bit of a flat foliage green for just a little more "depth" It isn't as fancy as some, and actually now has a lot of "battle worn" look to it from several range trips and packing into the woods for deer hunting (upper is used on a pistol lower for hunting w/o vertical grip and light. Don't over think it of you will talk yourself out of it. https://www.AR15.Com/media/mediaFiles/181534/20180307_201523_jpg-809231.JPG https://www.AR15.Com/media/mediaFiles/181534/Pistol_and_SBR_jpg-809234.JPG Another one I did. https://www.AR15.Com/media/mediaFiles/181534/ar_camo_jpg-809233.JPG Now I just wish I could find Aervoe paint locally so I can be all high speed and move away from the Rustoleum... 
|
|
|
|
|
[#7]
Originally Posted By 50DollarCheShirt: I've even stopped cleaning the rifles prior. Worst case scenario is that it wears a little faster in some spots which is sort of the appeal to the rattle can for me. Now I just wish I could find Aervoe paint locally so I can be all high speed and move away from the Rustoleum... |
|
|
|
|
[#8]
Originally Posted By 50DollarCheShirt: I've even stopped cleaning the rifles prior. Worst case scenario is that it wears a little faster in some spots which is sort of the appeal to the rattle can for me. Now I just wish I could find Aervoe paint locally so I can be all high speed and move away from the Rustoleum... For Aervoe, I buy from Brownells and use on of their codes for free shipping since most places have high shipping on paint/ammo. Pic thread. |
|
|
|
|
[#9]
Originally Posted By Lonestar12: I agree. Like the worn look of rattle can and makes prep easy because there is little. For Aervoe, I buy from Brownells and use on of their codes for free shipping since most places have high shipping on paint/ammo. Pic thread. https://www.AR15.Com/media/mediaFiles/298831/IMG_2325_JPG-809429.JPG |
|
|
|
NC, USA
|
[#10]
Man this thread is addicting. Ill eventually have all of my guns painted.
|
|
|
|
[#11]
Originally Posted By doubleshot00:
Man this thread is addicting. |
|
|
|
|
[#12]
Originally Posted By Lonestar12: I agree. Like the worn look of rattle can and makes prep easy because there is little. For Aervoe, I buy from Brownells and use on of their codes for free shipping since most places have high shipping on paint/ammo. Pic thread. https://www.AR15.Com/media/mediaFiles/298831/IMG_2325_JPG-809429.JPG It was starting to show some rust and worn parkerizing from getting beat around the blind, so decided to rattle can it a few years back. Used some yellow "squash" as my base, then some flat tan before some flat brown and olive. |
|
|
|
|
[#13]
Originally Posted By jblomenberg16: It's not an AR, but my trusty 870 is wearing nicely after a couple seasons of waterfowling. It was starting to show some rust and worn parkerizing from getting beat around the blind, so decided to rattle can it a few years back. Used some yellow "squash" as my base, then some flat tan before some flat brown and olive. https://www.AR15.Com/media/mediaFiles/181534/1547928026660400_jpg-813652.JPG https://www.AR15.Com/media/mediaFiles/181534/1547928118950915_jpg-813653.JPG |
|
|
|
|
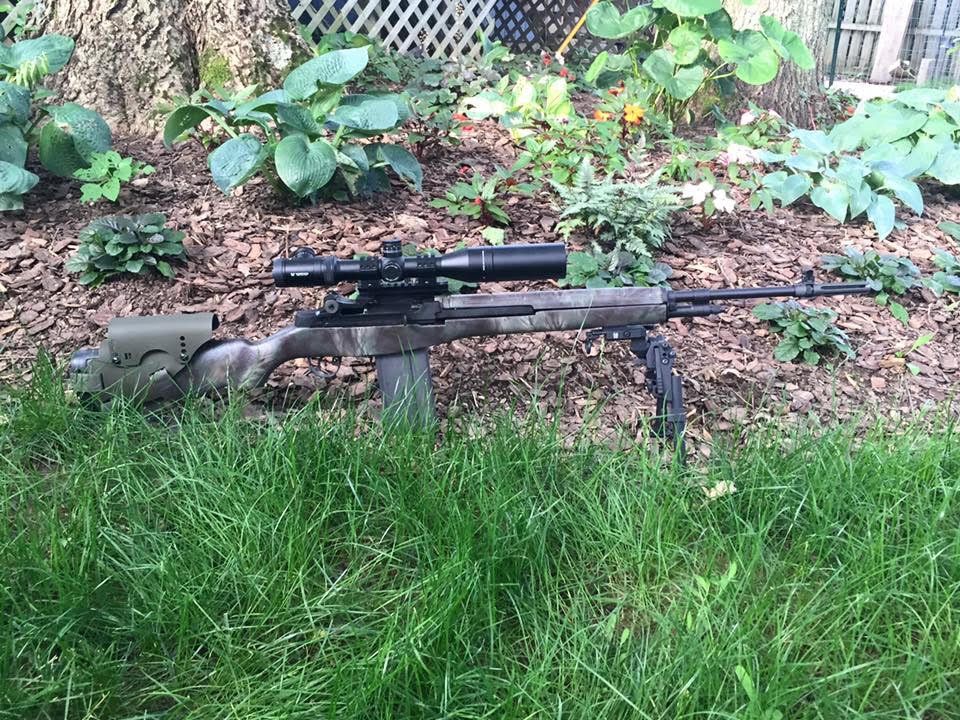
[#14]
Originally Posted By Finslayer83:
http://i.imgur.com/OpmSVjs.jpg I know this is an old post but can you tell me about the colors on the bottom rifle? I have a rifle similar to that and I reaaaaallllyyy like how that looks. |
|
|
|
|
[#15]
Originally Posted By Creature:
That is an awesome duck gun! Love the pattern. |
|
|
|
|
[Last Edit: Shootindave]
[#16]
Originally Posted By Rayrod911:
What paint did you use and how did you paint it? Originally Posted By Rayrod911:
Originally Posted By Shootindave:
My first SBR build and first attempt at painting. Thanks to EVERYONE who has posted pictures for me to study. Needs some touch up after I let it sit for a while but I like it. https://preview.ibb.co/fRkZO0/IMG-0114.jpg" target="_blank">https://preview.ibb.co/fRkZO0/IMG-0114.jpg https://preview.ibb.co/ctUTi0/IMG-0113.jpg https://preview.ibb.co/cY9di0/IMG-0111.jpg" target="_blank">https://preview.ibb.co/cY9di0/IMG-0111.jpg https://preview.ibb.co/hrYFVf/IMG-0110.jpg" target="_blank">https://preview.ibb.co/hrYFVf/IMG-0110.jpg I used Krylon camo series spray paint. I did a base layer of Olive and then I used mesh ($2 walmart mesh laundry bag) and sprayed Khaki over it. The farther away you are with the can the better. Just let it dry between coats and added a little here and there. |
|
|
|
MI, USA
|
[#17]
Also not an AR and I've posted before but not in the snow.
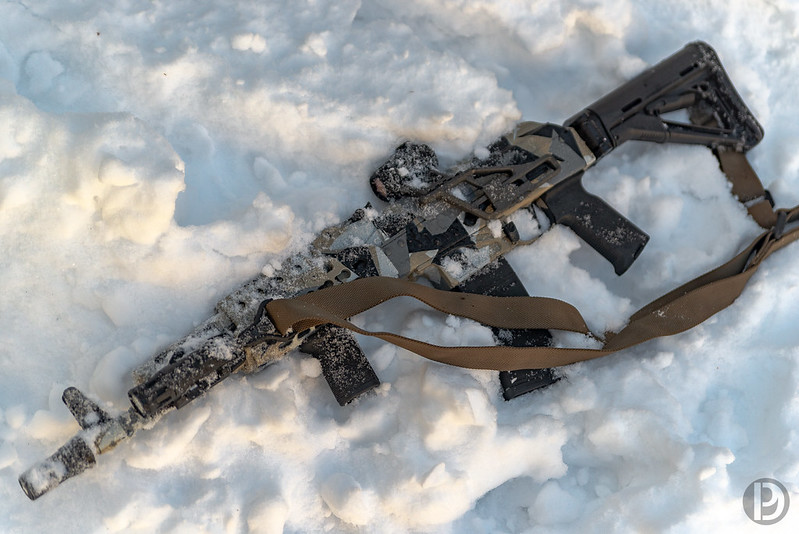
FDS_4422-Edit by Damage Photos, on Flickr |
|
|
|
[#18]
Originally Posted By Pyzik:
Also not an AR and I've posted before but not in the snow. https://farm5.staticflickr.com/4820/39873617263_d23c2c63f9_c.jpg FDS_4422-Edit by Damage Photos, on Flickr 
|
|
|
|
|
[#19]
My first stab at this sorta thing.

How's it look? |
|
|
|
|
[#20]
Originally Posted By CWied:
My first stab at this sorta thing. https://www.AR15.Com/media/mediaFiles/416409/48419836_1826060444170792_4905246869900230656_n-817889.jpg How's it look? |
|
|
|
|
[#21]
Originally Posted By CWied:
My first stab at this sorta thing. https://www.AR15.Com/media/mediaFiles/416409/48419836_1826060444170792_4905246869900230656_n-817889.jpg How's it look? |
|
|
|
|
[Last Edit: CWied]
[#22]
Thanks!
I have a couple from a few days ago. The pattern is a little light so I may darken it up a bit. Who knows. I can't wait till the whole rifle looks like my Wolf 9SD suppressor does. Just gotta get out there and run em hard. 

|
|
|
|
|
[#23]
Originally Posted By CWied:
Thanks! I have a couple from a few days ago. The pattern is a little light so I may darken it up a bit. Who knows. I can't wait till the whole rifle looks like my Wolf 9SD suppressor does. Just gotta get out there and run em hard. https://www.AR15.Com/media/mediaFiles/416409/IMG-0105_JPG-818178.jpg https://www.AR15.Com/media/mediaFiles/416409/IMG-0114_JPG-818180.jpg |
|
|
|
|
[#24]
Originally Posted By Gambel_02: Those turned out great. How's the paint hold up on the suppressors from all that heat? Holds up alright for being Krylon I think. After the suppressor gets hot the paint is easier to scrape off, but I haven't gotten a smoke show, any bad smells, and the paint hasn't turned black. I think it worked out alright. |
|
|
|
|
[#25]
When you guys are painting scopes are you removing them from the rifle or just leave it on? Also are you just putting the lens caps on or taping up the glass?
|
|
|
|
|
[Last Edit: Deere_John_16]
[#26]
Originally Posted By kered:
When you guys are painting scopes are you removing them from the rifle or just leave it on? Also are you just putting the lens caps on or taping up the glass? |
|
|
|
|
[Last Edit: ARnTN]
[#27]
I’ve done it several different ways. I will typically leave it on unless I think I’ll likely end up changing out the optic.
If I normally have flip caps on it then I’ll stuff some cotton balls under it and close it just as jblomenberg16 suggested. The only issue I’ve ever had with that is I had one optic with a tacky sealant around the lens and it was a pain to get all of the cotton fibers off. But normally that works great. If I don’t have flip covers then I’ll either run a circle of tape on the outside of the scope body at the edge, fold it inwards (think like a shotgun shell crimp), and then add tape to seal it up. Alternatively, I’ve also ran a ring around the inside of the ends of the scope (adhesive side out) and then folded over and added tape. |
|
|
|
|
[#28]
Thanks guys. Debated on doing my 6.8 and have finally decided to do it. Gonna practice on a paintball gun first. I'll post up when I'm done.
|
|
|
|
|
[#29]
Originally Posted By kered:
Thanks guys. Debated on doing my 6.8 and have finally decided to do it. Gonna practice on a paintball gun first. I'll post up when I'm done. |
|
|
|
AR, USA
|
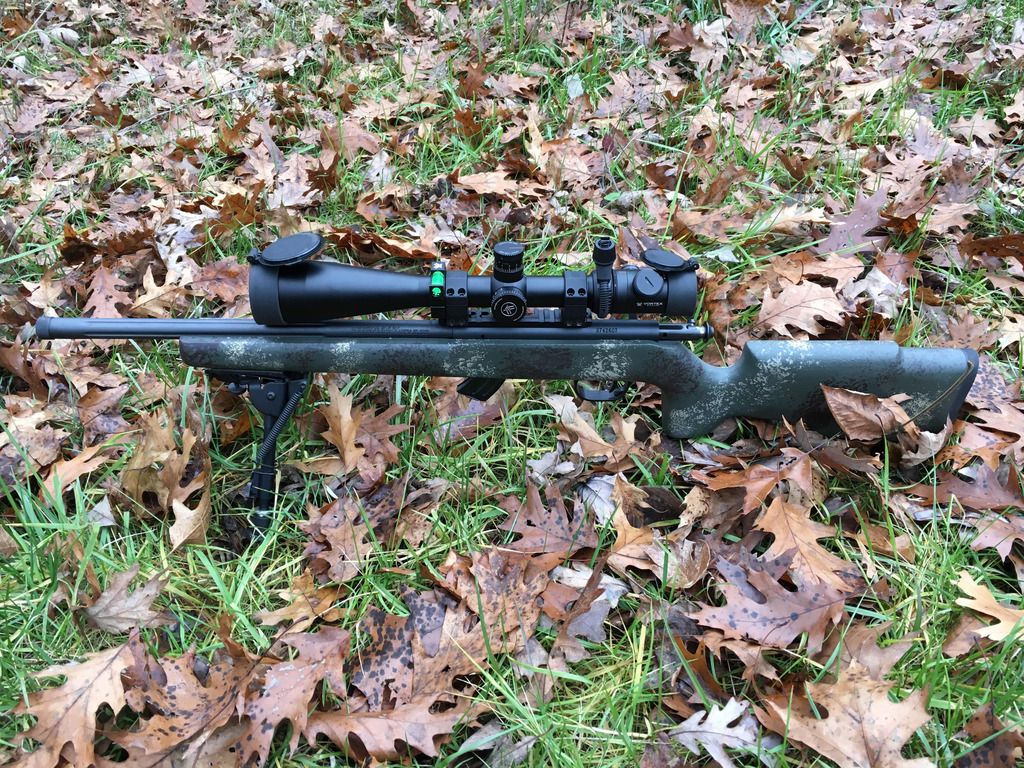
[#30]
R700 with Grayboe stock. Used large netting and small mesh to try and blend combinations of rustoleum and Aervoe colors. Wasn’t happy at all with the way it turned out so the next gun I used sponges and was much happier.


|
|
|
SC, USA
|
[#31]
Originally Posted By kered:
When you guys are painting scopes are you removing them from the rifle or just leave it on? Also are you just putting the lens caps on or taping up the glass? I cut out a circle of painters tape that’ll cover the lens but I put a bunch of cotton balls under there to prevent overspray like it was mentioned and sort of stick the tape on the cotton and affix the tape to the inside of the lens housing. I paint lens caps separately I also will tape off turret numbers, magnification settings, parallax, etc: 
|
|
|
NY, USA
|
[Last Edit: Bk0388]
[#32]
Test
|
|
|
OH, USA
|
[Last Edit: GardensandGuns]
[#34]
Havent posted in this thread since page 14-15? so i figured i would update you guys on my rattlecan projects.
I am currently practicing multicam for my next project, a manners stock
|
|
|
OR, USA
|
[#35]
Just finished up a light weight [ish] 11.3 SBR.
I think it came out OK, but I was shooting for a multicam tropic blend. Next time I'll add more olive and jungle greens. Overall quite pleased with it. 
|
|
|
TN, USA
|
[#36]
First time using Spray Paint on an AR-15. I must admit, this was an expensive build so I was a little nervous when I started.
I was going for the distressed/battle worn look. I used a plethora of techniques to get this result. How did I do? 


 Here are the "before" pictures: 

|
|
|
|
[#38]

|
|
|
|
TN, USA
|
[#39]
I started with 2 coats of dark green self-etching primer (I’ve read that it adheres better to anodizing). Then I base coated it with metallic silver and let it cure in front of a propane heater for an hour to get the bare-metal effect.
After I was satisfied that it was set enough, I’d apply foliage green to a small area and quickly remove some of it using a scotch brite pad to get that metal-under-paint effect. Some times I’d promote removal with a touch of paint thinner on the scotch Brite pad (bud not so much that you wear through the silver paint). I took my time and always just resprayed again if I wasn’t satisfied. Then end result was quite satisfying, but extremely light in tone. Next I dry-brushed some dark/OD green randomly over the surface of the rifle, trying to hit areas that would normally have less wear (nooks and crannies of the handguard, etc). This is one of those times where less-is-more and I wasn’t afraid to use paint thinner on a sponge to remove some of the paint if I felt it was too much. I also found that removal paint this way, allowed me to get patterns and effects that I never could by simply adding paint. Lastly, I painted on the rust using Aervoe red earth with a small craft brush and only accenting areas where two separate pieces of metal touched each other. The initial brushing looked way too much like I painted it on, so again I dabbed a sponge in some paint thinner and removed the brown until I got the lightest tinge of surface rust. I’d take that same sponge and dab that residual red on the open flat areas to give that hint of surface rust as well. I still need to matte clear coat it, but I was very happy with the end result. |
|
|
|
[#40]
A little disappointed in the colors. I used strictly the rustoleum camo colors and I feel everything except the dark brown and dark green is too light. There's too much contrast and I shouldve used more black. Also the humidity started making the tape come off so I got some bleed in. Oh well I'll give it another shot eventually.
|
|
|
|
|
[#41]
Originally Posted By kered:
A little disappointed in the colors. I used strictly the rustoleum camo colors and I feel everything except the dark brown and dark green is too light. There's too much contrast and I shouldve used more black. Also the humidity started making the tape come off so I got some bleed in. Oh well I'll give it another shot eventually. https://www.AR15.Com/media/mediaFiles/233493/20190209_174923-3024x2268_jpg-842823.JPGhttps://www.AR15.Com/media/mediaFiles/233493/20190211_071711-3024x2268_jpg-842824.JPG https://www.AR15.Com/media/mediaFiles/233493/20190212_001527-3024x2268_jpg-842825.JPG https://www.AR15.Com/media/mediaFiles/233493/20190212_001551-3024x2268_jpg-842826.JPG https://www.AR15.Com/media/mediaFiles/233493/20190212_001534-3024x2268_jpg-842827.JPG |
|
|
|
OR, USA
|
[Last Edit: DJTHEMAC]
[#42]
Originally Posted By kered:
A little disappointed in the colors. I used strictly the rustoleum camo colors and I feel everything except the dark brown and dark green is too light. There's too much contrast and I shouldve used more black. Also the humidity started making the tape come off so I got some bleed in. Oh well I'll give it another shot eventually. 
|
|
|
|
[#43]
Originally Posted By DJTHEMAC: Thats what I learned from my first attempt at multicam style krylon. Color Selection is absolutely key. I was going for a multicam tropic scheme on mine, but the army green top coat turned out to be much more of a "mint" color. I hit it with some brown to darken it and overall Im quite pleased. Another thing to consider is the multicam patterns don't have evenly spaced out off color patterns, rather they appear at random with mulitple colors overalapping, and then no color except for the top coat in other areas. https://photos.smugmug.com/Gun-pix/i-ZVJTNJw/0/a1b13c39/L/IMG_20190207_155850_891-L.jpg |
|
|
|
AL, USA
|
[#44]
Originally Posted By DJTHEMAC: Thats what I learned from my first attempt at multicam style krylon. Color Selection is absolutely key. I was going for a multicam tropic scheme on mine, but the army green top coat turned out to be much more of a "mint" color. I hit it with some brown to darken it and overall Im quite pleased. Another thing to consider is the multicam patterns don't have evenly spaced out off color patterns, rather they appear at random with mulitple colors overalapping, and then no color except for the top coat in other areas. https://photos.smugmug.com/Gun-pix/i-ZVJTNJw/0/a1b13c39/L/IMG_20190207_155850_891-L.jpg |
|
|
|
[#45]
Originally Posted By DJTHEMAC: Thats what I learned from my first attempt at multicam style krylon. Color Selection is absolutely key. I was going for a multicam tropic scheme on mine, but the army green top coat turned out to be much more of a "mint" color. I hit it with some brown to darken it and overall Im quite pleased. Another thing to consider is the multicam patterns don't have evenly spaced out off color patterns, rather they appear at random with mulitple colors overalapping, and then no color except for the top coat in other areas. https://photos.smugmug.com/Gun-pix/i-ZVJTNJw/0/a1b13c39/L/IMG_20190207_155850_891-L.jpg Pic thread: |
|
|
|
|
[#46]
Finished this today.


|
|
|
|
|
[#47]
|
|
|
|
|
[#48]
Originally Posted By beitodesstrafe:
Finished this today.
https://www.AR15.Com/media/mediaFiles/138374/20190218_141215-849934.jpg https://www.AR15.Com/media/mediaFiles/138374/20190218_141438-849940.jpg
|
|
|
|
|
[#49]
Originally Posted By beitodesstrafe:
Finished this today.
https://www.AR15.Com/media/mediaFiles/138374/20190218_141215-849934.jpg https://www.AR15.Com/media/mediaFiles/138374/20190218_141438-849940.jpg |
|
|
|
|
[#50]
Originally Posted By StraightMiataMan:
I'll be honest, I actually love this. May have to get my competition AR cerakoted with cherry blossoms now to match my Beretta. Originally Posted By StraightMiataMan:
Originally Posted By beitodesstrafe:
Finished this today.
https://www.AR15.Com/media/mediaFiles/138374/20190218_141215-849934.jpg https://www.AR15.Com/media/mediaFiles/138374/20190218_141438-849940.jpg |
|
|
|
 Win a FREE Membership!
Sign up for the ARFCOM weekly newsletter and be entered to win a free ARFCOM membership. One new winner* is announced every week!
You will receive an email every Friday morning featuring the latest chatter from the hottest topics, breaking news surrounding legislation, as well as exclusive deals only available to ARFCOM email subscribers.

AR15.COM is the world's largest firearm community and is a gathering place for firearm enthusiasts of all types.
From hunters and military members, to competition shooters and general firearm enthusiasts, we welcome anyone who values and respects the way of the firearm.

Subscribe to our monthly Newsletter to receive firearm news, product discounts from your favorite Industry Partners, and more.
Copyright © 1996-2024 AR15.COM LLC. All Rights Reserved.
Any use of this content without express written consent is prohibited.
AR15.Com reserves the right to overwrite or replace any affiliate, commercial, or monetizable links, posted by users, with our own.


