


AR Sponsor

Posted: 5/4/2017 5:32:54 PM EDT
|
I hope this is the right section.
I was looking at getting an AR15 upper lapping tool for my first AR15 build as it is a precision oriented build using the 6.5 Grendel. I saw Brownells had free shipping for today(use code: M5S) so i was going to purchase theirs, then i saw their reviews. It seems that it is made of soft steel so it deforms easily from use, and it seems every single one is made out of spec. Does anyone know of a good AR15 upper lapping tool that doesnt cost an arm and a leg(seriously, i am probably only going to use it once for a very long time.). Brownell's monstrosity |
|
Odds are this is the best one on the market but I see now it is no longer a stocked item and "made to order".
PTG Lapping Tool It's waaaay better than the Wheeler Engineering lapping tool and has to be better than the Brownells if theirs is soft. PTG tool worked great for me..... 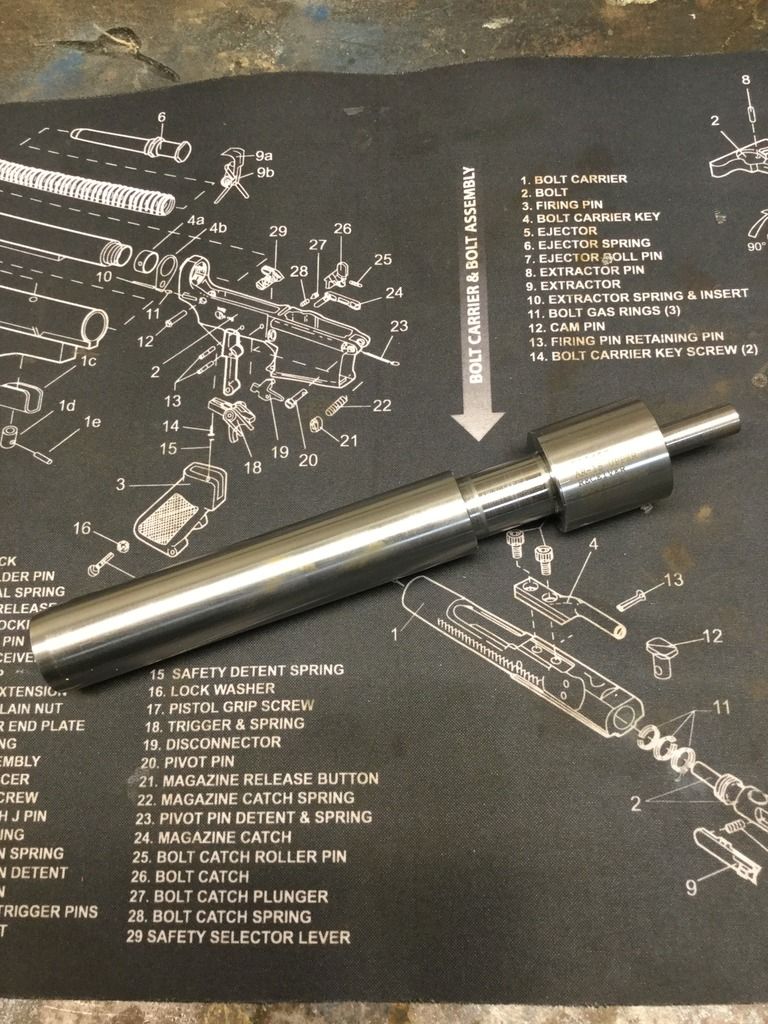

|
|
Quoted:
Odds are this is the best one on the market but I see now it is no longer a stocked item and "made to order". PTG Lapping Tool It's waaaay better than the Wheeler Engineering lapping tool and has to be better than the Brownells if theirs is soft. PTG tool worked great for me..... http://i77.photobucket.com/albums/j69/maximusscriptorius/95EA8434-A6EF-4FAF-875A-1C47F0C390CF_zpsaypsdk89.jpg http://i77.photobucket.com/albums/j69/maximusscriptorius/117B3F24-CA9A-44DC-8CA5-70E8590D8017_zpsuamjcwkb.jpg Did you use a clamshell to hold the upper receiver, or did you just chuck it up in a vise? |
| Is this something I should be doing? I have read about many times, just never tried it. Do you just coat the surface with a blue stick or something when done? I am going to research this, just need to know if I should buy one of these to make sure my Ar's hit like they should. <sorry for any hijack> |
| Like you, I'm putting together a precision build and wanted the barrel extension to be as true as possible. All of the tool for doing this have spotty reviews and I didn't want to make a bad situation worse. A member posted here about Paladin Machine Shop services and they offer receiver truing for $10 plus return shipping. Sent them 2 uppers and had them back in a couple days and the extensions came back beautifully flat. It was a light year better job than I feel I could have attained using a universal tool and valve grinding compound. They were really helpful and we were in regular contact via email. For the record, I don't work for Paladin or receive financial compensation form them. Just a guy passing along a referral that was passed to me on this board. |
|
Quoted:
Like you, I'm putting together a precision build and wanted the barrel extension to be as true as possible. All of the tool for doing this have spotty reviews and I didn't want to make a bad situation worse. A member posted here about Paladin Machine Shop services and they offer receiver truing for $10 plus return shipping. Sent them 2 uppers and had them back in a couple days and the extensions came back beautifully flat. It was a light year better job than I feel I could have attained using a universal tool and valve grinding compound. They were really helpful and we were in regular contact via email. For the record, I don't work for Paladin or receive financial compensation form them. Just a guy passing along a referral that was passed to me on this board. |
|
Quoted:
Is this something I should be doing? I have read about many times, just never tried it. Do you just coat the surface with a blue stick or something when done? I am going to research this, just need to know if I should buy one of these to make sure my Ar's hit like they should. <sorry for any hijack> We haven't even talked about bedding the barrel to the upper receiver! |
|
Quoted:
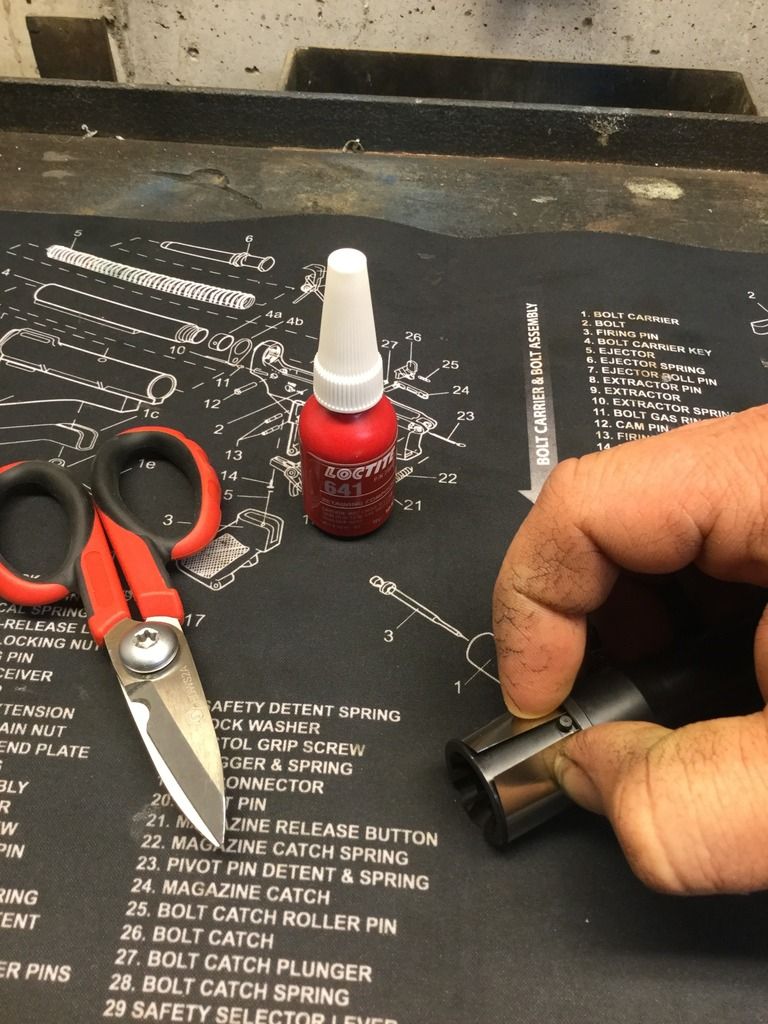
We haven't even talked about bedding the barrel to the upper receiver! I did this for the first time a few weeks ago. Not much to it. Did mine this way: To find out what shim stock to buy- took apart my feeler gauge set and wrapped an individual gauge around the barrel extension and then inserted it into the upper. In my case, a .002" feeler gauge was perfect. Ordered a sheet of .002 shim stock from McMaster Carr for $7.31 (#9011K813) and cut a strip about 15/16" wide and long enough to wrap completely around the barrel extension minus locating pin (@ 3 1/16"). After cleaning the inside of the receiver bore, the barrel extension, and both sides of the shim with degreaser (with automotive brake and parts cleaner) I spray a nice coating of Loctite Clean and Cure Primer to all of the parts and let dry. Then I coated all of the same surfaces individually with Loctite 641, wrapped the shim around the barrel extension and assembled as normal. Coating all of the surfaces will assure that there are no air gaps and you have a complete lock up and bonding of your barrel to your upper. The Clean and Cure Primer insures that Loctite will cure quickly and completely. But be careful with it- Loctite products will literally dry before your eyes when they touch it- so assemble quickly. 
|
|
Quoted:
OK- I did this for the first time a few weeks ago. Not much to it. Did mine this way: To find out what shim stock to buy- took apart my feeler gauge set and wrapped an individual gauge around the barrel extension and then inserted it into the upper. In my case, a .002" feeler gauge was perfect. Ordered a sheet of .002 shim stock from McMaster Carr for $7.31 (#9011K813) and cut a strip about 15/16" wide and long enough to wrap completely around the barrel extension minus locating pin (@ 3 1/16"). After cleaning the inside of the receiver bore, the barrel extension, and both sides of the shim with degreaser (with automotive brake and parts cleaner) I spray a nice coating of Loctite Clean and Cure Primer to all of the parts and let dry. Then I coated all of the same surfaces individually with Loctite 641, wrapped the shim around the barrel extension and assembled as normal. Coating all of the surfaces will assure that there are no air gaps and you have a complete lock up and bonding of your barrel to your upper. The Clean and Cure Primer insures that Loctite will cure quickly and completely. But be careful with it- Loctite products will literally dry before your eyes when they touch it- so assemble quickly. http://i77.photobucket.com/albums/j69/maximusscriptorius/6F904FBC-50BE-4996-BF4B-5F753CEF4493_zpsxrtocpco.jpg http://i77.photobucket.com/albums/j69/maximusscriptorius/94DFCD2B-9053-4A34-BA75-4F7AED44C1E7_zpsgm19api9.jpg Quoted:
Quoted:
We haven't even talked about bedding the barrel to the upper receiver! I did this for the first time a few weeks ago. Not much to it. Did mine this way: To find out what shim stock to buy- took apart my feeler gauge set and wrapped an individual gauge around the barrel extension and then inserted it into the upper. In my case, a .002" feeler gauge was perfect. Ordered a sheet of .002 shim stock from McMaster Carr for $7.31 (#9011K813) and cut a strip about 15/16" wide and long enough to wrap completely around the barrel extension minus locating pin (@ 3 1/16"). After cleaning the inside of the receiver bore, the barrel extension, and both sides of the shim with degreaser (with automotive brake and parts cleaner) I spray a nice coating of Loctite Clean and Cure Primer to all of the parts and let dry. Then I coated all of the same surfaces individually with Loctite 641, wrapped the shim around the barrel extension and assembled as normal. Coating all of the surfaces will assure that there are no air gaps and you have a complete lock up and bonding of your barrel to your upper. The Clean and Cure Primer insures that Loctite will cure quickly and completely. But be careful with it- Loctite products will literally dry before your eyes when they touch it- so assemble quickly. http://i77.photobucket.com/albums/j69/maximusscriptorius/6F904FBC-50BE-4996-BF4B-5F753CEF4493_zpsxrtocpco.jpg http://i77.photobucket.com/albums/j69/maximusscriptorius/94DFCD2B-9053-4A34-BA75-4F7AED44C1E7_zpsgm19api9.jpg |
|
Quoted:
OK- I did this for the first time a few weeks ago. Not much to it. Did mine this way: To find out what shim stock to buy- took apart my feeler gauge set and wrapped an individual gauge around the barrel extension and then inserted it into the upper. In my case, a .002" feeler gauge was perfect. Ordered a sheet of .002 shim stock from McMaster Carr for $7.31 (#9011K813) and cut a strip about 15/16" wide and long enough to wrap completely around the barrel extension minus locating pin (@ 3 1/16"). After cleaning the inside of the receiver bore, the barrel extension, and both sides of the shim with degreaser (with automotive brake and parts cleaner) I spray a nice coating of Loctite Clean and Cure Primer to all of the parts and let dry. Then I coated all of the same surfaces individually with Loctite 641, wrapped the shim around the barrel extension and assembled as normal. Coating all of the surfaces will assure that there are no air gaps and you have a complete lock up and bonding of your barrel to your upper. The Clean and Cure Primer insures that Loctite will cure quickly and completely. But be careful with it- Loctite products will literally dry before your eyes when they touch it- so assemble quickly. http://i77.photobucket.com/albums/j69/maximusscriptorius/6F904FBC-50BE-4996-BF4B-5F753CEF4493_zpsxrtocpco.jpg http://i77.photobucket.com/albums/j69/maximusscriptorius/94DFCD2B-9053-4A34-BA75-4F7AED44C1E7_zpsgm19api9.jpg I ask because I'm very interested in this technique and will likely try it myself. Also is your barrel new and if not did you happen to record its accuracy for a before and after comparison? |
|
Quoted:
When you used the feeler gauge, how did you know that you had the right one? I ask because I'm very interested in this technique and will likely try it myself. Also is your barrel new and if not did you happen to record its accuracy for a before and after comparison? At first I thought the upper receiver was out of spec but I tried the barrel (LaRue Stealth 20") in three other uppers and it had the same fit so instead of searching for another upper that was at the bottom of the spec for the bore diameter, I decided to bed it. This was a fresh build so I don't have a "before and after" story. The affect that this has on accuracy is probably debatable and don't even know if I can shoot well enough to see the merits of this procedure. I just wanted to remove one more variable from the precision shooting formula so I can always fall back on "its me-not the gun". If the gun is right, it must be the shooter References: Hellbenders Guide Archived thread |
|
When shimming a barrel extension, don't go crazy and make the extension so large in diameter that you have to pound it in. And once you've applied the shim, take care to align the barrel very carefully as you start it in the upper.
Shims are worlds more precise than using any form of thread locker or epoxy compound for "bedding" an AR barrel in the upper. And frankly, if you're going to take the time to true the face of your upper, it shouldn't be any problem to take the time to effectively and properly center the barrel in the upper. |
| My calipers and micrometer never left the drawer when I did this. It was done by feel. The bottom line is that the barrel still has to slide into the upper receiver using hand pressure. You'll know that you have the right shim when you can still assemble easily and most or all of the slop is gone. |
|
Quoted:
I maybe doing something wrong. I just measured my barrel extension and the upper receiver. For the barrel extension i got 1.002 inches, for the Anderson upper receiver i got .998 inches.  |
|
Quoted:
When shimming a barrel extension, don't go crazy and make the extension so large in diameter that you have to pound it in. And once you've applied the shim, take care to align the barrel very carefully as you start it in the upper. Shims are worlds more precise than using any form of thread locker or epoxy compound for "bedding" an AR barrel in the upper. And frankly, if you're going to take the time to true the face of your upper, it shouldn't be any problem to take the time to effectively and properly center the barrel in the upper. I just cut a notch in the shim for the alignment pin before wrapping it around the extension and lightly tap the barrel in with a wooden mallet. Slides right in. I have the Wheeler lapping tool and it wobbles way too much with the flexible shaft. I'm cutting the flex shaft off before using it again and chuck the drill to the remaining hex nut. |
|
Quoted:
Like you, I'm putting together a precision build and wanted the barrel extension to be as true as possible. All of the tool for doing this have spotty reviews and I didn't want to make a bad situation worse. A member posted here about Paladin Machine Shop services and they offer receiver truing for $10 plus return shipping. Sent them 2 uppers and had them back in a couple days and the extensions came back beautifully flat. It was a light year better job than I feel I could have attained using a universal tool and valve grinding compound. They were really helpful and we were in regular contact via email. For the record, I don't work for Paladin or receive financial compensation form them. Just a guy passing along a referral that was passed to me on this board. |
|
Hello All,
As some of you know I have several builds and upgrades going on right now. I want them as precise as possible. I want to do this lapping process but I am finding too much contradicting information. I understand you need a quality tool, I will get that. 1. However, I don't understand about the compounds, what are good to use? Brownells sells a 600 grit one - is this what I want? 2. Also, I understand I need to "bed the barrel," after this is done. Many use Loctite 620 - is this correct? 3. I understand that bedding it is mainly putting the Loctite on the extension liberally and inserting it - am I wrong here? I appreciate the help so much! |
|
Quoted:
2. Also, I understand I need to "bed the barrel," after this is done. Many use Loctite 620 - is this correct? I square the front of my receivers with the Brownells lapping tool but I don't bother to bed the barrel. |
|
I appreciate that advice, I am thinking about it but not sure on the bedding. Also I am still unsure on this:
1. However, I don't understand about the compounds, what are good to use? Brownells sells a 600 grit one - is this what I want? 2. Also, I understand I need to "bed the barrel," after this is done. Many use Loctite 620 - is this correct? (May need to, hearing I don't have to) 3. I understand that bedding it is mainly putting the Loctite on the extension liberally and inserting it - am I wrong here? Thanks in advance guys |
|
Quoted:
I have the Wheeler lapping tool and it wobbles way too much with the flexible shaft. I'm cutting the flex shaft off before using it again and chuck the drill to the remaining hex nut. ALL you need to do is to make the face of the upper true to the bore. That could mean just taking off some uneven anodizing. You do not need to have shiny aluminum all the way around for the face to be square and true to the bore. Doing the task by hand will encourage you to turn a little, check often, and be as conservative as possible. |
|
yes, that's the guy.
i use a cordless drill, at very low speed. how slow? only way i can describe it as maybe 1 rpm, in that ball park. pretty slow. i don't think it's more than 2 rpm. mainly to keep the heat out of the compound and surface, otherwise weird things happen that are not good: galling, which then leads to chunking, which may then cause depression. and even with the cordless drill, it still takes about half hour to do one. lapping for about 15-30 seconds, pull it back about 3/4", un-chuck the drill, get some Q-tips and wipe the receiver face carefully to inspect the progress (flashlight helps). carefully dab some more lapping compound onto the tool face with a small flat-blade screwdriver, resume. it's not a fast process. it is tedious. it's been about 5-10 iterations for one upper, for me. when you pull the tool back to check the progress, you have to keep the mandrel away from the accumulating lapping compound at the receiver face, otherwise the mandrel will take the lapping compound into the bore when you push it back in to resume. and then you have circular marks in the bore anodizing which are there forever, seen by you every time you pull the bolt back on your project AR to personally remind you. if you got all of this stuff laid out and set up, you might as well do more than 1 stripped upper while you're at it, make it worth your while. you know, for future builds. because, nobody builds just one AR upper and stops there. |
|
compounds:
i've used the Brownells 600 grit garnet lapping compound with good results. i've also used automotive Loctite Clover silicone carbide grease mix 180 grit with, fair-to-good results. they both work, resulting in a flat surface that's truer than original, obviously the finer compound gives you a smoother surface. i don't think it takes that much longer with the fine grit because the time consuming part is the interruptions to do the progress inspection. when the barrel extension crushes onto the lapped receiver face, i don't think it really cares whether it was lapped with 600 grit, or 180 grit. i use the brownells tool, and the PTG tool. i had one (and only 1) instance where the PTG would not fit the bore, but the brownell's did, smoothly. so i checked the receiver fit with the intended BCG and it's fine. so, no issues. it was a discovery. i've been using the PTG though, mainly, it's newer (less worn face). the PTG also has a longer shank, that helps with getting the drill lined up, collinear with the receiver bore, otherwise your hands will detect the wobble when you start, but, no biggie. i lightly grease the receiver bore, and the mandrel on the tool with plain old wheel bearing grease (not the expensive stuff). |
|
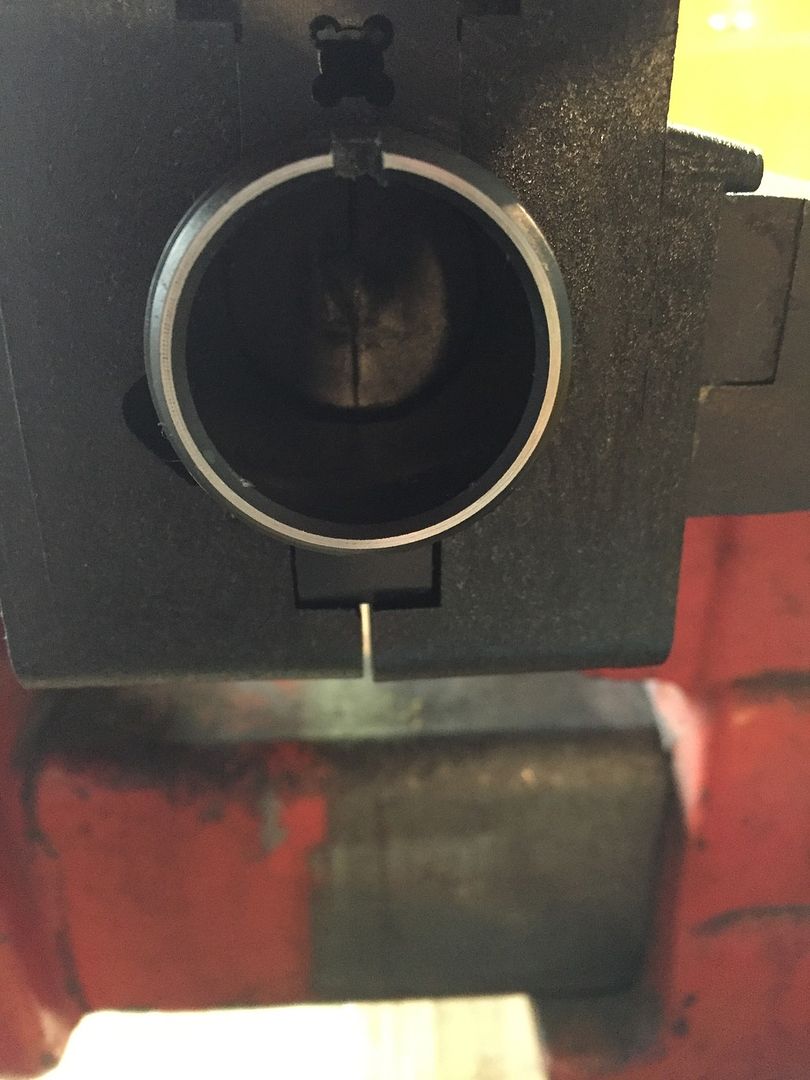
The problem I see with these lapping tools is that there is no way to check concentricity.
Unless the upper is put on a lathe and that surface is measured with a dial indicator there is no way to check how true that surface is. I've got two stripped uppers I want do this to but I don't have access to lathe or a mill or a dial indicator. I think I'm going to find a place that does this. |
| I bought the tool from Brownell's and the compound, 600 grit. I am going to see how it works. I figure if I go slow I can do a decent job. I was going to send my receivers off and have it done, but I just did not want to send so many of them off at once to get the 10 dollar price and I honestly have many to do. We will see if I regret this or not. I imagine if I go slow, and perhaps use it vertically as to allow gravity to assist me, I could do it. I bet I can turn it by hand. I don't have a problem spending an hour per receiver. Let's hope the tool from Brownell's is not subpar. Some seem to have great results, others, not so much. I will report back. The only thing that bugs me is that I have no way of making sure the surface is true, the machine shop would have ensured that - but again, I just did not want to send that many receivers out. Also, I just sent a barrel out to have it coated and the company apparently was closed when the postal worker came by and they left one of those notices...so now my barrel is floating between the post office and the company...I am kicking myself for not having it cerekoted locally now.... |
|
Quoted:
I'm guessing that there is something going on with your measurements because this indicates an interference fit of .004 inches. If your barrel slips into your upper easily then your measurements are off. If not then you have no reason to shim. Barrel goes in the freezer and upper gets heated with a heat gun or goes in the oven. Once you put it together and the temperatures stabilize, you are bedded. Quoted:
Quoted:
I maybe doing something wrong. I just measured my barrel extension and the upper receiver. For the barrel extension i got 1.002 inches, for the Anderson upper receiver i got .998 inches. |
|
Quoted:
Okay, I am probably going to send mine off to have them done. Let me ask this, what about the missing anodizing? Do you take a touch-up pin to it? I want to keep it from corroding. |
|
Before lapping your upper, you might consider this feedback from 2A-Armament:
http://www.ar15.com/forums/t_2_493/269790_Do-I-need-to-lap-a-Balios-Lite-upper-.html "One thing to consider, and BK already hit it in a more technical sense, is this.... If the lapping tool can fit down the bore, it means that it's sitting inside that bore at an angle. even if it's a thousandth out on that bore, it will translate to a thousandth or more! out of square at the face of that receiver. You could be doing damage by lapping that face. EDIT: After looking at these tools on line, I am going to go ahead and say that they are in fact TAKING THE FACE OUT OF SQUARE of the bore! The bore dimension for the extension is tighter than the dimension on the carrier bore. If you look at these tools, the pilot is inserted, and skips past the tightly held extension bore, and goes into the looser dimensioned carrier bore. So as this tool falls into the carrier bore, it is forcing the laping face out of square with the extension bore. Ryan " |
|
Quoted:
Before lapping your upper, you might consider this feedback from 2A-Armament: http://www.ar15.com/forums/t_2_493/269790_Do-I-need-to-lap-a-Balios-Lite-upper-.html "One thing to consider, and BK already hit it in a more technical sense, is this.... If the lapping tool can fit down the bore, it means that it's sitting inside that bore at an angle. even if it's a thousandth out on that bore, it will translate to a thousandth or more! out of square at the face of that receiver. You could be doing damage by lapping that face. EDIT: After looking at these tools on line, I am going to go ahead and say that they are in fact TAKING THE FACE OUT OF SQUARE of the bore! The bore dimension for the extension is tighter than the dimension on the carrier bore. If you look at these tools, the pilot is inserted, and skips past the tightly held extension bore, and goes into the looser dimensioned carrier bore. So as this tool falls into the carrier bore, it is forcing the laping face out of square with the extension bore. Ryan " |
| While I understand the technical argument when things are boiled down to the science of math and measurements.......but........experience is showing that home assemblers are resolving issues with rear sights that are getting cranked all the way to one side or another just to get a zero. I've said before- you would have to be awful careless or have a tool which is out of spec to ruin an upper from lapping. I don't see what it hurts. If you think it's snake oil- don't do it. |
|
Quoted:
While I understand the technical argument when things are boiled down to the science of math and measurements.......but........experience is showing that home assemblers are resolving issues with rear sights that are getting cranked all the way to one side or another just to get a zero. I've said before- you would have to be awful careless or have a tool which is out of spec to ruin an upper from lapping. I don't see what it hurts. If you think it's snake oil- don't do it. The precision of that tool is only going to be as precise as your eyeball, unless you can can see the differences in tolerances in the tenths of thousandths of inch. In this case we have two tolerances to be concerned about, a radial and a face to face. If one of them is not correct it completely negates the other. Putting that upper on a lathe and using a dial indicator to check the concentricity of both dimensions is the only correct way to do this properly. That second part, why bother doing anything if you're not going to try and do it correctly? |
|
Quoted:
I don't think you do. The precision of that tool is only going to be as precise as your eyeball, unless you can can see the differences in tolerances in the tenths of thousandths of inch. In this case we have two tolerances to be concerned about, a radial and a face to face. If one of them is not correct it completely negates the other. Putting that upper on a lathe and using a dial indicator to check the concentricity of both dimensions is the only correct way to do this properly. That second part, why bother doing anything if you're not going to try and do it correctly? Quoted:
Quoted:
While I understand the technical argument when things are boiled down to the science of math and measurements.......but........experience is showing that home assemblers are resolving issues with rear sights that are getting cranked all the way to one side or another just to get a zero. I've said before- you would have to be awful careless or have a tool which is out of spec to ruin an upper from lapping. I don't see what it hurts. If you think it's snake oil- don't do it. The precision of that tool is only going to be as precise as your eyeball, unless you can can see the differences in tolerances in the tenths of thousandths of inch. In this case we have two tolerances to be concerned about, a radial and a face to face. If one of them is not correct it completely negates the other. Putting that upper on a lathe and using a dial indicator to check the concentricity of both dimensions is the only correct way to do this properly. That second part, why bother doing anything if you're not going to try and do it correctly? Doing something correctly or "by the books" is always preferable. But sometimes the improvise-overcome-adapt mindset works too. I can't count how many times I've done a repair with a carbide burr in a die grinder and a welder- and it should have been done in a machine shop. But it worked.... |
|
Quoted:
I'll stand by what I said....and the purpose of the tool in my opinion is to bring the upper CLOSER to the spec, which it has proven itself to do. No, it won't do what a lathe and precision measuring instruments will do and I didn't say that. Doing something correctly or "by the books" is always preferable. But sometimes the improvise-overcome-adapt mindset works too. I can't count how many times I've done a repair with a carbide burr in a die grinder and a welder- and it should have been done in a machine shop. But it worked.... Before you machine to any metal surface the very first thing that you need to know is how much metal needs to be removed, in this case its the concentricity the face of that upper followed by the inside diameter of the upper that your barrel is going to be mated to. Without knowing any of that its quite possible that you have made the barrel/ receiver alignment even worse than it was. |
|
Quoted:
Yep. I've never understood why someone wants to take an item that's been CNC machined, and try to hand lap it square. Quoted:
Yep. I've never understood why someone wants to take an item that's been CNC machined, and try to hand lap it square. Like people who still insist on lapping scopes and rings. Time to let go. |
| My intent when I had my uppers machined flat was to take away as many of the variables in regards to the rifle that I could. There are too many reviews concerning the commercially availiable lapping tools that I knew I may only make the situation worse. To me, it made more sense to spend the $10 per upper to have a machinist use the proper tool for the job and mill the face dead nuts flat. Both my uppers needed some material removed. Both were expensive billet and we're presumed to be totally in spec. Besides, after you buy the tool and do it, your always gonna ask yours if all you did was remove the anodizing or did you make the face flat?? Good luck all. |
|
Quoted:
Before lapping your upper, you might consider this feedback from 2A-Armament: http://www.ar15.com/forums/t_2_493/269790_Do-I-need-to-lap-a-Balios-Lite-upper-.html "One thing to consider, and BK already hit it in a more technical sense, is this.... If the lapping tool can fit down the bore, it means that it's sitting inside that bore at an angle. even if it's a thousandth out on that bore, it will translate to a thousandth or more! out of square at the face of that receiver. You could be doing damage by lapping that face. EDIT: After looking at these tools on line, I am going to go ahead and say that they are in fact TAKING THE FACE OUT OF SQUARE of the bore! The bore dimension for the extension is tighter than the dimension on the carrier bore. If you look at these tools, the pilot is inserted, and skips past the tightly held extension bore, and goes into the looser dimensioned carrier bore. So as this tool falls into the carrier bore, it is forcing the laping face out of square with the extension bore. Ryan " I've lapped a few that were way off, like 15+ clicks of windage to get zeroed. After lapping, only 1 or 2 clicks if any. Sometimes I don't remove all the anodizing. There's one important thing to check before lapping. You need to insert the barrel extension into receiver and look at the feed ramps to make sure there's a little bit of room for lapping. If you remove to much material during lapping, the ext feed ramps will hang over the receivers feed ramps. Should be very little to no set-back if done correctly. Always lube the shaft and inside of receiver before lapping. I have all 3 lapping tools mentioned in this thread, they all work just fine. ETA: There's a great tutorial on here from one of our long time respected members but I can't find it at the moment. |


|
Quoted:
Odds are this is the best one on the market but I see now it is no longer a stocked item and "made to order". PTG Lapping Tool It's waaaay better than the Wheeler Engineering lapping tool and has to be better than the Brownells if theirs is soft. PTG tool worked great for me..... http://i77.photobucket.com/albums/j69/maximusscriptorius/95EA8434-A6EF-4FAF-875A-1C47F0C390CF_zpsaypsdk89.jpg http://i77.photobucket.com/albums/j69/maximusscriptorius/117B3F24-CA9A-44DC-8CA5-70E8590D8017_zpsuamjcwkb.jpg |
|
Quoted:
http://i837.photobucket.com/albums/zz300/rpol98/G%20and%20A/031725b1-c10c-4c40-9960-b1a0b31b4dfd_zpsu4omqxto.jpg 9mm: no gas tube http://i837.photobucket.com/albums/zz300/rpol98/G%20and%20A/65c6a53f-e85c-4c46-83de-41b37de6d1e5_zps9xgg5au2.jpg http://i837.photobucket.com/albums/zz300/rpol98/G%20and%20A/6619e451-805d-4d69-aecb-89635cf98e04_zpskjtdv13m.jpg http://i837.photobucket.com/albums/zz300/rpol98/G%20and%20A/8218974e-70a4-45c1-b787-6b1c2c35444e_zpsjlnqzj3z.jpg Thanks for sharing your pictures! |
AR Sponsor