


AR Sponsor


Posted: 6/21/2010 5:47:04 PM EDT
| I need some advice form anyone that has used Duracoat or has experience with it. I am getting ready to color up one of my ar's and need some pointers on Duracoat.I have been doing some reading and can use a spraygun or airbrush,but any tips or advice would be greatly appreciated.I have found there is more knowledge on this site than anywhere on the web.Thanks in advance. |
|
I just applied Duracoat to a few pieces this past weekend. This was my first experience with Duracoat. It was a learning experience for me, so i will share what I learned.
-Prep your parts well. Everything I've read about applying Duracoat - from Lauer custom Weaponry and from users on a variety of different forums - stressed not to skimp at all on the degreasing and surface prep steps. I used Lauer's TruStrip, and actually went over all the parts twice on two different occasions. -Duracoat is sticky just after it is applied. I made the big mistake of trying to dab some pooling off my lower, and nowhave a bunch of lint stuck in the finish. Nothing that some 600 grit sand paper won't fix, though. And although I my best to manipulate the parts by putting my hands/fingers into ends or cavities, my nitrile gloves still stuck to the finish along the edge. Those places were easily touched up after the initial coating was dried to the touch. -Duracoat recommends roughing up plastic with something like a Scotchbrite pad. Just don't lean on the pad too much. My A1 stock feels slightly rough. While that is great for grip, I think I'll wet sand the cheek weld area a little bit to smooth it out. -If you have an airbrush already, that's great. Being new to the whole process, I purchased Lauer's EZ Finishing Kit, which included everything needed to do the job - in theory. I had read several reviews of the kit that stated the included airbrush was junk. Not al reviews poo-pooed the airbrush though, so I decided to try my luck. I lost. The paint bottle (plastic fitting) wouldn't fit into the brush; even after some sanding work on the fitting. The airbrush hose fittings wouldn't turn all the way onto the can valve or the brush. Also, the included valve for the canned air wouldn't turn all the way down onto the can, and leaked badly. I spent $19.75 on a Coleman Powermate Airbrush Kit, and all of its components worked beautifully. -Watch your spray distance. I think ideally you should be 4"-6" away from the object you are coating. I suck at painting, and that is why I had my problem with the lower receiver. I coated my parts outside on our deck. I hung the parts in a box. The box prevented me from Duracoating our deck. Hanging the parts allowed me to manipulate them easier during the coating process. The box: 
Some pics: 


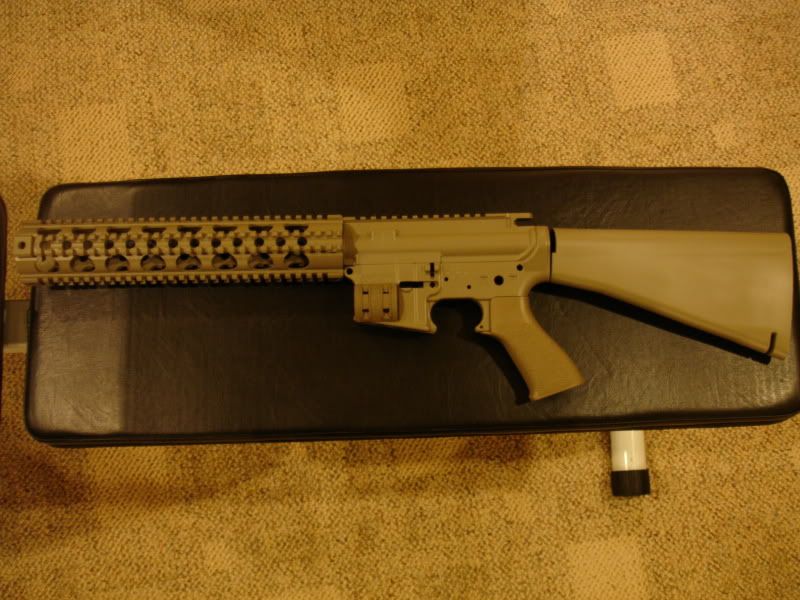
Overall, despite my own screwups, I am pleased with the Duracoat and its process. I used the Magpul FDE color. In real life (the flash really washes out the color), it is a little bit lighter than the actual Magpul FDE, as seen by the XTM rail panel onthelower receiver. I'm OK with that. Have fun with your project, lastchance. |
|
My best advice is to skip past your Duracoat learning experience and skip ahead to the Norrell’s moly resin or Ceracoat.
Duracoat should really be called Notsoduracoat IMO. If you are already committed and are dead set on using it here are a few pointers… 1] Duracoat is compatible with lacquer thinner… have plenty on hand 2] Sandblast with 70 grit aluminum oxide 3] CLEAN… CLEAN… CLEAN… CLEAN that substrate before you shoot it. 4] Keep the substrate at about 100 deg f it helps the solvents evaporate when they hit the substrate and keeps your coats even… 5] Have a clean dust free place to hang the items… DUST FREE!!!! A very clean large cardboard or sheet metal box works good… one that you can close up works better… one that you can stick a hair dryer in… better yet. 6] Even with heat accelerated curing that stuff will take a few months to “completely” cure… so, don’t treat it rough for a while… and even then duracoat isn’t very durable in my experience. 7] CLEAN… as in no fingerprints, no oil, no dust… CLEAN CLEAN CLEAN! |
|
Quoted:
My best advice is to skip past your Duracoat learning experience and skip ahead to the Norrell’s moly resin or Ceracoat. Duracoat should really be called Notsoduracoat IMO. If you are already committed and are dead set on using it here are a few pointers… 1] Duracoat is compatible with lacquer thinner… have plenty on hand 2] Sandblast with 70 grit aluminum oxide 3] CLEAN… CLEAN… CLEAN… CLEAN that substrate before you shoot it. 4] Keep the substrate at about 100 deg f it helps the solvents evaporate when they hit the substrate and keeps your coats even… 5] Have a clean dust free place to hang the items… DUST FREE!!!! A very clean large cardboard or sheet metal box works good… one that you can close up works better… one that you can stick a hair dryer in… better yet. 6] Even with heat accelerated curing that stuff will take a few months to “completely” cure… so, don’t treat it rough for a while… and even then duracoat isn’t very durable in my experience. 7] CLEAN… as in no fingerprints, no oil, no dust… CLEAN CLEAN CLEAN! I agree. Norrell's is the best and most durable finish that I have used. Goes on smoother and easier than Duracoat. I don't like DC because I have yet to see a DC job that did not either have the orange peel look or looked like it was 3 feet thick. Degrease the parts with brake cleaner or lacquer thinner, pre-heat to 100 degrees, apply desired color, bake for 300, let cool and put it back together. They even have air dry for plastic parts. |
|
What about the NIC Cerakote?
http://www.nicindustries.com/firearm_coatings.php |
| I've done many guns with duracoat. All comments posted are pretty accurate, laquer thinner will even strip a lower 3 months post spraying. I got a complete airbrush/ compressor kit from harbor frieght for $80, it works well but gets clogged and machine guns instead of flamethrowers if that makes sense. Use less hardener in this case. WAIT the cure time. I've had to touch up stuff for one guy 3 times because he is impatient. |
|
Cerakote is good stuff, but it is more expensive, takes more expensive equipment to spray, and harder to cook. For the DIY home job Norrell’s is the way to go… |
AR Sponsor