


AR Sponsor

[ARCHIVED THREAD] - 0% lower finally completed. (Page 1 of 2)
Posted: 2/24/2010 10:42:51 AM EDT

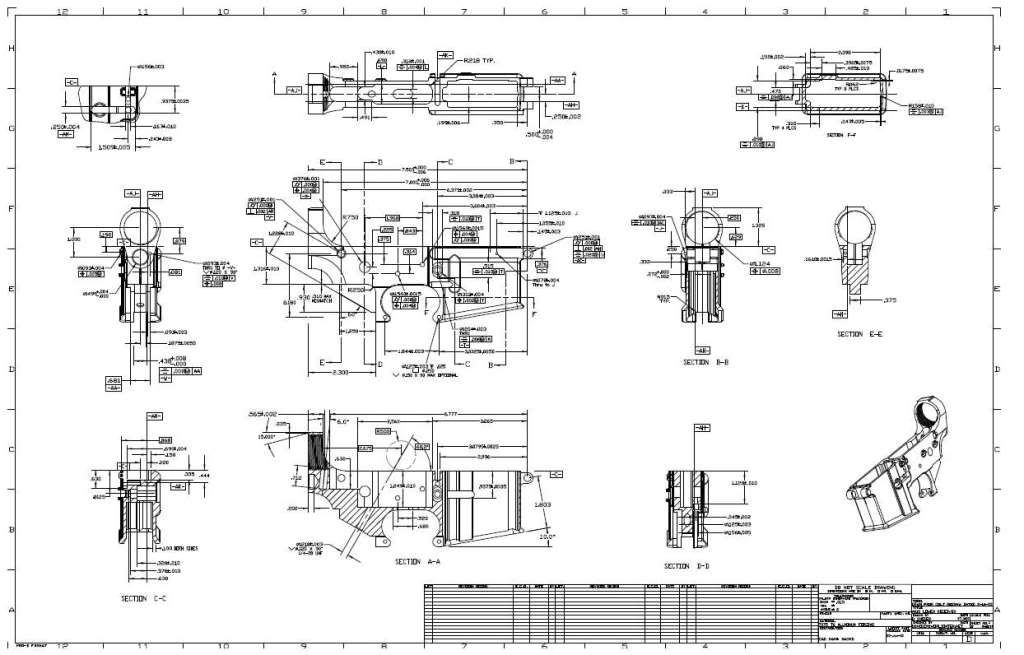
I bought a DSA forging a while back and now that I have DRO for the mill, I figured I would give it a go using the Ray-Vin Tutorial 
For this project, I used my Enco RF45 clone with Digital ReadOut. 
After making the jig plates per the instructions, I started by milling the top deck, and front and back of the buffer tower. The instructions call for a 1" cutter and then doing the .75" radius in steps. I didn't have a 1" cutter, so I decided that since I had to order one anyways, I would get a 1.5" cutter and not bother with stepping through the radius. Just remember to change the start points to match the new cutter diameter. 
So far, so good. 
Having previously indicated the right angle plate, I clamped the lower up to the plate and indicated it for plane as well. 
Take down and pivot pin holes are drilled and now I need to mill the Pistol grip boss, bolt catch and magazine catch, as well as drill holes for the hammer, trigger, selector and rear TG pins. 
So far everything fits nicely. 
Right side milling of pivot pin areas, mag catch button and front trigger guard pin hole. Next stop, the buffer tower. 
I don't have a boring bar yet, so I had to drill for the buffer tube. I started with a center drill followed by a ¼" pilot hole. 
With everything still locked down from the pilot hole, I chucked up that big drill. It makes the table wiggle on this smallish mill. 
Buffer hole and rear take down detent hole drilled. 
Tapped for buffer and then used a ½" endmill for the stock locator hole. 
Buffer tube threads in as it should. 
Everything fits up nicely. The grip screw hole is not yet drilled/tapped but I wanted it on for the pic) ;) 
Front detent hole is drilled. 
Milled out the slot for the front lug of the upper. 
I couldn't resist milling out the rear take down pocket, so I could mate up upper and lower for the first time. It fits tight and the front and rear TD pins are snug, but not tight. 
Finished milling the pistol grip boss and drilled and tapped for the PG screw. 
On to the buffer retainer. I used a long reach ¼” end mill to get past the threads, then a ¼" drill for the buffer retainer and spring. Installed the tube with buffer and spring and the retainer holds it the way it is supposed to. 
Installed the complete upper, PG and stock assembly to check buffer/carrier alignment. Slides the way it ought to without any drag. Next I guess I will have to get on with the mag well. 
As mentioned in the tutorial, the quickest way to remove material is with a drill. The small holes are to locate the corners of the mag well and the large ones are for the initial rough out. 
3/4" endmill was used to further rough out the magwell. 
That went well. Now I will finish the rough out with a 3/8" endmill. 
Then finish up with a file. 
And what do you know? The magazine fits! 
Next I finished off the bolt catch slot. 
Now it is time to finish up the fire control group pocket. I rough drilled out all that I could with the ½" drill. 
Then finished it off with an endmill. 
Flipped it over to mill the Trigger guard slot and trigger hole and drill the selector detent hole. 
Fire control pocket finished and FCG installed. A quick function check shows that FIRE releases the hammer when trigger is depressed then the disconnector catches it for reset. SAFE is what it is supposed to be. 
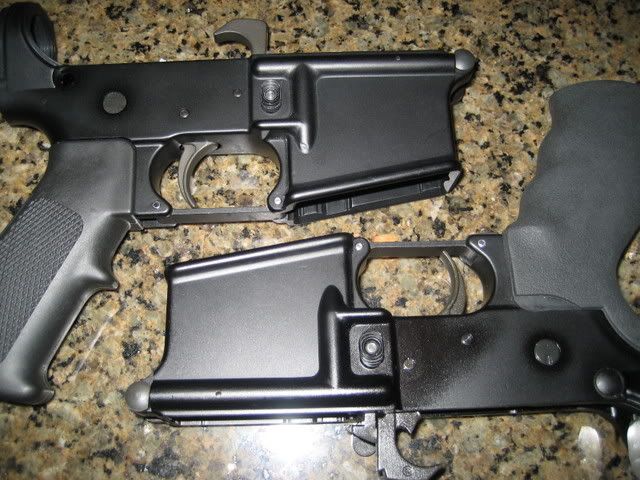
Completed and everything functions as it should. Trigger guard pin and bolt catch pin will not be installed until after I the finish is applied. 
You won’t save any money doing it this way but it is kind of nice to say I really “made” the lower. TheOtherChris |

|
Quoted: Any idea if this could be done with a dremel and set of appropriate files? I'm thinking about trying this while I'm at college and have alot of spare time. If you want a paperweight... Even current 80%'s require a good bit of milling. ETA: Nice work OP I've done a few 80%'s myself |
|
wow youre an animal. I would mill out the mag and fcg pockets first, then do all the gravy stuff. I think I would be more afraid of messing up those and ruining the blank. why do you drill with a drill first, then end mill? doesnt that make it mill roughly? I would think that milling through material with holes would make it mill hard. or is that easier? How much could I get a mill that would be capable of doing this work? whats the cheapest I could get away with? how do you know where to mill? how do you locate the holes so precisely? Man, I would love to learn how to do this.
thanks. |

|
Quoted:
wow youre an animal. I would mill out the mag and fcg pockets first, then do all the gravy stuff. I think I would be more afraid of messing up those and ruining the blank. why do you drill with a drill first, then end mill? doesnt that make it mill roughly? I would think that milling through material with holes would make it mill hard. or is that easier? How much could I get a mill that would be capable of doing this work? whats the cheapest I could get away with? how do you know where to mill? how do you locate the holes so precisely? Man, I would love to learn how to do this. thanks. Whoa. Slow down there. 
Drilling the take down pin holes first is important because the front pin is a reference for a lot of the subsequent operations. While you have the piece clamped on its side, you might as well do the TG pin holes too because it is easier to drill a block than through those 'ears' (after milling) and since you're there, you might as well do the rest of the operations, rather than repeating the same set-up later. When you hit those drilled holes when milling, it is no big deal as long as the piece is securely clamped. The fastest way to remove material other than using a wire EDM) is with a drill. That is why I used it to remove the most of the magwell. Besides, drills are cheap and cutters are not. After drilling, I PLUNGE what's left with the 3/4" endmill to remove enough of the irregularities of the wall to allow side milling. Also, you have to drill the corners of the magwell before milling. As pointed out in an earlier post, you "know where to mill by either following the print or the Ray-Vin Tutorial mentioned in the OP. The DigitalReadOuts allow me to locate the tooling precisely. My set reads out to 0.0005" and I would not have attempted this without it. I did an 80% (without jigs) before just using caliper and vernier scales on the mill and it turned out fine, but there are a lot less operations with that. |

|
Quoted:
Quoted:
How many hours would you estimate it took you? Strictly a WAG, but about 8 hours. As I said, you won't save any money doing your own and I probably won't be doing any more, (Though I will supervise my sons and daughter to do their own) I ask because my uncle did on last year, and I bought 5 for myself, but I work for a manufacturing and design company and get to play with CNC. So when I have time I’m going to machine all them out. Possible see if I can design a large jig to do multiple lowers at one time. |
| How did you drill the magazine catch roll pin hole? from the front or the back, and did you need a foot long drill bit? that must have been scary. what are the benefits of this besides feeling real awesome about yourself? that its cheap and you dont need a serial number. if you had a ffl with a manufacturers designation, could you sell that bad boy? Thanks. |
|
Quoted: How did you drill the magazine catch roll pin hole? from the front or the back, and did you need a foot long drill bit? that must have been scary. what are the benefits of this besides feeling real awesome about yourself? that its cheap and you dont need a serial number. if you had a ffl with a manufacturers designation, could you sell that bad boy? Thanks. .093" Aircraft drill, i believe. I bought 4 for around $3 apiece. They have a 1.5" fluted section and a 5" shank. Just ping your center point with a punch so it doesn't walk on the drafted surface. (and i drilled my 80%'s from the rear) |


|
Quoted:
How did you drill the magazine catch roll pin hole? from the front or the back, and did you need a foot long drill bit? that must have been scary. what are the benefits of this besides feeling real awesome about yourself? that its cheap and you dont need a serial number. if you had a ffl with a manufacturers designation, could you sell that bad boy? Thanks. Yep, I used an aircraft drill. As described above, they're just a long shank drill. Center punched it hard and then drilled. Set-up was with the top deck against the angle plate as shown in the pic where I drilled the buffer tower. Personally, I consider not having a serial number a definite draw- back because most LEOs don't know that it does not have to have one but will assume you have removed it, which is a crime. If I wanted to have it without a paper trail, I would not have detailed my build on the internet. I just built it because I wanted to do so. As for selling a homebuilt, well that is a murky subject. Without a manufacturer's license, you can't build with the intent to sell or otherwise transfer. If I later decided to transfer it, I would have to mark the lower (in accordance with BATFE regs) with my name, city and some type of SN. I don't even want to THINK about the liability that might be assumed by selling a firearm I created. TheOtherChris |
|
Quoted:
How did you tap the buffer tube threads? With a giant tap? Or some other way? I see that you don't have a lathe... Can you do that somehow on a mill? Used a tap. Waited for a 45% sale at MSC and bought this one. Used the same set-up as for drilling the hole, then just set the tap in place with a dead center in the mill to keep it alligned. A little downward pressure on the quill while turning the tap with a crescent wrench and all went well. |
| Question if you bought the lower as a 0% does it have a serial number/does the FFL have to call it in? Or what? I ask because if you do not because the gun is 0% and has no serial number, could you make it so the lower has absolutely no markings on it at all? I just think that would be cool because no other lower has absolutely zero markings of any kind on it. I mean no selector markings, caliber, city, etc. |
|
Quoted:
Question if you bought the lower as a 0% does it have a serial number/does the FFL have to call it in? Or what? I ask because if you do not because the gun is 0% and has no serial number, could you make it so the lower has absolutely no markings on it at all? I just think that would be cool because no other lower has absolutely zero markings of any kind on it. I mean no selector markings, caliber, city, etc. A 0% lower is a raw forging; nothing more. It is not regulated by anyone in the US. I am not aware of any Federal law that requires you to register a homebuilt firearm. BATFE does not require you to serial it, but they recommend it "in case of theft" or something like that. |
|
Quoted:
Quoted:
Question if you bought the lower as a 0% does it have a serial number/does the FFL have to call it in? Or what? I ask because if you do not because the gun is 0% and has no serial number, could you make it so the lower has absolutely no markings on it at all? I just think that would be cool because no other lower has absolutely zero markings of any kind on it. I mean no selector markings, caliber, city, etc. A 0% lower is a raw forging; nothing more. It is not regulated by anyone in the US. I am not aware of any Federal law that requires you to register a homebuilt firearm. BATFE does not require you to serial it, but they recommend it "in case of theft" or something like that. Local ordinances may differ. I saw a post where someone marked their projects under the pistol-grip area Nice write up |
|
Quoted: That's what i do. Not required, but I do it just so i can prove it's mine if need be...Quoted: Quoted: Question if you bought the lower as a 0% does it have a serial number/does the FFL have to call it in? Or what? I ask because if you do not because the gun is 0% and has no serial number, could you make it so the lower has absolutely no markings on it at all? I just think that would be cool because no other lower has absolutely zero markings of any kind on it. I mean no selector markings, caliber, city, etc. A 0% lower is a raw forging; nothing more. It is not regulated by anyone in the US. I am not aware of any Federal law that requires you to register a homebuilt firearm. BATFE does not require you to serial it, but they recommend it "in case of theft" or something like that. Local ordinances may differ. I saw a post where someone marked their projects under the pistol-grip area Nice write up |
|
Quoted: It is just an Enco clone of an RF45. I have had it for nearly 2 years now and am quite happy with it. I would have liked to have a full sized knee mill, but here in the middle of nowhere, freight would have cost half again as much as the mill itself. I picked up a used Supermax (bridgeport clone) 48" table, 3hp mill for $1500 a couple years ago. The guy used it with a tap-matic and it was COATED in wax and sludge from the tapping fluid. A lot of degreaser and rags later and it cleaned up nicely. (and i put it on the trailer myself 10miles from here) |
|
Yeah, I've wanted my own mill for over 20 years. I had been looking for a decent deal on a knee mill for about 5 and finally decided that the RF45 was better than no mill at all.
My only regret is that I didn't buy it years ago. It has easily handled my projects so far. Now, about that lathe I've always wanted........ |
|
Very nice! I like the cut your 1.5" endmill did on your buffer tube tower. My clapped out Bridgeport does not make a climbing cut look good on that large a radius.
I gotta call BS on the "8 hours" work. It took me much longer than that to finish my first successful 0%er after a couple serious tries. The world would be a better place with a mill and lathe in every garage. |


|
Quoted:
Very nice! I like the cut your 1.5" endmill did on your buffer tube tower. My clapped out Bridgeport does not make a climbing cut look good on that large a radius. That cut alone was an adventure. since the cutter path was relatively simple, 2 passes with the last being conventional with lots of air to keep the chips clear. I got too agressive on the first pass and as I was making the transition at the radius, the cutter began to pull from the collet; slow enough that I didn't notice. (The result is shown in the next post) The second pass in the opposite direction resulted in the nice final finish you see in the pics. I gotta call BS on the "8 hours" work. It took me much longer than that to finish my first successful 0%er after a couple serious tries.
It was a WAG. As I think about it, it was probably more like 10-12, but really not that bad.....unless you have to pay for those hours. The world would be a better place with a mill and lathe in every garage.
I know MY world is a better place. |

|
Quoted: This is what happened when I got too aggressive in my cut with that 1.5" cutter. http://i55.photobucket.com/albums/g154/TheOtherChris/AR%20casting%20completion/ARgoof3.jpg Now my mistake is imortalized for all to see. Man that sucks, but it does happen. |
|
Quoted:
Very nice! I like the cut your 1.5" endmill did on your buffer tube tower. My clapped out Bridgeport does not make a climbing cut look good on that large a radius. I gotta call BS on the "8 hours" work. It took me much longer than that to finish my first successful 0%er after a couple serious tries. The world would be a better place with a mill and lathe in every garage. So, especially starting from a block, bore the radius and blend the flats. This also brings the question: if a raw forging is 0%, what is starting from a block? |
[ARCHIVED THREAD] - 0% lower finally completed. (Page 1 of 2)
AR Sponsor