


AR Sponsor


Posted: 10/9/2009 9:43:28 PM EDT
| I have a couple of Lowers and was wondering what I'm looking at as far as assembling the lower/stock with a LPK and getting a completed upper. Is it idiotproof? Do I need tools? I'm just worried that even if I follow instructions carefully that something will fail when I need it most. Is there a way to check if it is 100% GTG/reliable? |
|
You will need a tool to push the roll pins into the trigger guard and the bolt catch lever. A small hammer and a a solid round rod say 3/ 16 in diameter about 6 inches long or so. 3/16 rod is a common size found in every hardware store in America. Wrap some electrical tape around the end that you use to push the pins. This will prevent scratching the lower when you push the mag release pin into place.
A tooth pick is handy for getting the pesky front hing pin detent into place. I prefer to use one of those little screw drivers for eye glasses for this job, but a tooth pick will do. That is all that I can think of at present. If I have left anything out, somebody will come along shortly and offer an insulting comment to bring attention to my oversight. Function checking the lower once it is assembled will determine whether it is reliable or not. Just take it to the range and run some rounds through the rifle. |
|
Look about 10 posts down for an easy method to install the front pivot pin.
http://www.ar15.com/forums/topic.html?b=3&f=4&t=226782&page=14 They go together pretty easily. I like to separate the parts into sub assemblies and do one thing at a time. |
|
Before I built my 2........I did alot of reading, reading, reading, looked at threads where others built thiers, bought a couple tools little by little, punches, flat head screw driver, rubber hammer, razor blade, and those robo-grips for the trigger guard pin......and the videos came in handy.......just take your time........and mask your lower with that blue tape!
Good Luck! Videos |
|
With a small hammer and a screwdriver you can get by. A 1/4" clevis will help with those tricky front detent springs, but i was able to just use the actual non channeled side of the front pin itself, rotating to the channeled side, once it made it through the first ear.
It really is a simple process especially with the walk-through pinned at the top of this site - definitely worth doing. |
|
A pair of channel locks or vise grips with electrical tape wrapped jaws do well with trigger guard and bolt release pins. No scratchy scratchy!
I built the last one in the bath tub (empty) with the drain closed and curtain drawn. Let the little parts fly, and they roll right back. |
| I just built my first one last night, no problems pretty easy followed theinstructions on this web site, well not to the t but they helped alot. The only hitch was couldn't really tell wich spring is for the bolt catch and disconnector, they both look about the same on the diagram. Other than that no problems went together like butter. |
|
Quoted:
Just remember this song: Where, oh where did my pivot pin detent go? oh where, oh where can it be..... Repeat 48 times.... It's actually pretty easy..I am doing one right now. Go to the hardware store and pay $ 1 - $ 2 for a 1/4" clevis pin . I would post a photo , but can not figure put how ? God bless Wyr |
|
I suggest the Brownells how to videos if you have fast internet...They have the whole AR15 build on there...
here is seven sigment on a lower assembly...great stuff. http://www.brownells.com/.aspx/lid=11011/learn/ |
|
Quoted:
I just built my first one last night, no problems pretty easy followed theinstructions on this web site, well not to the t but they helped alot. The only hitch was couldn't really tell wich spring is for the bolt catch and disconnector, they both look about the same on the diagram. Other than that no problems went together like butter. The disconnector spring- one end is slightly larger diameter than the other. The larger diameter end goes down into the recess in the trigger body. Do this inside a plastic bag- or in the bathtub like the other post said. The spring can go flying away. Do the function check after it's assembled. You really should build one- it's very satisfying, you'll learn a lot, and then won't be as intimidated by the prospect of having to work on your lower receivers in the future. |
|
Quoted:
Quoted:
Just remember this song: Where, oh where did my pivot pin detent go? oh where, oh where can it be..... Repeat 48 times.... It's actually pretty easy..I am doing one right now. Go to the hardware store and pay $ 1 - $ 2 for a 1/4" clevis pin . I would post a photo , but can not figure put how ? God bless Wyr From the thread I referenced above 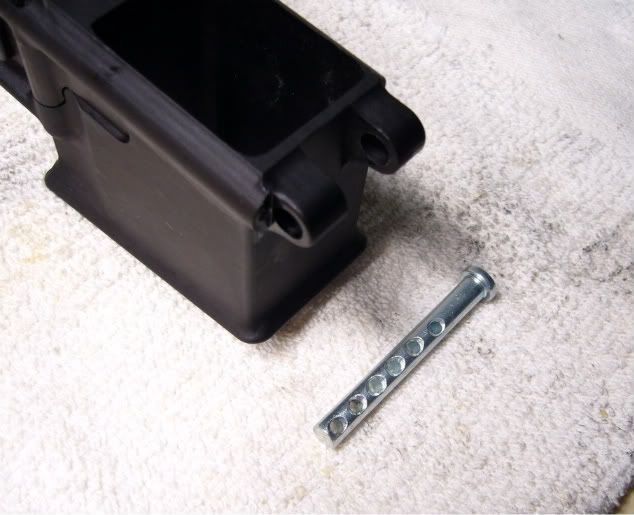
|
|
Quoted:
Quoted:
I just built my first one last night, no problems pretty easy followed theinstructions on this web site, well not to the t but they helped alot. The only hitch was couldn't really tell wich spring is for the bolt catch and disconnector, they both look about the same on the diagram. Other than that no problems went together like butter. The disconnector spring- one end is slightly larger diameter than the other. The larger diameter end goes down into the recess in the trigger body. Do this inside a plastic bag- or in the bathtub like the other post said. The spring can go flying away. Do the function check after it's assembled. You really should build one- it's very satisfying, you'll learn a lot, and then won't be as intimidated by the prospect of having to work on your lower receivers in the future. If you look closely at this picture, you can see the right side of the disconnector spring is wider than the left. That is the bottom of the spring and goes into the recess in the trigger. 
Found a close up view at Brownells Left side here is the bottom. 
|
|
Quoted:
Quoted:
Just remember this song: Where, oh where did my pivot pin detent go? oh where, oh where can it be..... Repeat 48 times.... It's actually pretty easy..I am doing one right now. Go to the hardware store and pay $ 1 - $ 2 for a 1/4" clevis pin . I would post a photo , but can not figure put how ? God bless Wyr 

Already in my Photobucket account. 
|
|
Quoted:
Look about 10 posts down for an easy method to install the front pivot pin. http://www.ar15.com/forums/topic.html?b=3&f=4&t=226782&page=14 They go together pretty easily. I like to separate the parts into sub assemblies and do one thing at a time. +1 on the clevis pin. Actually did the assembly for the detent pins standing in the shower with the drain plugged, so when they went flying I didn't have to look very far after the first one went across the living room. My carpet in the apartment is colored pivot pin detent brown. |
|
I'm about to do my first one and liked the clevis pin idea I got from another post on here so I grabbed one in the garage, but I also bought a stock wrench on eBay for $3.50 (plus $3.50 shipping) and the guy shipped it out same day on a Fri. from GA and it arrived to Ohio on Mon.. At some point I'll get an Armorers wrench also.  |
AR Sponsor