


AR Sponsor


Posted: 1/17/2006 4:04:33 PM EDT
| I have Bushmaster 16 inch upper that I'm getting threaded for a Phantom 5C1. My question is, When it goes to a gunsmith what parts are needed to take off before they start the threading, ie. receiver from barrel, gas tube, front FS post etc..?? If that is correct, I would like to get a flat top gas block for a folddown front sight put on while the barrel is being serviced. Would this be a good time to get it done as well? Whats is a good gas block and folding front sight also? |
|
Well, if you remove the barrel from the upper yourself (instead of the gunsmith doing it), you'll need an action block, barrel wrench, torque wrench, vise, moly lube, and 1/16" pin punch. If you also want to remove the front sight base, you'll need a hammer and a 3/32 nail set to drive out the two taper pins. I would assume that the front sight base can be left in place for barrel threading though. |
|
I prefer that people pull the barrel off and send it to me, but I often take apart a whole upper if the customer does not have the tools to do it. I usually remove the front sight base as well, just makes it easier to hold the barrel through the headstock on the lathe when I re-cut the crown. If you are considering swapping the front sight base out for a flip-up setup, then it's coming off anyways and that makes it an excellent time to do the swap. There are a few options out there, ranging from a simple YHM or PRI flip-up front sight base that replaces the standard FSB on the barrel, to a gas block with a picatinny rail that you can add either a flip-up sight or a removable sight tower to. Lastly, you could go to a quad railed handguard system with a flip-up sight on the rail. PRI is probably the best flip-up front sight that's barrel mounted, but YHM is half the price and very serviceable. I think a dedicated barrel mount flip-up is the best option, much better than a railed gas block AND some kind of sight added to the rail. Some pictures: YHM flip-up: 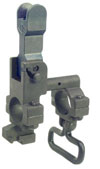 PRI flip-up:  YHM gas block mounted flip-up:  YHM gas block mounted tower:  YHM handguard mounted flip-up:  There are LOTS of other options, these pictures were just easy for me to find to show you ideas. |
I'm still trying to figure out how they do that. I have an idea based around a LONG keyed center that will reach down inside the reciever to the barrel extension and drive it from the lugs. My issue is with the crown. I poke my live center in the old crown and this damages it. This is the only way to ensure that you are threading perfectly concentric to the bore. I suppose adco has a brass tipped live center and this could work as well. My method with a steel live center requires re-cutting the crown when I am done. This has improved accuracy in some cases as a side benefit... |
Charles- Am I half way there on my arbor idea down the middle of the reciever and engaging the barrel extension? Got any pictures to share? |
|
I never have figured out how to do pics. The adapters are featured in Derrick Martin's "Accuracy Speaks" catalog. I bought one from him when I ran his gunsmith shop while he was in Iraq. You really have the right idea as the adapter is a steel cylinder the exact OD of a bolt carrier. There are 2 drilled and tapped holes in the cylinder that allow a clamp with 2 matching non-threaded holes to have hex head allen type bolts inserted and the clamp bears down on the bottom of the upper receiver. This is a really useful tool on occasion. But, as you said the muzzle is centered on either a live or dead center and the crown needs to be recut. This can be done by using a steady rest without removing the upper from the chuck. This allows you to stay on the same axis and center line that the threads are cut on. It does save some time. Hope this helps. Charles.  EDIT TO ADD: No real need to engage the barrel extension with this cylinder and clamp.
|
So it's just a 0.995" diameter bar with two 1/4-20 holes tapped across it and then a couple little plates clamp the reciever against the bar? That's EASY. I was trying to be all accurate by centering the barrel on a point at the end of the bar and basically holding the barrel between centers and letting the reciever float. As that setup clamps the receiver to the side, I could certainly run the steady rest for crowning. I already have a sleeve I thread on to the muzzle for crowning when I can't get the FSB off, so I am half way there. Thanks much for the pointer... |
|
Actually, the bolts in mine are 3/8 x 24, IIRC. This allows you to torque them down enough so that there is no danger of them coming loose when the barrel/chuck is spinning at 600+ RPM. I indicate it in to 0.0003 inches or less off the cylinder using a 4 jaw chuck. Works very well. Charles.
|
The guys who do all my shop work were threading barrels for 2 years before I ever saw how they were doing it. Its pretty neat, really clever, and has one of them fancy machine shop things dedicated to cutting and threading AR barrels. We lost track over a year ago over 2000 barrels threaded, so it must work. I wouldnt even know how to turn the thing on  |
You can use a die which is soecific to a certain thread spec, but a die does not cut threads nearly as nice as a single point tool that makes many small cuts. Here is a barrel blank after threading for the barrel extension. You can see that the tool cutting the threads is a single point cutter. In use, you plunge the tool into the metal and the lathe moves it across at the proper rate to cut the threads. You make many passes, cutting as little as 0.001" on the last passes. 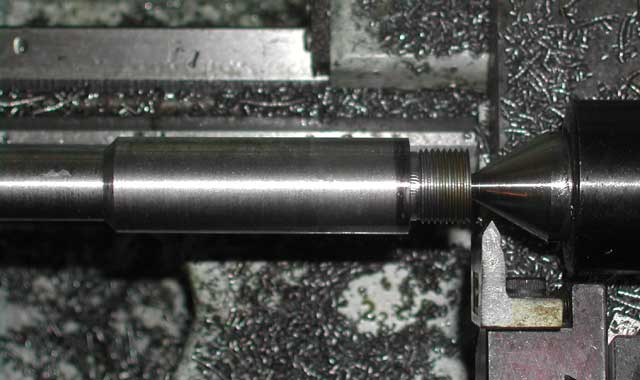
|

|
Thanks for the lesson guys. Very informative...and the pics are great! One more question: In order to make multiple passes at thread cutting, both the material and the tip of the cutter would have to be returned to exactly the same starting point each time. Is this a feature that is built into the lathe?? I could see how getting the cutter back would be fairly easy (linear motion) with stops, but how is the timing (axial motion) reset so precisely for the proceeding cuts? |
Yes. You have a thread dial that tells you when to engage the threading drive. As the dial comes around to whatever mark you are working from, you engage the clutch. The drive will take the cutter across in exactly the same place each time. |
AR Sponsor