


AR Sponsor
Simple fix for the rear takedown detent spring blues.... (Page 4 of 6)


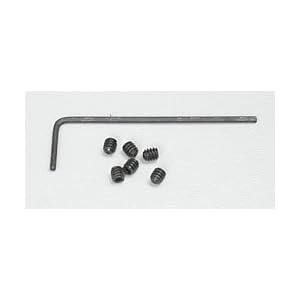
I have the tap but needed screws and 4-40 wrench. Found this combo for under $4 shipped. Link
|


|
Originally Posted By Gravity3694:
Originally Posted By tel0004:
I'm interested in doing this, but I have never used a tap before. Is it every bit as easy as it sounds, just use a lower receiver vice block so it doesn't move, use a bit of oil, then turn the tap like I would if I was screwing something in? I'm good with tools, I have no problem finishing an entire basement, but I have no experience with die taps and metal working, and I thought I would ask before do anything stupid. Yes it's that easy. Just put the tap on a drill, and run it at low rpms; I used my Dremel tool. I forgot to oil mine during the tap. Oil isn't exactly necessary, but it's nice insurance against screwing up the threads. Jeebus, do not put the tap in a drill ! Ideal parts/tools list : 1. Vise 2. AR magazine block 3. 4-40 x 1/8" set screw 4. 4-40 tap (tapered) 5. Tee handle tap holder 6. .050 allen wrench 7. Oil If you have never tapped before try tapping in a scrap piece of aluminum. Be sure to drill the hole the correct size. Tap and Die Reference As stated, this is a delicate tapping job as compared to what I do commercially. You don't want to break a tap here, so go slowly and back out when you feel the resistance suddenly increase. (It's all by feel, no set revolutions per se.) These are the chips building up in the tap. Use an old toothbrush for cleaning the tap and canned air for blowing out the hole. Stop and check depth with your set screw and Allen wrench. This is cake for someone that has tapped before, it's a short distance in soft material, but still GO SLOWLY. FYI, Aero Precision lowers come tapped for 4-40 I used the full length spring with a well-greased detent. Had to cycle the pin a few times to break it in. |
|
Originally Posted By Direct-Drive:
Originally Posted By Gravity3694:
Originally Posted By tel0004:
I'm interested in doing this, but I have never used a tap before. Is it every bit as easy as it sounds, just use a lower receiver vice block so it doesn't move, use a bit of oil, then turn the tap like I would if I was screwing something in? I'm good with tools, I have no problem finishing an entire basement, but I have no experience with die taps and metal working, and I thought I would ask before do anything stupid. Yes it's that easy. Just put the tap on a drill, and run it at low rpms; I used my Dremel tool. I forgot to oil mine during the tap. Oil isn't exactly necessary, but it's nice insurance against screwing up the threads. Jeebus, do not put the tap in a drill ! Ideal parts/tools list : 1. Vise 2. AR magazine block 3. 4-40 x 1/8" set screw 4. 4-40 tap (tapered) 5. Tee handle tap holder 6. .050 allen wrench 7. Oil If you have never tapped before try tapping in a scrap piece of aluminum. Be sure to drill the hole the correct size. Tap and Die Reference As stated, this is a delicate tapping job as compared to what I do commercially. You don't want to break a tap here, so go slowly and back out when you feel the resistance suddenly increase. (It's all by feel, no set revolutions per se.) These are the chips building up in the tap. Use an old toothbrush for cleaning the tap and canned air for blowing out the hole. Stop and check depth with your set screw and Allen wrench. This is cake for someone that has tapped before, it's a short distance in soft material, but still GO SLOWLY. FYI, Aero Precision lowers come tapped for 4-40 I used the full length spring with a well-greased detent. Had to cycle the pin a few times to break it in. is a plug tap what I need? tapered? |


| I had just bought 2 new American Tactical lowers this week. I found this thread after the purchase. Yesterday I bought a drill and tap combo at Lowes for $4.29, yes I know I don't need the drill. Bought 6 set screws at Sears Hardware for .20 cents each. Today I tapped both the American Tactical lowers using the Lowes tap,and Outers gun oil. I used a can of compressed air to blow out the channel after I tapped the holes. Tomorrow the S&W Tactical as well as a Superior lower/Sabre Defence upper build gets the mod. Glad I found the link. |
|
Originally Posted By Mac12782:
Not sure if It has been posted in here but Palmetto lowers are pre-threaded as well. Not the 3 (LW serial numbers) I just got in last week from them from the Black Friday sale.. 
Thats OK I just got the 4-40 set with drillbit (from Lowes) and have some 4-40x1/8" setscrews due in tommorrow. |

|
Originally Posted By 7point62:
might not be a bad idea for the selector detent as well. Won't work. The detent pin is too long and too much of the spring extends down into the pistol grip for this to work effectively. |
1st Cav Div, B 5/7
Vietnam/Cambodia
1970
Vietnam/Cambodia
1970

|
Originally Posted By wcj: Do a search on CormorantSlayer's kit in the EE.The Spike's I picked up today was not threaded either. Side note- does anyone know if they make a threaded pin set like this for the trigger guard? http://c0456141.cdn.cloudfiles.rackspacecloud.com/images/large/tra/tra5145.jpg Think little-bitty Allen key screws. There are brass inserts involved. I'm not equipped to give all the details from this unit. |
Fuck Obama
I agree with uxb
Deej86: "Piss off."
I agree with uxb
Deej86: "Piss off."

|
Originally Posted By ColtsnHarleys:
Originally Posted By Direct-Drive:
Originally Posted By Gravity3694:
Originally Posted By tel0004:
I'm interested in doing this, but I have never used a tap before. Is it every bit as easy as it sounds, just use a lower receiver vice block so it doesn't move, use a bit of oil, then turn the tap like I would if I was screwing something in? I'm good with tools, I have no problem finishing an entire basement, but I have no experience with die taps and metal working, and I thought I would ask before do anything stupid. Yes it's that easy. Just put the tap on a drill, and run it at low rpms; I used my Dremel tool. I forgot to oil mine during the tap. Oil isn't exactly necessary, but it's nice insurance against screwing up the threads. Jeebus, do not put the tap in a drill ! Ideal parts/tools list : 1. Vise 2. AR magazine block 3. 4-40 x 1/8" set screw 4. 4-40 tap (tapered) 5. Tee handle tap holder 6. .050 allen wrench 7. Oil If you have never tapped before try tapping in a scrap piece of aluminum. Be sure to drill the hole the correct size. Tap and Die Reference As stated, this is a delicate tapping job as compared to what I do commercially. You don't want to break a tap here, so go slowly and back out when you feel the resistance suddenly increase. (It's all by feel, no set revolutions per se.) These are the chips building up in the tap. Use an old toothbrush for cleaning the tap and canned air for blowing out the hole. Stop and check depth with your set screw and Allen wrench. This is cake for someone that has tapped before, it's a short distance in soft material, but still GO SLOWLY. FYI, Aero Precision lowers come tapped for 4-40 I used the full length spring with a well-greased detent. Had to cycle the pin a few times to break it in. is a plug tap what I need? tapered? You can do the first couple of turns with a tapered tap then switch to a bottom tap to finish, Just go in far enough to accept the setscrew. |
1st Cav Div, B 5/7
Vietnam/Cambodia
1970
Vietnam/Cambodia
1970

|
This mod has been around long enough, and gotten enough press, that someone should start offering springs that are the correct length without clipping.
For pre-tapped lowers, this would be considered the correct replacement spring, no? |
I don't often bare my soul, it's ugly and tends to frighten people.

|
Originally Posted By TerryC:
This mod has been around long enough, and gotten enough press, that someone should start offering springs that are the correct length without clipping. For pre-tapped lowers, this would be considered the correct replacement spring, no? Excellent idea. A kit with the spring, tap & screw would be a great idea. |
Of all tyrannies, a tyranny sincerely exercised for the good of its victims may be the most oppressive.
|
I don't know about AR-15's (M-14 guy). I ordered a Bushmaster Devastator and the vendor packed the 10 rd. mag in the case which dinged up the A2 stock. He swapped for a new stock, and in replacing them I lost a little pin and spring from a tiny hole below the main hole for the mounting bolt. Parts diagrams show these items, but but they rarely name them or tell what they are for.
I put the stock on without these parts - guessed they were just to keep the stock from turning. From this thread, I am getting the impression that they are more than that and I should find a replacement and install it. It test-fired a magazine just fine.. My question - are they necessary, what do they do, and what are they called and where can I get them? One more question - how much point-of-impact does each click on the rear sight represent at X-yards - vertical and horizontal. I just got approved for the board and am thanking in advance!! |
|
Rickyc - The spring and detent you refer to keep the rear takedown pin from coming loose. That's the pin you push on to separate the lower and upper. There is nothing but a little friction to hold them in if didn't use the spring and detent.
Don't fire the gun without them! . . |



America Bless God, Because Only He Can Help Us!
Joined:
Apr 2008
Posts:
3301
EE: 100% (341)
 TN, USA
|
Originally Posted By WI57: Between you and ruertar on the next page, I want more details about what you guys accomplished with that plug aft of the safety spring hole.Works like a champ.  http://i245.photobucket.com/albums/gg76/gi57/KAC/0f64d8e5.jpg I checked a few of my lowers after I decided I had no idea what that hole is. The lowers I have stored as stripper/spares no gots that hole. What's the story? |
Deej86: "Piss off."
Mazeman: "I don't let my daughter watch the Smurfs because she's such a whore."
VictorUnit: "Bitterly I cling."
Mazeman: "I don't let my daughter watch the Smurfs because she's such a whore."
VictorUnit: "Bitterly I cling."
| Thanks to the OP for this little gem- I have saved it for future use. I really wish I would have seen this before the little bugger popped up while I was screwing on the buffer tube yesterday...would have prevented the bent spring I now have waiting to be replaced. |

|
Originally Posted By kaos:
Originally Posted By WI57:
Between you and ruertar on the next page, I want more details about what you guys accomplished with that plug aft of the safety spring hole.
Works like a champ.
http://i245.photobucket.com/albums/gg76/gi57/KAC/0f64d8e5.jpg I checked a few of my lowers after I decided I had no idea what that hole is. The lowers I have stored as stripper/spares no gots that hole. What's the story? Ditto - I have no idea what that extra hole is. -bob |
Formerly Raeth on the forums. See this thread:
http://www.ar15.com/forums/t_8_35/501006_What_should_I_do___old_or_current_arfcom_account_.html
http://www.ar15.com/forums/t_8_35/501006_What_should_I_do___old_or_current_arfcom_account_.html
|
Originally Posted By Bob_L:
I'm good friends with ruertar and I can answer for him: Those are Knight's Armament lowers which have the rear take down ping spring and detent under the grip instead of behind the receiver end plate. In those photos he's capturing the rear takedown spring by tapping the hole and screwing a 4-40 set screw in its place.
Ditto - I have no idea what that extra hole is. |
|
Originally Posted By ayan: Thanks.Originally Posted By Bob_L: I'm good friends with ruertar and I can answer for him: Those are Knight's Armament lowers which have the rear take down ping spring and detent under the grip instead of behind the receiver end plate. In those photos he's capturing the rear takedown spring by tapping the hole and screwing a 4-40 set screw in its place.Ditto - I have no idea what that extra hole is. I kept looking at that pic trying to figure out how I'd missed seeing one of those all these years. Then I went and compared my stuff, and I felt cheated out of a hole.  |
Deej86: "Piss off."
Mazeman: "I don't let my daughter watch the Smurfs because she's such a whore."
VictorUnit: "Bitterly I cling."
Mazeman: "I don't let my daughter watch the Smurfs because she's such a whore."
VictorUnit: "Bitterly I cling."
|
Originally Posted By diggitybiggity:
I've read every thread in here and searched the internet... can someone explain what this spring actually does? Please don't flame me  , I'm simply not schooled enough to know how this spring effects the weapons functionality. , I'm simply not schooled enough to know how this spring effects the weapons functionality. 
Thanks 
The spring is to maintain the takedown pin and this modification prevents the spring to lunch into orbit when you remove the butt stock. Also check this out Good info |
|
The spring is to maintain the takedown pin and this modification prevents the spring to lunch into orbit when you remove the butt stock. Also check this out Good info You're awesome, thank you so much!! |

|
Got the set screws at Ace Hardware and bought a complete SAE Tap & Die set at Harbor Freight figuring I'd use it again some time. Had to shell out 10$ for a precision screwdriver set at Home Depot that had the .050 needed.
Worked great on my Polymer lower. Go ahead and laugh now but it's kind of a fun experiment for a new build and second rifle. Polymer is very easy to tap! |
|
Well guys,
After I went though the last 8 pages I decided that I had to do this. Except one post really cought my attention. See below. ( bolt catch screw) I'm not going to lie I have messed up some anodizing on a lower or two putting roll pins in so this seems like a great option for a stripped lower. The links didn't work for me so I did some searching and found TR Enabling. They have a great little kit with the bolt catch screw, set screw for the detent spring and the correct Allen wrench. I picked up 5 kits for $14.00. Now to find the 5-40 tap that is required for this kit. The set screws are a little bit bigger than 4-40 but I think it is a little bit nicer to have a bigger Allen head. The problem I'm having is finding a 5-40 tap for less than $20. Or not in a kit. Any help would be appreciated???????? TR Enabling Kit Originally Posted By wildman3006:
REPLY to Powder_Burns 3/22/2010 post yes someone has. i bought an 80% lower from UT ARMS and used an 'SI Defense Stainless Steel Bolt Catch Screw' as a replacement for the roll pin. http://shop.si-defense.com/v/vspfiles/photos/SI%20SS-BOLT-CTCH-SCRW-2T.jpg http://shop.si-defense.com/SI_Defense_Stainless_Steel_Bolt_Catch_Screw_p/si%20ss-bolt-ctch-scrw.htm you thread the REARMOST ONLY bolt catch 'LUG' 6-32. this is where it gets messy. there is very little room between the existing hole in the lug and the sidewall of the receiver. the hole has to be enlarged with a #36 drill (.1065 dia) ONLY THRU THE REARMOST LUG. if you can find a 6" #36 drill it will make it easier. aircraft supply vendors have them, though pricey. i used a regular length one chucked up in a 'pin vice'. i drilled it by hand and you must be patient. when viewed from the top the centerline of the hand drilled hole was slightly off axis, MAYBE 1 degree. this was due to the body of the pin vice hitting the sidewall of the receiver and not letting me get perfectly inline with the existing hole. this turned out to be a good thing, though (will explain later). then i chucked up a 6-32 starter tap in the pin vice and again, by hand, threaded the hole until the point of the tap just touched the hole of the FORWARD lug. i then chucked up (in the pin vice) a BOTTOMING or BLIND 6-32 tap (or grind the point off a starter tap until it is full thread dia at the tip) and ran it thru the hole to finish the threads completely thru the REARMOST lug. YOU MUST BE VERY PATIENT WHEN TAPPING LIKE THIS - WORK SLOWLY AND KEEP THE TAP STRAIGHT AND SQUARE (when viewed from the side), AND CLEAN THE TAP AFTER EVERY QUARTER TURN. now for the 'good thing' explanation. the very slight 'misalignment' (when viewed from the top) put a slight 'bind' on the 'smooth' pin as it enters the FORWARD lug as you screw it in place, just enough to kinda lock it in place. again, this misalignment was VERY SMALL. hope this helps. |
|
Sorry about that. Link below.
TR Enabling kit |

|
I was able to find a 4-40 tap for around $8 at my local Ace hardware. They also had the 4-40 set screw at $.30 each so I picked up 10 since they are so small and I have big gorilla mitts for hands.
This is a welcome mod on my lower since I change things on it more than my daughters change cloths on their barbies.
|
|
Anyone know an alternate source for the bolt catch set screw with long extension like what is at the link? Don't really want to pay $7 for one screw. I suppose I could get a normal threaded set screw of the proper length and then just grind the threads down in the middle. Edit: also, would normal wheel bearing grease be ok to use on the #4-40 set screw for the rear takedown detent? |
|
Originally Posted By Balog:
Anyone know an alternate source for the bolt catch set screw with long extension like what is at the link? Don't really want to pay $7 for one screw. I suppose I could get a normal threaded set screw of the proper length and then just grind the threads down in the middle. Edit: also, would normal wheel bearing grease be ok to use on the #4-40 set screw for the rear takedown detent? Originally Posted By Balog:
Anyone know an alternate source for the bolt catch set screw with long extension like what is at the link? Don't really want to pay $7 for one screw. I suppose I could get a normal threaded set screw of the proper length and then just grind the threads down in the middle. Edit: also, would normal wheel bearing grease be ok to use on the #4-40 set screw for the rear takedown detent? Interested in this as well. The TR site is quoting me around 15 bucks in shipping 1 screw set, which seems a bit much. |

|
I just bought a bag of 100x 4-40x1/8" set screws, if anyone is needing some.
I found them for $4 + Free shipping. http://www.ebay.com/itm/400178458457 Search albanycountyfasteners-ny on ebay if the link is dead. |
| I just started my build and this was the first thing I did on my new lower. My question is for the guys who have done it. Did you use anti seize on the set screw? And if so what did you use? I don't plan to take the screw back out but if I do I would like the threads to stay in place. I have used anti seize for years for spark plugs in aluminum heads. Just about every compound I have seen from loctite and permatex has some amount of graphite in it (even the copper based). |
Simple fix for the rear takedown detent spring blues.... (Page 4 of 6)
AR Sponsor
Join the Community
Your next conversation starts here.
Create your free account to join discussions, share your experience, save topics, and connect with the AR15.COM community.
- Join discussions
- Follow topics and replies
- Connect with fellow enthusiasts
Already a member? Sign in
Stay informed by subscribing to our Newsletter