


AR Sponsor


Posted: 9/3/2004 10:37:35 PM EDT
Can anyone tell me how (when the ban expires) if I can remove this brake? And whether or not there will be a threaded barrel underneath. It is Bushmaster. Any help would be appreciated. 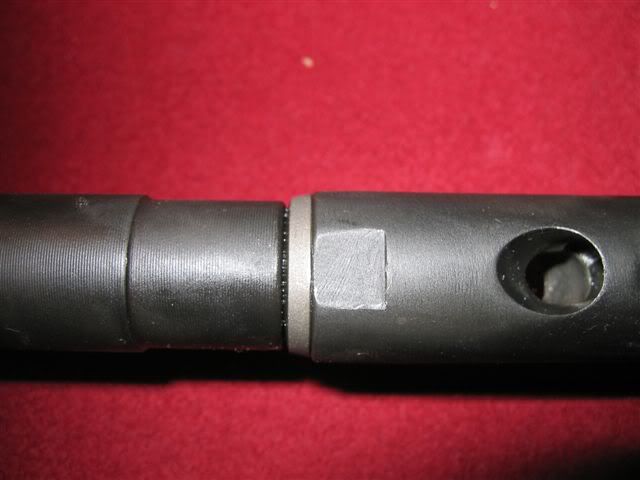 Thanks gentlemen as allways! |
Using some simple car lingo ... Top Dead Center and Bottom Dead Center, also known as the 12 o'clock and 6 o'clco positions.. looking at the barrel straight on. You will notice a spot weld, VERY faintly discolored, maybe .15-.20 inch diameter, at those locations. |
ar15.com/forums/topic.html?b=3&f=118&t=199258 Check that thread if you have issues removing the pins. I posted as much info as I could about my experiences today. The pins were an UTTER BITCH to find after grinding away the weld. They are only about 2mm wide after you get past the weld, and if you grind too hard the metal will smooth over and make the same thing impossible to pin point. This is why I ended up splitting the brake. Honestly, it wasn't that hard now that I see how its done exactly. Its just as safe to do as long as you are careful with the dremel. |
|
One thing I am going to do before I cut my own mini-y off is to try and modify it first. as I'm going to basically destroy it taking it off, I might as well play with it. I'm going to try and grind off the ramps that force the blast back toward me. Then maybe try connecting the 2 holes (to make it like a AK style brake). Then continue the cuts from the holes out to the front (to make a duckbill type front end). And if I'm then still not satisfied with it, cut the thing off and pin on another device of some sort. Anyone want to donate to me a removed mini-y to experiment with? I'll post pics of my progess in modifying it. |
|
Finally got the stupid brake off.... Not before it got messy, though. First, I was looking at all these threads and people were saying how easy it was, so I didn't expect to spend the time that I did on this project. I yanked out the two pins no problem, but after that, I couldn't untorque the brake. So I decided to split it, but the metal was not brittle enough, so all I had was a half a mini-y comp with two large chisel gouges down the side, nearly 1mm to the crown of the barrel. I even left the damn barrel in Kroil overnight, but I still couldn't get enough torque on the sucker even on a vise (the vise couldn't grip it enough). So finally I just got a friend, said "screw it", and I held my M4 down on the table by the sight bases, gave him a 3/4" wrench, and told him to turn as hard as he could. The brake FINALLY unscrewed, but the amount of torque applied was enormous, nearly 40 ft/lbs. Isn't that the torque rating for wheel lugnuts??? Anyway, I am glad I got it off, now I am waiting for the Phantom haps Good luck!!! |
| FortyFive, thanks for the advice, I think my plan at this point it is to send off the upper after my Bushmaster 16" S.I.R.S. Upper arrives. I just really don't have the time (or Patience at this point) to fuck with that upper right now. Although it is possible that I will do it myself, but just not now. |
Yeah originally my plan was to go for a new 14.5" upper, or at the very least, a new 14.5" barrel. But then when I found out that the y-comp could be taken off with minimal effort, I figured it wasn't worth spending the extra $185 or whatever when I could just unscrew it. I guess the only thing I'm missing out on is the bayonet lug.... |
| Well I finally got mine off. I tried the method of grinding the weld and locating the pins. iIfound the pins but they would not budge. I then cut the brake nearly in half and with a cold chisel started splitting the brake until I had enough leverage to brake one of the tabs off. I the quartered the brake with a Dremel cut off wheel beeing careful not to get into the threads a little at a time and hitting with a large hammer and chisel between grinding breaks finally it all came off. I had about 10 pieces of the brake when I was done. It took about two hours total. I do not reccomend this for those that are not that mechanically inclined or impatient like me. Would I do it again? Yes now that I know exactly how to do it. BTW the reason the pins would not budge was due the fact that moisture had gotten into the break / pin area and started to rust. |
|
I did mine today. The pins were located at 12 o'clock and 6 o'clock. I was using a dremel with a carbide tungsten grinding tool ($8.00 @ home depot). The pins were kind of hard to see while grining. The metal from the break looks seamless w/ the pin. Perhaps it was because of the tip I was using... Anyway, mine pretty much fell right out, and then I was able to unscrew the mini y comp and toss it in the trash. Now I just need to get my phantom :) |
How far was the pins from the peel/crush washer? Do you or anyone else have pics of the procedure? I need to remove my mini-y too, it sucks. Thanks! |

Here is a crapola pic, but it should give you what you need. http://www.thealangroup.com/chris/ycomp2.jpg |
AR Sponsor