


Posted: 5/12/2011 6:24:01 PM EDT
|
A friend of mine taught me to MIG weld a month or two ago...I have a pretty decent welder (Hobart Handler 140). I'm welding 16 gauge mild steel...which happens to be round exhaust pipe. A little bit harder to learn to weld on than bar stock or other flat surfaces. I do a pretty good job for a newbie, but I have trouble getting a nice continuous bead because what I'm welding has to be rotated in order for me to continue welding on it.
Not only is the pipe round, but the object I am welding has many bends where I can't use my left hand to support the welding gun, and find it hard to keep the right distance and angle as I round the pipe. I figure the only solution is "practice, practice, practice", but I cut a 4 foot straight exhaust pipe into 2 inch sections and welded it completely back together...so my technique is fairly good at this point...on a flat surface. Also, if someone could edumacate me about the difference in a TIG weld and a MIG weld (I know TIG is better at stainless steel and aluminum in most cases) but just about every TIG weld I see is a beautiful masterpiece without large heat coloring of the metal surrounding it...so I wasn't sure if it's because my the time you can afford/justify a TIG you're already pretty good at welding and that's just how it is...or if there is something else inherent to the TIG welding process that produces better (looking) welds. Any tips and info are appreciated...here's a couple pics what I'm doing for good measure. I'm more concerned about a strong weld than a pretty weld (good thing huh 


I'm welding up a few of them and picking my favorite... |
|
Stitch it, don't lay a continuous bead. You'll burn through the tubing.
Squeeze the trigger just like you were emptying a 30 round mag, one shot at a time. Move a little each time and you'll have a nice stitched weld. Gravity plays a big part too, so you'll want to tack it together first, then put it on the bench to weld flat. Stitching will look like neatly stacked spot welds and will give you more control of the work. When you look at the puddle like it's nothing more than runny steel caulking, it's easier to understand how it flows. 
A couple good forums for Turbo info (other than the LS1 forums)... www.yellowbullet.com http://www.theturboforums.com/smf/index.php |
|
I agree with dragracer. If you know how to MIG weld and are comfortable with it, just take your time and be careful not to blow through the metal. Running TIG would be nice, but you've gotta go with what you know. Also, for what most folks use a welder for at home. MIG is fine.
and info: http://en.wikipedia.org/wiki/TIG Sorry, I'm not an html sort of guy, so no hot links from me. |
|
Looks like everything is tacked so take the assembly off the motor and set it up on a workbench. You can adjust the work piece to a comfortable welding position instead of the other way around. If you are going to wrap it then looks aren't as important as penetration. Stitch as mentioned then carefully dress with a suitable angle grinder.
As far as practice goes you should dress (grind down) the practice weld and cut it in two so you can be sure you have proper penetration. |
|
Been a welder for 14+ years. Like was said in prior post stitch it.. I can pull a full bead without stitching but it took me a few years to be good enough to do this..
The best advice I can give is get some scrap pieces and go at it for about 30-45 mins at a time for a few days in a row. When you are new to welding the worst thing you can do is get fatigued.. You do this when you think too much about what you are doing. Your confidence will grow and this will be the most help to you. |
| I know the stitching method my welds look mostly good but I just wondered if there was something I was missing. I ha center typically done the circumference in four to five welds. I run into problems with burning through if I am too close to a 90 degree angle, which typically happens if I am not keeping the perfect angle as I round the pipe. I do tack in place and weld on a table....the fabrication parts I feel I am quite good at. But even on the table it can be hard to get a decent welding position due to the shape of what I am working on. |
|
Like was said above, stitch weld it. Welding out of position takes practice and more practice. As for the TIG, TIG welding is a more precise form of welding. The reason you see a sweet row of nickles and an even heat line is because the filler is added manually and the welder has more control of the heat via a foot pedal or finger control. You can TIG steel, aluminum, stainless etc. but for what you're doing ya just don't need it. TIG machines can get considerably more expensive than a MIG machine. On the bright side, with most TIG machines, you can stick weld with them too. |
|
the cheap way to learn how to tig is to do some good old fashion gas welding. you should practice doing flats first, on thicker material, then when you get good with that go to horizontal, then vertical, overhead, and then pipe. what gas are you running with your MIG ? from the looks of the weld, it appears that you are shorting it, turn your wire speed down, and try for a spray transfer and stitch your welds. on thin material you have to watch your heat and or run a heat sink. I understand your logic about wanting to learn the hardest thing first, because you think if you can do good with that, then easy stuff will be ... well easy. this type of logic will get you frustrated and is likely to teach you bad habits. TIG welds usually look good because the welder who did it already learned how to gas weld, stick weld and mig first, usually in that order. in conjunction with that TIG is a precise and controlled heat source (variable with a peddle ) and allows you to control the puddle. if you want to check your welds, do a butt or lap joint, then bend it away from the weld. if it breaks at or on the weld you fail. if it breaks in the heat affected zone of the base material you are doing it right. doing butt welds on small flat samples also allows you to check for lack of penetration or over penetration. |
|
Quoted:
the cheap way to learn how to tig is to do some good old fashion gas welding. you should practice doing flats first, on thicker material, then when you get good with that go to horizontal, then vertical, overhead, and then pipe. what gas are you running with your MIG ? from the looks of the weld, it appears that you are shorting it, turn your wire speed down, and try for a spray transfer and stitch your welds. on thin material you have to watch your heat and or run a heat sink. I understand your logic about wanting to learn the hardest thing first, because you think if you can do good with that, then easy stuff will be ... well easy. this type of logic will get you frustrated and is likely to teach you bad habits. TIG welds usually look good because the welder who did it already learned how to gas weld, stick weld and mig first, usually in that order. in conjunction with that TIG is a precise and controlled heat source (variable with a peddle ) and allows you to control the puddle. if you want to check your welds, do a butt or lap joint, then bend it away from the weld. if it breaks at or on the weld you fail. if it breaks in the heat affected zone of the base material you are doing it right. doing butt welds on small flat samples also allows you to check for lack of penetration or over penetration. amen. |
|
Quoted:
Like was said above, stitch weld it. Welding out of position takes practice and more practice. As for the TIG, TIG welding is a more precise form of welding. The reason you see a sweet row of nickles and an even heat line is because the filler is added manually and the welder has more control of the heat via a foot pedal or finger control. You can TIG steel, aluminum, stainless etc. but for what you're doing ya just don't need it. TIG machines can get considerably more expensive than a MIG machine. On the bright side, with most TIG machines, you can stick weld with them too. What he said. If you do have the time and $$$ to buy a TIG machine, I recommend the Miller Syncrowave. You'll need someone to teach you the different functions of the machine though such as the wave guide and pulse function, different types of electrode "tungston or 1 & 2% thoriated Tungston as well as the safe grinding or shaping of Thoriated Tungston, it gives off an alpha particle when ground or at least that's what I was taught 25 years ago. You'll need to do a lot of work to pay for one though. We paid about 5K a piece for 2 of them way back when, and that was just a basic machine without all the needed supplies. |
|
Also something you may want to consider...
You might want to put a piece of flexpipe on one side between the header and turbo. You will also want to fab a heavy bracket to mount the turbo flange. Those header pipes won't last long with the heat, vibration and weight of the turbo hanging on them. With 1100 degree EGT's and expansion/contraction, you'd be amazed at how quickly you will crack one of those pipes. Nice pipe work BTW... looks like it will work well. Those boosted LS1's really haul ass. Edit to add: 
|
|
Quoted:
Quoted:
the cheap way to learn how to tig is to do some good old fashion gas welding. you should practice doing flats first, on thicker material, then when you get good with that go to horizontal, then vertical, overhead, and then pipe. what gas are you running with your MIG ? from the looks of the weld, it appears that you are shorting it, turn your wire speed down, and try for a spray transfer and stitch your welds. on thin material you have to watch your heat and or run a heat sink. I understand your logic about wanting to learn the hardest thing first, because you think if you can do good with that, then easy stuff will be ... well easy. this type of logic will get you frustrated and is likely to teach you bad habits. TIG welds usually look good because the welder who did it already learned how to gas weld, stick weld and mig first, usually in that order. in conjunction with that TIG is a precise and controlled heat source (variable with a peddle ) and allows you to control the puddle. if you want to check your welds, do a butt or lap joint, then bend it away from the weld. if it breaks at or on the weld you fail. if it breaks in the heat affected zone of the base material you are doing it right. doing butt welds on small flat samples also allows you to check for lack of penetration or over penetration. amen. welding put me through engineering school, i learned it at a young age at my dad and uncle's welding and sheet metal fab shop ........... now i just tell people that they did it wrong  ya i'm that a$$hole who walks around a construction site with a white hardhat, a clip board, and some type of NDT instrument ... ya i'm that a$$hole who walks around a construction site with a white hardhat, a clip board, and some type of NDT instrument ... |
|
Quoted:
Also something you may want to consider... You might want to put a piece of flexpipe on one side between the header and turbo. You will also want to fab a heavy bracket to mount the turbo flange. Those header pipes won't last long with the heat, vibration and weight of the turbo hanging on them. With 1100 degree EGT's and expansion/contraction, you'd be amazed at how quickly you will crack one of those pipes. Nice pipe work BTW... looks like it will work well. Those boosted LS1's really haul ass. Edit to add: http://turboaddictionparts.com/catalog/media/catalog/product/cache/1/image/9df78eab33525d08d6e5fb8d27136e95/4/0/4044_webl.jpg Yeah...youre the second person I have heard say that's now...though I must admit in all the ls1 turbo builds I have seen....I dont think I have seen it done. I have seen bracing the flange, but it is usually on a much bigger turbo than mine....not saying youre wrong, just saying I havento seen it done a whole lot for builds like mine. |
|
Quoted:
A tag for more welding knowledge.. But I really want to know more about the setup, turbo, engine build, trans, etc. I miss wrenching on my old ls1. ETA: isn't 35 wire a little thick for the job he's doing? .030 or .035 was recommended and is listed on the welder settings sticker inside the lid and it has been working fine so far! Builds details are stock short block for now, E85 build, 78mm turbo, and a T56 manual to 4L80e swap and everything else to support. Should be safe at 550RWHP all day long. |
|
Quoted:
ive been thinking about going to school to learn to weld but was wondering what the job market is like for welders right now. My friend whole taught me went to school for it is out of work three years in and is looking for somethimg else....he mostly did commercial and work levels may be regional but it doesnt sound good in the midwest. Regardless...knowing how to welds seems to be a very useful skill...opens up all sorts of solutions in search of a problem! :P |
|
Quoted:
Quoted:
I am using gas (c25) and .035 wire. I'll bet you'd have an easier time with .030 wire. It won't need so much heat to get going, thus keeping burnthrough at a minimum. Trigger-welding with fat wire isn't bad, but try to match the wire to the work. Worth a shot....the welder came with a spool of 030 and some tips...the short stubby ones I dont like though. |
|
Quoted:
Quoted:
ive been thinking about going to school to learn to weld but was wondering what the job market is like for welders right now. My friend whole taught me went to school for it is out of work three years in and is looking for somethimg else....he mostly did commercial and work levels may be regional but it doesnt sound good in the midwest. Regardless...knowing how to welds seems to be a very useful skill...opens up all sorts of solutions in search of a problem! :P If i wanted to weld offroad bumpers and armor what kind of setup would I need and how much would it run me? |
|
If i wanted to weld offroad bumpers and armor what kind of setup would I need and how much would it run me? Welder Chop saw Grinders a million sanding discs Air compressor a million air tools Plasma Cutter a million magnets tubing bender a million tubing dies tubing notcher a million hole saws patience a million other little things should come out just under a million dollars. |
|
Looks like you have nicely fitted joints, so you are way ahead of the game. When I made performance headers like that I would tack them up in a jig, then weld them in the easiest position (mostly flat). I used TIG, but if you are going to wrap them then there's not reason not to use MIG. TIG will actually put a lot more heat into the base metal. |
|
Quoted: You could even try .023 wire also.Quoted: I am using gas (c25) and .035 wire. I'll bet you'd have an easier time with .030 wire. It won't need so much heat to get going, thus keeping burnthrough at a minimum. Trigger-welding with fat wire isn't bad, but try to match the wire to the work. |
|
Quoted:
TIG is tier 1, how else can you weld a Mtn Dew can back together? Posted Via AR15.Com Mobile That was a test for pipe fitter school. If it leaks you suck, if not your pretty good. That and taking a cylinder cutting a top and bottom piece and welding it together. |
|
Quoted:
ive been thinking about going to school to learn to weld but was wondering what the job market is like for welders right now. I hear it's in demand on the west coast. I counseled my little brother to learn a skill set (welding) and get a degree. He's at el camino CC in LA now doing both. I'm not bad a mig. I really want one of those new Miller Tig machines. OP. As mentioned. Stitch is the key for this job. I'm better at pulling it than pushing the weld. Control your heat and hit it in small bursts. Nice LS. I've got a LS7 for my 67 Camaro. |
|
Quoted:
Quoted:
TIG is tier 1, how else can you weld a Mtn Dew can back together? Posted Via AR15.Com Mobile That was a test for pipe fitter school. If it leaks you suck, if not your pretty good. That and taking a cylinder cutting a top and bottom piece and welding it together. And for your 6g the cylinder is at a 45. Posted Via AR15.Com Mobile |
|
Quoted:
Quoted:
You could even try .023 wire also.
Quoted:
I am using gas (c25) and .035 wire. I'll bet you'd have an easier time with .030 wire. It won't need so much heat to get going, thus keeping burnthrough at a minimum. Trigger-welding with fat wire isn't bad, but try to match the wire to the work. That's what I would use. It takes a bit more to build up a decent weld with .023 but it minimize the chance of burn through. Heck I have done satisfactory welds in 1/4" mild steel with .023 though I wouldn't go thicker. |
|
Quoted:
Btw. I have a 6l lq9, I would love to boost it, but with the ls6 heads I'm at 11.1:1 compression. I'm at 10.1:1 with the stock LS1 heads and will be fine with E85. If it's available in your area, it's worth a thought. You could always buy a set of 317 casting heads (should be what came on the LQ9) and lower the compression a bit. They're cheap (<$200) and the flow rate is just as good as the LS6 heads. |
|
OK...reviving this thread with more questions...
I've even seen it mentioned other places even .030 wire may be a bit thick - would .025 be too small? I realize I'll have to kick up the wire speed, but moving the pool along at a steady pace wasn't a problem for me. One of the biggest problems I have is that the standard "short" contact tips are recessed so close to the gun that I can't see my work. I've been using the longer/tapered Miller .035 tips, and it's helped being able to see the seam of the piping. Considering how hard it is for me to find the tapered tips locally, I can only assume they aren't used frequently and that the short contact tips are much more common. Thoughts? |
|
.0.23 wire will do wonderful on muffler tubing,as far as the tips go most guns use a 1/4 by 20 thread so get hobart or tweeco tips and taper them in a drill press with a file.you can also cut the nozzle or cup length to get a better view.
other than that practice ,did i mention practice |
|
Quoted:
Quoted:
FWIW, you can TIG steel if you have a stick machine with DC-. Scratch start sucks. Yes, but it pays the bills when it's all you got. I don't always have the luxury of a dedicated TIG machine, but I always have a torch and an assortment of electrodes, collets, and cups in my toolbox and can make do with most any DC welder that can go down low enough and still produce a stable current. If there's no polarity switch, I have a ground whip that will clamp into the electrode holder. |
|
TIG isn't that hard. I had NEVER welded ANYTHING, when I took a TIG class. But, I have used Airbrushes, and TIG guns look and feel similar. I did fine. In fact, one guy in the class offered to hire me to weld Stainless Steel pipe for him. (I wasn't about to move 200 miles for a job, so I didn't take it.)
All the other guys in the TIG class were professional welders, who acted like they were trying to learn brain surgery. I guess if you don't know why something is supposed to be hard, it isn't that hard. I did fine, some of them seemed to have to unlearn rushing. Not sure what welding needs speed, but a lot of them seemed to take it too fast, and rushed the job. I just did what they said to, and did fine. It's all how you look at it. 
|
|
Eh...it'd take a lot to justify the price of a TIG, but I am enjoying the whole fabricating portion of the process so if I can justify a TIG for a personal build in the future, I'll consider it...
In the mean time, I will buy some smaller wire and contact tips and see what happens. I got recommended .035 wire when I first started practicing on 16 gauge mild steel and I guess I got used to it...looking forward to seeing what happens with different wire. Thanks! |
|
Quoted: my understanding is you get more penetration if you push rather than pull.with this thin of tubing ,it may not matter,though. a good welder is rarely out of work.you just may have to travel to get it.Quoted: ive been thinking about going to school to learn to weld but was wondering what the job market is like for welders right now. I hear it's in demand on the west coast. I counseled my little brother to learn a skill set (welding) and get a degree. He's at el camino CC in LA now doing both. I'm not bad a mig. I really want one of those new Miller Tig machines. OP. As mentioned. Stitch is the key for this job. I'm better at pulling it than pushing the weld. Control your heat and hit it in small bursts. Nice LS. I've got a LS7 for my 67 Camaro. i just put an ad on CL to sell my lincoln classic 1 and have been inundated with calls for it. sold it to the first guy who called. he drove from sherman,tx to ne ok and paid me enough cash to buy a new miller trailblazer 302. there is a lot of welding work going on in the oil patch and related industries. i don't know about entry level, though.
|
|
**UPDATE**
I picked up a spool of .023 wire today from Harbor Freight and some of the "snub nose" contact tips - all I have to say is.......I wish I'd been using this wire sooner! So much easier! No problems burning through, I can make a nice even bead, welds look much better. Thanks! Pic of my new Harbor Freight welding cart/welding setup! 
|
|
As someone that builds manifolds for a living, I suggest not wrapping it. 90% of failures of our product are on ones that have been heat wrapped. Instead put gold foil on the stuff you want to protect.
Also, you could tack all the runners together, weld them off the car and then weld them to the flanges after. Leave them a little long so you can grind them to fit them into place. |
|
Quoted: **UPDATE** I picked up a spool of .023 wire today from Harbor Freight and some of the "snub nose" contact tips - all I have to say is.......I wish I'd been using this wire sooner! So much easier! No problems burning through, I can make a nice even bead, welds look much better. Thanks! Pic of my new Harbor Freight welding cart/welding setup! http://i198.photobucket.com/albums/aa309/evo4620/2011-05-20_18-13-27_315.jpg Make sure your rollers in the machine are capable of running 023 wire or you will get some nice rats nests at the rollers where the wire feeds into the gun liner. |
|
That's a decent looking lil Hobart there. It should be fine for the work you're doing.
What kind of gas are you using? Hopefully you have a Argon/CO2 mix. 75% ~ 25%. 20lbs of gas is more than enough and any more is just a waste. The smaller dia. wire will definitely help too. Make sure to get a good grade of wire as well. ER6 at least. I'm not sure what kind of pressures are involved with a manifold, but if you can manage to run your beads uphill, you will get a stronger weld. Though a downhill weld is much easier to make and may be just fine for what you're doing. Like others have said, grab some scraps and practice with different settings. My ESAB has a switch with 3 main power settings (low-medium-high) and another with 6 power settings that will fine tune your heat. I run SCH-40 pipe at low-3. I'm guessing that machine may have a similar power/amps setup. Get a piece of flat plate and tweak your settings while trying to make an uphill/vertical weld. Start off with the lowest heat possible then get your amps and wire feed tweaked till it sounds like some delicious bacon frying. Once you get smooth looking and sounding welds that don't fall out the bottom, you'll bet set. Then write down your settings for future reference. It only takes a couple amps to make a huge difference on how a weld will perform for you. It's all about the heat/wire, speed of travel and the angle of attack. Downhill welds are lazier and the angle is not as crucial. Uphill, the angle is absolutely critical. And please don't do any 'stitching' crap that I've seen mentioned. It's a cold, inferior weld that would get you run and laughed out of any fab shop. The job you have in front of you is most definitely going to be tough for anyone new to welding. Esp. seeing you have some 6G~ish welds in there to do. Taking it off the engine and welding it up would make the job easier, but good fkn luck getting it to line back up. I'd definitely do all your welds in position to eliminate that problem. To help with overall distortion, don't weld one whole side of the pipe at once. Jump around it like you were putting on a tire. Say... start from 7 O'clock to 4. Then go 10 to 1, 7 to 10, 4 to 1 kinda thing. I can't tell from the pics if you are putting any bevel on the pipe or not, but a little bit of bevel will give you a sounder weld and will help with appearance. 37 degrees is code, but not critical here... just a reference point. I would bevel it all the way down leaving no root face on the pipe (a sharp edge). A nice flapper wheel is the way to go with this. Like you said, it is about practice, practice, practice. And when you do, practice with BOTH hands so will eventually be able to use either hand to support. |
|
Hey that aint a Hobart handler is it, It looks like my machine, BTW Turbo kit looks like its going good, glad someone can afford to build this stuff right now,
Watch it cuz boost is very addictive, 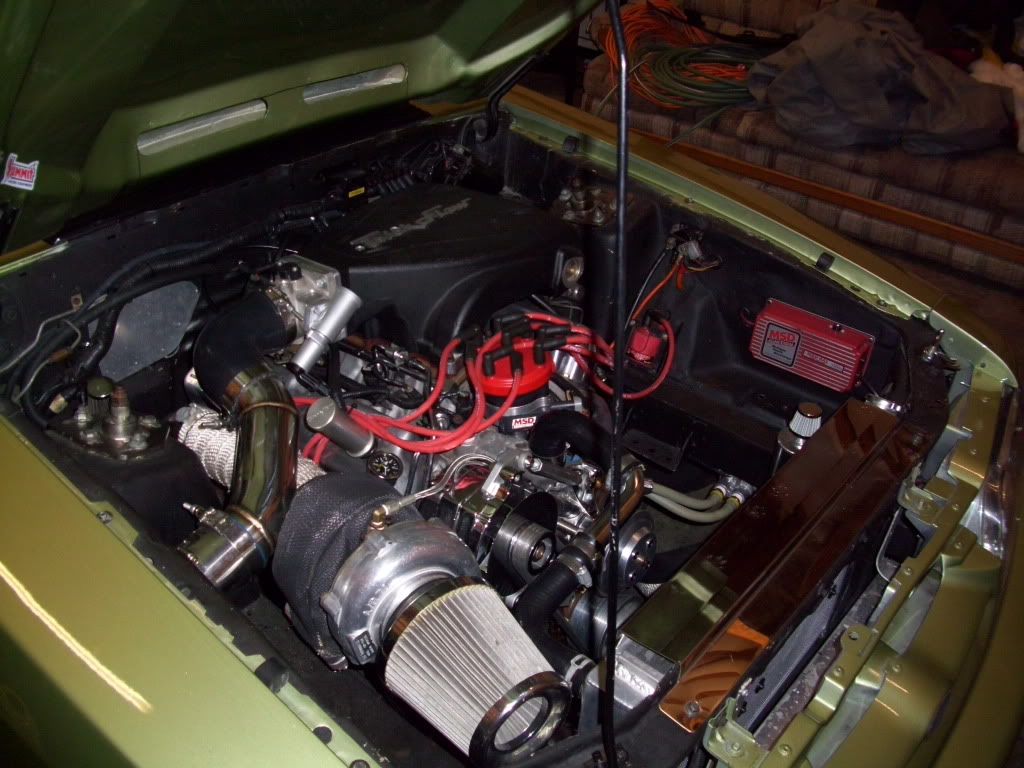
I plan on refabing this kit some day to mount the turbo on the drivers side, |
|
Quoted:
That's a decent looking lil Hobart there. It should be fine for the work you're doing. What kind of gas are you using? Hopefully you have a Argon/CO2 mix. 75% ~ 25%. 20lbs of gas is more than enough and any more is just a waste. The smaller dia. wire will definitely help too. Make sure to get a good grade of wire as well. ER6 at least. I'm not sure what kind of pressures are involved with a manifold, but if you can manage to run your beads uphill, you will get a stronger weld. Though a downhill weld is much easier to make and may be just fine for what you're doing. Like others have said, grab some scraps and practice with different settings. My ESAB has a switch with 3 main power settings (low-medium-high) and another with 6 power settings that will fine tune your heat. I run SCH-40 pipe at low-3. I'm guessing that machine may have a similar power/amps setup. Get a piece of flat plate and tweak your settings while trying to make an uphill/vertical weld. Start off with the lowest heat possible then get your amps and wire feed tweaked till it sounds like some delicious bacon frying. Once you get smooth looking and sounding welds that don't fall out the bottom, you'll bet set. Then write down your settings for future reference. It only takes a couple amps to make a huge difference on how a weld will perform for you. It's all about the heat/wire, speed of travel and the angle of attack. Downhill welds are lazier and the angle is not as crucial. Uphill, the angle is absolutely critical. And please don't do any 'stitching' crap that I've seen mentioned. It's a cold, inferior weld that would get you run and laughed out of any fab shop. The job you have in front of you is most definitely going to be tough for anyone new to welding. Esp. seeing you have some 6G~ish welds in there to do. Taking it off the engine and welding it up would make the job easier, but good fkn luck getting it to line back up. I'd definitely do all your welds in position to eliminate that problem. To help with overall distortion, don't weld one whole side of the pipe at once. Jump around it like you were putting on a tire. Say... start from 7 O'clock to 4. Then go 10 to 1, 7 to 10, 4 to 1 kinda thing. I can't tell from the pics if you are putting any bevel on the pipe or not, but a little bit of bevel will give you a sounder weld and will help with appearance. 37 degrees is code, but not critical here... just a reference point. I would bevel it all the way down leaving no root face on the pipe (a sharp edge). A nice flapper wheel is the way to go with this. Like you said, it is about practice, practice, practice. And when you do, practice with BOTH hands so will eventually be able to use either hand to support. Yeah, I'm using C25. And yes, it's a Hobart Handler 140. The way I've been fabricating it is to tack on 1 piece at a time with 3-4 tack welds. I haven't had any issues with distortion doing it this way - I'm not really gapping the two pieces either, I just butt the two pieces up together. I have been beveling the edges, which is as much a biproduct of grinding off the metal flashing as it is for a good weld. Thanks for the input. |