


[ARCHIVED THREAD] - Homemade Work Benches (Page 1 of 2)
Posted: 5/28/2010 10:40:48 AM EDT
|
I'm going to build a work bench for general do-it-youself projects this weekend and was wondering if any of you guys had plans or photos you would share so I could get some good ideas.
Thanks! |
|
Someone had a thread here on one he built, I will see if I can find it. ETA: Here toy go. |
|
Sit down with a piece of paper and a calculator and draw yourself up a set of plans. It isn't hard. Make the legs out of 2 x 4s and put in plenty of bracing. Make the top out of 2 layers of 3/4" plywood glued and screwed together. Paint the whole thing in camo in the Arfcom tradition. Post pics of your woman sitting on it scantily clad.
Now, get your ass to work. |
|
Quoted:
Sit down with a piece of paper and a calculator and draw yourself up a set of plans. It isn't hard. Make the legs out of 2 x 4s and put in plenty of bracing. Make the top out of 2 layers of 3/4" plywood glued and screwed together. Paint the whole thing in camo in the Arfcom tradition. Post pics of your woman sitting on it scantily clad. Now, get your ass to work. Best idea yet. |
|
I like things sturdy.
Sturdiest work benches I have built were: Use 4x4s for the legs. Cut dados in the 4x4s. Use 3/4" plywood for the shelves. For an 8' bench: Evenly space the 4x4s - for instance one on each end, then the other 2 32" from the end. Insert 3/4" plywood into the dados - glue and screw. Modify as desired. This will never, ever, rack. Very sturdy, quick and easy to build, and relatively inexpensive. |
|
Quoted:
Nothing in terms of a workbench. Im building a sweet coffee table right now though its gonna be sexy. Ill post that when Its finished. Our professor made a sick workbench though, the table top was from an old bowling alley. Really tough bench. And heavy too. Ask me how I know! |
|
I would suggest having a top apron and then a lower one to really beef up the bench, you could build a shelf on the bottom apron. Kind of like this one but have an apron under the table top as well.  It will make your table rigid as fuck. Then Make your top panel fairly thick maybe 1 1/2" then Use a polyurethane finish to keep the surface water proof, if you want to make it really indestructible. Its not about having giant legs. Its about making the table as rigid as possible. |
|
Quoted:
Someone had a thread here on one he built, I will see if I can find it. ETA: Here toy go. I built one just like this about two years ago......with bigger legs. (4x4s) |
|
4''x4'' for the legs and it doesnt wiggle around nearly as much
i used 2'x12s for the work top and 2x8 for the frame work also have a pegboard for the back with added lights no pics but I use it in my shop for doing heavy work on it cost me more to be built twice as heavy but it has held up well matter of fact right now its holding up 500 pounds of crap and needs a nice cleaning. if i had to do it over again i would put some sort of metal over the work top make it look better and stand up to beating on things a bit better |
|
Quoted: Metal is a bad Idea if you are doing any kind of wood working its going to ruin your tools. Or you'll always have to lay down plywood to prevent damage to tools. Hardwood is the way to go. 4''x4'' for the legs and it doesnt wiggle around nearly as much i used 2'x12s for the work top and 2x8 for the frame work also have a pegboard for the back with added lights no pics but I use it in my shop for doing heavy work on it cost me more to be built twice as heavy but it has held up well matter of fact right now its holding up 500 pounds of crap and needs a nice cleaning. if i had to do it over again i would put some sort of metal over the work top make it look better and stand up to beating on things a bit better |
| Best one I ever had was discarded kitchen base cabinets screwed to the studs. Made an overlay of TWO 3/4" MDF sheets glued and screwed together for the top. Put 1x2 edging around the edges and left it just high enough above the work surface to lay in a piece of tempered masonite for a work surface that was removeable and replaceable. Highly suggest that route. |
|
Quoted:
Quoted:
There have been a number of threads on this topic in the Do-It-Yourself Forum. Not as many as I was expecting, but there are a two very good ones. Thanks for the ideas guys! I guess the three pages of workbench posts in the other (linked) thread don't count.  
|
|
Quoted:
Quoted:
Metal is a bad Idea if you are doing any kind of wood working its going to ruin your tools. Or you'll always have to lay down plywood to prevent damage to tools. Hardwood is the way to go.
4''x4'' for the legs and it doesnt wiggle around nearly as much i used 2'x12s for the work top and 2x8 for the frame work also have a pegboard for the back with added lights no pics but I use it in my shop for doing heavy work on it cost me more to be built twice as heavy but it has held up well matter of fact right now its holding up 500 pounds of crap and needs a nice cleaning. if i had to do it over again i would put some sort of metal over the work top make it look better and stand up to beating on things a bit better very true forgot to add I keep wood work and metal work seperate wood shavings where you do your mechanic work can make for a really bad day and oil and metal in your wood work does about the same |


|
Here's the one I made.
Archive Link: http://www.ar15.com/archive/topic.html?b=1&f=139&t=736145 |


|
I just mounted the peg board to mine yesterday. I went the easy route and ordered a set of those 2X4 basics legs and just assembled everything. For the lower shelves I went with MDF and the work surface is birch veneer. Still need to go get my vise for mounting. |

|
Mine's dual purpose for amateur radio and gunsmithing/work bench.
I built it with a 3/4" thick top work surface and then threw a 1/4" on top of that. If the top gets damaged I flip the 1/4" over, if that gets bad I buy another. I put a 1/2" thick backing to mine that sticks up about two feet - to that I mounted shelves. This serves two purposes - no more chasing screws that rolled off the back and a place for the radio gear. 
There's a bottom shelf under the bench for the heavy stuff - drill press, grinders, wrench sets, jacks ... this weight holds the thing down pretty well. The frame is doubles up 2x4's and 2x4's |
|
These are the plans for the one I made. You want sturdy? This thing doubles as a bomb shelter. http://www.lowes.com/cd_Build+a+Workbench_692759023_ |
|
Quoted:
Quoted:
Quoted:
There have been a number of threads on this topic in the Do-It-Yourself Forum. Not as many as I was expecting, but there are a two very good ones. Thanks for the ideas guys! I guess the three pages of workbench posts in the other (linked) thread don't count.
Yeah, that was one of the "very good ones". |

|
Quoted:
I'd like to go heavy duty, but one of the things I haven't seen is what are people using for fastners when using 4x4's for the legs and 2x4's for frame? Lag bolts? In my experience, lag bolts will cause the hole in the wood to ovalize. Then the bench will try to rack. This was usually caused by a lot of weight and/or horizontal stresses on the bench. If you're gonna use bolts, get something like carriage bolts, nuts, and washers. Cutting dados for the cross pieces will add even more stability - as will glue. |
|
You didn't say if you wanted portable or fixed?
I went with odd/mismatch/closeout base cabinets, painted them all the same to match, screwed 2x12's on top, then screwed 3/4 osb on that, used that poly stuff in about 5 coats to seal it up nice, supports a loaded tool chest, big ass vice, etc 

|

|
Quoted:
I would suggest having a top apron and then a lower one to really beef up the bench, you could build a shelf on the bottom apron. Kind of like this one but have an apron under the table top as well. It will make your table rigid as fuck. Then Make your top panel fairly thick maybe 1 1/2" then Use a polyurethane finish to keep the surface water proof, if you want to make it really indestructible. Its not about having giant legs. Its about making the table as rigid as possible. Cool! I created this thread on my work computer today, I couldn't tell you why but some photos are blocked and some which probably should be aren't. Your photo was blocked, and now I see the hardware used with 4x4 legs. Thanks! |

|
Quoted:
Contraptions here. Salvaged materials and lots of headless nails, drywall screws and lag bolts, I recommend drawers and cabinets to prevent avalanches that shelves turn into. http://usera.ImageCave.com/garyj36/garage/1.jpg http://usera.ImageCave.com/garyj36/garage/2.jpg http://usera.ImageCave.com/garyj36/garage/3.jpg http://usera.ImageCave.com/garyj36/garage/4.jpg WTF?
|
|
Quoted:
These are the plans for the one I made. You want sturdy? This thing doubles as a bomb shelter. http://www.lowes.com/cd_Build+a+Workbench_692759023_ 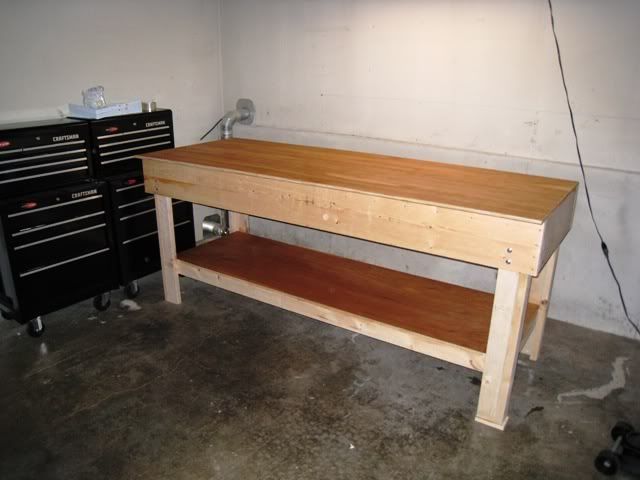
Mine is built based on the Lowes plans posted above; it is VERY sturdy. Frankly though, if I were doing it again, I think I'd just use a few cross braces under the top and double up on the plywood (for more or less the same result but less work to put it together). Consider leaving a lip (depending on what you use for a top) on at least one side to provide an easy clamping spot. |
|
Quoted: Sit down with a piece of paper and a calculator and draw yourself up a set of plans. It isn't hard. Make the legs out of 2 x 4s and put in plenty of bracing. Make the top out of 2 layers of 3/4" plywood glued and screwed together. Paint the whole thing in camo in the Arfcom tradition. Post pics of your woman sitting on it scantily clad. Now, get your ass to work.  I used 4x4's & a solid core door. That mf can only be moved with a forklift. |


|
Quoted:
Here's mine. It's a bit big but I would rather have my work in my face than have to bend down over it. http://i257.photobucket.com/albums/hh214/AnnaKay86/DSC00850.jpg Holy Sh!t that's creepy! You look just like a friend of mine that lives in Montana. Like you could be freaking twins. Wow. |

|
Quoted:
Quoted:
These are the plans for the one I made. You want sturdy? This thing doubles as a bomb shelter. http://www.lowes.com/cd_Build+a+Workbench_692759023_ http://img.photobucket.com/albums/v494/Adam7373/bench3.jpg Mine is built based on the Lowes plans posted above; it is VERY sturdy. Frankly though, if I were doing it again, I think I'd just use a few cross braces under the top and double up on the plywood (for more or less the same result but less work to put it together). Consider leaving a lip (depending on what you use for a top) on at least one side to provide an easy clamping spot. That's a great idea. thanks! |
|
Quoted:
http://www.petenelson.com/Photos/Misc/House%20in%20Austin/Workbench/01%20-%20Frame.jpg http://www.petenelson.com/Photos/Misc/House%20in%20Austin/Workbench/08%20-%20Two%20drawers.jpg http://www.petenelson.com/Photos/Misc/House%20in%20Austin/Workbench/09%20-%20Completed%20bench.jpg Once I finished it, I gave the top a coat of polyurethane so the MDF doesn't soak up all the crap I'd be spilling on it. How did you mount that board to the wall? It looks like carriage bolts, but what's going on behind the sheetrock? |
|
I needed a better workbench, so I decided to build one.
Stumbled across these plans for a torsion box design...it looked interesting so I decided to go with it. Cost about ~$100 to build excluding the vice. Plans are free. http://www.workbenchdesign.net/bench1.html Took about 5 evenings to put together and it's solid as a brick shithouse. Weighs over 250lbs. I decided to put it on a set of heavy duty caster wheels with brakes. Even with the wheels, it is very stable. 


|
|
Quoted:
Quoted:
Contraptions here. Salvaged materials and lots of headless nails, drywall screws and lag bolts, I recommend drawers and cabinets to prevent avalanches that shelves turn into. http://usera.ImageCave.com/garyj36/garage/1.jpg http://usera.ImageCave.com/garyj36/garage/2.jpg http://usera.ImageCave.com/garyj36/garage/3.jpg http://usera.ImageCave.com/garyj36/garage/4.jpg WTF? What's WTF about it? It's half of a one car garage, about 14 feet long. The two big double drawers hold power tools. The big drawer on the other is small carpentry tools. It's very organized. I can fabricate and or fix or diagnose almost anything in there. |