|
Posted: 10/19/2014 5:33:14 PM EDT
[Last Edit: ReconB4]
I thought this may be useful or interesting to those visiting this part of ARF. It's just Chapter 3 out of the US Army Sniper Training FM 23-10, Marksmanship. The fundamentals I'm quoting here are focused on the prone position but are meant for any position during precision fire. There are other books of instruction that list the fundamentals of marksmanship as applied to long range or precision shooting. If you have access to those and/or have used them please feel free to add them here or start a new thread with the name of that book or fundamentals in the title. If there's enough info and interest maybe we'll be able to decide and choose which ones to tack at the top of this section. I will add portions and photos/diagrams as I complete them so check periodically for the additions.
Also, if this excerpt interests you, you can find the manual in its entirety in PDF format online to download. US Army Sniper Training FM 23-10 Everything after this is directly from the 23-10 Sniper marksmanship is an extension of basic rifle marksmanship and focuses on the techniques needed to engage targets at extended ranges. To successfully engage targets at increased distances, the sniper team must be proficient in marksmanship fundamentals and advanced marksmanship skills. Examples of these skills are determining the effects of weather conditions on ballistics, holding off for elevation and windage, engaging moving targets, using and adjusting scopes and zeroing procedures. Marksmanship skills should be practiced often. Section I
FUNDAMENTALS The Sniper team must be thoroughly trained in the fundamentals of marksmanship. These include assuming a position, aiming, breath control, and trigger control. These fundamentals develop fixed and correct firing habits for instinctive application. Every sniper should periodically refamiliarize himself with these fundamentals regardless of his experience.. 3-1. STEADY POSITION ELEMENTS The sniper should assume a good firing position in order to engage targets with any consistency. A good position enables the sniper to relax and concentrate when preparing to fire. a. Position Elements. Establishing a mental checklist of steady position elements enhances the sniper's ability to achieve a first round hit. (1) Nonfiring hand. Use the nonfiring hand to support the butt of the weapon. Place the hand next to the cheek and rest the tip of the butt on it. Ball the hand into a fist to raise the weapon's butt or loosen the fist to lower the weapon's butt. An effective method is to hold a sock full of sand in the nonfiring hand and to place the weapon butt on the sock. This reduces body contact with the weapon. T o raise the butt, squeeze the sock and to lower it, loosen the grip on the sock. (2) Butt of the stock. Place the butt of the stock firmly in the pocket of the shoulder. Insert a pad on the ghille suit where the contact with the butt is made to reduce the effects of pulse beat and breathing, which can be transmitted to the weapon. (3) Firing hand. With the firing hand, grip the small of the stock. Using the middle through little fingers, exert a slight rearward pull to keep the butt of the weapon firmly in the pocket of the shoulder. Place the thumb over the top of the small of the stock. Place the index finger on the trigger, ensuring it does not touch the stock of the weapon. This avoids disturbing the lay of the rifle when the trigger is squeezed. (4) Elbows. Find a comfortable position that provides the greatest support. (5) Stock weld. Place the cheek in the same place on the stock with each shot. A change in stock weld tends to cause poor sight alignment, reducing accuracy. (6) Bone Support. Bone support is the foundation of the firing position; they provide steady support of the weapon. (7) Muscle relaxation. When using bone support, the sniper can relax muscles, reducing any movement that could be caused by tense or trembling muscles. Aside from tension in the trigger finger and firing hand, any use of the muscle generates movement of the sniper's crosshairs. (8) Natural point of aim. The point at which the rifle naturally rests in relation to the aiming point is called natural point of aim. (a) Once the sniper is in position and aimed in on his target, the method for checking for natural point of aim is for the sniper to close his eyes, take a couple of breaths, and relax as much as possible. Upon opening his eyes, the scope's crosshairs should be positioned at the sniper's preferred aiming point on the target. (b) Once the natural point of aim has been determined, the sniper must maintain his position to the target. To Maintain his natural point of aim in all shooting positions, the natural point of aim can be readjusted and checked periodically. (c) The sniper can change the elevation of the natural point of aim by leaving his elbows in place and by sliding his body forward or rearward. This raises or lowers the muzzle of the weapon, respectively. To maintain the natural point of aim after the weapon has been fired, proper bolt operations becomes critical. The sniper must practice reloading while in the prone position without removing the butt of the weapon from the firing shoulder. This may be difficult for the left handed firer. The techniques for accomplishing this task are as follows: o After firing, move the bolt slowly to the rear while canting the weapon to the right. Execution of this task causes the spent cartridge to fall next to the weapon. o After firing, move the bolt to the rear with the thumb of the firing hand. Using the index and middle fingers, reach into the receiver and catch the spent cartridge as it is being ejected. This technique does not require canting the weapon. NOTE: The sniper conducts bolt operation under a veil or equivalent camouflage to improve concealment. b. Steady Firing Position. On the battlefield, the sniper must assume a steady firing position with maximum use of cover and concealment. Considering the variables of terrain, vegetation, and tactical situations, the sniper can use many variations of the basic positions. When assuming a firing position, he must adhere to the following basic rules: (1) Use any support available. (2) Avoid touching the support with the barrel of the weapon since it interferes with barrel harmonics and reduces accuracy. (3) Use a cushion between the weapon and the support to prevent slippage of the weapon. (4) Use the prone supported position whenever possible. c. Types of Firing Positions. Due to the importance of delivering precision fire, the sniper makes maximum use of artificial support and eliminates any variable that may prevent adhering to the basic rules. He uses the prone supported, prone unsupported, kneeling unsupported, kneeling, sling supported, standing supported and the Hawkins firing positions. (1) Prone supported position. The prone supported position is the steadiest position; it should be used whenever possible. To assume the prone supported position, the sniper should- (a) Lie down and place the weapon on a support that allows pointing in the direction of the target. Keep the position as low as possible. (b) Remove the nonfiring hand from underneath the receiver and trigger, grasping the rear sling swivel. This removes any chance of subconsciously trying to exert control over the weapon's natural point of aim. Keep the elbows in a comfortable position that provides the greatest support. (c) Keep the body in line with the weapon as much as possible-not at an angle. This presents less of a target to the enemy and more body mass to absorb recoil. (d) Spread legs a comfortable distance apart with the heels on the ground or as close as possible without causing strain. 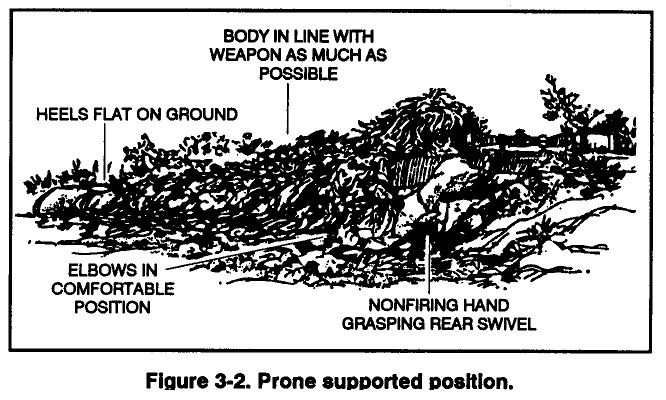 (2) Prone unsupported position. The prone unsupported position offers another stable firing platform for engaging targets. To assume this position, the sniper faces his target, spreads his feet a comfortable distance apart, and drops to his knees. Using the butt of the rifle as a pivot, the firer rolls onto his nonfiring side. He places the rifle butt in the pocket formed by the firing shoulder, grasps the pistol trip in his firing hand and lowers the firing elbow to the ground. The rifle rests in the V formed by the thumb and fingers of the nonfiring hand. The sniper adjusts the position of his firing elbow until his shoulders are about level, and pulls back firmly on the rifle with both hands. To complete the position, he obtains a stock weld and relaxes, keeping his heels closes to the ground. 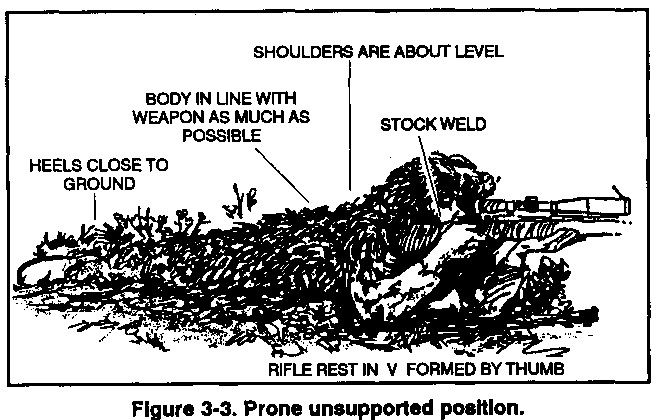 (3) Kneeling unsupported position. The kneeling unsupported position is assumed quickly. It places the sniper high enough to see over small brush and provides for a stable position. (a) Place the body at a 45 degree angle to the target. (b) Kneel and place the right knee on the ground. (c) Keep the left leg as perpendicular to the ground as possible; sit back on the right heel, placing it as directly under the spinal column as possible. A variation is to turn the toe inward and sit squarely on the right foot. (d) Grasp the small of the stock of the weapon with the firing hand and cradle the fore-end of the weapon in a crook formed with the left arm. (e) Place the butt of the weapon in the pocket of the shoulder, then place the meaty underside of the left elbow on top of the left knee. (f) Reach under the weapon with the left hand, and lightly grasp the firing arm (g) Relax forward and into the support position, using the left shoulder as a contact point. This reduces transmission of the pulse beat into the sight picture. (h) Lean against a tree, building, or vehicle for body support. 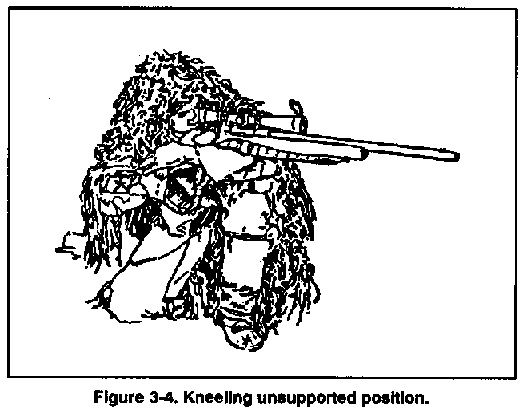 (4) Kneeling, sling supported position. If vegetation presents a problem, the sniper can raise his kneeling position by using the rifle sling. To assume the kneeling, sling supported position, he executes the first three stops for assuming a kneeling unsupported position. With the leather sling mounted to the weapon, the sniper turns the sling one-quarter turn to the left. The lower part of the sling will then form a loop. (a) Place the left arm (nonfiring) through the loop; pull the sling up the arm and place it on the upper arm between the elbow and shoulder, but not directly over the biceps. (b) Tighten the sling by sliding the sling keeper against the loop holding the arm. (c) Rotate the left arm in a clockwise motion around the sling and under the rifle with the sling secured to the upper arm. Place the fore-end of the stock in the V formed by the thumb and forefinger of the left hand. Relax the left arm and hand, let the sling support the weight of the weapon. (d) Place the butt of the rifle against the right shoulder and place the left elbow on top of the left knee. Pull the left hand back along the fore-end of the rifle toward the trigger guard to add to stability. 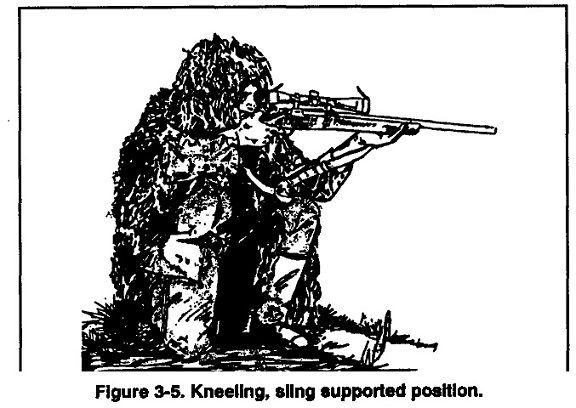 (5) Standing supported position. The standing supported position is the least steady of the supported positions and should be used only as a last resort. (a) To assume the standing supported position with horizontal support, such as a wall or ledge, the sniper proceeds as follows: o Locate a solid object for support. Avoid branches as they tend to sway when wind is present. o Form a V with the thumb and forefinger of the nonfiring hand. o Place the nonfiring hand against the support with the fore-end of the weapon resting in the V of the hand. This steadies the weapon and allows quick recovery from the recoil. o Then place the butt of the weapon in the pocket of the shoulder. (b) To use vertical support, such as a tree, telephone pole, corner of building or vehicle, the sniper proceeds as follows: o Locate stable support. Face the target, then turn 45 degrees to the right of the target and place the palm of the nonfiring hand at arm's length against the support. o Lock the left arm straight, let the left leg buckle and place the body weight against the nonfiring hand. Keep the trail leg straight. o Place the fore-end of the weapon in the V formed by extending the thumb of the nonfiring hand. o Exert more pressure to the rear with the firing hand. 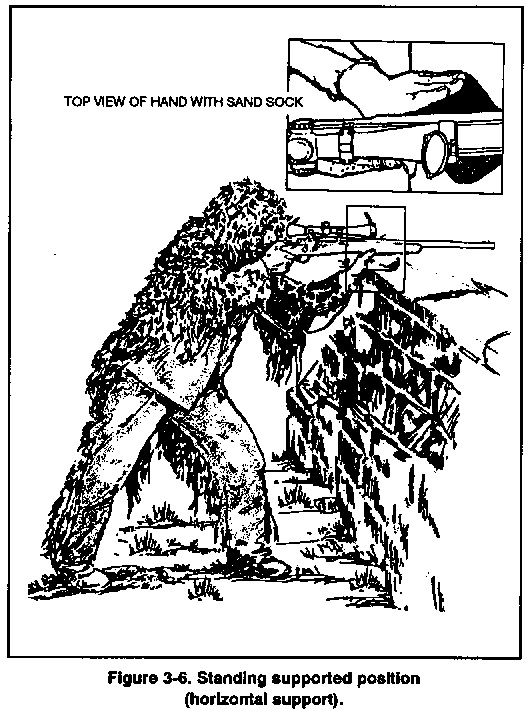 (6) Hawkins position. The Hawkins position is a variation of the prone unsupported position. The sniper uses it when firing from a low bank or a depression in the ground, over a roof or so forth. It cannot be used on level ground since the muzzle cannot be raised high enough to aim at the target. It is a low-profile position with excellent stability and aids concealment. To assume this position, the sniper uses the weapon's sling and proceeds as follows: CAUTION
LOCK THE NONFIRING ARM STRAIGHT OR THE FACE WILL ABSORB THE WEAPONS RECOIL (a) After assuming a prone position, grasp the upper sling swivel and sling with the nonfiring hand, forming a fist to support the front of the weapon. (b) Ensure the nonfiring arm is locked straight since it will absorb the weapon's recoil. Wearing a glove is advisable. (c) Rest the butt of the weapon on the ground and place it under the firing shoulder. The sniper can make minor adjustments in muzzle elevation by tightening or relaxing the fist of the nonfiring hand. If more elevation is required, he can place a support under the nonfiring fist.  d. Field Expedient Weapon Support. Support of the weapon is critical to the sniper's success in engaging targets. Unlike a well equipped firing range with sandbags for weapon support, the sniper can encounter situations where weapon support relies on common sense and imagination. The sniper should practice using these supports at every opportunity and select the one that best suits his needs. He must train as if in combat to avoid confusion and self-doubt. The following items are commonly used as field expedient weapon supports: (1) Sand sock. The sniper needs the sand sock when delivering precision fire at long ranges. He uses a standard issue, olive drab wool sock filled one-half to three-quarters full of sand and knotted off. He places it under the rear sling swivel when in the prone supported position for added stability. By limiting minor movement and reducing pulse beat, the sniper can concentrate on trigger control and aiming. He uses the nonfiring hand to grip the sand sock, rather than the rear sling swivel. The sniper makes minor changes in muzzle elevation by squeezing or relaxing his grip on the sock. He uses the sand sock as padding between the weapon and a rigid support also. (2) Rucksack. If the sniper is in terrain without any natural support, he may use his rucksack. He must consider the height and presence of rigid objects within the rucksack. The rucksack must conform to weapon contours to add stability. (3) Sandbag. The sniper can fill an empty sandbag on site. (4) Tripod. The sniper can build a field-expedient tripod by tying together three 12 inch long sticks (one thicker than the others) with 550 cord or the equivalent. When tying the sticks, he wraps the cord at the center point and leaves enough slack to fold th legs out into a triangular base. Then, he places the fore-end of the weapon between the uprights. (5) Bipod. The sniper can build a field-expedient bipod by tying together two 12 inch sticks, think enough to support the weight of the weapon. Using 550 cord or the equivalent, he ties the sticks at the center point, leaving enough slack to fold them out in a scissor like manner. He then places the weapon between the two uprights. The bipod is not as stable as other field-expedient items, and should b used only in the absence of other techniques. (6) Forked stake. The tactical situation determines the use of the forded stake. Unless the sniper can drive a forked stake into the ground, this is the least desirable of the techniques; that is, he must use is nonfiring hand to hold the stake in an upright position. Delivering long range precision fire is a near impossibility due to the unsteadiness of the position. 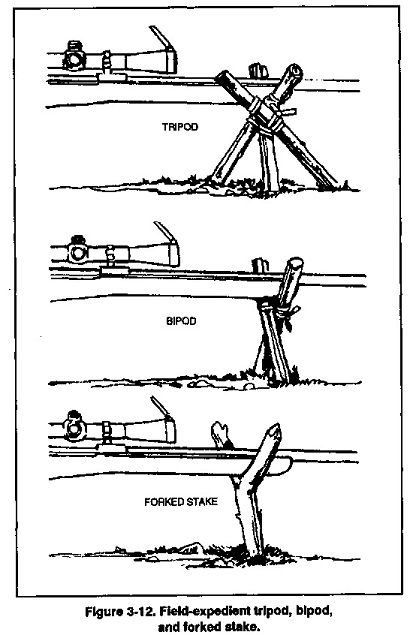 |
|
|
|
|
[#1]
Hell yes
Thanks for sharing that! |
|
|
|
|
[#2]
Awesome!
|
|
|
|
ME, USA
|
[#3]
Great to have, thank you.
|
|
|
MD, USA
|
[#4]
Gracias.
|
|
|
|
[#5]
Thank you ! Can you say tagged.

|
|
|
|
|
[#6]
Great info.
Glad I practice all of these on a regular basis. Txl |
|
|
|
VA, USA
|
[#7]
Is this the same as TC 23-14? That's the manual I had in Sniper Class 6-92. Wasn't sure if this replaced this or not? Those pics and info are in there just the same.
|
|
|
|
[#8]
Originally Posted By halofreefall:
Is this the same as TC 23-14? That's the manual I had in Sniper Class 6-92. Wasn't sure if this replaced this or not? Those pics and info are in there just the same. No, that was the little Training Circular we had when I first went in as well. It was basically dated back to the M21 days, with some updates after the M24 was introduced into the system. 
FM 23-10 came later, and is a much better production than TC 23-14. However, I preferred the SF SOTIC manual at the time, which was Special Forces Sniper Training and Employment. 
|
|
|
|
 Win a FREE Membership!
Sign up for the ARFCOM weekly newsletter and be entered to win a free ARFCOM membership. One new winner* is announced every week!
You will receive an email every Friday morning featuring the latest chatter from the hottest topics, breaking news surrounding legislation, as well as exclusive deals only available to ARFCOM email subscribers.

AR15.COM is the world's largest firearm community and is a gathering place for firearm enthusiasts of all types.
From hunters and military members, to competition shooters and general firearm enthusiasts, we welcome anyone who values and respects the way of the firearm.

Subscribe to our monthly Newsletter to receive firearm news, product discounts from your favorite Industry Partners, and more.
Copyright © 1996-2024 AR15.COM LLC. All Rights Reserved.
Any use of this content without express written consent is prohibited.
AR15.Com reserves the right to overwrite or replace any affiliate, commercial, or monetizable links, posted by users, with our own.


.jpg)


