


Posted: 10/17/2014 2:42:37 PM EDT
|
This is the work of a close friend of mine. He goes by Hellbender on snipershide these are his guides I copied to ensure they aren't lost forever. any question that I can't answer, I will forward onto him.
I'm working up/building my "Ultimate Long Range AR" over the next few days and am going to document some of the work I'm doing to it. I'll soon post in the "SH Semi-Auto Rifles" section the specs (and goals) of the gun and some completed pics. I've messed with AR's for over 30 years, I was an USAR Ordnance officer for 8 years (1981-1988) (schooled heavily in the system, and got to work on a few over the years) and have been an avid hobbyist gunsmith and competitor since the early 80's. Also had a gun shop for several years and have worked on hundreds of these rifles. I have a pretty complete shop with about any machine tool I need, but most of these mods can be done with hand tools, a hand drill and a Dremel. Some of these mods may be controversial and many will say they are not necessary, and that may be true, but they really make a nice gun that will work and feel so slick you won't believe it. I also believe anything you do to make the rifle return to battery more consistently can only help the accuracy and reliability. Anyway.......... Bolt Slick up...... These mods will reduce or eliminate the "brass shaving" problem many rifles exhibit, it will also increase reliability in several ways and make the return to battery very consistent. These pics are of a DPMS LR bolt, but all these things will be the same for AR-15's also. Remember, on all these mods, you are only polishing and slightly (a couple of thousandths) rounding the corners off, you ARE NOT removing a lot of metal. Get the following tools: A pack of black emory paper in mixed grits of 220-400 Dremel tool with some buffing pads and polishing compound Hand drill or drill press or lathe Can of brake cleaner 600 grit lapping compound, here's what I use.... http://www.brownells.com/.aspx/sid=4...pping_Compound A fine sharpening stone. COMPLETELY disassemble the bolt and clean all the oil off everything with brake cleaner Start with the extractor, look at the pic below and polish the area where the extractor slides over the rim of the case, start with the 320 grit paper wrapped around a round rod and finish up with the Dremel, it should look like a mirror after you're done. Don't mess with the actual "hook" that grabs the case rim. I also smooth up the sharp edges on each side of the extractor groove, as these can scrape off brass as the case rim turns during bolt rotation. Check the ejector spring in the hole and make sure it slides freely with nothing grabbing in the hole, stone the sharp edges of the spring where it can rub/scrape on the sides of the hole. Check the ejector in the hole and make sure nothing rubs, polish the face (that touches the shell head) of the ejector, use the stone and the Dremel to a mirror finish. 
Now the bolt body..... The flat, sharp edge on the bolt face (where the extractor sits) needs a small chamfer put on it, also the edges of the ejector hole needs smoothed up. Think of the case head turning and sliding against these sharp edges with several thousand pounds of pressure on it......and you wonder why there are brass shavings there??? 
Chuck the tail of the bolt body (the small end) in a drill or lathe, and while spinning it, wrap some 320 emory cloth around a small, flat tool and polish the bolt face. Here's what it should look like when you are finished: 
Now to the bottom of the bolt; put the bolt in the carrier and find the lugs that grab the shells from the magazine, here's a pic: Slightly round and polish the rear sharp corners (bolt carrier side only) of these lugs, as they can scrape the shoulders of the cases in the mag as the bolt cycles to the rear. (Not all calibers/mags will hit here, but I do it on everything anyway) 
Now we can lap the bolt lugs to the barrel extension...... Take an empty case and cut it in two, then find a spring that will fit inside the case like this: 
Clean the locking lugs on the bolt and inside the barrel extension with the brake cleaner. Assemble the bolt and carrier group all back together, WITHOUT the ejector and extractor in the bolt. Put a little of the 600 grit lapping compound on the rear (bolt carrier side) of each of the bolt locking lugs. Put your spring loaded cartridge in the chamber, slide in the BCG, and assemble the rifle. Pull back slightly on the charging handle (1/2" or so), just enough to work the locking lugs and slightly retract the bolt. The spring inside the case needs cut so that the rifle recoil spring will close the bolt. Work the bolt 100 times or so, put new lapping compound on the lugs every 25 strokes or so. I watch the wear pattern on the bluing on the back of the lugs and quit when I get to about 70% contact on all the lugs, many rifles only hit 3 or 4 lugs when new. You will NOT create excessive headspace by doing this if you use the 600 grit, it is very fine, and will only knock off the high, rough spots on the lugs, it is basically doing what 500-1000 fired rounds would do to a stock bolt. That should finish the bolt, I'll do another writeup when I get time on the carrier and some other stuff. Part 2 HOW-TO: Ultimate AR Bolt Carrier slickum Now I'll attack the bolt carrier, some of these are so rough (esp. the sliding rail surfaces) they look like a wood rasp. Use a fine stone and 320 emory paper to smooth up the surfaces shown in the pics below. Buff them all to a mirror finish when done. 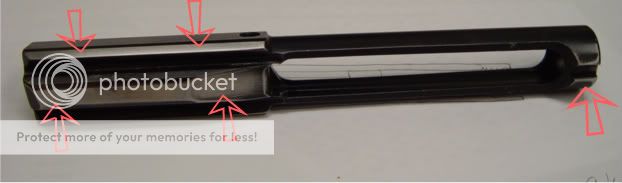
Also slick up the face of the hammer (remove it from the lower receiver) where it slides against the bottom of the Bolt Carrier. 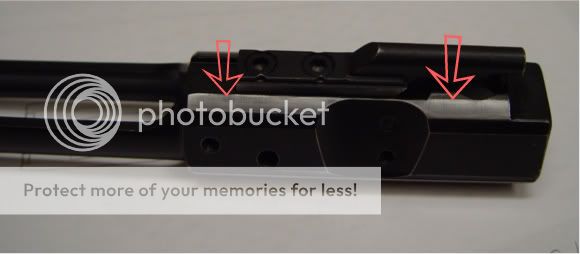
Part 3: The barrel extension usually only needs the feed ramps polished and the sharp edges knocked off the 2 lugs shown in the last pic below. Notice how the rough machine marks run at 90 degrees to the nose of the cartridge (scraping a little off the bullet on the way in). BAD......... 
GOOD......... 
Also note how I knocked off the sharp ridge down the center, which will scratch the case on the way into the chamber. On some guns the two lugs shown below will make longitudinal cuts/scratches on the shoulder and neck of the case upon ejection. Knock off the sharp points and slick up the edges a little to cure this problem. 
Part 4: Wrap a strip of 320 grit emery paper around a snug fitting swab, secure it with a piece of tape. I use a couple of full turns so as to cover the tape. 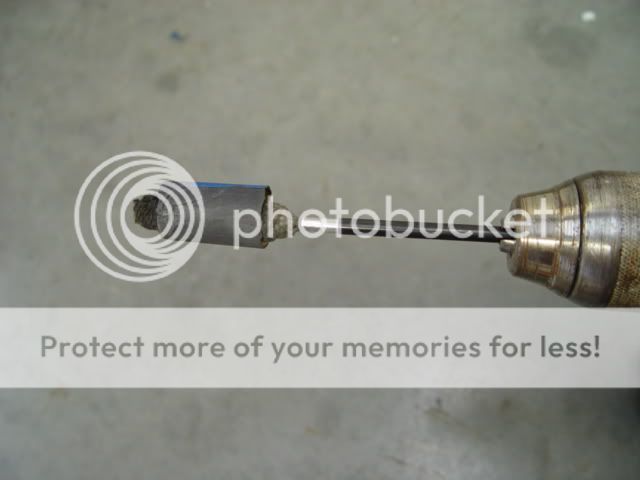
Chuck the rod into a medium speed hand drill and polish the chamber....keep it out of the shoulder area, just polish the straight, parallel walls of the chamber. This will help with extraction and brass life. Here's more than you've ever wanted to know about chamber polishing..... http://www.varmintal.com/a243z.htm On an AR, I just go to 320 grit, it lowers bolt thrust forces about 500-700 lbs over going a full polish to crocus cloth, but still adds to reliability and brass life. Part 5: Disassemble your mags and degrease everything with the brake cleaner. Use the 320 grit paper and smooth up all the sharp edges, there is usually a sharp wire edge on many of the stamped edges, esp. the mag lips. 
Slightly round the sharp corners here 
Check the followers and make sure they slide smoothly and freely the full length of the mag body Part 6: The mag catches are cast and usually have lots of bumps and high spots that need stoned off. You want the catch to work quickly and smoothly with no drag. When we start tuning things later this will be important. Check the spring and plunger for any burrs that drag in the hole. Make sure the catch pivots easily on the pivot pin and the hole is not too tight around the pin. Take some cold blue when you're done and touch everything up. 
Part 7: Many AR's have pins that are very tight and hard to push, requiring a tool (bullet tip, punch, etc) to push them in. The tool tends to slide off the rounded head of the pin and scratch the lower. I chuck mine in the lathe and put a slightly concave indentation on them. If you don't have a lathe, you can chuck the pin in a drill and use a stone on your Dremel and do the same thing. 
Part 8: For those that use the JP Adjustable Gas Blocks (& some other brands), I don't like the single set screw that is supposed to be secured with Locktite (which breaks down under high heat, like a gas block). So I add an extra set screw that locks the gas adjustment screw... 
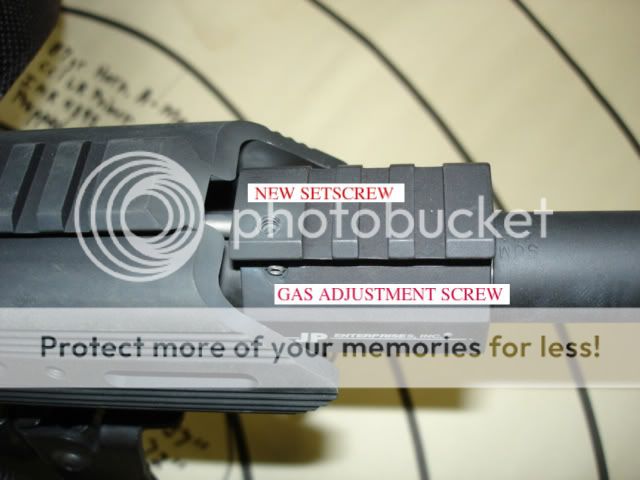
PS: I also always use a CLAMP on style gas block in a small (.750" or smaller dia.) barrel, as I've heard of the set screw type actually deforming the bore of the barrel when tightened. Part 9: IDIOCITY, ie STUPIDITY...definition: med. jur. That state of the mind which cannot perceive and embrace the data presented to it by the senses; and therefore the stupid person can, in general, form no correct judgment. It is a want of the perceptive powers. Ray, Med. Jur. c. 3, Sec. 40. Vide Imbecility. This post concerns the DPMS LR series rifles only. DPMS decided to use the standard AR15 bolt catch and button on the LR series rifle, even though the receiver is almost 1/4" wider at this point. This results in the stock ALUMINUM button usually having only 2 (TWO) threads engaged...... CHECK YOURS!! This is a major malfunction waiting to happen....please reference definition above. Anyway, this is how I fixed it; buy an extended STEEL button, this is the one I used...... http://www.brownells.com/.aspx/pid=1...GAZINE_RELEASE Take a file or a belt sander and cut off all the "oversized" part, making a long, standard sized button. This will allow at least 4-5 STEEL threads to secure the button, it's a little higher than stock, but you could cut it down more if you wanted it shorter. 
Part 10: Checking and adjusting Bolt Catch overrun. The amount of Bolt Catch overrun is important, as too little may not allow the Bolt Catch time to fully engage, and too much (most common) beats excessively on the Catch and causes a "slamming" feel when the bolt locks back on the last shot of a mag. It is also hard on your lower receiver. On Large frame AR's, this is a common cause of premature Bolt Catch breakage, as the heavy parts really slam the Stop. Doubly important if you have added mass with a Tubb weight or heavy buffer. First (for A1 and A2 style stocks only), remove the Buffer and Buffer Spring, take a flashlight and look down the Buffer Tube and MAKE SURE the Buttstock Screw is below the level of the Buffer Tube end. Many of these screws are too long and protrude into the end of the tube. This is where the Buffer strikes and stops the rearward movement of the Buffer. If it is too long, grind or file off the end of the screw until it is below flush. With the rifle fully re-assembled (if you have a Tubb weight, install it also), pull the charging handle ALL the way to the rear and hold it there. Push in the Bolt Catch and hold it. Check how much gap there is between the Catch and the Bolt face, it should be about .075 inches (2mm). This is about the thickness of a nickel. If it is too close, you can sand or file some off the plastic snubber on the rear of the Buffer. If it is too wide (most common), remove the buffer and spring, then place shims (Quarters are almost the perfect size, and work well) down in the bottom of the Buffer Tube until the gap is correct. When you get the gap correct, remove the shims, and drill a small hole in the center of them so the air hole in the Buttstock Screw is continued. Check all your mags and make sure they engage the Bolt Catch properly, sometimes the follower hangs a little in the last little bit of travel and will not engage the Catch fully. 11. Buffer Spring Tuning What we are doing here is adjusting your Buffer Spring rate to your individual gun and load. Stock springs are a "one size fits all" and are almost always much heavier than needed. This mod, coupled with an Adjustable Gas Block (AGB), will allow you to adjust both the amount of rearward movement (w/ AGB), and forward movement (by adjusting Buffer Spring) of the Bolt Carrier Group. The recoil feel, smoothness, and gun movement will be considerably lessened when these 2 forces are balanced properly. FIRST: Do all the other mods (1-10) I've outlined in the last few weeks. Click on my Username in the upper left corner, and then hit "View Posts" to look them up. SECOND: You MUST have your load worked up and finalized and your adjustable gas block (if equipped) adjusted properly (per directions with gas block). If you are gonna be shooting a bunch of different loads, don't do this mod, as you may need to buy a new spring and start over if your load changes very much in either gas pressure or recoil energy. THIRD: Only do this with a chrome silicone spring (I use Tubb's CSS) as a normal spring will change rates as the spring wears. Now, on to the tuning. Load up 20 rounds with 1/2 grain LESS powder than your normal, finalized load; OR, as an alternate, or if you shoot factory loads, remove your scope. I usually pull my scope off, or, if you have a heavy stock, like a PRS, pull it off. What you are doing here is either reducing the recoil/gas pressure input OR reducing the mass the recoil spring has to work against. This makes sure the spring cutting will be on the safe side and not cut too much. Load a magazine full of your loads and ready the gun for firing. Now, while holding the rifle VERY LOOSELY at arms length (let the rifle free recoil as much as possible, NOT against your shoulder) shoot a couple of rounds. If the rifle functions properly, remove the buffer spring and cut a full coil off the buffer spring (not counting the first flat coil). I use a Dremel tool with a thin cutoff wheel to cut the spring. Replace the spring with the cut end towards the butt of the rifle. Reassemble the rifle and repeat this process, 1 coil at a time, until the rifle malfunctions, or you remove 6 coils maximum, whichever comes first. Make sure you always hold the rifle at arms length, loosely, as you do this. My guns, which are slicked up, always go the full 6 coils (plus the flat coil, which does not count). Now, go back to your normal load and readjust your AGB, if equipped. Fitting Barrel Extension to Upper Receiver This is a little out of order with the other HOW-TO's but here it is anyway. Most people use Locktite for this step and it is a lot easier, but...This is the ULTIMATE AR !!! So, we're gonna do it right. First we get to measure the Inside Diameter (ID) of the upper where the Barrel Extension slides into, then we will measure the Outside Diameter (OD) of the Barrel Extension. Check the Barrel Extension for any burrs or high spots. If the difference is .0025" or less, you are good to go, no need for a shim. 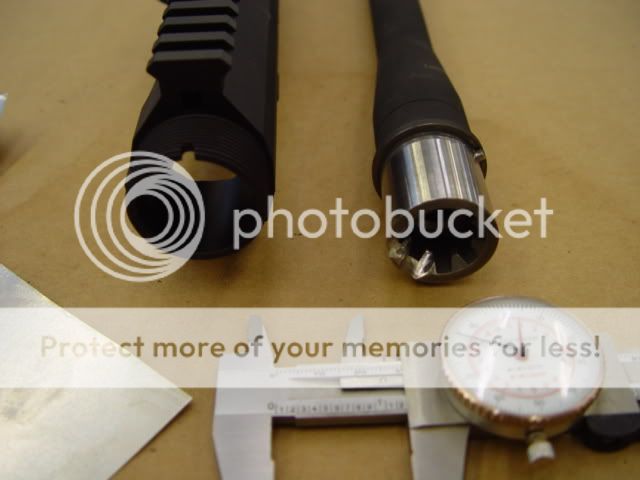
Now we get to do some math..... 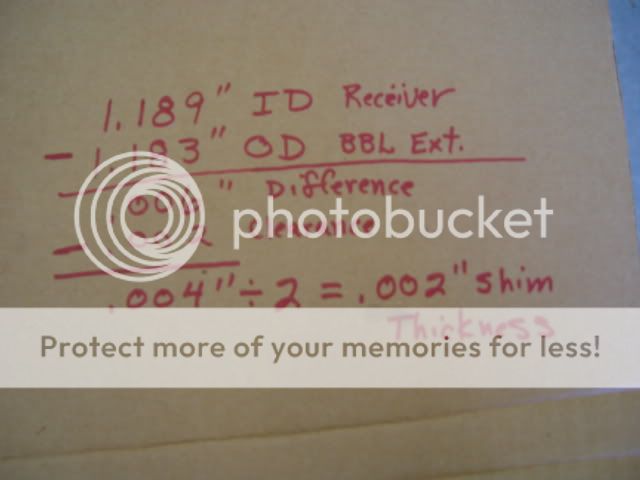
Then we make a trip to the local Industrial supply house and get some Stainless Steel shim stock of the correct thickness (in this case .002"). Get a pair of sharp scissors and cut the shim to fit around the barrel extension (make sure it clears the feed ramps). I take a flat stone and knock the burrs off the shim to make it flat again. 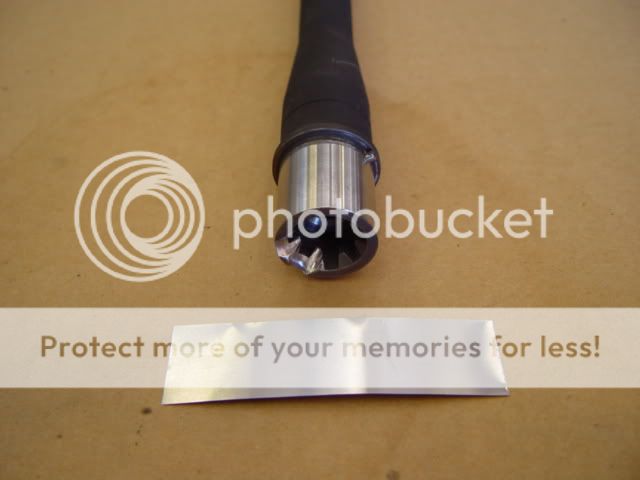
Wrap it tightly around the extension, with the seam to the right or left side of the rifle (NOT the top or bottom), secure it with a piece of tape to get it started (remove the tape before you slide it all the way in). I put a drop of blue Locktite in the seam right before I put it all together 
You can heat the receiver up a little if it's a little tight getting together. 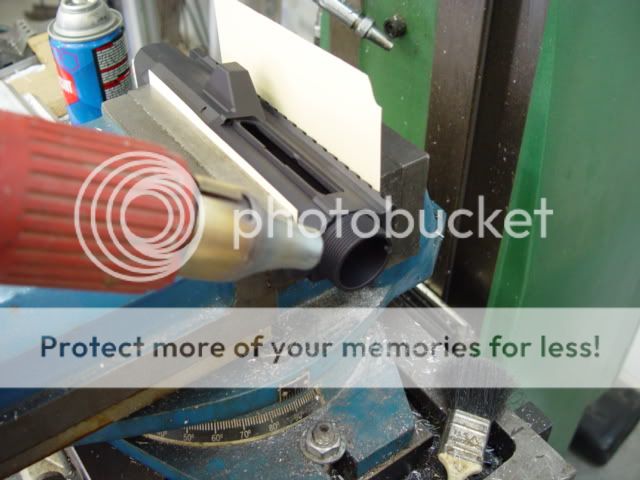
DON'T FORGET to install the ejection port cover before the barrel nut! Install the barrel nut and torque to spec. Part 12 for the lazy Get an old Weaver ring and grind off the excess and throw the top steel part away. I used a piece of 1/16" thick Kydex, but any plastic will do. Put the ring base in a location that will clear everything and be easy to get to the thumbscrew on the offside. Cut the plastic to fit, and screw it to the base, I used the stock Weaver screws, the angle of the base screw location holds the plastic at the correct angle. I have a brass catcher, but it is a pain. This piles it in a neat little pile right beside the rifle. They sell these premade for AR15's, but they have never worked very well for me, and the attachment screw never fits with my scope ring location. The premade ones don't work well on the large platform AR's, as they are too high. Excuse the spots all over the gun, I haven't cleaned the mud off it from my last match! Only downside I can tell is you will either need to trim your gun case foam to fit, or I just remove it before I put it in. 
|
|
This is turning into an awesome thread. Will you go into your procedure for installing the barrel? Im sure you probably true them as you are more than happy to mill everything else but what grease do you use and then at what psf do you use when tightening down.
Thanks for all the cool info. I am trying to squeeze more accuracy out of my maten and am always open for some voodoo ideas. eta post again so you have a second post to add to you are going to run out of room very soon. |
|
Quoted:
This is turning into an awesome thread. Will you go into your procedure for installing the barrel? Im sure you probably true them as you are more than happy to mill everything else but what grease do you use and then at what psf do you use when tightening down. Thanks for all the cool info. I am trying to squeeze more accuracy out of my maten and am always open for some voodoo ideas. eta post again so you have a second post to add to you are going to run out of room very soon. First, true the receiver face so the barrel will sit perfectly flush. I've never had Brad build me an AR10 mine he's worked on is an AR15. He has a lapping tool that fits into his lathe for the process. If you don't have access to a machine shop, brownells sells a handheld tool Brownells Just use standard moly grease nothin fancy and torque to standard milspec level. I've written down what ft/lbs he uses but I can't find my notes right now. The numbers are standard though. This combined with stainless shim to remove any and all play will ensure your upper to be perfectly aligned with no wobble. |
|
Quoted:
First, true the receiver face so the barrel will sit perfectly flush. I've never had Brad build me an AR10 mine he's worked on is an AR15. He has a lapping tool that fits into his lathe for the process. If you don't have access to a machine shop, brownells sells a handheld tool Brownells Just use standard moly grease nothin fancy and torque to standard milspec level. I've written down what ft/lbs he uses but I can't find my notes right now. The numbers are standard though. This combined with stainless shim to remove any and all play will ensure your upper to be perfectly aligned with no wobble. Quoted:
Quoted:
This is turning into an awesome thread. Will you go into your procedure for installing the barrel? Im sure you probably true them as you are more than happy to mill everything else but what grease do you use and then at what psf do you use when tightening down. Thanks for all the cool info. I am trying to squeeze more accuracy out of my maten and am always open for some voodoo ideas. eta post again so you have a second post to add to you are going to run out of room very soon. First, true the receiver face so the barrel will sit perfectly flush. I've never had Brad build me an AR10 mine he's worked on is an AR15. He has a lapping tool that fits into his lathe for the process. If you don't have access to a machine shop, brownells sells a handheld tool Brownells Just use standard moly grease nothin fancy and torque to standard milspec level. I've written down what ft/lbs he uses but I can't find my notes right now. The numbers are standard though. This combined with stainless shim to remove any and all play will ensure your upper to be perfectly aligned with no wobble. I have that facing tool from Brownells and it works quite well. I've found that it only takes a few minutes to go from 50% of the face touching the barrel to 100% touching on most recievers. Some come right from the factory perfect, but not very many. Mag Tactical did, and the extensions fit snug and cleanly. I honestly think the Mag Tac upper would be a good precision upper. While I haven't polished the lugs on the bolt like you've shown, I have stoned the extension down to keep it from slicing the brass as badly. I have a small selection of stones and I just go slow and try to break the edges of the feed ramps on the extension, especially the knob between them. Great thread, thanks. |
|
I'm Hellbender from the Hide and I wrote the above articles several years ago.
Thank you wheelchairman for saving these posts. I don't post much anymore, as my life is very busy. I will try to keep an eye on these posts and answer questions as I get the time. Chris, the reason I put the seam on the side is most of the pressure from loading the bipod, laying on barricades, sandbags, etc. is up and down, not side to side. Does it REALLY matter?? Probably not, but seems to make sense to me. The hand guard takes a lot of whacks during use, and most of these are up and down. |
|
Quoted:
I'm Hellbender from the Hide and I wrote the above articles several years ago. Thank you wheelchairman for saving these posts. I don't post much anymore, as my life is very busy. I will try to keep an eye on these posts and answer questions as I get the time. Chris, the reason I put the seam on the side is most of the pressure from loading the bipod, laying on barricades, sandbags, etc. is up and down, not side to side. Does it REALLY matter?? Probably not, but seems to make sense to me. The hand guard takes a lot of whacks during use, and most of these are up and down. Thanks! I'm thinking of pulling one of my barrels that I haven't gotten great groups with and trying this. I agree with you about whether it REALLY matters, yeah probably not. In my mind, I would think top/bottom would make more sense because as the barrel heats up and transfers heat to the shim and upper receiver, these three components will all heat/cool at different rates, potentially causing some different stressors. If this were to occur, I would rather have the shift in POI be a vertical string (a very slight one hopefully) rather than a horizontal one. Either way, I don't think this amount of tension would have a noticeable affect, especially if you cut it as precise as possible and have a very slim seam. Also, I have a FF tube that takes most of the abuse instead of the barrel itself. Anyways, I appreciate your response and your insight. I needed someone to confirm that this is a good method (the shimming). I first caught wind of this method when someone from this forum posted this video https://www.youtube.com/watch?v=pJL-IscH_jo |
|
Quoted:
Is there any harm in an interference fit between the upper and barrel extension? If so, which part would you machine to get that close slip fit? A slight interference fit is fine, as long as it's not more then what you could install by heating the upper to 200 degrees or so. If it was more than that, I would machine the bbl. extension, I don't like to remove the anodizing anywhere I don't have to. The extension would be easier to cut down, anyway. |
|
Started .308 ARs back in 1999.
Have gone through @ a dozen of them, all ARMALITEs. Never met an ARMALITE 20" AR-10(A4 or T) that couldn't shoot multiple five (5) shot groups sub MOA with fodder that it liked. Never owned a 20" 10(A4 or T) that didn't shoot sub 0.5MOA five (5) shot groups @ 100yds. I'll stick with ARMALITE (and the new owners, till further notice), seems that it might da-da-damn well be less work with other engineering and craftsmanship already taken care of. Not hatin', just lazy. 
Best to all. BTW, looks like the competition has driven ARMALITE's prices down, even with Quantitative easing thrown it the works. Might just have to break down and get an "A" model. 
Yeah, I can remember Monica and Tom Clancy (card carrying genius and Shooter Team Member), old school. Tom!!!, sir... 
BTW, he hand built this chrome-lined (for those is Rio Linda) A4 for me back in 2000: 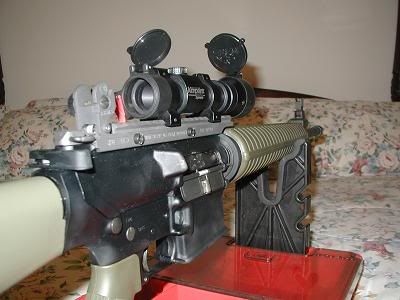
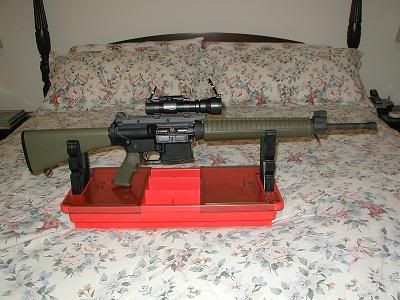
It shot equal to the rifle that I returned to him. Thank Goodness and his skills. The evening before Bambi Bashing Opening Day, I drove up to the farm and sighted the AIMPOINT 2000 {1.5MOA RedDot) @ 100yds. a few shots were for fine tuning at 100yds, and then and only then, did I shoot two (2) five (5) shot groups to finalize my engagement POI: 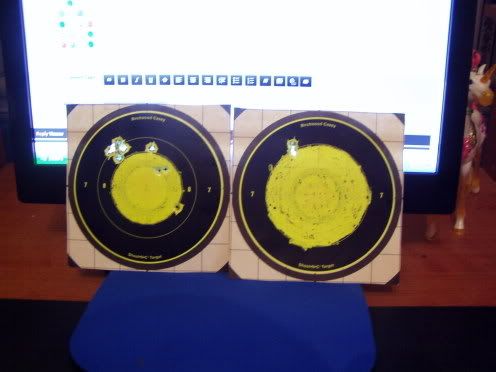
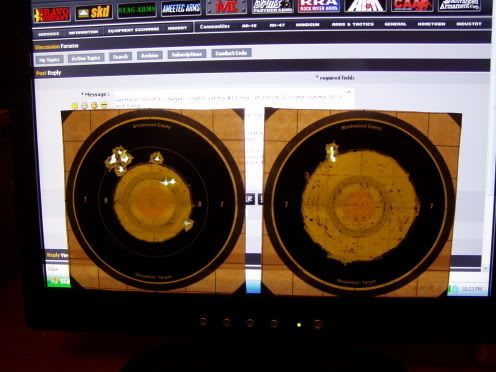
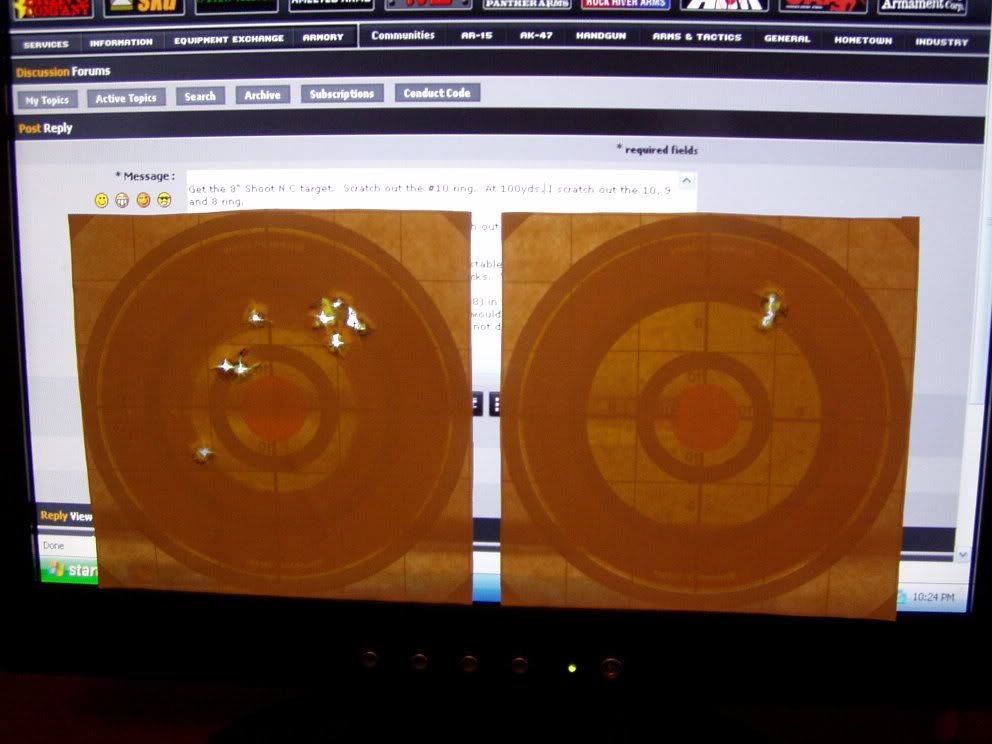
Used to do it for a living on the two (2) way range... just so da-da-damn much slower with an M40A1. There was less than one (1) hour of light (including the 30min after sundown) left in the day when I first started. |
|
Quoted:
First, true the receiver face so the barrel will sit perfectly flush. I've never had Brad build me an AR10 mine he's worked on is an AR15. He has a lapping tool that fits into his lathe for the process. If you don't have access to a machine shop, brownells sells a handheld tool Brownells Just use standard moly grease nothin fancy and torque to standard milspec level. I've written down what ft/lbs he uses but I can't find my notes right now. The numbers are standard though. This combined with stainless shim to remove any and all play will ensure your upper to be perfectly aligned with no wobble. Quoted:
Quoted:
This is turning into an awesome thread. Will you go into your procedure for installing the barrel? Im sure you probably true them as you are more than happy to mill everything else but what grease do you use and then at what psf do you use when tightening down. Thanks for all the cool info. I am trying to squeeze more accuracy out of my maten and am always open for some voodoo ideas. eta post again so you have a second post to add to you are going to run out of room very soon. First, true the receiver face so the barrel will sit perfectly flush. I've never had Brad build me an AR10 mine he's worked on is an AR15. He has a lapping tool that fits into his lathe for the process. If you don't have access to a machine shop, brownells sells a handheld tool Brownells Just use standard moly grease nothin fancy and torque to standard milspec level. I've written down what ft/lbs he uses but I can't find my notes right now. The numbers are standard though. This combined with stainless shim to remove any and all play will ensure your upper to be perfectly aligned with no wobble. Using the brownells tool for squaring the face of the receiver where the barrel mates into it, does the tool end up changing the inner dimensiion at all with the tool running inside? I have an upper and barrel that are a very tight fit and didn't want to create a situation where the tolerances increaseed and then need shimming. Trying to understand which operation is more important to accuracy, the barrel/ receiver fit or the absolute squareness of the face of the receiver. In a perfect world,both, I am sure .... but don't want to try to fix something that might not be broken and end up creating worsened tolerances elsewhere. Thanks |
|
Quoted:
Using the brownells tool for squaring the face of the receiver where the barrel mates into it, does the tool end up changing the inner dimensiion at all with the tool running inside? I have an upper and barrel that are a very tight fit and didn't want to create a situation where the tolerances increaseed and then need shimming. Trying to understand which operation is more important to accuracy, the barrel/ receiver fit or the absolute squareness of the face of the receiver. In a perfect world,both, I am sure .... but don't want to try to fix something that might not be broken and end up creating worsened tolerances elsewhere. Thanks Quoted:
Quoted:
Quoted:
This is turning into an awesome thread. Will you go into your procedure for installing the barrel? Im sure you probably true them as you are more than happy to mill everything else but what grease do you use and then at what psf do you use when tightening down. Thanks for all the cool info. I am trying to squeeze more accuracy out of my maten and am always open for some voodoo ideas. eta post again so you have a second post to add to you are going to run out of room very soon. First, true the receiver face so the barrel will sit perfectly flush. I've never had Brad build me an AR10 mine he's worked on is an AR15. He has a lapping tool that fits into his lathe for the process. If you don't have access to a machine shop, brownells sells a handheld tool Brownells Just use standard moly grease nothin fancy and torque to standard milspec level. I've written down what ft/lbs he uses but I can't find my notes right now. The numbers are standard though. This combined with stainless shim to remove any and all play will ensure your upper to be perfectly aligned with no wobble. Using the brownells tool for squaring the face of the receiver where the barrel mates into it, does the tool end up changing the inner dimensiion at all with the tool running inside? I have an upper and barrel that are a very tight fit and didn't want to create a situation where the tolerances increaseed and then need shimming. Trying to understand which operation is more important to accuracy, the barrel/ receiver fit or the absolute squareness of the face of the receiver. In a perfect world,both, I am sure .... but don't want to try to fix something that might not be broken and end up creating worsened tolerances elsewhere. Thanks It should not remove any material where there isn't lapping compound. I put a coat of oil on the part that enters the upper. Worked fine for the five ARs I've done it to. |
|
Quoted:
As far as I know, a lapping tool for the heavy platform ARs doesn't exist for sale by anyone at this point. Quoted:
Quoted:
Does the lapping tool work on AR15 and AR10/LR308 uppers? I'm tempted to buy one and give it a try. As far as I know, a lapping tool for the heavy platform ARs doesn't exist for sale by anyone at this point. I think you are correct. I had to make one for my .308 |
|
I can't add much to some of the topics here, but my first ar I polished the sliding surfaces of the bolt carrier, hammer, etc then treated them with a metal treatment to enhance lubricity of the metal.
The rifle felt like it was riding on ball bearings when you pull the charging handle. A big contrast to some of the factory rifles that feel like sand is in the action when you pull the bolt back. Did it enhance reliability? I don't know for sure, but it sure feels better than it did before. |
|
I've been following these techniques for a while as well. I remember the original thread on SH.
I also follow Robert Whitley's accuracy enhancement guide. The difference is basically hand-fitting and polishing all the points of conflict, versus slapping parts together. Here's a Krieger barrel that I did for a friend of mine. He was only getting 1.5" groups at 100yds at best. Barrel needed bedding to the upper, and the gas system needed work, with an ArmaLite tube vs, the AR15 that was in it, DPMS aluminum gas block needed replacement, etc. Before: 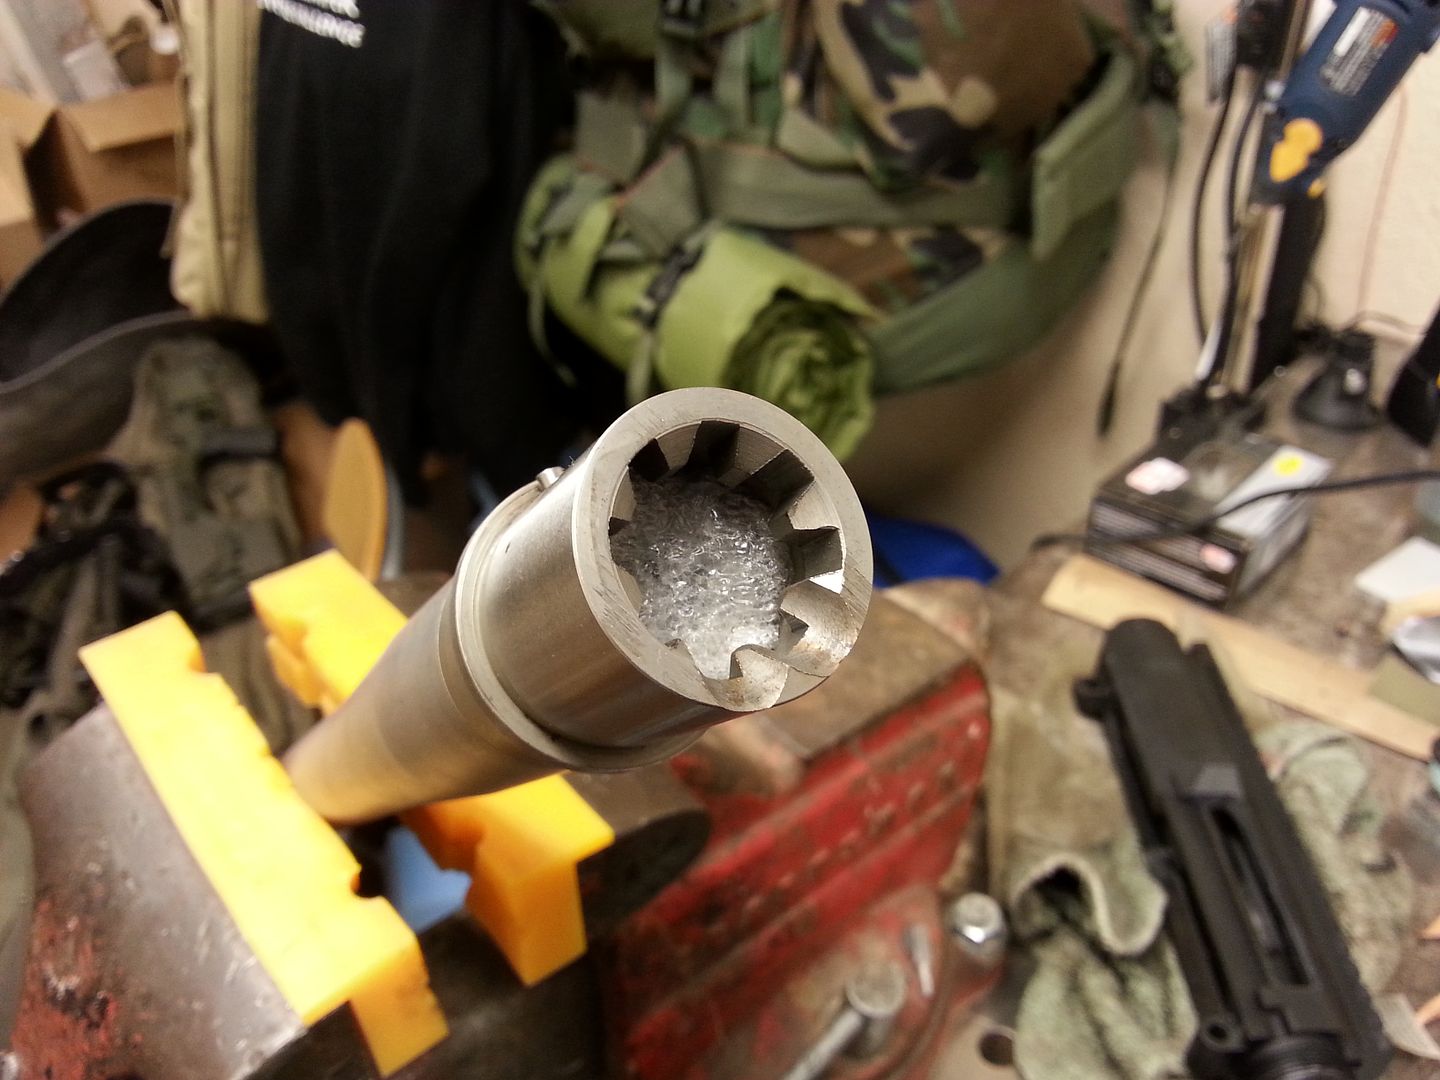
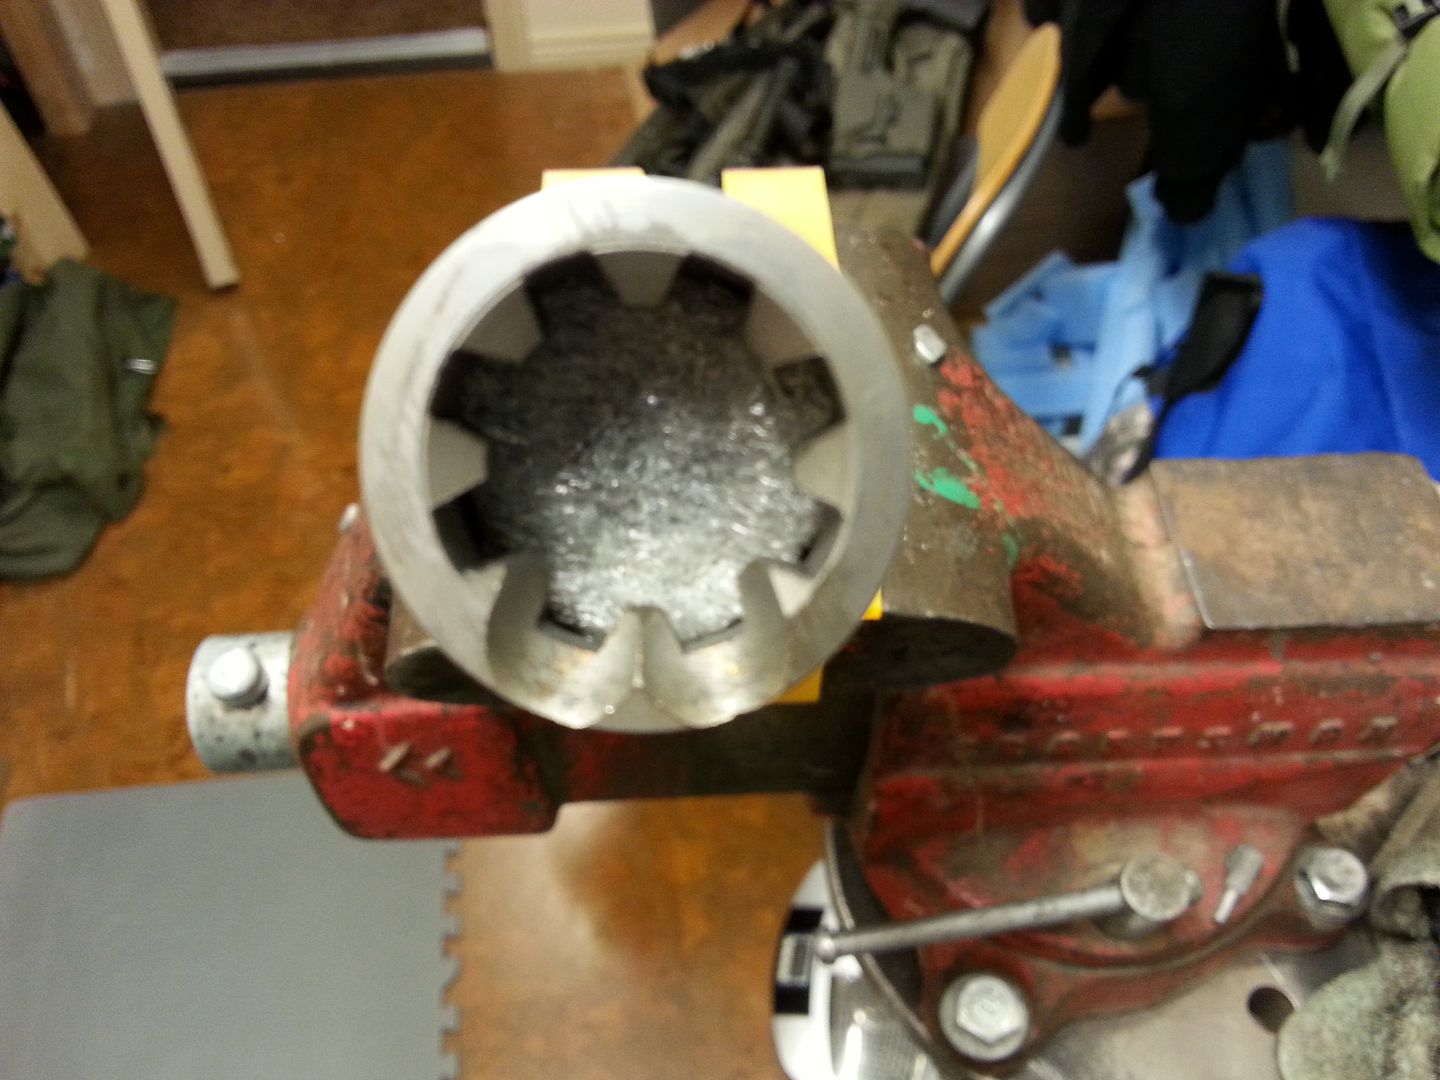
After: 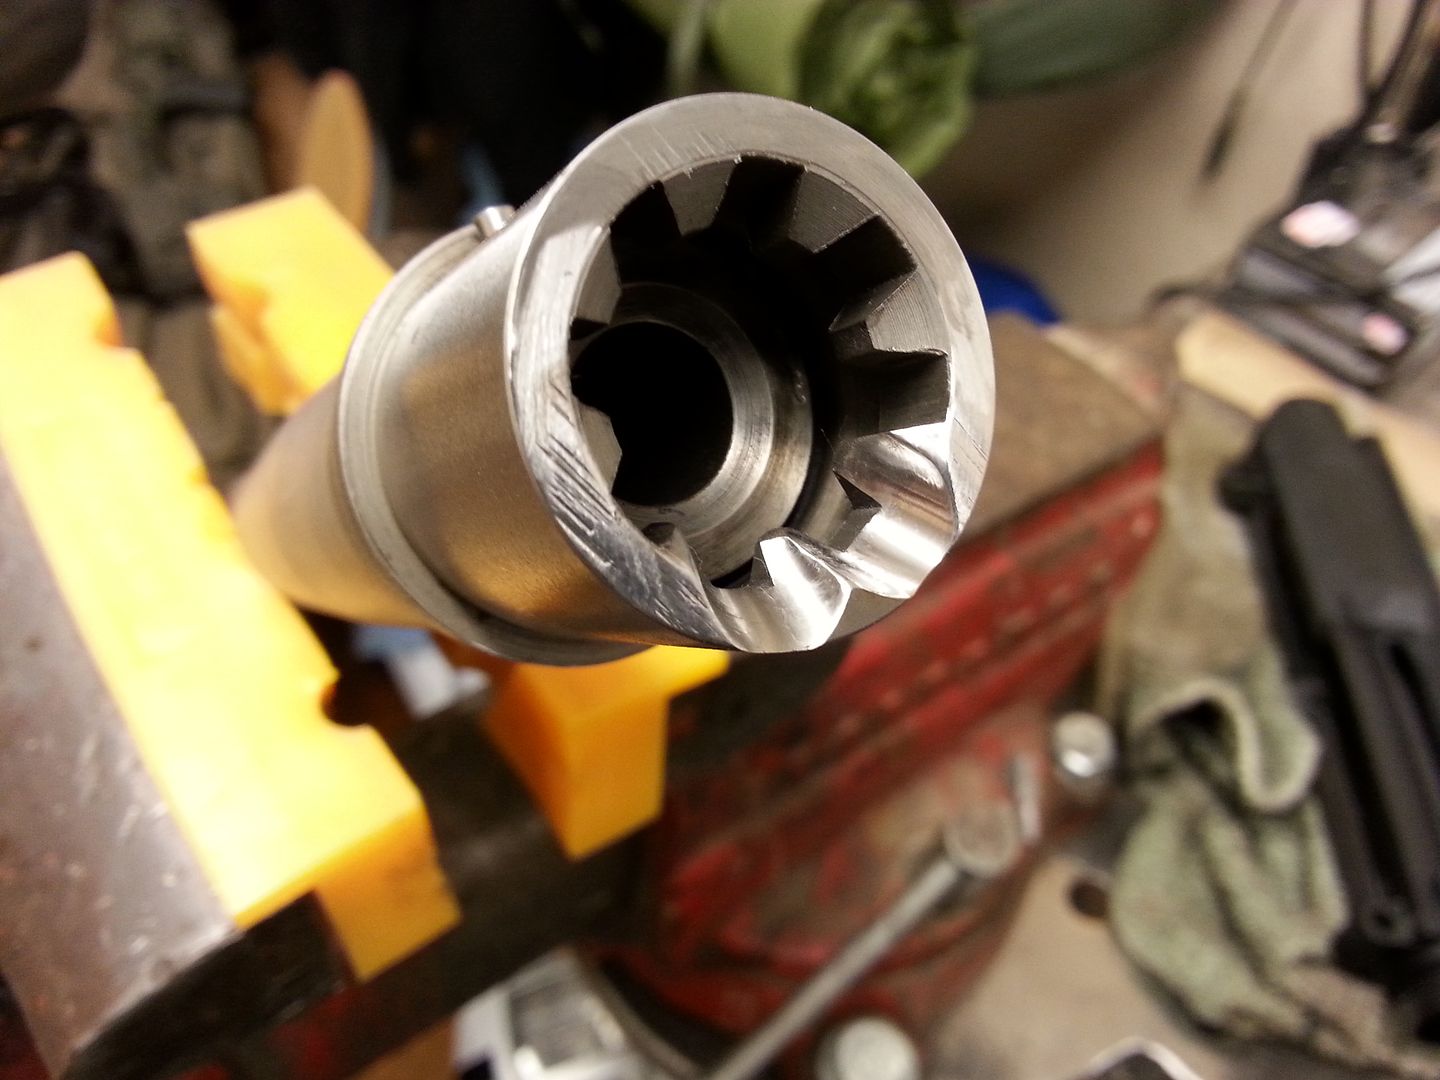
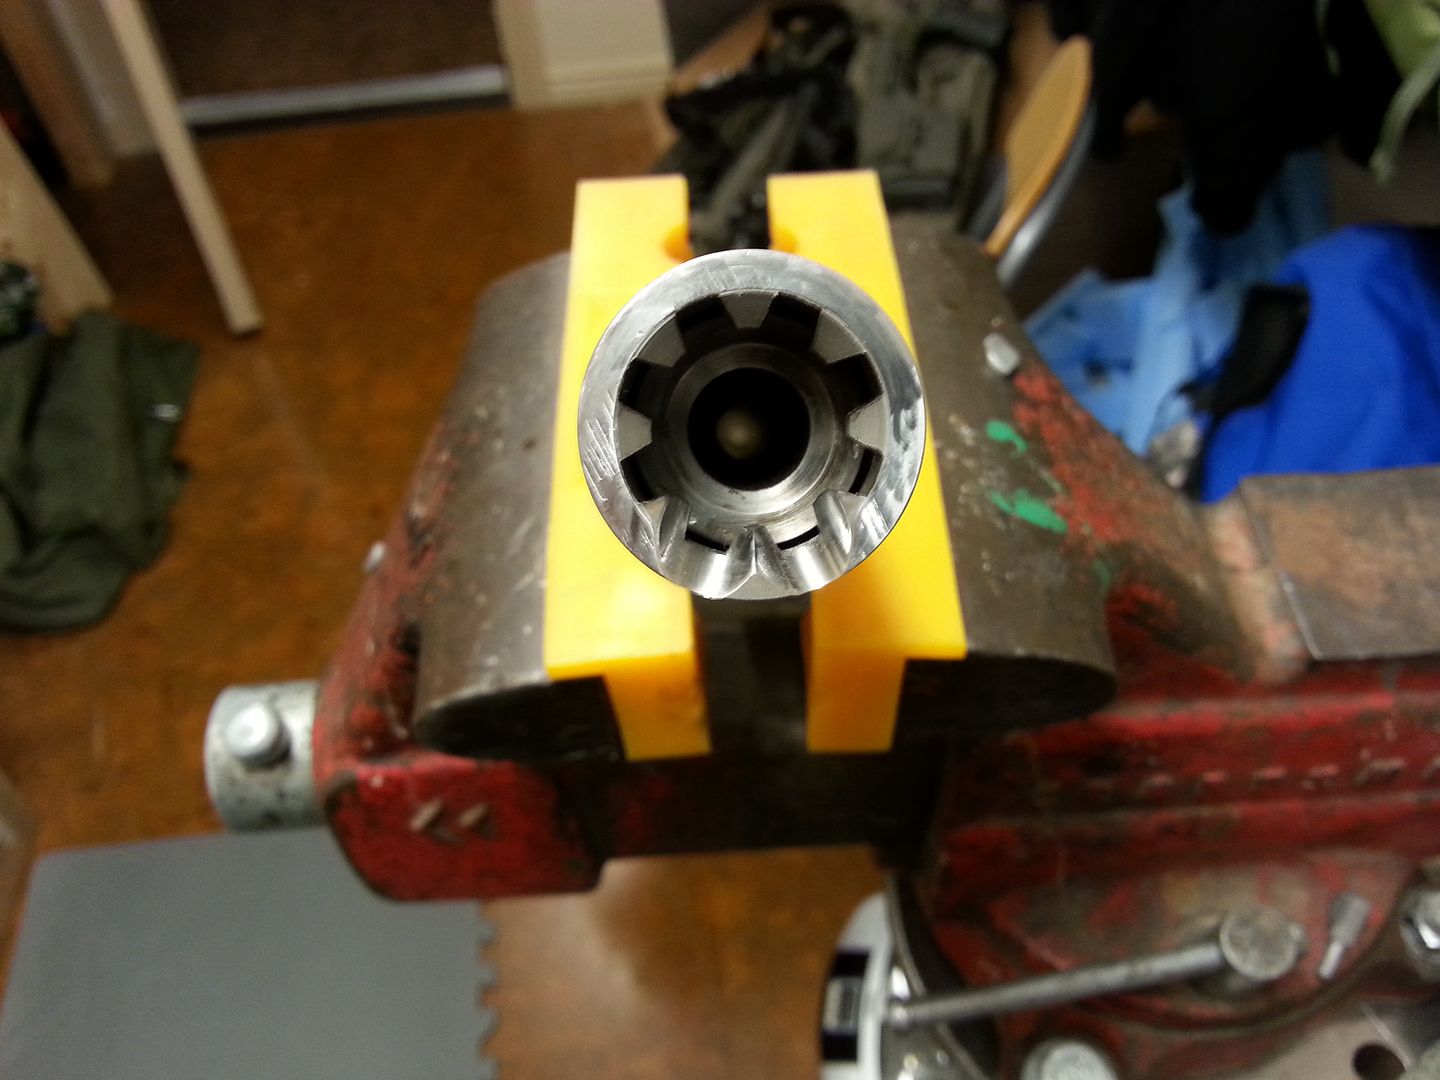
You can see some ugly tool marks that were already there, but are inconsequential to function and accuracy. I wasn't too impressed with that extension aesthetically, but after all the work I did, the gun shoots into the .6's with a random 155gr SMK load he had, 5rd groups. |
|
The only thing i would change is the method for polishing a chamber.
Instead of the mop, emery paper etc. I use a case fired from that chamber. Pop the primer open the flash hole (not too much) just enough so a dremel polishing pad's mandrel threads in to the hole. I then use Colgate White toothpaste (none of this extra bright, high what ever) basic colgate. FWIW: it's an old smith trick for cleaning up revolver actions. ANYWAY ...................... mandrel is secure in brass case, toothpaste rubbed on the case. Dremel mandrel secure in dremel flex extension. place a cotton ball or piece of rag in the barrel, to minimize debris from the bbl. Run the case in chamber 2-3x. Wipe out chamber, inspect rinse & repeat 1 maybe 2 more times. There's no need to get carried away. That case was fired and formed to that chamber. After it's done a good cleaning of the chamber area and barrel, completes the job You could also use a section of cleaning rod IF you don't have the dremel and or accessories for them. |
|
Quoted:
I've been following these techniques for a while as well. I remember the original thread on SH. I also follow Robert Whitley's accuracy enhancement guide. The difference is basically hand-fitting and polishing all the points of conflict, versus slapping parts together. Here's a Krieger barrel that I did for a friend of mine. He was only getting 1.5" groups at 100yds at best. Barrel needed bedding to the upper, and the gas system needed work, with an ArmaLite tube vs, the AR15 that was in it, DPMS aluminum gas block needed replacement, etc. Before: http://i1085.photobucket.com/albums/j422/LRRPF52/20150127_2223231_zpsuhdmsnnt.jpg http://i1085.photobucket.com/albums/j422/LRRPF52/20150127_2223351_zps9evcercm.jpg After: http://i1085.photobucket.com/albums/j422/LRRPF52/20150127_2234041_zpsjlvywxqp.jpg http://i1085.photobucket.com/albums/j422/LRRPF52/20150127_2233571_zpsfc1dub7e.jpg You can see some ugly tool marks that showed up, but are inconsequential to function and accuracy. I wasn't too impressed with that extension aesthetically, but after all the work I did, the gun shoots into the .6's with a random 155gr SMK load he had, 5rd groups. You messed up that Krieger! |
|
Quoted:
The only thing i would change is the method for polishing a chamber. Instead of the mop, emery paper etc. I use a case fired from that chamber. Pop the primer open the flash hole (not too much) just enough so a dremel polishing pad's mandrel threads in to the hole. I then use Colgate White toothpaste (none of this extra bright, high what ever) basic colgate. FWIW: it's an old smith trick for cleaning up revolver actions. ANYWAY ...................... mandrel is secure in brass case, toothpaste rubbed on the case. Dremel mandrel secure in dremel flex extension. place a cotton ball or piece of rag in the barrel, to minimize debris from the bbl. Run the case in chamber 2-3x. Wipe out chamber, inspect rinse & repeat 1 maybe 2 more times. There's no need to get carried away. That case was fired and formed to that chamber. After it's done a good cleaning of the chamber area and barrel, completes the job You could also use a section of cleaning rod IF you don't have the dremel and or accessories for them. Why would polishing a chamber be necessary? Considering the 'precision' application Serious question; I'm not trying to be a smart*ss. Just trying to add to my ever-growing quest for knowledge |
|
Quoted:
You messed up that Krieger! Quoted:
Quoted:
I've been following these techniques for a while as well. I remember the original thread on SH. I also follow Robert Whitley's accuracy enhancement guide. The difference is basically hand-fitting and polishing all the points of conflict, versus slapping parts together. Here's a Krieger barrel that I did for a friend of mine. He was only getting 1.5" groups at 100yds at best. Barrel needed bedding to the upper, and the gas system needed work, with an ArmaLite tube vs, the AR15 that was in it, DPMS aluminum gas block needed replacement, etc. Before: http://i1085.photobucket.com/albums/j422/LRRPF52/20150127_2223231_zpsuhdmsnnt.jpg http://i1085.photobucket.com/albums/j422/LRRPF52/20150127_2223351_zps9evcercm.jpg After: http://i1085.photobucket.com/albums/j422/LRRPF52/20150127_2234041_zpsjlvywxqp.jpg http://i1085.photobucket.com/albums/j422/LRRPF52/20150127_2233571_zpsfc1dub7e.jpg You can see some ugly tool marks that showed up, but are inconsequential to function and accuracy. I wasn't too impressed with that extension aesthetically, but after all the work I did, the gun shoots into the .6's with a random 155gr SMK load he had, 5rd groups. You messed up that Krieger! How? The barrel extension was the only thing touched, and it was covered in tool marks. The reason for de-edging and polishing feed ramps is to prevent meplats from HPBT's getting shaved or stuck on the transition from the upper to the extension. I messed up nothing. Gun shoots twice as good as it did from before, like a Krieger should, but that had nothing to do with the polishing the extension, and was more a function of bedding and using high torque for the nut. |
|
Quoted:
Why would polishing a chamber be necessary? Considering the 'precision' application Serious question; I'm not trying to be a smart*ss. Just trying to add to my ever-growing quest for knowledge Quoted:
Quoted:
The only thing i would change is the method for polishing a chamber. Instead of the mop, emery paper etc. I use a case fired from that chamber. Pop the primer open the flash hole (not too much) just enough so a dremel polishing pad's mandrel threads in to the hole. I then use Colgate White toothpaste (none of this extra bright, high what ever) basic colgate. FWIW: it's an old smith trick for cleaning up revolver actions. ANYWAY ...................... mandrel is secure in brass case, toothpaste rubbed on the case. Dremel mandrel secure in dremel flex extension. place a cotton ball or piece of rag in the barrel, to minimize debris from the bbl. Run the case in chamber 2-3x. Wipe out chamber, inspect rinse & repeat 1 maybe 2 more times. There's no need to get carried away. That case was fired and formed to that chamber. After it's done a good cleaning of the chamber area and barrel, completes the job You could also use a section of cleaning rod IF you don't have the dremel and or accessories for them. Why would polishing a chamber be necessary? Considering the 'precision' application Serious question; I'm not trying to be a smart*ss. Just trying to add to my ever-growing quest for knowledge Didn't think you were. If one doesn't ask, one never learns why. Outside of the repetitive SHOULD I WRITE A LETTER TO ATF FOR CLARIFICATION 
IMO "Precision" is a term taken loosely. Precision this, precision that. Like that word TACTICAL 
IF one is taking the time / effort to clean up and smooth moving parts . Polishing the chamber is one step to not overlook. Much easier to clean up prior to installation. I've encountered tight chambers in higher $$ end "Precision" barrels before. Nothing is perfect, getting your gun that much closer is. One may or may not choose to do anything on their gun. For those who do, as shown in this thread, you can do as the OP does (polish chamber) or simplify it . There's not need to cut a case, find a spring that fits. Then cut spring to size. Remove parts from BCG. When the same results can be done with spent case, dremel, or cleaning rod. The thread has some information i've done for years, some not, or thought about before. . I like the picture / write up, walk through, and applaud the OP for taking the time passing it on. |
|
Quoted:
Question... Wouldn't a polished chamber make it more difficult for the case to "grab" when it is fired? I have heard that the chamber needs to be smooth but enough rough enough to grab the case when it is fired. I'm not the most experienced but that makes absolutely no sense to me. The case is mechanically locked in the chamber, there's no reason I can see for it to grab anything. |
|
Quoted:
Question... Wouldn't a polished chamber make it more difficult for the case to "grab" when it is fired? I have heard that the chamber needs to be smooth but enough rough enough to grab the case when it is fired. Rough chamber is a no no. It's one of the most over looked items, when diagnosing extraction issues. Is it a major one, of course not. However it's been known, on more then 1 occasion to cause issues. We can debate it back and for for 2-3 pages. That takes away from the OP's intent. One can start another thread on the subject, if they like. |
|
Just want to say a big thank you to OP, LRRPF52, jim, and all who've contributed to this thread.
I read and studied all this great information when I was building my rifle. The results far exceeded my expectations, and I continue to learn & improve every time out. Thanks fellas
|
|
Quoted:
Someone with the brownells receiver lapping tool, can you post some caliper measurements? OD of the section that slides into the upper is the main one I would need. 0.997" for the extension/guide portion inside the receiver 1.250" for the lapping face surface |

|
Quoted:
I had Tubb's reloading videos on YouTube as background noise, but remember hearing him saying that the brass should have a little grip on the chamber walls to reduce the thrust on the locking lugs. Yup. A chamber that is so smooth will allow the brass to thrust more against the bolt. Adhesion/obturation to the chamber walls under pressure is what you want. Also, cases with more taper have more thrust for that reason. The chamber, brass gasket, and charge is like a shape charge directed against the bolt because of the bottleneck. |
|
Quoted:
Using the brownells tool for squaring the face of the receiver where the barrel mates into it, does the tool end up changing the inner dimensiion at all with the tool running inside? I have an upper and barrel that are a very tight fit and didn't want to create a situation where the tolerances increaseed and then need shimming. Trying to understand which operation is more important to accuracy, the barrel/ receiver fit or the absolute squareness of the face of the receiver. In a perfect world,both, I am sure .... but don't want to try to fix something that might not be broken and end up creating worsened tolerances elsewhere.Thanks Both squareness and fit of the extension affect accuracy. Here's where squareness really comes in even for a blaster. If the receiver face is out of square, the bolt lugs will not be balanced when loaded up with thrust. Whichever lugs are in contact with the barrel extension teeth will get the most loading, and start to fatigue. Precision smiths will often point out how most factory Remington's have only one lug engaged into the lug recess on the receiver, then tell you why they square the receiver face and lap the lugs. |
|
Quoted:
0.997" for the extension/guide portion inside the receiver 1.250" for the lapping face surface Quoted:
Quoted:
Someone with the brownells receiver lapping tool, can you post some caliper measurements? OD of the section that slides into the upper is the main one I would need. 0.997" for the extension/guide portion inside the receiver 1.250" for the lapping face surface Perfect, thank you sir. And thanks for posting this stuff OP, it'll be helpful for a lot of people for a long time. |

|
Quoted:
Of all my uppers from Compass Lake and White Oak none have this barrel bedding and I still shoot at least expert scores with them. I don't recall Derrick Martin bedding barrels to barrel ext. either. Compass lake fits the extensions to the uppers with very tight dims. They are not ignorant of this aspect of the gun, if that's what you are wondering. I don't know of any reputable shop that does not address this somehow, whether it be by: * Thermo-fit using undersized upper and oversized extension * Machine fit, press fit with oversized BAT extension or in-house/spec'd extensions for them * Shimming Everybody does it, to include square faces on the receivers, tightly controlled extension tunnels, tightly controlled extension diameters, and variations of the fitting methods listed above. JP does it, GA Precision does it, Les Baer does it, name a shop, and if they are catering to precision shooters, they do it. I've personally taken several rifles ranging from .223 Wylde to .308 Win., performed these services, and have seen groups shrink noticeably. My buddy's Krieger-barreled Iron Ridge Arms went from shooting 1.5" into the .6" range with a random hand load. A JP barrel I used went from 1.5" to .75" and less. The upper it was originally in had a face way out of square that I had to spend some time with lapping to get squared up. I put it in a tighter upper with a square face, bedded it and voila. |
|
Quoted:
Nobody makes an off the shelf tool. A guy on predator masters forum named dtech does them for around $20. Quoted:
Quoted:
Where can I get a .308 version of the tool to true the face of the receiver? All I found was AR15 sized tools. Nobody makes an off the shelf tool. A guy on predator masters forum named dtech does them for around $20. Thanks. |