|
Posted: 7/12/2020 12:45:39 PM EDT
Long backstory follows. Click if you really want to read it.
Click To View Spoiler Anywho, terribly long story short, that was the first time since about 1986 that I didn't own a guitar of any kind. It lasted about a day. I decided to get a beater to play around with and maybe get back into recording some. Looked around on Facebook and found an old Harmony H80-t. Now, by all regards, these are not fine instruments. But the guy selling it said that all of the electronics had been upgraded. And he had a demo of him playing it. It sounded pretty darn good. It was only a half hour away, so I went and looked at it. Played it myself. It needed some adjustment, but it wasn't bad at all, and the pickups seemed really hot. Selector switch, volume and tone all worked without static. Little to no hum even when running a single coil. He wanted $100 for it, so I got it. I've always wanted a CBS era strat. They're generally regarded as the years that Fender phoned it in, but there's something about a jumbo headstock that I like. I found another guitar that same day on Facebook. It was a Squier with a cracked body and a jumbo headstock. I looked at it and the neck looked perfectly straight. I offered the guy $50 and he took it. Then I found out you could get Strat bodies off of eBay for $30-40 shipped. Got me one of those, too. So, this has morphed from, "I'll get a cheap guitar to play for fun" into "I'm going to build a Partscaster". I'm not going to try to build a replica, rather...I'll call it an "homage" to a 1972 CBS Stratocaster. It'll obviously have a four-bolt neck (although, I suppose it wouldn't be hard to replicate the 3 bolt, either). and I'm going to use the tuners from the Harmony as they seem to work well and are close enough in terms of style. I'm even thinking of Lake Placid Blue, which was available that year, with some slightly yellowed lacquer to give it an aged look. 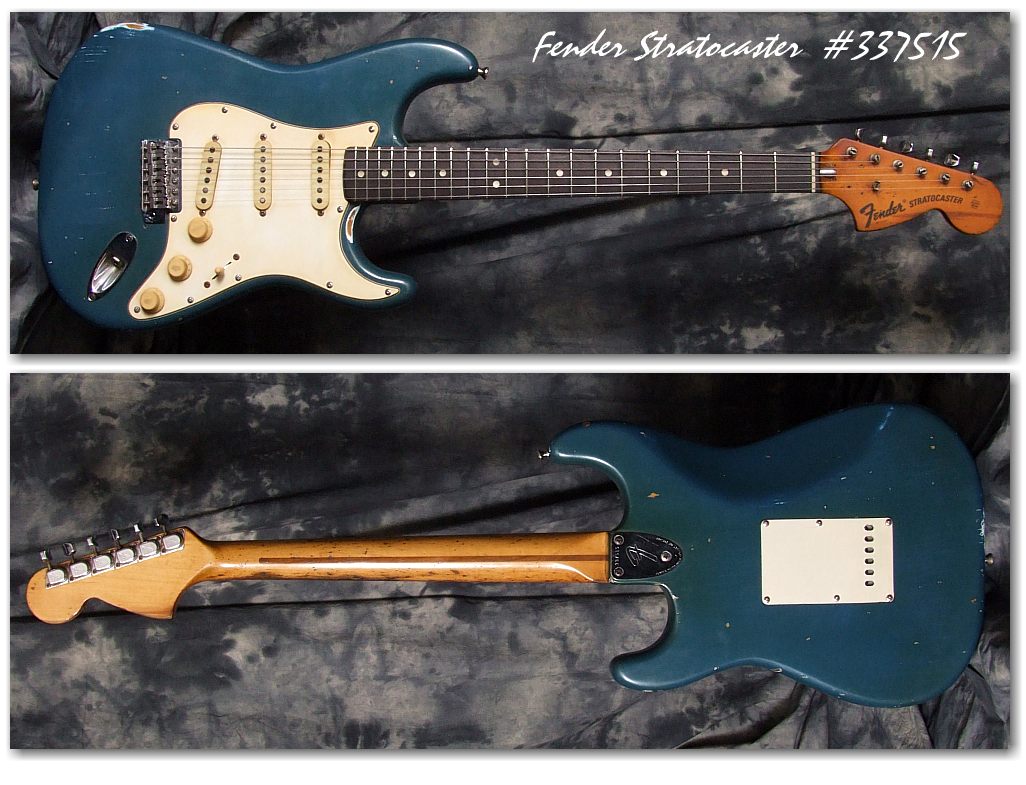 Maybe not the full "thrown down the driveway" look, but something that looks older. I might go the whole nine yards and get the yellowed plastic parts to make it look authentic. Anyhow, if you never see me post in this thread again, you know I gave up on it...lol. genera |
|
|
|
[#1]
Good for you. I have made a few small repairs on my guitars (strats, Telly’s, LPs) but I never had the guts to do a build. Keep us posted. Like you I played out for years, but now just play in the living room 7 days a week. My guitars, Mesa Boogies, Marshall’s and other equipment just sit and wait in the basement.
|
|
|
|
[#2]
Quoted: Good for you. I have made a few small repairs on my guitars (strats, Telly’s, LPs) but I never had the guts to do a build. Keep us posted. Like you I played out for years, but now just play in the living room 7 days a week. My guitars, Mesa Boogies, Marshall’s and other equipment just sit and wait in the basement. I think with enough Youtube videos, I should be able to solve about any problem I come up against. I have enough carpentry tools that I can adjust stuff, like for example, if I have to make neck shims or fill stripped screw holes and re-drill, I can probably do that without much trouble. It'll be fun. I don't know how much I'll get back into guitars, but if I could make one and have it turn out decent, it'd be a fun little side gig building kits from eBay and flipping them for a profit. |
|
|
|
[#3]
Good project! I always enjoy working on my own stuff. It's a great feeling when you build, or repair something, and it turns out they way you wanted it to. I'll be following along.
|
|
|
|
[#4]
One of these days I'll do a build myself. I actually have a neck still lying around that I picked up years ago, but never got further than that.
 For now, I just do little mods, like pickup and pot swaps. Just picked up a new guitar and found out that the pickups actually support coil splitting, but its not currently wired up for it. So going to get a push-pull pot and correct that. |
|
|
|
[#5]
Quoted: The first major purchase I made when I got my first job (1990 or 1991, don't remember) was a 1979 Ibanez Artist AR100. https://i.imgur.com/QMWEEKg.jpg I picked up playing guitar in 1986 or so, and this was the first "real" guitar that I bought at the tender age of 19. I bought it from a neighbor who made me promise him that if I ever sold it, he'd get first dibs on it. I kept that thing for years. I played in a few bands, and owned more guitars than anyone should have. I ended up owning several Stratocasters, a thinline Tele, and some other stuff, but I always kept the Ibanez. I had gotten away from playing. In fact, my last gig was over 15 years ago, and I stopped work on the last song I recorded with my buddies, which I never finished, in 2006. Well, about a week ago, I had a dream that someone gave me a guitar. And a few nights later, that someone gave me an amplifier. I didn't know what it meant, but I started thinking about the Ibanez in the closet. That was too much guitar to simply be sitting there in the closet for so many years. They were going for around a thousand on eBay, but I didn't want to deal with shipping, potentially getting ripped off, etc. And I remembered my neighbor's desire that I contact him before selling. So, I went over to his house cold. No call ahead, no warning. Just knocked on his door. He let me in and we sat down and caught up for a bit. Finally I said, "Well, you know why I'm here..." His eyes lit up. What I didn't know was, the Ibanez was his first "real" guitar as well, right out of high school (he's a few years older than me). And when I brought it in, he was positively ecstatic. He didn't even flinch at the asking price. Wrote me a check for $850 without hesitation. Anywho, terribly long story short, that was the first time since about 1986 that I didn't own a guitar of any kind. It lasted about a day. I decided to get a beater to play around with and maybe get back into recording some. Looked around on Facebook and found an old Harmony H80-t. Now, by all regards, these are not fine instruments. But the guy selling it said that all of the electronics had been upgraded. And he had a demo of him playing it. It sounded pretty darn good. It was only a half hour away, so I went and looked at it. Played it myself. It needed some adjustment, but it wasn't bad at all, and the pickups seemed really hot. Selector switch, volume and tone all worked without static. Little to no hum even when running a single coil. He wanted $100 for it, so I got it. I've always wanted a CBS era strat. They're generally regarded as the years that Fender phoned it in, but there's something about a jumbo headstock that I like. I found another guitar that same day on Facebook. It was a Squier with a cracked body and a jumbo headstock. I looked at it and the neck looked perfectly straight. I offered the guy $50 and he took it. Then I found out you could get Strat bodies off of eBay for $30-40 shipped. Got me one of those, too. So, this has morphed from, "I'll get a cheap guitar to play for fun" into "I'm going to build a Partscaster". I'm not going to try to build a replica, rather...I'll call it an "homage" to a 1972 CBS Stratocaster. It'll obviously have a four-bolt neck (although, I suppose it wouldn't be hard to replicate the 3 bolt, either). and I'm going to use the tuners from the Harmony as they seem to work well and are close enough in terms of style. I'm even thinking of Lake Placid Blue, which was available that year, with some slightly yellowed lacquer to give it an aged look. https://www.12fret.com/wp-content/gallery/fender_strat_blue72c/Fender_Strat_Blue72%28C%29.jpg Maybe not the full "thrown down the driveway" look, but something that looks older. I might go the whole nine yards and get the yellowed plastic parts to make it look authentic. Anyhow, if you never see me post in this thread again, you know I gave up on it...lol. The fun part is making it just how you want. I put a couple partscasters together that started with loaded pickguards then decided on the body color and neck profile and fingerboard. One has the aged white pickup covers and knobs like you mentioned and they look good on the right setup. Sounds like you already have the design in your head. I look forward to seeing the guitar when you have it ready to show. |
|
|
|
[#6]
I've got a starcaster that I want to upgrade. For some reason soldering and doing the wiring is very intimidating to me.
The starcaster has a full size strat body and is routed for humbuckers and I think I want to go that route. But I would like to keep both tone knobs. Either that or P90s. Or even single coils. But if I stay with single coils I want to get rid of the middle pup. I want to try that mod with my current pickguard and cheap pups just to see how I'd like that. And if I did do single coils I would love to do S-1 switching. Anyways.. The guitar you are aiming for is super cool looking. Can you post pics of the guitars you picked up? I'm in kind of the same boat as you. I used to play in bands when I was a young man. Started singing in a band when I was 17 and it was terrible. I don't think the bass player and guitarist ever tuned their guitar and I just sang. And it was heavy stuff so I'd just kill my voice. I think I remember spitting up blood a few times trying to sing so loud to keep up with them. Even though we had an amp for me to sing through. The guitarist just wanted to blast. The drummer was pretty good though and some of the songs were catchy. I quickly jumped into learning guitar and bass and drums just cuz I knew I didn't always want to play with them and the style of that band was not completely up my alley. So then I had about 8 years of intense singing songwriting playing with people learning a few different bands and some of them even made some decent music. At age 24 I got burnt out and figured it was never going anywhere. The band I played drums in played a pretty big show and went to a music conference in Philadelphia and he was this really fun short set at Samuel Adams pub. Where everyone was upbeat and got lots of cheering and it was great. The show I speak of we opened up for a more well known band that for some reason escapes me and there were a couple thousand there. Those two events were the peak of my music career. But that particular band had all kinds of infighting and wailing and gnashing of teeth and I quit. I also had my own band and was making a few songs I actually liked but I was burnt out. So I basically gave it up to "grow" up. I was never a super great guitarist but I do rhythm and sing and like that. I'm not a very good lead guitarist. I focus more on chords and such. Anyways... I was just trying to relate to your story with mine cuz your story sounded very similar to mine. I sold all my stuff except my Ibanez acoustic AE 300 that I bought new in about 1992 ish. I still have it. I ended up playing all three instruments in church after not playing for about 5 years. I played a lot of drums at first and then mostly bass. I play bass at my current church and love it. But recently one of my old drummers and I are starting to move towards making music. It's in it's infancy but I had a few songs I wrote recently and about 4 I wrote about 10 years ago and I would like to try and figure out how to record them decently and do some more of this music making before I die. I think playing music is something I could actually see doing into old age. I mean, dudes do that. I am also riding bikes and even doing some BMXing and I don't think I will be able to do that forever. The bmxiing part. LOL. I'm 48 so maybe a few years younger than you. I don't have a lot of money so trying to figure out what way to record is going to be a challenge. If you get set up for that, let e know what programs you are using and your set up. Especially if you're doing it on a small budget. I bought a Squier Tele and a vox 9159 amp I paid 150 for the guitar and 110 for the amp and I'm pretty pleased with both of them. I would've liked to get an all tube amp but they're not cheap. This amp uses a tube for the pre amp so the clean channel needs some help but liveable for now. The distortion sounds great and it has vibrato. I'm not going to win any tone awards but it's a start. I keep thinking about if I do or do not need a compressor pedal. I'd post pics but my imgur account went TU lately for some reason.... Grrrrrrr.... I'll see if I can find a new hosting site. |
|
|
|
[#7]
I've built several partscasters, sold some and parted some out. Just know if you are doing the finish right (nitrocellulose), Fender or American made components and proper toneswoods (no basswood or poplar), you will likely spend as much as you would for a lower end American made Fender. The thousand or so dollar Fenders and Gibsons are a tremendous bargain compared to what they traditionally cost.
|
|
|
|
[#8]
“Anyhow, if you never see me post in this thread again, you know I gave up on it...lol.”
Please, please post again and again. I was damn near praying just last night that some guitar builder would start a thread like this. Me ... I can barely hold a guitar. My son plays damn near any instrument he picks up. Guitar, bass, keyboard, drums. He started w a Jazzmaster and now has quite a variety of others, but we never really dug into any of them. That is changing now, as we have started to morph a decent Stratocaster into a “CooderCaster”. We have most of what we need, but may need to bounce some questions off you all if it’s OK. Would be happy to post them in this thread ? Or start another ? Or ? Stay safe |
|
|
|
[#9]
Just make a new post with your questions. Another good place for finishing questions is reranch.com
|
|
|
|
[#10]
Cool deal, if you run into any issues, post them up. I've been building electrics for years and years, and have a decent side business selling them so there's not likely something I haven't run across.
|
|
|
|
[#11]
Quoted: Cool deal, if you run into any issues, post them up. I've been building electrics for years and years, and have a decent side business selling them so there's not likely something I haven't run across. The builds and projects shared around here are really cool like the sparkle blue tele. I would love to see more of everyones projects posted up. I have a couple waiting for fun money to shake loose to complete but they are only assemblies from parts not actual luthier work. I'll have to remember to take some pics when working on them and post them up. |
|
|
|
[#12]
Preliminary finishing practice.
I have a pine board outside right now that has 3 coats of sanded primer and two coats of metallic blue Dupli-Color lacquer, which is what many of the DIY guitar guys use. I figure if I can make pine look good, then the body that I'm getting from eBay should be no problem. The Dupli-Color seems to flow really well. It's an old can, and I'm getting some drips, but when you lay it flat, it seems to flow smooth. Very forgiving. I was kind of surprised about how smooth it looks. No wood grain is showing through the paint at all. I have a can of Dupli-Color clear lacquer as well and I'm going to put 3-4 coats of that on the top (until I start to run out) and then wet sand and polish just to see what kind of results I can get. So far, though, it's very encouraging. All the paint and the scrap wood I had lying around, so it's not like I'm out anything, and it's good practice for the real thing. I want to make a somewhat authentic 70's Strat, but part of me wants to do this as well:  I know that would be MUCH easier than painting. Sand down to 800-1000, apply dye with a cloth, then 8-10 coats of spray poly, wet-sanded and polished, and you're there. I've refinished enough rifle stocks to be able to do that in my sleep...lol. So, if the paint ends up a sloppy mess, the whole thing gets stripped, sanded, dyed, and poly'd. This is plan B. |
|
|
|
[#13]
Someone needs to come back to this thread as long as it is alive and remind me to take my time.
The finish on my "practice piece" was looking really good. And then I got too heavy handed with the clearcoat. And it started making tiny bubbles, I'm assuming as the layers underneath hadn't dried and were off-gassing through the top layers. Anyway, it looks "interesting". The fact is, though, had I not rushed, I think it would actually look decent. I'm going to continue with wet sanding and re-coating just to keep learning about what will work and what doesn't. Also I've made a decision to do the topcoat in oil based polyurethane. Reason being, poly will more readily yellow as it ages, giving the antique looking finish I'm after. Plus I'm really comfortable working with poly and it can be painted over dried lacquer without issue. |
|
|
|
[#14]
Experiment one.
This looks a lot better in person than the pictures show. Remember, I rushed this and did most of it today. Here's what I did: Primer, color, clear, wet sand, rubbing compound, wax. It looks good, except for the bubbles where I went too fast. I might start over for tomorrow to see if I can do better. It cut very easily during wet sanding and the surface was very smooth. I can see that I want to build a few more layers of the clear, even though no blue came off on my block or when I was polishing. Might make me re-think my idea of finishing in polyurethane. It looks pretty good, except for my stupid rookie mistakes. Very glossy finish.  Question: I have some very fine swirl marks that you can see in the pic. What do I do to take care of those? |
|
|
|
[#15]
Meguiar's swirl remover from Autozone is the ticket for buffing out fine swirl/scratch marks on poly surfaces.
For future reference, something that has saved me a lot of headaches is doing the primer/color/stain/base whatever....and taking the coat-ready body to an auto-body shop. A small, non-chain one usually is happy to give you a professional coat/buffed body for cheap. They're usually in the booth on a much larger car and turning around and hitting the body real quick is a simple task. I give the guy down the street from me $25 and a case of his favorite beer and he's happy to do them. Sometimes he turns down the cash, too. I can do the clear, and have done it on some builds with success, but it's the worst part of the finishing process and I'm happy to farm it out. |
|
|
|
[#16]
That's a great idea for getting small parts painted. I'll have to remember that if/when I need things painted since no matter how clean I try to keep things I end up with bugs and fuzz in the paint.
|
|
|
|
[#17]
Quoted: Meguiar's swirl remover from Autozone is the ticket for buffing out fine swirl/scratch marks on poly surfaces. For future reference, something that has saved me a lot of headaches is doing the primer/color/stain/base whatever....and taking the coat-ready body to an auto-body shop. A small, non-chain one usually is happy to give you a professional coat/buffed body for cheap. They're usually in the booth on a much larger car and turning around and hitting the body real quick is a simple task. I give the guy down the street from me $25 and a case of his favorite beer and he's happy to do them. Sometimes he turns down the cash, too. I can do the clear, and have done it on some builds with success, but it's the worst part of the finishing process and I'm happy to farm it out. I actually found some Meguiars swirl remover and it helped. But, the thing that helped the best was another light wet-sanding with 1000, then starting the rubbing over again. It's 10x better now. I'm starting the process over on the other side of my practice piece to make sure I can do it again without bubbling it. I feel pretty confident that I can. Right before I got the bubbles, I remember thinking, "I'm gonna lay the clearcoat to this and lay it flat so it flows smooth." That's when I ran into problems. Not only is it a bad idea, its not even necessary. This stuff works pretty easily and looks great when you get several thinner coats on it and sand & polish. Not worth rushing! I'll get it, even if I have to strip it once, re-sand, re-prime, and start over. Attempt #2 coming up tomorrow. |
|
|
|
[#18]
Quoted: That's a great idea for getting small parts painted. I'll have to remember that if/when I need things painted since no matter how clean I try to keep things I end up with bugs and fuzz in the paint. Took me a couple before I found someone cool who understood it wasn't a huge project if they added it to the workload. A couple guys were like "Yeah, maybe" and then wanted a lot more than I thought it was worth. Found a Mexican shop that does auto body, asked him if he could throw it in his next booth job on clearing and he was fine with it, said it wasn't much work. So, don't be deterred if someone acts like it's a big project (it's really not), might have to ask around a little but it's so worth it and all my finishes have come out awesome. Last one he did for me, which was a quilted maple top with some green dye/sealer.  |
|
|
|
[#19]
A couple of tips...
Warm your lacquer. Let the spray can sit in a sink full of warm water for about 10 minutes before you start spraying. It will spray finer, and flow out better. And of course, make sure the spray cap is 100% clean. Drop it in small bowl of lacquer thinner for a few minutes and wipe it off throughly. Buy these Micro Mesh sanding pads. Give your finish a few days to fully cure, and then wet sand it up to 12000 grit. It will look like shit (scratches), and you will think you have ruined the finish when you start with the 1500 grit. But by the time you get to 12000, it will shine like nothing you have ever seen before. No rubbing compound necessary. Be sure to use a very light hand when sanding, and it only takes a few passes with each grit. Change your water between each grit. I used these to wet sand the original Nitrocellulose lacquer finish on my Les Paul, and it looks better than new, now. Edit: I changed the link. The first link I put up may have been Chinese fakes. Edit again: Not great pictures, but here is a before and after shot. 27 years of built up grunge.  After wet sanding to 12000 grit (and replacing darn near everything else, too).. 
|
|
|
|
[#20]
Quoted: A couple of tips... Warm your lacquer. Let the spray can sit in a sink full of warm water for about 10 minutes before you start spraying. It will spray finer, and flow out better. And of course, make sure the spray cap is 100% clean. Drop it in small bowl of lacquer thinner for a few minutes and wipe it off throughly. Buy these Micro Mesh sanding pads. Give your finish a few days to fully cure, and then wet sand it up to 12000 grit. It will look like shit (scratches), and you will think you have ruined the finish when you start with the 1500 grit. But by the time you get to 12000, it will shine like nothing you have ever seen before. No rubbing compound necessary. Be sure to use a very light hand when sanding, and it only takes a few passes with each grit. Change your water between each grit. I used these to wet sand the original Nitrocellulose lacquer finish on my Les Paul, and it looks better than new, now. Edit: I changed the link. The first link I put up may have been Chinese fakes. Edit again: Not great pictures, but here is a before and after shot. 27 years of built up grunge. https://pbase.com/david_3/image/170875905/original.jpg After wet sanding to 12000 grit (and replacing darn near everything else, too).. https://pbase.com/david_3/image/170875906/original.jpg That looks sweet. I've already taken some of your suggestions. I think I can do this. The operative word is PATIENCE. I want to go out and spray a bunch all at once, but you really have to do thin coats and build it up somewhat. It takes time. |
|
|
|
[#21]
Quoted: Someone needs to come back to this thread as long as it is alive and remind me to take my time. The finish on my "practice piece" was looking really good. And then I got too heavy handed with the clearcoat. And it started making tiny bubbles, I'm assuming as the layers underneath hadn't dried and were off-gassing through the top layers. Anyway, it looks "interesting". The fact is, though, had I not rushed, I think it would actually look decent. I'm going to continue with wet sanding and re-coating just to keep learning about what will work and what doesn't. Also I've made a decision to do the topcoat in oil based polyurethane. Reason being, poly will more readily yellow as it ages, giving the antique looking finish I'm after. Plus I'm really comfortable working with poly and it can be painted over dried lacquer without issue. Bubbles in the clear finish could also be tiny dust particles. Standard traditional varnish was notorious for that. |
|
|
|
[#22]
Quoted: After wet sanding to 12000 grit (and replacing darn near everything else, too).. https://pbase.com/david_3/image/170875906/original.jpg Never wanted to own an LP until i saw what you did there. With the gloss knocked off its gorgeous! |
|
|
|
[#23]
Quoted: Never wanted to own an LP until i saw what you did there. With the gloss knocked off its gorgeous! It was pretty shiny when it was new, but over the years, the dirt, sweat, heat from your hands/arm works down into the lacquer, and then it starts to get that "cloudy" look. Sanding, cuts back the top surface of the lacquer, where all of the grunge is, so it looks crystal clear, again. It worked great on the body. The lacquer on the back of the neck is much improved, but not quite a clear as that on the body. I chickened out, because I didn't want to go too far with it. Sanding through the finish, and into the wood, would have been a real dumb move. 
|
|
|
|
[#24]
Complete change of gears.
Got to thinking about the LP blue finish. It would look just like a factory Strat. I can get a factory Strat by buying a factory Strat. But, I can make something that doesn't look like a factory Strat...or any other Strat, or any other electric guitar for that matter. So, I made grain filler out of wood filler and black paint, diluted it with a little water to make a thin paste, then filled the entire body of the guitar...  Then, sanded back to wood:  Then, hit it with the blue dye:  Distressed the grain a bit by sanding:  And now, layering on the Tru Oil...  Added bonus...the Tru Oil is a bit yellow, so it's slowly turning the color turquoise. I'm OK with that...lol. |
|
|
|
[#25]
Quoted: Complete change of gears. Got to thinking about the LP blue finish. It would look just like a factory Strat. I can get a factory Strat by buying a factory Strat. But, I can make something that doesn't look like a factory Strat...or any other Strat, or any other electric guitar for that matter. So, I made grain filler out of wood filler and black paint, diluted it with a little water to make a thin paste, then filled the entire body of the guitar... https://i.postimg.cc/7hym4Dm5/IMG-20200716-191426466.jpg Then, sanded back to wood: https://i.postimg.cc/5y6NxdyM/IMG-20200716-201723040.jpg Then, hit it with the blue dye: https://i.postimg.cc/Jhktj3rV/IMG-20200717-094742439-HDR.jpg Distressed the grain a bit by sanding: https://i.postimg.cc/Yqd2YcRc/IMG-20200717-162012459.jpg And now, layering on the Tru Oil... https://i.postimg.cc/qgVD9cDZ/signal-attachment-2020-07-19-164143.jpg Added bonus...the Tru Oil is a bit yellow, so it's slowly turning the color turquoise. I'm OK with that...lol. The movement of the grain on the body looks really good with the color choice. |
|
|
|
[#26]
Yeah, it's crazy everything that's going on in that grain. I'm glad I filled it before I started or it wouldn't have been nearly as interesting.
When I get it finished and all shined up, I'll take some non-potato pics of it in sunlight with my good camera and post them here. |
|
|
|
[#27]
I'm liking where you're going with this build.
Looks really great. As an aside, Sherwin-Williams commercial (not consumer) stores have a full range of dyes for wood to play with. For a small project like this on a slow day they would probably lay on the dye for free. |
|
|
|
[#28]
Quoted: Yeah, it's crazy everything that's going on in that grain. I'm glad I filled it before I started or it wouldn't have been nearly as interesting. When I get it finished and all shined up, I'll take some non-potato pics of it in sunlight with my good camera and post them here. How's the project going? Any new pics to show of the progress? |
|
|
|
[#29]
Quoted: How's the project going? Any new pics to show of the progress? Let's just say... I'm not diggin' the Tru Oil. Thinking of scuffing with 400 and hitting it with Poly, which was my first instinct (and I should have listened to myself). |
|
|
|
[#30]
I haven't messed with the guitar for a few days, partly because of other things needing done, but mainly out of frustration.
I know this is a gun forum and I know lots of people use Tru Oil and love it. I am not among those people. Heck, even my own DAD said I should use it. Put it on thin...when I go to sand it out...even with 800, 1500, or 3000 grit, I still get blue dye coming off. The finish is SO thin. When I apply it heavier, I get runs and sags. There's a happy medium there that I can't seem to hit. So frustrating. I don't know what I'm doing wrong, but learning a new way of finishing on a project this big is kind of stupid. I know what I can get from polyurethane. I know that, with a light scuff with 400 grit, it will paint just fine over Tru Oil. So, I started with that this evening. It already looks 10x better. I was going to keep applying coats until the can ran out, but after about the 4th coat, I did the old "turn the can upside down to clean the nozzle" trick, and for some reason, all of the propellant came out. Letting off on the button did nothing. I just had to set the can down on the sidewalk and let it do its thing. Ripoff. So, with polyurethane, you can respray within 2 hours, and if you can't make it within that window, you must wait 72 hours. In hindsight, I probably could have run to WalMart and back, but I had other things to do that kept me around the house. So, looks like I'm out of comission until Tuesday. Anyway, slight hiccup, but the guitar is looking fantastic. I'm probably going to put like 10 coats or more on, so there's no chance of sanding through when I wet sand. I'll try to get a pic tomorrow. |
|
|
|
[#31]
OST
|
|
|
|
[#32]
Did a whole can of polyurethane today. Went out every 1-1.5 hours and put another coat on. Finished up the last one just a while ago.
 Even without anything else being done, it still looks better than the Tru Oil. That's probably my fault though. All I know is, when I go to wet sand, I'm not going to burn through the finish. Gonna let it dry for a day or two then wet sand. After that, I guess I'm gonna start drilling holes in it... |
|
|
|
[#33]
Looks good. I really like hows its coming out.
|
|
|
|
[#34]
Well, it's looking pretty good right now. My big fear is, after all this work, I hope I don't mess up drilling any holes.
I guess there's always wood glue and toothpicks...lol. |
|
|
|
[#35]
My biggest fear should have been not getting an even coat of #$^*@ polyurethane.
Started wet sanding today. 400 grit, with slightly soapy water. My goal was to sand all of the little shiny spots off.  A little sanding got me here. More sanding got this:  I have about 1.5 cans of Minwax gloss polyurethane, so I had no real worry about sanding through. After I sanded off all the shiny spots, I started with 800, then 1500, then 3000, then polish. Sometimes, if I wasn't getting the shine I wanted, I hit it with the 3000 and polished again. Usually, that would give me what I was after. I forgot how easy it is to get a shine on polyurethane.   And then, disaster!  Yep, 400 grit, wet sanded right through the poly. GRRRRR! I guess I must have had a thin spot here, even though as I was doing the coats of polyurethane, it felt like I was getting enough there. Part of me said, "Screw it. People pay big money for relic guitars." But, I just couldn't do it. So, I got the dye back out and put a coat on and let it dry:  Not quite there. Put on a second coat.  Bingo. This area has already been scuffed with 400, and I didn't do anything else to it, so once the poly under it is cured (72 hours from yesterday, so Friday) I can shoot 3-4 more coats and LIGHTLY sand it so it can be polished. I'll have to blend it in to what's there, but I don't think that will be too bad. Other than that, I really like the way it's looking. The better it looks, the more reluctant I am to start drilling holes in it. |
|
|
|
[#36]
That's too bad about sanding through the finish. But it looks like you did a very nice repair on it. I've never tried sanding polyurethane, so I'm following along to see the results.
|
|
|
|
[#37]
Quoted: That's too bad about sanding through the finish. But it looks like you did a very nice repair on it. I've never tried sanding polyurethane, so I'm following along to see the results. I found it easier to wet sand and put a shine on polyurethane than I did lacquer. And of course, Tru Oil, lol. The good thing about spraying it is, it's easy to build up coats. Every hour or so, just go out and spray another coat. By the time you're through the can, you've got a thick sanding surface to work with. Unless you don't pay attention and get it too thin... |
|
|
|
[#38]
Great work on filling the thin spot. I just realized a pick guard is going to cover up some of the cool grain in that wood. The finish is coming out really nice.
|
|
|
|
[#39]
Quoted: Great work on filling the thin spot. I just realized a pick guard is going to cover up some of the cool grain in that wood. The finish is coming out really nice. Yeah. I "cheated" and didn't wet sand as closely in a couple of places that the pick guard was going to cover. |
|
|
|
[#40]
that is freaking beautiful!!!!!
|
|
|
|
[#41]
I pulled parts from the donor guitar today.
Started getting the neck ready. Tuners installed, string trees in place.  I figured I might as well do a mock-up pic. I have a white pickguard and cream pickup covers and knobs that I might use. But, the black looks better than I thought it would. Nothing is mounted, just set in place. Decisions, decisions.   This thing's gonna look awesome. Hope I can make it play as good as it looks... Gotta run...gonna start respraying the thin spot here in a bit. |
|
|
|
[#42]
I might require an intervention.
I was getting the neck off of the donor guitar ready to sell to recoup some of my money... ...when I noticed how similar in dimention the headstock was to a Telecaster.  Cut away the gray parts, sand down the face and edges, put on the decal of your choice, and spray with 2-3 coats polyurethane, and you're there. |
|
|
|
[#43]
Resprayed the lower horn with poly to re-cover where I sanded through.
I took a risk here, because I didn't want to wet-sand there. So, I decided to put the poly on a bit thicker to hopefully "flow" a little bit and get smooth enough that I wouldn't have to wet sand and polish. Ended up working really well. Blends right in. To be honest, maybe a little shinier than the rest of it. 
|
|
|
|
[#44]
Worked on polishing it up this morning.
If the last three steps to any woodworking project are "sand, sand, sand," then the last three steps to any painting project must be, "polish, polish, polish." 
|
|
|
|
[#45]
The white pickguard came in the mail today.
This throws me into a quandry. I can't decide which one I like best...the black, or the white.   |
|
|
|
[#46]
Black.
|
|
|
|
[#47]
Quoted: Black. Then you're going to be very happy...lol. I decided there wasn't a whole lot to do to get finished with this thing today. So, the first thing to do was install the neck. The plate was a bit too small. When I laid it over the bolt holes in the neck, each one was just barely inside the hole in the neck plate. So, I figured that when I drilled, I probably needed to angle just a bit in order to hit the holes in the neck. Got the plate lined up correctly and drilled the starter holes by hand...  Drilled the holes. The tape was a guide I put there to line up the neck plate. I clamped it in place before drilling.  Nailed it. But, I wasn't finished with the neck yet.  Next up was installing the bridge. I put two strings through the E position in order to check where the top and bottom string would fall. LIned it up, and after I was satisfied with my placement, held it in place while I drilled holes in the 1st and 6th position, then, checking to make sure the bridge hadn't moved, I drilled pilot holes (by hand) for all of the other screws.   Then, drill the holes all the way and install the bridge...  Function checked the bridge...the pivot worked great. Don't know if I'll ever use it, because I never used one when I played before, and besides, neither of the donor guitars had the actual whammy bars with them anyway. Next up was the tremolo spring claw. This posed some interesting challenges that I didn't see coming. I couldn't get my drill in at a shallow angle, so when I drilled these holes the first time and installed the claw, it stuck up above the surface of the back of the guitar. That was obviously unacceptable, so I had to re-drill, this time with my Dremel, which would allow me to go at a much shallower angle. Results were much better, but I'm sure the bolts are now in weaker material as the holes intersected. To shore them up, I filled the old bolt holes with wood glue. I think that will stabilize and anchor it a bit better once it dries. Next was installing the pickguard with all of the electronics pre-installed. Routed the wires and had to drill a hole all the way through the body to allow for the ground wire that attaches for the tremolo claw.  With all the wiring in place, I drilled holes for the pickguard and put the screws in.  Soldered the wires to the jack and screwed it into place:  then soldered the ground wire to the tremolo claw:  With all that done, it was time to hook up and see if it played. It did. Tomorrow, maybe I'll post some audio.   There were a couple of issues. One, the strings didn't line up over the pickups. I read that this was caused by a neck that was out of alignment. I followed the instructions at this website, since it applied exactly to my guitar. I did the shim fix: https://mmguitarbar.wordpress.com/2017/06/15/squier-o-practor-a-misaligned-neck-could-be-painful/ and pulled the neck back to where it was supposed to be. It's much better now. I didn't take a before pic, but just picture the low E string not lining up under the magnet in the pickup like in the article. This is what it looked like after I finished:  That also seemed to make it play better. I also had some fret buzz when I first started playing, but it wasn't bad. The action was VERY low. So, I started running each of the bridge saddles up a little. The buzz stopped long before I got the strings set at the height I like (I prefer my strings higher than a lot of players). Otherwise, it didn't take much setup. I still need to do intonation, but it doesn't seem bad at all. One thing I did notice was that the wood is super soft. Just in the assembly of it, there were a couple of places that it got dinged, and I'm sure playing it will only lead to more. It's gonna age real fast. Oh well. As of this May, I became a grandad. I wonder how long before a baby can hold a guitar? |
|
|
|
[#48]
Fantastic! How do you like playing it? Is the fretboard pretty squared away?
So it was a Squier neck with Fender markings? |
|
|
|
[#49]
Yeah, it's a Squier neck, and it's pretty good. I've had a few Stratocasters in the past and this neck doesn't seem bad at all in comparison. I sighted down it on both sides and put a straightedge on the frets and everything is kosher. No truss rod adjustment or shimming required.
The guitar it came off of had a cracked body and was in unplayable condition. It looked like it had been sitting in a closet for a while. Date of manufacture is 2004. I haven't bought strings yet, but I got a couple sets with the broken guitar. They're 9's I'll post some audio and non-potato pics of it when I get a chance. I've been playing it through my old digital processor and running right out into a Bluetooth speaker...so I want to hook it up to my old Music Man Twin at some point and see how it sounds through real equipment. But, that won't be today, because I spent all day yesterday on guitar, looks like today will be honeydew...lol. |
|
|
|
[#50]
Non potato pics:
 
|
|
|
 Win a FREE Membership!
Sign up for the ARFCOM weekly newsletter and be entered to win a free ARFCOM membership. One new winner* is announced every week!
You will receive an email every Friday morning featuring the latest chatter from the hottest topics, breaking news surrounding legislation, as well as exclusive deals only available to ARFCOM email subscribers.

AR15.COM is the world's largest firearm community and is a gathering place for firearm enthusiasts of all types.
From hunters and military members, to competition shooters and general firearm enthusiasts, we welcome anyone who values and respects the way of the firearm.

Subscribe to our monthly Newsletter to receive firearm news, product discounts from your favorite Industry Partners, and more.
Copyright © 1996-2024 AR15.COM LLC. All Rights Reserved.
Any use of this content without express written consent is prohibited.
AR15.Com reserves the right to overwrite or replace any affiliate, commercial, or monetizable links, posted by users, with our own.


