|
Posted: 9/28/2013 8:53:28 PM EDT
Mentioned doing this in another thread. Received the Law Tactical Folding Adapter yesterday afternoon and got to work. In case anyone was wondering, it's not a drop in product for the JRC, but then I think we all guessed that already. So far the actual folding unit is unmodified, however the screw-in buffer insert and bolt spacer were both altered quite a bit. Also, the way I've chosen to do this, which probably isn't the best way, involves drilling and tapping the bolt extension to attach the bolt spacer. What I didn't count on was the bolt extension being made of hardened steel, and after 4 ruined drill bits, I'll have to hit up the local machine shop for some help. When everything is done I'll post a full guide and review.
EDIT: Full guide posted below! 


|
|
|
|
[#1]
I'd like to do this too, thanks for posting it.
I hope it gets easy. |
|
|
|
[#2]
Interesting.
I originally bought my LT unit for one of my 9mm ARs. Once it got here and I realized it wasn't compatible with the 9mm bolt, I switched direction and just put in on a very short 5.56mm SBR instead. I'll be curious to see how your project goes... |
|
|
|
[#3]
Why wasn't it compatible with a 9mm bolt?
ETA - Never mind, I figured it out. The bolt carrier extension won't attach to a 9mm bolt. |
|
|
|
[#4]
My bad for the delay, but I wasn't able to take her for a spin until after work today.
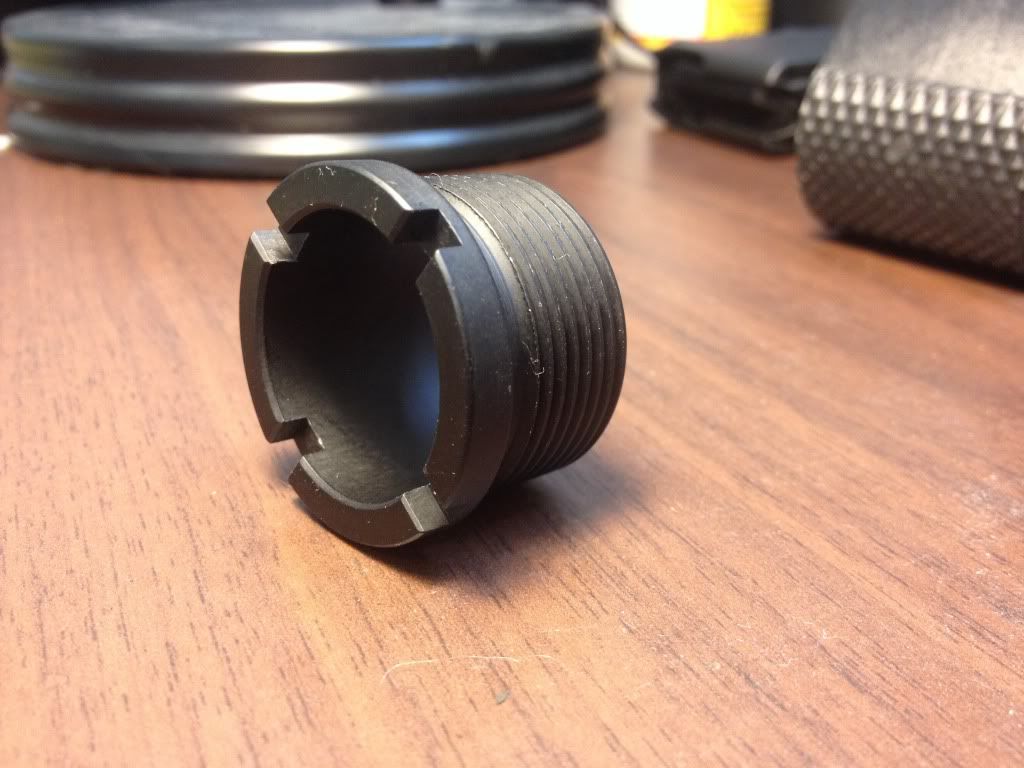
So the first thing I did was modify this piece, let's call it (A). This piece secures the folding mechanism into the buffer tube threads on the JR Carbine. Couple issues here.: - The portion of the JRC that accepts the buffer tube seemed too shallow for the above piece, so the folding mechanism was not secure when installed. - This buffer tube threads in JRC aren't threaded all the way to the stop, so the threads of (A) bottom out before they need to. 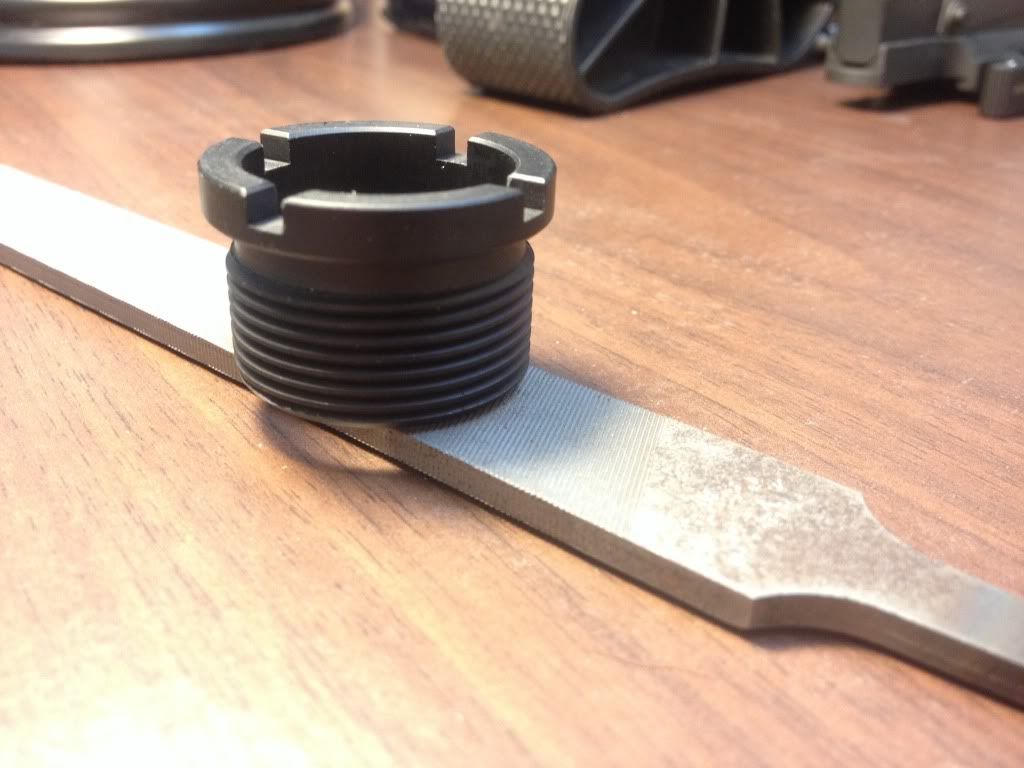
My fix was twofold. - As shown in the picture above, I filed the bottom of (A) to shorten it so as to snug up the folding mechanism. - I used a smaller file and a table vise to turn the front portion of (A)s threads down. This prevented the threads from bottoming out and let me snug (A) securely in the JRC. I did not turn all the threads down, on the first ring or so. The next picture shows this completed step. 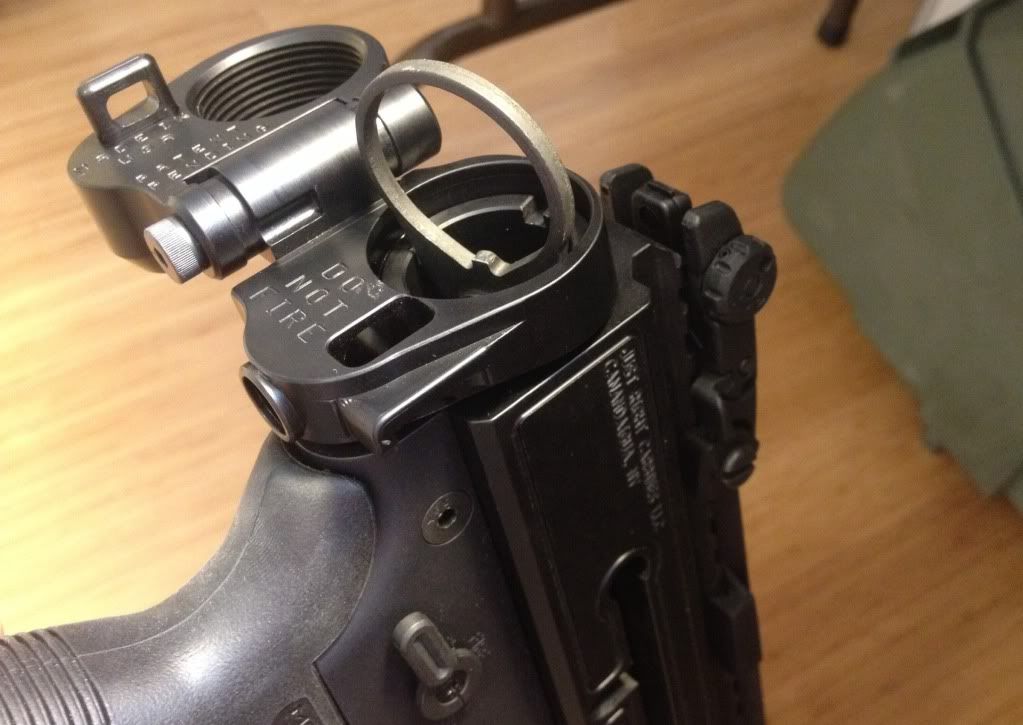
With this portion out of the way, next I was on to the bolt extension. If you didn't already know, the Law Tactical folder uses this bolt extention, let's call it (B), to compensate for the added length of the folding mechanism. Normally, this extension fits inside a standard AR15 bolt carrier and is secured when you tighten down the internal screw, which pushes the metal prongs (shown in the picture below) out and secures the piece inside the bolt carrier. The JRC, on the other hand, uses a totally proprietary bolt and bolt carrier that is much smaller in diameter and makes the original attachment system impossible to use. 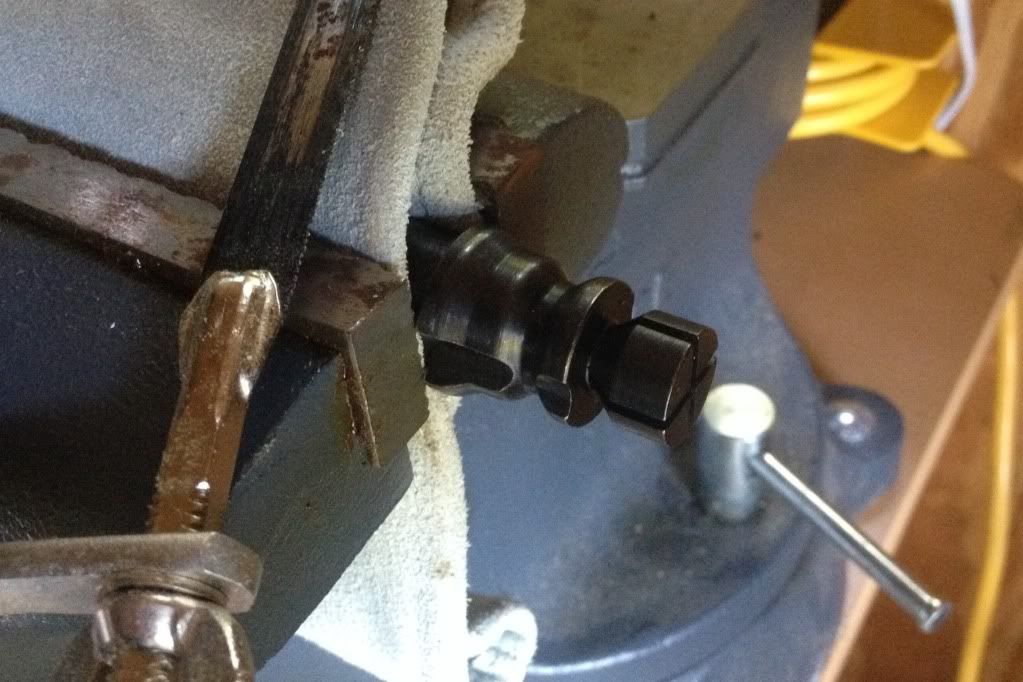
My solution: - Remove screw and ball bearing from (B), keep the screw! - Place (B) in vise as shown above and cut off prongs with a hacksaw. With this done I test fit (B) in the JRC with bolt and folding mechanism installed. The goal here is to be able to get the spring loaded bolt stop on the Law Tactical folder to snap over the lips on (B). Sounds confusing, but if you have one in front of you it should make sense. Unfortunately, even with the prongs cut off (B) was much too long to fit. My solution: - Take (B) to my table mounted grinder and grind away on the end that I had cut the prongs off to get desired length. - Continuously test fit (B) in the JRC until I was close enough to use a hand file. - Place (B) in table vise and carefully use a file to evenly finish end of (B) until I had a nice flat and square surface. With this accomplished, I threaded the screw from before back into (B) so that it looked like the picture below. 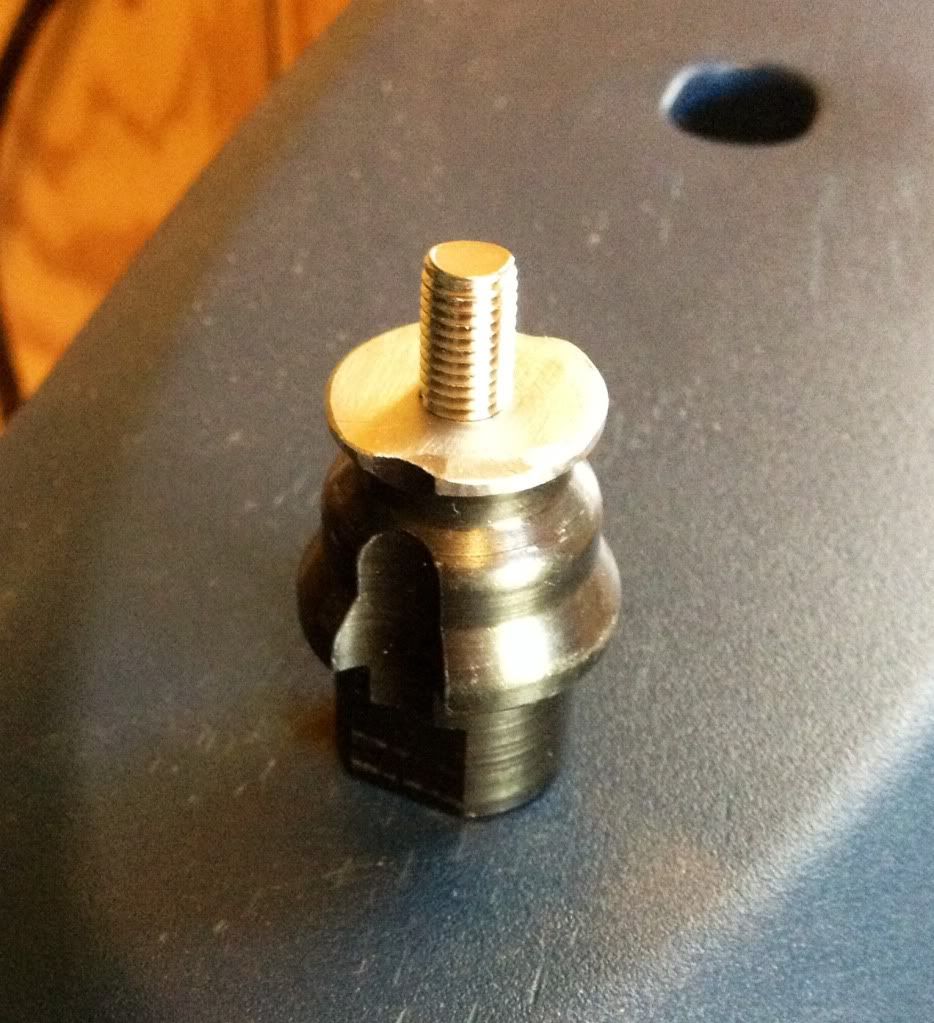
For the final step I had to seek out a local machine shop. My idea was to drill and tap the JRC bolt extension, let's call it (C), so that I could then just screw (B) as shown above into (C). Where as I killed my home drill press and ruined the original (C) on my own, my local shop easily drilled and tapped the new (C) that I had had shipped to me. The only issue was to time (B) into (C), so that (B) would clear the buffer retainer pin. The result, you can see next! 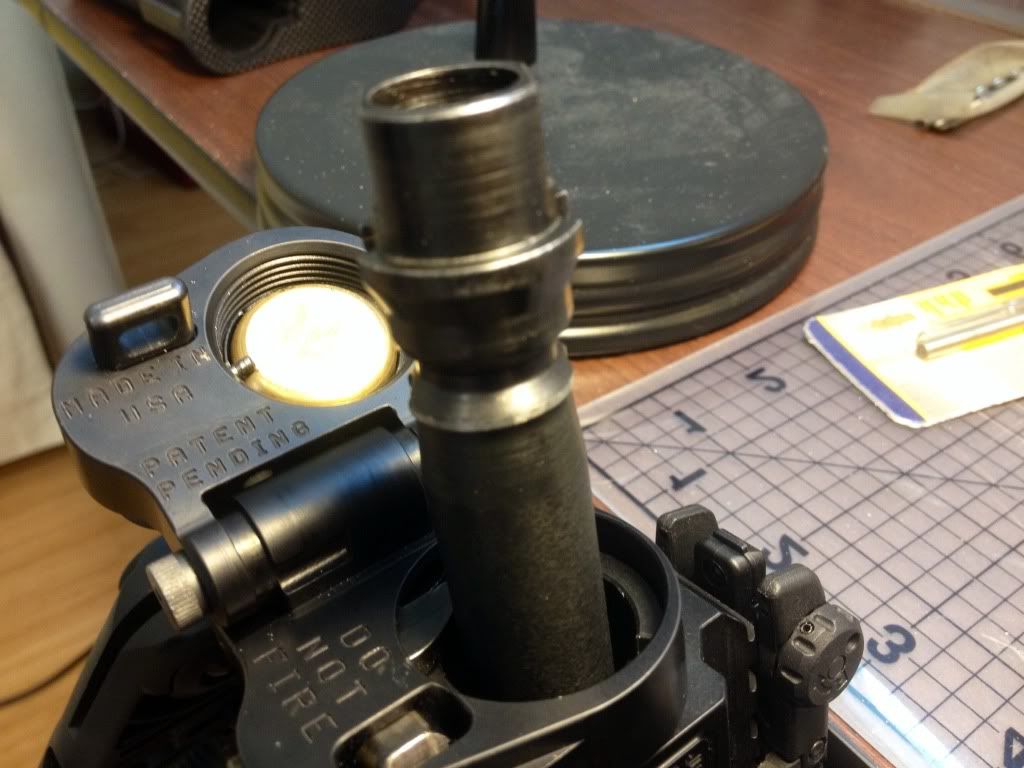
Now when all was said and done, I cold-blued all the parts I had worked on and applied locktite where needed. Everything is nice and solid, and I can happily say that after 133 (suppressed) rounds fired earlier tonight, I didn't have a single malfunction and everything remained totally solid and secure. Now I can fold the stock for storage or travel, and it's much less of a hassle to remove the bolt to clean. As always, your results may vary, and I can't advise you nor do I take responsibility for any actions you or others may take in relation to this post. |
|
|
|
[#5]
Couple things I forgot to add last night.
I'm using a Slash 9QT buffer with XP recoil spring. The JRC comes from the factory with its own heavy buffer, custom length spring, plastic spacer, and rubber recoil bumper. I'm sure these would have worked just as well, but since I mainly shoot suppressed, I wanted a heavier buffer and stronger spring. I also had planned on firing a mag unsuppressed to make sure it was still reliable, but left that last mag at home, which is why I only fire 133 rounds, and why they were all suppressed. When I was finished shooting, the gun was filthy and half my face was black from the extra blowback caused by shooting suppressed. Despite the excess blowback, she handled two factory Glock 33 round mags, one factory Glock 17 round mag, and one Korean 50 round drum mag without a single issue. Ammo was all 115gr from various manufacturers... basically whatever I've been able to find over the past couple months. Little extra note: the buffer system from the JRC (minus the plastic spacer) works great in a 9" barrel 9mm AR pistol when shooting suppressed. Wish I could tell you it worked well unsuppressed too, but I never got around to taking the suppressor off that one either. |
|
|
|
[#6]
Thanks for posting this! I'm thinking about doing this plus their "takedown tube" to make an ultra-portable 9mm carbine + Glock 17 Suitcase.
|
|
|
|
[#7]
Awesome....can you show some pics that show more of the complete gun with stock open and folded?
Thanks! |
|
|
|
[#8]
Quoted:
Awesome....can you show some pics that show more of the complete gun with stock open and folded? Thanks! +1 Looks great man. |
|
|
|
[#9]
Pics up top!
|
|
|

AR15.COM is the world's largest firearm community and is a gathering place for firearm enthusiasts of all types.
From hunters and military members, to competition shooters and general firearm enthusiasts, we welcome anyone who values and respects the way of the firearm.

Subscribe to our monthly Newsletter to receive firearm news, product discounts from your favorite Industry Partners, and more.
Copyright © 1996-2024 AR15.COM LLC. All Rights Reserved.
Any use of this content without express written consent is prohibited.
AR15.Com reserves the right to overwrite or replace any affiliate, commercial, or monetizable links, posted by users, with our own.


