|
Posted: 10/28/2010 5:19:47 PM EDT
My friend asked me to paint his Spikes Tactical Lower yesterday and I figured I would put a 2nd coat on mine also that I had done a few weeks back.
They didnt turn out too bad in my opinion, and I used Testors model car paint. First photo is as soon as I got done applying the paint, I still needed to wipe off a lot of excess paint and smudges, you can see it a lot at the top. 
2nd photo here is after drying and wiping down one last time for the night. 
|
|
|
|
[#1]
Very cool, this is my preferred method of coloring markings as well. I generally only do the selector markings for my own lowers, but those look great fully colored. Makes me want to touch up my Spikes lower...
|
|
|
|
[#2]
Nice work. How did you do it?
|
|
|
|
[#3]
Looks really good. That Rock River painted roll mark really pops.

I must say when I first read about painting the roll marks at the first of the year, I wasn't to interested but with the right paint and a little patience... 
I use Testers model enamel, thinner, thin brush and Q tips. Brush on paint heavely into roll marks. Dry for a couple of hours. Clean off overpaint with lightly dipped almost dry thinner Q tip. 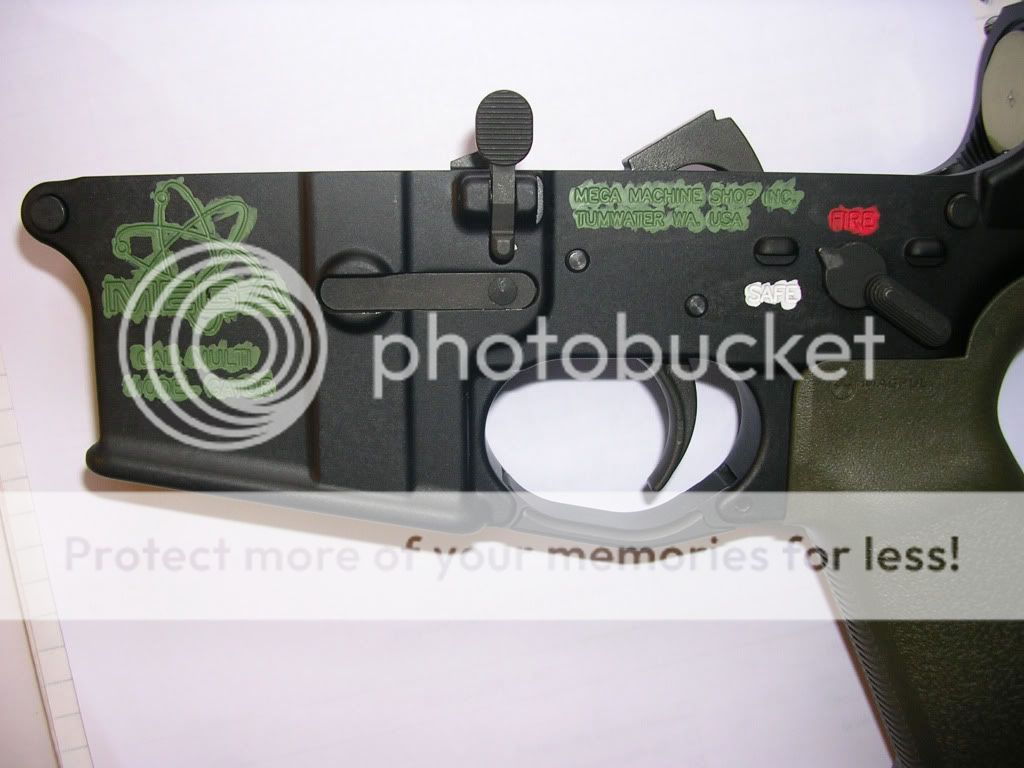
Cheers, 
|
|
|
|
[#4]
Quoted:
Nice work. How did you do it? thanks everyone for the comments, here is a quick walk through of what I done, some peoples may vary. First: As of always, while doing anything other than shooting, make sure the rifle is unloaded, separate upper/lower. Next I took 2 bottle lids from 2 bottles of water, tried them with a paper towel inside and poured the needed amount of white in one and red in the other. After this, I took about 3-4 drops of the thinner and put in each, this is to help it run in the markings easier and not be so thick. Had 2 brushes, one for each color, dabbed them in each and applied to markings as I wanted them to be colored. Of course, you are going to have smudges, and run overs, not to mention I literally cover the section I am painting to make sure its deep in the markings. Once I set and let each section dry about 15-20 minutes, I get a paper towel or small cloth and spray Barricade or some type of power fighting oil to help remove the excess. I do the wax on, wax off motion with my fingers lying absolutely flat and the cloth tight around the fingers so your sure to not rub it down in the markings and remove it from there. Once I am finished with this, I let it set just a few more moments to make sure everything is nice and dry again, then go over the whole lower with a cleaning cloth because I am OCD. |
|
|
 Win a FREE Membership!
Sign up for the ARFCOM weekly newsletter and be entered to win a free ARFCOM membership. One new winner* is announced every week!
You will receive an email every Friday morning featuring the latest chatter from the hottest topics, breaking news surrounding legislation, as well as exclusive deals only available to ARFCOM email subscribers.

AR15.COM is the world's largest firearm community and is a gathering place for firearm enthusiasts of all types.
From hunters and military members, to competition shooters and general firearm enthusiasts, we welcome anyone who values and respects the way of the firearm.

Subscribe to our monthly Newsletter to receive firearm news, product discounts from your favorite Industry Partners, and more.
Copyright © 1996-2024 AR15.COM LLC. All Rights Reserved.
Any use of this content without express written consent is prohibited.
AR15.Com reserves the right to overwrite or replace any affiliate, commercial, or monetizable links, posted by users, with our own.


