|
Posted: 7/9/2015 7:26:01 PM EDT
Well at least one of them.
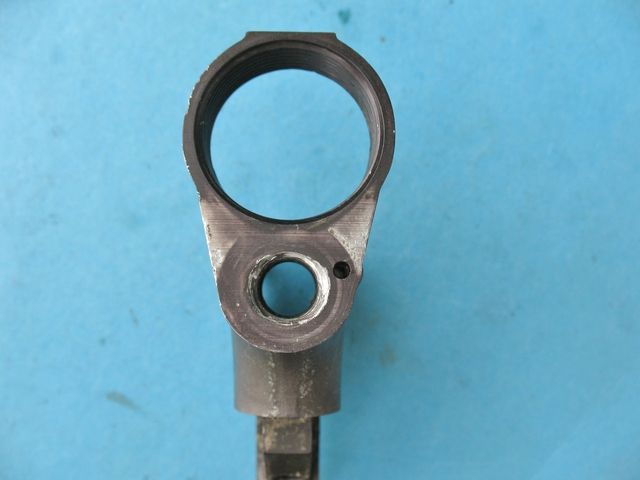
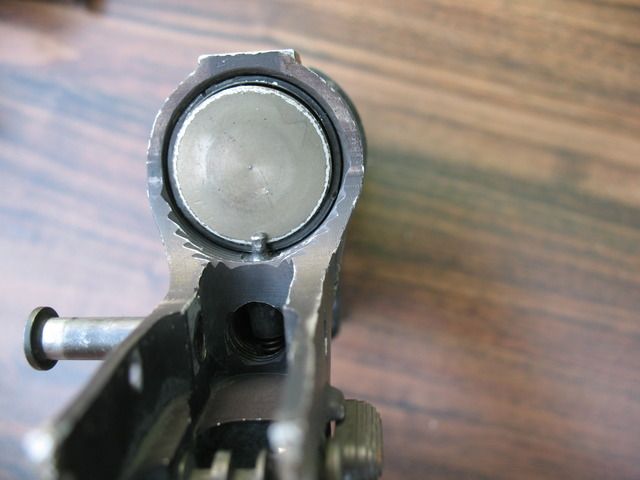
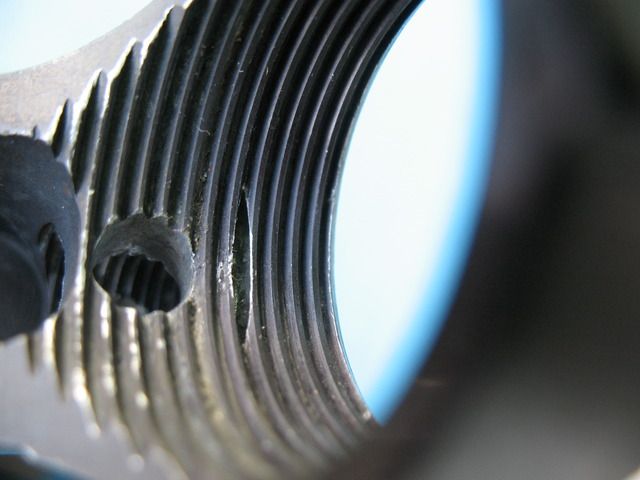
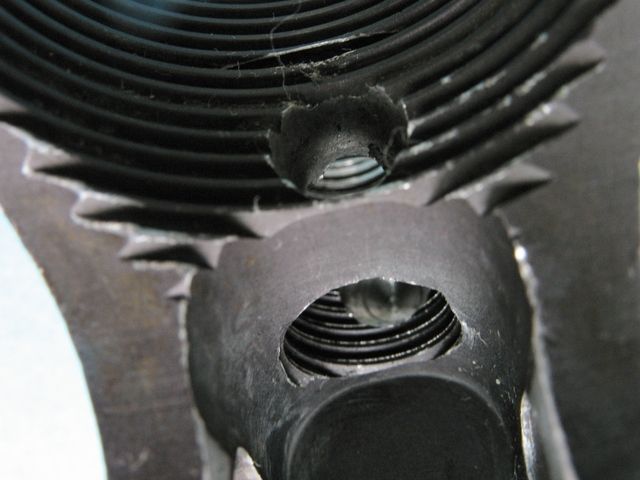
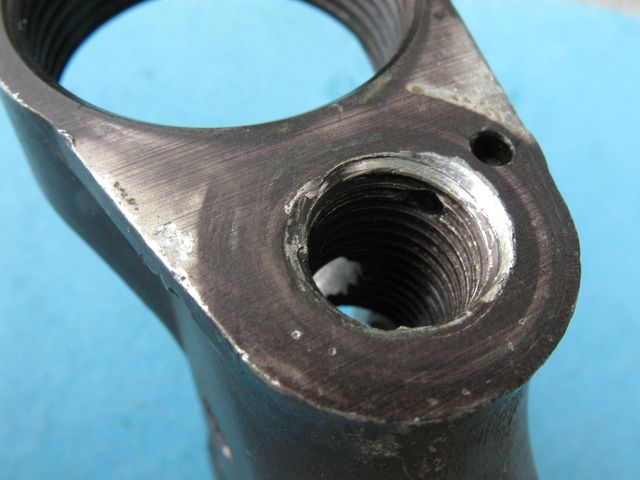
I picked this up for reference. Seen that it was a 607 or GX5857 lower that was updated to a 2nd gen. collapsible buttstock. When I removed the upper and looked into the rear I seen the thread in the lock rod hole. Then removed the remains of the buttstock and could confirm that the rod hole was indeed threaded. Drilled and threaded to 7/16x20 before it was anodized. Then the threaded lock rod was screwed in up to it's shoulder, then cross drilled and pinned. Then the buffer retainer pin hole was finished drilled through the lock rod. It's a crying shame that the stock had been updated because it sure would have been nice to find a piece the original buttstock.  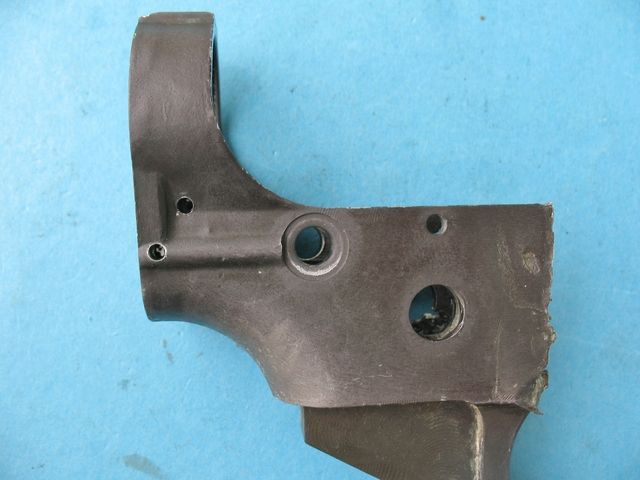
|
|
|
|
[#1]
wow that's really interesting, where did you find that?
|
|
|
|
[#2]
The feels.
|
|
|
|
[#3]
It would make a hell of a beer tap...
|
|
|
|
[#4]
Just finding that much is bloody amazing...
|
|
|
|
[#5]
Ehhh,, what's that I hear?? Sounds like several members are turning on their machines and reworking their 607 clones, I bet Stoner gets it done 1st LMAO...............

Thanks much for posting Private Snafu. Very cool stuff right there. |
|
|
|
[#6]
Not for one build.
|
|
|
|
[#7]
Quoted:
Ehhh,, what's that I hear?? Sounds like several members are turning on their machines and reworking their 607 clones, I bet Stoner gets it done 1st LMAO...............
Thanks much for posting Private Snafu. Very cool stuff right there. LOL......and I've got a stock install to do for 30CalM1. He and I were talking a couple weeks ago about his install, and he brought up the idea that if the receiver were threaded then the lock rod could be removed and reinstalled and the roll pin hole would easily line up for the roll pin. We were discussing this because I'll have to do the stock install PRIOR to him machining the 80% out. m1sniper....the only thing about firing up the machines to redo mine is this......the hole that is already machined into the receiver is .500-.501, which is too large for 1/2-20 threads, much less 7/16-20 threads. That means I won't be reworking mine. (lower is stamped for SBR). Don't know if we can do 30Cal's that way either. It would require making another 1/2" lock rod most likely. First, the receiver would have to be drilled and threaded. Then, after the rod is threaded into the receiver the other part of the locking mech (the tube) would have to be put in place and the rod marked with the tube......to locate the ball detent and 3/16" pin in the correct location. It's sort of like what came first, the chicken or the egg. It would be most difficult to thread an existing finished rod correctly, to have it thread in and shoulder to be in "time" with the existing tube slots/ etc. OR.............sitting here thinking.......I guess it could be threaded in and the very rear of the tube (the part that has the tang which the lock lever is attached to) could be removed and repined in the correct "time" And finally........Thanks Pvt for shedding this light on the retro community. Some may wonder why such a small detail would excite anyone, but to those of us that ate-up with "correctness", and not the political kind, it is very important. You would have thought that the several people that have had museum examples in their hands would have brought this to light long ago.........makes me wonder if perhaps there were several methods of attaching the rod. |
|
|
|
[#8]
Well, that's pretty cool. It never even crossed my mind that it would have been threaded, but now in hindsight, I guess the better question would have been why would it NOT have been threaded? Thanks for sharing this.
John Thomas |
|
|
|
[#9]
you have a very very very rare paperweight there! Thank you for sharing and advancing the community's knowledge!
|
|
|
|
[#10]
Now that would be cool if you married it up to a 80% lower
|
|
|
|
[#11]
So, after reading all this - what are the threads, 1/2-13? Stoner - I guess I don't understand why you'd have to drill, tap and install the op-rod before he machines out the TG pocket...can you explain? You know, in layman's terms.
|
|
|
|
[#12]
That's cool!
|
|
|
|
[#13]
Wow, that took a minute to figure out what I was looking @. How does the buffer stop plunger work, then? Or is the spring pressing on the top of the lower stock tube threads?
NVM, answered in OP. |
|
|
|
[#14]
Quoted:
So, after reading all this - what are the threads, 1/2-13? Stoner - I guess I don't understand why you'd have to drill, tap and install the op-rod before he machines out the TG pocket...can you explain? You know, in layman's terms. Morg, PrivateSnafu's post says that the receiver is threaded 7/16-20. The stocks that I have done, and all the other repops that I have seen except for TSI's bolt on, have the 1/2" rod as a slip or light press into the receiver. (that means no threads involved) If the 1/2" lock rod is already mated to a 1/2" hole in the receiver that means that a 7/16 rod cannot possibly be threaded into the receiver. (7/16 is smaller than 1/2") EDIT: I also couldn't thread the 1/2" rod into the 1/2" hole as 1/2-20 threads call for a 27/64" tap drill hole, not 32/64 (1/2") We'll see if 30Cal wants to have the first known "correct" repop, as far as the threaded rod is concerned. My comment that I need to do 30CalM1's stock install before he does the fire control pocket is because of this: I don't have an FFL and cannot receive a "firearm" from him. If I were doing it to my own 80% lower I would probably do the fire control pocket before the stock install, but it doesn't really make any difference the order of operations. |
|
|
|
[#15]
That is an amazing find. We have photo's of disassembled 607's but, none of them go into that kind of detail, especially in that area. I knew from an old Colt photo that there was a step down at the end of the lock rod but, I never would have thought it was threaded.
What I don't quite understand is; how would they have timed it? Unless we assume that the lock rod was mated to a receiver and both were machined and finished and then, put back together. |
|
|
|
[#16]
Quoted:
Morg, PrivateSnafu's post says that the receiver is threaded 7/16-20. The stocks that I have done, and all the other repops that I have seen except for TSI's bolt on, have the 1/2" rod as a slip or light press into the receiver. (that means no threads involved) If the 1/2" lock rod is already mated to a 1/2" hole in the receiver that means that a 7/16 rod cannot possibly be threaded into the receiver. (7/16 is smaller than 1/2") EDIT: I also couldn't thread the 1/2" rod into the 1/2" hole as 1/2-20 threads call for a 27/64" tap drill hole, not 32/64 (1/2") We'll see if 30Cal wants to have the first known "correct" repop, as far as the threaded rod is concerned. My comment that I need to do 30CalM1's stock install before he does the fire control pocket is because of this: I don't have an FFL and cannot receive a "firearm" from him. If I were doing it to my own 80% lower I would probably do the fire control pocket before the stock install, but it doesn't really make any difference the order of operations. Quoted:
Quoted:
So, after reading all this - what are the threads, 1/2-13? Stoner - I guess I don't understand why you'd have to drill, tap and install the op-rod before he machines out the TG pocket...can you explain? You know, in layman's terms. Morg, PrivateSnafu's post says that the receiver is threaded 7/16-20. The stocks that I have done, and all the other repops that I have seen except for TSI's bolt on, have the 1/2" rod as a slip or light press into the receiver. (that means no threads involved) If the 1/2" lock rod is already mated to a 1/2" hole in the receiver that means that a 7/16 rod cannot possibly be threaded into the receiver. (7/16 is smaller than 1/2") EDIT: I also couldn't thread the 1/2" rod into the 1/2" hole as 1/2-20 threads call for a 27/64" tap drill hole, not 32/64 (1/2") We'll see if 30Cal wants to have the first known "correct" repop, as far as the threaded rod is concerned. My comment that I need to do 30CalM1's stock install before he does the fire control pocket is because of this: I don't have an FFL and cannot receive a "firearm" from him. If I were doing it to my own 80% lower I would probably do the fire control pocket before the stock install, but it doesn't really make any difference the order of operations. I've come across some 80% lowers that have shallow, flat bottomed holes at that spot. Would it be feasible to drill a smaller hole in the center of the 1/2" hole and use it like a big counter sink? You could even make a nub behind the threads on the lock rod to fit it. |
|
|
|
[#17]
Quoted:
That is an amazing find. We have photo's of disassembled 607's but, none of them go into that kind of detail, especially in that area. I knew from an old Colt photo that there was a step down at the end of the lock rod but, I never would have thought it was threaded. What I don't quite understand is; how would they have timed it? Unless we assume that the lock rod was mated to a receiver and both were machined and finished and then, put back together. My first thought.......we don't know what period of time PrivateSnafu's example is from. Remember the stocks with the hole/grommet in each side......the rod could have been installed (without 3/16 pin and detent) then the stock/locking tube slipped over the 1/2" rod. With the locking lever flipped to it's appropriate position a hole could have been drilled through the whole works and a roll pin installed. Or.......like I was saying in the above post. Everything could have been completed on the locking assembly EXCEPT having the piece that the locking lever attaches to left unpinned. Assemble everything and turn the locking lever to it's appropriate position. Remove lever. Remove stock. Cross drill and pin the tanged plug that goes on the end of the locking tube. Reassemble and you're finished. |
|
|
|
[#18]
Quoted:
I've come across some 80% lowers that have shallow, flat bottomed holes at that spot. Would it be feasible to drill a smaller hole in the center of the 1/2" hole and use it like a big counter sink? You could even make a nub behind the threads on the lock rod to fit it. Quoted:
Quoted:
Quoted:
So, after reading all this - what are the threads, 1/2-13? Stoner - I guess I don't understand why you'd have to drill, tap and install the op-rod before he machines out the TG pocket...can you explain? You know, in layman's terms. Morg, PrivateSnafu's post says that the receiver is threaded 7/16-20. The stocks that I have done, and all the other repops that I have seen except for TSI's bolt on, have the 1/2" rod as a slip or light press into the receiver. (that means no threads involved) If the 1/2" lock rod is already mated to a 1/2" hole in the receiver that means that a 7/16 rod cannot possibly be threaded into the receiver. (7/16 is smaller than 1/2") EDIT: I also couldn't thread the 1/2" rod into the 1/2" hole as 1/2-20 threads call for a 27/64" tap drill hole, not 32/64 (1/2") We'll see if 30Cal wants to have the first known "correct" repop, as far as the threaded rod is concerned. My comment that I need to do 30CalM1's stock install before he does the fire control pocket is because of this: I don't have an FFL and cannot receive a "firearm" from him. If I were doing it to my own 80% lower I would probably do the fire control pocket before the stock install, but it doesn't really make any difference the order of operations. I've come across some 80% lowers that have shallow, flat bottomed holes at that spot. Would it be feasible to drill a smaller hole in the center of the 1/2" hole and use it like a big counter sink? You could even make a nub behind the threads on the lock rod to fit it. I have not seen any lowers that did not have the shallow 1/2" diameter spotface. That spotface is what "locks" the receiver plate, or a full rifle stock) in place. At any rate though, YES, the thing to do if you were wanting to do a 607 stock install using a threaded rod would be to: drill in the center of that spotface a hole, using the appropriate drill bit for a 7/16-20 thread. (7/16-20 tap drill) Drill through to the fire control pocket. tap 7/16-20 install threaded rod into the tapped hole until the shoulder of the rod bottoms out in the 1/2" counterbore. (counterbores are square shouldered, while countersinks are tapered holes, usually 82 degrees included) |
|
|
|
[#19]
Not sure if this info makes any difference but a comment Stoner made is true about "different methods" of attaching.
When willp was researching 607s to do his (those of you who remember him he would dig REALLY deep for info), he found picturs of 607s that showed the lower rod hole being drilled all the way thru to the fire control pocket as well as pics of some that were not drilled all the way thru. He chose to drill thru, so did I when I did mine. It does require more work doing it that way because you then need to set your lower up on a 22 degree angle and "re-drill" the buffer retainer hole down thru the lower rod. |
|
|
|
[#20]
Quoted:
Not sure if this info makes any difference but a comment Stoner made is true about "different methods" of attaching. When willp was researching 607s to do his (those of you who remember him he would dig REALLY deep for info), he found picturs of 607s that showed the lower rod hole being drilled all the way thru to the fire control pocket as well as pics of some that were not drilled all the way thru. He chose to drill thru, so did I when I did mine. It does require more work doing it that way because you then need to set your lower up on a 22 degree angle and "re-drill" the buffer retainer hole down thru the lower rod. m1, unless I am overlooking something, or am misunderstanding you, the angle should be 6 degrees. |
|
|
|
[#21]
Just another observation regarding the lower in the OP pic. My best guess is that that lower was "specifically" made as a 607. Reason I say this. Note how the edge of the end plate has had the outer edge relieved. I'm betting that the lower never had the 1/2" diameter hole that we see on all other lowers, and was, at the factory, drilled to the smaller size to accommodate the threaded rod right from the get go. When the lower was then fitted with the telescoping stock, the end plate nub would be too large to fit into the threaded hole so rather then bore the hole wider, the armorer just "softened" the edge of the nub.
|
|
|
|
[#22]
Quoted:
m1, unless I am overlooking something, or am misunderstanding you, the angle should be 6 degrees. Quoted:
Quoted:
Not sure if this info makes any difference but a comment Stoner made is true about "different methods" of attaching. When willp was researching 607s to do his (those of you who remember him he would dig REALLY deep for info), he found picturs of 607s that showed the lower rod hole being drilled all the way thru to the fire control pocket as well as pics of some that were not drilled all the way thru. He chose to drill thru, so did I when I did mine. It does require more work doing it that way because you then need to set your lower up on a 22 degree angle and "re-drill" the buffer retainer hole down thru the lower rod. m1, unless I am overlooking something, or am misunderstanding you, the angle should be 6 degrees. You're prolly correct, I seem to remember 22 degrees for "something" while doing 80% lowers. Maybe the wedge I cut was 22 millimeters at it's thickest??? I forget off hand.The number was in the instructions that you could get off the CNCGunsmithing web site for use with their jigs. ETA, case of CRS. Here are the instructions right off the CNCGunsmithing tutorial using for doing the buffer retainer hole. : Next, I setup and drilled the buffer retaining hole. I didn't have a block that was exactly 0.220 thick so I just stacked up some index cards and placed them under the receiver. I completely eye balled this hole. I just made sure it was in the center of the receiver and right up against the buffer tower. It's not critical at all... |
|
|
|
[#23]
BTW, for those wanting to do their own, there was a great "tutorial" posted by Hal143 several years ago using a my65pan stock set posted on RBR>>http://bpullignwolnet.dotster.com/retroblackrifle/How2Install607Stock.html
|
|
|
|
[#24]
Quoted:
Is there anything to be cleaned by the wear pattern on the ass end of the receiver? The circle around the plug hole looks less worn than anything else. That whole area would be covered by a carbine stock plate. |
|
|
|
[#25]
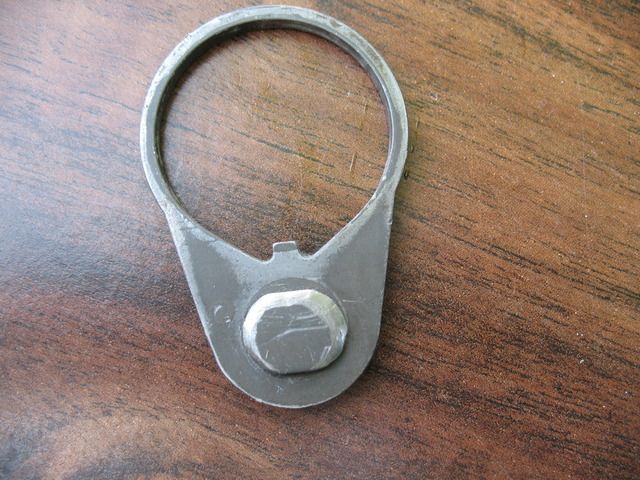
Does anyone care to share how the internals of the original 607's locked open and shut?
|
|
|
|
[#26]
Quoted:
Does anyone care to share how the internals of the original 607's locked open and shut? Here is the patent information from Robert Roy/Colt https://www.google.com/patents/US3267601 I believe all the repops, from TSI, My65Pan, the several that I've done, and perhaps others, have used basically the same principle with the exception of this........I'm not sure why the one end of the slot has the zig-zag notch. Generally, what you'll see is a perpendicular notch at each end of the long slot. A ball detent is used to "hold" the tube in a particular postion. ( "O" or "L") |
|
|
|
[#27]
Quoted: Here is the patent information from Robert Roy/Colt
https://www.google.com/patents/US3267601 I believe all the repops, from TSI, My65Pan, the several that I've done, and perhaps others, have used basically the same principle with the exception of this........I'm not sure why the one end of the slot has the zig-zag notch. Generally, what you'll see is a perpendicular notch at each end of the long slot. A ball detent is used to "hold" the tube in a particular postion. ( "O" or "L") https://www.google.com/patents/US3267601 
|
|
|
|
[#28]
Great Thread, Thanks for sharing Snafu.... I am sure this will change the future of 607 builds for those die hard 607 guys. Looks like there is still some goodies to plunder off that demilled 607.
|
|
|
|
[#29]
Quoted:
........I'm not sure why the one end of the slot has the zig-zag notch. Generally, what you'll see is a perpendicular notch at each end of the long slot. A ball detent is used to "hold" the tube in a particular postion. ( "O" or "L") My best guess is that it would not lock as securely as it would in the open position allowing you to pull hard on the stock to force it open and then swing the lever rather than manipulating it, moving the stock, and locking it. From what I'm thinking you could un-sling the rifle, give it a hard tug, and then lock the stock open. Stoner: Where are you saying the ball detent would be, on the latch itself? |
|
|
|
[#30]
Quoted:
Is there anything to be cleaned by the wear pattern on the ass end of the receiver? The circle around the plug hole looks less worn than anything else. That whole area would be covered by a carbine stock plate. Quoted:
Is there anything to be cleaned by the wear pattern on the ass end of the receiver? The circle around the plug hole looks less worn than anything else. That whole area would be covered by a carbine stock plate. The flange on the end of the hollow tube in the stock would account for the wear just around the threaded hole. |
|
|
|
[#31]
SEE! My head IS used for something else besides a hat rack!
I need to get these stock parts anodized! I WANT to be the guinea pig! |
|
|
|
[#32]
Quoted:
Just another observation regarding the lower in the OP pic. My best guess is that that lower was "specifically" made as a 607. Reason I say this. Note how the edge of the end plate has had the outer edge relieved. I'm betting that the lower never had the 1/2" diameter hole that we see on all other lowers, and was, at the factory, drilled to the smaller size to accommodate the threaded rod right from the get go. When the lower was then fitted with the telescoping stock, the end plate nub would be too large to fit into the threaded hole so rather then bore the hole wider, the armorer just "softened" the edge of the nub. My reasoning as well. The 1/2 hole was never drilled into the rear of this receiver. Also the threaded opening at the rear of the receiver was beat in from the oversized endplate to make it fit better. Government work. Get it done fast and get it out. |
|
|
|
[#33]
So I was doing a google image search and ran across a thread with pictures of an original 607... http://www.ar15.com/forums/t_3_123/414249_Colt_607_Pictures.html
Upon further examination it looks like the one from that thread should be a threaded rod too... Keep in mind, the rear lug pocket is .500" wide, that hole is definitely not the width of that pocket. Does anyone know the diameter of the rod on an original? Wondering if the threaded portion is smaller with a shoulder and the rod is bigger, or if they threaded a .4375" rod and just pinned it in 

|
|
|
|
[#34]
Quoted:
So I was doing a google image search and ran across a thread with pictures of an original 607... http://www.ar15.com/forums/t_3_123/414249_Colt_607_Pictures.html Upon further examination it looks like the one from that thread should be a threaded rod too... Keep in mind, the rear lug pocket is .500" wide, that hole is definitely not the width of that pocket. Does anyone know the diameter of the rod on an original? Wondering if the threaded portion is smaller with a shoulder and the rod is bigger, or if they threaded a .4375" rod and just pinned it in http://www.hunt101.com/data/500/medium/Colt_607_021.jpg http://www.hunt101.com/data/500/medium/Colt_607_020.jpg You can do this: in the pics that 101 posted, you know what the diameter of the buffer tube is.......right?..............so, print off one of the pics that have the stock extended and measure the diameter of the buffer tube. Then, measure the diameter of the lock rod tube......from that you can do an equation and come up with the diameter of the rod........just work a ratio. Measured dia of buffer tube OVER known dia of buffer tube is EQUIVALENT to measured dia of lock rod over X Something that has always made me wonder is this......why does the patent drawing show the buffer tube as being a small diameter rod? |
|
|
|
[#35]
Quoted:
Something that has always made me wonder is this......why does the patent drawing show the buffer tube as being a small diameter rod? Quoted:
Something that has always made me wonder is this......why does the patent drawing show the buffer tube as being a small diameter rod? For reference: While the drawings illustrate use of a single adjustable tube to achieve the desired variation in the length of the rifle, the phantom lines 50 illustrate a guide rod suitably attached to the rifle and the phantom lines 51 illustrate a cooperating passageway in the buttstock which can be used to preclude stock rotation. My guess is for patent purposes they went with the generic "guide rod", in reality it turns out to be the buffer tube. I'll scale the pictures tonight or so and see what I can come up with. |
|
|
|
[#36]
Quoted:
Wondering if the threaded portion is smaller with a shoulder and the rod is bigger, or if they threaded a .4375" rod and just pinned it in. Yes, there is a shoulder. The threaded portion is smaller. You can find a photo of a disassembled 607 in Small Arms Reveiw's online archive. It's good enough that you can see the step but you can't really tell that it's threaded. |
|
|
|
[#37]
Agreed.
51 is a scale issue. Seldom are these Patent drawings to spec.. This line kinda sums up the various ways to mount the rod. As will be apparent to persons skilled in the art, various modifications and adaptations of the structure above described will become readily apparent without departure from the spirit and scope of the invention, the scope of which is defined in the appended claims. |
|
|
|
[#38]
 I'm inspired to figure this out, that and the 607 has been on my list for awhile now. |
|
|
|
[#39]
Quoted:
... where did you find that? Thanks Wes |
|
|
|
[#40]
Quoted: Here is the patent information from Robert Roy/Colt https://www.google.com/patents/US3267601 I believe all the repops, from TSI, My65Pan, the several that I've done, and perhaps others, have used basically the same principle with the exception of this........I'm not sure why the one end of the slot has the zig-zag notch. Generally, what you'll see is a perpendicular notch at each end of the long slot. A ball detent is used to "hold" the tube in a particular postion. ( "O" or "L") Quoted: Quoted: Does anyone care to share how the internals of the original 607's locked open and shut? Here is the patent information from Robert Roy/Colt https://www.google.com/patents/US3267601 I believe all the repops, from TSI, My65Pan, the several that I've done, and perhaps others, have used basically the same principle with the exception of this........I'm not sure why the one end of the slot has the zig-zag notch. Generally, what you'll see is a perpendicular notch at each end of the long slot. A ball detent is used to "hold" the tube in a particular postion. ( "O" or "L") |
|
|
 Win a FREE Membership!
Sign up for the ARFCOM weekly newsletter and be entered to win a free ARFCOM membership. One new winner* is announced every week!
You will receive an email every Friday morning featuring the latest chatter from the hottest topics, breaking news surrounding legislation, as well as exclusive deals only available to ARFCOM email subscribers.

AR15.COM is the world's largest firearm community and is a gathering place for firearm enthusiasts of all types.
From hunters and military members, to competition shooters and general firearm enthusiasts, we welcome anyone who values and respects the way of the firearm.

Subscribe to our monthly Newsletter to receive firearm news, product discounts from your favorite Industry Partners, and more.
Copyright © 1996-2024 AR15.COM LLC. All Rights Reserved.
Any use of this content without express written consent is prohibited.
AR15.Com reserves the right to overwrite or replace any affiliate, commercial, or monetizable links, posted by users, with our own.


