CA, USA
|
Posted: 11/13/2017 4:00:39 AM EDT
Worked up a couple ladders for my son's rifle and got some interesting results. On both of these the lowest powder weight provided the best results. Seems a bit like reading tea leaves to me so I'm hoping to get some guidance on interpreting these. Where to go from here?
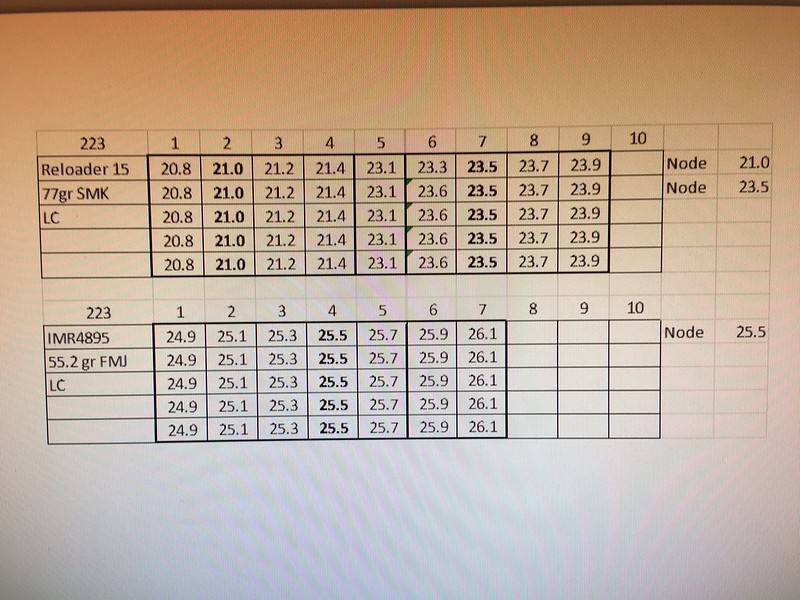
It was fairly early in the morning and the chrono wasn't picking up with the bright sun casting long shadows across the firing line so I wasn't able to get any speed data. 24" AR White Oaks Armament varmint upper, 1/8 twist 100 yds, no wind Forster sizing and ultra micrometer seating die LC cases bought once fired. Sorted by head stamp and prepped. Shooting sequence: First string, shot one round of each powder weight from lowest to highest. Second string, highest to lowest. Third string, lowest to highest. No wait between strings. Results shown below: 52gr SMK IMR 4895 WSR COL 2.200 At 26.4gr primers were getting flattened out, so the highest level (26.5gr) was not shot. 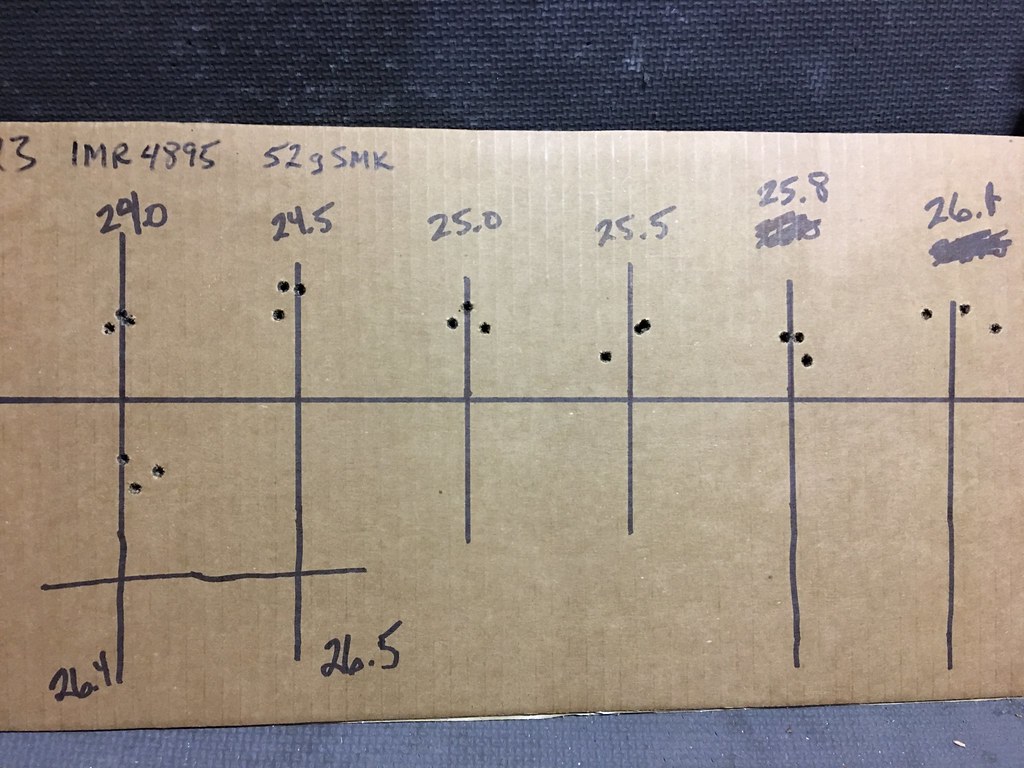
77gr SMK R15 WSR COL 2.250 I'd really like to know what the speed was at 21.0gr. 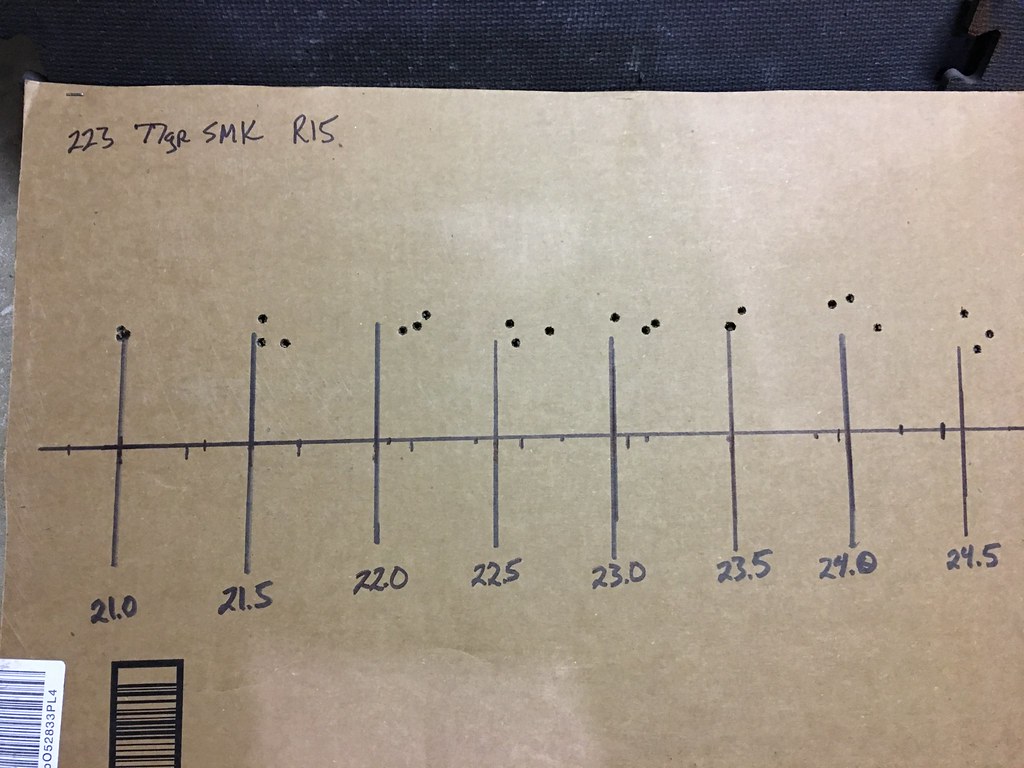
|
|
|
|
[Last Edit: HighpowerRifleBrony]
[#1]
100yds doesn't show much. I prefer a minimum of 5 shots per group.
From the data given, I see nodes at 24.7gr and 23.3gr, respectively. Where the height relative to POA and group size is similar. I'd try 24.5, 24.7, 25.0, and 25.2gr - and 22.7, 23.0, 23.2, and 23.5gr. If they shoot similarly again, I'd pick the one with the best ES/SD. FWIW, I have used 25.0gr H4895 and 50gr VMAX (#1 Service in the MOA All Day) and have backed down to 23.6gr H4895 under moly'd 77gr SMK (my window was 23.5 - 24.0gr, erring on the side of caution). However, I'm only trying to keep them within a 1.5 MOA 10-ring with irons. Konrad Powers, former service rifle champion, uses 24gr R15 /77gr SMK: http://www.sw-hearing.com/konrad/reloading/reloading_procedure.html ETA: based off Sierra's data, the 21gr load would be about 2400fps - http://www.sierrabullets.com/documents/xrings/vol6no3.pdf |
|
|
|
CA, USA
|
[#2]
Thanks for the read on these and appreciate the additional input.
The only 200 yd range is open once a month during the winter which is next Sunday. Plan to shoot the next loads then. |
|
|
CA, USA
|
[Last Edit: uglygun]
[#3]
First load, agreed on 24.7 being worth exploring but also possibly something around 25.6-25.7.
For the 2nd, something around 23.5-24 may prove interesting as well. I wouldnt care much about velocity of something between 21 and 21.5 proved to be magic. Hard to tell unless you up the number of rounds fired for larger sample size. |
|
|
CA, USA
|
[#4]
I definitely have a lot to learn about reading the tea leaves. Thanks for the input!
I'll load up 5 rds of each this time at 0.3 gr increments around the selected nodes. |
|
|
USA
|
[#5]
I see 52gr / 4895 load 3 nodes 24gr / 25gr / 25.8
I see 77gr / RL15 load 2 nodes 21 / 23.5 Your going to need to shoot 5 shot groups for your load development as well as have .2gr or .3gr load increments. .5gr load increments are fine for larger calibers like 308 with heavier projectiles (they are not as grain sensitive). .223/5.56 projectiles are sensitive to these load variations. Your going to need a chrono. if you want to know the FPS of the load for terminal ballistic projections, if you're into that kind of thing |
|
|
CA, USA
|
[#6]
Went back and reread Dan Newberry's OCW instructions again. Then plotted the average POI for each group on the same target as indicated in #14 for comparison.
I would expect the POI to rise as the load increases, but that's not the case here. Is there something I'm missing except the fact it's only 100yds? 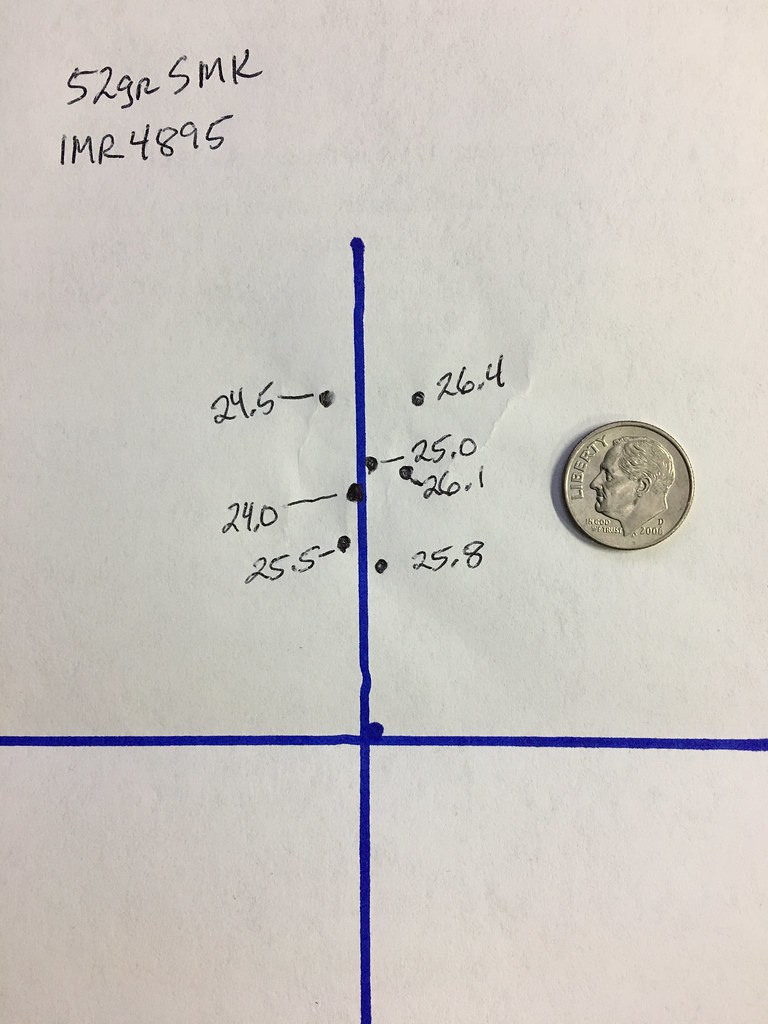
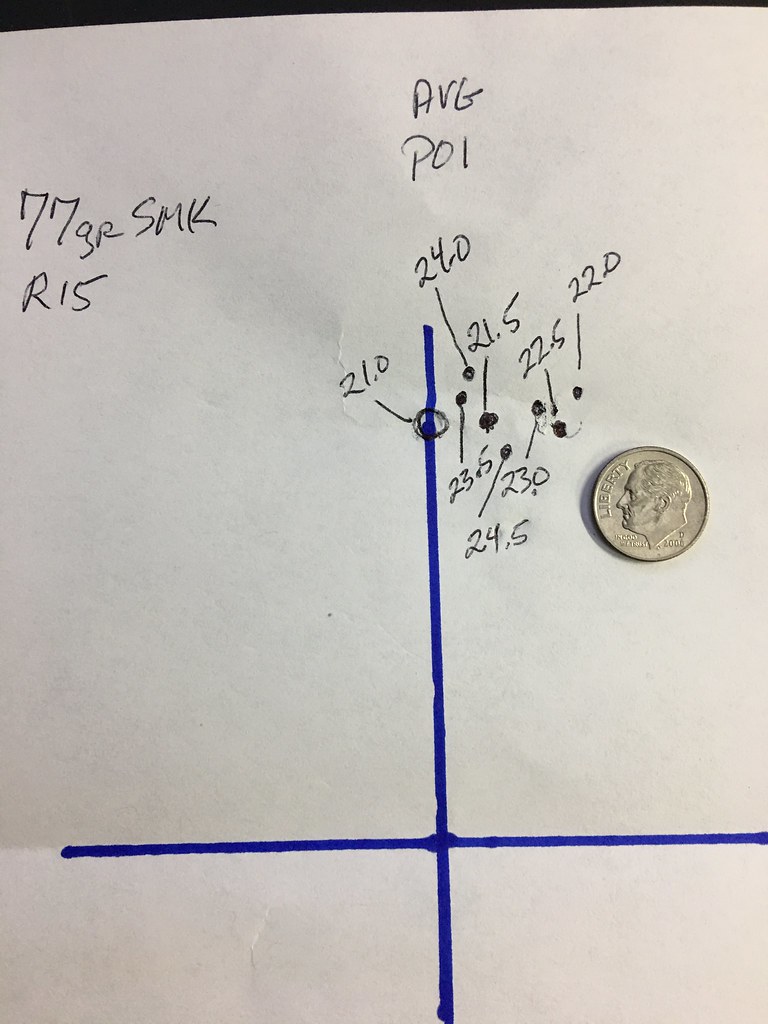
I'm want to call the 52gr SMK node at 26.6gr based on the consolidated target and the 77gr SMK at 21gr and 23.5gr. Any thoughts? Then do 0.2gr increments on each side of the OWC. |
|
|
|
[#7]
If the muzzle is near the top of it's whip with a smaller charge, it may go down with a bigger charge. And vice versa.
|
|
|
|
|
[#8]
Looks to me like you need to shoot groups with more shots in them more range would help but 5 shot groups would be better and 10 shot groups even more so. With that said most of my work up shooting has been done at 100 due to lack of a place to shoot farther and the people who taught me ro shoot and reload. What I usually do is 3 shot groups to get close to the node then twn shot groups to locate it once I know where to look. I also shoot k own ammo in a knowm rifle before I shoot woork up ammo and if I am not shooting to the potential of the known weapon ammo combo tnen I leave the work up stuff for a day when I am on.
|
|
|
|
CA, USA
|
[#9]
Originally Posted By HighpowerRifleBrony:
If the muzzle is near the top of it's whip with a smaller charge, it may go down with a bigger charge. And vice versa. |
|
|
CA, USA
|
[#10]
Originally Posted By porider:
I see 52gr / 4895 load 3 nodes 24gr / 25gr / 25.8 I see 77gr / RL15 load 2 nodes 21 / 23.5 Your going to need to shoot 5 shot groups for your load development as well as have .2gr or .3gr load increments. .5gr load increments are fine for larger calibers like 308 with heavier projectiles (they are not as grain sensitive). .223/5.56 projectiles are sensitive to these load variations. Your going to need a chrono. if you want to know the FPS of the load for terminal ballistic projections, if you're into that kind of thing Makes me want a Labradar for Xmas. |
|
|
CA, USA
|
[#11]
|
|
|
|
[Last Edit: Dominion21]
[#12]
Thank you for creating this thread OP!
Here is what I consider a well-done video on one shooter's ladder test, showing his technique and results: EDIT: let try that again:  Road to Precision Part VIII - Ladder testing for realoading |
|
|
|
|
[#13]
Originally Posted By Dominion21:
Thank you for creating this thread OP! Here is what I consider a well-done video on one shooter's ladder test, showing his technique and results: EDIT: let try that again: |
|
|
|
CA, USA
|
[#14]
Originally Posted By Dominion21:
Thank you for creating this thread OP! Here is what I consider a well-done video on one shooter's ladder test, showing his technique and results: EDIT: let try that again: The other challenge for me is finding a 300yd+ distance to shoot at. For that reason I was following the OCW method that indicates it can be used at 100yd. A friend sent me this link from another forum that does a good job of explaining the OCW method and their example of load development and identifying the nodes: https://www.reddit.com/r/reloading/comments/65kmxb/some_ocw_load_development_in_my_new_ruger/ |
|
|
TX, USA
|
[#15]
Originally Posted By Blowout:
Thinking about using this as the next load sequence. The sequence you are using will help identify the node(s) of accuracy. After I "finish" a load workup, I do 2 additional steps. The first is a bullet seating depth experiment {0.015 from the lands, 0.020, 0.025, and 0.030} The second is a fine sweep to find the width of the charge weight window where the round shoots well. I do this one at 0.05gr steps. The result of this sweep is to identify the first set of 5 shots that are "beyond" the accuracy node. The accuracy node in my 308 with my bullets (155 scenars) and my MV (2950 fps) is 0.25gr wide. So I set the thrower to throw just under this range, trickle up to the window, and dump. THe important thing is knowing how wide the window is. |
|
|
CA, USA
|
[#16]
@MitchAlsup
Thanks... determining the ends of the node more precisely makes sense. I'm planning on adjusting seating depths once the node is confirmed and the OCW determined. I'm planning on 5 shot groups for each seating depth at 0.005 increments starting from the original CBTO used to determine the node and extending until reaching max length for the magazine. I'll also load a few shorter seating depths for comparison. I'm using a Forster ultra micrometer seating die, so making adjustments should be simple. |
|
|
TX, USA
|
[#17]
The ladder method didn't get me anywhere towards finding a precision node. On the other hand, the Optimal Charge Weight method identified a good node on the first range trip with 50 rounds of 10 charges. Now I'm experimenting with bullet seating depth since I've identified a fault tolerant precision charge node.
|
|
|
|
[Last Edit: Dominion21]
[#18]
Originally Posted By assaultdog0351: He had a good series, haven't seen anything new from him in a while though... dad life. |
|
|
|
CA, USA
|
[Last Edit: Blowout]
[#19]
Hard to believe its been a year since working on this load.
Starting to question my ability to accurately measure loads after this last range session. This time used a Caldwell chronograph to record velocities (except the first 2 rounds because I forgot to press start on the app Loaded at 0.1gr increments above and below node 1 (21.0gr) and node 2 (23.5gr) to try to determine the ends of the nodes. 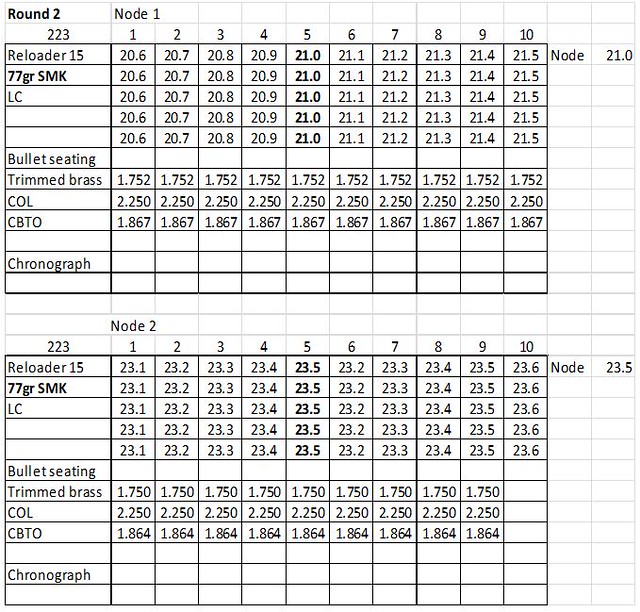
I don't understand the wide velocity spread at each carefully trickled charge using a beam balance. A lower weight charge can also have a higher velocity average than a higher weight charge. Not sure what could cause this besides weighing charges incorrectly. Any thoughts on this? I'm baffled. Once fired cases have been head stamp sorted and full length sized, but never shot through this gun. Concentricity verified under +/- .004" for all rounds. I attached UV lights to the Caldwell chrono and draped a thick black garbage bag over the top of the skyscreens to get consistent readings throughout the day. Seems to work fairly good, but wind is not a friend to this setup. The mags were loaded and shot 1-10. Forgot to round robin shoot these, so expect the barrel heating up from 1 to 10 as well. My son was having some issues since we forgot the rear squeeze bag rest and the bipod wasn't snugged up at first so I wouldn't rely too much on reading these groups. The elevation on the scope got changed some how since the last outing and was shooting about 4" high. Hadn't shot this gun for a year and it showed. 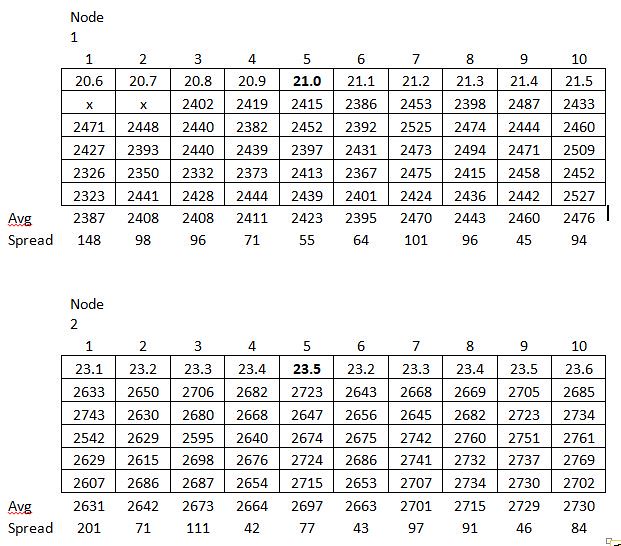 First shot on 1 went high and then lowered the elevation for the remaining rounds. 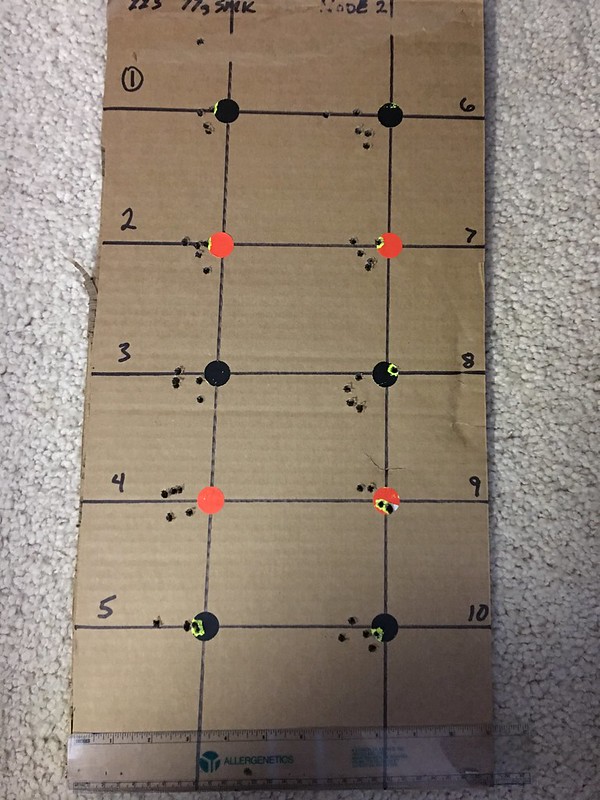
Edit: forgot to add Node 1 target. This is before scope elevation and windage was adjusted. POI is ~ 4" high 
|
|
|
|
[#20]
Originally Posted By Blowout:
Hard to believe its been a year since working on this load. Starting to question my ability to accurately measure loads after this last range session. This time used a Caldwell chronograph to record velocities (except the first 2 rounds because I forgot to press start on the app Loaded at 0.1gr increments above and below node 1 (21.0gr) and node 2 (23.5gr) to try to determine the ends of the nodes. https://farm2.staticflickr.com/1955/44847263895_bb34e6b5bf_z.jpg I don't understand the wide velocity spread at each carefully trickled charge using a beam balance. A lower weight charge can also have a higher velocity average than a higher weight charge. Not sure what could cause this besides weighing charges incorrectly. Any thoughts on this? I'm baffled. Once fired cases have been head stamp sorted and full length sized, but never shot through this gun. Concentricity verified under +/- .004" for all rounds. I attached UV lights to the Caldwell chrono and draped a thick black garbage bag over the top of the skyscreens to get consistent readings throughout the day. Seems to work fairly good, but wind is not a friend to this setup. The mags were loaded and shot 1-10. Forgot to round robin shoot these, so expect the barrel heating up from 1 to 10 as well. My son was having some issues since we forgot the rear squeeze bag rest and the bipod wasn't snugged up at first so I wouldn't rely too much on reading these groups. The elevation on the scope got changed some how since the last outing and was shooting about 4" high. Hadn't shot this gun for a year and it showed. https://farm2.staticflickr.com/1948/44847449885_826f560f5c_z.jpg First shot on 1 went high and then lowered the elevation for the remaining rounds. https://farm2.staticflickr.com/1931/44813336665_82f3c4739e_c.jpg As to your load info, if chart 1 matches up with the target then #5 is my pick for more work... |
|
|
|
CA, USA
|
[Last Edit: Blowout]
[#21]
Oops, I just edited to add the target for the first node. It was late when I posted last night
Yes, they match the chart. Thanks for the input...I'm sure your on to something. Neck tension was not checked for every round. On set up it showed 0.003" expansion of the neck when a bullet was seated. No crimp was used. I need to address consistent neck tension in my reloading process. I'm going to stay away from turning necks for this load since these are shot from an AR. |
|
|
|
[#22]
Originally Posted By Blowout:
Oops, I just edited to add the target for the first node. It was late when I posted last night Yes, they match the chart. Thanks for the input...I'm sure your on to something. Neck tension was not checked for every round. On set up it showed 0.003" expansion of the neck when a bullet was seated. No crimp was used. I need to address consistent neck tension in my reloading process. I'm going to stay away from turning necks for this load since these are shot from an AR. Created: 06/06/18 02:03 PM Description: 300rum 3.0950" test 6 Ballistic Coefficient: 0.717 Bullet Weight(gr): 230.00 # FPS FT-LBS PF 5 3218 5289.51 740.14 4 3221 5299.38 740.83 3 3214 5276.37 739.22 2 3208 5256.69 737.84 1 3214 5276.37 739.22 Average: 3215.0 FPS SD: 4.9 FPS Spread: 13 FPS True MV: 3220 FPS |
|
|
|
CA, USA
|
[Last Edit: Blowout]
[#23]
Thanks for the detailed process description. Your definitely getting good velocity reproducibility and I'm definitely missing a couple steps from what your doing.
I only anneal once before sizing. Made a machine so its simple and would be easy to add a second anneal in the process. The cases used here were purchased as once fired LC, then sorted by headstamp. Primer pockets reamed to remove crimp, uniformed, flash hole reamed. Wet tumbled > annealed > lubed > full length sized (Forster die) neck sized by expander ball > dry tumbled corn cob w/Nu finish > trimmed/chamfered > primed > Bullet seated (Forster Ultra) > concentricity checked to be under +/- 0.004. Since this is for an AR, I planned on using a full length sizing die to bump the shoulder instead of a bump die. Been thinking about removing the expander ball on the sizing die and adding a mandrel to expand the neck as separate step. I'll look into finding something suitable. I'm curious how you straiten a loaded round for concentricity without effecting neck tension? Thanks again for your insights! |
|
|
|
[Last Edit: AKSnowRider]
[#24]
Originally Posted By Blowout:
Thanks for the detailed process description. Your definitely getting good velocity reproducibility and I'm definitely missing a couple steps from what your doing. I only anneal once before sizing. Made a machine so its simple and would be easy to add a second anneal in the process. The cases used here were purchased as once fired LC, then sorted by headstamp. Primer pockets reamed to remove crimp, uniformed, flash hole reamed. Wet tumbled > annealed > lubed > full length sized (Forster die) neck sized by expander ball > dry tumbled corn cob w/Nu finish > trimmed/chamfered > primed > Bullet seated (Forster Ultra) > concentricity checked to be under +/- 0.004. Since this is for an AR, I planned on using a full length sizing die to bump the shoulder instead of a bump die. Been thinking about removing the expander ball on the sizing die and adding a mandrel to expand the neck as separate step. I'll look into finding something suitable. I'm curious how you straiten a loaded round for concentricity without effecting neck tension? Thanks again for your insights! So For me and my 308" bullet, I want to neck bush down to .335"(bullet diameter plus neck thickness twice..minus .003", then when I run thru the mandrel it resizes back to .306" which gives me .002" of neck tension when the bullet is seated... As for the concentricity stuff I just use a snap-on screwdriver, holding the screwdriver by the shank and use the handle as a "hammer" , spin it in the gauge, find the high spot and a light tap and recheck..pretty simple to get runout under .001" without affecting tension...I hold the case with my finger under the neck, casehead against my palm... ETA: OP, running a full length die is not an issue, you don't need individual dies..I run them just because it isolates each part of the brass prep and allows me to concentrate on each step...You can get a full length die with a bushing..and forester does custom die work on your dies to match to your chamber if you send them the die and a couple fired pieces of brass..You can most likely get away with the die you have if you carefully measure and size the neck and expander ball.. the big issue with the stock dies are they normally way under size the neck then the ball brings it back, which is hard on the brass annealing wise and the pulling force of the ball can screw with neck concentricity...Maybe remove your ball, size a couple pieces and see what the inner diameter is..then figure out if a resized ball or a mandrel can get you the finished size you want or if you need a bushing die to control the neck better.....Either way it is a tougher deal on a semi auto since you have to body size more in order to get reliability...You also must run more neck tension to avoid bullet setback in the magazine..so you will need to watch for both of those..Also raising neck tension can increase pressure..so carefully work up on it.... |
|
|
|
|
[#25]
Have you guys ever tested to see if all of the extra work is needed? I’ve found that getting half moa or better and single digit std. dev. can be used by doing far less work. There’s no way I’d go through that much work to load up 250rds for a match.
OP, was the brass sized by the seller? Have you resized any of the brass that you’re using for testing after being fired in your chamber? |
|
|
|
CA, USA
|
[Last Edit: Blowout]
[#26]
@AKSnowRider
I've spoke to folks at Forster and they said honing the die to whatever neck size I wanted would only be $12. I need to measure a bunch of LC cases that I'd consider loading for this rifle and determine what would be the best ID sizing for the die neck. Once its honed there's no going back. Interesting how you tweek the round concentric. What do you find is the range of measured runout before tweeking? Are they all already under 0.004 or some over? I imagine concentricity is pretty good with all the effort you've put in up to that point and a little tweek would not affect neck tension much if any. Curious what mandrels your using? Sinclair, K&M, other? I've read the mandrel from Sinclair was rough and shaving some of the brass from inner neck. I'm sure it could be polished, but rather get something I don't have to mess with right out of the gate. |
|
|
CA, USA
|
[Last Edit: Blowout]
[#27]
Originally Posted By SuperJlarge:
Have you guys ever tested to see if all of the extra work is needed? I’ve found that getting half moa or better and single digit std. dev. can be used by doing far less work. There’s no way I’d go through that much work to load up 250rds for a match. OP, was the brass sized by the seller? Have you resized any of the brass that you’re using for testing after being fired in your chamber? The brass wasn't sized. These are all once fired after my FL sizing. I think I know where your going and thought about this too... perhaps on the second firing the SD will drop. I'll load some rounds up after bumping the shoulders back .003 and see what it does to the SD. All the work up front could have been reduced a lot if I just bought Lapua cases to start with. Thought I would learn a lot by going through all the steps of prepping LC cases to reach match potential. Definitely not saving any time or money... I plan to work up a 308 load for my Rem 700 and this is getting the process shaken out before doing that. I've got Lapua cases for that work up. |
|
|
|
[#28]
Originally Posted By Blowout:
@AKSnowRider I've spoke to folks at Forster and they said honing the die to whatever neck size I wanted would only be $12. I need to measure a bunch of LC cases that I'd consider loading for this rifle and determine what would be the best ID sizing for the die neck. Once its honed there's no going back. Interesting how you tweek the round concentric. What do you find is the range of measured runout before tweeking? Are they all already under 0.004 or some over? I imagine concentricity is pretty good with all the effort you've put in up to that point and a little tweek would not affect neck tension much if any. Curious what mandrels your using? Sinclair, K&M, other? I've read the mandrel from Sinclair was rough and shaving some of the brass from inner neck. I'm sure it could be polished, but rather get something I don't have to mess with right out of the gate. I use the Sinclair mandrel and die, I have lightly steel wooled them the SS mandrels seem tougher then the carbide mandrel, but the carbide seems just slightly more consistent on finished neck size... I do this as something to keep me busy and my mind working, the TBI from the wreck is someday going to give me serious problems, so this is a way to strengthen my brain...the range time gets my body a bit stronger and the whole deal keeps me a bit saner... 
It is a pile of work, time, and energy...but I enjoy it..as I said before 90% investment in time for less then a 5% improvement in ammo...not sure its worth it for a busy person, but maybe some single step in there helps someone make better ammo for themselves... |
|
|
|
CA, USA
|
[Last Edit: Blowout]
[#29]
Sorry to hear about your wreck injury. Good to have a hobby to keep the mind occupied elsewhere.
I see Brownells is out of Sinclair 30 cal steel mandrels so I was looking at other options. Found K&M and 21st Century. What I don't like about K&M is they don't use a lock ring on the mandrel die body and there are 2 pieces screwed together to get a window in the die to see when the casing touches the mandrel. 21st Centrury looks decent. They recommend leaving the die body loose in the press to get proper mandrel alignment. I think its like anything... it's easiest to make gains at first and the last 5% of fine tuning performance takes the most effort. |
|
|
|
[#30]
Originally Posted By Blowout:
Sorry to hear about your wreck injury. Good to have a hobby to keep the mind occupied elsewhere. I see Brownells is out of Sinclair 30 cal steel mandrels so I was looking at other options. Found K&M and 21st Century. What I don't like about K&M is they don't use a lock ring on the mandrel die body and there are 2 pieces screwed together to get a window in the die to see when the casing touches the mandrel. 21st Centrury looks decent. They recommend leaving the die body loose in the press to get proper mandrel alignment. I think its like anything... it's easiest to make gains at first and the last 5% of fine tuning performance takes the most effort. |
|
|
|
CA, USA
|
[#31]
Good to know, thanks!
|
|
|
AL, USA
|
[#32]
|
|
|
CA, USA
|
[#33]
Thanks, but Holy smokes, its a 104 page thread spanning 5 yrs ! I'll have to skim that when I have a span of a couple hours to fill. I used a Redding beam scale to measure the previous loads and was having issues tonight with that giving repeatable results trickling. I just pulled the magnets out of a 505 Ohaus scale to see if I can get more accurate and repeatable results with that scale. Used a 30.86gr (2 gram) calibration weight and it weighed in at 30.8gr. I think the modification will help. Previously it was difficult to trickle into the scale with the magnets in because they would inhibit movement of the needle and then it would jump. I'll see this helps to get better SD before going to a mandrel. |
|
|
FL, USA
|
[Last Edit: Reorx]
[#34]
Magnetic dampening is your friend. Without it, it will take much longer for your scale to "settle". If the scale is not moving smoothly, I think it would benefit more from a good cleaning (specifically at the fulcrum/pivot) than from the removal of its magnetic dampening. The only reason other than a dirty fulcrum/pivot for the beam to not move smoothly is if it is touching something somewhere... have a look.
|
|
|
CA, USA
|
[#35]
I've been through both scales more than once... cleaning with a brass brush and solvents, straightening the balance weights, making sure the fulcrums were sharp and checked accuracy with calibration weights. They did work better after this.
Discovered oil is not a good thing to apply to the fulcrum points on these scales. It was enough to cause a bias either high or low when trickling. Now I just wipe it on and off to keep rust from forming on the bare metal. I found the magnets on this Ohaus have enough force to influence movement of the pointer. I would have to swing the scale slightly and look for the mean of the pointer swing to get accurate reads that seemed to match the Redding fairly close. Removing the magnets increased the sensitivity when trickling and it seems to settle fairly quickly. Much quicker than the Redding. The Ohaus has a large metal piece located behind the pointer that usually interacts with the magnets that seems to work as a counter balance and dampens some of the motion. I'm heading to the bench now to finish loading a ladder for the 6.8. This will give me some more hands on time with it to see if it really helps or adds more problems. |
|
|
FL, USA
|
[#36]
|
|
|
CA, USA
|
[Last Edit: Blowout]
[#37]
Thanks for the video! He added some nice updates to that scale. Like the camera set up. I use my cell phone with a magnifying app.
The Redding scale I have is a #1 model and probably not worth the effort since one of the hanger pegs is partly broken. It really takes a long time to settle down since there is not a lot of weight to the beam and its not counter balanced. I cleaned the Ohaus again with some mineral spirits and found a little rust on the fulcrum blades that I gently filed off. It does seem to work better with the magnets removed. Doesn't take too long to settle down, but I'm sure it could be better. Guess I'll find out on the next range trip. Have one ladder with the magnet in half way through the loads and the other half no magnets. Second ladder with no magnet. EDIT: Your right Reorx... Did some more reading on scales and the influence of the magnets. They are going back in when I figure out how to replace them correctly. Seems the polarity greatly influences their effectiveness and they have a particular configuration. Likely the issues with the scale are elsewhere and when cleaned again corrected some of them. |
|
|
 Win a FREE Membership!
Sign up for the ARFCOM weekly newsletter and be entered to win a free ARFCOM membership. One new winner* is announced every week!
You will receive an email every Friday morning featuring the latest chatter from the hottest topics, breaking news surrounding legislation, as well as exclusive deals only available to ARFCOM email subscribers.

AR15.COM is the world's largest firearm community and is a gathering place for firearm enthusiasts of all types.
From hunters and military members, to competition shooters and general firearm enthusiasts, we welcome anyone who values and respects the way of the firearm.

Subscribe to our monthly Newsletter to receive firearm news, product discounts from your favorite Industry Partners, and more.
Copyright © 1996-2024 AR15.COM LLC. All Rights Reserved.
Any use of this content without express written consent is prohibited.
AR15.Com reserves the right to overwrite or replace any affiliate, commercial, or monetizable links, posted by users, with our own.