|
Posted: 2/2/2020 6:07:09 PM EDT
Can the safety be removed?
|
|
|
|
|
[#1]
Why would you want or need to?
|
|
|
|
|
[#2]
Safety is a bit sensitive to any upward pressure and, will partially engage. Makes the trigger suddenly hard to pull.
At first I thought there was something wrong with the gun. Changed my grip and now it doesn't do it any more but, I would like to get rid of it if I can to avoid this situation. |
|
|
|
|
[#3]
Originally Posted By beemerman:
Safety is a bit sensitive to any upward pressure and, will partially engage. Makes the trigger suddenly hard to pull. At first I thought there was something wrong with the gun. Changed my grip and now it doesn't do it any more but, I would like to get rid of it if I can to avoid this situation. Not tryin' to preach to you, but I really would like to know what you're trying to accomplish. @beemerman |
|
|
|
|
[#4]
Well it comes from the factory with or, without manual safety. Version without the frame safety, it has a trigger and striker block safety.
Version with manual frame safety has trigger and, striker block safety. My point is that when I am shooting the gun the manual safety will partially engage and, cause the gun to malfunction. So I asked if anyone has or,can it be removed without any issues. So..... |
|
|
|
TN, USA
|
[#5]
I'd like to remove the manual safety as well. I didn't want manual safety. But wasn't willing to pay more for a safety free version, as that seemed to be the case when I purchased.
|
|
|
KS, USA
|
[#6]
Originally Posted By beemerman:
Well it comes from the factory with or, without manual safety. Version without the frame safety, it has a trigger and striker block safety. Version with manual frame safety has trigger and, striker block safety. My point is that when I am shooting the gun the manual safety will partially engage and, cause the gun to malfunction. So I asked if anyone has or,can it be removed without any issues. So..... |
|
|
|
[#7]
Originally Posted By 44-40pro: Well considering that the safety SHOULD BE ON until you are ready to actually shoot something, I'm still not seeing the issue. I shoot a variety of guns for SD/HD. Some have safeties and some don't. For those that do I ALWAYS have the safety on until I draw and take aim at a target. My Sig P250 for example has no safety at all. It is essentially a 17 shot revolver DA only gun. Safety is no booger hook on the trigger until ready. My G2 has a safety, and it is always deployed until I'm ready to shoot. Not tryin' to preach to you, but I really would like to know what you're trying to accomplish. @beemerman He's trying to accomplish a safety removal, as he said. If you don't have anything to input towards the question there is no reason to comment. You also contradicted yourself, "Safety is no booger hook on the trigger" but then mention how "the safety SHOULD BE ON". so which is it? Originally Posted By beemerman: Can the safety be removed? I was having a similar issue as you. Shot fine to begin with but it got 'mushy' after a while and would kick on. The short answer is yes, you can. However, it can be a pain in the butt and it will leave a gap from where the safety was (same as with Smith & Wesson M&P's)  
|
|
|
|
|
[Last Edit: beemerman]
[#8]
Thanks for the reply CT.
I don't suppose you would be willing to give some instructions on the process? Any pitfalls to avoid while doing it that you came across? |
|
|
|
|
[Last Edit: CheeksTac]
[#9]
Originally Posted By beemerman: Thanks for the reply CT. I don't suppose you would be willing to give some instructions on the process? Any pitfalls to avoid while doing it that you came across? Always happy to help, after all its what the forums are for! As for instruction, it was pretty straight forward. First step is of course you need to gut the frame of the handgun. I was doing this at a range so I just used a small Allen key and a small hammer. Once you have the "striker housing" out, be mindful of the pins. #14 and #12 in the attached diagram had no resistance to them and want to slide free. #19 and #20 is of course the saftey itself and #22 is the spring that gives the safety its 'clicks' I put the safety in the 'safe' position and just kept pulling on #20, using a suppressor tool I have as a fork to help. The press fit is very tight, as its the only thing keeping the safety from falling off your gun.  Honestly it really seems like it was just an after thought and I have zero regrets from taking it off, plus the safety doesn't kick on if I put the slightest pressure on it. 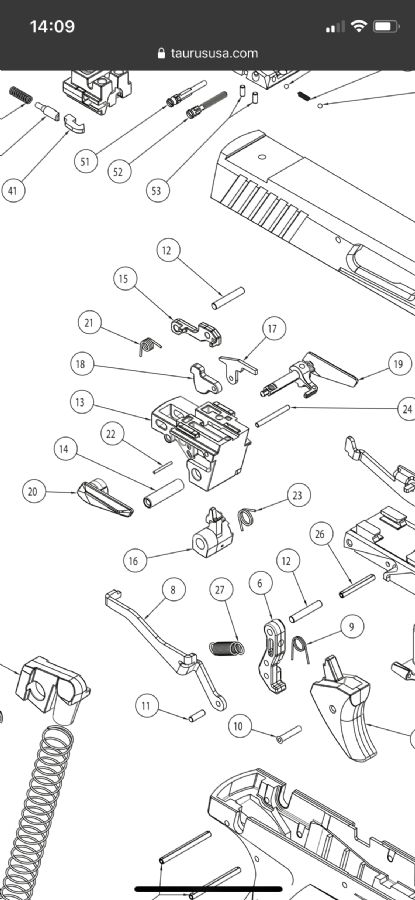 |
|
|
|
|
[#10]
Sugru
This stuff works really well at filling in voids on polymer frames. I sticks, but can be removed when you want to. |
|
|
|
|
[#11]
Thanks guys .
|
|
|
|
|
[#12]
@beemerman
Were you able to remove your safety using these instructions? Any issues since it’s been removed? |
|
|
|
IN, USA
|
[#13]
Originally Posted By Nate19: @beemerman Were you able to remove your safety using these instructions? Any issues since it’s been removed? Also in for the response as I have the comp version and would love to also remove the safety. |
|
|
IN, USA
|
[#14]
Originally Posted By Mav3rick: Also in for the response as I have the comp version and would love to also remove the safety. Guess we will never find out. |
|
|
OR, USA
|
[#15]
Originally Posted By 44-40pro: Well considering that the safety SHOULD BE ON until you are ready to actually shoot something, I'm still not seeing the issue. I shoot a variety of guns for SD/HD. Some have safeties and some don't. For those that do I ALWAYS have the safety on until I draw and take aim at a target. My Sig P250 for example has no safety at all. It is essentially a 17 shot revolver DA only gun. Safety is no booger hook on the trigger until ready. My G2 has a safety, and it is always deployed until I'm ready to shoot. Not tryin' to preach to you, but I really would like to know what you're trying to accomplish. @beemerman |
|
|
MI, USA
|
[#16]
I followed the above instructions and removed the safety. Then I made these plugs on my 3d printer, using a design I found on thingiverse. I thought they came out really well.
 
|
|
|
IN, USA
|
[#17]
Originally Posted By theGOLDENchild: I followed the above instructions and removed the safety. Then I made these plugs on my 3d printer, using a design I found on thingiverse. I thought they came out really well. https://i.imgur.com/9WVdwkz.jpg https://i.imgur.com/A54Rk0J.jpg @theGOLDENchild Nice! If I threw a few bucks your way would you be willing to make me some for mine? How hard was it to remove the safety? I read though the previous persons steps, but he doesn't explain how to tear down some of the parts. Just wondering if it is a task I want to take on. I am going to see if there is a youtube video of someone showing how to take it down/apart. |
|
|
MI, USA
|
[#18]
Yeah, I can make some for ya. Send me a message and we’ll has out details.
I thought it was fairly straight forward. I think it took all of 10 minutes and most of that was trying to wrap my head around the previous instructions. Now that I’ve done it once, it’s a couple minute job. |
|
|
IN, USA
|
[#19]
Today I successfully attempted to remove my safety levers from my TX22 comp using the instructions in that post above.
At first it didn't seem like those instructions were correct, however, they do work. You gently have to pull and in a way pry the right safety lever (part#20 from diagram) away. What worked for me was I took some fine needle nose pliers that I covered in some electrical tape so nothing would get marred and then just gently but firmly pried and pulled the lever off by gently wiggling it as I pulled on it while it was in the safe (up) position. Those pins he mentions to be careful not to fall out where in my striker block pretty good but I made sure to keep my fingers over them just in case. |
|
|
|
[#20]
Pleasantly surprised how easy it was to remove. And no sear spring to send into orbit like an m&p22c!
|
|
|
|
|
[#21]
Thanks to @CheeksTac for posting instructions on this.
@theGOLDENchild Do your frame plugs just push into place in the frame and fit snuggly? Or do they require some type of adhesive? |
|
|
|
MI, USA
|
[#22]
They fit in snug, no adhesive required. The way they were designed, once everything is reassembled, they can't fall out.
Originally Posted By Nate19: Thanks to @CheeksTac for posting instructions on this. @theGOLDENchild Do your frame plugs just push into place in the frame and fit snuggly? Or do they require some type of adhesive? |
|
|
 Win a FREE Membership!
Sign up for the ARFCOM weekly newsletter and be entered to win a free ARFCOM membership. One new winner* is announced every week!
You will receive an email every Friday morning featuring the latest chatter from the hottest topics, breaking news surrounding legislation, as well as exclusive deals only available to ARFCOM email subscribers.

AR15.COM is the world's largest firearm community and is a gathering place for firearm enthusiasts of all types.
From hunters and military members, to competition shooters and general firearm enthusiasts, we welcome anyone who values and respects the way of the firearm.

Subscribe to our monthly Newsletter to receive firearm news, product discounts from your favorite Industry Partners, and more.
Copyright © 1996-2024 AR15.COM LLC. All Rights Reserved.
Any use of this content without express written consent is prohibited.
AR15.Com reserves the right to overwrite or replace any affiliate, commercial, or monetizable links, posted by users, with our own.


