|
Posted: 12/18/2017 12:59:18 PM EDT
PS. A couple quick notes. The EXTENDED mag release that comes in the kit is way too large for these frames (IMO). I swapped the oem mag release from my G23 to the Polymer80 frame and then put that one on the G23. Perfect fit both ways for me.
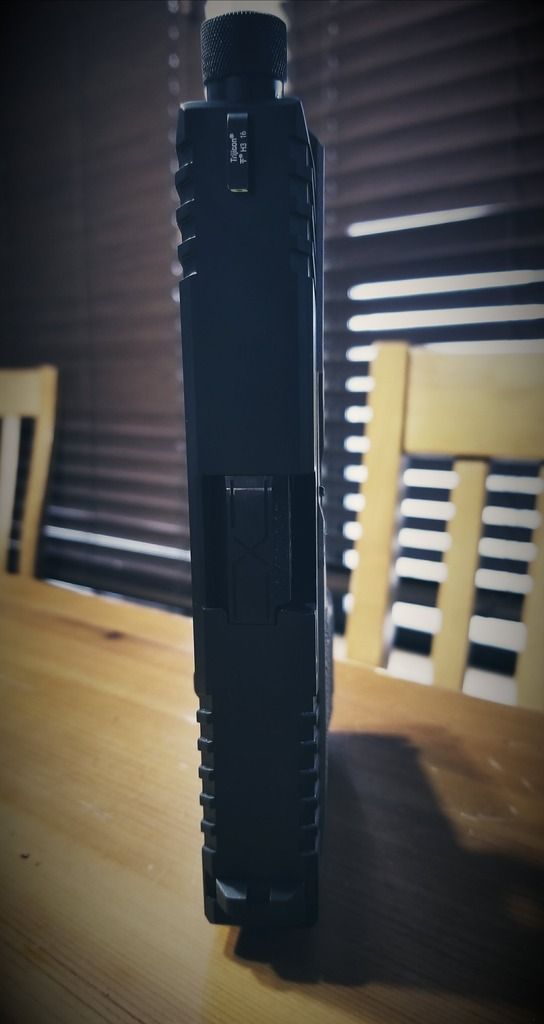
PSS. I don't have a suppressor, I bought a threaded barrel, simply for looks and MAYBE, I'll look at a suppressor or a comp for fun later down the road. Figured since I was going for a "custom" type build, I'd make it fun. In hindsight, the threaded barrel is cool and all, but I need to figure out how to get the thread protector to stay on. Seems after cycling, it works itself loose. I'm sure there is some type of o-ring that I don't have yet, or need, etc. Any suggestions welcome. Just finished my first Polymer 80 build this weekend. I say first because before I'd even started, I'd ordered multiple colors of frames. Thinking that I'd want to make one of them all. I was a little skeptical going in, but like a lot of folks, I'd seen a gazillion YouTube videos and figured "Hell, if they can do it, I can do it". Right? 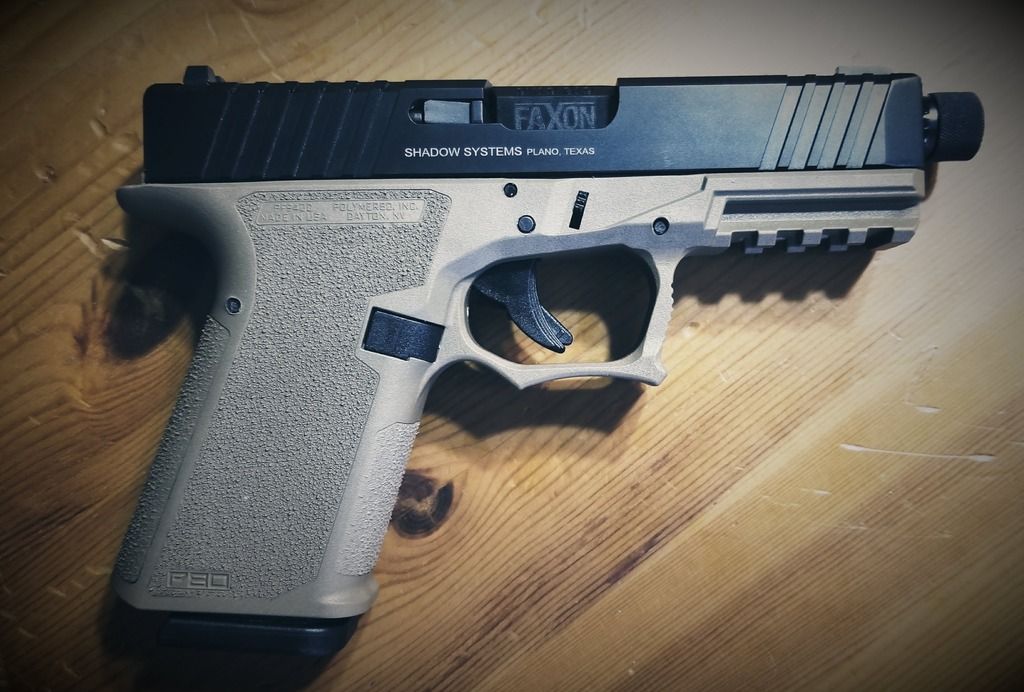

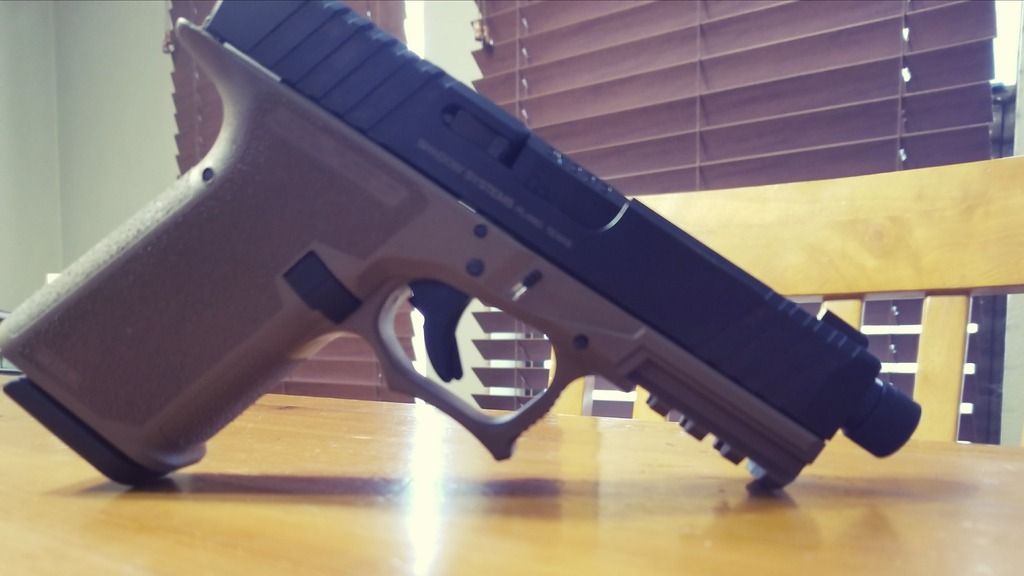 To do the milling I used a dremel, hand files, a drill, and sand paper. The drill was used ONLY to drill the pin holes. I never even opened the milling bit. I don't have a drill press so it wouldn't have helped me much. I first started to take down the tabs with a file, this was taking a bit too long so I broke out the dremel. Within 5 minutes, all 4 of the top tabs were down, close to the frame. Then I finished those off with files and sand paper. Also, I'd read and heard about people using 2000 grit with WD-40, so I finished off the tops with that as well. The top portion was ridiculously easy to be honest. The barrel seat portion, or whatever that's officially called, was a little trickier. My dremel didn't have a long enough post to get it in there without risking damaging the sides so I busted out my pocket knife and seriously just cut it out, scraping it into a rough U shape. Then I wrapped a punch in sand paper and went to town. That took the longest by far. Not a whole lot of room to maneuver using what I had, so I had to just take my time. All in all, the first round (yes there was more than one round) took legitimately about an hour of actual work time. I'm not counting the time I had to spend looking for tools that my daughters have borrowed and didn't put back in their place, as well as the cussing involved. So I get it done that night, install the upper parts kit into the Shadow Systems slide, install the Faxon barrel, and then start working on the lower parts. Now I've never done this, however I have assembled many AR's and felt comfortable installing a lower parts kit. Most of the parts went in without issue, EXCEPT the rear rails. For the life of me, I couldn't get the rear rails to line up perfectly. It just seemed like on the right side of the frame, it was off, ever so slightly. I WAS able to get all of the pins in, with a little help from one of the aforementioned daughters (who's going to start her build next). I have a G23 and G19, so I knew that if I had any questions on where things go, or how they go, I had google, youtube, and my "REAL" Glocks on the table. Once I got all the pins and the rest of the kit installed, I dropped the slide on and started to cycle the slide. Here's where I ran into issues. So first, it just seemed to drag quite a bit in the front, felt like guide rod and spring, so I took it apart, sanded it down a bit more, and put it back together, NEXT it wouldn't reset the trigger. I remembered seeing a YouTube video of a guy that had the same problem, and the fix he applied. So I took the lower apart again, and applied that fix. I'll post a link to that video here too.Since I had it all apart, I put the rear and front rails onto a diamond stone to sand down any high spots, saw that on a video too, I'll look for the link. Oiled everything back up and put it all back together. Trigger reset issue fixed! But it was still dragging. It would cycle about 90% of the time just fine, but if I "rode" the slide forward, or cycled very slow, it would get caught. I took it apart again and noticed small burs, or material in the guide-rod/spring area. Not only that, but there were a couple times that the take down lever got stuck and once even fell out! At first I thought that I just didn't do a perfect job milling that area, so I sanded some more. While I was sanding, I went back to youtube/google. Found a video from a guy having the same problems, turns out, his take down lever spring wasn't flush enough and was causing the guide rod and spring to drag on it, even getting caught and causing his take down lever to fall out! Voila! Watched THAT video, adjusted the spring and installation and BAM! Problems fixed. I put it all back together, cleaned everything up and then proceeded to cycle it about 1 gazillion times. Then I loaded a magazine with snap caps and ran through cycling, reloading etc to TRY to get it to jam. So far nothing. I have this Friday off and will be taking her to the range to run some rounds through her. I'm pretty confident that she'll run smooth but this will be the first test. I'll post links to the vids in case someone else has the same issues. Overall, I'm much more confident and ready to start the next build. My REAL Glock is still my EDC, but making these is fun and so far rewarding. Here's the parts list for the first build: Polymer 80 / Coyote Brown Brownells exclusive Lower Parts Kit - Brownells Barrel - Faxon Arms, flame fluted and threaded Sights - Ameriglo Spaulding Slide - Shadown Systems G19 Carry Slide Upper Parts Kit - Brownells Youtube on sanding rails Takedown lever and spring drag issue Trigger reset issue Once I take it to the range this weekend, I'll post good honest feedback. If it runs like a champ, awesome, if it doesn't, I'll post that too, and whatever I do to re-mediate. I'm pretty set on making this baby work. Thanks for looking. |
|
|
|
[#1]
Ok, so apparently, I don't know how to insert pics or video links. I inserted the youtube video links using the button on the form. I inserted the images from Google Photos. How am I supposed to share this awesomeness if I can't get the pics posted?
FIXED! At least the links are fixed! |
|
|
|
[#2]
You need to be a team member to post video
 Failed To Load Title  Failed To Load Title  Failed To Load Title |
|
|
|
[#3]
Awesome, thanks for the help!
|
|
|
|
[#4]
Just a little update:
Friday before Christmas I took my first build to the range/ Put 350 rounds through it. Side by side with my G23 and G19. I gotta say, I'm ridiculously in love with this gun. I had some old ammo (about 5 years) that I took. I had 2 FTE's. One I know was a bad round, the other I suspect as a bad round as well. I don't think that's too bad, considering this was the first range trip, new barrel, etc. I'll keep everyone up to date if everything changes, but I'm sold at this point. Santa brought me another frame and slide and I still have the grey frame waiting patiently at home for me. This could get addicting! Just a couple notes. Grip - I love the grip angle, while it's not wildly different, it feels different enough that I seem to get a much higher grip. The stippling is the "Brownells Exclusive", it's the "aggressive" texture. Compared to the V2 that I got for Christmas, I think the "aggressive" is LESS aggressive than the Brownells. YMMV. Accuracy - RIght up there with my other Glocks. Not as accurate as my CZ's, but still puts the bullet where I tell it to go, when I do my part. I did use a rest on a magazine or two, to see where I was hitting if I was "perfectly" still and it's right on. I put the Ameriglo Spaulding sites on this gun and love these sights. I have the Vickers on my other Glocks. I think the Spauldings are what I'll use on the other builds as well. They sight quick, feels natural and hit where they say they will ht. The front is tritium and the rear is black. This is my preferred setup. Mags - All of the magazines I had ran flawless. Most are Glock OEM, but I also have Pmag and ETS clear mags. I am REALLY liking the ETS. I think for the future builds, especially at the price, I'll load up on the ETS for a bit. Plus they just look dang cool! Trigger - I used the Glock stock setup and am really loving it. I know a lot of people hate the Glock trigger but I prefer it. I know where I'm gonna hit the wall and I know what comes after that. I will use stock Glock on the rest of the builds. May even put the G23 and G19 back to stock as well for consistency. End result? Like I said, I'm sold. I know that there are issues here and there and that it takes some time, elbow grease and troubleshooting, but I venture to say that if we were building 1911's we'd be doing a lot of the same. I'll continue to put rounds down the pipes and see if I can't get any failures again. Oh btw, 95% of the rounds I shot this weekend were cheap Federal and Blazer 115gr. Next round will be 124gr. Find out what she prefers, etc. I prefer whatever's on sale! I did run a few mags of the defensive ammo to cycle it out, Hydrashocks and had no issues. |
|
|
|
[#5]
For the barrel nut thread protector issue I used Danco part number #96724 O-ring size #7 purchased at Home Depot a 10 pack ran me about $3.00. It's actually an O-ring for a faucet but it worked perfectly as a thread protector O-ring.
|
|
|
|
[#6]
Awesome thanks!
|
|
|
|
[#7]
What do you have in to it ($$$$) so far?
|
|
|
|
[#8]
Thanks for the post, I am planning on doing a build myself, parts are on the way. I also agree with you on the glock trigger, I've carried a glock for 20+ years and I'm so used to it that I don't want to upgrade it.
|
|
|
|
[#9]
Quoted:
Awesome thanks! |
|
|
|
[#10]
Quoted:
What do you have in to it ($$$$) so far? |
|
|
|
[#11]
Quoted:
For the barrel nut thread protector issue I used Danco part number #96724 O-ring size #7 purchased at Home Depot a 10 pack ran me about $3.00. It's actually an O-ring for a faucet but it worked perfectly as a thread protector O-ring. |
|
|
|
[#12]
I'm trying out the clear nail polish to hold the thread protector on. Will be putting rounds down range this weekend and will report back on how it holds up
|
|
|
|
[#13]
Well, I started on my Polymer80 lower yesterday and almost went exactly like you explained, top part was a breeze, spring area was challenging, and I had some issues getting the front rail block into place to where all the pins would go into place. What I ended up doing was using the dremel and stone attachment to "countersink" the large trigger pin hole on the rail block, ever so slightly, and this fixed the issue. Over all it took me about 2 hours to get it all together. Once I got it all together, I had a trigger issue similar to yours, this time the trigger would not engage and would often fire about 3 seconds after I pulled the trigger. I removed the rear slide post and filed the bit you mentioned and followed the youtube video , put it back together. Trigger works flawlessly now ! Waiting on a few more parts and my first build will be in the books.

|
|
|
|
[#14]
Awesome build!!
|
|
|
|
[#15]
OP, what does the bevel on the front of your slide look like from a different angle? Is it like a gen 5 bevel?
|
|
|
|
[#16]
Did mine today. Took about an hour.
I started with the Dremel, but the plastic is pretty tough. I have a sliding vice on my drill press. With the end mill I milled the rail bits in about 2 minutes. Used a Dremel for the recoil spring channel. After drilling I used a flat file and some 1500 grit sandpaper with DW40. Total machine and polish time, maybe 45 minutes. I had to trim almost 3/8" off the tail of the slidelock spring to get it to fit. I got the Midway G19 kit, but I think they put a G17 spring in the kit. Polished the rails as described above. Slide went on fine. Initially I had a trigger reset/failure to return to battery. If I held the trigger to the rear after firing (dry), and cycled the slide,it stayed out of battery about 1/8" until I released the trigger and let it reset. Then the slide returned to battery. I manually cycled and dry fired about 50 times and that went away. Probably a burr somewhere. I did a quick live fire test. One round loaded. Fired, locked back. Loaded two, fired, cycled and loaded, fired and locked back. I'll clean and lube it and run a box through it. Fun project! 
|
|
|
|
[#17]
Quoted:
What do you have in to it ($$$$) so far? it's a fun project though. |
|
|
|
[#18]
Quoted:
you're not gonna save money on a poly80, it ends up costing about the same as a regular glock. it's a fun project though. Quoted:
Quoted:
What do you have in to it ($$$$) so far? it's a fun project though. |
|
|
|
[#19]
Quoted:
Did mine today. Took about an hour. I started with the Dremel, but the plastic is pretty tough. I have a sliding vice on my drill press. With the end mill I milled the rail bits in about 2 minutes. Used a Dremel for the recoil spring channel. After drilling I used a flat file and some 1500 grit sandpaper with DW40. Total machine and polish time, maybe 45 minutes. I had to trim almost 3/8" off the tail of the slidelock spring to get it to fit. I got the Midway G19 kit, but I think they put a G17 spring in the kit. Polished the rails as described above. Slide went on fine. Initially I had a trigger reset/failure to return to battery. If I held the trigger to the rear after firing (dry), and cycled the slide,it stayed out of battery about 1/8" until I released the trigger and let it reset. Then the slide returned to battery. I manually cycled and dry fired about 50 times and that went away. Probably a burr somewhere. I did a quick live fire test. One round loaded. Fired, locked back. Loaded two, fired, cycled and loaded, fired and locked back. I'll clean and lube it and run a box through it. Fun project! https://www.AR15.Com/media/mediaFiles/71432/P_20180114_203142_1-420838.JPG https://www.AR15.Com/media/mediaFiles/71432/P_20180114_203204_1-420839.JPG Also had the same issue with RTB. I used the same slide (Swenson) as you (actually on both of my builds). The issue was that the trigger bar "shark fin" was so close to the underside of the slide that it was having difficulty getting over the firing pin safety plunger. After leaving it sit (trigger pulled, fin pressing against firing pin safety plunger) for about a week, was golden (must have been a STIFF spring that needed to soften up). I also polished the top surface of the trigger bar "fin", so that helped too (trigger feels GREAT now!). I didn't have any trigger issues because I filed off the rail stamping burrs prior to installing. There are usually two burrs in the rail stamping in the area that the trigger bar bend meets upon full travel (about the worst place you'd want a burr!). Make sure they're gone/smooth prior to installing. I file/smooth out that corner of the stamping that makes contact as well (for good measure). Overall.. these are an easy build, but NOT always "plug and play" and do require some attention to detail/custom fitting. Oh, and good luck with holsters with the Swenson slide... both of mine fit HELLA tight in every holster I have (one holster is unusable because of how tight that slide is in it). They are just a smidge larger... but enough to make it stick like mad in kydex holsters. The top edges have a nice smooth radius, but still more squared than a factory slide (which is where the Swenson binds in holsters... at the top edges). The black comes off the top edged fairly easily too, from the tight holster fit/friction (doesn't phase me.. guns are tools to me). Great slides, otherwise (as are their barrels). GREAT value. |
|
|
|
[#20]
Are the slide rails cast into the plastic or fitted in parts?
Other than the fun of doing it, what is the point of finishing a non Glock plastic frame? The end result seems to be more or less a Glock that could be gotten for about half the cost blue label. If a 4473 is a big deal, like wise pre-owned "used" ones are available. Uniqueness is interesting, but factoring in cost, time, and reliability, the why is the why? |
|
|
|
[#21]
The front rails are built into the locking block, and the rear rails are a stamped steel part that goes around the ejector housing and is held in the the ejector housing pin. I can't speak for everyone, but I built mine because it seemed like a fun project and I was able to piece them together a little at a time using the parts I wanted. I bought all my parts on sale or using coupon codes. Total price for both builds was around $550. Not bad considering I ended up with something more along the lines of a custom Glock. By the time you add a threaded barrel, RMR cut, slide work, refinishing, frame work, etc. to a stock Glock you are usually well over $700 anyway. I have plenty of stock Glocks, so my P80's will just be fun guns.
Quoted:
Are the slide rails cast into the plastic or fitted in parts? Other than the fun of doing it, what is the point of finishing a non Glock plastic frame? The end result seems to be more or less a Glock that could be gotten for about half the cost blue label. If a 4473 is a big deal, like wise pre-owned "used" ones are available. Uniqueness is interesting, but factoring in cost, time, and reliability, the why is the why? |
|
|
|
[#22]
Quoted:
Are the slide rails cast into the plastic or fitted in parts? Other than the fun of doing it, what is the point of finishing a non Glock plastic frame? The end result seems to be more or less a Glock that could be gotten for about half the cost blue label. If a 4473 is a big deal, like wise pre-owned "used" ones are available. Uniqueness is interesting, but factoring in cost, time, and reliability, the why is the why? I have not had any reliability issues with my first build and I don't expect any with my second which I just completed. They are fun to piece together. I've learned way more about Glocks by building them instead of buying the finished product. I have had very few fitting issues during assembly on the two builds I've done. And I believe that Polymer 80 has actually produced a superior product when compared to a factory Glock lower. I know that's a bold assumption and only time will tell if it's true but so far so good from what I've seen. They are guys out there with 1000's of rounds through them with no issues. And I think they look better. Cost- Who cares? Custom Glocks cost money, too. Buy OEM and modify later vs. build it the way you want the first time. Time- I got plenty of that. Reliability- No issues so far. |
|
|
|
[#23]
Quoted:
Well, I started on my Polymer80 lower yesterday and almost went exactly like you explained, top part was a breeze, spring area was challenging, and I had some issues getting the front rail block into place to where all the pins would go into place. What I ended up doing was using the dremel and stone attachment to "countersink" the large trigger pin hole on the rail block, ever so slightly, and this fixed the issue. Over all it took me about 2 hours to get it all together. Once I got it all together, I had a trigger issue similar to yours, this time the trigger would not engage and would often fire about 3 seconds after I pulled the trigger. I removed the rear slide post and filed the bit you mentioned and followed the youtube video , put it back together. Trigger works flawlessly now ! Waiting on a few more parts and my first build will be in the books. https://preview.ibb.co/fxExCR/20180112_141559.jpg |
|
|
|
[#24]
Quoted:
OP, what does the bevel on the front of your slide look like from a different angle? Is it like a gen 5 bevel? |
|
|
|
[#25]
Quoted: Appears to be even more then a regular Glock. |
|
|
|
[#26]
Quoted:
Are the slide rails cast into the plastic or fitted in parts? Other than the fun of doing it, what is the point of finishing a non Glock plastic frame? The end result seems to be more or less a Glock that could be gotten for about half the cost blue label. If a 4473 is a big deal, like wise pre-owned "used" ones are available. Uniqueness is interesting, but factoring in cost, time, and reliability, the why is the why? "Other than the fun of doing it, what is the point of finishing a non Glock plastic frame?" It's CUSTOM, do any stock Glocks come with the features that the Poly80 builds do? No, no they don't. If you go out and have them ADDED after your purchase of a Stock Glock, you will be paying MUCH more. WHat's the point? The same point as any custom. Or say, AR-15? What's the point of NOT buying a stock Bushmaster, or Ruger AR? Why BUILD one? Because you get what YOU want. THAT'S the point. Not to mention the fun and learning experience. To be quite honest, before venturing down this project's road, I'd NEVER taken my trigger assembly all the way out, and had never studied the functions of every piece as much as I have now. This I'm very grateful for. There's more to just spending the money friend. You gotta look at it in a different angle. Did you buy or build your AR? Some people will just buy one, and there's nothing wrong with that. My first AR (outside the Army) was bought, not built. But after that, everything was built. Learned more than even the Army taught me about my weapon. Just my .02 |
|
|
|
[#27]
Fuck me.
(I know this isn't GD but I gotta vent) If you have no desire to build one, then don't. This petty bullshit is why the antis keep winning at the state level. Fucking sectoring yourselves into tiny identity groups, easily defeatable one by one. How about embracing the fact the people enjoy exercising their rights to firearms ownership for a variety of reasons. Different people are enthusiastic about different areas of interest. How about, "cool pistol" and leave it at that. Or I'd even accept, "Why are you interested in building one?" When you say something to the effect of, "I don't see the reason or need.", or "That's too much money.", you're placing a judgement of the builder's motivations, passively aggressively calling them stupid or wasteful. Fuck you, it's not your money, not your time, not your pistol. Go fudd somewhere else. |
|
|
|
[#28]
Quoted:
Not to mention the fun and learning experience. I am not really a Glock fan, only owned a G19 as a home defense pistol, and didn't give a rip about custom Glock anything. But...I've made 80% ARs, and when a Lenny McGill YouTube video of a PF940V2 popped up in my suggestions last year, I was immediately interested just for the "fun project" factor. Cost more than a stock Glock? Don't care...it is fun and interesting to choose and assemble my own parts and learning to dremel, file, and sand the plastic and not have it look like an idiot did the work is just another skill in my toolbox. The fact that it is non-serialed and a big F-you to The Man is just a terrific bonus. |
|
|
|
[#29]
You guys who enjoy building these may want to help our brothers out by smashing this poll
(left cold) http://www.newhavenindependent.org/index.php/archives/entry/pbanguns/ |
|
|
|
[#30]
Loving mine so far. Fits “my” hand better than a stock G19.
Took a little patience with a well oiled sharpening stone to get rails all true, then polished em all up. Running like a champ. 600 rds so far blazer,ae,lawman and 2 mags HsT. Zero failures yet. Oem mags, pmags it likes it all. 
|
|
|
|
[#31]
Old fashion tag
|
|
|
|
[#32]
Just finished my first. 200rds this weekend and no problems. Ordered a full size I used a flex shaft on my dremel to do the center channel. Has a Swenson slide on it now. Here is a picture with my G23 slide. Tryed both put about 30 rounds off .40 though it then changed slides.l
|
|
|
|
[#33]
Thanks to some fellows for answering my why question politely.
|
|
|
|
[#34]
ETA: nevermind.
|
|
|
|
[#35]
Quoted: Yes it costs more than a stock Glock, but a stock Glock doesn't come with a custom slide, barrel, grip stippling, double undercut, color, and all that fun stuff. So my guess is that if you BOUGHT a stock GLock, went out, added those features? You'd be WELL above a Polymer80 build. I HAVE stock Glocks. None of them are any color other than black, none of them have any of the other features or improvements I was able to work into this build. You're not comparing apples to apples, you're comparing apples to Mangoes. |
|
|

AR15.COM is the world's largest firearm community and is a gathering place for firearm enthusiasts of all types.
From hunters and military members, to competition shooters and general firearm enthusiasts, we welcome anyone who values and respects the way of the firearm.

Subscribe to our monthly Newsletter to receive firearm news, product discounts from your favorite Industry Partners, and more.
Copyright © 1996-2024 AR15.COM LLC. All Rights Reserved.
Any use of this content without express written consent is prohibited.
AR15.Com reserves the right to overwrite or replace any affiliate, commercial, or monetizable links, posted by users, with our own.


