|
Posted: 2/18/2021 10:18:05 PM EDT
Wanting to build a solid work bench in my garage. I’m wanting to build one that is 8’ long, 2’ deep, and 38” tall. I also want to build it so that there is a storage shelf half way up for tool boxes, paint, power tools, etc.
I’m posting this to see if anyone here would like to share pictures of their bench and the plans they used, bonus points for ms paint plans  . Or, it’d be great if anyone has any links to plans that they can share. I’ve looked online for plans myself and can’t seem to find what I’m looking for. . Or, it’d be great if anyone has any links to plans that they can share. I’ve looked online for plans myself and can’t seem to find what I’m looking for. |
|
|
|
[#1]
I reallllly hate this, but a chicom, and really nice bench can be had at sams club for about 225.00. Rock solid.
|
|
|
|
[#2]
2x4 basics.
You only need to make 90 degree cuts. You can make it 8' x 4', or something smaller. I used it to make my first reloading bench. I also used it to make a stand for a 120-gallon fish tank, that's 1,000 lbs of water, plus the tank and lid and filters and such. It worked find. I also make a rock-solid workbench for my old job. What I'd do beyond the basic directions: 1. Use 2x6 boards for the top rails, this will allow you to make the top sheet of plywood extend over the sides. Pretty useful if you're going to pull up a chair. 2. Use 3/4" plywood for the top. 3. Add a thin sheet of plywood to the backside, it'll reinforce it for side-to-side movements. |
|
|
|
[#3]
Quoted: 2x4 basics. You only need to make 90 degree cuts. You can make it 8' x 4', or something smaller. I used it to make my first reloading bench. I also used it to make a stand for a 120-gallon fish tank, that's 1,000 lbs of water, plus the tank and lid and filters and such. It worked find. I also make a rock-solid workbench for my old job. What I'd do beyond the basic directions: 1. Use 2x6 boards for the top rails, this will allow you to make the top sheet of plywood extend over the sides. Pretty useful if you're going to pull up a chair. 2. Use 3/4" plywood for the top. 3. Add a thin sheet of plywood to the backside, it'll reinforce it for side-to-side movements. Thank you for your post and ideas  I like your idea of keeping it simple with the two by fours. I was worried about strength with that but it sounds like your aquarium was never an issue. The closest thing i’ve found online to what I am after is this.. I want to run the shelf part all the way across. For me this bench will serve as a general home handy man’s project table... nothing too heavy. |
|
|
|
[#4]
Quoted: 2x4 basics. You only need to make 90 degree cuts. You can make it 8' x 4', or something smaller. I used it to make my first reloading bench. I also used it to make a stand for a 120-gallon fish tank, that's 1,000 lbs of water, plus the tank and lid and filters and such. It worked find. I also make a rock-solid workbench for my old job. What I'd do beyond the basic directions: 1. Use 2x6 boards for the top rails, this will allow you to make the top sheet of plywood extend over the sides. Pretty useful if you're going to pull up a chair. 2. Use 3/4" plywood for the top. 3. Add a thin sheet of plywood to the backside, it'll reinforce it for side-to-side movements. Another vote for 2x4 Basics Photo from an Amazon review |
|
|
|
[#5]
Quoted: Thank you for your post and ideas I like your idea of keeping it simple with the two by fours. I was worried about strength with that but it sounds like your aquarium was never an issue. The closest thing i’ve found online to what I am after is this.. I want to run the shelf part all the way across. For me this bench will serve as a general home handy man’s project table... nothing too heavy. If you think you will pull up a stool to the bench, dont make that shelf as wide as the top. Set it in at least 8" to give yourself room for your legs while sitting. I just made 2 basic benches like this. One is 6ft, and one is 4ftx18" deep for reloading. I used 2 layers of 3/4" primed plywood as the tops. Glued and screwed down, and put tied the screws. Have some garage floor epoxy paint to go on the tops from lowes. Just did the filler on the screws of the reloading bench, will rout the edges and sand the filler. Then paint both tops at the same time. |
|
|
|
[#6]
Not a good picture, but you get the idea. This is 2x6 on top and the frame is made from 2x6. Double up the top and inset the cross-beams if you are going to mount presses directly to the table.
|
|
|
|
[#7]
shame as there used to be a tacked work bench thread here in the diy section
|
|
|
|
[#8]
Quoted: shame as there used to be a tacked work bench thread here in the diy section |
|
|
|
[#9]
I built my own bench.
It is 8' long, 24" deep and 34" high. There is a tool tray bolted along the rear edge of the back, so it's actually deeper than 24" It has a top made from 2X4's stacked face-to-face. The legs are 4X4's with 2X4 stretchers. Between the legs is an open shelf made from 2X2's. It has a shoulder vise built into the top. There is also a wood worker's vice integrated into the top at the end opposite the shoulder vice. It was dyed two-tone and finished in some sort of varnish, probably polyurethane. It was one of my first serious first wood working projects. I learned a lot building it. It is a beast! It is beautiful and the most important woodworking tool I have. Few wood working projects would be possible without it. BUILD YOUR OWN. |
|
|
|
[#10]
Quoted: I built my own bench. It is 8' long, 24" deep and 34" high. There is a tool tray bolted along the rear edge of the back, so it's actually deeper than 24" It has a top made from 2X4's stacked face-to-face. The legs are 4X4's with 2X4 stretchers. Between the legs is an open shelf made from 2X2's. It has a shoulder vise and a tail vice built into the top. There is also a wood worker's vice integrated into the top at the end opposite the shoulder vice. It was dyed two-tone and finished in some sort of varnish, probably polyurethane. It was one of my first serious first wood working projects. I learned a lot building it. It is a beast! It is beautiful and the most important woodworking tool I have. Few wood working projects would be possible without it. BUILD YOUR OWN. Damn man, that sounds awesome! Question: Do you think the 4 x 4 legs are necessary, or rather do they offer additional benefit? I like the idea of using those but I’m not sure because of cost and maybe not being necessary. |
|
|
|
[#11]
Quoted: If you think you will pull up a stool to the bench, dont make that shelf as wide as the top. Set it in at least 8" to give yourself room for your legs while sitting. I just made 2 basic benches like this. One is 6ft, and one is 4ftx18" deep for reloading. I used 2 layers of 3/4" primed plywood as the tops. Glued and screwed down, and put tied the screws. Have some garage floor epoxy paint to go on the tops from lowes. Just did the filler on the screws of the reloading bench, will rout the edges and sand the filler. Then paint both tops at the same time. Thank you for posting. It sounds really nice  Quoted: Not a good picture, but you get the idea. This is 2x6 on top and the frame is made from 2x6. Double up the top and inset the cross-beams if you are going to mount presses directly to the table. https://www.ar15.com/media/mediaFiles/335009/IMG_2212_JPG-1832486.JPG Looks excellent!
|
|
|
|
[#12]
I've made a few of them, two full sized 8'x4' and two smaller ones.
I didn't have any 4x4 so I glued two 2x4 together for the corner posts of the first one. Probably heavier than needed, as I used a single 2x4 for the second one and didn't notice much difference. The shelf on the bottom is braced with 2x4 as well but I may have used 2x2 to save a little more shelf room. I'd go deeper than 24" if you want a shelf to sit against the wall. 24" of work room is good if you have the space to spare. This is one of the smaller ones, I don't have pictures on my phone of the others. I screwed down through a piece of OSB to the frame, and then glued and screwed (from the bottom) a piece of 3/4" plywood for the top. That way there are no exposed holes on the work surface.  |
|
|
|
[#13]
Mine is 12’ long Iirc.
Way over built. Used 8 left over 4x4 for posts, 2x4 framing, dadoed into the legs. The three bays under the bench were plywooded into seperate cabinets, iirc from the window cutouts of the plywood garage sheathing. Lagged that with 1/4” carriage bolts to the back wall studs. Surfaced the top with two layers of 3/4 good grade plywood., Glued first layer with construction adhesive and screwed. That layer was an 8’x2’ and a 4x2’ piece. Applied another layer of adhesive this time thinly and same panel sizes, just laid them the opposite way to stagger the seam. Screwed that down. Primed it and painted with Rustoleum blue. Not white but easy enough to not not lose parts on......well when it isn’t covered in the seven layer burrito of projects. Started on cabinet doors but remember that thing about the seven layer burrito of projects. Lower cabinet doors aren’t done but I did build upper cabinets with a good chunk more of the plywwood shearhing window cutouts and some new buy wood. I had pics before photobucket kicked the bucket. |
|
|
|
[#14]
This is mine. All 2x4 frame, with a double layer of industrial particle board for the top. The particle board is cheap and heavy, but doesn't hold up well if it comes in contact with ANY moisture. In hindsight I wish I had done a plywood top, or at least added a layer of hardboard over the particleboard (which I may still do). Glued up 2x4s for the top would be the best, but I don't have a thickness planer and could never get a decent looking top without being able to plane it.
The legs are double 2x4, with cuts for the shelf and top support so they are sitting on top of the legs rather than bolted to them. You could do the same with 4x4s. |
|
|
|
[#15]
Quoted: Question: Do you think the 4 x 4 legs are necessary, or rather do they offer additional benefit?. If you want the table to be rigid they aren't cost-effective. 2x6 or maybe 2x8 and bracing is better cost/strength and cost/rigidity ratio. The problem with that table I pictured above was that it was so light it could be pushed around while working. It's very rigid though. You can just load up the bottom shelf with heavier stuff to add mass to the table. |
|
|
|
[#16]
Quoted: Damn man, that sounds awesome! Question: Do you think the 4 x 4 legs are necessary, or rather do they offer additional benefit? I like the idea of using those but I’m not sure because of cost and maybe not being necessary. Thanks, it is awesome. I'm not bragging, just telling you what you can do for the cost of lumber and some of your time. The 4X4 legs allowed thru-mortising the stretchers and bracing without having to cut tenons on the stretcher ends. They also all make the bench free-standing and stiff in all direction. Finally, there is an aesthetic. Note, some people (above) were using double 2X4 to get the same effects as a single 4X4. That's too much work. Buy all the proper tools you need to build your bench and you will be on your way to a good tool collection of proper tools. You will also learn how to use those tools as you build it. |
|
|
|
[#17]
File cabinets and a commercial door?
|
|
|
|
[#18]
Quoted: Damn man, that sounds awesome! Question: Do you think the 4 x 4 legs are necessary, or rather do they offer additional benefit? I like the idea of using those but I’m not sure because of cost and maybe not being necessary. You can double up 2x4's, that's what I did. |
|
|
|
[#19]
Quoted: Thanks, it is awesome. I'm not bragging, just telling you what you can do for the cost of lumber and some of your time. The 4X4 legs allowed thru-mortising the stretchers and bracing without having to cut tenons on the stretcher ends. They also all make the bench free-standing and stiff in all direction. Finally, there is an aesthetic. Note, some people (above) were using double 2X4 to get the same effects as a single 4X4. That's too much work. Buy all the proper tools you need to build your bench and you will be on your way to a good tool collection of proper tools. You will also learn how to use those tools as you build it. |
|
|
|
[#20]
https://www.homedepot.com/p/Husky-8-ft-Adjustable-Height-Solid-Wood-Top-Workbench-G9600-US1/207131346
|
|
|
|
[#21]
Quoted: This is mine. All 2x4 frame, with a double layer of industrial particle board for the top. The particle board is cheap and heavy, but doesn't hold up well if it comes in contact with ANY moisture. In hindsight I wish I had done a plywood top, or at least added a layer of hardboard over the particleboard (which I may still do). Glued up 2x4s for the top would be the best, but I don't have a thickness planer and could never get a decent looking top without being able to plane it. The legs are double 2x4, with cuts for the shelf and top support so they are sitting on top of the legs rather than bolted to them. You could do the same with 4x4s. https://www.ar15.com/media/mediaFiles/77386/Workbench_png-1833395.JPG This pic is how I did mine. I put the shelf up higher and didnt run it all the way to the front so that I can slide up to it on a stool easier. |
|
|
|
[#22]
Quoted: This is mine. All 2x4 frame, with a double layer of industrial particle board for the top. The particle board is cheap and heavy, but doesn't hold up well if it comes in contact with ANY moisture. In hindsight I wish I had done a plywood top, or at least added a layer of hardboard over the particleboard (which I may still do). Glued up 2x4s for the top would be the best, but I don't have a thickness planer and could never get a decent looking top without being able to plane it. The legs are double 2x4, with cuts for the shelf and top support so they are sitting on top of the legs rather than bolted to them. You could do the same with 4x4s. https://www.ar15.com/media/mediaFiles/77386/Workbench_png-1833395.JPG Wow, this is excellent. This is definitely something I can build and with a few tweeks on design it will be a perfect fit my garage. Thank you for posting this and also, a big thanks to everyone for sharing their pictures or ideas. I appreciate it!
|
|
|
|
[#23]
This is a work bench I threw together with scrap 4x4 and 2x4 I had laying around. The snap on top was something a dealership was throwing away when it went out of business so it was free. You could use plywood for the top instead.
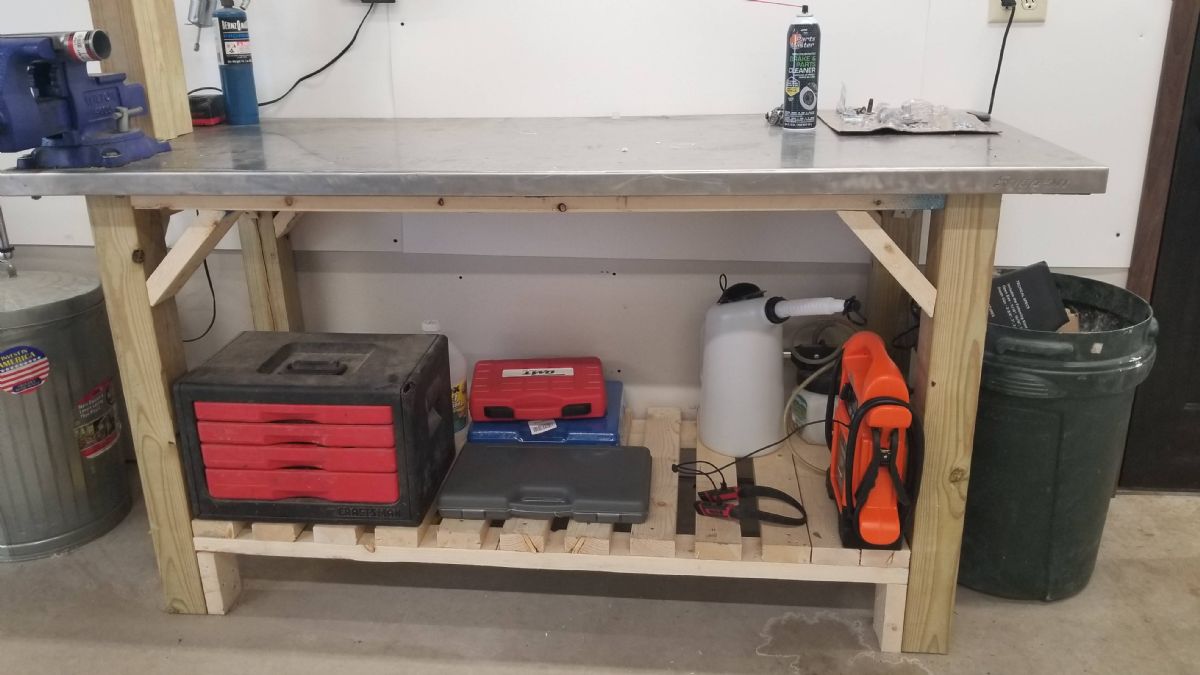 This is the end view  Here are the scribbled plans haha  I made it on the fly one night. Some of the wood was split scrap, but the bench is rock freaking solid and not super heavy to move. |
|
|
|
[#24]
Quoted: This is a work bench I threw together with scrap 4x4 and 2x4 I had laying around. The snap on top was something a dealership was throwing away when it went out of business so it was free. You could use plywood for the top instead. https://www.ar15.com/media/mediaFiles/334273/20210224_110645-1839377.jpg This is the end view https://www.ar15.com/media/mediaFiles/334273/20210224_112043-1839390.jpg Here are the scribbled plans haha https://www.ar15.com/media/mediaFiles/334273/20210224_112013-1839394.jpg I made it on the fly one night. Some of the wood was split scrap, but the bench is rock freaking solid and not super heavy to move. Thanks for posting this! You scored with the find on that top... lucky! |
|
|
|
[#25]
For the shelf...make the width of it half the depth of your bench unless you want it to become a catch all storage space for random shit and don't plan to sit at it. Also allows for "bigger" things in the offseason to be stored there if this is in a garage.
|
|
|
|
[#26]
Quoted: For the shelf...make the width of it half the depth of your bench unless you want it to become a catch all storage space for random shit and don't plan to sit at it. Also allows for "bigger" things in the offseason to be stored there if this is in a garage. That’s a great idea and very practical. I will likely go that route because I do plan to sit at the bench for tedious and intricate projects and my boys will use for models and similar projects too.
|
|
|
|
[#27]
My biggest lesson to share- don't permanently mount anything to the top.
It begets clutter, always in just the wrong spot and a nuisance. My vise is even clamped down 95% of the time, its own mass is sufficient to hold what I'm working on. |
|
|
|
[#28]
A few things I have found important:
1.) Sacrificial top overlay of plywood or mdf. Makes renewing easy if you plan on hard use. 2.) 3-4 inch top overhang for clamping projects. 3.) Some sort of backsplash attachment so you aren't loosing small rolling items off the back of the bench into the abyss (or wherever the hell they go) 4.) If your vice will not be hard use (lots of filing/sawing) make it an attachment you can remove (bolt on/clamp on) 5.) If #4 applies consider QUALITY, locking, heavy-duty wheels. Sometimes being able to roll the table to the middle of the room for 360 access is awesome. Have fun! |
|
|
|
[#29]
If I was starting over, Id go with a bank of lower cabinets to hide junk under the bench, and keep dust and dirt off the things I crammed under my bench... Cabinets are so simple to make, and I will probably rip out everything I have now, and make custom cabinets...
current set up... Started tinkering with cabinets... Even got a hidden beer fridge This is where 99% of my posts come from... Constant supply of cold beer at the ready |
|
|
|
[#30]
Simpson Strong Tie. Easy to keep square and strong.
I built one that looks like this along with a miter saw table, both with 1/2” plywood tops and shelf underneath. Built another on casters that’s 4’ by 4’ with a poly top for game processing. On all of them, I boxed in the top (added a section of plywood under the top rails of the bench) for added strength. |
|
|
|
[#31]
English Joiners Bench
|
|
|
|
[#32]
Quoted: Simpson Strong Tie. Easy to keep square and strong. I built one that looks like this along with a miter saw table, both with 1/2” plywood tops and shelf underneath. Built another on casters that’s 4’ by 4’ with a poly top for game processing. On all of them, I boxed in the top (added a section of plywood under the top rails of the bench) for added strength. https://www.ar15.com/media/mediaFiles/176562/4E248704-675E-494A-881F-42851468A37E_jpe-1843038.JPG Poor design... 8 foot span with just 2x4s that are relying on nothing but a few screws in the corners for support... Even if you used nails, or lag screws with a higher shear strength, an 8 foot span of a standard 2x4 is not ideal... 
|
|
|
|
[#34]
(Envy!)
|
|
|
|
[#35]
Quoted: This is mine. All 2x4 frame, with a double layer of industrial particle board for the top. The particle board is cheap and heavy, but doesn't hold up well if it comes in contact with ANY moisture. In hindsight I wish I had done a plywood top, or at least added a layer of hardboard over the particleboard (which I may still do). Glued up 2x4s for the top would be the best, but I don't have a thickness planer and could never get a decent looking top without being able to plane it. The legs are double 2x4, with cuts for the shelf and top support so they are sitting on top of the legs rather than bolted to them. You could do the same with 4x4s. https://www.ar15.com/media/mediaFiles/77386/Workbench_png-1833395.JPG Stretcher (4) 87 
|
|
|
|
[#36]
Work benches ideally for most uses should be heavy. I made a top out of 2 14inch wide LVLs. I glued them together lengthwise and then glued another 3/4 sheet of plywood on the top. It’s VERY heavy. I have a vice, a bench grinder, and a drill press on top. The legs are some steel industrial bench legs I got from my uncle’s estate. The same legs are available through Grainger.
|
|
|
|
[#37]
Quoted: Work benches ideally for most uses should be heavy. I made a top out of 2 14inch wide LVLs. I glued them together lengthwise and then glued another 3/4 sheet of plywood on the top. It’s VERY heavy. I have a vice, a bench grinder, and a drill press on top. The legs are some steel industrial bench legs I got from my uncle’s estate. The same legs are available through Grainger. I was putting my plans together for a bit today and honestly, I’m struggling a bit as to what I’m going to use for the top of mine. Ideally, I’d like to use something different than simple plywood. Something beefier like an old solid wood door or table top from an old industrial bakers table. Finding what I want for that is going to be the issue for me completing the work bench...
|
|
|
|
[#38]
Quoted: I was putting my plans together for a bit today and honestly, I’m struggling a bit as to what I’m going to use for the top of mine. Ideally, I’d like to use something different than simple plywood. Something beefier like an old solid wood door or table top from an old industrial bakers table. Finding what I want for that is going to be the issue for me completing the work bench... Make the top replaceable... I have cheap masonite as the final layer on all mine, its like 20 bucks a sheet.. Once a year I will replace or flip the tops as they get dinged up/stained... |
|
|
|
[#39]
Quoted: Stretcher (4) 87 That was intentional! |
|
|
|
[#40]
Quoted: Quoted: Stretcher (4) 87 That was intentional! https://www.ar15.com/images/smilies/icon_smile_big.gif lol I didn’t even notice it until today when I was scratching out plans and trying to get total board length/count for yours. 
|
|
|
|
[#41]
Quoted: I was putting my plans together for a bit today and honestly, I’m struggling a bit as to what I’m going to use for the top of mine. Ideally, I’d like to use something different than simple plywood. Something beefier like an old solid wood door or table top from an old industrial bakers table. Finding what I want for that is going to be the issue for me completing the work bench... I used 2 layers of 3/4" plywood on mine. I glued and screwed the top layer down and filled the screw dents and sanded it all smooth. Then painted with some garage floor paint. |
|
|
|
[#42]
Quoted: I was putting my plans together for a bit today and honestly, I’m struggling a bit as to what I’m going to use for the top of mine. Ideally, I’d like to use something different than simple plywood. Something beefier like an old solid wood door or table top from an old industrial bakers table. Finding what I want for that is going to be the issue for me completing the work bench... LVL beams are thick (1 3/4 inch) and dense and heavy. They are also stable and not prone to warping. Another layer of 3/4 plywood on top and you’ll have a nice flat solid and VERY heavy top. Unless you are just doing light work or have a need for easily movable workspaces, you can’t make a work bench too heavy. The heavier the better. |
|
|
 Win a FREE Membership!
Sign up for the ARFCOM weekly newsletter and be entered to win a free ARFCOM membership. One new winner* is announced every week!
You will receive an email every Friday morning featuring the latest chatter from the hottest topics, breaking news surrounding legislation, as well as exclusive deals only available to ARFCOM email subscribers.

AR15.COM is the world's largest firearm community and is a gathering place for firearm enthusiasts of all types.
From hunters and military members, to competition shooters and general firearm enthusiasts, we welcome anyone who values and respects the way of the firearm.

Subscribe to our monthly Newsletter to receive firearm news, product discounts from your favorite Industry Partners, and more.
Copyright © 1996-2024 AR15.COM LLC. All Rights Reserved.
Any use of this content without express written consent is prohibited.
AR15.Com reserves the right to overwrite or replace any affiliate, commercial, or monetizable links, posted by users, with our own.


