


So You Want To Buy A Surplus HMMWV/Humvee - A How-To Guide (And All Other Things HMMWV Too!) (Page 48 of 102)

|
someone in GD posted a story about two married couples 4 wheeling at night in indiana, their m998 went into a river and drowned both the women. sad story, and not great for milsurps either, regardless of the fact that it could have happened in any vehicle. not to downplay the lives lost, but i hope indiana doesnt do anything derpy regarding military vehicles. in response to running out of space in the HMMWV, i cant offer any real advice except it seems standard, and who would have thought a 7 foot wide truck would have so little interior space? seems like the military sometimes puts the vic-3 stuff mounted near the roof, which you seem to be considering. i just recall the entire front filled with radio and BFT, and the space between the passengers filled with 7.62 boxes and a spare 240 barrel and whatever drinks/otis spunkmeyer pastries from the chowhall. 
|
|
Originally Posted By Aguas:
someone in GD posted a story about two married couples 4 wheeling at night in indiana, their m998 went into a river and drowned both the women. sad story, and not great for milsurps either, regardless of the fact that it could have happened in any vehicle. not to downplay the lives lost, but i hope indiana doesnt do anything derpy regarding military vehicles. in response to running out of space in the HMMWV, i cant offer any real advice except it seems standard, and who would have thought a 7 foot wide truck would have so little interior space? seems like the military sometimes puts the vic-3 stuff mounted near the roof, which you seem to be considering. i just recall the entire front filled with radio and BFT, and the space between the passengers filled with 7.62 boxes and a spare 240 barrel and whatever drinks/otis spunkmeyer pastries from the chowhall. https://i.imgur.com/heKe7mg.jpg |

|
I Like the unsecured classified folder. Just the old Intel SGT in me coming out. 
|
|
Did the A1 to A2 rear seat upgrade thing today. Not a big deal, but makes the rear passengers happier.
Attached File |

|
Originally Posted By FKAM:
Did the A1 to A2 rear seat upgrade thing today. Not a big deal, but makes the rear passengers happier. https://www.AR15.Com/media/mediaFiles/455280/DSC00731post-444703.JPG |

|
I got my 2 man M998 picked up last Thursday. That night I got my keyed ignition installed. For the weekend I got the PS pump and alternator belts changed out then spent the rest of the weekend removing about 30 pounds of dirt from the foot wells and rear seat storage. I found 2 scissor jacks, some tool bags, first aid kit, and safety triangles under the rear seats.
I was troubleshooting my fan running constantly and found a cable was made to replace the time delay module. I've ordered a new TDM and am hoping that does the trick and it's not just masking something else. In the fan troubleshooting process I found the hydraulic hose from the Cadillac valve to the fan is wrenched on incredibly tight. If my Cadillac valve has to be replaced I may have to make another hydraulic hose leading to the fan housing. That hose connection at the Cadillac valve wasn't coming off so I couldn't hook my air hose up to the line to make the fan disengage. I found on steel soldiers that 24f batteries worked well instead of the tl6 so I have those in. I haven't come up with a good orientation to get them to work with the battery hold downs yet. Anyone using 24f batteries and can provide a picture? Only solution I see right now is to cut the two halves apart. Last night I replaced the seat belts with new ones. This evening I painted my new air intake shield and mushroom cap 686 tan. My vehicle had the deep fording stack but it was noted as not included in the sale. Flipping through the TMs it looks like I need to remove the rubber elbow to fit the standard intake shield. Can anyone confirm that's correct or did I waste $10 on a new intake shield? I also got lucky that a neighbor 2 doors down worked on HMMWVs for 11 years. He's retired and can't wrench anymore but here's offered to hang out and supervise any work I might need help with. |
┌∩┐(◣_◢)┌∩┐

|
Originally Posted By Gixxersixxer:
I got my 2 man M998 picked up last Thursday. That night I got my keyed ignition installed. For the weekend I got the PS pump and alternator belts changed out then spent the rest of the weekend removing about 30 pounds of dirt from the foot wells and rear seat storage. I found 2 scissor jacks, some tool bags, first aid kit, and safety triangles under the rear seats. I was troubleshooting my fan running constantly and found a cable was made to replace the time delay module. I've ordered a new TDM and am hoping that does the trick and it's not just masking something else. In the fan troubleshooting process I found the hydraulic hose from the Cadillac valve to the fan is wrenched on incredibly tight. If my Cadillac valve has to be replaced I may have to make another hydraulic hose leading to the fan housing. That hose connection at the Cadillac valve wasn't coming off so I couldn't hook my air hose up to the line to make the fan disengage. I found on steel soldiers that 24f batteries worked well instead of the tl6 so I have those in. I haven't come up with a good orientation to get them to work with the battery hold downs yet. Anyone using 24f batteries and can provide a picture? Only solution I see right now is to cut the two halves apart. Last night I replaced the seat belts with new ones. This evening I painted my new air intake shield and mushroom cap 686 tan. My vehicle had the deep fording stack but it was noted as not included in the sale. Flipping through the TMs it looks like I need to remove the rubber elbow to fit the standard intake shield. Can anyone confirm that's correct or did I waste $10 on a new intake shield? I also got lucky that a neighbor 2 doors down worked on HMMWVs for 11 years. He's retired and can't wrench anymore but here's offered to hang out and supervise any work I might need help with. Sounds like you're on the right track with the fan issue. With the intake, if you're not going to install a DWF snorkel, I would forget about the shield and attach the mushroom cap right to the 90 degree elbow. This will actually give smoother air flow into the intake and give you a little margin for safety if you happen to splash some water a little too high. If you do want to use the shield though, taking the elbow off is really all you should need to do. If you do and it's in decent shape, I'm sure you can find a buyer for it!  Don't feel bad about wasting money buying for the stuff you really don't need. I've been there and done that more times and for more dollars than I care to think about. Don't feel bad about wasting money buying for the stuff you really don't need. I've been there and done that more times and for more dollars than I care to think about. 
Personally, since your truck should have most all of the DWF kit already installed, I would just install the missing pieces and call it good to go. People pay upwards of $1200 to put the kit in their truck. You should be able to scare up a new snorkel reasonably easy. I've seen them on eBay pretty frequently and I think there's even someone out there making repros. Same for the exhaust stack if it's missing like a lot sold with the DWF kit I've seen. I can't offer any advice on the batteries since I'm not familiar with what they look like. If you could post up some pics of them in the truck we might be able to help you come up with an idea. Also, something to consider, are those batteries sealed and rated for submersion? If not, submerging them could cause problems. |
|
Originally Posted By Gixxersixxer: I found on steel soldiers that 24f batteries worked well instead of the tl6 so I have those in. I haven't come up with a good orientation to get them to work with the battery hold downs yet. Anyone using 24f batteries and can provide a picture? Only solution I see right now is to cut the two halves apart. I stayed with the military 6TL military batteries. When one of mine went bad, I ordered a new one from NAPA for around $175 with a decent warranty. Ryan picked one up for me when Southern Metals had them so I have a spare. But I wouldn't hesitate getting another from NAPA. |
|
Originally Posted By Ryan_Ruck:
Nice! Welcome to the club! Sounds like you're on the right track with the fan issue. With the intake, if you're not going to install a DWF snorkel, I would forget about the shield and attach the mushroom cap right to the 90 degree elbow. This will actually give smoother air flow into the intake and give you a little margin for safety if you happen to splash some water a little too high. If you do want to use the shield though, taking the elbow off is really all you should need to do. If you do and it's in decent shape, I'm sure you can find a buyer for it! Don't feel bad about wasting money buying for the stuff you really don't need. I've been there and done that more times and for more dollars than I care to think about.
Personally, since your truck should have most all of the DWF kit already installed, I would just install the missing pieces and call it good to go. People pay upwards of $1200 to put the kit in their truck. You should be able to scare up a new snorkel reasonably easy. I've seen them on eBay pretty frequently and I think there's even someone out there making repros. Same for the exhaust stack if it's missing like a lot sold with the DWF kit I've seen. I can't offer any advice on the batteries since I'm not familiar with what they look like. If you could post up some pics of them in the truck we might be able to help you come up with an idea. Also, something to consider, are those batteries sealed and rated for submersion? If not, submerging them could cause problems. The batteries aren't sealed or rated for submersion. That's beyond my intended level of use for now. I need the kids to get older before I can spend a weekend wheeling the thing. |
┌∩┐(◣_◢)┌∩┐
|
Originally Posted By jake-cutter: You will need to remove the plastic tray at the bottom and them make new supports. I believe this thread on G503 shows a pic of regular batteries. I stayed with the military 6TL military batteries. When one of mine went bad, I ordered a new one from NAPA for around $175 with a decent warranty. Ryan picked one up for me when Southern Metals had them so I have a spare. But I wouldn't hesitate getting another from NAPA. |
┌∩┐(◣_◢)┌∩┐
|
Originally Posted By Gixxersixxer:
If I had the full DWF kit I'd definitely be looking for a snorkel. The truck only had the snorkel from the DWF kit put on it. There's no evidence of other parts from the DWF ever existing on the truck. The batteries aren't sealed or rated for submersion. That's beyond my intended level of use for now. I need the kids to get older before I can spend a weekend wheeling the thing. Originally Posted By Gixxersixxer:
Originally Posted By Ryan_Ruck:
Nice! Welcome to the club! Sounds like you're on the right track with the fan issue. With the intake, if you're not going to install a DWF snorkel, I would forget about the shield and attach the mushroom cap right to the 90 degree elbow. This will actually give smoother air flow into the intake and give you a little margin for safety if you happen to splash some water a little too high. If you do want to use the shield though, taking the elbow off is really all you should need to do. If you do and it's in decent shape, I'm sure you can find a buyer for it! Don't feel bad about wasting money buying for the stuff you really don't need. I've been there and done that more times and for more dollars than I care to think about.
Personally, since your truck should have most all of the DWF kit already installed, I would just install the missing pieces and call it good to go. People pay upwards of $1200 to put the kit in their truck. You should be able to scare up a new snorkel reasonably easy. I've seen them on eBay pretty frequently and I think there's even someone out there making repros. Same for the exhaust stack if it's missing like a lot sold with the DWF kit I've seen. I can't offer any advice on the batteries since I'm not familiar with what they look like. If you could post up some pics of them in the truck we might be able to help you come up with an idea. Also, something to consider, are those batteries sealed and rated for submersion? If not, submerging them could cause problems. The batteries aren't sealed or rated for submersion. That's beyond my intended level of use for now. I need the kids to get older before I can spend a weekend wheeling the thing.  Just goes to show you never know what type of hodgepodge configuration you can find on these trucks. Just goes to show you never know what type of hodgepodge configuration you can find on these trucks.
Oh well, like I mentioned, I'd just keep the elbow in place and attach the mushroom cap to it then.
By the way, if they left the windshield bracket for the snorkel on there, make sure you keep that. If you decide to piece together the DWF at some point, that can be an expensive part to buy on it's own. |
|
Originally Posted By Ryan_Ruck:
Really, just the snorkel? Just goes to show you never know what type of hodgepodge configuration you can find on these trucks.
Oh well, like I mentioned, I'd just keep the elbow in place and attach the mushroom cap to it then.
By the way, if they left the windshield bracket for the snorkel on there, make sure you keep that. If you decide to piece together the DWF at some point, that can be an expensive part to buy on it's own. 
|
|
Got half way through the 60A to 100A alternator (thanks, Ryan_Ruck!) upgrade yesterday, but when I removed the 60A I noticed the back bracket attached to a stud holding one side of the exhaust header on was rusted and broken off clean with the cylinder heads. That ruined my whole day, needless to say. I suppose its been broken or when tapping out the long bolt under the alt I finally did it in. Either way it wasn't long for this world.
I understand someone will have to drill out the remaining half of the stud, and I doubt that can be done without taking the valve cover and heads off. I still have some questions on the correct pulley to use with the niehoff 100A, and a mystery wire (458c) that connected to the old alt via some soldering on what I guess was an accessory stud. Heres where 458c is connected. It goes back to the t-case lock lamp, but before it gets near the firewall it has a junction and connects to 568A. That comes from the wiring harness, and it looks like it might be the old positive wire that gets replaced by the large gauge positive wire included in the 100/200A alt installation kit. The kit even comes with a plastic plunger to shove in the packard connector. 
I searched for awhile for a diagram that points to that stud between the 60a alt terminals, with an explanation for what that connection is. I suspect its just 24v power for accessories but I sure would love to be sure about that. The next big thing thats getting me is the new pulley from the installation kit is for 3 v belts, but my old alt was only setup for 2. In fact the drive belts were in a 2 inner and 2 outer configuration. The alt kit came with 3 long and 1 shorter belt, and its my understanding that newer trucks changed the belt routing. I am not very familiar with the TMs but I could not for the life of me locate how the new config with 3 v belts on the alternator pulley should go, or if I even need to do it. I may be able to take the 2 belt pulley off of the 60a and fit it onto the 100a alt for all I know. In fact, one TM includes that in the instructions (but its not clear if they mean reuse the pulley from a 60A while upgrading, or from an broken 100A while just replacing with a different 100A). You guys that have the larger dual voltage alternators and v belts, how are your belts run? Now if I can find the guy who decided that a whatever grade stud should bolt into the cylinder heads and hold the back end of a 20 pound alternator... |
|
Originally Posted By Aguas:
Got half way through the 60A to 100A alternator (thanks, Ryan_Ruck!) upgrade yesterday, but when I removed the 60A I noticed the back bracket attached to a stud holding one side of the exhaust header on was rusted and broken off clean with the cylinder heads. That ruined my whole day, needless to say. I suppose its been broken or when tapping out the long bolt under the alt I finally did it in. Either way it wasn't long for this world. I understand someone will have to drill out the remaining half of the stud, and I doubt that can be done without taking the valve cover and heads off. Originally Posted By Aguas:
Got half way through the 60A to 100A alternator (thanks, Ryan_Ruck!) upgrade yesterday, but when I removed the 60A I noticed the back bracket attached to a stud holding one side of the exhaust header on was rusted and broken off clean with the cylinder heads. That ruined my whole day, needless to say. I suppose its been broken or when tapping out the long bolt under the alt I finally did it in. Either way it wasn't long for this world. I understand someone will have to drill out the remaining half of the stud, and I doubt that can be done without taking the valve cover and heads off. 
Since I haven't had to mess with the alternator on my truck, I can't say I'm familiar with the area you're describing. Pics would help. Is there any of the bolt sticking out or is it snapped off flush? If there's a bit sticking out, you could possibly get a nut welded on there to finish backing it out with a socket. Originally Posted By Aguas:
I still have some questions on the correct pulley to use with the niehoff 100A, and a mystery wire (458c) that connected to the old alt via some soldering on what I guess was an accessory stud. Heres where 458c is connected. It goes back to the t-case lock lamp, but before it gets near the firewall it has a junction and connects to 568A. That comes from the wiring harness, and it looks like it might be the old positive wire that gets replaced by the large gauge positive wire included in the 100/200A alt installation kit. The kit even comes with a plastic plunger to shove in the packard connector. https://i.imgur.com/TFTL4K6.jpg I searched for awhile for a diagram that points to that stud between the 60a alt terminals, with an explanation for what that connection is. I suspect its just 24v power for accessories but I sure would love to be sure about that. Originally Posted By Aguas:
The next big thing thats getting me is the new pulley from the installation kit is for 3 v belts, but my old alt was only setup for 2. In fact the drive belts were in a 2 inner and 2 outer configuration. The alt kit came with 3 long and 1 shorter belt, and its my understanding that newer trucks changed the belt routing. I am not very familiar with the TMs but I could not for the life of me locate how the new config with 3 v belts on the alternator pulley should go, or if I even need to do it. I may be able to take the 2 belt pulley off of the 60a and fit it onto the 100a alt for all I know. In fact, one TM includes that in the instructions (but its not clear if they mean reuse the pulley from a 60A while upgrading, or from an broken 100A while just replacing with a different 100A). You guys that have the larger dual voltage alternators and v belts, how are your belts run? 


Going from memory on what I think I've heard, I'm pretty sure you cannot reuse the 60A pulley on the dual volts due to a difference in shaft size. |
|
I got my new TDM and unfortunately that did not fix my fan issue. I'm going to try taking the Cadillac valve apart and see if there's a blockage. I can hear a humming sound from it when the truck is running which I gather is normal but I don't know if that indicates it's actually working properly.
If that doesn't do things I'll pull the cooling stack and whack the fan clutch. I need to clean the cooling stack and flush the radiator anyway. I think after those it just leaves my temp sensor as a possibility of being faulty. I found the diagnostic procedure in the TM so the fix shouldn't elude me for too long, may just take more money. |
┌∩┐(◣_◢)┌∩┐
|
As for my truck, I'm almost ready to do my drivetrain swap once the weather warms up.
Only parts I'm needing at this point is some insulation from db Engineering I still have to order, a longer 242 t-case shift linkage that's on the way, and the taller body mounts and spacers as well as 4L80E shift linkage I've got coming from 86humv (the linkage on my 4L80E on my takeout drivetrain was torch cut  ). I do still need to pick up some new u-joints since I figure I may as well replace them all with the driveshaft changes being done. ). I do still need to pick up some new u-joints since I figure I may as well replace them all with the driveshaft changes being done.
I should have all of the other parts I need, including some new body panels that get riveted in once I trim the doghouse opening. My buddy Dave is going to shorten my rear driveshaft and weld in the center section of the trans crossmember that came with my takeout since the idiots torch cut the ends off that too. 
Right now I'm in the middle of building my trans harness. 
I've got the cannon plug and wiring stub that connects to the TCM, a new Rostra internal 4L80E wiring harness (the plug on the trans is also jacked up thanks to the sloppy removal job), a Rostra 4L80E external harness to connect the trans to the TCM, and a 6.5T engine harness that came with my takeout that I'm going to graft my trans harness onto since that has the connectors for the TPS and engine speed sensors. I've ID'd and labeled all the TCM plug wires. Thankfully they all had the metal tags on them still so it was just a matter of cross-referencing them in the 387-24-2 TM. Also got the leads ID'd and matched up to the TCM plug leads on the Rostra external 4L80E harness. The Rostra civilian trans harness instructions use some different terminology than what's listed in the TM but it's not to hard to figure out what's what. Also helps I've got an A2 body harness I'm borrowing from Dave to use for reference so I can compare the military 4L80E plug (with metal ID tags) on that to the civilian one. Tonight I started working on the engine harness, toning out and IDing where each of the cut wires that go to the EESS cannon plug leads end up. I was originally going to just cut up my engine harness to rob the cannon plug on that but, instead I'm working on getting a junk 6.5T engine harness with a good EESS and TDM plug to splice onto my harness. I figure having the junk harness to use for parts will let me make more progress on the harness build than if I had to wait to pull the harness out of my truck. It looks like it's also got some ID tags on a couple of the remaining leads for wires I'm still trying to figure out (but have an idea) where they go. I still need to determine the A2 brake switch lead lengths as well as the length of the leads on the rest of the 16ga wires that go to the TCM plug and then get some 18 and 16 AWG Prestolite wire. It may be overkill but I'm adding an extra 24" to each lead I measure to give some wiggle room. It's always easier to cut some off than splice some more on. And the way the installation should go, the majority of the leads end up going to the TCM plug which is going in one of the rear seat compartments so the connections to the TCM plug won't happen until I've got the wires through the body tub and will be able to trim them to length before splicing them. I'm probably going to end up installing the TCM box in the rear driver's side seat compartment since that's where it's supposed to go on the A2 and up trucks according to the TM.
|
|
Originally Posted By Gixxersixxer:
I got my new TDM and unfortunately that did not fix my fan issue. I'm going to try taking the Cadillac valve apart and see if there's a blockage. I can hear a humming sound from it when the truck is running which I gather is normal but I don't know if that indicates it's actually working properly. If that doesn't do things I'll pull the cooling stack and whack the fan clutch. I need to clean the cooling stack and flush the radiator anyway. I think after those it just leaves my temp sensor as a possibility of being faulty. I found the diagnostic procedure in the TM so the fix shouldn't elude me for too long, may just take more money.
Just make sure when you take the Cadillac valve apart, you do a thorough bleed of the power steering. Maybe even change all of the PS fluid while you're at it. |
|
great answers guys. i know something as simple as drivebelt routing should be in the TMs but im crap at navigating those so far.
the kit came with 3 longer and 1 short belts, so the pictures support that. looks like the routing is 3 outers traveling around all 4 pulleys, and 1 inner from the fan to the power steering. 
interesting side note, the 100a and 200a niehoffs are visibly very similar but the voltage regulator on the 100a is mounted 180 degrees differently. Ive called in higher help on the broken bolt, if one removed the entire exhaust header maybe theres a tiny knub sticking out of the head. its hard to tell, it almost looks concave into the head. we hope to address it this weekend. there is also some question about grounding the 14v output to the alternator case if not using it, or running a lead back to the battery, or leaving it empty. forum threads out there suggest that voltage regulators dated before 2012 should be grounded out, and ones 2012 and newer shouldnt. i have a 2012 model so i may have to fashion a new wire to one battery. |
|
Luckily my engine is still sitting in the floor of my garage waiting on me, so I was able to snap the pic below. But yes, the three longer ones go on the outer. Let me know if you need more pics. Attached File |
Looks like the first of the turbo trucks has gone through auction! 
http://www.govplanet.com/jsp/s/item/1127516 It's cool and all to have a factory turbo truck but, that's a lot of scratch for a truck that's still going to need a lot of cleanup plus big question marks on the trans and t-case since both are drained (trans pan has a hole drilled in it  ). ).
My truck will be most all of that and still be at least $15k cheaper when it's 100% done. I'm sure as more come out they'll come down in price but they'll definitely still need work where as mine won't. |
|
Originally Posted By Ryan_Ruck:
Looks like the first of the turbo trucks has gone through auction!
http://www.govplanet.com/jsp/s/item/1127516 It's cool and all to have a factory turbo truck but, that's a lot of scratch for a truck that's still going to need a lot of cleanup plus big question marks on the trans and t-case since both are drained (trans pan has a hole drilled in it ).
My truck will be most all of that and still be at least $15k cheaper when it's 100% done. I'm sure as more come out they'll come down in price but they'll definitely still need work where as mine won't. $50k is definitely more than I would have wanted to spend, but it'll be worth it to whoever bought it in the end. A 4-speed truck with all late features, to include seats, factory A/C and 1165 ductwork? It'll be a damn nice truck when it's done. |
|
Originally Posted By Lawman734:
I'm not gonna get too excited about it being "the first of the turbo trucks" as it seems a bit peculiar that this made it through - they've had turbo trucks for how many years and the first one to go through is a 2011? I didn't see any more in the queue, but I suppose anything is possible. $50k is definitely more than I would have wanted to spend, but it'll be worth it to whoever bought it in the end. A 4-speed truck with all late features, to include seats, factory A/C and 1165 ductwork? It'll be a damn nice truck when it's done. Originally Posted By Lawman734:
Originally Posted By Ryan_Ruck:
Looks like the first of the turbo trucks has gone through auction!
http://www.govplanet.com/jsp/s/item/1127516 It's cool and all to have a factory turbo truck but, that's a lot of scratch for a truck that's still going to need a lot of cleanup plus big question marks on the trans and t-case since both are drained (trans pan has a hole drilled in it ).
My truck will be most all of that and still be at least $15k cheaper when it's 100% done. I'm sure as more come out they'll come down in price but they'll definitely still need work where as mine won't. $50k is definitely more than I would have wanted to spend, but it'll be worth it to whoever bought it in the end. A 4-speed truck with all late features, to include seats, factory A/C and 1165 ductwork? It'll be a damn nice truck when it's done. 


I'm betting that's one of those aftermarket add-on suspension stability systems (I think some videos of some were posted way earlier in the thread).  Failed To Load Title  Active Shock Testing - HMMWV  FrontLine Magazine L-3 ECASS So, this could just be a test mule unit that was on loan from DoD to a company for R&D and returned or, a military T&E unit getting surplussed. Since it's a test mule of some sort and not an active duty truck, they might have been using it to figure out the best way to demil it for future sales of other uparmored trucks. After all, there's only so many soft skin and add-on armor kit equipped trucks and I don't think .gov or GP want the money all of these surplus sales have brought in to dry up. If that stability system is even functional I could see an added premium on the price but good luck with repairs if it ever breaks, assuming it works which I'm not so sure of. Notice in this pic it looks like there's a big plug that would go into a possibly missing control box:  Originally Posted By jake-cutter:
That 15k difference is clearly for the ac. But yeah, that is over priced and I expect them to come down some.

|
|
Ryan
When I viewed your first link, the height of the body over the tires caught my eye right off the bat and intrigued me immediately. Later I finally figured out that it had some type of active suspension system. I was going to ask about it but you read my mind and posted additional info. I never saw anything like it when I was on active duty. I think your analysis that this is a test bed is correct. The way the cables are hanging out the front doesn't look too functional to me. It definitely would be cool to have but I think the cost of repair (missing) parts and maintenance would be a nightmare. Even if you could find the parts. Very Cool tho.
|

|
Originally Posted By Ryan_Ruck:
Yeah, it is an interesting truck. Did you see the electro-hydraulic assemblies on the suspension? https://i.imgur.com/hzSRQzq.jpg https://i.imgur.com/XNy0a2B.jpg https://i.imgur.com/uuKZtRK.jpg I'm betting that's one of those aftermarket add-on suspension stability systems (I think some videos of some were posted way earlier in the thread).  https://www.youtube.com/watch?v=F4y24_wVxBQ
https://www.youtube.com/watch?v=F-qE4H1t3qg
https://www.youtube.com/watch?v=-vArnkbQ1ws https://www.youtube.com/watch?v=F4y24_wVxBQ
https://www.youtube.com/watch?v=F-qE4H1t3qg
https://www.youtube.com/watch?v=-vArnkbQ1ws
So, this could just be a test mule unit that was on loan from DoD to a company for R&D and returned or, a military T&E unit getting surplussed. Since it's a test mule of some sort and not an active duty truck, they might have been using it to figure out the best way to demil it for future sales of other uparmored trucks. After all, there's only so many soft skin and add-on armor kit equipped trucks and I don't think .gov or GP want the money all of these surplus sales have brought in to dry up. If that stability system is even functional I could see an added premium on the price but good luck with repairs if it ever breaks, assuming it works which I'm not so sure of. Notice in this pic it looks like there's a big plug that would go into a possibly missing control box: https://i.imgur.com/790a5j6.jpg NO A/C FOR YOU!
https://i.imgur.com/IPowq2j.jpg Originally Posted By Ryan_Ruck:
Originally Posted By Lawman734:
Originally Posted By Ryan_Ruck:
Looks like the first of the turbo trucks has gone through auction!
http://www.govplanet.com/jsp/s/item/1127516 It's cool and all to have a factory turbo truck but, that's a lot of scratch for a truck that's still going to need a lot of cleanup plus big question marks on the trans and t-case since both are drained (trans pan has a hole drilled in it ).
My truck will be most all of that and still be at least $15k cheaper when it's 100% done. I'm sure as more come out they'll come down in price but they'll definitely still need work where as mine won't. $50k is definitely more than I would have wanted to spend, but it'll be worth it to whoever bought it in the end. A 4-speed truck with all late features, to include seats, factory A/C and 1165 ductwork? It'll be a damn nice truck when it's done. https://i.imgur.com/hzSRQzq.jpg https://i.imgur.com/XNy0a2B.jpg https://i.imgur.com/uuKZtRK.jpg I'm betting that's one of those aftermarket add-on suspension stability systems (I think some videos of some were posted way earlier in the thread). https://www.youtube.com/watch?v=F4y24_wVxBQ
https://www.youtube.com/watch?v=F-qE4H1t3qg
https://www.youtube.com/watch?v=-vArnkbQ1ws
So, this could just be a test mule unit that was on loan from DoD to a company for R&D and returned or, a military T&E unit getting surplussed. Since it's a test mule of some sort and not an active duty truck, they might have been using it to figure out the best way to demil it for future sales of other uparmored trucks. After all, there's only so many soft skin and add-on armor kit equipped trucks and I don't think .gov or GP want the money all of these surplus sales have brought in to dry up. If that stability system is even functional I could see an added premium on the price but good luck with repairs if it ever breaks, assuming it works which I'm not so sure of. Notice in this pic it looks like there's a big plug that would go into a possibly missing control box: https://i.imgur.com/790a5j6.jpg Originally Posted By jake-cutter:
That 15k difference is clearly for the ac. But yeah, that is over priced and I expect them to come down some.
https://i.imgur.com/IPowq2j.jpg |
So you are saying God hates these endangered ducks?
No, I am just saying that if God liked ducks they wouldn't be endangered.
No, I am just saying that if God liked ducks they wouldn't be endangered.
|
Got my cooling stack pulled and cleaned today. I took the fan clutch off and gave it a beating. Hopefully that gets things fixed.
I also drained the coolant, trans, transfer case, and rear diff. I ran out of daylight to be able to fill the coolant and trans. I want to put in an engine heater so that may be tomorrow or Monday after I figure out how to knock the plug loose. While I was under the truck I found an oil leak coming from the oil filter housing. It's not the filter, the housing itself can swing with some moderate force. There's a big ass bolt head on it that I don't have a socket for and the fit is very tight in there for a wrench. Any ideas how this assembly works? Is there a nut on the backside I'm going to have to figure out how to hold too? |
┌∩┐(◣_◢)┌∩┐
|
Originally Posted By Gixxersixxer:
Got my cooling stack pulled and cleaned today. I took the fan clutch off and gave it a beating. Hopefully that gets things fixed. I also drained the coolant, trans, transfer case, and rear diff. I ran out of daylight to be able to fill the coolant and trans. I want to put in an engine heater so that may be tomorrow or Monday after I figure out how to knock the plug loose. While I was under the truck I found an oil leak coming from the oil filter housing. It's not the filter, the housing itself can swing with some moderate force. There's a big ass bolt head on it that I don't have a socket for and the fit is very tight in there for a wrench. Any ideas how this assembly works? Is there a nut on the backside I'm going to have to figure out how to hold too? Here's the oil filter assembly: Attached File They call it "BOLT,FLUID PASSAGE" and that looks to be the bolt that holds your whole filter adapter assembly to the engine. There's a gasket and o-ring with it so I bet that's the source of your leak. Since that's leaking, I'd recommend picking up one of the dual oil filter kits. There's a crap ton on eBay for $40-$50. Just search for HMMWV dual filter. It includes the gasket and o-ring you need to replace (plus 2 new Purolator filters) and, you get the benefit of a dual oil filter setup. |
|
Thank you very much, that helps. If I'm lucky another section in the manual will tell me what size head is on the bolt.
The cooling stack wasn't terrible. I'm a molecular biologist. I do my own intermediate car maintenace so someone with more tools would have an easier time. I got started around 1030 and had it back together by 1700. No lunch break though. Pulling the fiberglass side shields made things much easier to work around. I couldn't get the trans/oil cooler AN fittings off with the driver side in. The 2 radiator bracket bolts on each side were much easier to access. I took the passenger side off too since the rad bracket bolts were so much easier to work on. The radiator definitely needed to be cleaned so I'm glad I did it. The radiator is heavy and a helper would have made it a lot easier. The power steering cooler is held down by a bolt on each side. The trans cooler is held down by two bolts around 2/3rds to the top and the power steering bolts. I unnecessarily wasted time on a hex head plug thinking it was a bolt near the middle of the trans cooler. The radiator has a bolt at the very bottom accessed from the front and the 2 bracket connections. I had to use my 1/2 impact with hex sockets to get the fan clutch assembly unbolted. Trying to do them by hand just spun the water pump. The fan bolts came out easy by hand then I had to check pictures to make sure I put it on so the blades spun the right way. |
┌∩┐(◣_◢)┌∩┐
|
Originally Posted By Gixxersixxer:
Thank you very much, that helps. If I'm lucky another section in the manual will tell me what size head is on the bolt. The cooling stack wasn't terrible. I'm a molecular biologist. I do my own intermediate car maintenace so someone with more tools would have an easier time. I got started around 1030 and had it back together by 1700. No lunch break though. Pulling the fiberglass side shields made things much easier to work around. I couldn't get the trans/oil cooler AN fittings off with the driver side in. The 2 radiator bracket bolts on each side were much easier to access. I took the passenger side off too since the rad bracket bolts were so much easier to work on. The radiator definitely needed to be cleaned so I'm glad I did it. The radiator is heavy and a helper would have made it a lot easier. The power steering cooler is held down by a bolt on each side. The trans cooler is held down by two bolts around 2/3rds to the top and the power steering bolts. I unnecessarily wasted time on a hex head plug thinking it was a bolt near the middle of the trans cooler. The radiator has a bolt at the very bottom accessed from the front and the 2 bracket connections. I had to use my 1/2 impact with hex sockets to get the fan clutch assembly unbolted. Trying to do them by hand just spun the water pump. The fan bolts came out easy by hand then I had to check pictures to make sure I put it on so the blades spun the right way. 9-2320-280-20-2, section 3-4 has the oil filter adapter replacement but it doesn't give a bolt size head, of course!
|
|
Hmm... Now this is interesting...
http://my.govliquidation.com/humvee/ "Here's a selection of what we'll have available" Attached File Attached File Attached File
|
|
Originally Posted By jake-cutter:
I always like looking in the background of their pics to get an idea of what is also coming up. In the second pics looks like some UTVs in the background. When Gov planet first started, there were some SF modified Artic Cats that sold for good prices.
|
|
finally felt like looking at the truck again today, my help is sick so we didnt get anything drilled out over last weekend. i started taking the 4 old drivebelts off and then realized the hydraulic line to the fan was in the way! a wuick search yielded that i either had a quick disconnect, or id have to have tiny hands and wrenches. well the hmmwv gods were kind to me today, and my truck had a quick disconnect fitting. 2 drops of fluid is the only thing that escaped. thanks for the help with the belt config, everyone. so if a GMV goes for auction, how much of that kit is gonna make it thru demill and how much is it going to bring? $50K? |
|
Originally Posted By Ryan_Ruck:
Hmm... Now this is interesting... https://www.AR15.Com/media/mediaFiles/102941/GMV_GovLiquidation-458020.JPG https://www.AR15.Com/media/mediaFiles/102941/GMV_GovLiquidation1-458025.JPG https://www.AR15.Com/media/mediaFiles/102941/GMV_GovLiquidation2-458029.JPG |
|
Originally Posted By Aguas:
so if a GMV goes for auction, how much of that kit is gonna make it thru demill and how much is it going to bring? $50K? Originally Posted By JohnyRotten:
Alright I give on truck 231 what is that on top of the fender wall? Originally Posted By FKAM: Sure could use the C-Pillar tho. |
|
Originally Posted By jake-cutter:
Have you seen the repro ones that Greg (86humv) and Retire War Horses had made? They have a thread on g503. |
|
Originally Posted By jake-cutter: I bet more than $50K, probably higher but not as high as the new ones that sold a few years ago. Based off of current demils, we know the weapons tray and turret parts will be gone. Smoke launchers will be gone, don't know if they will leave the mounts or not. All radio stuff will be gone. The doors have a 50/50 chance. Will be interesting in the end to see what stays and what goes. Air compressor possibly? Have you seen the repro ones that Greg (86humv) and Retire War Horses had made? They have a thread on g503. They would look similar to this type of setup http://img0122.psstatic.com/182676370_hummer-h1-wheels-and-tires-cepek-17quot-ctis-lines-bfg-.jpg CTIS spindle https://www.bing.com/images/search?view=detailV2&ccid=ua75BSIs&id=C853B48CE9FF90203E4B98358E32658B8D974598&thid=OIP.ua75BSIsCAZxD_dUmQW-oAHaHK&mediaurl=https%3a%2f%2fwww.4x4parts.com%2fimages%2fF143840489.jpg&exph=773&expw=800&q=ctis+hummer+h1+spindle&simid=608022690992948396&selectedIndex=16&qpvt=ctis+hummer+h1+spindle&ajaxhist=0 |
|
Okay. I've tried to stay true to the 2 door softtop cheap n' easy configuration.
But damn that DMV is cool. Hard top with turret, looks good with x doors or no doors, and retains the slats over the fenders that remind me of some old stakebed truck (why I like my troop seats). Not a fan of the non-usable tailgate, but I do like the simple spare mounting method. If I get tired of the rhino being in the way of my tailgate I may look into that. There is a distinct lack of rear curtain though. One likes to have a barrier against the elements in most parts of this country. I remember walking along on Creech AFB in 2011 when some highspeed looking dudes in tiny helmets came rolling by in a funny looking humvee. That may have been a DMV/GMV and the only time I actually saw one with my own eyes. |
|
Originally Posted By JohnyRotten: That's what I thought first but there's no CTIS spindles or any lines to the valve stems. They would look similar to this type of setup http://img0122.psstatic.com/182676370_hummer-h1-wheels-and-tires-cepek-17quot-ctis-lines-bfg-.jpg CTIS spindle https://www.bing.com/images/search?view=detailV2&ccid=ua75BSIs&id=C853B48CE9FF90203E4B98358E32658B8D974598&thid=OIP.ua75BSIsCAZxD_dUmQW-oAHaHK&mediaurl=https%3a%2f%2fwww.4x4parts.com%2fimages%2fF143840489.jpg&exph=773&expw=800&q=ctis+hummer+h1+spindle&simid=608022690992948396&selectedIndex=16&qpvt=ctis+hummer+h1+spindle&ajaxhist=0 Originally Posted By Aguas:
Okay. I've tried to stay true to the 2 door softtop cheap n' easy configuration. But damn that DMV is cool. Hard top with turret, looks good with x doors or no doors, and retains the slats over the fenders that remind me of some old stakebed truck (why I like my troop seats). Not a fan of the non-usable tailgate, but I do like the simple spare mounting method. If I get tired of the rhino being in the way of my tailgate I may look into that. There is a distinct lack of rear curtain though. One likes to have a barrier against the elements in most parts of this country. I remember walking along on Creech AFB in 2011 when some highspeed looking dudes in tiny helmets came rolling by in a funny looking humvee. That may have been a DMV/GMV and the only time I actually saw one with my own eyes. I'm thinking some sort of forward mounts that are independent of the c-pillar, like an upright that mounts to the fender and follows the line of the c-pillar instead, so the rear curtain can still be installed. The plan is in the colder months, the rear cargo cover will still be able to be installed over top everything and then in the warmer months I've got a GMV looking truck with an open top. It won't be 100% military faithful but it's just not possible to have a 100% authentic GMV repro and truck that's usable year round in this part of the country. It'll be easier to figure out a solution for the slats once I can actually get some (or a reasonably close facsimile) in hand but I'm not going to sweat that too hard until I've got my drivetrain swap done. Speaking of my drivetrain swap, in case anyone was curious about an update... I think I've got all of the wire lead lengths figured out and am just waiting on some 16 AWG Prestolite wire and Packard connectors from Erik's Surplus to get started actually building the harness. Then just need to get a couple Sure Seal connectors to tie to some of the sensors. I could have ordered them online but PEI Genesis (that has all of them in stock) wanted more to ship 4 little rubber connectors than to actually purchase them so I need to give them a call and see if they can't figure something cheaper out on shipping. I lucked out and found a spool of 18 AWG wire (that's used on most of the trans connector leads) that's nearly identical to the white wire in the factory harness. Only difference is mine is yellow. Scored 560' for about $30 on eBay! Only other thing I really need is a donor engine harness to get a usable cannon plug off of to repair my 6.5T harness. Still working on trying to get a 6.5T specific harness but I've been told any of the harnesses at the cannon plug will work. I also decided that with the addition of a turbo, a boost gauge would be good to have. I thought about adding a small boost gauge on the other side of my tach on my dash but, I've noticed my pyro being a little hinky recently (jumping around) so I decided to look at other options. I found a Westach combo EGT/boost gauge in a write-up on FlashOffroad that I really liked the look of but the price on that made my eyes water (~$350) and there are none to be found on the secondary market. I found a decent substitute from ISSPRO called the R609 for a little over $150 shipped. The caveat is that it is just the gauge, no thermocouple or anything. I figure I can re-use my K thermocouple from my existing pyro (ISSPRO says a K type with lead length of 6'-15' is good to go) and the gauge just uses some 1/8" hose to get boost so, that with a 1/8" brass hose barb fitting should be easy enough to source for the $80 difference. The only thing I don't care for are the red needles but, it isn't like there are a ton of alternatives without going digital. Attached File The ISSPRO even has a couple users on SS!
It's just as big as the tach at 3" diameter so I'll end up getting another AutoMeter pod for it to stick next to the tach (which may get nudged over slightly, we'll see). |
|
I have the 2-man setup with troop seats. I have a c-pillar and top to convert to 4-man. I keep trying to figure out a way to be able to go back and forth. I’m thinking about cutting the troop seats in half (maybe removing the seat portion altogether) so that I have side rails that don’t interfere with the c-pillar. Other thoughts are to hinge them at the halfway point so that they can fold back on themselves when in 4-man mode and go back into place for cargo hauling. Another possibility is to make the side slats telescoping so they can slide forward and back to suit both configurations. If I could attach a telescoping version to the c-pillar, and make the whole shebang lock in place in both configurations, that would be awesome. Then, the rear cargo cover could go over the cargo area in four-man if I wanted some weather protection of the cargo area or be removed for the two-man setup. Who wants to build the transformer side rails for all of us? |
|
Originally Posted By An51960:
I have the 2-man setup with troop seats. I have a c-pillar and top to convert to 4-man. I keep trying to figure out a way to be able to go back and forth. I’m thinking about cutting the troop seats in half (maybe removing the seat portion altogether) so that I have side rails that don’t interfere with the c-pillar. Other thoughts are to hinge them at the halfway point so that they can fold back on themselves when in 4-man mode and go back into place for cargo hauling. Another possibility is to make the side slats telescoping so they can slide forward and back to suit both configurations. If I could attach a telescoping version to the c-pillar, and make the whole shebang lock in place in both configurations, that would be awesome. Then, the rear cargo cover could go over the cargo area in four-man if I wanted some weather protection of the cargo area or be removed for the two-man setup. Who wants to build the transformer side rails for all of us? With the troop seats, I could have sworn I saw someone on SS that modified theirs to fold out of the way to allow a 4 man setup exactly like you're talking. Pretty sure they ditched the actual seat part over the rear seat wells but kept it over the fender and then the back folded outwards on itself. I'll see if I can find it... But, you could also just cut the back section of the side rails that extend over the rear set wells and permanently attach them to the door blanks that go in place when it's in 2 door mode. You would then just take the door blanks and side rails out as one piece when switching to 4 man. For the C-pillar, at first I thought nutserts in the top of the fender but quickly realized that's probably not the strongest way, even though the C-pillar isn't any sort of roll over protection or sees a lot of force. Then I came up with an idea that would be a lot stronger but will require some welding. I would take a piece of steel bar stock, drill holes to allow the C-pillar mounting bolts to pass thorough, and then weld nuts to the underside of the bar stock. Then that piece would be permanently mounted to the body. From there you could use some fastener like this 32mm x 1/4"-20 star grip 
Or, maybe some 1/4"-20 x 1" wing screws 
You can, of course, adjust fastener size and length as needed. Just a word though, as you go up in fastener diameter on the star grip fasteners, the grip size goes up too so if they're too big they could interfere with each other. That just leaves the roof side rails... The only thing I can come up with that is cutting them at the B-pillar, just behind the B-pillar mounting screw, and attaching a metal tab to the rear rail sections (maybe via rivets so they're low profile on the door side of the rail and don't interfere with rear door operation) so that it could overlap onto the B-pillar where the nutsert is there. Then something like the star grip or wing screw could be used to hold both the forward and rear rail section onto the B-pillar. The rear rail sections would just use regular screws to hold them to the C-pillar "permanently" so you would be taking the C-pillar and rear rail sections out as one. I hope that makes sense... |
|
Originally Posted By FKAM: I believe those are going to go for lots of cash. They are actually not GMV's but a precursor DMV. It's what I've been trying to build for the last two years. They were what were rode at the beginning of Afghanistan and Iraq before all the Frag upgrades and being issued GMV's. Sure would like to get one but like Augas stated, lots of stuff that I want/need to complete my project is probably coming off before they hit the block. Sure could use the C-Pillar tho. |
|
Originally Posted By Lawman734:
I've never heard them referred to as "DMV's", except for when dealing with international guys. It's always been a GMV truck and looks like a pretty standard GMV mobility truck from 10th Group. The ODA's only recently gave them up as the new GMV 1.1's started coming on board. My truck is built up as a straight up early-mid GWOT GMV. I've got a bunch of parts here at the house for my buddy who'll be turning his into a GMV Assaulter truck from the same timeframe, Originally Posted By Lawman734:
Originally Posted By FKAM: I believe those are going to go for lots of cash. They are actually not GMV's but a precursor DMV. It's what I've been trying to build for the last two years. They were what were rode at the beginning of Afghanistan and Iraq before all the Frag upgrades and being issued GMV's. Sure would like to get one but like Augas stated, lots of stuff that I want/need to complete my project is probably coming off before they hit the block. Sure could use the C-Pillar tho. What sets the Assaulter apart from the other variants? |
|
Originally Posted By Ryan_Ruck:
Any pics of a GMV Assaulter version? I did an image search and came up with a bunch of pics of trucks that definitely weren't a HMMWV. What sets the Assaulter apart from the other variants? The Assaulter trucks are (still actually in use) set up to get a bunch of guys on a target quickly while allowing them to load/unload a bunch of guys quickly to assault a target. They're usually assigned to the SF CIF/CRIF company within each SF Group. You'll usually see them with the tubular MSG bed rails, the step mounted to the bumper that is the full width of the truck and running boards/steps. 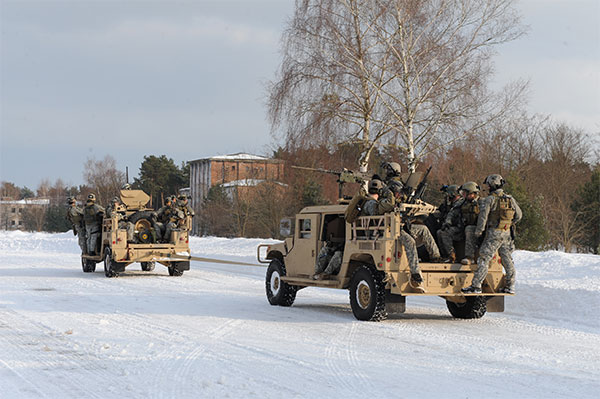
|
|
Originally Posted By Lawman734: I've never heard them referred to as "DMV's", except for when dealing with international guys. It's always been a GMV truck and looks like a pretty standard GMV mobility truck from 10th Group. The ODA's only recently gave them up as the new GMV 1.1's started coming on board. My truck is built up as a straight up early-mid GWOT GMV. I've got a bunch of parts here at the house for my buddy who'll be turning his into a GMV Assaulter truck from the same timeframe,
https://www.globalsecurity.org/military/systems/ground/hmmwv-gmv.htm |
|
There's actually several 3-speed trucks still being driven around R37 at Bragg - I would have figured they would have disappeared a long time ago. It's obvious that a number of "monster garage" mods were done to them over the years. They're not pretty at all.
Everything that I've seen assigned to Group and NSW units were 4-speed trucks though - some Turbo trucks but mostly non-turbo. The turbo trucks with extended grill/radiator stacks didn't become prominent until the up-armored trucks came about. |
|
Originally Posted By Lawman734:
The unarmored Mobility trucks were kept well past their turn-in dates because they offered cross-country mobility that the up-armored GMV's lacked. The Assaulter trucks are (still actually in use) set up to get a bunch of guys on a target quickly while allowing them to load/unload a bunch of guys quickly to assault a target. They're usually assigned to the SF CIF/CRIF company within each SF Group. You'll usually see them with the tubular MSG bed rails, the step mounted to the bumper that is the full width of the truck and running boards/steps. http://www.americanspecialops.com/images/photos/special-forces/army-special-forces-gmv.jpg Originally Posted By Lawman734:
Originally Posted By Ryan_Ruck:
Any pics of a GMV Assaulter version? I did an image search and came up with a bunch of pics of trucks that definitely weren't a HMMWV. What sets the Assaulter apart from the other variants? The Assaulter trucks are (still actually in use) set up to get a bunch of guys on a target quickly while allowing them to load/unload a bunch of guys quickly to assault a target. They're usually assigned to the SF CIF/CRIF company within each SF Group. You'll usually see them with the tubular MSG bed rails, the step mounted to the bumper that is the full width of the truck and running boards/steps. http://www.americanspecialops.com/images/photos/special-forces/army-special-forces-gmv.jpg |
So You Want To Buy A Surplus HMMWV/Humvee - A How-To Guide (And All Other Things HMMWV Too!) (Page 48 of 102)
Join the Community
Your next conversation starts here.
Create your free account to join discussions, share your experience, save topics, and connect with the AR15.COM community.
- Join discussions
- Follow topics and replies
- Connect with fellow enthusiasts
Already a member? Sign in
Stay informed by subscribing to our Newsletter