|
[#1]
Quoted:
Dads been cleaning out old stuff and gave me one of the first knives my great grandfather made. The design is rough, there's rust and stains on it, and one of the scales is broke. I'm not looking to keep it original but make it functional. I'll get pics up soon. I was going to try gluing the scale back down but the blade is thin and flexible like a filet knife which is why it broke. I think I need some sort of steel liner under the scales to strengthen the tang so it doesn't happen again. What material would be best and where should I look for it? What's the best way to remove the brass pins? The blade is rusty with chips out of the edge. I think it was made from a saw blade. What the best way to clean these up? Beltsander? Where would you start cleaning up the rust and stains? It doesn't look pitted. Greenie? Sandpaper? How would I know if it needs heat treated? I ran a file along the edge and it made a mark but didn't grab. I assume a blade this thin shouldn't be too hard. I'll get pics tonight. If you are completely replacing the scales, I would drill the brass pins out. After the scales are removed, you can hand sand the blade to clean it up. I would start with 220 grit wrapped around a block of hard wood. Sand up to 400 - 800 grit. On the last grit, only sand in one direction. This gives a nice, clean finish to the blade without the curly-qs left from switching directions when sanding. A lot of knives have been made from old saw blades without heat treating them afterwards, so it's hard telling on that. You could compare it's cutting capabilities to a known knife and get somewhat of an idea on whether it's been heat treated or not. I've heard the old saw blades were around a 45 rockwell hardness, so definitely softer than most knives that are between 58 - 60. |
|
|
|
[#2]
Here's some pics. Its sharp. Thickness runs from .065 to .072. The blade tends to flex at the narrowest point by the front pin hole. That's why I'm thinking metal liners.
|
|
|
|
[#3]
I don't think that's due to blade flex. I think the wood simply warped and pulled away. Hardness has very little impact on flexibility compared to geometry. I would drill the pins out like ksred said. With the scales off, I'd grind the chip out, refinish the steel, then put new scales on with g-flex and corby bolts as well.
|
|
|
|
[#4]
Thanks guys. I drilled out the pins and pulled the handles. Started working on the blade a bit. What material would you recommend? Where should I look for handle material and corby bolts?
|
|
|
|
[#5]
You can get everything you need from USA knifemaker. As for material, hard to beat micarta for stability.
|
|
|
|
[#6]
I just got the corby bolts and micarta scales from them today. Any secrets to shaping them and drilling the shoulders for the bolts? I was planning on doing the majority of the shaping before I glue it all together.
ETA- the only experience I have in this is from watching FIF. So all tips and tricks are welcome. |
|
|
|
[#7]
Nice knife OP, hope this comes out well.
|
|
|
|
[#8]
Quoted:
Nice knife OP, hope this comes out well. When I was little, it seemed somehow magical that my great grandfather made knives. We had several of his around and they were special and not to be used. I really don't know if he was any good at it or if he even forged them. He may have just been grinding down files or what ever metal he found. I need to ask my grandmother more about him while she's still alive. Last time we talked she was telling me about having one of Jesse James guns around the house when she was a kid. I gave her a hard time about how everyone had one of Jesses guns and it was one of the most counterfeited guns of all time. She's like no your great-great-great (i can't remember how many greats she said) grandfather was sheriff of Clay county and arrested him once. I really need to get down there and talk to her more about family history while she's still alive. |
|
|
|
[#9]
Got 600, 800, and 1000 zirc belts for the belt sander. Did some more grinding/polishing on the blade. Looks much better but it'll probably need a lot of hand sanding.
The micarta slabs are green/black. I got the 1/4 holes from the blade transferred to the slabs and a rough cutout done. I'm thinking I'll probably copy the original dome shape of the front of the old slabs but I left extra to play with. I assume that all of that profiling needs to be done prior to glueing everything together. The slabs I ordered are a bit thicker than I'd estimated. |
|
|
|
[#10]
Sanded the blade with 1000/1500/2000 today. Got the front of the scales shaped close. Will have work some more on the front part. Before counter drilling the holes. Decided to use a stainless corby instead of the brass one I'd ordered.
|
|
|
|
[#11]
Looking good.
If the tang isn't too hard, I'd drill a bunch of holes under the scales so the epoxy will bond the 2 scales together. I also sand the tang under the scales with 80 grit so the epoxy will bond to the tang better. Here's an example. 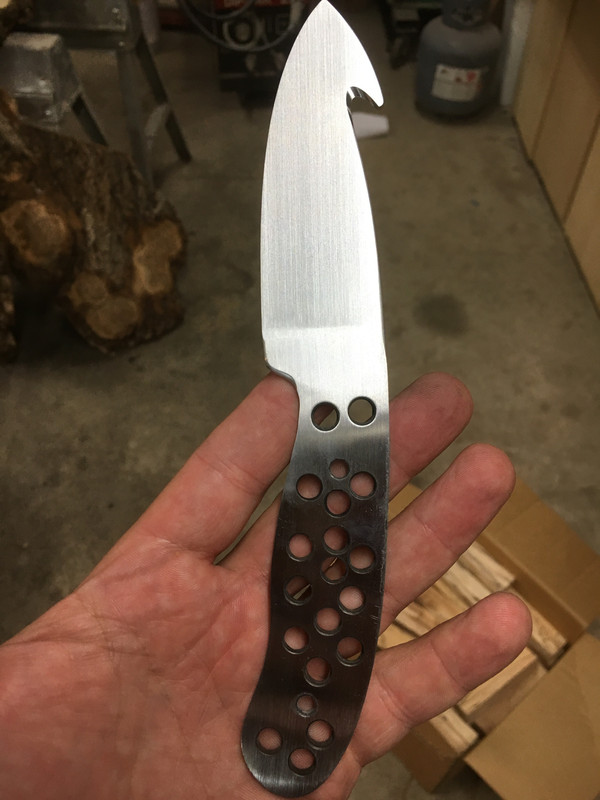
|
|
|
|
[#12]
Quoted:
Looking good. If the tang isn't too hard, I'd drill a bunch of holes under the scales so the epoxy will bond the 2 scales together. I also sand the tang under the scales with 80 grit so the epoxy will bond to the tang better. Here's an example. https://s25.postimg.cc/xx82tcev3/2018-08-21_19.40.47.jpg Any more tips for dealing with the epoxy? Like how to keep from making a mess? How do I apply it to the corby bolts? |
|
|
|
[#13]
Probably asking the wrong person if you want to know how to do it without making a mess. I use denatured alcohol and lots of q-tips for clean up.
I use an 1/8" drill bit and dimple the back side of the scales for more epoxy bond also. When tightening the corby bolts, just snug them up good. You don't want to squeeze all the epoxy out. I don't use clamps when using corby bolts unless I see an obvious gap. It's probably not necessary, but I dab a little epoxy on the shoulder of the corby and a little on the threads before putting them together. |
|
|
|
[#14]
That's good to know.
|
|
|
|
[#15]
Did some final shaping on the front of the slabs and drilled a bunch of dimples. I got one hole drilled in the tang before the bit started screeching. It would still dimple but seemed to hit the center of the blade and stop. Either I smoked the bit or I'm an idiot. Both are possible.
|
|
|
|
[#16]
How do you need to clean the blade before applying epoxy?
|
|
|
|
[#17]
I use denatured alcohol. It won't leave a residue like other cleaners will.
|
|
|
|
[#18]
After putting those dimples in, run a stone across the tang to make sure you didn't raise a burr around the dimples.
As for glue up, I advise to glue up without the corby bolts installed. If the holes in the tang are oversized for the corbys, this is much easier to do. But basically glue the scales on with a mule bolt or pin like you've been showing. Clamp with spring clamps, that's all the force you want to use to avoid squeezing all the epoxy out. Keep the scales aligned to each other, but don't worry so much about whether they float around a bit on the blade (as long as there is scale material larger than the tang on all 3 sides). After you've clamped up, clean the front of the scales as described with alcohol and Q tips. Depending on how fast setting the epoxy you use is, check it again before it starts to set as I can't tell you how many times I thought I had a knife clean only to find it had oozed more after the fact. Much harder to clean up after it sets, so set an alarm 50% into the time for set up and clean it again. After the glue starts to set, before it cures, remove your mule bolts/pins. If some epoxy oozes into the holes that's fine. Don't worry about cleaning the other 3 sides. You're going to sand that off to shape anyway. After 24 hours of curing you can now run a drill slowly through the holes for the minimum size hole to clean any oozed epoxy from them, then completely contour and shape the scales to the tang and how you want them on the sides. Again, before putting the corbys in. Make sure when sanding the profile of the scales/tang flush you don't get the tang too hot. It's micarta and cured epoxy. Don't be afraid to dunk it in the water while your doing this to keep things cool, it won't hurt anything. The reason for this is the stainless corbys in particular cause a lot of heat when grinding. Enough that it will bake your epoxy around them and ruin it. So once the handle is shaped (not finish sanded, just finished shaping) mix up a small amount of epoxy and install the corby bolts. Get them nice and tight and make sure any clearance in the holes is filled with epoxy. At this stage, just wiping up any oozing epoxy with a paper towel is sufficient as long as it doesn't get in front of the scales. After that's cured, using a bandsaw or hack saw or another cold method, saw the corbys off flush or close to flush. Then using a file get them nicely shaped with a better finish flush with the scale contour. Now you can finish sand with very little worry about over heating the corbys and burning the epoxy sealing them in. It takes more work to describe how to do this than to actually do it and believe me it's worth the effort. It only takes 1 second for a corby to get too hot and end up with a black line of burned epoxy that no longer seals. And removing corbys sucks. This is an ounce of prevention/lb of cure thing, imo. |
|
|
|
[#19]
Dude, You guys are awesome.
I had considered the stainless being harder and was wondering what to do with the heat. I did order some titanium ones too if those would be easier to cut. I almost just went ahead and used the brass ones cause they'd be softer and easier to work with. The 1/4" bolts I'm using to line every thing up are very tight. I have to thump them a bit to get them out. The idea of gluing the scales without the corbys is great. The scales are much thicker than needed and that would of been alot of sanding on those SS corbys. I'm thinking that if I spring clamp all three pieces to my bench top with the bolts pointing up I'll be able to pull the bolts and keep everything lined up better while it cures. Hopefully the G-Flex gets here this week and I can let it cure next week while I'm stomping around the mountains. I taped the blade up all the way to the edge of the scales to keep the epoxy off the blade. I don't know if this was a good idea or not. |
|
|
|
[#20]
I don't think the tape is a good plan. Even if the stars align and you place everything perfectly, once you get epoxy between the knife and scales things tend to float around a bit and you run the risk of A) getting tape between the scale and blade or B) having the tape just make it harder to see and clean the epoxy that does ooze forward. I have tried it, and it just made life more difficult.
Using tape to protect your finish is good. But I peel it back an inch during glue up, clean away the oozing epoxy, then just lay it back down after curing. |
|
|
|
[#21]
Cool. Got the g-flex and alcohol today. My spring clamp seems excessive pressure wise. Do I drill the counter sink after shaping?
Just testing out the setup. |
|
|
|
[#22]
You can counter bore before or after. There are pros and cons to both. As long as you do it before shaping any contour you'll be ok.
Try counter boring a piece of scrap to get a feel for it. The larger drill will want to pull into the material and its important you don't let it. Looks like my home depot clamps. I'll use 2-3 on a knife that size. |
|
|
|
[#23]
Quoted:
You can counter bore before or after. There are pros and cons to both. As long as you do it before shaping any contour you'll be ok. Try counter boring a piece of scrap to get a feel for it. The larger drill will want to pull into the material and its important you don't let it. Looks like my home depot clamps. I'll use 2-3 on a knife that size. I've havent worked with epoxy before and I don't want the scales to come off because I'm grinding on them before the corbys are installed. |
|
|
|
[#24]
Quoted: I glued it up a couple nights ago. SHould I counter bore and install the corbys before grinding the scales down to a reasonable thickness or can I grind them down, install the corbys and start contouring? I've havent worked with epoxy before and I don't want the scales to come off because I'm grinding on them before the corbys are installed. 1- drill counter bores while scales are still flat so you get them centered and square. Dry fit corby bolts for confirmation. 2- with corbys out, completely shape the handle to finished dimension with 36 grit or files (no finish sanding just shaping) 3- Install corbys with more epoxy, get it in the threads and around the holes, you're trying to fill any open spaces. Allow to cure. 4- Saw off corbys flush/close to flush, then file them to match the contour 5- Finish sand completely and buff/wax/oil/whatever. You don't have to worry about G-Flex coming loose while grinding the scales unless you're grinding the tang so much you're heating it up. At 150F it starts to get loose, at 200F it fails completely. Barring heat, you won't have a problem. |
|
|
|
[#25]
Fantastic. That's what I was hoping for.
I plan on test drilling some scrap material to make sure I can control the depth and properly center the counter bore. |
|
|
|
[#26]
Got back from vacation and got the counter holes drilled. Also decided on a way to shape the handle since my belt sander wouldn't reach all the places I needed.
Needed a reason to get an angle grinder anyway. Used a 120 grit flapper wheel. Worked well and I'm happy with how it turned out. Just had to remember not to take too much off. Think I'm about ready finish the corbys and final finish sand. |
|
|
|
[#27]
|
|
|
|
[#28]
Looking good!
At that stage I generally use sand paper like a shoe shine to round corners. |
|
|
|
[#29]
Cool. That was my plan. I may hit it with a sanding block first to get the problem areas evened out. Then get it to where I'm happy with it and install the Corbys.
|
|
|
|
[#30]
|
|
|
|
[#31]
Spent two hours tonight cutting and filing the corbys. The only thing I had to cut them with was a dewalt sawsall. I went super slow and cooled it off with a wet rag. They never got too hot to hold a finger on them. That left me with a lot filing to do. That took a hour but I'm very happy with the results. Some how I managed to not make any dummy marks.
|
|
|
|
[#32]
When I finish this up, I'm going to make a kydex sheath for it. I normally heat my kydex to 350 degrees. Can I assume that the epoxy and or micarta wont stand up to this temp? I typically don't heat the knife up but it will be pressed with the hot kydex for 20 minutes.
|
|
|
|
[#33]
I've been heating Kydex to 315 degrees, but have never had it really effect the epoxy in the knife that I'm aware of. I don't think there's enough thermal mass to effectively dump the amount of heat into the knife to "bake" the epoxy. But, I also don't cover the entire handle, just enough of it that I can trim to where I want it to finish.
|
|
|
|
[#34]
Cool thread OP and great work.
Thanks also to the many instructional replies. Quality thread and a beautiful old skinner brought back to a useful life. Thanks again. |
|
|
|
[#35]
Quoted:
I've been heating Kydex to 315 degrees, but have never had it really effect the epoxy in the knife that I'm aware of. I don't think there's enough thermal mass to effectively dump the amount of heat into the knife to "bake" the epoxy. But, I also don't cover the entire handle, just enough of it that I can trim to where I want it to finish.  Your thread is amazing. Your thread is amazing.
|
|
|
|
[#36]
Quoted: I'll stick to your way. You seem to know what you're doing. Your thread is amazing.I am no Kydex guru though so that's about all the advice I can give there. |
|
|
|
[#37]
I'm still working on the knife. I've been getting picky about fixing scratches and blemishes in the steel with files. I plan on polishing it up and any scratches or waves with really show up then. So I'm just taking my time getting everything just right before moving to finer grits. The handle looks great but I can already tell that I'm going to get OCD on making the scales perfectly symetrical.
|
|
|
|
[#38]
|
|
|
|
[#39]
Damn, very nice! It came out great.
|
|
|
|
[#40]
Quoted:
Did a bunch of sanding tonight. Played with some higher grits. https://www.AR15.Com/media/mediaFiles/26018/20180930_192220-01-688761.JPG https://www.AR15.Com/media/mediaFiles/26018/20180930_192240-01-688763.JPG |
|
|
|
[#41]
Thanks guys. I'm very happy with how that micarta looks. I had no idea at the amount of contrast would come out of it. I didn't know what canvas micarta was and just thought green and black would be cool.
There's still a lot left to do to touch up all the scratches and doing it by hand takes forever. |
|
|
|
[#42]
I've been slacking and off to other projects but I owe you awesome folks an update.
Its had to get a good pic with the light down here and the shiny blade. |
|
|
|
[#43]

|
|
|
 Win a FREE Membership!
Sign up for the ARFCOM weekly newsletter and be entered to win a free ARFCOM membership. One new winner* is announced every week!
You will receive an email every Friday morning featuring the latest chatter from the hottest topics, breaking news surrounding legislation, as well as exclusive deals only available to ARFCOM email subscribers.

AR15.COM is the world's largest firearm community and is a gathering place for firearm enthusiasts of all types.
From hunters and military members, to competition shooters and general firearm enthusiasts, we welcome anyone who values and respects the way of the firearm.

Subscribe to our monthly Newsletter to receive firearm news, product discounts from your favorite Industry Partners, and more.
Copyright © 1996-2024 AR15.COM LLC. All Rights Reserved.
Any use of this content without express written consent is prohibited.
AR15.Com reserves the right to overwrite or replace any affiliate, commercial, or monetizable links, posted by users, with our own.


