|
[#1]
I mentioned weathering cars. I've done the container chassis in the intermodal yard, and about 1/3 of the containers.
Also 6 or 7 cars today. Here's a few examples. Before (light gray Union Pacific MP 717433 covered hopper on the left): After (same light gray UP 717433 covered hopper, again, on the left): Here are two others I did today. I applied the graffiti decals a few days ago. And here, compare the weathered Southern Pacific caboose on the left, with the unweathered Cotton Belt caboose on the right. The Cotton Belt red wide vision caboose on the far left has a light coating of dust. Clearly visible, but not so much in this photo. I have two more cabooses to weather, and some containers. Also a few locos. |
|
|
|
[#2]
And I've been burning up the airbrush the last two days, weathering cars and containers.
|
|
|
|
[#3]
All of the container chassis were dusted up. Took the plastic shine off. You have to dust these up from all
angles, bottom, top, sides, ends. And finished the cabooses on the caboose track. Some are done heavier than others, slightly different colors of dust, dirt, grime. I made sure to get into the step wells. For cars it is important to also paint the sides of the wheels and the trucks. I also paint the axles if shiny metal. |
|
|
|
[#4]
I bought the two container lift trucks used, on eBay, at what I felt was a reasonable price.
The kits are quite expensive otherwise, and at the time, I couldn't find anyway. One came in, the mast assembly broken off. The other, the plastic axle was broken. What's with that? Would it have been a problem to put a metal axle in there, like the old AMT model cars? The axles were easy enough. Some 1/16" piano wire cut to length, and 3/32" aluminum tubing for bearings, the wheels were back on. While I was at it, I did both front and rear on both lift trucks. One less problem to worry about. I glued the mast back on by putting a piece of 1/4" square styrene in the front, and glued the mast to that. The only remaining problem, the hydraulic cylinders that adjusted the mast angle were missing, either lost in the packing material or just plain not there to begin with. I made pretty fair replacements from 1/8" aluminum tubing, left over from the discharge line on the front of the Cargill Concrete Grain Elevator (see earlier post), and 3/32" aluminum left over from fixing the axles. These sizes telescope. Cutting to length, and cutting notches on the bottoms of the ends, made pretty good replacements. This is the intact container lift with the original mast cylinders. This is the container lift with the replacement cylinders I made from aluminum tubing. You can also see the white square tubing I used to reinforce the base of the mast. The cylinders and white plastic at the base of the mast were then painted to match. These lift trucks still looked "plastic", badly needing a little weathering. The tire treads were painted Southern Pacific Lark Light Gray. While it does not stick out, it does add some subtle detail to the overall look. I painted the hydraulic cylinders Trailer Train Yellow, and also got the square tubing used at the base of the mast. Mufflers were painted rusty brown. No matter what you paint mufflers, the paint burns off and they rust. Some airbrushed dirt and dust, and finished off with some glossy black on the sliding parts of the mast, to simulate grease, and they no longer look so "plastic". |
|
|
|
[#5]
Very nice work. I can tell you've put a lot of hours into it. Do you have any pics of the lay out as a whole, or track plan image?
|
|
|
|
[#6]
A little past halfway down the 1st page of this thread is a sketch of the deckwork. Give me a bit, I'll
do a hand drawn trackplan. |
|
|
|
[#7]
I tried drawing a trackplan... OK, nix that. This is the best I can do. A photographic walkaround.
Here is the deck layout, and location of businesses, to give you some orientation. I'm starting this walkaround at the upper left of this drawing. The track over the desk and around to the drop-in bridge, and the drop-in, have not been done at this time, but soon. The track going to the narrow section over the desk. The inner track has insulated rail joiners (painted track brown, so difficult to see) so that a DPDT - Center Off toggle switch can be used to connect the track to either the rest of the layout, and operate as a stub siding, or switched over to a Soundtraxx Programming Module coming off the NCE Power Pro. That siding can be killed altogether by toggling to the center position. The Power Pro, Power Supply, and Radio transmitter are all directly under the Engine House and Maintenence Building ("Car-knocker's Shed). A USB Printer cable over to my computer on the desk allows programming with JMRI. The middle track will go the length of the wall, and join with the main line - which is the third track nearest the backdrop, in the lower right corner of the first drawing. That track will continue toward the door, and go across a yet to be built drop-in bridge, which is about 100 miles long. (hahah...) Same corner, but stepping way back for a better view. Engine House in the far right corner. On it's left is the Car-knocker's shed, and the caboose track. The blue building further up the track is a combination Crew's sleeping quarters and Yard Dispatcher's Office. These two locos are on the main. Next the back sides (trackside) of a series of warehouses, another unserved (by the railroad) building with a big painted Bull Durham ad from long ago, then a feed & seed store. |
|
|
|
[#8]
Feed and seed, its silos, and further down to the end of the siding is a plastics molding manufacturer.
Their office, finishing, and shipping operations are in the front building. The rear building contains a machine shop in the left bay for die work, and the two other bays give access to the big injection molding machines. In the little wedge corner by the plastics operation will eventually have a cell tower, it's doghouse, and a fence around it. The doghouse will be made from the Pikestuff Yard Utility Building, leaving out all windows, and substituting a door with no window. A/C and generator will be beside it. Just an overgrown area leading to the bridges over the bayou. The bayou, complete with airboat and alligators. The two state troopers' cars are blocking the grade crossing (I'll have some signs with flashers up shortly, as well as road markings) because Dewey failed to program his loco's CV29 with a value of 34, and ended up the french fry cook at a fast food joint. (Reference to the movie "Unstoppable"... 34 makes the loco run DCC only and also prevents runaways.) The "water" is a two part resin called "Magic Water" by Unreal Details. The bottom is hardboard aka "Masonite" (like the back of a clipboard) painted olive with acrylic artist's paint. A little of the paint was mixed well into the resin to tint it. The resin was poured only 1/8" - 3/16" deep, but looks as if you could put your finger down into it and feel the muddy bottom. There are two alligators submerged in the water hidden along the banks. I only modeled the half of Cargill you can see. Unseen are the other 8 silos and the back half of the center building... hahah! The main line splits, with the main continuing on the left track, and the right track goes to the intermodal yard. |
|
|
|
[#9]
After the main splits near Cargill, it continues around, main on the far track, and the near track heads
into the intermodal facility. This gray building is TranShip International (shipping, receiving, transloading). It is on the same road leading into the intermodal facility. I'll admit, operating that turnout will be a problem for guest operators. I've seriously considered placing a servo on the slab under the gray building. Running a 1/16" control rod from the servo through a slot in the back wall, and on to the points, bending it to keep it low to the ground, and covering it with ground cover. Then for control putting two push buttons on the fascia. Well, that's my idea. EDIT: I have obtained a small servo (Tower Hobbies "Tower Pro MG90S", steel gears and clear smoke case) for about $5, a servo tester, $3 or so, and am waiting on some servo extension leads. I found a 5 vdc wall wart at a thrift store to power this with. I'll remove the control pot from the servo tester, replace with two pots that will adjust the throw and endpoints, and a toggle on the fascia to switch position of the servo, and thus throw the switch behind the gray building. All will be hidden under the gray building. These two tracks go into the intermodal yard. This turnout is easy to see and switch. The cornflower blue metal building with hurricane damage repaired with mismatched panels is the back side of Rope, Soap, 'n Dope, the industrial supply biz. And on into the intermodal yard. End view of the intermodal facility from the end of the peninsula. All of that is just 2' x 4'. I got a lot in there!!! |
|
|
|
[#10]
And from the other side of the peninsula, another view of TranShip International (gray building),
into the intermodal yard, and Rope, Soap, 'n Dope (industrial supply), the cornflower blue building. Where the mainline ends abruptly at the fascia just under the light switches is where the drop-in bridge across the doorway will be placed. I'll make something to put there when the bridge is not in use to keep the trains on the track and not the floor. This layout can be run point-to-point just fine. The bridge will be dropped in for young guests who just want to play trains roundy-round, not have to do all that switching cars stuff. Not a very big layout, but I got a lot into a small room. |
|
|
|
[#11]
A few projects today... weathering a covered hopper, handicap parking, and safety bumper posts.
This Golden West Service covered hopper has the logo and other stenciling lightened, and nearly, but not quite removed with an old fashioned white ink eraser bar. You can even remove road numbers this way, and redecal. Then the car was wiped clean with a little Windex. The trucks were removed, and sideframes, sides of the wheels, and shiny axles painted rail brown. That takes only a few minutes, and should be done on every car. You can break up the monotony by doing them on just a few cars, mud colored, or rust, or other earth tones. A fade mix was made with a few drops of white acrylic and a lot of ArmorAll Glass Cleaner... which makes a great thinner for water based acrylics. It sprays well without beading up. Good for cleaning the airbrush, too. Actually, I use half Armorall Glass Cleaner and half isopropal alcohol for brush cleaning. Spray on the fade mix heavily, and immediately blow most of it off and dry with a hair dryer on low heat. It should come up frosty looking... like sunbleached paint. Then turn upside down, and spray the bottom with rail brown or mud, or other earthy color. Get a little on the lower edges and a little heavier on the ends. Let it dry. Turn right side up, spray browns, earth colors along the bottom, heavier on the ends. Let dry. Dust or desert tan mixed very thin, lightly sprayed on top and the rest of the upper areas. After dry, seal all with a few very light coats of Dullcoat or Krylon Crystal Clear Flat. The results: Project two... Decals came in!!! My wife told me there were no handicap parking places in my parking lots. "You have to have them... it's the law," she said. And she's right! I contacted Dave at Dave's Decals... www.davesdecals.com or www.davart.net and we collaborated on decals. He sent me the first test sheets off the printer, and also announced on his site... Decal # 9017. The small sign posted on the building says "Van Accessable". Edit: Dave posted this picture on his products page. https://www.davart.net/?product=9017-misc-signs-handicap-parking-lines-and-signs Both parking lot spots, and posted on the buildings. I need to draw space lines but these decals are drying now, and will spray with some sealer tomorrow. |
|
|
|
[#12]
Oh, you noticed the yellow safety bumper posts.
Project three. Those posts were made from the protective tips of the disposable needles of an autoinjector for medication I take. I knew those would come in handy for something. I glued stubs cut from round toothpicks, each about 1" long, into the caps, let dry, then stood them up in a block with holes drilled that I used to spray the screw heads of the screws holding the fascia around the edge of the layout. I used Krylon Colormaster Gloss Sun Yellow (close to safety yellow), which is made to adhere well to plastics, too. Shot from four sides, let dry, shot from four sides again, let dry, shot with Krylon Clear Flat. To install, drill 3/32" hole and push in... no glue needed. |
|
|
|
[#13]
This whole setup is nothing short of amazing.

I'm not even a train guy at all but I can definitely appreciate the work and dedication involved in this. My favorite part, if I had to choose, would be the bridge and bayou. So very very cool, thank you for sharing this. |
|
|
|
[#14]
Thank you!
|
|
|
|
[#15]
The decals are a great touch..
The weathering is excellent as well.. How 'bout.. A few trash cans.. Beat up old dumpster.. Couple deer grazing.. A junkyard of busted stuff.. Some kids peeking thru the fence.. Keep the photos coming. It's looking great! |
|
|
|
[#16]
pretty cool. Well done.
|
|
|
|
[#17]
Quoted:
The decals are a great touch.. The weathering is excellent as well.. How 'bout.. A few trash cans.. Beat up old dumpster.. Couple deer grazing.. A junkyard of busted stuff.. Some kids peeking thru the fence.. Keep the photos coming. It's looking great! can't find them right now. I remember buying them. I'm sure they'll show up. Thank you about the weathering. Deer... thought about that, but also need a hunter and dog. No scenes suitable for kids peeking, nude sunbathers, Bigfoot, Mike the Tiger (LSU's mascot) stalking the deer, but a few BLMA dumpsters should be a good addition. I have 12' of triple track to lay and ballast, over the desk, and a 100 mile long drop in bridge across the doorway. Not really a bridge... I'll put some backdrop on the door. Then clean up all the empty boxes, scenery materials no longer needed... and I have about 50 lb of Calcoat 127 to give away for the asking. This is a great plaster-like material, light, very strong, but I only used about 2 lb of it. Local pickup only. But I'm just about where I can have a few guests operate. I need to get some sturdy step stools for younger engineers. Hell, if they break something, I'll fix it or replace it. Cost of having a great time seeing the gleam in their eyes. I will advise... don't buy stuff until you actually need it. Don't buy a lot of locos and cars. Wait, and buy just what you really need. Buy good quality locos. You'll be far happier with just a few great running locos than a dozen mediocre ones. The Dash 9's and SD90's are fine for a big club layout, but for a small home layout you are better off with a few good GP's. GP7's and GP9's for older era, GP38-2's through GP60's for more modern. Don't buy 3-unit or 5-unit container well cars. Buy singles only. I have some I will not be using all five, only triples at the most due to the length of my sidings. Cars will be handled a lot. You may want a few super detailed cars... but cars with delicate brake lines, air hoses, all that, details easily broken, well, you can do without that. Athearn and Accurail hold up better than the more highly detailed Exactrail cars with guest operators. I like detailed locos, but don't put on details easily broken. I like the metal handrails on Athearn Blue Box locos. And I will be making brass wire handrails to replace other delicate handrails over time. I don't use those crappy pewter air hose castings. I use fine solder, glued on, cut to length, painted. Air Conditioners seem to hold up well. Antennas don't. I can get some great weathering effects with chalks, but they don't withstand handling. I'm not going to be the @$$hole constantly yelling, "Don't touch that!!!" Locos and cars are going to be touched... a lot. Get used to it. Just some things I've learned over the past few years. |
|
|
|
[#18]
|
|
|
|
[#19]
Interesting!
|
|
|
|
[#20]
This is what I mean about buying things too far ahead of time. I just now found the vending machines
I bought 4 or 5 years ago. Edit: That stack of track in the first photo above... here's the prototype. 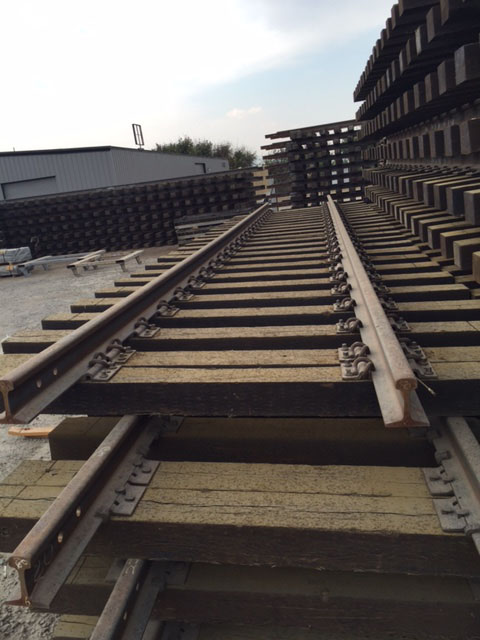
|
|
|
|
[#21]
A few final touches to the intermodal yard.
Still need to add an air conditioner to the guard shack. The pavement markings are made by http://highwaysnbyways.com/index.html. I bought "the Package", which included RR grade crossing markings, arrows, road stripes, and more. |
|
|
|
[#22]
And across the aisle, back at the road along the bayou that turns off to the Cargill grain elevator.
And a driver's view. Yes, the signals will alternately flash when I get 12 vdc hooked up to them. I'll put a little hidden switch behind the fascia to turn them on and off. Up against the backdrop, where the road turns to the right to Cargill, I'll put some wood posts and boards painted yellow and black, like at a dead end, and a little sign pointing to the right, "Cargill". |
|
|
|
[#23]
Today's project... two Athearn Gunderson Husky Stacks, undecorated, and three in Burlington Northern red.
These were painted with Badger Modelflex 16-168 Trailer Train Yellow. I fought the airbrush clogging the whole time. I was not having fun. See my pissed-off face. I tried all kinds of things thinning this paint. I can spray Valejo Acrylic, and others, but not this ^$@&**!@# Badger crap! I also have three A-Line Husky stacks, which I sprayed with Tru-Color Wisconsin Central Gold, since they don't have TTX Yellow. WC Gold is so close, you'd never notice. If you are a rivet counter add a few drops of white to the WC Gold. Once I weather them no one will notice. I didn't bother adding any white to the Gold. In a photo you can hardly see the difference. The two undecs came to me with the frames, weights, two T's on the bottom (coupler cover and truck mounting pad, and the air reservoirs. Nothing else. I'll make walkways from JTT treadplate. No, not going to use the Plano walkways... they don't have all the parts I need anyway. I'll fabricate the brake wheel stand from some Athearn caboose brake wheel parts and a little sheet plastic. I've already fabricated the truck/coupler cover parts from sheet plastic. So those will look complete. The Burlington Northern cars were from a complete kit. I just repainted, and used Microscale decals from two different sheets, #87-670, and #87-839. Here's the Athearn car painted with Badger Modelflex Trailer Train Yellow (top) and A-Line car painted with Tru-Color Wisconsin Central Gold. Not enough difference to tell after weathering. Also works well for Caterpillar yellow and Hyster forklifts. The A-Line car was first sprayed with Alclad II Clear Primer. After letting it dry overnight, I shot on two coats of the Tru-Color with about 30 minutes between coats. Coverage was 100% with the first coat, but I just felt better with a second coat. All details are clear and crisp. This paint sprays like a dream! I'm not missing Floquil as much... Tru-Color is my new paint. |
|
|
|
[#24]
I'm not a hobbyist but I am in the RR business, thank you for sharing. It's absolutely fantastic!!! Love it!!!
|
|
|
|
[#25]
Thanks, Tommy!
|
|
|
|
[#26]
So, one of the problems was, how to attach the piping from the elevator to the silos and feed store?
I couldn't glue plastic that came in the elevator kit. The backdrop panel behind that area of the layout is removable to allow access to one of the windows. That means that the buildings in front of the backdrop also must be removable... as well as the piping to the silos. In true Arfcom fashion, it came to me in a flash! No, not an airplane on a treadmill... but MAGNETS!!! I bought these little 1/2" x 1/2" x 1/8" neodymium aka "rare earth" magnets on Ebay. Then glued one of them to the mouth of the plenum on the elevator. And glued some truck screws into the ends of 1/8" brass tubing. The tubing was sprayed silver to look like galvanized metal. And drilled some holes into the tops of the silos, and the feed store (to bring grain to the sacking machine inside the back of the feed store). Slipped the ends of the tubing into the silos and feed store, and stuck the ends of the tubing with the screw to the magnet. The ends of the tubing are hidden with a little piece of sheet plastic glued to the plenum. A fifth line was run from the elevator over to the building later, but at the time of this photo I had run out of tubing. But you get the idea. With those tubes stuck to the elevator, the elevator requires no glue to remain standing. It is anchored in place quite well, is stable and will not fall over. |
|
|
|
[#27]
Further around the layout, the same idea was used at the big Cargill Grain Elevator to attach
the discharge line going down to the loading shed. No glue, just drilled a hole in the side of the building, and glued another magnet to the inside. This time aluminum tubing was used so I could put a gentle bend in it without kinking. I had snapped this picture a few years ago. It was this photo that was the inspiration for the scene below. I called them and asked what the 5th line was for, and they told me for their sacking machine, to custom blend feeds. And here is the 5th line added from the grain elevator over to the feed store. |
|
|
|
[#28]
Forklifts! The purpose of a railroad is to move stuff for customers from one place to another.. And if you are
moving stuff, you need equipment at each end of the trip to load and unload. It's big stuff, otherwise you would have shipped by Fed Ex or UPS. For some of that stuff you need forklifts. This is the Walthers SceneMasters series Heavy Forklift, which is actually made by Kibri. Based on one of the Kalmar forklifts. It looks very much like one of the Hyster brand forklifts. I sprayed the ugly red plastic with Wisconsin Central Gold, which is close to Trailer Train Yellow and Caterpillar Yellow... and Hyster Yellow. But that's not what this is about. Like the container lift trucks in my RR's intermodal yard, it's about those flimsy plastic axles. I did the same as with the broken lift trucks. The plastic axles, where they insert into the wheel/tire assemblies is .063", which is 1/16". I cut new axles from 1/16" piano wire rod. I used a diamond cutoff wheel with my Dremel Tool, and actually made them a tad longer than the plastic axles, leaving about 1/32" of play. Further, the middle part of the plastic axles is larger. I drilled, just with a bit by hand, the axle holes in the forklift bodies with a 3/32" bit, and cut little pieces of 3/32" aluminum tubing to fit. 3/32" tubing is 1/16" + on on the inside, and the 1/16" rod will go through and rotate easily, though that is not important for this, just that it goes through. These wheels won't break off. A detail... on the My-Jack Crane, the container lift trucks, and this forklift, the mufflers and exhaust pipes are painted rust. As soon as an industrial diesel is put into operation the silver high temperature paint burns off the muffler and exhaust pipe and it begins to rust. There is no high temp paint made that will not burn off. As a safety precaution, when a forklift is not in use the forks should be lowered all the way to the ground. Even if the engine is not running pushing on the down lever will release the hydraulic fluid causing the forks to drop. Another detail... paint the tops of the forks silver to simulate the paint being scraped off by inserting the forks under loads. At an active business with the forklift in almost continuous use the forks won't rust. And these wheels won't break off. |
|
|
|
[#29]
Here's a loco I built for another modeler.
Proto undecorated shell and frame, new Athearn trucks, repowered with Walthers can motor, TCS WOW decoder with Keep Alive. The WOW decoder included speaker and baffle. The Proto motor was a copy of the old Athearn blue box type motor, and crap. I tossed it and replaced with the Walthers can motor, which was bought on a discontinue sale. I bought three for $8 each. These are the same motors that Micromark used to sell, and have also discontinued. Proto trucks were a copy of Athearn trucks, but used inferior plastic prone to cracking. I tried just replacing the gears, but the pin spacing was not good, and new Athearn gears and wheelsets would bind. In the trash they went. Bought all new Athearn trucks. Waiting on a few items before installing couplers and shipping. Also installed LEDs (3 mm "warm white") in place of the old light bulbs. No resistors needed, they are on the TCS decoder. With the TCS decoder and the can motor it will creep in speed step 1 (28/128) about 5 seconds tie to tie. Sound is outstanding! Paint is Tru-Color and Floquil. Weathering is done with Vallejo acrylics. |
|
|
|
[#30]
Weathering ... here are three similar cars recently finished. Each of these was weathered with different color paints.
Vallejo acrylics were used for all three. DTTX 56132 Vallejo Air* 71.047 US Grey - weathered medium DTTX 56079 Vallejo Model Color** 70.988 Khaki - weathered lightly DTTX 56128 Microlux (by Vallejo) Tie Brown 29053 - weathered heavily And don't forget to get down in the well, heavier there, and even more heavily near the trucks, which throw up a lot of grime. * Vallejo Air is formulated for airbrush, and said to not need thinning ** Vallejo Model Color is formulated for brushing, but can be thinned to use in airbrush. Microlux is Vallejo Model Color bottled in larger bottles for Micromark. Weathering these three cars also helped to tone down the Wisconsin Central Gold paint to look more like the correct Trailer Train Yellow as the others are painted. Now you really can't tell the difference. I like to mix up the weathering so everything doesn't look the same. In fact, for this reason I have some cars traded or bought from other modelers already weathered, or have paid others to weather some of my cars. And I have weathered for others. The mix of styles and colors of dirt and grime make for a more realistic effect, I think. Here is a wide shot showing the subtle variation from car to car. |
|
|
|
[#31]
You have a very nice railroad and thank you for posting up pics. I stay subscribed so I can see what is new on your railroad.
|
|
|
|
[#32]
Thank you, Frank!
I've got something neat coming up soon. A how-to, and unusual for model RR'ing. Borrows from another hobby. |
|
|
|
[#33]
Here's a little update on some of the earlier photos.
I've stained the "concrete"... which is not gray, but a more realistic buff or very light tan, by sanding some black and gray artists' "crayon" (chalks) with 150 grit sandpaper, making a powder, and rubbing that onto the slab with my finger making tracks where vehicles repeatly travel. In and out the loading doors, parking spaces, etc. This is easy and fast. Another detail you can add... see the rear tires of the 18-wheeler tractor above? I've painted the treads only of the tractors and trailers a medium gray color. I could have also used tan. I've done this also on fork lifts, container lift trucks, and the Mi-Jack Crane. It shows up better in person than on camera, but every little bit helps. This can be done easily and quickly. |
|
|
|
[#34]
I have one car that would often, not every time, but too often for my requirements, derail when backing through some
switches. Part of the problem was weight, too light. I am currently weighting up some containers to bring these container well cars up to NMRA (National Model Railroad Association) recommended weight. With containers weighted, this one car would still derail in the switch. Watching carefully, I saw the wheels jump going through the flangeway. Well, it is not a handlaid switch, but a "store bought" reliable Atlas switch. I grabbed my handy-dandy NMRA Standards Gauge. Every model railroader must have one of these. They are available for all scales. With this easy to use device I can check track gauge and flangeways (usually not a problem with factory manufactured track and switches), ... and wheel gauge... which is most often the problem. It can even be used to check side and height clearances (tunnel and bridge openings). This problem is because plastic wheels are just a force fit onto a metal axle. To fix it, you grab the wheels, and twist while pulling out or pushing in until the flanges fit perfectly into the notches in the side of the Standards Gauge. Voila! Problem is fixed. |
|
|
|
[#35]
I had some Athearn Gunderson Husky Stack undecorated frames, just plain black plastic, and a few of the
detail parts, but not enough to complete the cars. I painted them Trailer Train Yellow, added the DTTX decals, and had them nearly finished. They were missing the walkway perforated grating, brake wheel stands, and ladders/stanchions. I had a set of current Athearn trucks with the good metal wheel sets. The only parts I had were the air reservoir tanks. To complete I fabricated brake wheel stands from some caboose brake parts. The missing walkways were made from diamond tread sheet plastic. While not "correct" I don't think anyone will notice. I obtained the ladders from Athearn. Despite showing out of stock, they did indeed have them. I had to phone in the order. They came in yesterday, and I painted them this morning. So here they are. The numbers are correct for that type of car. I think the grating and brake stands will pass muster. Some Evergreen 1/4" angle was used to mount the caboose brake stand. As it was easier prior to final assembly, the truck sideframes and sides of the wheels were painted with Vallejo "concrete". That seems to make a nice weathered color. Sometimes I will use "rail brown" or a lighter "sand" color on trucks and wheels. I have since weathered these cars, one with browns, the others with grays. They blend in with the other cars. |
|
|
|
[#36]
Some asked for a video walkaround. My good friend Art Houston of Grande Pacific Model Railroad fame came over
today and shot some video. You've probably seen some of his excellent videos covering every aspect of this hobby. https://www.youtube.com/user/arthurhouston3 The first section of this video is the walkaround of my layout. https://www.youtube.com/watch?v=c7Bfyh5lb2c Later in the video he shows the locomotives that I had reworked for him. I had replaced bad decoders in his SP Black Widow F7A & F7B units with Soundtraxx TSU-AT1000 decoders, with Keep Alives. While I was in there, I replaced the cheesy grain-of-wheat bulbs with "warm white" LEDs. This color looks more like the older incandescent lights rather than the pure bluish white you see on modern locos and automotive headlights. Also, these LEDs will last the life of the loco. I used 2k ohms in series with each LED. This cuts the current through the LED roughly in half, and the light produced is still more than sufficient as you will see. Hope you enjoy the show. You'll have to fix your own popcorn. |
|
|
|
[#37]
Outstanding!
Thanks for posting the video.. |
|
|
|
[#38]
You are very welcome, FN!
For those unfamiliar, "Keep Alives" (TCS brand) aka "No Halt" (NCE brand) aka "Current Keeper" (Soundtraxx) and other names are capacitor banks that can be wired into the decoder. They charge up and will provide enough current to keep the sound, motor, and lights running while the loco passes over temporary dead spots in the track... dirty, or just plain bad connection for various reasons. Without this, a sound decoder will often stutter and stop, and reboot, sounding like the diesel is being started, even though the motor flywheel momentum has carried the loco over a bad spot. The result of using a Keep Alive is that operation of the loco is very smooth and consistent. The most difficult part of installation is where to put the bulky capacitors. For those SP F7's, on the A unit I had to remove the interior... seats, control, floor, back wall. All that had to go. You can't see that in use anyway. Also, the bright purple heat shrink was visible, as were the headlight wires. They did not stick up even with the windows, but were visible when looking down on the loco in a normal viewing angle. I simply painted the Keep Alive and wires flat black. As above, Keep Alives come with various manufacturers' names, and various shapes. The benefits of using them far, far outweighs the difficulty in putting them in. I plan to add them to many or all of my locomotives. If I had to choose between having sound and the Keep Alive, I'd choose the Keep Alive. |
|
|
|
[#39]
This is the same F7A and F7B I installed the new decoders and keep-alives into being run on the
loco owner's huge layout. This post is not about the locos, but rather it is about the scenery, the buildings and backdrop. https://www.youtube.com/watch?v=5Ez87GYKFU0 Note the use of just building fronts, not the whole buildings, like a Hollywood movie street scene. We are modeling the railroad, not the whole town and such. We only need the parts of the buildings we can see. Some of these buildings are just printed and pasted onto foam board (such as "gator board"). Even some of the loading docks and warehouse doors are printed. These were done with the Model Builder program. Some places, these are stacked in flat against the wall 2 and 3 deep. And check out the strategic use of photos between the buildings, framed to flow into the buildings and give and appearance of depth. You can see this at 1:00 on the time stamp, appearing on the right, the street that goes back where the red pickup is turning in... is just a photo. And it works over a good range of viewing angles, both L-R and up/down. Another such street scene appears at 1:25. No part of your layout should be deeper than you can easily lean over and reach... 24"-30" deep. Using the techniques above you can devote more real estate to the railroad. There are still places you want the full 3D buildings, but many times you can do some selective compression, such as my Cargill Grain Elevator. I want it to look like 16 silos... 8 silos on the side you can see, and there are 8 imaginary silos on the other side you can't see. Another railroader and I split this expensive Walthers kit. I built my silos from scratch from 2" pvc pipe and some sheet plastic on top. The head house I built from scratch. The loading shed is from the kit, as well as the elevator building, or rather, my half of it. The other modeler got the other half, the silos from the kit, and the headhouse. He made his loading shed from corrugated plastic using tracings I made of the pieces of my shed. An aside, if you want to expand your Walthers Concrete Grain Elevator kit with more silos, 2" PVC is the same diameter as the silos in the kit. |
|
|
|
[#40]
Layout looks great. Keep the updates going.
|
|
|
|
[#41]
I just finished setting up these four Athearn "tunnel motors". Southern Pacific had problems with locomotives
overheating when going through long tunnels. Diesel exhaust, hot dynamic brake discharge air, and hot radiator air all up near the ceiling. and the fans sucked air from all that hot air. So the locos after the first one in a consist suffered overheating. The solution was to move the radiator up top, sucking in cool air through the grills that were moved down near the walkway. And this became the EMD SD40T-2 and SD45T-2. T for tunnel, -2 for the more advanced electronics. They still had the same horsepower as previous models, SD40T-2's were still 3000 HP, like the SD40's and SD40-2's. The SD45T-2's were still 3600 HP like the SD45's and SD45-2's. UP also owned some "tunnel motors" but the majority of them went to Southern Pacific and its subsidiary. Here is my consist of four "tunnel motors" in HO scale. Lead unit, SP 8529, is an SD40T-2. It's a highly detailed Athearn Ready to Run series loco. Lots of details, air conditioner, horns, antennas, air hoses, plows. Unfortunately, these locos had the old "blue box" style motors which draw excessive current and have poor low speed performance. I replaced the motors in all four locos with the Athearn Genesis motors which were made by Roco. These were drop in replacements and perform superbly. This unit has had the "light board" inside removed and discarded. The grain-of-wheat bulbs (lame, old school) were also removed and replaced with LED's. Both the headlights (on the nose) and MARS lights work (above the windshield). Headlight can turn on/off, and be dimmed ("Rule 17"). The MARS light goes bright-dim-bright-dim. Even better, it is equipped with a TCS WOW Sound decoder with build in "Keep Alive" capacitors. These very high capacity caps store enough charge to carry the loco over dirty track or problem switches with no hesitation, continuous sound, no stuttering, no blinking headlights, just good continuous operation. Not only diesel sound, but the turbo whine is great! Horn, bell, compressor running, pop-off valve spitting, all the sounds. But wait! There's MORE! The second loco in this consist has a TCS non-sound decoder. So I set the sound in the first loco (#8529) to have "dual prime mover" sound. It sounds like another diesel. You hear two startups, two diesels notching up and down, just enough apart to sound like two locos. The speaker is inside, just above the "see through" radiator grills and can be heard quite well. Here is the second loco, Southern Pacific #8262, also an SD40T-2. It has the later "Speed Lettering" logo. Same Genesis motor, but the decoder is a TCS A6X (non-sound) with TCS KA3 Keep Alive. No sound, but that's OK, got that covered with the first one. Using the same brand of decoder has the advantage of similar motor control as the sound decoder in the first loco, and both locos having the same motor, etc, made "speed matching" easy. That's important as these four locomotives have to work together without one dragging the others, or one lagging, the locos fighting and bucking against each other. Here's the third one, SP #8263, also an SD40T-2. It is built from an old undecorated Athearn "blue box" kit. It sports the UP/SP post-merger simplified paint scheme. I painted and decalled this loco as per a photo of the real #8263 about 1999. I've added air conditioner, horns, antenna base, and will soon add the snow plow and a few other details. Like the previous loco, #8262, it has the TCS A6X non-sound decoder and TCS KA3 Keep Alive. But that's OK, too... I have that covered. Here's the last loco, #9372, a Cotton Belt (St. Louis Southwestern - a Southern Pacific subsidiary) SD45T-2. It is also an Athearn Ready-to-Run very highly detailed loco. Like the lead unit, this one is also equipped with a TCS WOW sound decoder with Keep Alive. And I have the sound set to "Dual Prime Movers", so this covers the previous #8263 unit, too. After decoder installation, I chose #8529, the first loco, to be the master that the other three were matched to. Each of the three other locos were matched to it one at a time. Then the locos were placed on the track about 1" apart and operated at various speeds to see if they remained at that separation. A few minor tweeks and they were matched. Then all coupled together, and they run smoothly as a "consist" (multiple locos working together). After I finish the last few bits of detailing, they will be weathered heavily, like the real ones looked. Well, #8263 will be very lightly weathered to reflect the new paint job look. That loco will get only some exhaust soot on the roof, and very light dust. The others will get more grime and dirt, perhaps a little rust, too. |
|
|
|
[#42]
Regarding my locomotive Southern Pacific SD40T-2 #8263, here is a photo of the real thing.
And here is a photo of my model of the same. I still need to add the snow plow and window shades. I have already put on the same type of antenna base and air conditioner. I did not use the same horn and horn location. I just wanted to be a little different, and placed the horn back on the long hood between the dynamic brake fans and radiator like the majority of the other locos in that series, such as #8232, #8241, #8247, #8250, #8256, #8258, #8259, #8261, and #8296, of which I have photos. There are probably more, I just have those photos. Most of these had the headlight on the nose. Some also had a Mars light above the windshield, some had that light location blanked off. I chose to not carve up the nose putting in a light that won't be run anyway. This loco will always be buried back in the middle of the consist and lights never run. This difference won't be noticed. |
|
|
|
[#43]
Here are two other SD40T-2's from that same series.
Note the blanked off light above the windshield. Also the horn located on the long hood near the rear. And this one lacks the SP on the side of the long hood. This loco is similar. Note how the loco behind #8261 has so much soot it is almost black. That shows the need for the "tunnel motor" radiator design. |
|
|
|
[#44]
Beyond impressive all of this.
I got to thinking, how do you deal with the control of dust in your layout room? |
|
|
|
[#45]
For the track and roadbed, I use my shop vac with a small hose and brush end. It's a little kit I got somewhere for doing
delicate stuff, like sucking dust out of a computer, etc. I do what I can with that on other areas, such as the concrete. I don't use it over foliage as it will suck up things even glued down lightly. Tops of buildings and things like that, I use a new, very soft, fluffy makeup brush. New ones won't spread makeup all over everything. Brush and hold the vacuum hose near by to suck up dust. Over foliage, rain washes away dust. Seriously, I get out a little mister and spray. I don't really have a problem as anytime I sand, which creates the most dust, I do it with sandpaper in one hand, shop vac hose in the other, and wipe clean with a damp cloth right away. For the bayou, I use a little duster, forget who makes them. Little plastic handle and slip-on disposable wipes. It is small enough to go under the bridge. That get's most of it, and the makeup brush is used to sweep along the banks out to the front and off the layout. Cars and locos are also brushed clean wth the makeup brush. It's so soft it won't hurt delicate details, hoses, horns, and such. |
|
|
|
[#46]
OK, let's run these babies. First they need to be "speed matched." I did this in the "Speed Table" mode, rather than 3-point speed control (start, mid speed, top speed). Speed tables allow you to set operating voltage for each of 28 speed steps. Each of the three rear locos were matched individually to the first one. Pardon the low quality picture. I used a low resolution, otherwise the file would be huge. As it is, each one was 12-14 mb. https://youtu.be/ZaijaJyctBY Now, couple them together. No dragging, tugging, fighting, bucking, or otherwise acting up. Just smooth operation. https://youtu.be/Wkd0QkzDB5k |
|
|
|
[#47]
Do you guys know what a "Keep Alive", aka "Stay Alive", aka "No Halt Insurance", is? It's a bank of very high capacity
capacitors that are wired into the decoder of a locomotive, so that when the locomotive runs over dirty track, a difficult switch, dead frog, etc, the microprocessor of the decoder stays up and running, as do lights and motor. So the locomotive travels over those spots of intermittent contact as if they were not even there. You can, in fact, pick up a running loco off the track, set it on the table or floor, and it will keep going, the lights remain lit. The lights will not flicker, and the loco will not stall going over bad spots of track at slow speeds. You can buy commercial capacitor banks under the various brand names listed above, but I make my own now. Instead of paying $23-$25 per loco for these capacitor units, I now make my own in just minutes for about $5 per loco. I am well on my way to having my entire roster fitted with these capacitor banks. Would you like to see a step-by-step on how to make your own? |
|
|
|
[#48]
A post awhile back I showed cars I had weathered. I've just done some locos.
This Denver & Rio Grande (aka D&RGW, aka Rio Grande) is an Atlas GP38-2 that I got for almost nothing. I stripped the paint by soaking a few hours in 91% isopropyl alcohol. 70% won't do, you need the high octane stuff. After soaking the shell I hold the parts under running water and scrub in the nooks and crannies with an old toothbrush. I painted it with Vallejo Air acrylics and decalled with the Microscale D&RGW GP60 decal set, but choosing another road number, in this case, 3167. I had been suffering since Floquil was bought out and shut down, and remaining stock was depleted. I had experimented with several other paints, Scalecoat, Trucolor, but have finally learned how to use water based acrylics. You can't thin acrylics with just water, even though they are "water based". I use Vallejo thinner, but there are some others that work well... including Armor All ammonia-free window cleaner! You can't get thin, transparent coats by use of thinner alone. Adding Liquitex Acrylic Airbrush Medium is the trick here. If you add thinner only the paint falls apart, and will bead up when sprayed, like water on wax paper. Airbrush Medium is the binder that holds the pigment together. For, say, 10 drops of paint, I use 2 drops of thinner, 3 drops of the airbrush medium, and one drop each of Liquitex acrylic retarder and Liquitex flow enhancer. The flow enhancer makes it spray well, and the retarder keeps it from drying out before it hits the model, and lets it flow and bond well. Great for thin transparent coats when weathering. I also added some details, Athearn "Vapor" air conditioner (I had run out of another brand I usually use) and Details West antenna base to the roof, and A-Line etched brass sunshades over the cab windows. So, here's the D&RGW black/orange GP. I left off air hoses, and other delicate details. This will be a workhorse on my layout. This loco is equipped with TCS A4X decoder and a Keep Alive. Lighting is LED's. |
|
|
|
[#49]
This is an Atlas GP40 in SP/D&RGW paint. D&RGW 3059 was painted in SP Speed Lettering paint. It has small letters
"DRGW" under the 3059 on the cab. I lightly weathered this one, including some flat black "soot" on the roof. The soot does not show well at this angle. This loco is also equipped with LED's replacing the bulbs, TCS A4X decoder, and Keep Alive. A/C and antenna base were added, as well as sunshades. The other details are factory applied by Atlas. |
|
|
|
[#50]
As you can see, I have the SP painted "bloody nose" DRGW 3059 paired with the black/orange DRGW 3167.
This is the photo of the real thing that inspired this project. |
|
|
 Win a FREE Membership!
Sign up for the ARFCOM weekly newsletter and be entered to win a free ARFCOM membership. One new winner* is announced every week!
You will receive an email every Friday morning featuring the latest chatter from the hottest topics, breaking news surrounding legislation, as well as exclusive deals only available to ARFCOM email subscribers.

AR15.COM is the world's largest firearm community and is a gathering place for firearm enthusiasts of all types.
From hunters and military members, to competition shooters and general firearm enthusiasts, we welcome anyone who values and respects the way of the firearm.

Subscribe to our monthly Newsletter to receive firearm news, product discounts from your favorite Industry Partners, and more.
Copyright © 1996-2024 AR15.COM LLC. All Rights Reserved.
Any use of this content without express written consent is prohibited.
AR15.Com reserves the right to overwrite or replace any affiliate, commercial, or monetizable links, posted by users, with our own.


