


[ARCHIVED THREAD] - OK. I guess I'm building a guitar. NOW A GENERAL GUITAR BUILD THREAD. (Page 5 of 6)
|
Quoted: Totally silent. I get the usual clicks as I plug the cable in, so it's not the cable or amp. I've already stripped everything out, just cleaning up before I rebuild the pot/wire harness assembly. Everything was connected to the proper terminals/ground, per wiring diagrams. I probably just got poor contact somewhere due to trying to work on it inside the cavity, rather than do it outside and then install the whole lot. Often it's a ground issue, sometimes I've had something grounding out to the shielding tape in control cavity. |
|
Quoted: Often it's a ground issue, sometimes I've had something grounding out to the shielding tape in control cavity. Yup, always start there....something touching something it ain't supposed to touch. Or, a bent lug on a pot, or even a small strand of braided wire that's poking out of a lug and wandering over to its neighbor. |
| Nothing new on the Warmoth build, I'm waiting on a new cap, I'm iffy on the one I had...but I did replace the active electronics in my ESP LTD B-206 with a Darkglass Tone Capsule. I'd never particularly liked the treble on the original one, its effect was minimal, and I got more out of the mid boost/cut than the treble, so the DG's low-mids and high-mids in place of mids and treble appealed to me. Sounds great, and it confirms that that's what I want to use for the Warmoth Gecko 6 body I picked up from the showcase in December, when I build that. I did have to slightly enlarge the holes for the preamp pots, but that was easy enough. |
|
Background project done. I had stripped down my old MiM J-Bass when I finally noticed, 27 years later, that the bridge was off-center. Some day, I'll rebuild that with, probably, a Hipshot bridge with adjustable string spacing, which I can use to center up the strings. In the meantime, I picked up a Squier Affinity PJ body on eBay, some new pickups, and almost all the rest reused parts (new pots, too, and installed a Nordstrand Tone Drop for the tone control), and put this mutant together.  It needs some setup work, starting with filing the nut slots (the other issue on the J-Bass was that the nut broke, so that's new), maybe a shim for the neck, then the usual truss rod, action, and intonation. This one, at least, works on the first sound/electronics test. The Warmoth I still need to stop procrastinating on. |
|
Well, I started another one. Don't know how much time I'm going to have to work on it, as this is a busy time of year for me. But, a buddy of mine brought me this poor thing. 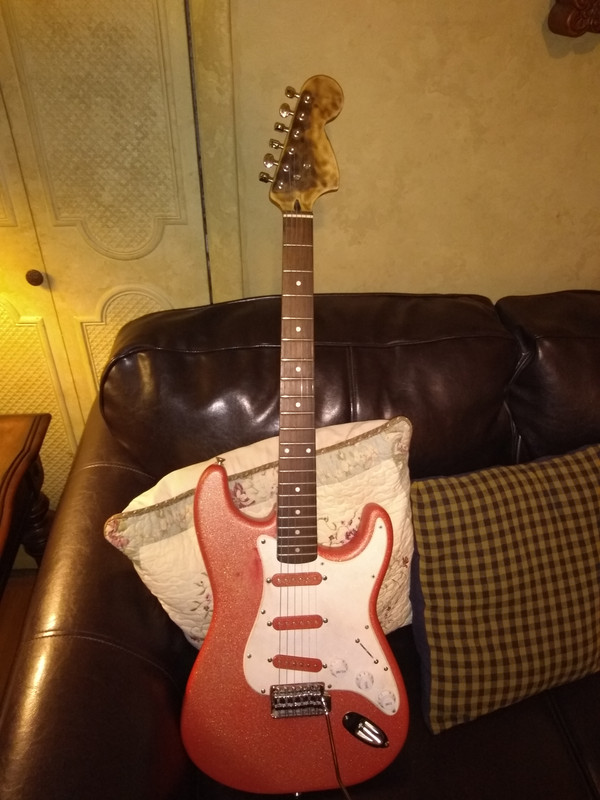 Yes, a thick coat of metalflake pink. Oh, it's awful. And the headstock...did someone want to simulate a guitar that survived a house fire? 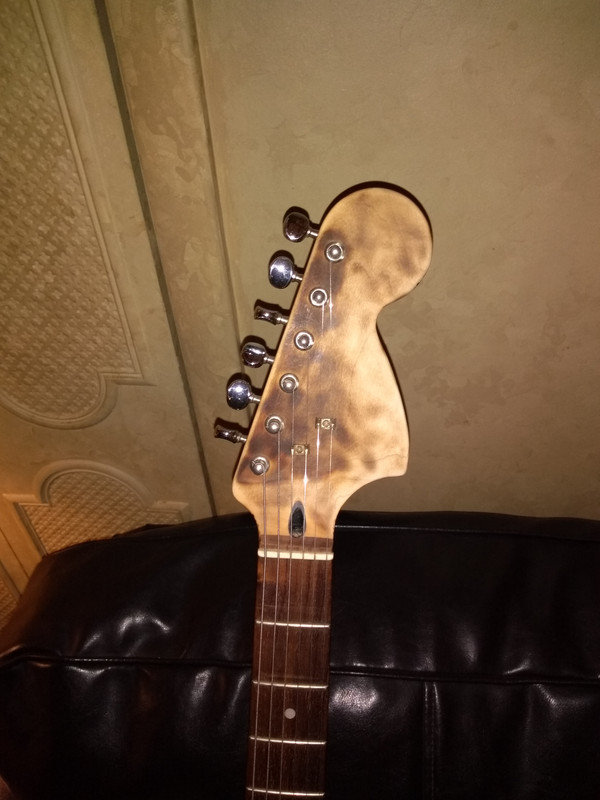 Obvious overspray: 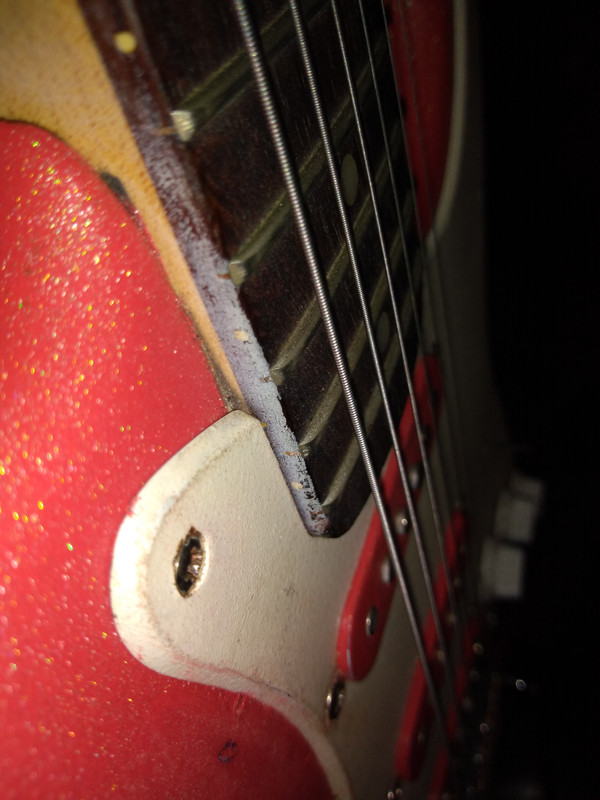 Sheet metal screws holding the back on...lol. 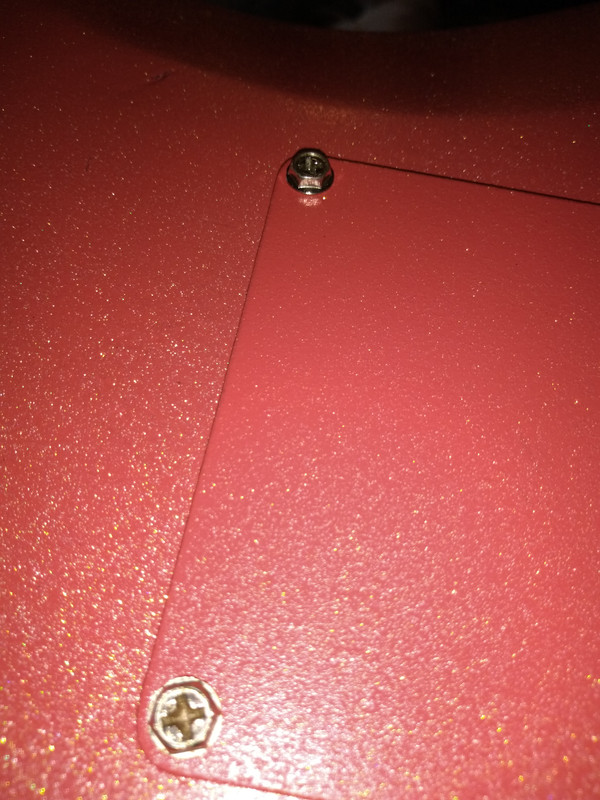 Pulled the neck and found the coolest vintage cream color...along with a layer of blue and a layer of black paint. WHY? I was thinking cream color with a brownish red pearloid pickguard and some vintage cream colored pickup covers and knobs. Kinda like this, but with a walnut fretboard:  It's a Squier made in Indonesia. Maybe I can remove the offensive paint and preserve the original? Tune in next time. |
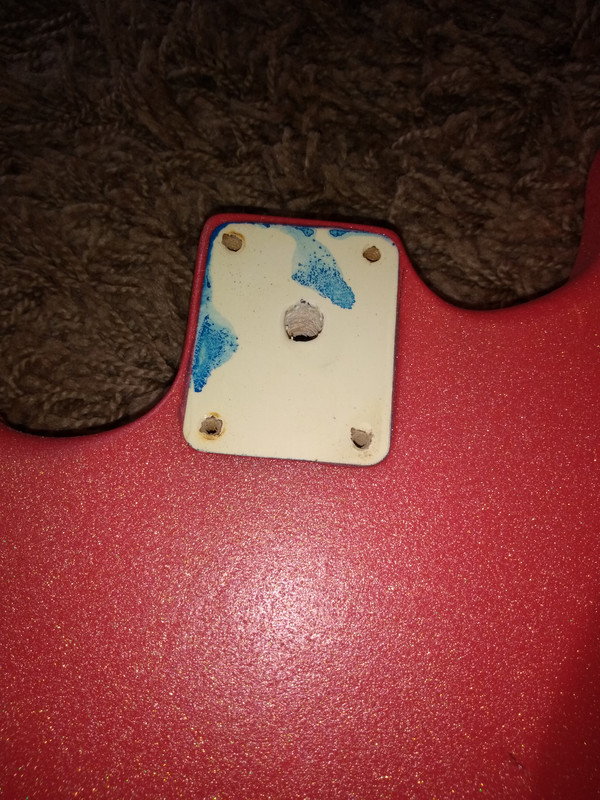 Uh oh. There's blue under there too. Ugh. That's at least three coats of paint if you count the factory stuff. Meanwhile, let's look at the neck. First, it has way too much relief in it. Haven't tried to adjust it yet, will probably do so when I put it back on the guitar and re-string. Until then, wish me luck that the truss rod isn't broken... Sanded the awful burnt off of it, hit it with some "yellow" stain, and a thin coating of polyurethane. I'll hit it with a few more coats later. 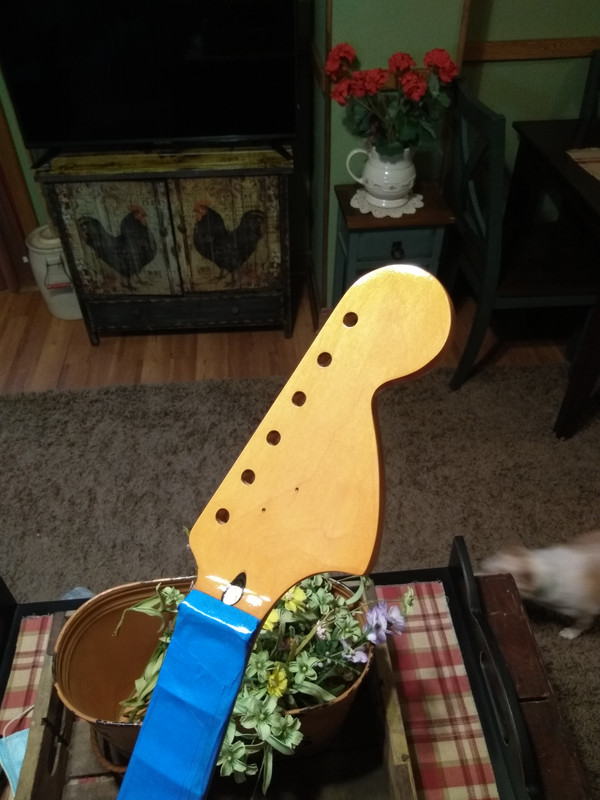 The fretboard was really dry. I've hit it with probably 10-15 coats of linseed oil over the course of three days. It's soaked up every bit of it and taken on a nice sheen as well. The yellow of the linseed also is making the grain, which is fantastic, a bit more visible. Kitteh approves, but she wants to call it a StratoCATster. 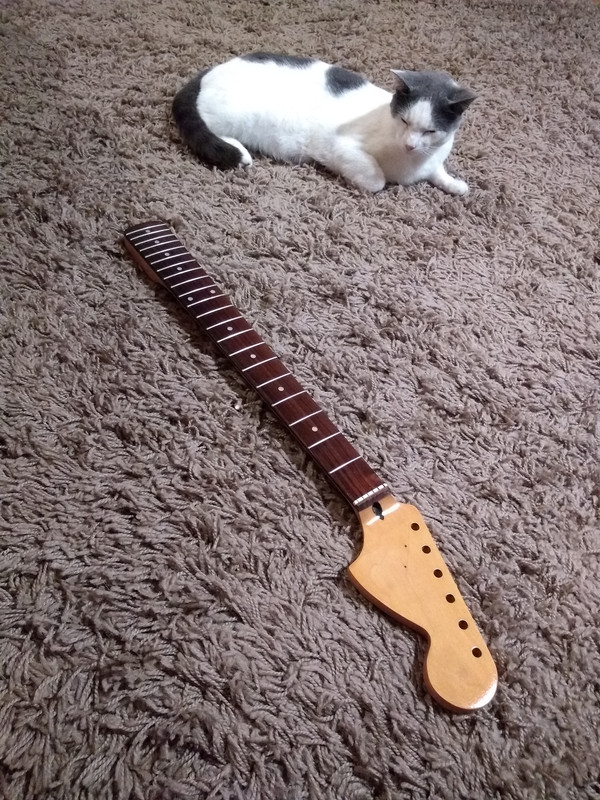
|
|
Quoted: https://i.postimg.cc/4xS2jM0w/2021-04-11-13-02-02.jpg Uh oh. There's blue under there too. Ugh. That's at least three coats of paint if you count the factory stuff. Meanwhile, let's look at the neck. First, it has way too much relief in it. Haven't tried to adjust it yet, will probably do so when I put it back on the guitar and re-string. Until then, wish me luck that the truss rod isn't broken... Sanded the awful burnt off of it, hit it with some "yellow" stain, and a thin coating of polyurethane. I'll hit it with a few more coats later. https://i.postimg.cc/gcvNH1MR/2021-04-11-19-30-34.jpg The fretboard was really dry. I've hit it with probably 10-15 coats of linseed oil over the course of three days. It's soaked up every bit of it and taken on a nice sheen as well. The yellow of the linseed also is making the grain, which is fantastic, a bit more visible. Kitteh approves, but she wants to call it a StratoCATster. https://i.postimg.cc/6pNCJH5C/2021-04-11-21-13-28.jpg Nice work brining the neck back to life. |
|
So far, I have torn down and cleaned the weird old Starcaster I got. Have all the parts lined up. But have to travel out of state for the next month and a half, so it will be a while before I start putting it together. But if all goes well, I'll be tackling another shortly after. |
|
I like the aged white or blonde with the pick guard you in the example picture you posted. That dark pickguard with the fretboard would look classy. I look forward to seeing the thick candy shell taken off that guitar and it being brought back to its former glory. I don't think I'll have much to add in the project department. All I have right now is a re-wire of my SG and decide on pickups to finish off my Firebird. Unfortunately house projects and a few other things are taking priority so I fully expect to be able to live vicariously through your project for a while. |
|
Attached File All routing and major shaping is done. Just got a Shinto saw rasp to do the belly cut - totally worth it. Still need to drill out the string-through holes to final size, then comes sanding. Lots of sanding. |
|
Quoted: https://www.ar15.com/media/mediaFiles/106617/IMG_20210414_165809_jpg-1904885.JPG All routing and major shaping is done. Just got a Shinto saw rasp to do the belly cut - totally worth it. Still need to drill out the string-through holes to final size, then comes sanding. Lots of sanding. That looks great. I wish I had the tools and skill to make parts like that. |
|
I decided against routing the pickup cavities for humbuckers and will put vintage FB voiced ones in. Leaning toward SD Antiquity or Mojotone Johnny Winter pickups. Ended up putting in the rest of the wiring while I decide which to buy. Attached File |
|
Quoted: I decided against routing the pickup cavities for humbuckers and will put vintage FB voiced ones in. Leaning toward SD Antiquity or Mojotone Johnny Winter pickups. Ended up putting in the rest of the wiring while I decide which to buy. https://www.ar15.com/media/mediaFiles/256712/20210414_204206_jpg-1905626.JPG I'm usually a resto-mod guy but thats definitely not the guitar you want to take a router to. Good call on swapping with like size pickups. I'd go with the Johnny Winter set. |
  Looking like it might work! So far, the paint is intact underneath and the weak stripper is not touching it. Found another layer of black which was painted on without removing the pickguard. People are idiots. Anyway, even if all of the black doesn't come off, it's awfully thin and may rub out with fine sandpaper or even rubbing compound. If this is the case, I'm golden. |
|
Quoted: https://i.imgur.com/gMMgFCG.jpg https://i.imgur.com/iDhrlq6.jpg Looking like it might work! So far, the paint is intact underneath and the weak stripper is not touching it. Found another layer of black which was painted on without removing the pickguard. People are idiots. Anyway, even if all of the black doesn't come off, it's awfully thin and may rub out with fine sandpaper or even rubbing compound. If this is the case, I'm golden. That is working way better than I would have expected. If it thins the white a little it may just look like a blonde finish which may look really good. I love the blonde finish on my one strat. |
|
AUUUUUUUUUUUUUUUUUUUUGH! NOOOOOOOOOOOOOOOOOO! Poor guitar was a victim of the "relic" craze. WHY DO PEOPLE DO THIS? 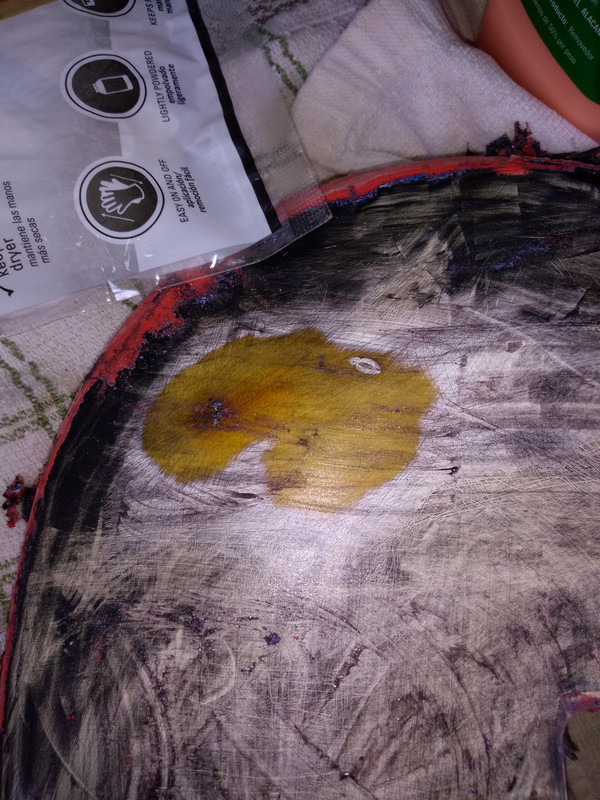 YOU'RE NOT FOOLING ANYONE! 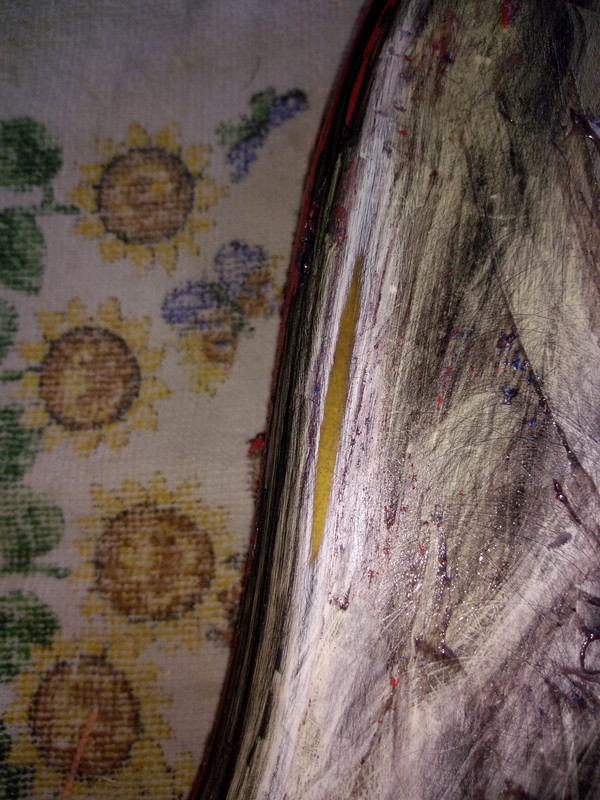 IT DOESN'T LOOK "ROAD WORN"! IT LOOKS LIKE IT WAS SANDED BY BUBBA THE GUITARSMITH, BECAUSE IT WAS! 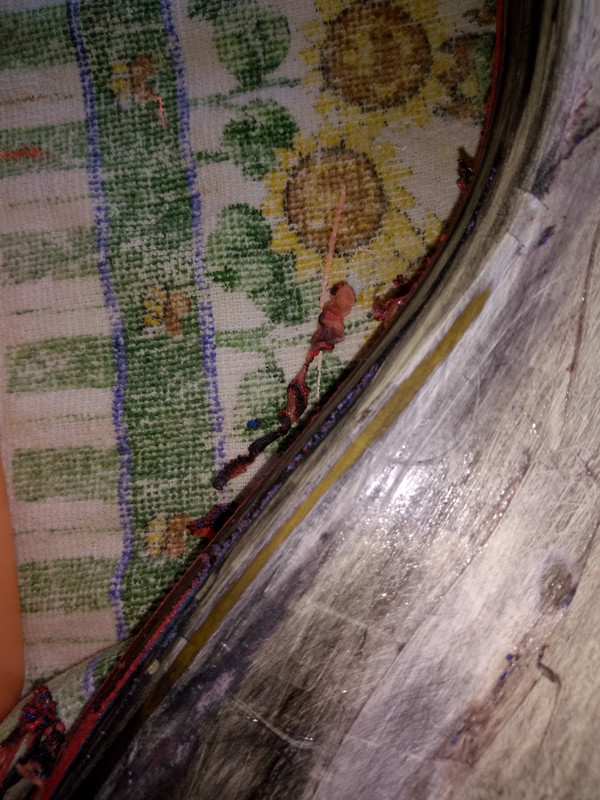 So, I guess the next step is to take it down to bare wood. Gonna get some full strength stripper and see if I can get all of it off. If it looks good, I may go for a natural finish, even though I already have one woodgrain guitar (the blue Strat I did earlier in this thread). The color, from what I can see, looks like it might match the red pearloid pickguard I'm getting nicely. But, I'm torn because I want to do a cream-colored paint as well. Decisions, decisions. Some people should never be allowed to own a guitar. |
Wow. I think I'm gonna be alright on this one. The wood beneath looks absolutely beautiful. 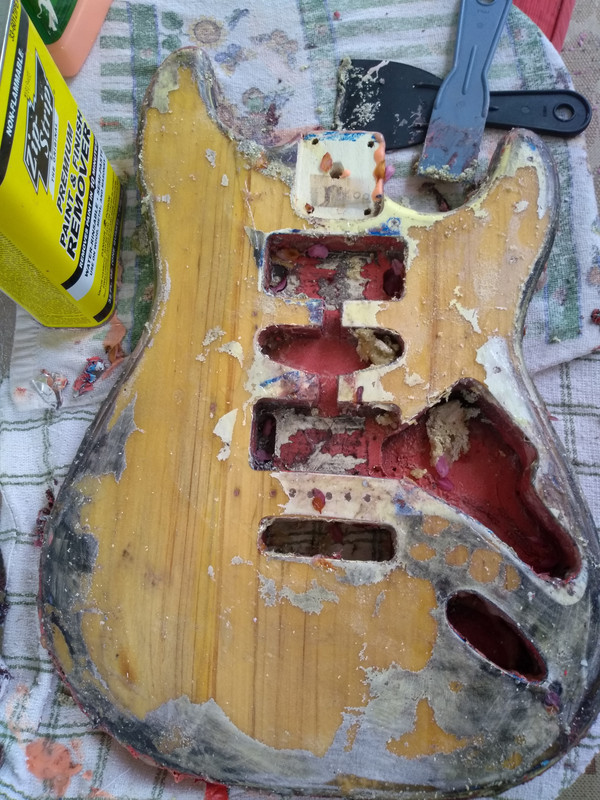 There are a few imperfections, but no dealbreakers. So far, looks like I can probably use this. Not holding my breath, though. At the rate I'm going, somebody probably burned a giant swastika or something into the wood under some of the remaining paint. |
|
Quoted: Wow. I think I'm gonna be alright on this one. The wood beneath looks absolutely beautiful. https://i.postimg.cc/ZqsQTdk7/2021-04-15-18-03-03.jpg There are a few imperfections, but no dealbreakers. So far, looks like I can probably use this. Not holding my breath, though. At the rate I'm going, somebody probably burned a giant swastika or something into the wood under some of the remaining paint. I still think your original color scheme with a thin layer of paint on the body to let some of the grain show. |
|
Spent most of the evening sanding, sanding, sanding, sanding. Note to self...get more 60 grit for the orbital. Wood is hard. Ash? Alder? What do they make Squier bodies out of? Anyway, got through most of it. Still some kind of sealer under the paint, but when I get more 60 grit, that will come right off. Hit it with a little denatured alcohol to remove the dust and grit. When it got damp, boy did it look good. 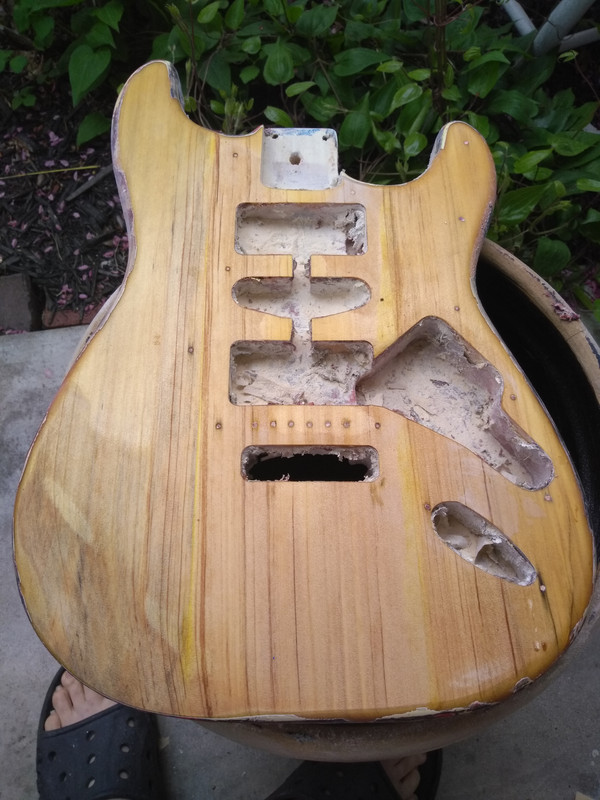 I ain't even mad. I'm impressed. I can't cover this up. It's beautiful. Let's see how it looks with the pickguard... 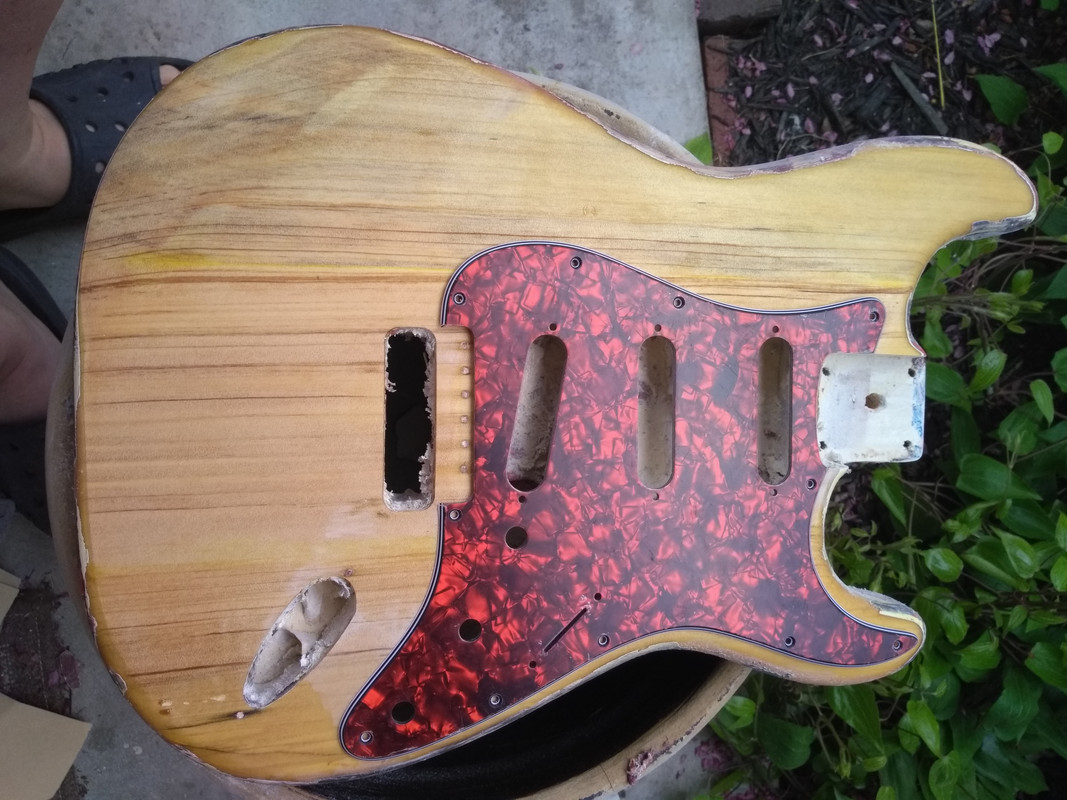 I didn't want another woodgrain guitar, but this thing is gonna look awesome. |
|
Quoted:  Pretty much my reaction. Anybody have any idea what kind of wood this is? Really tight-grained and non-porous. Hard, too...can't nick it with a fingernail (my other Strat is made of candlenut wood and you can make dents in it if you breathe on it too hard). I can't imagine they'd use anything super expensive on a Squier. Thoughts? |
|
Quoted: Anybody have any idea what kind of wood this is? Really tight-grained and non-porous. Hard, too...can't nick it with a fingernail (my other Strat is made of candlenut wood and you can make dents in it if you breathe on it too hard). I can't imagine they'd use anything super expensive on a Squier. IIRC, older ones were mostly alder. Newer ones are mostly poplar or basswood. Basswood is generally pretty soft - and light - so probably not that. As a point of comparison visually, here are the body blanks I picked up most recently (from when I got them): Attached File Clockwise from the top, basswood, poplar, and alder. That poplar one being used for the bass I currently have in progress, while the other two are for projects yet to come. |
|
I built a body from a Cedar tree I cut, iirc 1997 ish. 1 solid piece of cedar, pair of Seymour Duncan Humbuckers (don't recall the model). Japan made tuners, Gotoh? Warmoth Les Paul style bolt on 24.75" scale neck, graphite nut. I was going for a Les Paul copy, but decided the carved body and angled neck was above my skill set, so I didn't use my TOM hardware. Original high quality pots I installed ended up with cedar resin goo mucking them up. It turns out the wood needed longer than 15 months to season? I also assembled a semi-hollow body Telecaster style guitar on the cheap more recently, if it hasn't been lost by the person that has/had it I'll get a picture of it. It's a dandy, $45 ebay neck, cheap humbuckers, and other cheap hardware. 3 layers of 3/4" cabinet grade plywood, finished with a yellow highlighter (faded fairly quickly), with the back and sides painted in a fluorescent orange. I thought it sounded surprisingly good. Attached File |
|
Quoted: Pretty much my reaction. Anybody have any idea what kind of wood this is? Really tight-grained and non-porous. Hard, too...can't nick it with a fingernail (my other Strat is made of candlenut wood and you can make dents in it if you breathe on it too hard). I can't imagine they'd use anything super expensive on a Squier. Thoughts? sent the pics to my sister, she's a retired forester (now a biology teacher). Hopefully she'll know.. ETA: my guess is poplar... Attached File |
|
Quoted: sent the pics to my sister, she's a retired forester (now a biology teacher). Hopefully she'll know.. ETA: my guess is poplar... https://www.ar15.com/media/mediaFiles/300247/il_794xN_2838565493_6p5s_jpg-1908286.JPG That would account for the unusual colorations in the grain. Osage Orange was what I was thinking of, but it should be much darker than that. |
|
Pickguard is done. Attached File Body is ready for sanding, but not sure when I'll get to it - prefer to do it outside to minimize dust in my garage/shop areas, and it doesn't look like the weather is going to cooperate. |
|
Quoted: sent the pics to my sister, she's a retired forester (now a biology teacher). Hopefully she'll know.. ETA: my guess is poplar... https://www.ar15.com/media/mediaFiles/300247/il_794xN_2838565493_6p5s_jpg-1908286.JPG I think you're right. This build has been such a rollercoaster. I finished stripping the back (with 60 grit and a palm sander) Still has that sealer on it, Found some interesting things... 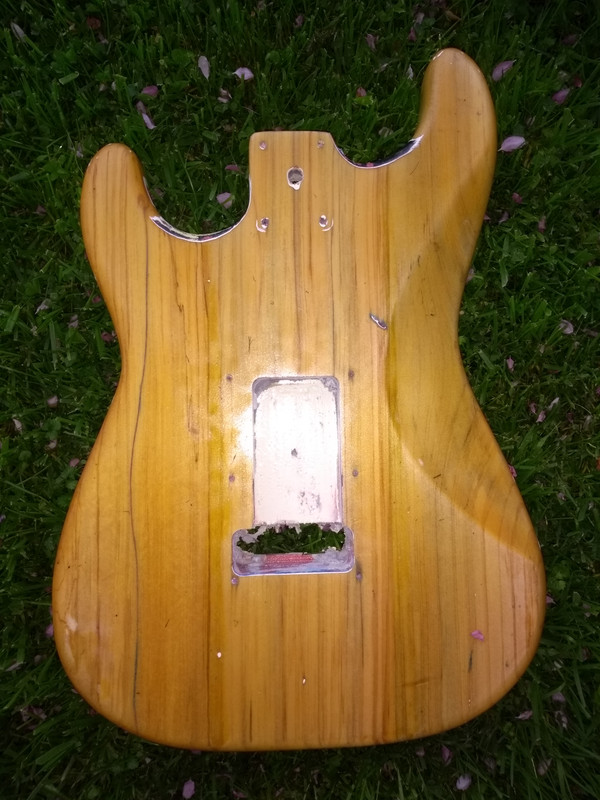 That wavy line on the left is a crack. No biggie. It doesn't go all the way through, and I can't move it when I try to pull on it. The line coming from the top right of the rear cavity is also a crack. Especially concerning, because it extends to the neck pocket. It doesn't go all the way through, obviously. But, it's proximity to the neck concerns me. I twisted and turned the body in every way I could. Could not get any movement at all...no noises, no cracking, nothing. Grabbed the neck pocket and pushed and pulled it. Solid. And of course, it was mounted on a (barely) working guitar. The neck had too much bend in it, most of which went away when I took the strings off. So, it's getting a solid mount to the body. Gonna keep going. I can always get another body later if necessary. And, I'll have another project to work on! |
|
Of course, there's always this: https://www.guitarfetish.com/Aged-White-Double-Cutaway-Style-Body-HSH-Vintage-Trem-Rout_p_42005.html I can get that for under $60 shipped.... Wife is starting to ask questions about my "free" guitar. |
|
Quoted: Of course, there's always this: https://www.guitarfetish.com/Aged-White-Double-Cutaway-Style-Body-HSH-Vintage-Trem-Rout_p_42005.html I can get that for under $60 shipped.... Wife is starting to ask questions about my "free" guitar. The one you already have has Mojo! |
|
Quoted: That wavy line on the left is a crack. No biggie. It doesn't go all the way through, and I can't move it when I try to pull on it. The line coming from the top right of the rear cavity is also a crack. Especially concerning, because it extends to the neck pocket. It doesn't go all the way through, obviously. But, it's proximity to the neck concerns me. I twisted and turned the body in every way I could. Could not get any movement at all...no noises, no cracking, nothing. Grabbed the neck pocket and pushed and pulled it. Solid. Cyanoacrylate (super glue) is a woodworkers best friend. Get some of the thin stuff and drizzle it all along the length of the crack. It will wick way down deep into the crack, and stabilize it. It will also soak into the wood, and make it hard as a rock. You don't need to fill the gap full of glue. Just let it soak into the wood. Handy tip....if you have a small, stripped out screw hole (like the screws that hold the tuners in place) in the wood, remove the screw, and put a drop of thin super glue in the hole. Let it soak in, and cure. The wood will swell slightly from the moisture, thus making the hole slightly smaller, and then, the glue will cure, making the wood rock solid again. Then, you can thread the screw back into the same hole. You are not plugging the hole with glue, or gluing the screw into the hole, but rather, "making the wood solid again". Works virtually every time. |
|
Quoted: Cyanoacrylate (super glue) is a woodworkers best friend. Get some of the thin stuff and drizzle it all along the length of the crack. It will wick way down deep into the crack, and stabilize it. It will also soak into the wood, and make it hard as a rock. You don't need to fill the gap full of glue. Just let it soak into the wood. Thanks for the tip. I assume it goes away (appearance wise) when sanded? I may try this first before I order a replacement body. Funny thing is, for all the world, it looked like the cracks had been painted over with the original white. I might be wrong. Would Fender send a guitar out like this? |
|
Quoted: That would account for the unusual colorations in the grain. Osage Orange was what I was thinking of, but it should be much darker than that. I think shes been away from trees too long, her guess was Sumac and ill give you $5 if you can find a commercially avail Sumac body... |
|
Quoted: Thanks for the tip. I assume it goes away (appearance wise) when sanded? Yes, but I doubt it would take a stain (I haven't tried it). But you just want to let the super glue wick down in the crack. Luthiers use super glue all the time. A common use is to fill fret board divots with sanding dust, and super glue. Or to fill in chips around frets, during a fret job. It is also commonly used for drop fills on a guitar finish. If you want to add some color to that body without covering up the wood grain, I would spray a thin coat of lacquer with some color toner in it. Then spray the clear lacquer top coat over that. |
|
Quoted: Yes, but I doubt it would take a stain (I haven't tried it). But you just want to let the super glue wick down in the crack. Luthiers use super glue all the time. A common use is to fill fret board divots with sanding dust, and super glue. Or to fill in chips around frets, during a fret job. It is also commonly used for drop fills on a guitar finish. If you want to add some color to that body without covering up the wood grain, I would spray a thin coat of lacquer with some color toner in it. Then spray the clear lacquer top coat over that. ...or just leave all the "character" in there, including 100 year old hammer divots  Attached File |
|
Quoted: Of course, there's always this: https://www.guitarfetish.com/Aged-White-Double-Cutaway-Style-Body-HSH-Vintage-Trem-Rout_p_42005.html I can get that for under $60 shipped.... Wife is starting to ask questions about my "free" guitar. Free guitar. Like a free puppy or a free sailboat. Ouch. So far my set of $100 guitars is running me around $500 each. |
|
Quoted: I think shes been away from trees too long, her guess was Sumac and ill give you $5 if you can find a commercially avail Sumac body... Quoted: Quoted: That would account for the unusual colorations in the grain. Osage Orange was what I was thinking of, but it should be much darker than that. I think shes been away from trees too long, her guess was Sumac and ill give you $5 if you can find a commercially avail Sumac body... I'd be shocked if anyone had a big enough piece of sumac to make a slab with. Osage Orange is a beautiful wood, but expect to dull all your cutting tools quickly. |
|
Fairly certain this is poplar. And, good news. The cracks were in the finish, and the dark color was the paint soaking through and into the wood. When I sanded all the way down to the wood, the "cracks" mostly disappeared. Before: After: 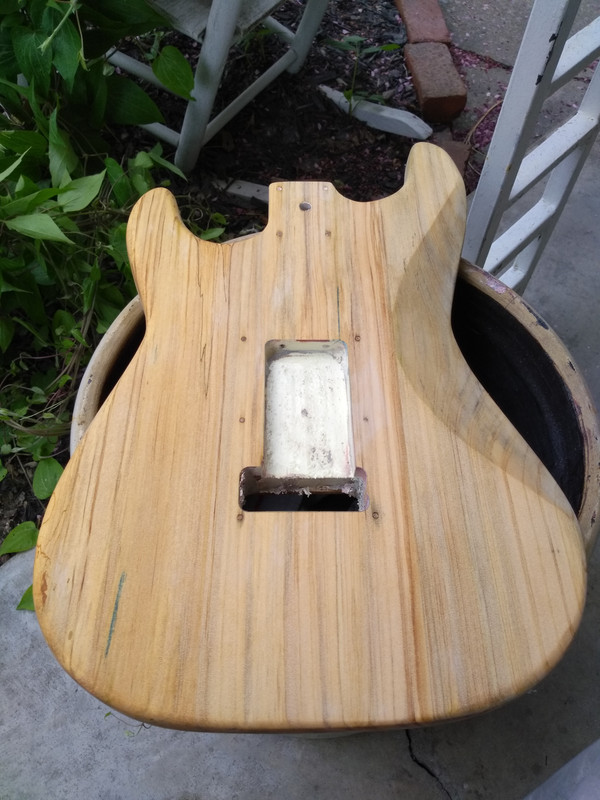 Notice the wavy "crack" is gone now, except for a little blue paint, which soaked in REALLY deeply. Apparently, the original paint had cracks in it, and when they painted over top of it, the new stuff got drawn under the surface by capillary action. When I sanded off the remaining finish, the cracks went with them, for the most part. I'm leaving the blue marks as part of the guitar's history (and due to the fact that I'm lazy). The one on the back pocket to the neck is still there, but once the finish is gone, it looks like it only extends a couple inches up toward the neck and stops. I might do the super glue trick, especially since I can get at it from the end in the back pocket. Otherwise, she's solid. Figured out that it's a three piece body. Still needs some finishing sanding to smooth things out, but it's pretty close to ready for paint/clearcoat as it is. Speaking of sanding, I probably put in two solid hours of sanding today. Great fun. I sanded, sanded, sanded, and then when I was done, I sanded some more. Much was removing whatever that clear finish was under the paint. The rest was re-doing the contours that I messed up by sanding. When I got done, my wife said I looked like Colonel Sanders.  I assure you I am not gray. At all. I did discover a few neat looking features in the grain of this guitar as I sanded. One part looks a lttle "spalted". 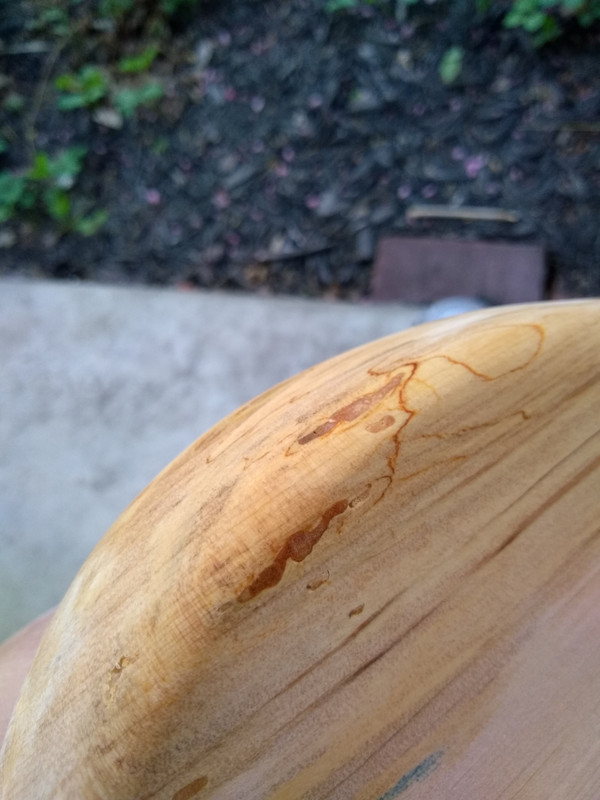 Very cool looking grain on the lower horn as well. 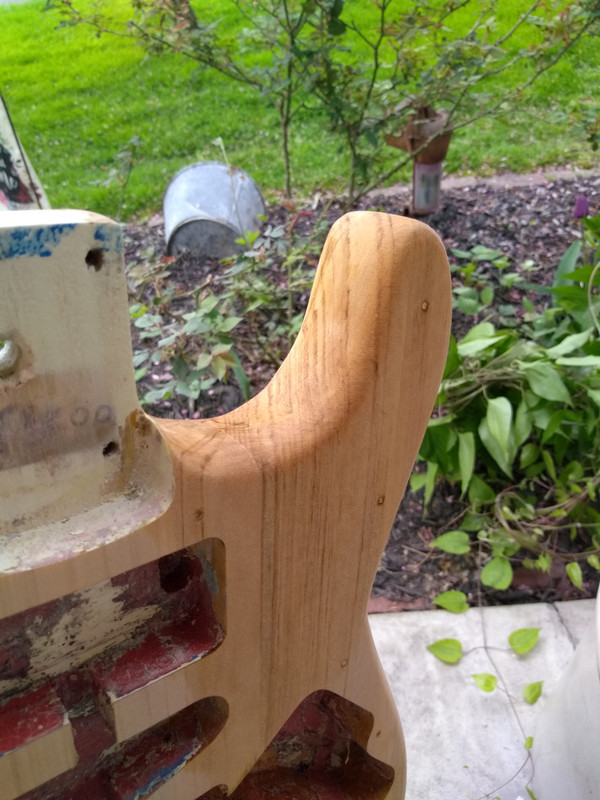 Considering putting a coat of boiled linseed oil on first and letting it dry for a week before shooting it with polyurethane. That would give it the yellowed color I'm after. I used poly on my last one and got good results, and it's pretty easy to work with.  Only thing is, will have to let it set a minimum of a week to make sure the linseed oil is dry. Can't have it off-gassing under the poly. Good part is, since I'm only going for color, one coat should do it. Anyway, here's how she looks after rough sanding and a good wipe-down with denatured alcohol. I think it's going to be awesome when it's done. 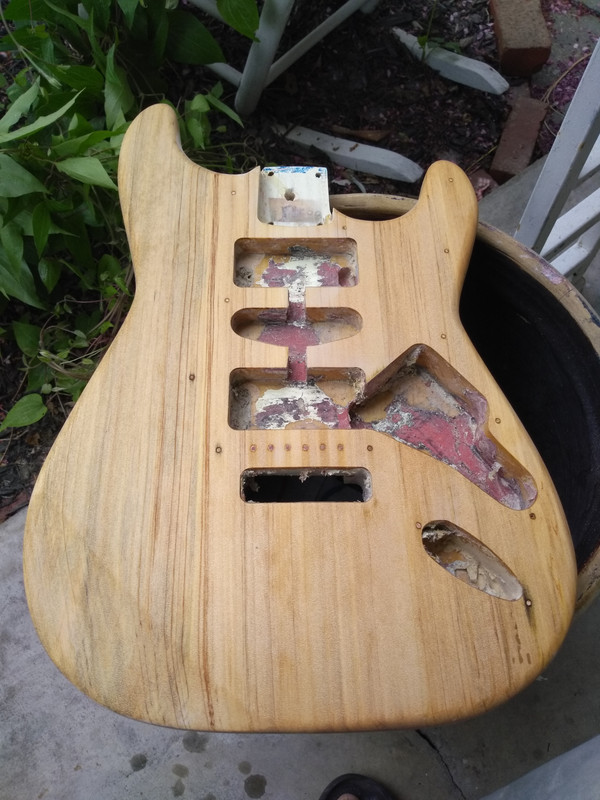
|
|
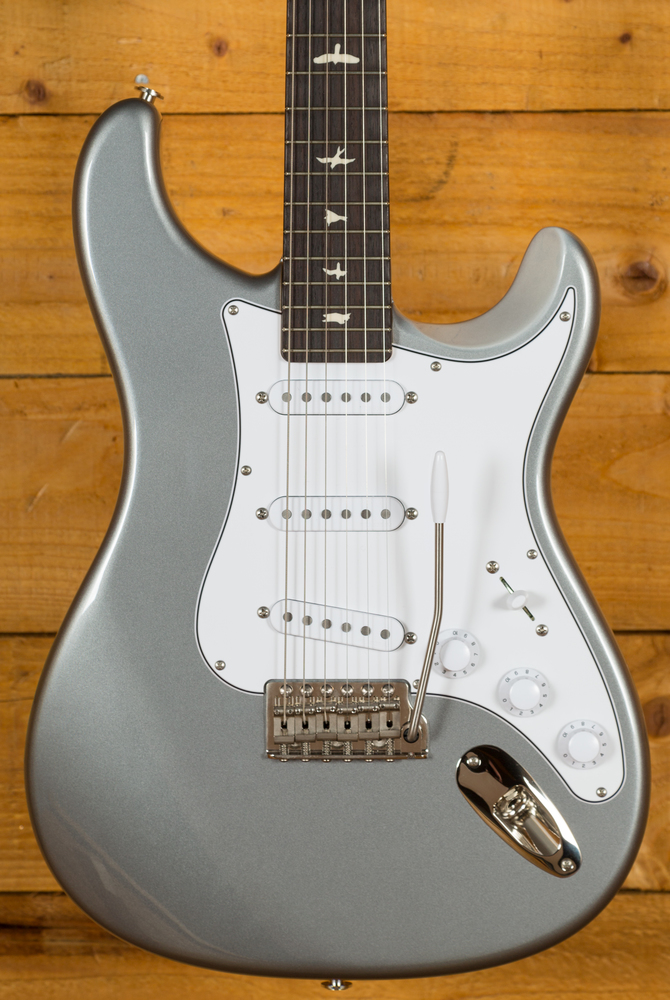
Quoted: You should do the PRS Silver Sky carve in the lower bout while you have it stripped down!  https://peachguitars.2dimg.com/114/_48a3116_4b60c6e55f.jpg Then, I'd have to get a new pickguard...lol. Mixed some mineral spirits and boiled linseed oil and put a thin coat on it. Should dry in 24 hours, and tomorrow I can decide if I want to start shooting polyurethane. The photo makes it look more yellow than what it actually is. It looks really good, though! 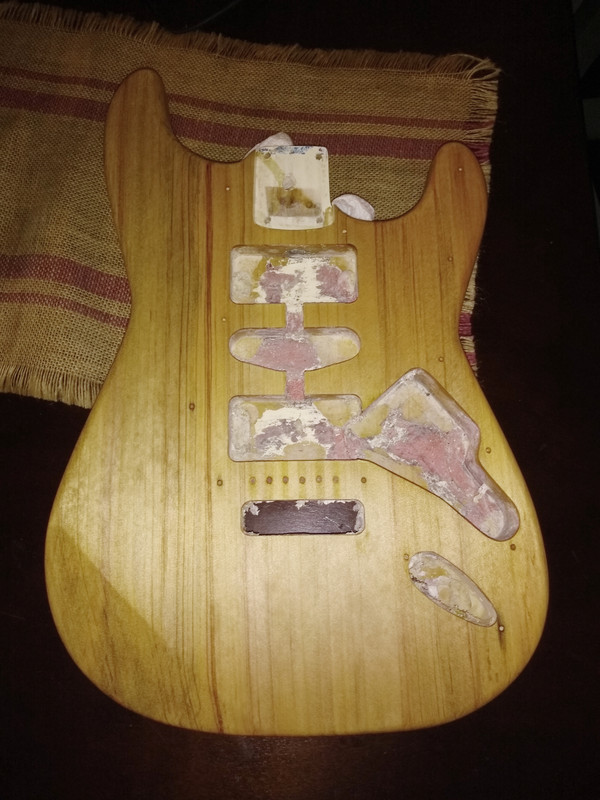 I have enough to keep me busy that I wouldn't have to start finishing until next weekend, but I might go ahead and start putting finish on tomorrow. |
|
Quoted: Very nice results. So glad the cracks turned out to be a non-issue, too. As for new pickguard, can't you just Dremel a new beveled edge onto the shape you desire? i dremeled to shape mine, which burns the edge. Cleaned it up by dragging razor blade across the edge of PG. |
|
Quoted: i dremeled to shape mine, which burns the edge. Cleaned it up by dragging razor blade across the edge of PG. Quoted: Quoted: Very nice results. So glad the cracks turned out to be a non-issue, too. As for new pickguard, can't you just Dremel a new beveled edge onto the shape you desire? i dremeled to shape mine, which burns the edge. Cleaned it up by dragging razor blade across the edge of PG. Bit running too fast? I haven't tried going slower with a Dremel, which seems counter-intuitive to how it works, but I may give it a try. |
|
Quoted: Bit running too fast? I haven't tried going slower with a Dremel, which seems counter-intuitive to how it works, but I may give it a try. I'm thinking he may have used something other than a router bit - like a sanding drum or something maybe. I can't imagine having much of an issue with a dremel router bit. Dremels typically max out around 35k RPM, which is a bit faster than most routers, but the models with any adjustability normally offer at least one speed that would be around 20k RPM (or less), and I make pickguards on a 25k RPM router table. |
|
Quoted: I'm thinking he may have used something other than a router bit - like a sanding drum or something maybe. I can't imagine having much of an issue with a dremel router bit. Dremels typically max out around 35k RPM, which is a bit faster than most routers, but the models with any adjustability normally offer at least one speed that would be around 20k RPM (or less), and I make pickguards on a 25k RPM router table. Quoted: Quoted: Bit running too fast? I haven't tried going slower with a Dremel, which seems counter-intuitive to how it works, but I may give it a try. I'm thinking he may have used something other than a router bit - like a sanding drum or something maybe. I can't imagine having much of an issue with a dremel router bit. Dremels typically max out around 35k RPM, which is a bit faster than most routers, but the models with any adjustability normally offer at least one speed that would be around 20k RPM (or less), and I make pickguards on a 25k RPM router table. Now that i think about it, it was a sanding drum but the razor blade dragging method really cleans up the edge even where i needed to clean up other places cut with the band saw. |