


Armory Sponsor


|
Originally Posted By RLR350:
Originally Posted By stevos758:
Do you have a link for the 200rpm motor you installed for hte case feeder? I also would like to speed mine up. I couldn't find them in stock at the usual places. Here is one on ebay that has the same mounting as the original. 200 rpm identical to 30 rpm Here is one that looks promising, but you would have to redo the mount. 200 rpm geared motor I might try this to vary the speed on the 200 rpm similar to the original. Speed Regulator Since I have the original working I'm going to take more time with a new spinning plate and way to attach it when I get ready to install the faster one. Since you have access to a lathe, did you try machining a 1" diameter (or whatever your deck's hole size is) by ~3/4" long piece of aluminum with a hole down the middle the same size as the motor's arbor. I think attaching it to the motor with a set screw would be easier to align since the piece you start with is already perfectly round and flat. As you probably saw on yours, a slight wobble causes the brass to "trip" entering the plate sometimes when the edge of the spinning plate gets too high or low at the point the brass is sliding on. I found that that making sure the blade stops the brass dead center on the plate makes a big difference. I adjusted this by messing with the distance from center of the bolt on the blades actuating arm. (I made about four of them until I got it right - the other option would have been moving the big motor by drilling larger mounting holes so it could be adjusted.) Looks good so far - good luck. Looking forward to seeing what you come up with. That is what I plan on doing when I get time. Machining a case turning plate. That should take care of the wobble! 
|

|
Nice DIY project! Thanks for sharing.
I've used these $21 PWM (Pulse Width Modulated) DC motor controllers on a couple of projects and they work well for the $. Similar ones are on ebay a little cheaper, but these ship from Canada so they're at your door in 5 days or less. (I have no affiliation with this vendor, just a satisfied customer). http://store.qkits.com/images/MX033b.jpg http://store.qkits.com/category.cfm/DCMOTOR Other DC motor control units: http://store.qkits.com/category.cfm/DCMOTOR There are a ton of cheap DC gear motors on ebay & some surplus sites, so with a spare 12 v. wall wart power supply the whole motor & control system can be acquired inexpensively. - Bob |

|
thanks for the added info. i have been researching cheaper options for the power and variable set ups. this looks promising.
Originally Posted By Bayport_Bob:
Nice DIY project! Thanks for sharing. I've used these $21 PWM (Pulse Width Modulated) DC motor controllers on a couple of projects and they work well for the $. Similar ones are on ebay a little cheaper, but these ship from Canada so they're at your door in 5 days or less. (I have no affiliation with this vendor, just a satisfied customer). http://store.qkits.com/images/MX033b.jpg http://store.qkits.com/category.cfm/DCMOTOR Other DC motor control units: http://store.qkits.com/category.cfm/DCMOTOR There are a ton of cheap DC gear motors on ebay & some surplus sites, so with a spare 12 v. wall wart power supply the whole motor & control system can be acquired inexpensively. - Bob |

|
Bayport_Bob: So you think something as simple as this 12 volt power supply connected to two of the controllers you posted (one for each motor) would suffice? If so that brings down the cost of making one and seems like it would give more individual control over each motor independently.
I ordered one of the controllers and it will fit right in without any changes to the face plate I have made. I'll post back when it's installed. |
|
Originally Posted By RLR350:
Bayport_Bob: So you think something as simple as this 12 volt power supply connected to two of the controllers you posted (one for each motor) would suffice? If so that brings down the cost of making one and seems like it would give more individual control over each motor independently. I ordered one of the controllers and it will fit right in without any changes to the face plate I have made. I'll post back when it's installed. I don't see the current specs on the laptop power supply in your link. As long as your motor's current draw is within the range of the power supply, then you're golden. I looked at my laptop PS & it will put out ~1.5 amps, so the one you linked should be enough for a small Dayton 2L009 DC gear motor (1.4 amps). The nice feature of the PWM controller there's not much of a drop in torque at low rpm's when compared to using a resistor based "throttle". The controller has a very smooth 0-100% power band on the gear motors I've used them on (1/10 hp,180 rpm, 5 amp, 45 in-lb torque motors - much bigger than needed for the annealing project). |

|
Originally Posted By BIGGDAWG:
Thought i would share another video of mine in action. i just did 300 7.62x40wt brass tonight in 20 or so minutes. then new faster case spin motor is working good.  http://youtu.be/vMdlGquhJR8 http://youtu.be/vMdlGquhJR8Thats Sweeeeet!! way to go! 
|
|
I also ordered a couple pulse width modulators to try out too along with a 10 buck power supply i will let you all know how they work then i will get the part numbers and places to get them posted.
if you haven't figured it out yet my projects are always evolving and i really appreciate the input we are getting from others so we can make our projects better. |
|
That case spin motor is working great - fast. It doesn't look like you have a problem with the case trying to spin off. Nice work.
I've been working on a case feeder trying to use the Lee collater as the base while I'm waiting for the PWM and faster motor to arrive. You make some neat stuff. I ran across a thread in another forum with some of the other things you have made. Quite creative. |
|
Originally Posted By RLR350:
That case spin motor is working great - fast. It doesn't look like you have a problem with the case trying to spin off. Nice work. I've been working on a case feeder trying to use the Lee collater as the base while I'm waiting for the PWM and faster motor to arrive. You make some neat stuff. I ran across a thread in another forum with some of the other things you have made. Quite creative. thanks for the compliments. setting up the case spin is quite tedious -- lots of tweaking and what i have found is if your case head has a bur or anything on it it will want to walk off. so i say it runs 99% now. funny thing is i had to reset between 223 and x40 and they use the same case -- had to tweak it a little. didn't try 223 after set for x40 it may be ok i think the added weight or height had something to do with it. The lee collator sounds like a good idea. i will be doing 1000 308 cases later in the week when i get the rest of the brass prep done on them |

| Just thinking out loud here, but what if you made the spinning disk that the brass sits on to get annealed drop down from the plate 1/2" or so? That way it kind of self centers and then gets moved to the drop hole? You could make an 1/2" hole for it to drop down into, spin, and get annealed. Of course you would have to drop the torches down a little from where they are now. |
|
Originally Posted By BadLuther:
Just thinking out loud here, but what if you made the spinning disk that the brass sits on to get annealed drop down from the plate 1/2" or so? That way it kind of self centers and then gets moved to the drop hole? You could make an 1/2" hole for it to drop down into, spin, and get annealed. Of course you would have to drop the torches down a little from where they are now. Hmmmm.... I may have to give this a try. I might whip up some parts when I get time next week. I think even just a 1/4 hole in the case turning plate would be sufficient. Wait... the cases would be stuck in there and the case holder plate would get jammed up. unless you just made a very shallow cut and beveled the edges. That might work. I am talking just enough to help center the case. |
|
Originally Posted By stevos758:
Originally Posted By BadLuther:
Just thinking out loud here, but what if you made the spinning disk that the brass sits on to get annealed drop down from the plate 1/2" or so? That way it kind of self centers and then gets moved to the drop hole? You could make an 1/2" hole for it to drop down into, spin, and get annealed. Of course you would have to drop the torches down a little from where they are now. Hmmmm.... I may have to give this a try. I might whip up some parts when I get time next week. I think even just a 1/4 hole in the case turning plate would be sufficient. Wait... the cases would be stuck in there and the case holder plate would get jammed up. unless you just made a very shallow cut and beveled the edges. That might work. I am talking just enough to help center the case. Steve, here is my idea and i am going to work on it next week. take and cut a circle the same size as the inner diameter of the sawblade wheel then cut notches to match up with the holes in the plate, cut this out of like 16 gauge steel, then after getting everything lined up and putting 3 or so screws to hold it down (with slots in the new plate where these screws hold it down) now drill out the center hole so it isn't held down by the bolt holding the plate down. so now you have an adjustable plate on top of your blade that you can very the opening for the cases. What do you guys think of this? it will work better for the guys not running a case feed. i may have a few issues to work through with the case feed. then you can make the opening smaller to hold the case and it can be adjusted when you change case sizes. |
|
Originally Posted By stevos758: You make the spinning plate on the same level as the hole that the brass drops through to your water (or box). It does the same thing it does now, just the spinning plate and hole through the plate are both lower than the top alum (or wood) plate that the rest of the brass is sliding on. Apologies if I am not making a lot of sense, only got about 4 hours of sleep last night.Originally Posted By BadLuther: Just thinking out loud here, but what if you made the spinning disk that the brass sits on to get annealed drop down from the plate 1/2" or so? That way it kind of self centers and then gets moved to the drop hole? You could make an 1/2" hole for it to drop down into, spin, and get annealed. Of course you would have to drop the torches down a little from where they are now. Hmmmm.... I may have to give this a try. I might whip up some parts when I get time next week. I think even just a 1/4 hole in the case turning plate would be sufficient. Wait... the cases would be stuck in there and the case holder plate would get jammed up. unless you just made a very shallow cut and beveled the edges. That might work. I am talking just enough to help center the case. |
|
Originally Posted By BIGGDAWG:
Originally Posted By stevos758:
Originally Posted By BadLuther:
Just thinking out loud here, but what if you made the spinning disk that the brass sits on to get annealed drop down from the plate 1/2" or so? That way it kind of self centers and then gets moved to the drop hole? You could make an 1/2" hole for it to drop down into, spin, and get annealed. Of course you would have to drop the torches down a little from where they are now. Hmmmm.... I may have to give this a try. I might whip up some parts when I get time next week. I think even just a 1/4 hole in the case turning plate would be sufficient. Wait... the cases would be stuck in there and the case holder plate would get jammed up. unless you just made a very shallow cut and beveled the edges. That might work. I am talking just enough to help center the case. Steve, here is my idea and i am going to work on it next week. take and cut a circle the same size as the inner diameter of the sawblade wheel then cut notches to match up with the holes in the plate, cut this out of like 16 gauge steel, then after getting everything lined up and putting 3 or so screws to hold it down (with slots in the new plate where these screws hold it down) now drill out the center hole so it isn't held down by the bolt holding the plate down. so now you have an adjustable plate on top of your blade that you can very the opening for the cases. What do you guys think of this? it will work better for the guys not running a case feed. i may have a few issues to work through with the case feed. then you can make the opening smaller to hold the case and it can be adjusted when you change case sizes. Sounds good! Can't wait to see it in action. |
|
Originally Posted By BadLuther:
Originally Posted By stevos758:
You make the spinning plate on the same level as the hole that the brass drops through to your water (or box). It does the same thing it does now, just the spinning plate and hole through the plate are both lower than the top alum (or wood) plate that the rest of the brass is sliding on. Apologies if I am not making a lot of sense, only got about 4 hours of sleep last night.
Originally Posted By BadLuther:
Just thinking out loud here, but what if you made the spinning disk that the brass sits on to get annealed drop down from the plate 1/2" or so? That way it kind of self centers and then gets moved to the drop hole? You could make an 1/2" hole for it to drop down into, spin, and get annealed. Of course you would have to drop the torches down a little from where they are now. Hmmmm.... I may have to give this a try. I might whip up some parts when I get time next week. I think even just a 1/4 hole in the case turning plate would be sufficient. Wait... the cases would be stuck in there and the case holder plate would get jammed up. unless you just made a very shallow cut and beveled the edges. That might work. I am talking just enough to help center the case. I am confused. I need a MS paint image!
|
Well, I spent the last couple nights working on the case feeder - again, no welding. I got everything below the feeder itself working; the actuator arm, door opening, etc. I should have the Lee collater Friday which is the final step. Here is a picture of one of the arms I made for the door (I guess the catch area where it drops into the blade). I used two of them. One for the stationary back half and one for the moving door. I'll let you use your imagination for a day or two until it's complete.
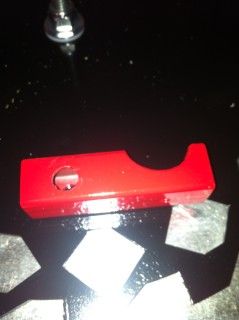
|
|
Originally Posted By RLR350:
Well, I spent the last couple nights working on the case feeder - again, no welding. I got everything below the feeder itself working; the actuator arm, door opening, etc. I should have the Lee collater Friday which is the final step. Here is a picture of one of the arms I made for the door (I guess the catch area where it drops into the blade). I used two of them. One for the stationary back half and one for the moving door. I'll let you use your imagination for a day or two until it's complete. http://i369.photobucket.com/albums/oo134/rlr350/feederarm_zps2cde40b9.jpg that is great can't wait to see the pics of everything complete. |
This is where I am. Everything is working so far. The next step is to mount two floor plates; one on top of the upper catch arm and one on top of the white blocks. Then I have to figure out how to mount the Lee case feed tube.


Here is how I did the lower portion of the feeder. It took some work, but it works great. 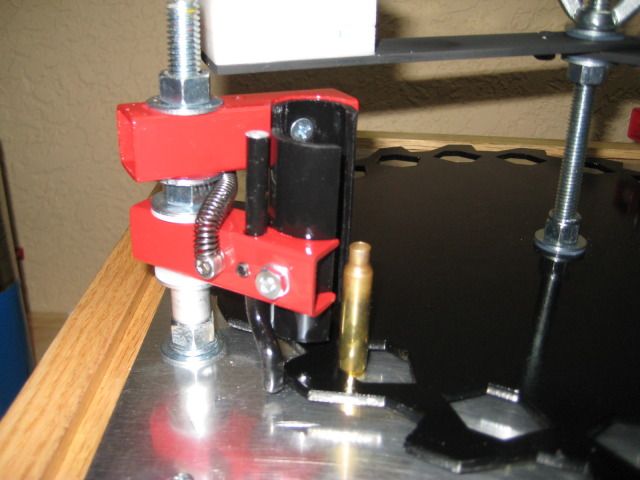
Here is where I am going with it. 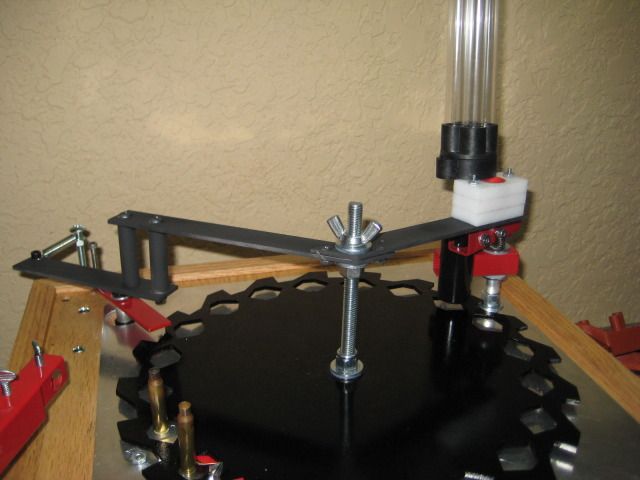
ETA: Changed video |
|
Originally Posted By RLR350: This is where I am. Everything is working so far. The next step is to mount two floor plates; one on top of the upper catch arm and one on top of the white blocks. Then I have to figure out how to mount the Lee case feed tube. The video will feed one case at about 18 seconds to give an idea of how it is working. http://www.youtube.com/watch?v=eT2XKDSXWCQhttp://i369.photobucket.com/albums/oo134/rlr350/IMG_0734_zpsb2fd8e74.jpg Here is how I did the lower portion of the feeder. It took some work, but it works great. http://i369.photobucket.com/albums/oo134/rlr350/IMG_0733_zpsc297d7a6.jpg Here is where I am going with it. http://i369.photobucket.com/albums/oo134/rlr350/IMG_0730_zps561c9d0a.jpg Nice work! I need to get mine up and running... |
|
Originally Posted By RLR350:
This is where I am. Everything is working so far. The next step is to mount two floor plates; one on top of the upper catch arm and one on top of the white blocks. Then I have to figure out how to mount the Lee case feed tube. The video will feed one case at about 18 seconds to give an idea of how it is working. http://www.youtube.com/watch?v=eT2XKDSXWCQ
http://i369.photobucket.com/albums/oo134/rlr350/IMG_0734_zpsb2fd8e74.jpg Here is how I did the lower portion of the feeder. It took some work, but it works great. http://i369.photobucket.com/albums/oo134/rlr350/IMG_0733_zpsc297d7a6.jpg Here is where I am going with it. http://i369.photobucket.com/albums/oo134/rlr350/IMG_0730_zps561c9d0a.jpg that turned out great. excellent work thanks for sharing |
|
Originally Posted By stevos758:
How far down would you say you are letting your 450 templaq melt on your 308 cases? I am thinking of moving out of the test phase finally and doing some real cases. steve, i haven't used the 450 yet i just use 750 on the inside of the neck. when it melts i have it advance. been meaning to get some 450 and probably will with the next midway order. but mine is doing 3-3.5 seconds on 223 cases. i plan on running 308 tomorrow or thursday. got my pwm modules and have to get them wired up first. |
How about this to stop the case from wandering:

simple with your existing design, just change the angle of your caseturner, this will push your case always into the V, just play with the angle, as you dont want your case to flip over when you move it out of the flame and from the caseturner, and too much angle wont make your cases turn reliable |
|
sid_79: I just tried it by pulling the motor a little forward to create a slight angle as your described. (Thanks for putting the time into the diagram). It seems to help with the little movement I could do and I will definitely try adding a slight angle to the entire motor when I install the 200 rpm. It seems to help with feeding the cases onto the disk without tripping, too. Thanks for the tip - no pun intended.
BIGGDAWG: The Lee collater is working amazing. I have to pay more attention to the operation since each tube only holds about 10-12 cases (40-50 with all tubes loaded), but it is a cheap alternative to a powered case feeder. The only thing that needs to be done is make the feeding of 223 cases into the tubes a little easier/quicker, but I remember Gwhis did a tutorial on that using light fixture crating that I'll try. Also, the PWM's do exactly what we talked about. I can set the power supply to 12 volts and run each motor independently from 0 - max. |
|
Originally Posted By RLR350:
Also, the PWM's do exactly what we talked about. I can set the power supply to 12 volts and run each motor independently from 0 - max. I'm glad the PWM controllers worked out. I'll be planning a build next year sometime & controlling the various motors inexpensively will make the process a lot easier to dial in and keep the budget reasonable. Thanks again for putting together such a detailed thread. Happy holidays - Bob |
|
They worked out great. Thanks for the tip. I am still using the variable power supply, but I think your idea of a simple 12v supply would work good - less stuff. Here are the pictures of the wiring and face plate. I decided to use a switch block that I had. The power supply is going in to the top two contacts of the block then out to the individual switches and pwms. One pwm +/- goes out to the middle two contacts on the block and the other pwm +/- goes to the bottom two contacts. From there they go to the individual motors.
(The face plate is just painted lexan cut and drilled to the dimensions I needed.) 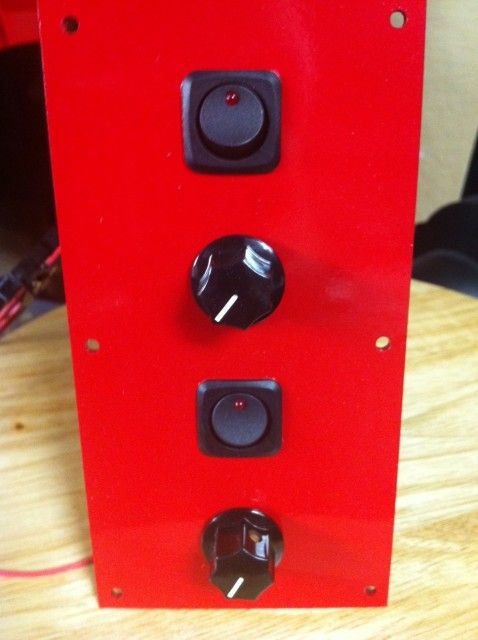 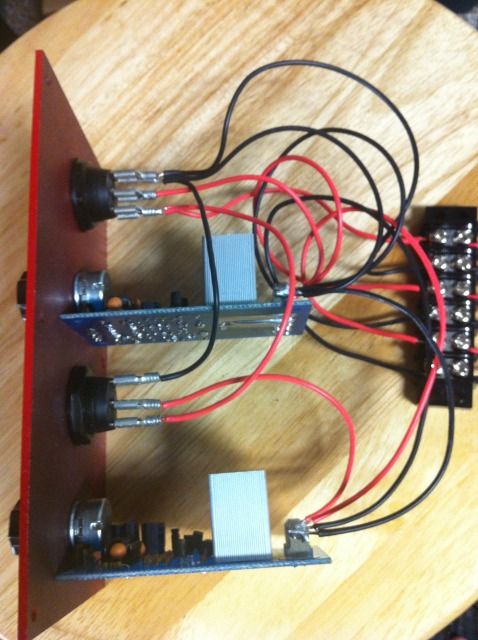
|
|
Great work guys.
i just installed my pwm's tonight. i set my voltage at 14 volts and did some playing around with it and i like it. i have a 14v 3 amp computer monitor power supply ordered that i am going to try if it works i will post up all the part numbers and prices. it will be cheaper or about the same as using the fancy power supply but you can control them independently. I used pwm's that had a remote mount so i had more versatility. here are a few pics not near as nice of a wiring job as you RLR350 but it is working started getting it set up for 308 and it looks like 3.6-3.9 seconds to do a 308 case. 

|
|
Sid_79 excellent idea. i have mine working pretty good but i am going to build another one after i have all the bugs worked out of this one.
i will try your idea on that one. i am also working on a plate to put on top of the blade that is adjustable and that we can vary the opening where the cases sit that would hold the cases in place also. the only issue i see with that method is with my case feeder and the cases dropping and hitting a smaller hole. we will see that is the fun of building things. Originally Posted By sid_79:
How about this to stop the case from wandering: http://up.picr.de/12776093su.jpg simple with your existing design, just change the angle of your caseturner, this will push your case always into the V, just play with the angle, as you dont want your case to flip over when you move it out of the flame and from the caseturner, and too much angle wont make your cases turn reliable |

|
Originally Posted By rcav8r:
Question: with the case spinner, do you guys really think that a 2 flame setup is necessary anymore? with the case spin you could get away with one torch in my opinion, the 2nd torch just speeds the process up |
|
Originally Posted By BIGGDAWG:
Originally Posted By rcav8r:
Question: with the case spinner, do you guys really think that a 2 flame setup is necessary anymore? with the case spin you could get away with one torch in my opinion, the 2nd torch just speeds the process up I am thinking of trying one torch next time around. |
|
That case spin looks like its working great! What did you use for the spinning platform and how did you attach it so there isn't any wobble or spinning off?
I think one torch would work, too. It might even be better with that motor since the case would need to sit longer and it would allow more revolutions in the flame. |
|
Originally Posted By RLR350:
That case spin looks like its working great! What did you use for the spinning platform and how did you attach it so there isn't any wobble or spinning off? I think one torch would work, too. It might even be better with that motor since the case would need to sit longer and it would allow more revolutions in the flame. If you are talking to me, I used a piece of scrap metal I had laying around. I welded it onto a bolt I had drilled out and tapped with a setscrew to attach to the shaft. I had to face it in the lathe to get rid of my wobble. I think that is why mine works so well. I have noit tried the faster case spinning motor yet. |
|
Originally Posted By BIGGDAWG:
here is a video of my first batch of 308. i am getting a few cases walking with the case spin. it needs a little more tweeking but hopefully i will have my solution done after christmas. i did 300 cases in 25 minutes  http://youtu.be/Gv2H56H4skY http://youtu.be/Gv2H56H4skYLooks like you are running at almost the exact speed I am. What is your speed controller set at? |
|
Originally Posted By stevos758:
Originally Posted By BIGGDAWG:
here is a video of my first batch of 308. i am getting a few cases walking with the case spin. it needs a little more tweeking but hopefully i will have my solution done after christmas. i did 300 cases in 25 minutes http://youtu.be/Gv2H56H4skYLooks like you are running at almost the exact speed I am. What is your speed controller set at? there is no read out on my speed controllers but they are both at about half way. and yes i think we are pretty close on speed wish i had a small lathe it would make some of this so much easier. |
|
Originally Posted By stevos758:
Originally Posted By RLR350:
That case spin looks like its working great! What did you use for the spinning platform and how did you attach it so there isn't any wobble or spinning off? I think one torch would work, too. It might even be better with that motor since the case would need to sit longer and it would allow more revolutions in the flame. If you are talking to me, I used a piece of scrap metal I had laying around. I welded it onto a bolt I had drilled out and tapped with a setscrew to attach to the shaft. I had to face it in the lathe to get rid of my wobble. I think that is why mine works so well. I have noit tried the faster case spinning motor yet. Looks like it worked out well for you. I re did mine when I swapped to the faster motor. I don't have a lathe, so I used a .45 case gage for the spinner base and mounted the motor to a piece of flat aluminum so it is sturdier/flatter/level. I also drilled a one inch hole (the diameter of the case gage) in the deck and left it 3/4 round before the drop hole so it acts as a guide for the spinner. With the plastic piece to keep the case near center on the spinner the motor can run almost top speed before the cases try to walk off. ETA: Moved pictures to next post. |
|
I think I am finally done. I changed from the variable power supply to a 12v/5 amp supply that had a cigarette lighter type plug on it. I cut the plug off, hooked it into the power bar and it works. Here is a video overview of the final product doing some annealing.
The whole thing. I added a temporary paper funnel and center post to the collater to get the .233 cases to feed more reliably. Seems to work, although there is the occasional upside down one. 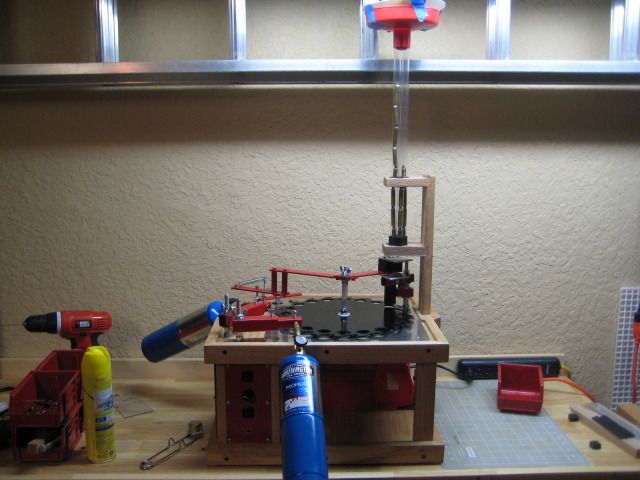
A top view of the feeder stand. 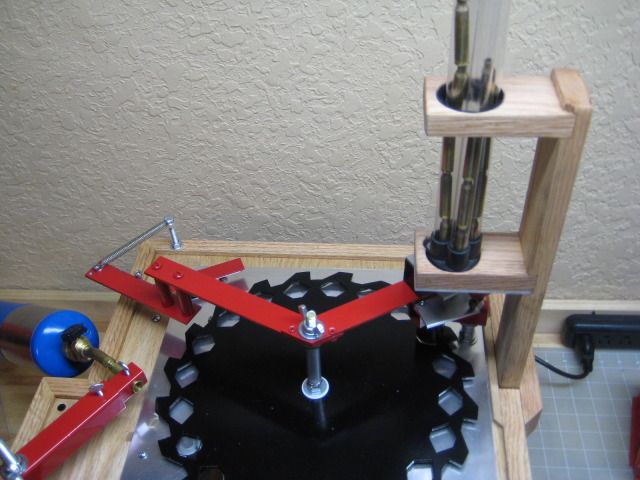
A side view of the feeder stand with it's height adjuster in case I do taller brass like .308. 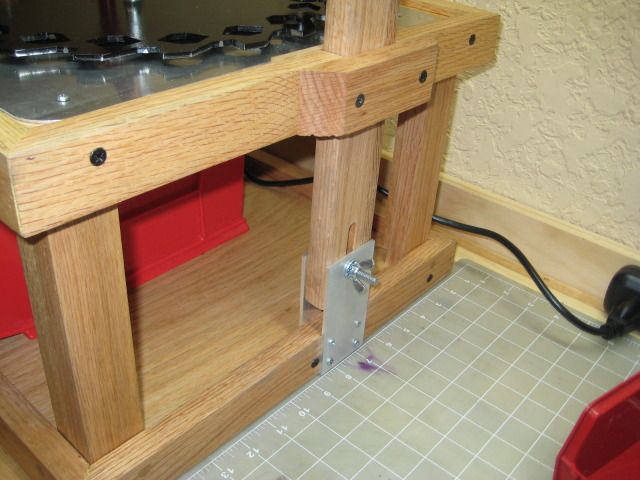
The outside of the electrical box. 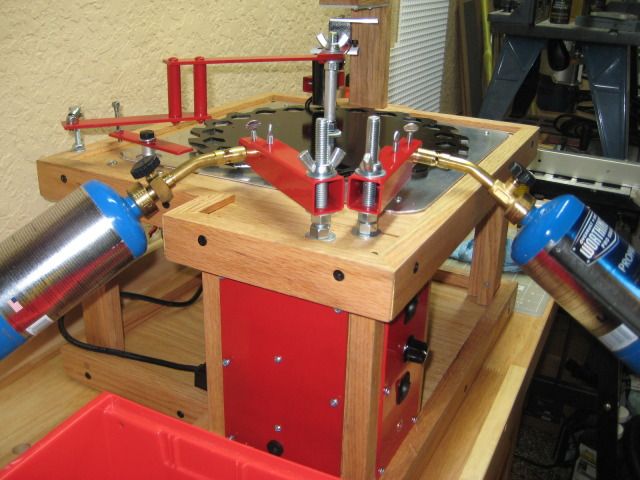
Inside the electrical box. Two switches, two PWM's and the 12v/5 amp power supply (held in place with a spring) all attached to the bar. It looks more complicated than it is. 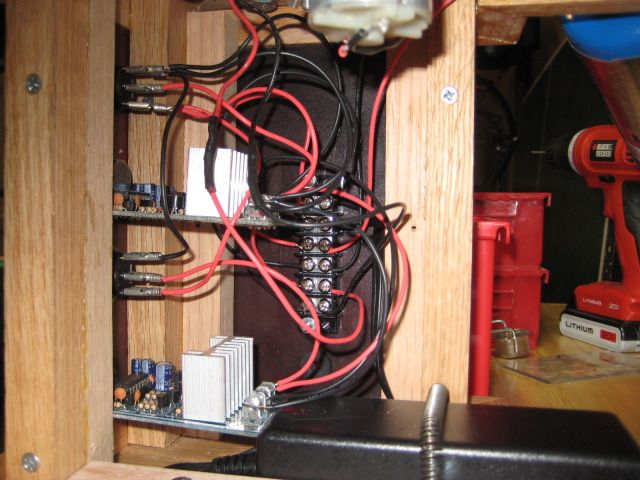
The motor mounts and bearing. I changed the cut out design in the aluminum decking for the spinner and drop hole. The motor mounted on the aluminum plate makes it sturdier and easy to adjust. 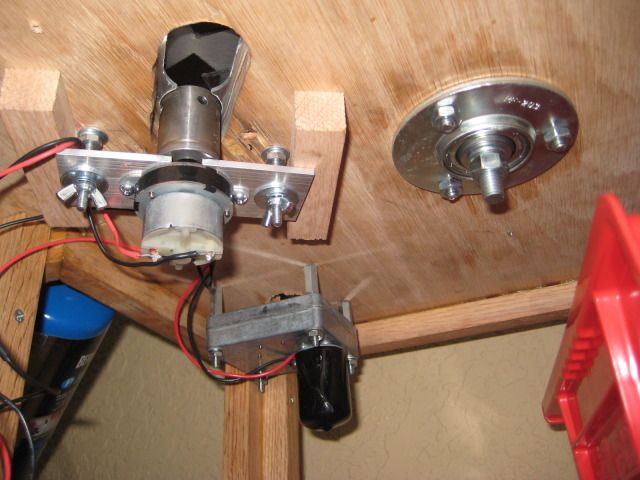
Top view of spinner (.45 case gage) and cut out. The clear plastic piece keeps the cases from spinning off. 
and a close up of the feeder. 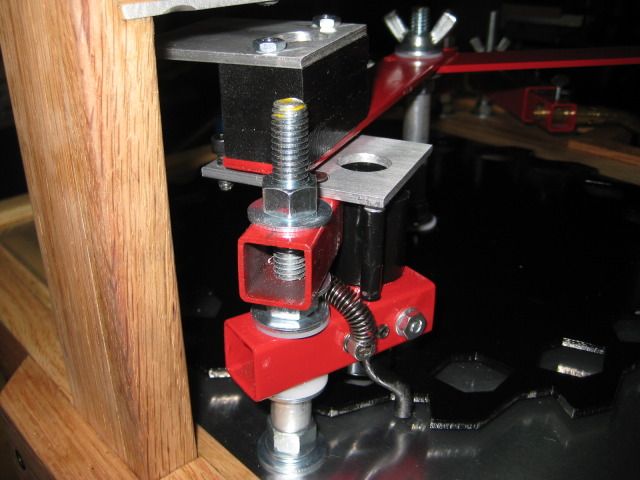
|
|
Originally Posted By BIGGDAWG:
here is a video of my first batch of 308. i am getting a few cases walking with the case spin. it needs a little more tweeking but hopefully i will have my solution done after christmas. i did 300 cases in 25 minutes http://youtu.be/Gv2H56H4skYIn your video I took notice of this statement: "The necks of my cases aren't discoloring like normal annealing" I experienced the same thing. Trying to get them to "look" like military cases was clearly overheating them. I went back and re read this 6mmbr.com and noticed this statement: "Do not expect that the color will be as dark as it appears on military cases. This darkness of the color on military cases occurs over a period of time, as do the delicate reds and purples around the dark color. If you leave one of your cases sitting out for a few months, it will begin to take on the same appearance that military cases have." I experimented with some polished brass and not polished brass. I used 475 tempilaq on the exterior and 650 inside the neck (.223). The 650 is useless because it burns immediately. Anyway, the method you used seemed best. Just before a tint of orange and back off. Polished brass was the easiest to see the results. The colored ring travels down the neck and stops just above where the 475 starts to melt. The cases look proper to my untrained eye and using the vise grip flex test. The colored ring is clear and consistent on the polished cases. On the unpolished cases, I'm sure the actual result was the same, but visually it was harder to read. So, my method will be to polish cases before annealing just because they are easier to read and look better - even though unpolished actually have the same effect. I also retrieved some .308 and 30-06 brass during my last range trip. I opened up all of the drop holes on the feeder to .5". After that, with a simple height adjustment to the feed tower and torches based on the case height, the annealer handled all three (.223, 308 and 30-06). The heavier cases do better on the spinner, too. No adjustment to the spinner was needed. |

|
Originally Posted By RLR350:
Originally Posted By BIGGDAWG:
here is a video of my first batch of 308. i am getting a few cases walking with the case spin. it needs a little more tweeking but hopefully i will have my solution done after christmas. i did 300 cases in 25 minutes http://youtu.be/Gv2H56H4skYIn your video I took notice of this statement: "The necks of my cases aren't discoloring like normal annealing" I experienced the same thing. Trying to get them to "look" like military cases was clearly overheating them. I went back and re read this 6mmbr.com and noticed this statement: "Do not expect that the color will be as dark as it appears on military cases. This darkness of the color on military cases occurs over a period of time, as do the delicate reds and purples around the dark color. If you leave one of your cases sitting out for a few months, it will begin to take on the same appearance that military cases have." I experimented with some polished brass and not polished brass. I used 475 tempilaq on the exterior and 650 inside the neck (.223). The 650 is useless because it burns immediately. Anyway, the method you used seemed best. Just before a tint of orange and back off. Polished brass was the easiest to see the results. The colored ring travels down the neck and stops just above where the 475 starts to melt. The cases look proper to my untrained eye and using the vise grip flex test. The colored ring is clear and consistent on the polished cases. On the unpolished cases, I'm sure the actual result was the same, but visually it was harder to read. So, my method will be to polish cases before annealing just because they are easier to read and look better - even though unpolished actually have the same effect. I also retrieved some .308 and 30-06 brass during my last range trip. I opened up all of the drop holes on the feeder to .5". After that, with a simple height adjustment to the feed tower and torches based on the case height, the annealer handled all three (.223, 308 and 30-06). The heavier cases do better on the spinner, too. No adjustment to the spinner was needed. Great info, it is basically what i had found. glad you took the time to write it up. i will be doing a batch of 308 tomorrow and probably a few of my 6.5pcc. i am not going to tumble them after annealing to see what happens. |
|
Originally Posted By BIGGDAWG:
here is a video of my first batch of 308. i am getting a few cases walking with the case spin. it needs a little more tweeking but hopefully i will have my solution done after christmas. i did 300 cases in 25 minutes http://youtu.be/Gv2H56H4skYBring your flame down to the center of the shoulder instead of the center of the case neck, that will allow the shoulder to get up to temp without over heating the necks. The way you have it now(or from the looks of it) your probably not getting the shoulder area hot enough before the necks start to glow. |
|
Originally Posted By RLR350:
Here is a photo of polished vs. not polished cases. Both were annealed exactly the same, but the ones polished prior to annealing are easier to read/see the result. .http://i369.photobucket.com/albums/oo134/rlr350/IMG_0768_zps54442354.jpg The color of your cases looks perfect, that is exactly what you want them to look like. EWP |
|
Originally Posted By EWP:
Originally Posted By BIGGDAWG:
here is a video of my first batch of 308. i am getting a few cases walking with the case spin. it needs a little more tweeking but hopefully i will have my solution done after christmas. i did 300 cases in 25 minutes http://youtu.be/Gv2H56H4skYBring your flame down to the center of the shoulder instead of the center of the case neck, that will allow the shoulder to get up to temp without over heating the necks. The way you have it now(or from the looks of it) your probably not getting the shoulder area hot enough before the necks start to glow. Thanks EWP i wasn't sure how hot i should get the shoulders i thought the neck was the important part. i will try that on my next batch tomorrow. |
|
Originally Posted By EWP:
Originally Posted By BIGGDAWG:
here is a video of my first batch of 308. i am getting a few cases walking with the case spin. it needs a little more tweeking but hopefully i will have my solution done after christmas. i did 300 cases in 25 minutes http://youtu.be/Gv2H56H4skYBring your flame down to the center of the shoulder instead of the center of the case neck, that will allow the shoulder to get up to temp without over heating the necks. The way you have it now(or from the looks of it) your probably not getting the shoulder area hot enough before the necks start to glow. I did as you said to do and lowered the flame a little so it was at the neck shoulder junction and it worked a lot better. thanks for the input. |
Armory Sponsor
Join the Community
Your next conversation starts here.
Create your free account to join discussions, share your experience, save topics, and connect with the AR15.COM community.
- Join discussions
- Follow topics and replies
- Connect with fellow enthusiasts
Already a member? Sign in
Stay informed by subscribing to our Newsletter