AL, USA
|
[#1]
Originally Posted By 101ABN327:
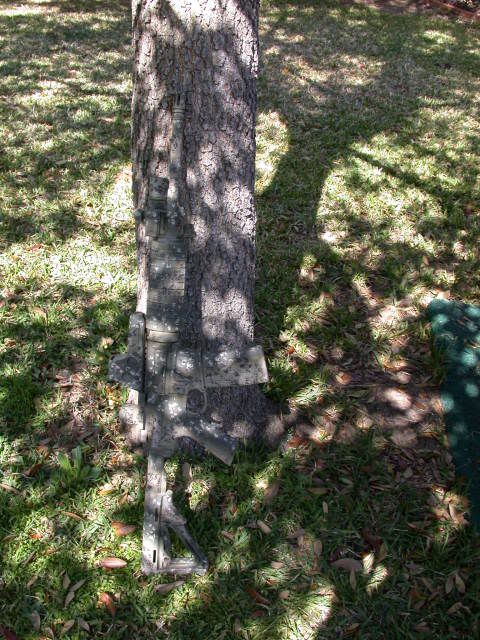
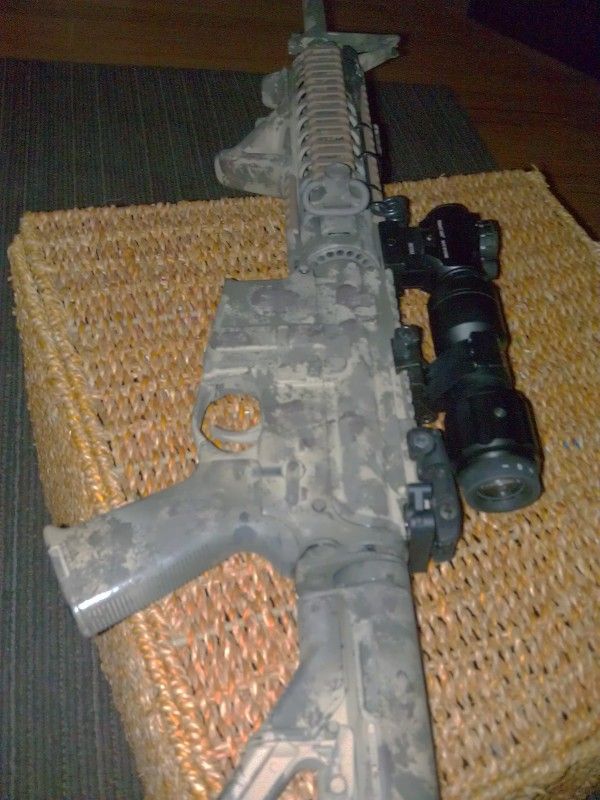
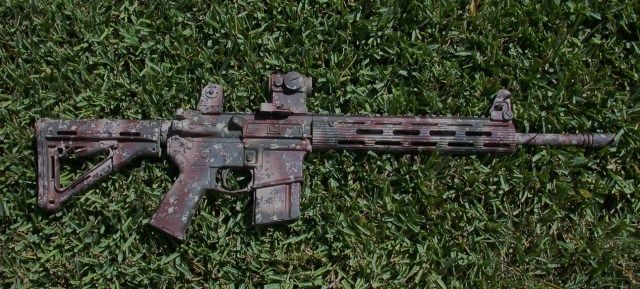
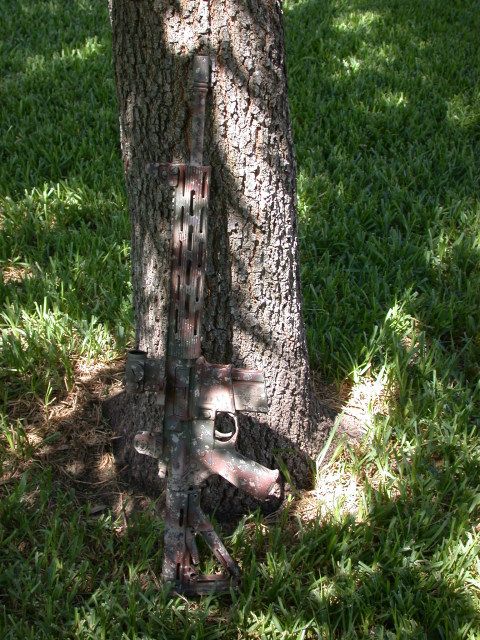
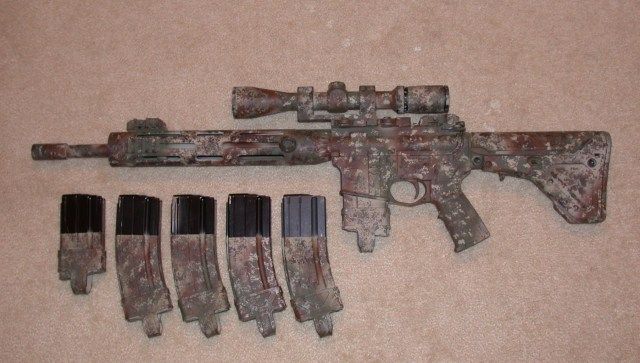
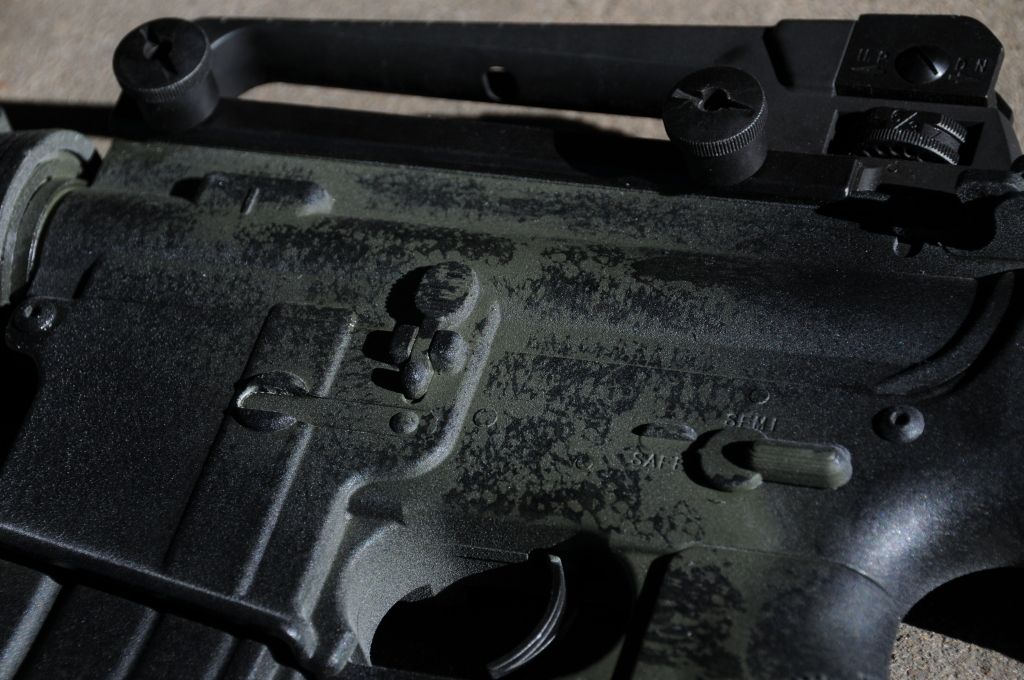
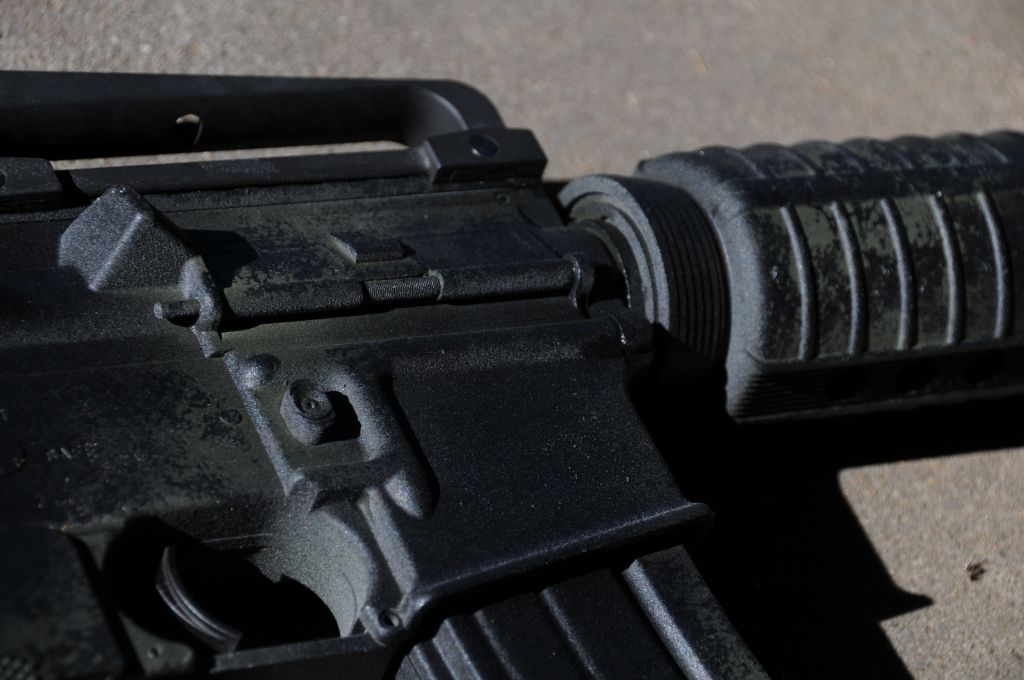
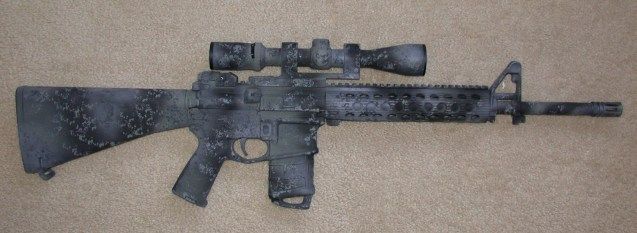
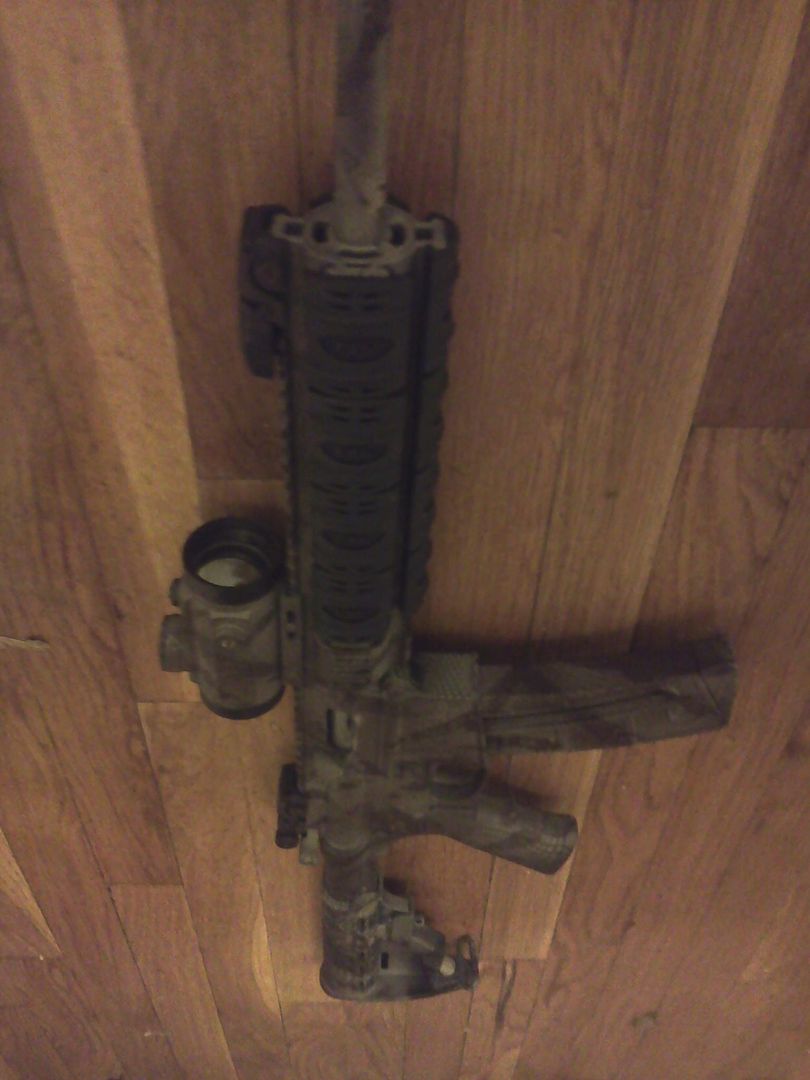
Here is a shot of my SPR project. Used the sponge technique and looks good. Now for some glass to finish it... 101 http://www.hunt101.com/data/500/medium/100_0438.JPG Very nice job. I like the colors and the way you blended them. |
|
|
|
[#2]
Mmmm...do I detect a hint of Rhodesian coloration therein?
|
|
|
VA, USA
|
[#3]
looks like my Mossberg is getting painted.. nice post OP
|
|
|
|
[#4]
Originally Posted By LJM:
Mmmm...do I detect a hint of Rhodesian coloration therein? Good eye... |
|
|
|
TN, USA
|
[Last Edit: TreyStrumsStrings]
[#5]
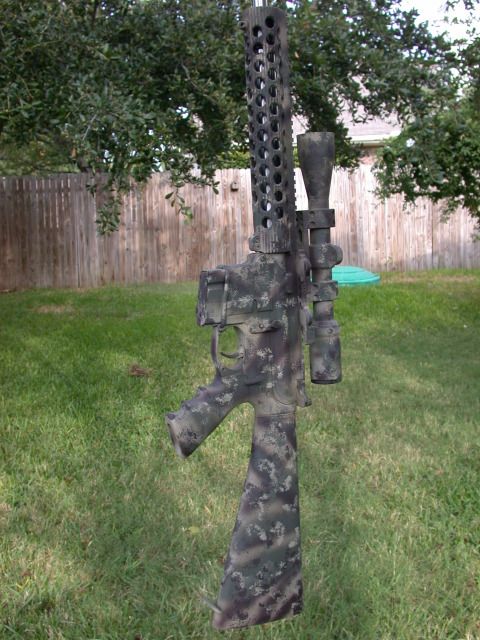
Hi guys! I thought I'd register and show you all what I was able to do with this technique with my M4 AEG. Not sure if you all mind that it's airsoft or not, but, here it is: [link removed]
The pictures are a bit hard to make out, for which I do apologize. You can get the basic jist of the paint scheme although. If anyone would like me to try and get a better shot, I'd be glad to try my luck with it out in some natural light. In order to make up for my crappy video, I made a quite more substantial one; the sun decided to pop out for a few, so I grabbed my gun and my DSLR and went outside to get some shots! Here's the link for the new video: http://www.youtube.com/watch?v=lj_KMR6a5q0 As far as paint goes, it was a black base with OD stripes, followed up with a lighter shade of green for "sponging". Then, layers of brown and OD sponging were applied as well. To finish it all off, I went back in with black sponging in areas where I went a bit heavy on the other colors, and now the entire gun looks great. The camo is really subtle, and it's hard for me to even tell where I striped it originally. Overall; great paint method, really easy and cheap, quick to do. |
|
|
ND, USA
|
[#6]
Great job on that AEG man. I like it.

|
|
|
TN, USA
|
[#7]
Originally Posted By Supergyro:
Great job on that AEG man. I like it. Thanks! |
|
|
|
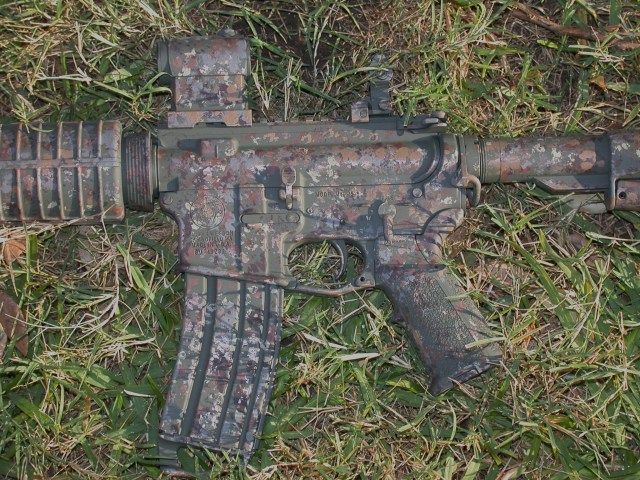
[#8]
jrn156, you are an F'ng genius. I have always been scared to rattle can a rifle. I've done furniture in the past, but nothing more. Your idea is incredibly easy and yields great results. A big thank you is warranted.
Krylon Khaki base with OD stripes and khaki, OD and brown earth sponging. I am quite happy with my first attempt. 

|
|
|
|
FL, USA
|
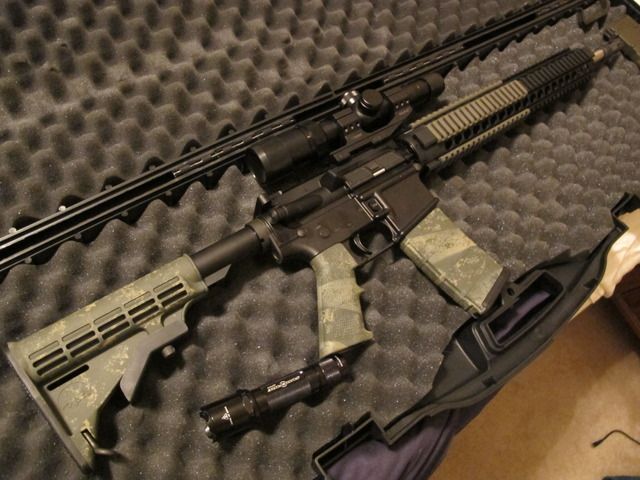
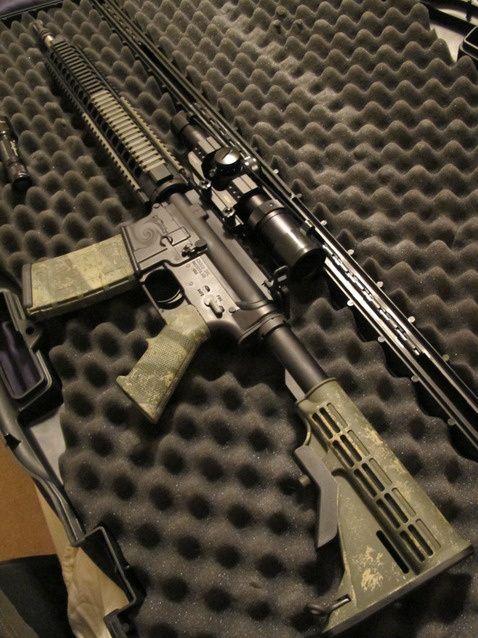
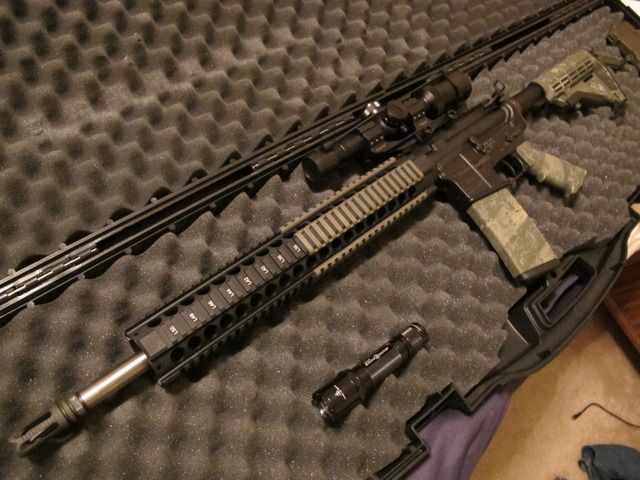
[#9]
I'm a little bit chicken with the subject of painting a very expensive weapon but I am going to replace the grip and stock soon and the mags I can always acetone back to black/OD so I decided to play my hand at a little sponge'n
|
|
|
TX, USA
|
[#10]
That my friend, is absolutely bad ass!
Originally Posted By prcharlie:
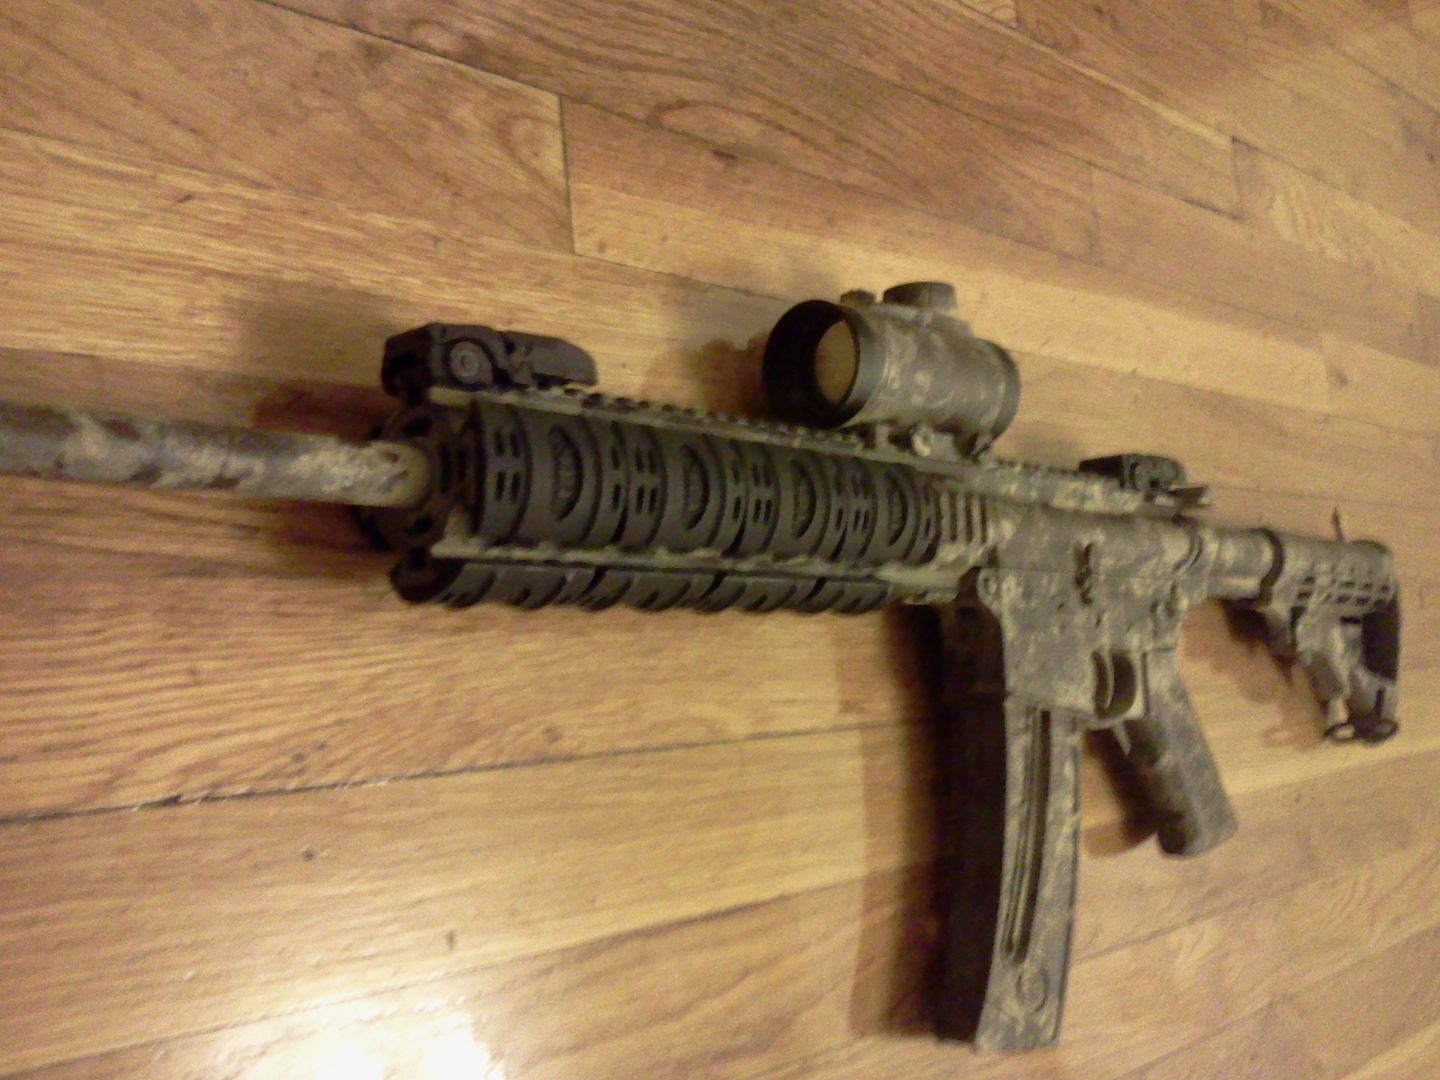
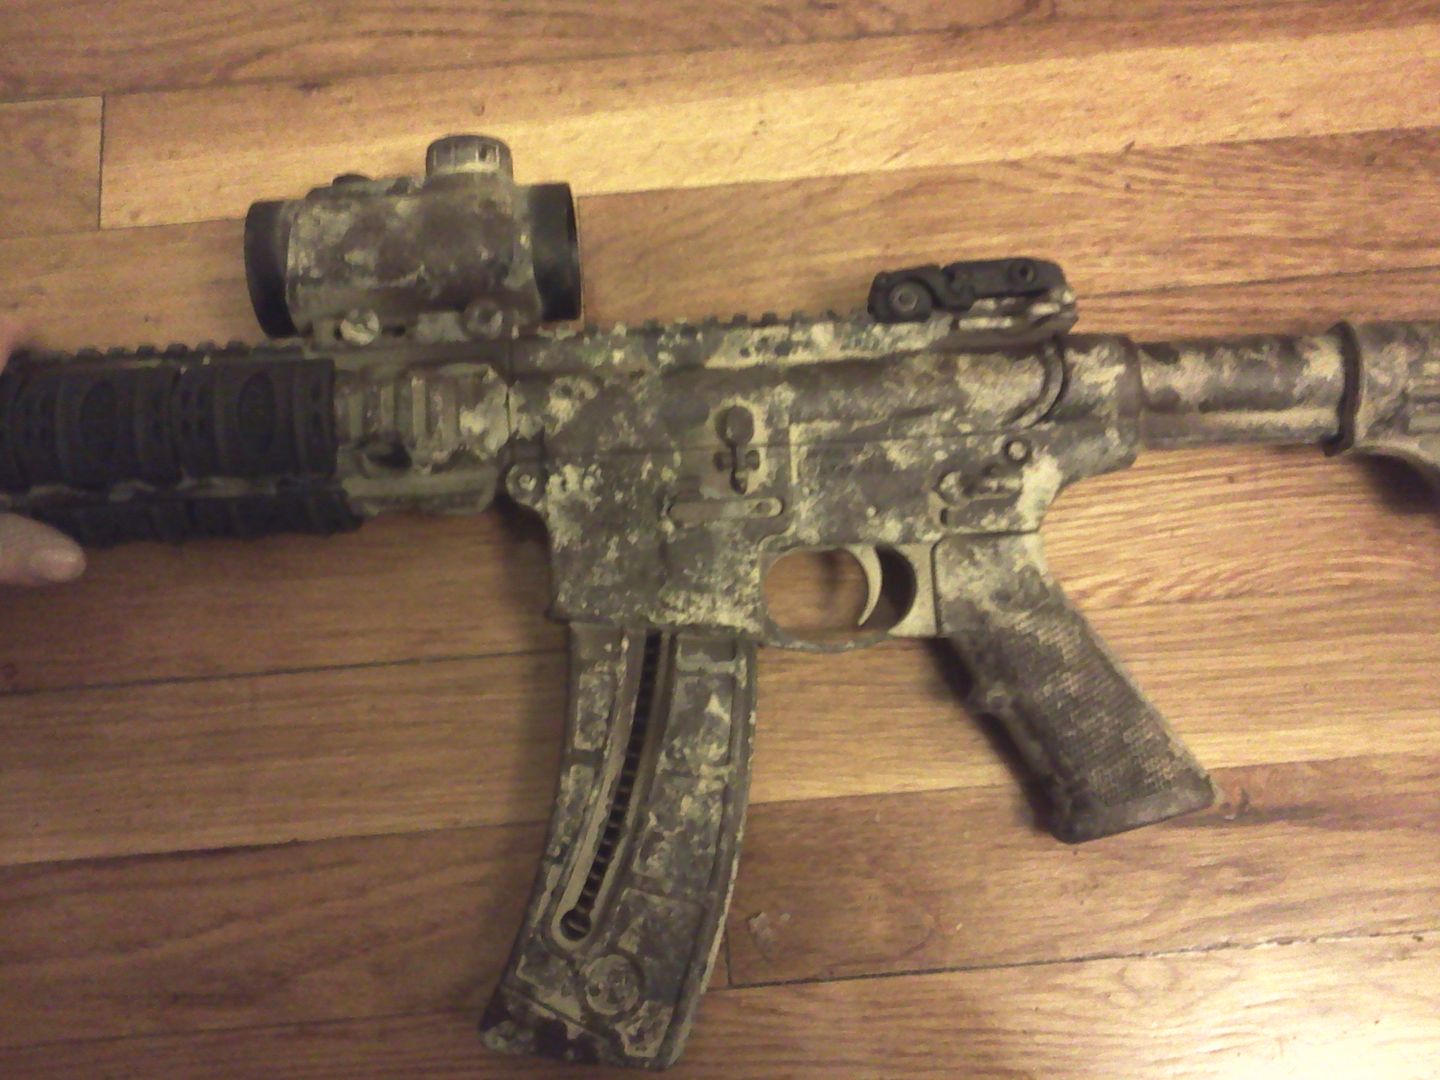
jrn156, you are an F'ng genius. I have always been scared to rattle can a rifle. I've done furniture in the past, but nothing more. Your idea is incredibly easy and yields great results. A big thank you is warranted. Krylon Khaki base with OD stripes and khaki, OD and brown earth sponging. I am quite happy with my first attempt. http://i60.photobucket.com/albums/h5/prcharlie/DSCN0305.jpg http://i60.photobucket.com/albums/h5/prcharlie/DSCN1536.jpg http://i60.photobucket.com/albums/h5/prcharlie/DSCN1534.jpg |
|
|
|
[#11]
Originally Posted By battlestick:
That my friend, is absolutely bad ass! Originally Posted By prcharlie:
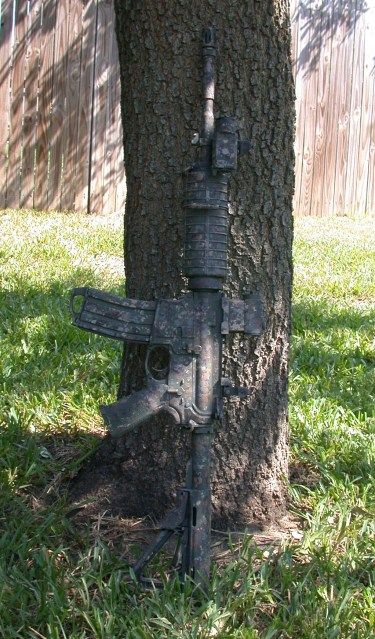
jrn156, you are an F'ng genius. I have always been scared to rattle can a rifle. I've done furniture in the past, but nothing more. Your idea is incredibly easy and yields great results. A big thank you is warranted. Krylon Khaki base with OD stripes and khaki, OD and brown earth sponging. I am quite happy with my first attempt. http://i60.photobucket.com/albums/h5/prcharlie/DSCN0305.jpg http://i60.photobucket.com/albums/h5/prcharlie/DSCN1536.jpg http://i60.photobucket.com/albums/h5/prcharlie/DSCN1534.jpg Thanks. I went camping a few weeks ago and took that rifle. It was amazing what that simple paint job did to break up the outline. The pic below was taken with an unpainted mag. Quite a contrast, heck even with the bcg.. 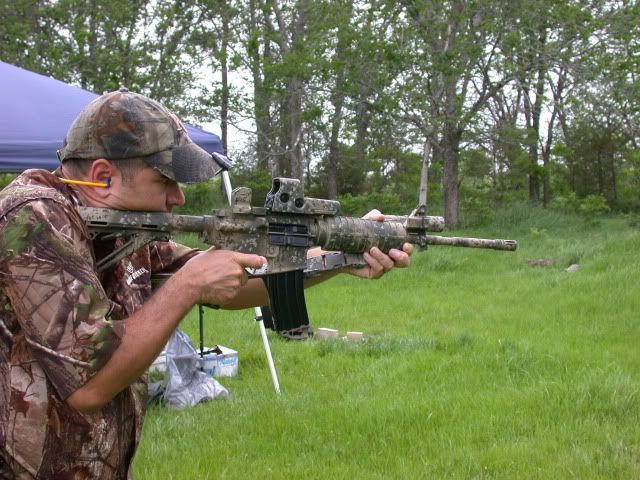
|
|
|
|
|
[#12]
Great tutorial. The rifle came out pretty Damn good if I do say so myself. |
|
|
|
FL, USA
|
[#13]
Thanks -That looks very well done. The best part of rattle can is that its easy to touch up and if you get tired of it, its easy to remove.
|
|
|
TX, USA
|
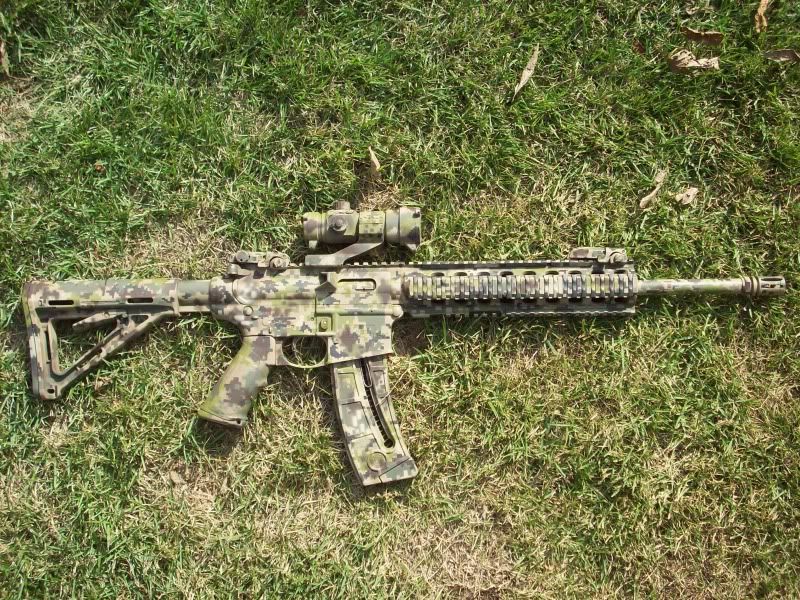
[#14]
An updated pic of mine..... She has been touched up a bit here and there, but most of it is from the original paint job.
|
|
|
OH, USA
|
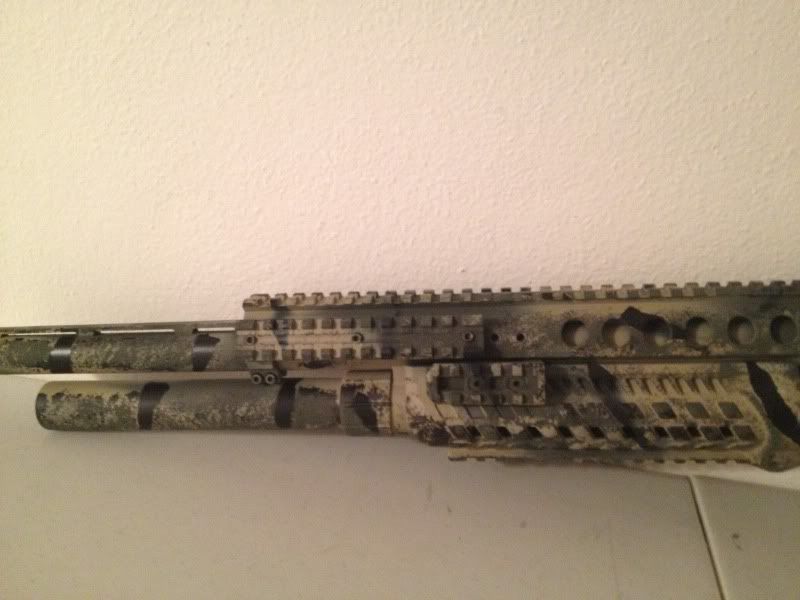
[#15]
has anyone done a quad rail, in the sponge camo? If so could you please post a pic I am thinking about doing this to my gun and not sure about how the quad rail will look.
|
|
|
|
[#16]


|
|
|
|
OH, USA
|
[#17]
Thanks. What colors would you guys recommend for woodland? Sorry I'm color blind and can't tell the shades. And would you use flack as the back ground color or brown?
|
|
|
CA, USA
|
[#18]
Question for you, or anyone else that has painted their scope.... I notice that no one bothers taping the windage or elevation adjustment caps, which makes sense since they are sealed when closed tight. But my scope is a 3-9 so I have a power ring adjustment that leaves that little crack where it turns. Do I need to tape that??? I doesn't look like most people are doing it, but I wanted to make sure!
P.S. my scope is silver, so I can't tape a little line right there and leave it. My only option would be to tape a thin line and go over it with black sharpie, so I would rather not have to do that if I don't have to. Originally Posted By usmc5593:
|
|
|
|
[#20]
Anybody do their truck yet?
|
|
|
|
|
[Last Edit: 23pistol23]
[#21]
Originally Posted By Bizarro:
Anybody do their truck yet?  I wish I would have known about this when I did my old civic a while back. I wish I would have known about this when I did my old civic a while back.

|
|
|
|
OH, USA
|
[#22]
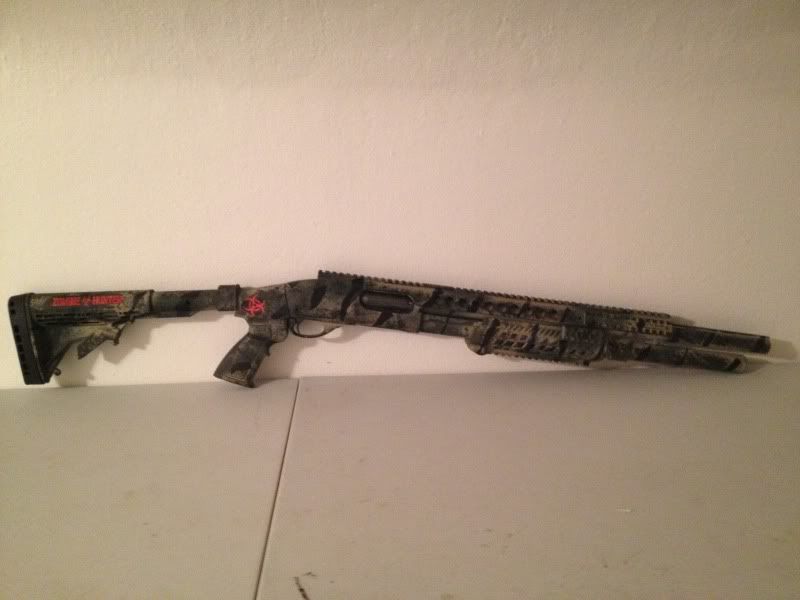
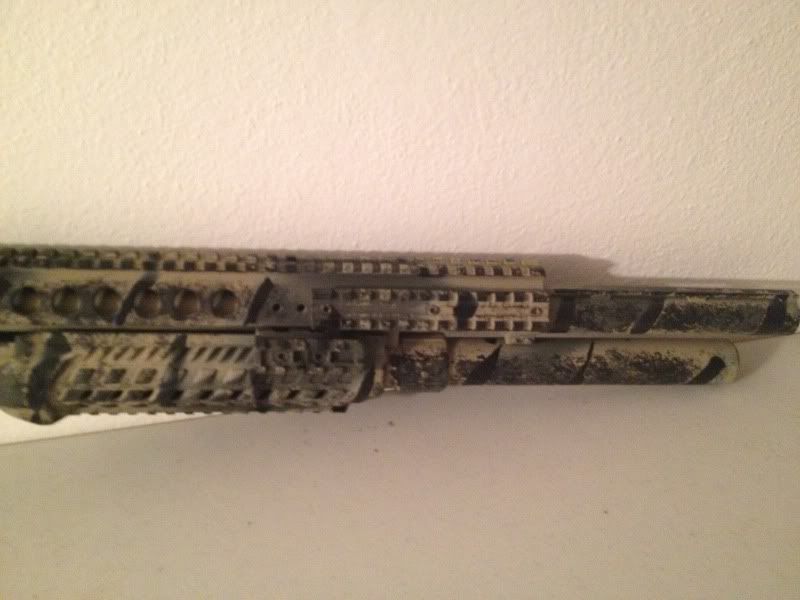
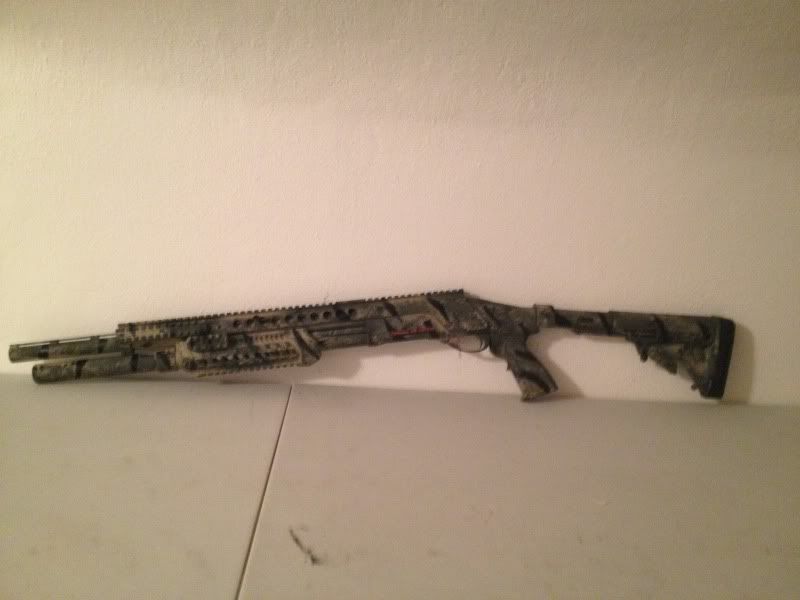
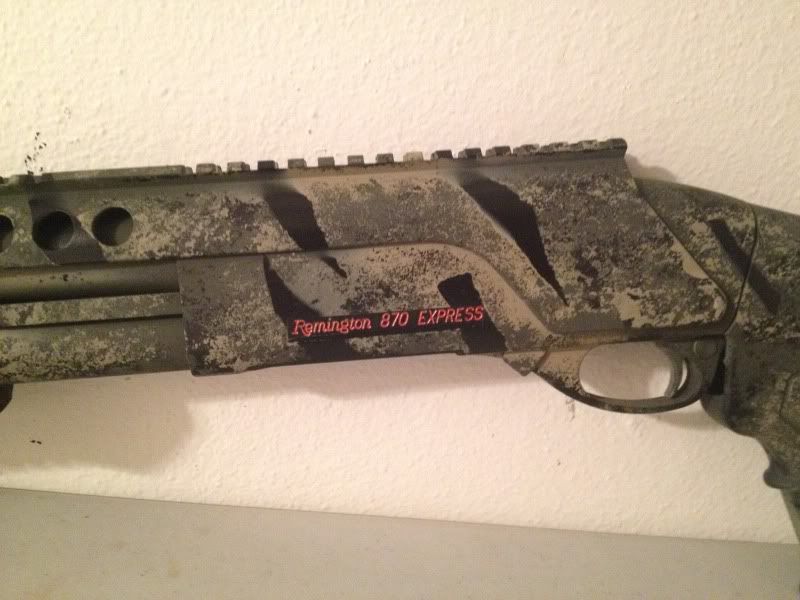
Here's my first try at it. Figured I would throw a twist in with tiger stripes. I know its not a AR but I wanted to try it on a cheaper gun first.
|
|
|
|
[#23]
Originally Posted By waterfowlwidowmaker:
Here's my first try at it. Figured I would throw a twist in with tiger stripes. I know its not a AR but I wanted to try it on a cheaper gun first.[/url] Dude, the tiger stripe look is killer on that shotty. Nice job. |
|
|
|
USA
|
[#24]
wish I had seen your tiger strip look earlier, flippin' bad assed!
|
|
|
|
[#25]
I did another to match.
|
|
|
|
GA, USA
|
[#26]
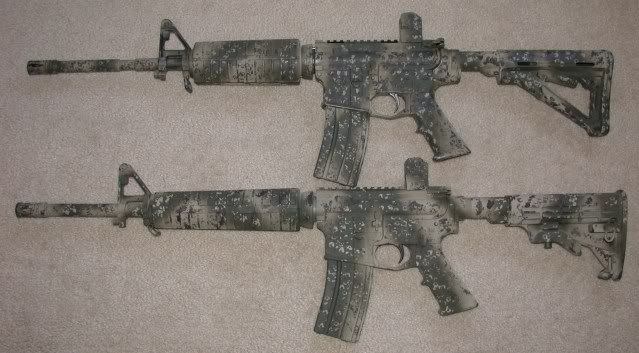
I decided to try it on my .17HMR rifle. Turned out pretty good and was surprisingly easy.
Khaki-first coat Forest green-stripes Brown Before http://i818.photobucket.com/albums/zz107/wjackson11x/1341538612.jpg After http://i818.photobucket.com/albums/zz107/wjackson11x/1341538722.jpg http://i818.photobucket.com/albums/zz107/wjackson11x/1341788723.jpg |
|
|
|
[Last Edit: prcharlie]
[#27]
Did my lightweight 6.8
Khaki base Rustoleum Flat brown and OD camo Stripes 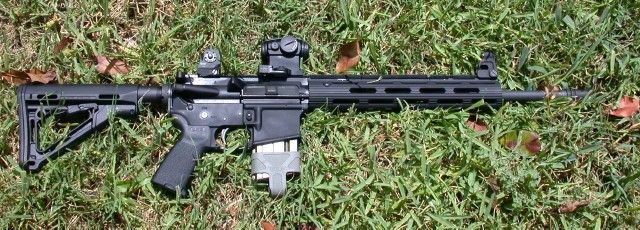
|
|
|
|
|
[Last Edit: prcharlie]
[#28]
|
|
|
|
OR, USA
|
[#29]
Alright heres my attempt. I used my airsoft rifle cuz this was my first time painting a rifle. I'm still debating whether or not I should paint my real AR or not.
THIS IS WHAT IT LOOKS LIKE WHEN YOU USE A REGULAR (HOUSEHOLD) SPONGE INSTEAD OF A NATURAL ONE. 

|
|
|
|
[#30]
Urban
|
|
|
|
|
[#31]
|
|
|
|
MO, USA
|
[Last Edit: Armson-Oeg]
[#32]
Really like the Sponge . Going to be much easier than a digital Marpat i did on this M&P15-22

Just right of tree in brush pile 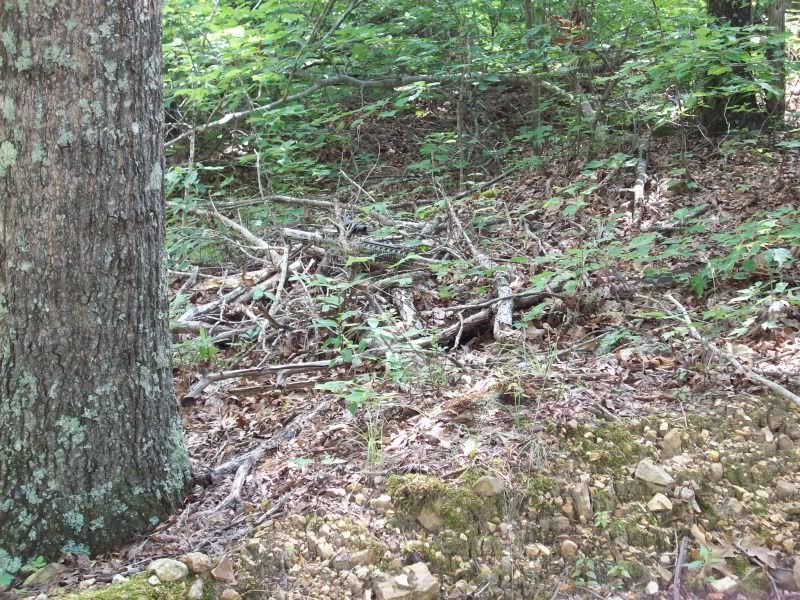
Upright on tree 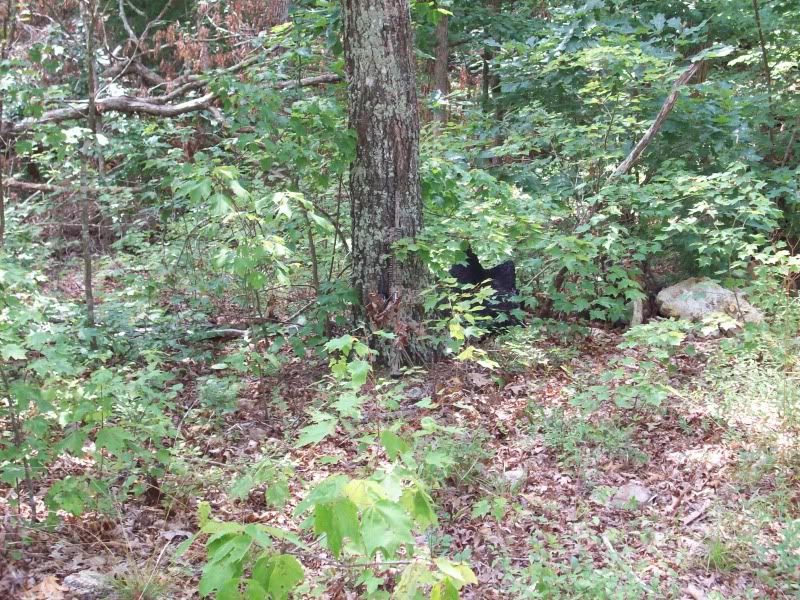
Then there is my Jeep 
I'll never do a pure digital pattern again, was a real chore |
|
|
HI, USA
|
[Last Edit: Dragonfly228]
[#33]
I did my helmet with sponge. It was very fast, easy, and effective. It blends with everything around my house. Used several shades of green, OD and final A-symetrical pattern of light tan and MC green for a finishing touch. behind a bush it looks like I see right through it with the bits of highlight. I will never mask and paint a project again.

Funny how 10 years ago, two tone guns was a breakthrough (ala Wilson combat), then it was all the furniture blocks starting 5 years ago, not it's all this stipple stuff. Pretty cool. I bet the next 5 years we'll go back to the old woodland bloches of the 90's. but with fading colors, with now crisp demarcations. Like ATAC. |
|
|
|
[#34]
Originally Posted By Dragonfly228:
I did my helmet with sponge. It was very fast, easy, and effective. It blends with everything around my house. Used several shades of green, OD and final A-symetrical pattern of light tan and MC green for a finishing touch. behind a bush it looks like I see right through it with the bits of highlight. I will never mask and paint a project again. http://imageshack.us/a/img831/7733/dsc04077g.jpg Funny how 10 years ago, two tone guns was a breakthrough (ala Wilson combat), then it was all the furniture blocks starting 5 years ago, not it's all this stipple stuff. Pretty cool. I bet the next 5 years we'll go back to the old woodland bloches of the 90's. but with fading colors, with now crisp demarcations. Like ATAC. That helmet came out great! The several shades of green that you used blend well with each other. |
|
|
|
HI, USA
|
[Last Edit: Dragonfly228]
[#35]
Thanks for the compliment. Color selection is very important. Camouflage theory is to have two colors relatively close together for a color and shadow effect. Then a third color of contract to break up the surface. Like the Vietnam F-4 fantom pattern.
The key is to not be afraid and don't stop too soon. Add plenty all around and keep going. Don't stop. When you think it is enough, add some more. Then take the previous colors and add for blending effect so that you can't tell which color came first. I use the same sponge, and the messier the better. In fact, some of the speckle blobs are a blend of several shades of green for an even more blend effect. Then take a step back and add a sparingly amount of highlight and shadow. I think for my next project, I will try a more consistent pattern so that from a distance it will look like blobs (that will break up the surface), but up close it will look like a blend (to pick up colors from around it). I bought my kids some russian steel helmets (cheaper than those plastic crap at toysRus), and they have been asking for a camo job on them. come to think of it, I should have them do it, and post the results. but I am afraid of the paint scuffing the walls of our house. |
|
|
NM, USA
|
[#36]
Hey guys, new fella here. I've lurked this forum for a while and figured I'd had enough of lurking and wanted to start posting when I came across this thread. Love the sponge camo and painted my Mosin scout project using this technique. Going to edit this post when I get decent pictures uploaded.
|
|
|
TN, USA
|
[Last Edit: MovinMan]
[#37]
Heres a few Ive done with sponges.


|
|
|
AZ, USA
|
[#38]
I was inspired by this tutorial to give this a try myself. I decided to try my hand at painting a rifle with a desert camo pattern today. Tested first on a piece of cardboard to figure out the color combination and pattern I wanted to use. Then I painted one of my pellet rifles as a test of my skills, because I couldn't bring myself to chance messing up something more expensive. I plan to do this to my bolt action Savage Mark II when it finally arrives. I'll have to wait until I get the scope, bi-pod, and any other accessories before I paint it though.
Overall, I'm really happy with the results. If you look at the photos in the order that they are attached here is the progression. –– wipe entire rifle down with lint free rag and acetone –– paint entire rifle desert tan –– paint stripes of olive green, with faded edges –– use texture sponge to apply olive green on top of tan in random pattern –– same as above with the tan on top of the olive green stripes –– same across entire rifle with brown –– same across entire rifle with a lighter version of olive green, touching the spots where brown was applied to soften it –– done I had planned on applying a matte clear finish but my test on the cardboard pattern revealed that it still makes the paint shiny. I prefer the dull finish of the paint. 


ben |
|
|
|
[#39]
Here is my newest creation so far.
If you all remember my AR57 SBR: 
I ended up trading off the AR57 SBR upper to a friend and had the SBR Colt lower sitting in the safe for sometime now. I pulled it out and got an itch to build something with it. So, I used a 22LR intergrated suppresser that I had laying around. I built the upper around it. I used a DPMS upper that I picked up on the cheap at Knob Creek, then I bought a YHM 13" diamond FF rail and stuck in a CMMG India 22 Kit. I stuck on the Nikon P223 Carbine 3x scope, Tactical Link, Magpul rails and the AFG2 in a hurry for a shoot the other weekend. That is the reason they are not painted so far. The combo is killer! I did the upper in the same camo pattern as the lower since I didn't feel like stripping the paint off. 


So, what does the hive say? |
|
|
|
KS, USA
|
[#40]
S&W M&P 15-22 (such a long name for a firearm.)
|
|
|
|
[#41]
Looks good. Get your optic off your rail.
|
|
|
|
KS, USA
|
[#42]
Is there benefit to it? Its mainly positioned there because the height it sits at makes it like a upper 2/3 co witness
|
|
|
|
[#43]
Originally Posted By prcharlie:
Looks good. Get your optic off your rail. Why? is it not a FF rail? 
I am asking because I have yet get to play with one. OP: looks good. |
|
|
|
KS, USA
|
[#44]
It is free float or atleast I thought it was.
Anyways here is what I ended up doing with it anyways did tiger stripes with painters tape. 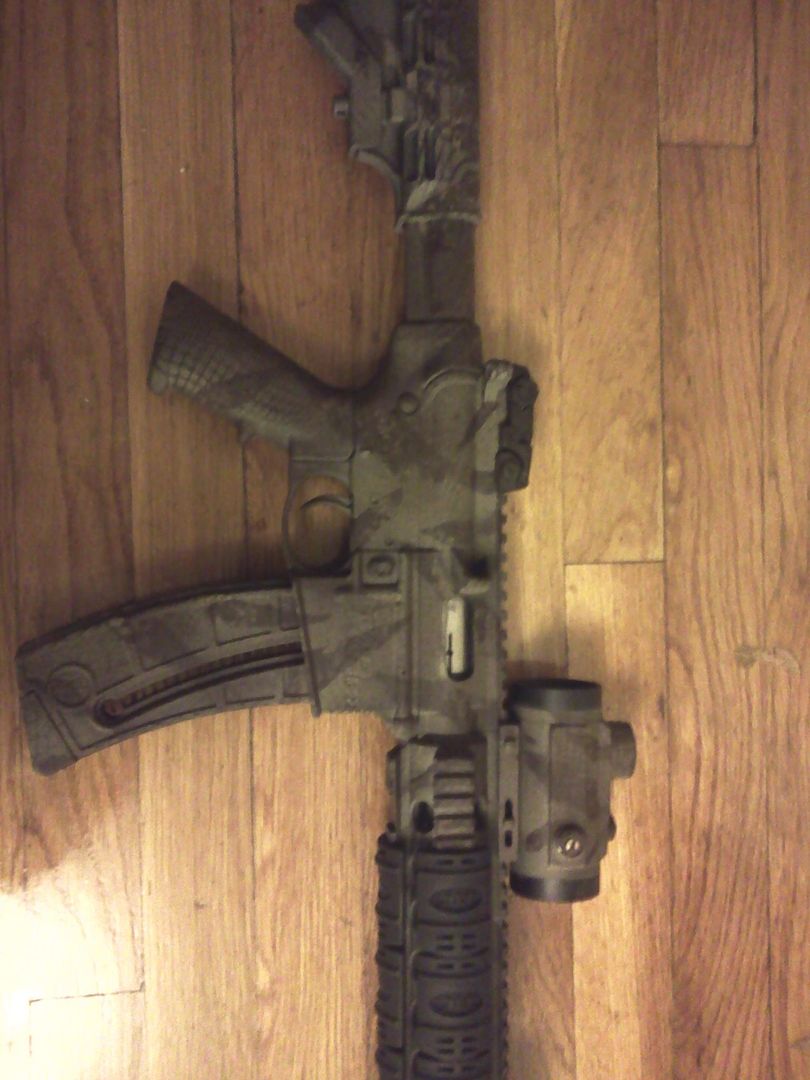
|
|
|
|
[#45]
How well do you guys find the matte clear coat is holding up? I don't mind dings and scratches from use (those just give a weapon character) but I don't want the pant rubbing off on my hands or cheek while out shooting.
|
|
|
|
|
[#46]
Originally Posted By Loremsk:
How well do you guys find the matte clear coat is holding up? I don't mind dings and scratches from use (those just give a weapon character) but I don't want the pant rubbing off on my hands or cheek while out shooting. Mine is holding up great after a few years now. never had any paint just rub off, except for a Hogue stock I did on a 10/22 but that was not very bad just small flakes. I knew it would not hold up long but it was better than I thought. |
|
|
|
|
[#47]
Originally Posted By Greg3:
Originally Posted By Loremsk:
How well do you guys find the matte clear coat is holding up? I don't mind dings and scratches from use (those just give a weapon character) but I don't want the pant rubbing off on my hands or cheek while out shooting. Mine is holding up great after a few years now. never had any paint just rub off, except for a Hogue stock I did on a 10/22 but that was not very bad just small flakes. I knew it would not hold up long but it was better than I thought. Sweet. Was planning on just doing a DCU type scheme on my M1A but this sponge style has caught my eye. Just gotta see about getting the correct colors. |
|
|
|
CA, USA
|
[#48]
First attempt at "sponging".


|
|
|
ME, USA
|
[#49]
Very nice, now im tempted to do mine LOL!
|
|
|
|
[#50]
Amazing work by all of you guys. This is really gonna wear on me. I don't think I can handle doing it to an expensive rifle...but I do have a couple of cheap wood stocks floating around here to try my luck...and then, well you never know.
|
|
|
|
 Win a FREE Membership!
Sign up for the ARFCOM weekly newsletter and be entered to win a free ARFCOM membership. One new winner* is announced every week!
You will receive an email every Friday morning featuring the latest chatter from the hottest topics, breaking news surrounding legislation, as well as exclusive deals only available to ARFCOM email subscribers.

AR15.COM is the world's largest firearm community and is a gathering place for firearm enthusiasts of all types.
From hunters and military members, to competition shooters and general firearm enthusiasts, we welcome anyone who values and respects the way of the firearm.

Subscribe to our monthly Newsletter to receive firearm news, product discounts from your favorite Industry Partners, and more.
Copyright © 1996-2024 AR15.COM LLC. All Rights Reserved.
Any use of this content without express written consent is prohibited.
AR15.Com reserves the right to overwrite or replace any affiliate, commercial, or monetizable links, posted by users, with our own.


