FL, USA
|
Posted: 9/6/2016 9:09:30 PM EDT
[Last Edit: ReefRaider]
So as to not take another thread here off topic. Thought I'd start a new one.
Looking at maybe doing some up grades to my S1050s. Was wanting some input as to what some of you might have tried and liked . Also what didn't work out for you. About 3 years ago some one gave me a bearing for the shell plate . I never put it on though. Now I'm reading that the bearings can make the shell plate retainer hit the tool head when it's all the way at the bottom of the down stroke. Even if you haven't done any up grades to your 1050. I also would like to know how you have your tool head set up to process 5.56 brass. I've always use all Dillon dies with the exception of the last station. Which has a redding neck sizing die with expander. It helps to roll any burr left by the trimmer and gives very consistent neck tension. ETA Keep in mind I run my 1050s on a PW auto drive. The up date's done as of now. Level 10 delrin guide rods and also their delrin primer slide sleeve cover. Fast and Friendly Brass , super duty small swager rod. If you do a lot of large swaging they have a large rod too. Home made case feeder plunger , to slow the .223 case feeding in to the shell plate. NOTEif your doing a caliber conversation to .233 on the 1050. Fast and Friendly Brass sells a up graded #3 shell that from what I'm told is well worth the money over the Dillon one. They also sell other shell plates for other caliber conversation s. Check their web site. They are also a sponsor of ARFCOM ! |
|
|
AL, USA
|
[#1]
I took the ratchet off of my 1050. It now runs smooth as silk. Installed the hose device that captures primers and puts them all into a liter coke bottle under the bench. Use a redding competition seater.
In the near future I am installing the the inline fabrication 4" smart mount. |
|
|
TX, USA
|
[#2]
Autodrive?
I like the Level 10 guide Rod Kit - allows you to get rid of that dang spring. Easier to swap out heads. If you don't have autodrive, then not really helpful. https://lvl10i.com/collections/dillon-upgrades/products/specialty-guide-rod-for-dillon-1050 |
|
|
MO, USA
|
[Last Edit: blake-b]
[#3]
I've got two S1050s. I'm lazy and don't want to move things around too much. One is dedicated to 223/556 and the other 308. Both of them are set up the same way. I have a total of 4 tool heads. One for each caliber to process brass and one for each caliber to load. It doesn't take too long to switch out a toolhead. I don't have to mess with the different systems that rely on primer size, caliber specific feeding parts, etc.
They are set up the same way. I use a mix of Dillon, Lee, and Lyman dies. Processing head: Station 1 is a Lee universal decapper. Station 2 swages Station 3: Empty (no primers loaded) Station 4: Empty (where powder measure would be) Station 5 is where an electric trimmer is (RT1200 for 223; Bosch 1617EVS router with an adapter kit for 308. I went with the router just to try it. Both the router setup and a Dillon trimmer came out similar price wise so I thought I'd try it) Station 6 empty Station 7 is a Lyman M die to open the necks up just a little Loading head: Station 1 is a Lee universal decapper to catch any media stuck in the flash hole or in case a primer snuck through during the processing phase. Station 2 swages (I don't back it out when loading, I just leave it as it was in case one gets through that didn't get swaged enough). Station 3: Primes Station 4: Powder measure Station 5 Empty Station 6 Dillon Bullet seater Station 7 is a Lee FCD if I choose to crimp Ratchet mechanism is removed. I installed the bearing and just ground down the bolt heads because they did contact tool head when it was all the way down. Installed a couple of things I bought on ebay like the case feed fix plate and a spent primer chute thing you attach a hose to so the primers will go down into a bucket or two liter bottle. I don't sort cases by headstamp/year and just average out the swaging. I have loaded 10s of thousands of 223 this way with zero issues. I just started 308 and plan to do the same unless it because necessary to sort by headstamp/year. I also did some of these tips/tricks from site sponsor Fast and Friendly Brass' site. |
|
|
|
[Last Edit: cur]
[#4]
Right now I'm only doing .223 on the 1050.
Using the 550 for pistol and .243, and just starting .300blk and .338LM Setup is similar to blake-b Processing 1 - Dillon resizing 2 - swage 3 - empty 4 - empty 5 - RT1200 6&7 - empty Loading 1 - universal decapper (make sure no media is in flash hole) 2 - swage 3 - prime 4 - powder drop 5 - Mr. Bulletfeeder 6 - Dillon seater 7 - Dillon crimp Going to change the seating die to Forster Ultra Micrometer to reduce runout and crimp die to Lee FCD. Only real change I've made is removing the ratchet. eta - I never worried about the bur left by trimming because wet tumbling w/ss media mostly took care of it. But I like the idea of the neck sizer in station 7 on the processing head. |
|
|
|
FL, USA
|
[#5]
Originally Posted By nigla:
I took the ratchet off of my 1050. It now runs smooth as silk. Installed the hose device that captures primers and puts them all into a liter coke bottle under the bench. Use a redding competition seater. In the near future I am installing the the inline fabrication 4" smart mount. Have given the hose some thought. Since the spent primer catcher had to be modified anyway for the auto drive. Which on occasions gets bumped out of place causing it to dump it self on the floor. 
|
|
|
FL, USA
|
[#6]
Originally Posted By djryan13:
Autodrive? I like the Level 10 guide Rod Kit - allows you to get rid of that dang spring. Easier to swap out heads. If you don't have autodrive, then not really helpful. https://lvl10i.com/collections/dillon-upgrades/products/specialty-guide-rod-for-dillon-1050 This item will probably be a must have for both units. |
|
|
FL, USA
|
[#7]
Originally Posted By blake-b:
I've got two S1050s. I'm lazy and don't want to move things around too much. One is dedicated to 223/556 and the other 308. Both of them are set up the same way. I have a total of 4 tool heads. One for each caliber to process brass and one for each caliber to load. It doesn't take too long to switch out a toolhead. I don't have to mess with the different systems that rely on primer size, caliber specific feeding parts, etc. They are set up the same way. I use a mix of Dillon, Lee, and Lyman dies. Processing head: Station 1 is a Lee universal decapper. Station 2 swages Station 3: Empty (no primers loaded) Station 4: Empty (where powder measure would be) Station 5 is where an electric trimmer is (RT1200 for 223; Bosch 1617EVS router with an adapter kit for 308. I went with the router just to try it. Both the router setup and a Dillon trimmer came out similar price wise so I thought I'd try it) Station 6 empty Station 7 is a Lyman M die to open the necks up just a little Loading head: Station 1 is a Lee universal decapper to catch any media stuck in the flash hole or in case a primer snuck through during the processing phase. Station 2 swages (I don't back it out when loading, I just leave it as it was in case one gets through that didn't get swaged enough). Station 3: Primes Station 4: Powder measure Station 5 Empty Station 6 Dillon Bullet seater Station 7 is a Lee FCD if I choose to crimp Ratchet mechanism is removed. I installed the bearing and just ground down the bolt heads because they did contact tool head when it was all the way down. Installed a couple of things I bought on ebay like the case feed fix plate and a spent primer chute thing you attach a hose to so the primers will go down into a bucket or two liter bottle. I don't sort cases by headstamp/year and just average out the swaging. I have loaded 10s of thousands of 223 this way with zero issues. I just started 308 and plan to do the same unless it because necessary to sort by headstamp/year. I also did some of these tips/tricks from site sponsor Fast and Friendly Brass' site. All good info thanks for taking the time to post that. Would like to know more about this " case feed fix plate" . |
|
|
MO, USA
|
[Last Edit: blake-b]
[#8]
All good info thanks for taking the time to post that. Would like to know more about this " case feed fix plate" . http://www.ebay.com/itm/Dillon-Super-1050-case-feed-fix-plate-/201636435095?hash=item2ef277d497:m:mFYNYabKQ7ffvBwLBYsdZ3w I feel it made a difference in the way the cases enter the shellplate. Even if it is all in my mind, it was cheap. |
|
|
FL, USA
|
[#9]
Originally Posted By blake-b:
http://www.ebay.com/itm/Dillon-Super-1050-case-feed-fix-plate-/201636435095?hash=item2ef277d497:m:mFYNYabKQ7ffvBwLBYsdZ3w I feel it made a difference in the way the cases enter the shellplate. Even if it is all in my mind, it was cheap. Originally Posted By blake-b:
All good info thanks for taking the time to post that. Would like to know more about this " case feed fix plate" . http://www.ebay.com/itm/Dillon-Super-1050-case-feed-fix-plate-/201636435095?hash=item2ef277d497:m:mFYNYabKQ7ffvBwLBYsdZ3w I feel it made a difference in the way the cases enter the shellplate. Even if it is all in my mind, it was cheap. I've seen different versions of this. I don't think it's in your mind. Have had problems in the past with 5.56 brass . Loading into the shell plate right. Most of the ones that seem to help are profiled like that one. FF&B shell plate might have helped too. It seems 5.56 cases feed into his plates even at a speed that's faster then the case feeder. Those shell plates are not cheap. But I do want to try one. |
|
|
|
[#10]
Originally Posted By blake-b:
http://www.ebay.com/itm/Dillon-Super-1050-case-feed-fix-plate-/201636435095?hash=item2ef277d497:m:mFYNYabKQ7ffvBwLBYsdZ3w I feel it made a difference in the way the cases enter the shellplate. Even if it is all in my mind, it was cheap. Originally Posted By blake-b:
All good info thanks for taking the time to post that. Would like to know more about this " case feed fix plate" . http://www.ebay.com/itm/Dillon-Super-1050-case-feed-fix-plate-/201636435095?hash=item2ef277d497:m:mFYNYabKQ7ffvBwLBYsdZ3w I feel it made a difference in the way the cases enter the shellplate. Even if it is all in my mind, it was cheap. I think it made a difference also , you can save you a little $ and the seller ebay fees if you catch him on Eno's forum |
|
|
|
|
[Last Edit: FastAndFriendlyBrass]
[#11]
Originally Posted By ReefRaider:
I've seen different versions of this. I don't think it's in your mind. Have had problems in the past with 5.56 brass . Loading into the shell plate right. Most of the ones that seem to help are profiled like that one. FF&B shell plate might have helped too. It seems 5.56 cases feed into his plates even at a speed that's faster then the case feeder. Those shell plates are not cheap. But I do want to try one. Originally Posted By ReefRaider:
Originally Posted By blake-b:
All good info thanks for taking the time to post that. Would like to know more about this " case feed fix plate" . http://www.ebay.com/itm/Dillon-Super-1050-case-feed-fix-plate-/201636435095?hash=item2ef277d497:m:mFYNYabKQ7ffvBwLBYsdZ3w I feel it made a difference in the way the cases enter the shellplate. Even if it is all in my mind, it was cheap. I've seen different versions of this. I don't think it's in your mind. Have had problems in the past with 5.56 brass . Loading into the shell plate right. Most of the ones that seem to help are profiled like that one. FF&B shell plate might have helped too. It seems 5.56 cases feed into his plates even at a speed that's faster then the case feeder. Those shell plates are not cheap. But I do want to try one. It's not the case feed plunger actuating lever that makes it work. It's the shell plate and decapping. Here's a vid we did with our press running around 4500 rounds per hour with the stock plunger. |
|
|
|
FL, USA
|
[#12]
I didn't mean to make it sound that way. What I was trying to convey is that with your shell plate there was no need to change the profile of the plunger plate.
I also like the way you process your brass in two passes. If I do another large run I'll use both 1050s and give it a try. Really do want to try one of your shell plates. |
|
|
|
[#13]
Originally Posted By ReefRaider:
I didn't mean to make it sound that way. What I was trying to convey is that with your shell plate there was no need to change the profile of the plunger plate. I also like the way you process your brass in two passes. If I do another large run I'll use both 1050s and give it a try. Really do want to try one of your shell plates. We didn't take it offensively. It's the internet, ya gotta have thick skin. We've tried running the 1050s to do it in one pass, and we'd really like to, as it would double our production. However, what we've found is that the swaging and sizing operations are so variable in pressure required, there just no good way to do it in one pass and be consistent. If the 1050 was a more stable machine, this wouldn't be an issue, but we can only work with what we're given. |
|
|
|
FL, USA
|
[Last Edit: ReefRaider]
[#14]
What are you guys using for trimmer motors ? I have 3 RT 1200 now . But two of them have been rebuilt twice now and I'm all out of brushes. So when there gone I'll be needing to make a change there two.
|
|
|
TX, USA
|
[#15]
Originally Posted By ReefRaider:
What are you guys using for trimmer motors ? I have 3 RT 1200 now . But two of them have been rebuilt twice now and I'm all out of brushes. So when there gone I'll be needing to make a change there two. 1500... happy so far. |
|
|
LA, USA
|
[Last Edit: Ronnie_B]
[#16]
Funny I see mention of problems prepping brass on 1050's. I was getting several thousandths variation in the trim length and headspace, and noticed that the toolhead tilted slightly and in different directions depending on where brass was located. All 3 of my 1050's have a little bit of ram/frame clearance even when new.
223 case prep adventure- Station 2- Full length sizing/decap die with no expander. The die body adjusted for slightly long headspace. Final headspace established at the trim die. Station 3- Swager die body adjusted for slight preload against the shellplate Station 5- soon to be done- I may cut down a Dillon Powder die or Lee Universal decap die. This will then support both sides of the trim die- this modified die will have to be cut down to fit under the Vacuum manifold/adapter. Station 6- I cut down some Hornaday Lock n' Load die adapter bushings and screwed one onto the bottom of the trim die (under the toolhead) and did some final trimming so that the bushing preloads slightly against the shellplate. This allows me to set headspace without affecting preload at that point. Also cut the Vacuum manifold/adapter back side off, opposite of the hose connector, so I can have a die in station 7. Temporarily using duct tape to cover the hole, and will work on this some more. I may modify another one manifoldby heating it and pressing a recess into it. Station 7- Lee 45 ACP die body with a 223 expander, also adjusted for a slight preload. This gradually expands the case neck and shears any burr off the inside of the mouth. I also noted no apprecuiable change in runout- much better that the conventional method. Station 8- Dillon swage die, modified by cutting the support rod back it is used to put a slight flare on the case mouth. All of this eliminates the variability in the toolhead/shellplate spacing. I am getting very consistent results, independent of brass arrangement. Runout is excellent as well- I usually see about .001-.002 at the neck on LC brass In another post I will explain the swager arrangement I use which gives me consistent results independent of brass type and case head thickness. I also use the smae general concept on my loading toolhead and the results are great! |
|
|
FL, USA
|
[#17]
Originally Posted By Ronnie_B:
Funny I see mention of problems prepping brass on 1050's. I was getting several thousandths variation in the trim length and headspace, and noticed that the toolhead tilted slightly and in different directions depending on where brass was located. All 3 of my 1050's have a little bit of ram/frame clearance even when new. 223 case prep adventure- Station 2- Full length sizing/decap die with no expander. The die body adjusted for slightly long headspace. Final headspace established at the trim die. Station 3- Swager die body adjusted for slight preload against the shellplate Station 5- soon to be done- I may cut down a Dillon Powder die or Lee Universal decap die. This will then support both sides of the trim die- this modified die will have to be cut down to fit under the Vacuum manifold/adapter. Station 6- I cut down some Hornaday Lock n' Load die adapter bushings and screwed one onto the bottom of the trim die (under the toolhead) and did some final trimming so that the bushing preloads slightly against the shellplate. This allows me to set headspace without affecting preload at that point. Also cut the Vacuum manifold/adapter back side off, opposite of the hose connector, so I can have a die in station 7. Temporarily using duct tape to cover the hole, and will work on this some more. I may modify another one manifoldby heating it and pressing a recess into it. Station 7- Lee 45 ACP die body with a 223 expander, also adjusted for a slight preload. This gradually expands the case neck and shears any burr off the inside of the mouth. I also noted no apprecuiable change in runout- much better that the conventional method. Station 8- Dillon swage die, modified by cutting the support rod back it is used to put a slight flare on the case mouth. All of this eliminates the variability in the toolhead/shellplate spacing. I am getting very consistent results, independent of brass arrangement. Runout is excellent as well- I usually see about .001-.002 at the neck on LC brass In another post I will explain the swager arrangement I use which gives me consistent results independent of brass type and case head thickness. I also use the smae general concept on my loading toolhead and the results are great! Like you I have loaded my tool head to even it out. It helped ,but the shell plate has to be full for me to get down to + - .02. Do you use any auto drives ? What trimmer motor do you have ? |
|
|
FL, USA
|
[#18]
Originally Posted By djryan13:
1500... happy so far. Originally Posted By djryan13:
Originally Posted By ReefRaider:
What are you guys using for trimmer motors ? I have 3 RT 1200 now . But two of them have been rebuilt twice now and I'm all out of brushes. So when there gone I'll be needing to make a change there two. 1500... happy so far. Do they get hot like the rt1200 ? I've always felt that was one of the reasons the bearings would fail in the 1200 . |
|
|
|
[#19]
Originally Posted By ReefRaider:
Do they get hot like the rt1200 ? I've always felt that was one of the reasons the bearings would fail in the 1200 . Originally Posted By ReefRaider:
Originally Posted By djryan13:
Originally Posted By ReefRaider:
What are you guys using for trimmer motors ? I have 3 RT 1200 now . But two of them have been rebuilt twice now and I'm all out of brushes. So when there gone I'll be needing to make a change there two. 1500... happy so far. Do they get hot like the rt1200 ? I've always felt that was one of the reasons the bearings would fail in the 1200 . Not seeing the heat like in the 1200 but hardest I've run it is 1K of 223 made to 300blk |
|
|
|
TX, USA
|
[#20]
Originally Posted By angus6:
Not seeing the heat like in the 1200 but hardest I've run it is 1K of 223 made to 300blk Originally Posted By angus6:
Originally Posted By ReefRaider:
Originally Posted By djryan13:
Originally Posted By ReefRaider:
What are you guys using for trimmer motors ? I have 3 RT 1200 now . But two of them have been rebuilt twice now and I'm all out of brushes. So when there gone I'll be needing to make a change there two. 1500... happy so far. Do they get hot like the rt1200 ? I've always felt that was one of the reasons the bearings would fail in the 1200 . Not seeing the heat like in the 1200 but hardest I've run it is 1K of 223 made to 300blk Not enough to fry egg (like 1200) but pretty hot. I have run 3k of the 300bo conversion on a beautiful Sat afternoon without issue. I really need to shoot them more.. |
|
|
FL, USA
|
[#21]
That's working it hard for sure. I usually only run the 1200 for about 45 mins at a time and that's with a fan blowing on it. Then let it cool down and start again. It seemed to help them last a little longer. I did have one new 1200 that blew out a lower bearing at about 30K. The brushes were just about gone too. Dillon replaced that motor under warranty. In fact they ended up replacing two motors for me over all. It's was on the 2nd one that they sent me extra brushes. 5-6 sets if I recall correctly.
|
|
|
|
[#22]
Have you, by chance, seen the Honey Badger?
|
|
|
|
FL, USA
|
[#23]
I have actually been looking at that too. I was thinking I would just have my brother turn down a shaft from one of my old Dillon motors. If I can do that it would really help to lower the cost of changing over both presses.. I take it the collets on those routers is 3/8 ?
|
|
|
LA, USA
|
[#24]
I am using an RT1500 and it stays a lot cooler than the 1200 did.
Reef Raider, I adjust the dies and have the preload bushing so that the toolhead stops the in the same position whether there is brass or not- kind of like the concept of adjusting a die in a single stage to cam-over slightly. On my brass prep toolhead I installed the spacer bushing on the bottom of the trim die. I then adjust the other dies by running the toolhead down, turn the die until it seats against the shellplate, then add a little extra for the preload. I first noticed the toolhead tilt problem about two years ago when my headspace and trim were inconsistent, and could see the trimmer tilt slightly as the toolhead bottomed out. Dillon pretty much said if the brass headspaces within spec there is no problem. They checked one of my 1050s (New press) and said the frame/ram were within spec. When the ram is extended up, I can move the toolhead about .005 for/aft and side-side measured with a mag-base dial indicator which, to me, is not really a precise fit. Not even close. All three of my 1050's are about the same. One rep suggested I send the ram out to be hard chromed- We used to do that on worn hydraulic valve actuators on large steam turbines, and it would probably work. These presses were new/almost new at that time. With the changes I made, I don't see it happen now and all my brass pretty much gauges the same. |
|
|
|
[Last Edit: ChevelleDave]
[#25]
I never thought about that, equally loading the toolhead. I guess I kinda do that somewhat already with the swage die and trim die, being opposite each other and M die.
My brass gauges very consistently, and OAL is consistent, I guess it comes down to how precise of a load You're doing. I only use the 1050 for de-capping and mass sizing/trimming and blaster loading. All my "precision" stuff is worked on the LEE Classic or Co-Ax, and trimmed on a Wilson. I guess I could add a extra powder die to load alittle bit back there. I'll have to check for play in My S1050 when I get back out to the garage. I notice twist in the tool head, but not tilt. I've always meant to see if I could shim some of the twist out of it. I guess it all comes down to what You're expecting from you're machine. I don't see how you could NOT get .005" of play with the design of the S1050. Anyhow, I have the primer drop tube upgrade, FF&B .308 shellplate, Swage rod, and swage rod backer, I highly recommend those if you're processing brass. LUD with the FF&B pin is very nice upgrade. I had a P&W drive, but never really liked it, sold it for what I had into it. I don't do enough to warrant the expense of an Autodrive. I do love my Mr. Bulletfeeder! |
|
|
|
FL, USA
|
[Last Edit: ReefRaider]
[#26]
Originally Posted By Ronnie_B:
I am using an RT1500 and it stays a lot cooler than the 1200 did. Reef Raider, I adjust the dies and have the preload bushing so that the toolhead stops the in the same position whether there is brass or not- kind of like the concept of adjusting a die in a single stage to cam-over slightly. On my brass prep toolhead I installed the spacer bushing on the bottom of the trim die. I then adjust the other dies by running the toolhead down, turn the die until it seats against the shellplate, then add a little extra for the preload. I first noticed the toolhead tilt problem about two years ago when my headspace and trim were inconsistent, and could see the trimmer tilt slightly as the toolhead bottomed out. Dillon pretty much said if the brass headspaces within spec there is no problem. They checked one of my 1050s (New press) and said the frame/ram were within spec. When the ram is extended up, I can move the toolhead about .005 for/aft and side-side measured with a mag-base dial indicator which, to me, is not really a precise fit. Not even close. All three of my 1050's are about the same. One rep suggested I send the ram out to be hard chromed- We used to do that on worn hydraulic valve actuators on large steam turbines, and it would probably work. These presses were new/almost new at that time. With the changes I made, I don't see it happen now and all my brass pretty much gauges the same. I know it's a lot to ask but I'm sure I'm not the only one here that would like to see some pics of your tool head. I would like to try doing some thing similar to what you have done. I would have my brother make me faults dies to put in the tool head for the people. Then put the nuts on the bottom of the tool head to secure them. That way nothing on top of the tool head would have to be modified. Did you make something that will screw on to the bottoms of the dies to contact the shell plate ? There is some tolerance stacking going on in the S1050s that's a given. My PW auto drives also have some. Mostly in the bearings of the pivot arms. I've replace them in the past and keep spares. |
|
|
FL, USA
|
[Last Edit: ReefRaider]
[#27]
Originally Posted By ChevelleDave:
I never thought about that, equally loading the toolhead. I guess I kinda do that somewhat already with the swage die and trim die, being opposite each other and M die. My brass gauges very consistently, and OAL is consistent, I guess it comes down to how precise of a load You're doing. I only use the 1050 for de-capping and mass sizing/trimming and blaster loading. All my "precision" stuff is worked on the LEE Classic or Co-Ax, and trimmed on a Wilson. I guess I could add a extra powder die to load alittle bit back there. I'll have to check for play in My S1050 when I get back out to the garage. I notice twist in the tool head, but not tilt. I've always meant to see if I could shim some of the twist out of it. I guess it all comes down to what You're expecting from you're machine. I don't see how you could NOT get .005" of play with the design of the S1050. Anyhow, I have the primer drop tube upgrade, FF&B .308 shellplate, Swage rod, and swage rod backer, I highly recommend those if you're processing brass. LUD with the FF&B pin is very nice upgrade. I had a P&W drive, but never really liked it, sold it for what I had into it. I don't do enough to warrant the expense of an Autodrive. I do love my Mr. Bulletfeeder! I only use the Mr. Bullet feeder for .45. I would like to get the extended large primer tube for running .45 also. Then I'll need a bigger ammo tray too. Another thing on my list is the extended powder hopper for running .223. not having to fill the hopper with powder every stack of primers would be nice too. With that I might be able to have added the extended small primer tube also. As long as it will run out of primers before powder. Which I think it will. |
|
|
TX, USA
|
[#28]
Balancing a progressive press toolhead is nothing new or special to the 1050. And certainly not only a concern for trimming. When loading, you can see variation in COAL. I applaud those of you who spend the time working on tricks to improve it. Personally, I dont think much about it for my bulk ammo reloading. I do balance the head just due to necessity. My results are good.
|
|
|
FL, USA
|
[Last Edit: ReefRaider]
[#29]
The bushings to get a preload that removes the tolerance stacking of the 1050 , is a new idea to me. As has been said I'm sure it would in fact tighten the press and make it able to achieve a + - .01. regardless of die configuration and or location of cases in the shell plate. Running an auto drive sure helps , but this would put it over the top.
|
|
|
FL, USA
|
[Last Edit: ReefRaider]
[#30]
Just a bump to get back on page 1 . To see if maybe we can get pics from Ronnie.
|
|
|
|
[#31]
One thing I thought of, does the extended hopper fit on the 1050? I thought I remember reading that the case feeder gets in the way.
|
|
|
|
FL, USA
|
[#32]
Unique tec makes a model that's 11" instead of 14". The 11" unit fits the 1050 and raise's the capacity by 57%.
|
|
|
|
[#33]
I'll have to check that out.
I don't remember if I posted it, but the Level 10 spring and bushing are nice. |
|
|
|
LA, USA
|
[#34]
Checking in- I will try to get pics later tonight and post them or email tomorrow night.
I did not modify a toolhead. I adjust all die bodies to touch the shellplate wherever possible, and install the bushings on others. I have not settled on a final configuration until I run a few batches of brass, but so far so good. I made the bushings by cutting down some Hornaday LocknLoad die adapters and hand lapped them for final thickness- they screw onto the bottom of the die, with the shoulder seating against the bottom of the toolhead. They could be made a little undersized then shimmed. My goal is to support the toolhead at as many points as possible. At this time I have contact with the shellplate at 5 points. I may make a dummy die by cutting a junk die down to install in station 5 which will have to clear the vacuum manifold on the trim die. I also use the bushings on my loading toolhead- same problem with the same solution. |
|
|
|
[#35]
I just reset My 1050 back to process a bunch of 5.56.
I was going to set all the die body's just till they touch the shell plate, then adjust the sizing die until it is correct. Then turn the de-capping die, swage, and M die bodies down the same amount. Also was going to try cutting down a extra powder die to go under the vacuum hood. That sound about right? I'm thinking that is what you mean. |
|
|
|
LA, USA
|
[#36]
That's it!
|
|
|
|
[#37]
Cool, I'll try to get it done tomorrow. I'll post up when I get it.
|
|
|
|
FL, USA
|
[#38]
For some reason I envision something like the Hornady die bushings on the bottom of the dies with a nut to lock them in place. This way there's nothing above the top of the tool head and they can be adjusted very easily. I would think 4 of them spread out would be enough. I suppose if you really wanted to a rod could be made and threaded on one end. It would then go though the tool head in the 4 the station ( primer ) with a nut on both top and bottom of the tool head for adjustments. Wonder if there is a size of black pipe that could be tapped out on the ID to make these bushings out of ?
|
|
|
|
[#39]
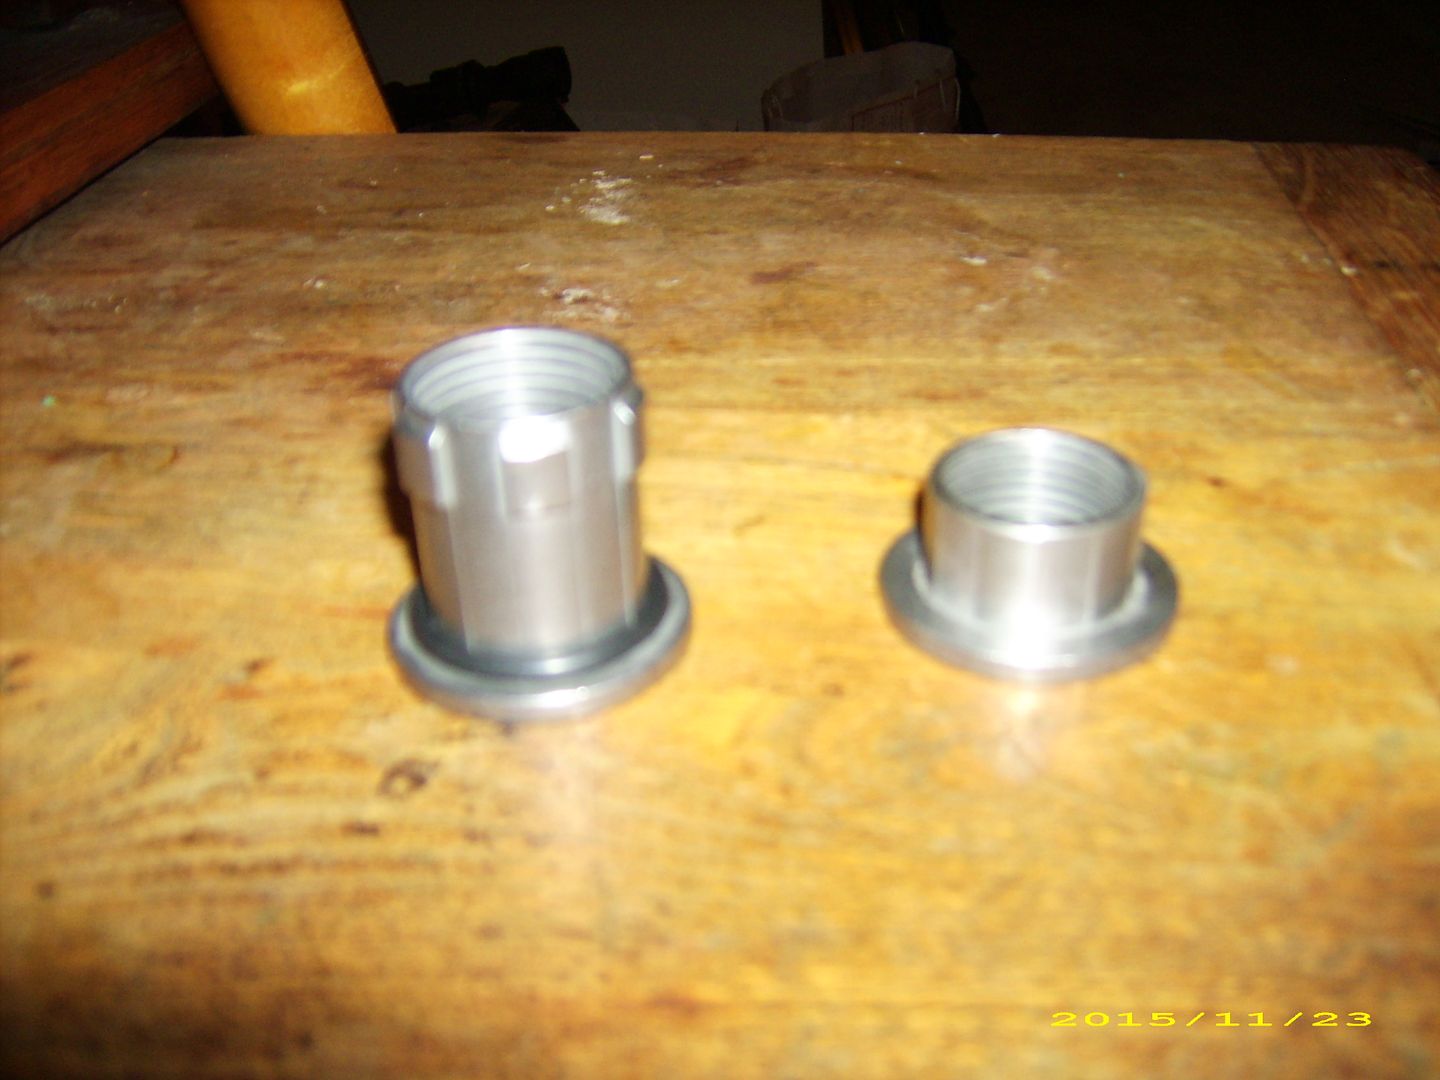
Well, this is what I came up with. Chopped off and extra powder die.

It will work for my purposes, it is kind of a bitch to tighten. I got to looking, and with a little bit of work, I think I could find the right size threaded hex socket cap and thread it, or just tack weld it in the hole and clean it up. Something to look into this winter. |
|
|
|
|
[#40]
I also ordered a couple extra trimmer adjustment nuts, and drilled and tapped them with a 8-32th nylon tipped set screw.
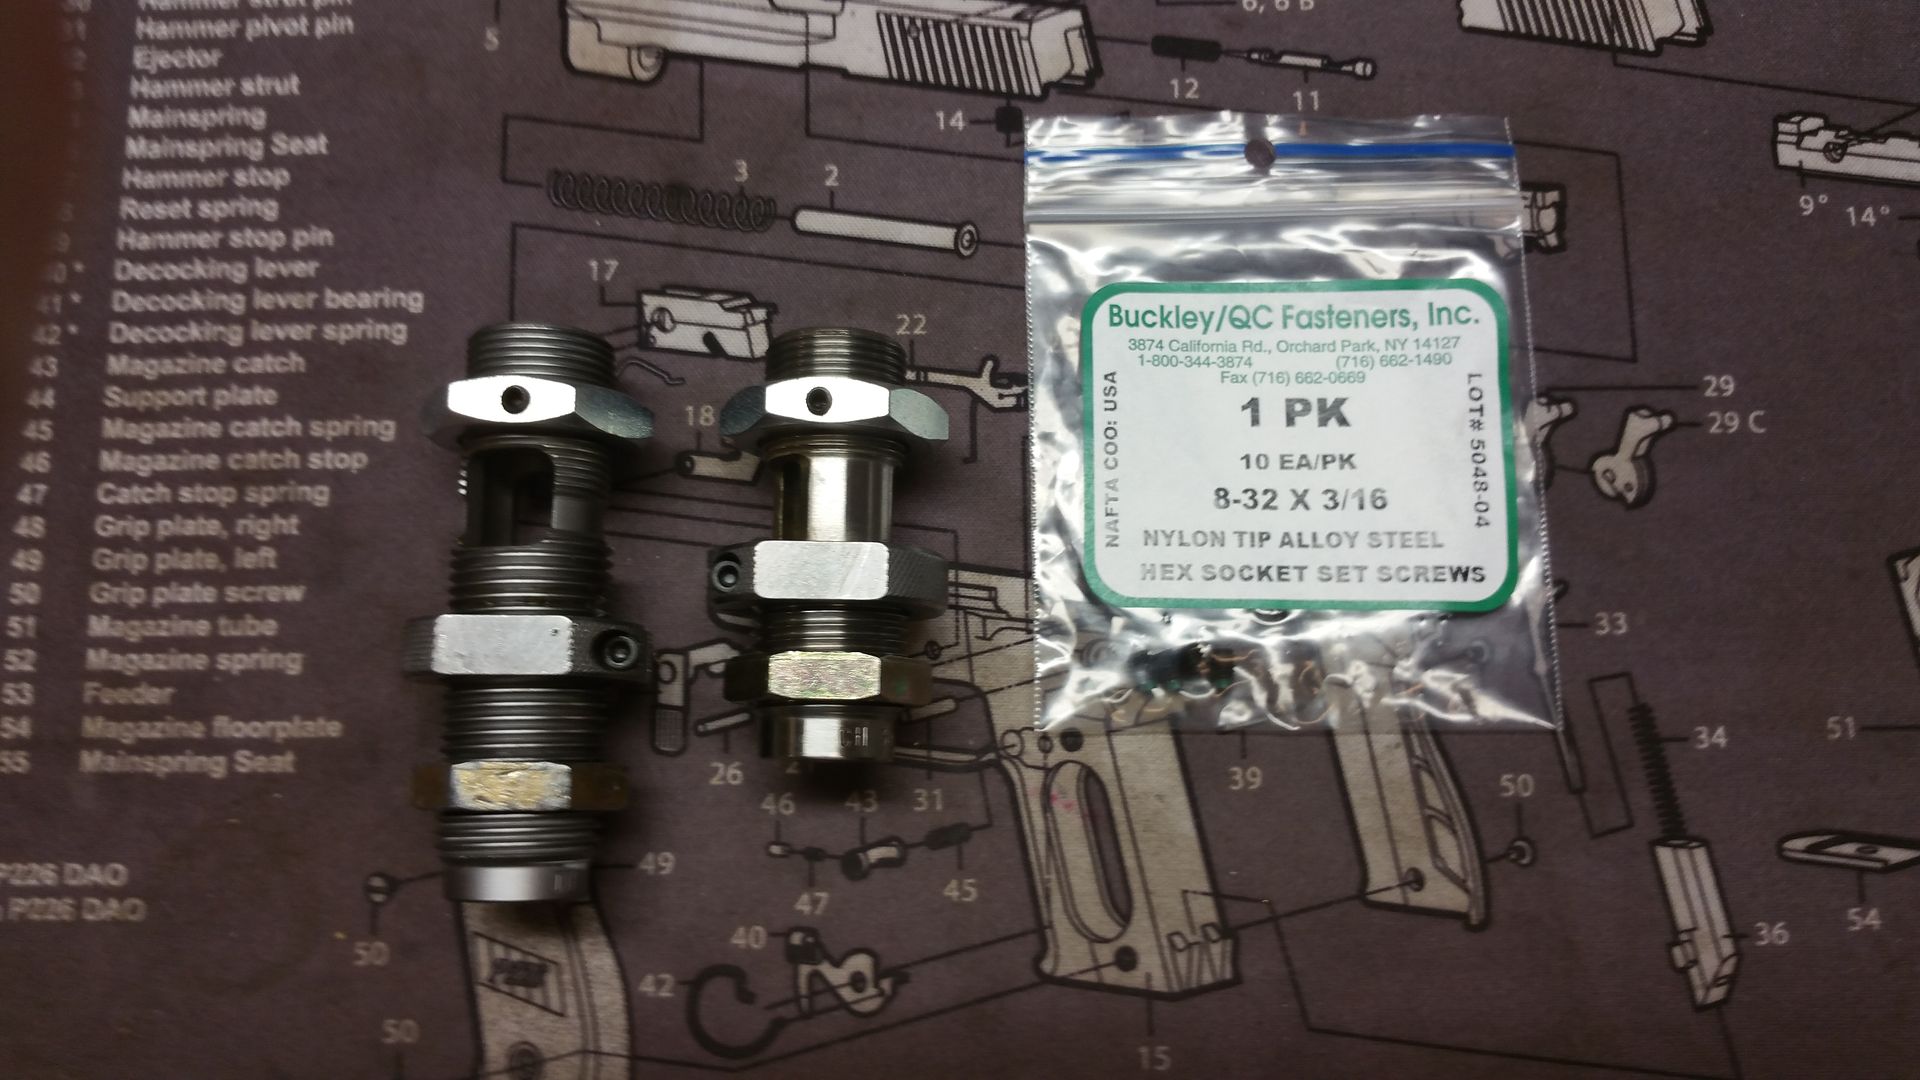
Hopefully I can somewhat keep the ballpark adjustments of the trimmer when I switch between calibers. |
|
|
|
FL, USA
|
[Last Edit: ReefRaider]
[#41]
Great thanks for posting those pic.
|
|
|
|
[Last Edit: ChevelleDave]
[#42]
You're welcome.
.308 die on the left, 300 BO die on the right. That is My Dillon "notched toolhead" for 300 BO. I forget the real name. It is My dedicated trim/de-capping toolhead, do all my processing on it. |
|
|
|
TX, USA
|
[Last Edit: djryan13]
[#43]
Originally Posted By ChevelleDave:
You're welcome/ .308 die on the left, 300 BO die on the right. That is My Dillon "notched toolhead". I forget the real name. It is My dedicated trim/de-capping toolhead, do all my processing on it. "Trim Toolhead" or something like that. There is a company who makes 550 and 650 heads with a vacuum attachment. Basically a hole drilled in with tube for hose. Not sure if they have em for 1050. I really hated using the Dillon 550 trim head with certain calibers so I may try the modified head. Took dillon way too long to come out with the 1050 trim head.. Nice post, Dave! |
|
|
|
[#44]
Going to set the archive toggle to keep this thread out of the archives. 1050 guys, save a link to this thread for future reference. |
|
|
|
FL, USA
|
[#45]
Originally Posted By dryflash3:
Going to set the archive toggle to keep this thread out of the archives. 1050 guys, save a link to this thread for future reference. I see your still on top of things here. |
|
|
|
[#46]
Originally Posted By ReefRaider: I see your still on top of things here. Originally Posted By ReefRaider: Originally Posted By dryflash3: Going to set the archive toggle to keep this thread out of the archives. 1050 guys, save a link to this thread for future reference. I see your still on top of things here. |
|
|
|
LA, USA
|
[#47]
I sent Chevelle Dave a picture of my bushings- maybe he can post them.
|
|
|
FL, USA
|
[#48]
Originally Posted By Ronnie_B:
I sent Chevelle Dave a picture of my bushings- maybe he can post them. Thank you Sir ! |
|
|
|
[#49]
Originally Posted By Ronnie_B:
I sent Chevelle Dave a picture of my bushings- maybe he can post them. I either didn't get it, or I didn't recognize it and it got dumped. I'm one of those clean email box freaks.
But PM it, or remail it, and I will post it. Was it to the wavecable account from when we where doing the wiring schematic? I'll pm you a email address to make sure. |
|
|
|
|
[#50]
Here is Ronnie's modified LNL bushing.
|
|
|
|
 Win a FREE Membership!
Sign up for the ARFCOM weekly newsletter and be entered to win a free ARFCOM membership. One new winner* is announced every week!
You will receive an email every Friday morning featuring the latest chatter from the hottest topics, breaking news surrounding legislation, as well as exclusive deals only available to ARFCOM email subscribers.

AR15.COM is the world's largest firearm community and is a gathering place for firearm enthusiasts of all types.
From hunters and military members, to competition shooters and general firearm enthusiasts, we welcome anyone who values and respects the way of the firearm.

Subscribe to our monthly Newsletter to receive firearm news, product discounts from your favorite Industry Partners, and more.
Copyright © 1996-2024 AR15.COM LLC. All Rights Reserved.
Any use of this content without express written consent is prohibited.
AR15.Com reserves the right to overwrite or replace any affiliate, commercial, or monetizable links, posted by users, with our own.


