FL, USA
|
[#1]
Thanks again for taking the time to post that.
|
|
|
FL, USA
|
[#2]
I would prefer having bushings that can be adjusted to fit. I'll have to look into that soon and let you all know what becomes of it.
|
|
|
|
[#3]
You are welcome.
I'm going to try to get out to the garage and work on an idea I had, I'll post it up later if it works out. |
|
|
|
FL, USA
|
[#4]
Well had some time on my hands today so I made one of those case feeder fix plates. It sits under the stock unit for now. Since I didn't feel like spending money on the press right now. Made this one out of aluminum. When I get to the final version of it then there's some 1/8 plate steel here for it.
For now it sure seems to make a difference in the feed. Since this 1050 is on a 900rpm drive. This might be all I need for now. One of those new shell plates is still on my want list. |
|
|
|
[#5]
I was looking at a couple on Ebay, then watched a few vids of them. I'll tell you with .308 the FF&B shellplate solved a lot of the problem. Also in his video he sets up his shellplate with feeler gauges, tried that and it really worked well, also took out the phenolic detent ball for the steel one.
I also found that sometimes when I am just de-capping a batch of brass, sometimes I just get cranking too fast. Just need to slow down a little and be very definitive in going lock to lock. How did you come up with the profile, just trial and error? |
|
|
|
FL, USA
|
[Last Edit: ReefRaider]
[#6]
The one I made is just for .223. I had a good starting point knowing what seemed to make the case rock the most was when it moves out from under the case that's above it in the tube. The curve starts right after that to slow the feed into the shell plate. I did have to trim it twice though to get right to were I wanted it. Going to make another one just like this one, to try on my press that loads .223 .
There was a guy on here years ago. Can't remember his screen name though. He was a commercial reloader and did a modification to the shell plates too. Which amounted to a small bevel at the top of the rim channel in the shell plate. Dillon puts a bevel on the bottom of were the web is. I've got an old #3 shell plate here. But don't have the tools to attempt to do the mod. Unless I use my dremal.  |
|
|
FL, USA
|
[#7]
Anyone else add anything lately ?
|
|
|
TX, USA
|
[#8]
Not just for 1050... but I really like these powder measure knobs:
https://lvl10i.com/collections/dillon-upgrades/products/dillon-powder-measurer-adjustment-screw-with-knurled-knob They sell cheaper ones on Ebay.. but they are not as big and not as nice. But they are good too. Makes adjustment much easier. |
|
|
|
[#9]
I just took delivery of a 1050 this week. It's going to be for 45acp mainly, manual operation, and have been setting up the bench and deciding on height, mounting, etc.
Inline Fab 1050 mount was recommended, however I have 2" Maple BB top so not sure that I really need it. Right now bench at 39" with no mount and also 550B with 8.5" strong mount (replacing the wood stand shown) seems to be best solution for shoulder height lever/standing. If I add Inline Fab mount for 1050 will have to re-jigger my math :). Since new, haven't done any upgrading but did buy a few of those clear primer plates, and plan on picking up the Level10 spent primer deal. I guess I will pick up a few of his derlin components as well, for the primer slide and casefeed slide, if they truly are beneficial? Other than that, plan is to get it up and running, load a bit and see what if anything is needed from there. Mocking things up below and measuring :).  |
|
|
|
TX, USA
|
[#10]
Congrats!
Get an autodrive... height doesn't matter so much. 
Originally Posted By 78Staff:
I just took delivery of a 1050 this week. It's going to be for 45acp mainly, manual operation, and have been setting up the bench and deciding on height, mounting, etc. Inline Fab 1050 mount was recommended, however I have 2" Maple BB top so not sure that I really need it. Right now bench at 39" with no mount and also 550B with 8.5" strong mount (replacing the wood stand shown) seems to be best solution for shoulder height lever/standing. If I add Inline Fab mount for 1050 will have to re-jigger my math :). Since new, haven't done any upgrading but did buy a few of those clear primer plates, and plan on picking up the Level10 spent primer deal. I guess I will pick up a few of his derlin components as well, for the primer slide and casefeed slide, if they truly are beneficial? Other than that, plan is to get it up and running, load a bit and see what if anything is needed from there. Mocking things up below and measuring :). http://i.imgur.com/1E9VFuZl.jpg |
|
|
|
[#11]
You shouldn't need the primer slide bushing. I believe all the new S1050's have a bronze bushing.
I highly recommend the Level 10 spring upgrade, really nice feel to it. The primer drop tube is almost a must in My opinion. I have the Delrin ball and shellplate bearing, just switched back to the steel ball with no bearing and having good success for processing brass. |
|
|
|
|
[#12]
Originally Posted By 78Staff:
I just took delivery of a 1050 this week. It's going to be for 45acp mainly, manual operation, and have been setting up the bench and deciding on height, mounting, etc. Inline Fab 1050 mount was recommended, however I have 2" Maple BB top so not sure that I really need it. Right now bench at 39" with no mount and also 550B with 8.5" strong mount (replacing the wood stand shown) seems to be best solution for shoulder height lever/standing. If I add Inline Fab mount for 1050 will have to re-jigger my math :). Since new, haven't done any upgrading but did buy a few of those clear primer plates, and plan on picking up the Level10 spent primer deal. I guess I will pick up a few of his derlin components as well, for the primer slide and casefeed slide, if they truly are beneficial? Other than that, plan is to get it up and running, load a bit and see what if anything is needed from there. Mocking things up below and measuring :). http://i.imgur.com/1E9VFuZl.jpg Heads up on conversions , I’m at a hair under $60 per conversion as I just add the parts needed to make up a conversion with the ones I already have when you run 15 calibers the cost savings adds up along with not having to deal with that many kits |
|
|
|
FL, USA
|
[#13]
Originally Posted By angus6:
Heads up on conversions , I’m at a hair under $60 per conversion as I just add the parts needed to make up a conversion with the ones I already have when you run 15 calibers the cost savings adds up along with not having to deal with that many kits Originally Posted By angus6:
Originally Posted By 78Staff:
I just took delivery of a 1050 this week. It's going to be for 45acp mainly, manual operation, and have been setting up the bench and deciding on height, mounting, etc. Inline Fab 1050 mount was recommended, however I have 2" Maple BB top so not sure that I really need it. Right now bench at 39" with no mount and also 550B with 8.5" strong mount (replacing the wood stand shown) seems to be best solution for shoulder height lever/standing. If I add Inline Fab mount for 1050 will have to re-jigger my math :). Since new, haven't done any upgrading but did buy a few of those clear primer plates, and plan on picking up the Level10 spent primer deal. I guess I will pick up a few of his derlin components as well, for the primer slide and casefeed slide, if they truly are beneficial? Other than that, plan is to get it up and running, load a bit and see what if anything is needed from there. Mocking things up below and measuring :). http://i.imgur.com/1E9VFuZl.jpg Heads up on conversions , I’m at a hair under $60 per conversion as I just add the parts needed to make up a conversion with the ones I already have when you run 15 calibers the cost savings adds up along with not having to deal with that many kits Since I only load .223&.45 all the parts to change caliber's is straight forward. How do you mange all those parts when changing between caliber's ? Got a chart you can post here ? |
|
|
|
[#14]
Originally Posted By ReefRaider: Since I only load .223&.45 all the parts to change caliber's is straight forward. How do you mange all those parts when changing between caliber's ? Got a chart you can post here ? Originally Posted By ReefRaider: Originally Posted By angus6: Originally Posted By 78Staff: I just took delivery of a 1050 this week. It's going to be for 45acp mainly, manual operation, and have been setting up the bench and deciding on height, mounting, etc. Inline Fab 1050 mount was recommended, however I have 2" Maple BB top so not sure that I really need it. Right now bench at 39" with no mount and also 550B with 8.5" strong mount (replacing the wood stand shown) seems to be best solution for shoulder height lever/standing. If I add Inline Fab mount for 1050 will have to re-jigger my math :). Since new, haven't done any upgrading but did buy a few of those clear primer plates, and plan on picking up the Level10 spent primer deal. I guess I will pick up a few of his derlin components as well, for the primer slide and casefeed slide, if they truly are beneficial? Other than that, plan is to get it up and running, load a bit and see what if anything is needed from there. Mocking things up below and measuring :). http://i.imgur.com/1E9VFuZl.jpg Heads up on conversions , I’m at a hair under $60 per conversion as I just add the parts needed to make up a conversion with the ones I already have when you run 15 calibers the cost savings adds up along with not having to deal with that many kits Since I only load .223&.45 all the parts to change caliber's is straight forward. How do you mange all those parts when changing between caliber's ? Got a chart you can post here ? Similar for me, ordered the press in 45acp and also ordered a 9mm conversion and quick change kit, plus the small primer system since you don't get both with the 1050... spendy. This online conversion finder includes the 1050, albeit with limited calibers (45acp is not listed, for instance) :(. - http://thegunwiki.com/apps/calconversion/ |
|
|
|
TX, USA
|
[#15]
Originally Posted By 78Staff:
Similar for me, ordered the press in 45acp and also ordered a 9mm conversion and quick change kit, plus the small primer system since you don't get both with the 1050... spendy. This online conversion finder includes the 1050, albeit with limited calibers (45acp is not listed, for instance) :(. - http://thegunwiki.com/apps/calconversion/ Originally Posted By 78Staff:
Originally Posted By ReefRaider:
Originally Posted By angus6:
Originally Posted By 78Staff:
I just took delivery of a 1050 this week. It's going to be for 45acp mainly, manual operation, and have been setting up the bench and deciding on height, mounting, etc. Inline Fab 1050 mount was recommended, however I have 2" Maple BB top so not sure that I really need it. Right now bench at 39" with no mount and also 550B with 8.5" strong mount (replacing the wood stand shown) seems to be best solution for shoulder height lever/standing. If I add Inline Fab mount for 1050 will have to re-jigger my math :). Since new, haven't done any upgrading but did buy a few of those clear primer plates, and plan on picking up the Level10 spent primer deal. I guess I will pick up a few of his derlin components as well, for the primer slide and casefeed slide, if they truly are beneficial? Other than that, plan is to get it up and running, load a bit and see what if anything is needed from there. Mocking things up below and measuring :). http://i.imgur.com/1E9VFuZl.jpg Heads up on conversions , I’m at a hair under $60 per conversion as I just add the parts needed to make up a conversion with the ones I already have when you run 15 calibers the cost savings adds up along with not having to deal with that many kits Since I only load .223&.45 all the parts to change caliber's is straight forward. How do you mange all those parts when changing between caliber's ? Got a chart you can post here ? Similar for me, ordered the press in 45acp and also ordered a 9mm conversion and quick change kit, plus the small primer system since you don't get both with the 1050... spendy. This online conversion finder includes the 1050, albeit with limited calibers (45acp is not listed, for instance) :(. - http://thegunwiki.com/apps/calconversion/ dont forget manual also lists each part needed for each conversion (at the end). I have conversions for a bunch.. mostly bought piece meal. I use some parts from 550 conversion too (powder at least). |
|
|
|
[#16]
Originally Posted By 78Staff: I just took delivery of a 1050 this week. It's going to be for 45acp mainly, manual operation, and have been setting up the bench and deciding on height, mounting, etc. Inline Fab 1050 mount was recommended, however I have 2" Maple BB top so not sure that I really need it. Right now bench at 39" with no mount and also 550B with 8.5" strong mount (replacing the wood stand shown) seems to be best solution for shoulder height lever/standing. If I add Inline Fab mount for 1050 will have to re-jigger my math :). Since new, haven't done any upgrading but did buy a few of those clear primer plates, and plan on picking up the Level10 spent primer deal. I guess I will pick up a few of his derlin components as well, for the primer slide and casefeed slide, if they truly are beneficial? Other than that, plan is to get it up and running, load a bit and see what if anything is needed from there. Mocking things up below and measuring :). http://i.imgur.com/1E9VFuZl.jpg Tried a few different heights today on the bench, from 34-39 - and 39 seems like the best option. Put's the 1050 roller handle right a shoulder height without any additional mount required, and same for the 550 (using a strong mount). Good height for standing and reloading, or sitting/leaning on stool for maintenance, parts cleaning, etc. |
|
|
|
|
[#17]
I made a little UHMW ring to support the vacuum shroud.

I finally got to processing some brass, got running and pulled 10 samples. All of them were +/- a thousandth in length and headspace. I think that cut off die, and adjusting all the other dies really helped to get the best consistency I've gotten yet. I was thinking about the cut off powder die, I need to get a 1/2" square push through reamer. I could then use a 1/2" extension to adjust it and hold it while tightening it. I looked one up, and way to spendy to buy one, 150.00 bucks. I'll need to call a couple machine shops to see if they can do it. |
|
|
|
LA, USA
|
[Last Edit: Ronnie_B]
[#18]
Dave-
What about threading (Fine threads) the inside of a cut-down die and using a bolt for the stop? Or, maybe a Lee universal or 45 ACP die body- something with existing internal threads. I need to go out to the ManCave and look into this. You could then use a bolt with a lock nut. The Dillon rifle swage die body is also a possibility. And, the die body might be oriented updside down. I really wish someone would make a new vacuum manifold design that would not overhang the adjacent die positions. I cut the back off of one to try it, covered the hole with gorrila tape. I may do something a little more sophisticated next try. It worked, I was able to install the Lee expander die in the station following the trim die, and with the body adjusted to preload. It does look like you are getting pretty good results so far! |
|
|
|
[#19]
Yeah Ronnie, couple of good ideas to look into there. I got a couple things I wanna look into once I am done with processing this batch of brass.
I'm thinking of trying to just blow a hole on the vacuum shroud opposite the vac port. I'd rather listen to a whoosh, then that goddamn whistling noise it makes. 
|
|
|
|
|
[#20]
What is the smallest quietest vacuum that will work for trimming on the 1050?
Tired of listening to my monster shop vac, also wearing it out. Would like to get a little dedicated vac for trimming operations. |
|
|
|
FL, USA
|
[#21]
Originally Posted By ChevelleDave:
What is the smallest quietest vacuum that will work for trimming on the 1050? Tired of listening to my monster shop vac, also wearing it out. Would like to get a little dedicated vac for trimming operations. I got a red devil up right for my 1st trimmer. Removed the handle and the belt that drives the sweeper brush. It has a removable canister so emptying is easy. A filter that can be cleaned. It ended up having enough power to hook up to both trimer motors. Though a T fitting of PVC. I think I paid &59.00 for it years ago. Has countless hours on it and still working ( knocks on wood ). Not to loud and the exhaust is out the front. On a real cool day I'll point it in my direction some times. Every now and then I do get a birds nest in the pipes. It's easy enough to clear out though as none of it is glued together. To answer your question though 2 hp would seem to be a minimum. |
|
|
|
[#22]
I'm thinking about one of these as it would have a lot of other uses around the house, cleaning cars.
DeWalt DCV581H 18/20 |
|
|
|
FL, USA
|
[Last Edit: ReefRaider]
[#23]
https://www.amazon.com/gp/aw/d/B008L5F4H0/ref=mp_s_a_1_8?ie=UTF8&qid=1475465755&sr=8-8&pi=AC_SX236_SY340_FMwebp_QL65&keywords=Dirt+Devil
I'm thinking just about any vac made to be used inside the home is going to make less noise. I do know for a fact that my red devil vac makes less noise than my small shop vac does. I use my small corded shop vac on the cars and in the house to clean up after the honey do's |
|
|
|
[#24]
Originally Posted By ChevelleDave:
I'm thinking about one of these as it would have a lot of other uses around the house, cleaning cars. DeWalt DCV581H 18/20 I use an older version, DC500 I think. It does ok but not great. It's loud enough that I wear ear pro and the hose occasionally clogs with brass shavings. I just moved and my reloading is on hold until I get a shop built. When I do build I'm seriously considering a separate closet for the vacuum. |
|
|
|
TX, USA
|
[#25]
Originally Posted By SubQ:
I use an older version, DC500 I think. It does ok but not great. It's loud enough that I wear ear pro and the hose occasionally clogs with brass shavings. I just moved and my reloading is on hold until I get a shop built. When I do build I'm seriously considering a separate closet for the vacuum. Originally Posted By SubQ:
Originally Posted By ChevelleDave:
I'm thinking about one of these as it would have a lot of other uses around the house, cleaning cars. DeWalt DCV581H 18/20 I use an older version, DC500 I think. It does ok but not great. It's loud enough that I wear ear pro and the hose occasionally clogs with brass shavings. I just moved and my reloading is on hold until I get a shop built. When I do build I'm seriously considering a separate closet for the vacuum. i want to vac and compressor into a closet and build lines... hopefully it will still work. At the very least, I need an exhaust to outside for vac. Vac throws a lot of heat. Winter is fine but during the Summer (we only have 2 seasons in TX), its a b!tch. My split mini AC cant handle the heat. |
|
|
|
[#26]
Originally Posted By SubQ:
I use an older version, DC500 I think. It does ok but not great. It's loud enough that I wear ear pro and the hose occasionally clogs with brass shavings. I just moved and my reloading is on hold until I get a shop built. When I do build I'm seriously considering a separate closet for the vacuum. Originally Posted By SubQ:
Originally Posted By ChevelleDave:
I'm thinking about one of these as it would have a lot of other uses around the house, cleaning cars. DeWalt DCV581H 18/20 I use an older version, DC500 I think. It does ok but not great. It's loud enough that I wear ear pro and the hose occasionally clogs with brass shavings. I just moved and my reloading is on hold until I get a shop built. When I do build I'm seriously considering a separate closet for the vacuum. Yeah, I figure that I will have to wear ear pro anyway. Just the hissing from the shroud ports is maddening enough. |
|
|
|
|
[#27]
Originally Posted By djryan13:
i want to vac and compressor into a closet and build lines... hopefully it will still work. At the very least, I need an exhaust to outside for vac. Vac throws a lot of heat. Winter is fine but during the Summer (we only have 2 seasons in TX), its a b!tch. My split mini AC cant handle the heat. Originally Posted By djryan13:
Originally Posted By SubQ:
Originally Posted By ChevelleDave:
I'm thinking about one of these as it would have a lot of other uses around the house, cleaning cars. DeWalt DCV581H 18/20 I use an older version, DC500 I think. It does ok but not great. It's loud enough that I wear ear pro and the hose occasionally clogs with brass shavings. I just moved and my reloading is on hold until I get a shop built. When I do build I'm seriously considering a separate closet for the vacuum. i want to vac and compressor into a closet and build lines... hopefully it will still work. At the very least, I need an exhaust to outside for vac. Vac throws a lot of heat. Winter is fine but during the Summer (we only have 2 seasons in TX), its a b!tch. My split mini AC cant handle the heat. If I can get going today, I'll try to take pics of My set-up. I have the beast shop vac vented to the outside. I would love to have room to build a closet, or even a lean to type shed outside for the air compressor and a vacuum system for woodworking, with a hood over a bench for small welding projects/casting. I may just try the DeWalt as it is less space consuming and would be convenient for small clean up jobs around the bench. |
|
|
|
|
[#28]
I bought the DeWalt at Hardware Sales today.

I really like it, I can size/trim with no earpro on. Very quiet, lees suction then the big vac, but no jams so far. |
|
|
|
FL, USA
|
[#29]
That was a good up grade then.
On that note. Yesterday I busted two index paws. One to a case that the rim was damaged to and the other as far as I can tell might have been a primer that didn't get pushed all the way out. I know there's a up graded paw sold. But it's the weakest link when there's a jamb . So I need some more spare parts now as I'm out of something's and low on others. Thought I'd see if Enos had the parts I want , just to find out he's gone now. Retired and closed the store. Is there any other place besides Dillon for small parts ? |
|
|
TX, USA
|
[#30]
Sometimes ebay has parts.
What decap pin are you using? I had similar issues all the time with primers sticking to pins (thus not allowing shellplate to rotate). Issue mostly with Lee universal and RCBS decap pins. I saw a tip on a thread where the end of pin was tapered like a hypodermic needle. Haven't had an issue since. I did buy a hardened pawl which I installed recently. No issues yet but a little worried that a tougher pawl will just allow something else to break. |
|
|
FL, USA
|
[Last Edit: ReefRaider]
[#31]
Originally Posted By djryan13:
Sometimes ebay has parts. What decap pin are you using? I had similar issues all the time with primers sticking to pins (thus not allowing shellplate to rotate). Issue mostly with Lee universal and RCBS decap pins. I saw a tip on a thread where the end of pin was tapered like a hypodermic needle. Haven't had an issue since. I did buy a hardened pawl which I installed recently. No issues yet but a little worried that a tougher pawl will just allow something else to break. Have always used the Dillon carbide die, with the carbide explanation ball. Which is another thing I'm running low on. I get bent pins some times. Other times the pin and bolt get bent. Then I replace both. It seems to depend mostly on the brass and how well I QC it before processing it. Nothing there is 100% when your going for high volume. So as they say $ hit happens. Have seen all the lower parts come up on eBay. From guys that have converted to auto drive units. Those are the parts I've never needed and hope not to ever need. |
|
|
|
[Last Edit: angus6]
[#32]
IIRC I solved the primer being pulled back up by cutting pin off the base of a Dillon pin and using their base as a spacer for a lyman pin, their slightly smaller in diameter works great
ETA: credit the mod to RePete over on Enos forum below is a cut and paste from him Here is my fix for primers sticking to the decapping pin. I've been doing this from year 2 of ownership of the 1050 (over 7 years now).
Take a Dillon pin and cut off the pin from the cap - discard pin. file the cap smooth and square. Take a Lyman decapping pin and drop it into the pin retainer for the stem, then drop the cap from the Dillon on top of the Lyman pin and assemble the decapping stem. The Lyman pins are smaller than the Dillons, are cheaper and easier to find. http://www.lymanproducts.com/store/page6.html it's been a 100% cure for me |
|
|
|
|
[#33]
I have been having great success lately with the FF&B de-capping pin. I don't have near the amount of pull back I used to, actually I see the primer drop on the downstroke. Another benefit of the clear primer drop tube.
|
|
|
|
FL, USA
|
[#34]
Now that Dillon has a carbide trimmer die I've been thinking about reconfiguring my tool head. There's two thing I want though. One is to have a expander ball in the 2nd station. To get the ID of the necks worked out. Don't want to be trimming necks that are out of round. This is also so the swagger back up rod has as big of an opening as it can have. The other thing is to be able to process the brass in one pass.
I tried a Lee type decapping die once. My biggest problem with that was it would keep popping up and then cases with primers still in them would start to go though. While I do watch for primers dropping . One can't stop to check every time they think it didn't. FF&B knows that's a problem that's why he had to make up a sensor switch to stop the press. As it stands right now and I'm sure this will change later. There are 3 items I see as must haves as far as up grades go. #1 Case feed plunger fix and or FF&B #3 shell plate. Having both can't hurt. #2Level 10 guide rod kit. #3 Level 10 delrin primer slide sleeve. Down the road when I do have to change my trimmers over . That will be done with the FF&B Honey badger router conversation. If I can use the cut off shafts from my old trimmers. If not the RT 1500 might be an option. I was asking before what the shank size was for those routers. To see if my cut offs could be made to work. I'll try to ck online and see if they give that spec. |
|
|
FL, USA
|
[#35]
Originally Posted By angus6:
IIRC I solved the primer being pulled back up by cutting pin off the base of a Dillon pin and using their base as a spacer for a lyman pin, their slightly smaller in diameter works great ETA: credit the mod to RePete over on Enos forum below is a cut and paste from him it's been a 100% cure for me Originally Posted By angus6:
IIRC I solved the primer being pulled back up by cutting pin off the base of a Dillon pin and using their base as a spacer for a lyman pin, their slightly smaller in diameter works great ETA: credit the mod to RePete over on Enos forum below is a cut and paste from him Here is my fix for primers sticking to the decapping pin. I've been doing this from year 2 of ownership of the 1050 (over 7 years now).
Take a Dillon pin and cut off the pin from the cap - discard pin. file the cap smooth and square. Take a Lyman decapping pin and drop it into the pin retainer for the stem, then drop the cap from the Dillon on top of the Lyman pin and assemble the decapping stem. The Lyman pins are smaller than the Dillons, are cheaper and easier to find. http://www.lymanproducts.com/store/page6.html it's been a 100% cure for me I still can't wrap my head around this. As some of the items your making references to I've never seen. I only have this problem with rifle primers not pistol. But then again I only load .45 and .223 . |
|
|
|
[#36]
I built my own de-cap sensor, and used a relay to shut down the PW.
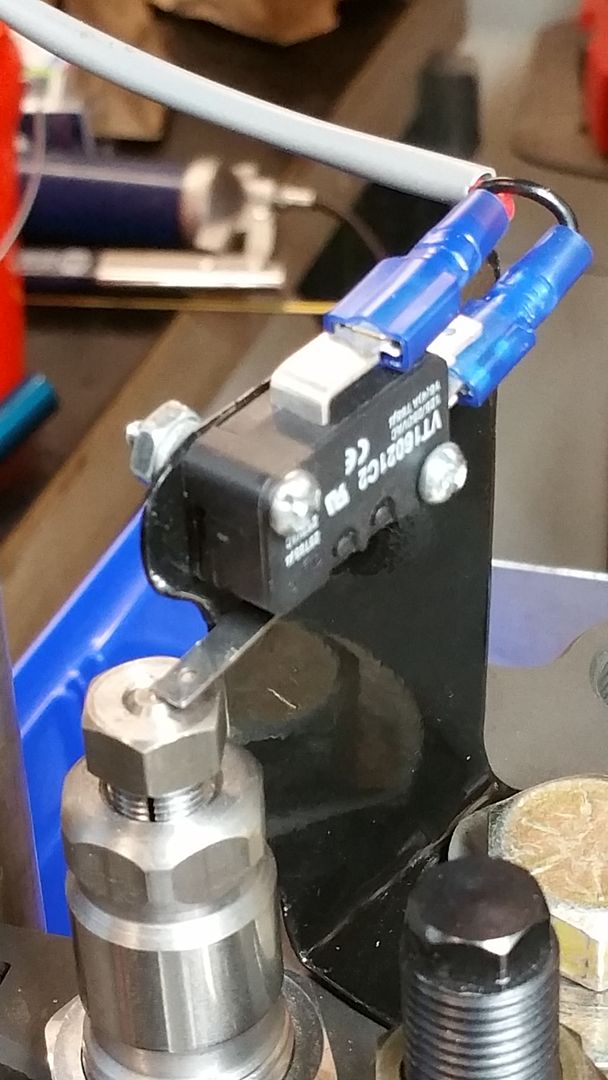
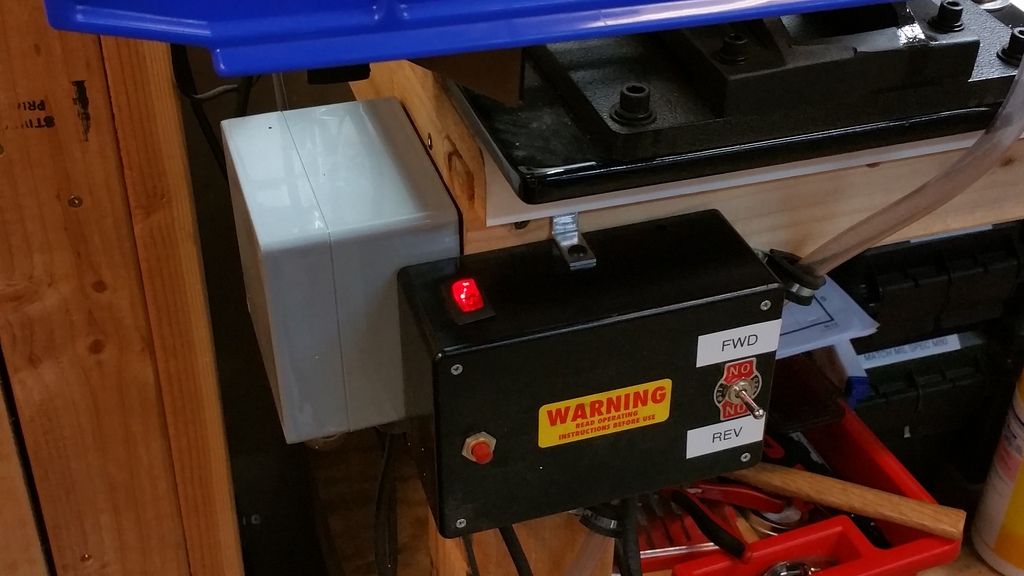
I got some better pics somewhere. If any one is interested I'll try to find them. |
|
|
|
FL, USA
|
[Last Edit: ReefRaider]
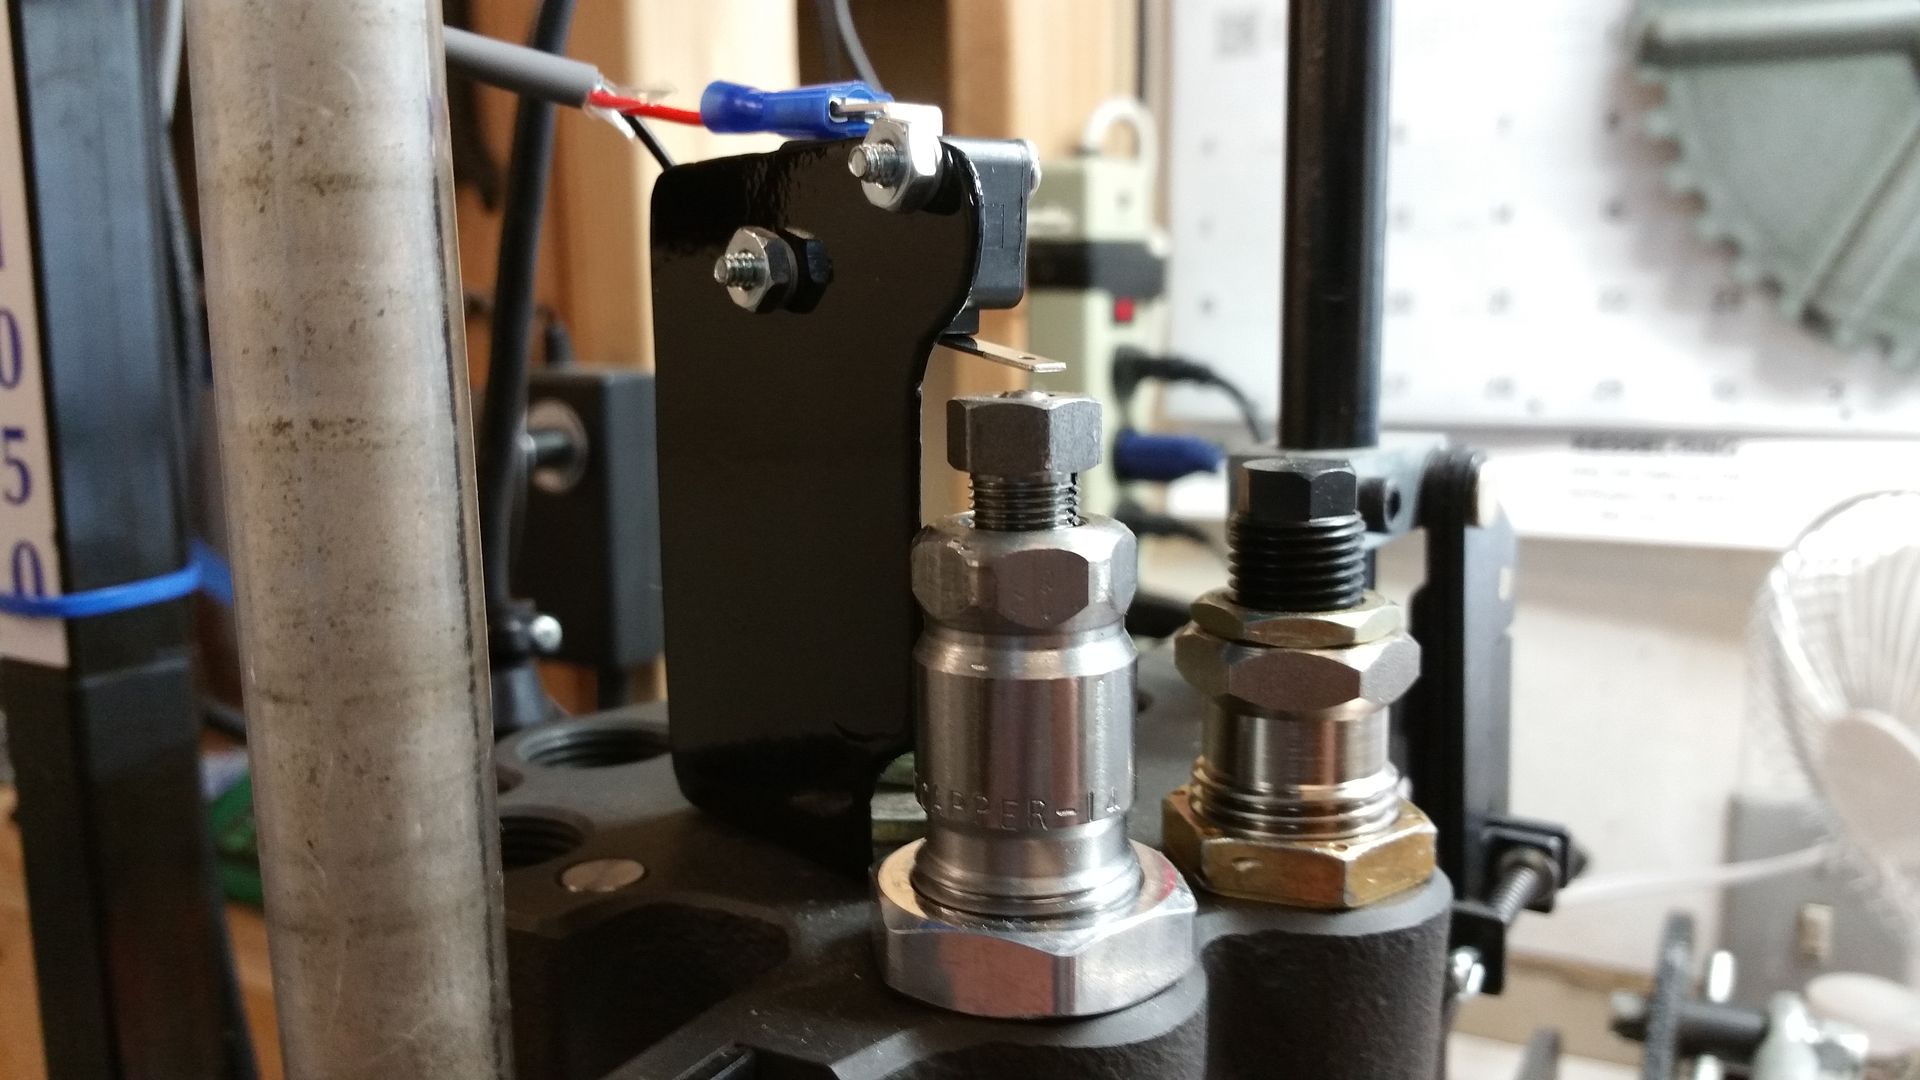
[#37]
How many times has that stopped the press compared to # of cycles ? How are you expanding the necks before you trim them ? Or are you running them though twice also? A pic of how that tool head is set up would be worth 1000 words.
|
|
|
|
[#38]
Originally Posted By ReefRaider:
I still can't wrap my head around this. As some of the items your making references to I've never seen. I only have this problem with rifle primers not pistol. But then again I only load .45 and .223 . Originally Posted By ReefRaider:
Originally Posted By angus6:
IIRC I solved the primer being pulled back up by cutting pin off the base of a Dillon pin and using their base as a spacer for a lyman pin, their slightly smaller in diameter works great ETA: credit the mod to RePete over on Enos forum below is a cut and paste from him Here is my fix for primers sticking to the decapping pin. I've been doing this from year 2 of ownership of the 1050 (over 7 years now).
Take a Dillon pin and cut off the pin from the cap - discard pin. file the cap smooth and square. Take a Lyman decapping pin and drop it into the pin retainer for the stem, then drop the cap from the Dillon on top of the Lyman pin and assemble the decapping stem. The Lyman pins are smaller than the Dillons, are cheaper and easier to find. http://www.lymanproducts.com/store/page6.html it's been a 100% cure for me I still can't wrap my head around this. As some of the items your making references to I've never seen. I only have this problem with rifle primers not pistol. But then again I only load .45 and .223 . Will guess where my head was , it was the pistol dies stems that were modded |
|
|
|
|
[#39]
All the brass I process is for Myself. I run it through 3 time. 1) de-cap and swage for OFB, on 2X brass the swage rod is in loosely to detect primers. 2)after wet tumbling is a LUD to clear flash holes, no swage, trim/re-size, Lyman M die. 3) load them up. On OFB LC, it would trip every now and then. The problem is that You had to sit there and stare at it. If one primer lifted the pin, well, You know the rest. It was very nice, gave me a lot of confidence that I could turn My head for a second prepping the next load of brass to go in, or handling the load that just came out. |
|
|
|
|
[#40]
I got a few more pic of the build if you want to see them. |
|
|
|
FL, USA
|
[#41]
Originally Posted By angus6:
Will guess where my head was , it was the pistol dies stems that were modded Originally Posted By angus6:
Originally Posted By ReefRaider:
Originally Posted By angus6:
IIRC I solved the primer being pulled back up by cutting pin off the base of a Dillon pin and using their base as a spacer for a lyman pin, their slightly smaller in diameter works great ETA: credit the mod to RePete over on Enos forum below is a cut and paste from him Here is my fix for primers sticking to the decapping pin. I've been doing this from year 2 of ownership of the 1050 (over 7 years now).
Take a Dillon pin and cut off the pin from the cap - discard pin. file the cap smooth and square. Take a Lyman decapping pin and drop it into the pin retainer for the stem, then drop the cap from the Dillon on top of the Lyman pin and assemble the decapping stem. The Lyman pins are smaller than the Dillons, are cheaper and easier to find. http://www.lymanproducts.com/store/page6.html it's been a 100% cure for me I still can't wrap my head around this. As some of the items your making references to I've never seen. I only have this problem with rifle primers not pistol. But then again I only load .45 and .223 . Will guess where my head was , it was the pistol dies stems that were modded It's all good as it is still a mod that someone can use on their 1050. |
|
|
FL, USA
|
[#42]
[b]Originally Posted By ChevelleDave:[]
I got a few more pic of the build if you want to see them. For the purpose of this thread that's good. I like the way you did that and if it works for you then it might work for someone else too. I dont really process rifle brass for other people. I do however keep a lot of ready to load brass on hand. When prices get to a certain point I have been known to sell off . Over the years I've come to know some people that don't like to pick up their brass. These same people don't like to process their brass either. I don't do that to make money. I do it just to feed this hobby. |
|
|
|
[#43]
I just don't see the money in processing brass. To make a profit the volume you would have to do it enormous.
|
|
|
|
FL, USA
|
[#44]
Originally Posted By ChevelleDave:
I just don't see the money in processing brass. To make a profit the volume you would have to do it enormous. One could never make a living doing it. If you were a 07 FFL it would be a good side line. Getting enough good brass at the right price is a big problem. |
|
|
TX, USA
|
[#45]
Originally Posted By ReefRaider:
One could never make a living doing it. If you were a 07 FFL it would be a good side line. Getting enough good brass at the right price is a big problem. Originally Posted By ReefRaider:
Originally Posted By ChevelleDave:
I just don't see the money in processing brass. To make a profit the volume you would have to do it enormous. One could never make a living doing it. If you were a 07 FFL it would be a good side line. Getting enough good brass at the right price is a big problem. some still pay a premium for converting 223 to 300. Lots of those guys use the 1050 (trying to stay on topic). I couldnt find the vacuum hole 550 toolhead I had posted earlier. Was hoping to find a 1050 version. Anyone know what I am talking about? It was a toolhead with hole drilled into side and tube for attaching vacuum. Maybe I dreamt it but I swear I saw it for sale somewhere. Would be easier for most calibers since you dont have to mess with blue thing if you need to adjust headspace. |
|
|
FL, USA
|
[Last Edit: ReefRaider]
[#46]
Kind of remember seeing something like that back when the 300BO was just getting popular. With the cut down tool head might have made those with a whole obsolete ?
|
|
|
|
[#47]
Originally Posted By djryan13:
some still pay a premium for converting 223 to 300. Lots of those guys use the 1050 (trying to stay on topic). I couldnt find the vacuum hole 550 toolhead I had posted earlier. Was hoping to find a 1050 version. Anyone know what I am talking about? It was a toolhead with hole drilled into side and tube for attaching vacuum. Maybe I dreamt it but I swear I saw it for sale somewhere. Would be easier for most calibers since you dont have to mess with blue thing if you need to adjust headspace. Originally Posted By djryan13:
Originally Posted By ReefRaider:
Originally Posted By ChevelleDave:
I just don't see the money in processing brass. To make a profit the volume you would have to do it enormous. One could never make a living doing it. If you were a 07 FFL it would be a good side line. Getting enough good brass at the right price is a big problem. some still pay a premium for converting 223 to 300. Lots of those guys use the 1050 (trying to stay on topic). I couldnt find the vacuum hole 550 toolhead I had posted earlier. Was hoping to find a 1050 version. Anyone know what I am talking about? It was a toolhead with hole drilled into side and tube for attaching vacuum. Maybe I dreamt it but I swear I saw it for sale somewhere. Would be easier for most calibers since you dont have to mess with blue thing if you need to adjust headspace. GSI built in vacuum port toolhead |
|
|
|
FL, USA
|
[Last Edit: ReefRaider]
[#48]
Looking at that the 1st thing that I notice is the contour of that case feed plunger. It looks a lot like the design Level 10 sells.
|
|
|
|
[#49]
That was the first thing I saw as well.
|
|
|
|
TX, USA
|
[#50]
Setup would be way quicker without that stupid blue vacuum attachment. I am never satisfied the first go around with headpsace... Maybe if I balance toolhead better (as mentioned earlier), I would have less trouble.
|
|
|
 Win a FREE Membership!
Sign up for the ARFCOM weekly newsletter and be entered to win a free ARFCOM membership. One new winner* is announced every week!
You will receive an email every Friday morning featuring the latest chatter from the hottest topics, breaking news surrounding legislation, as well as exclusive deals only available to ARFCOM email subscribers.

AR15.COM is the world's largest firearm community and is a gathering place for firearm enthusiasts of all types.
From hunters and military members, to competition shooters and general firearm enthusiasts, we welcome anyone who values and respects the way of the firearm.

Subscribe to our monthly Newsletter to receive firearm news, product discounts from your favorite Industry Partners, and more.
Copyright © 1996-2024 AR15.COM LLC. All Rights Reserved.
Any use of this content without express written consent is prohibited.
AR15.Com reserves the right to overwrite or replace any affiliate, commercial, or monetizable links, posted by users, with our own.


