|
[#1]
Couple of things.
500 rounds of rifle ammo expended through my spear LT with the Raid XE mounted. This thing is awesome. I managed to shave five ounces off of the front of the gun by switching the MAWL out to the Raid. The gun balances way better. The offset fire button is a non issue although I did find that under recoil, sometimes I wouldn't keep the button fully depressed resulting in the unit deactivating. The illuminator is absurdly powerful. When i'm not crunched for time I need to see if perhaps I can dial it down a bit, or find a setting where it's not blowing out what i'm trying to look at. The same can be said for the high power laser. It's just too much. We basically had a full moon so I spent most of the night shooting with the low power laser and low power illuminator activated. The low power laser is fantastic and worked fine out to 100 yards. The low power illuminator is mostly useless. The divergence wheel was a non issue. I can still see it being knocked around by gear. I do believe that there are better ways to skin this cat and i'm surprised that Wilcox and L3 think their solution is appropriate. I can't say this conclusively as I have no experience with an Ngal but the fact that you can dial your power levels on the RAID is absolutely awesome. That right there is forward thinking and really gives the individual user options. Options are good. Ultimately, I still hold that the MAWL is the UI king. It is easier to use than anything else on the market. Still, other units can be put into service with minimal heartache. I just think that being able to fire either a focused or an NIR simply by moving your thumb a half inch is pretty awesome. No dials, no settings, just press the button. The RAID and the NGAL can't do this unless you utilize the RAID's pressure pad which I don't have. Not a huge deal, you just have to know that there will be shortcomings. I really only have one gripe: See below: My crane junction box doesn't seem to be sitting well. I'm not sure what the deal is there. Is the gap normal? The crane plug port works as it should. I just don't trust the small ass screw that Wilcox used to hold that thing in there...  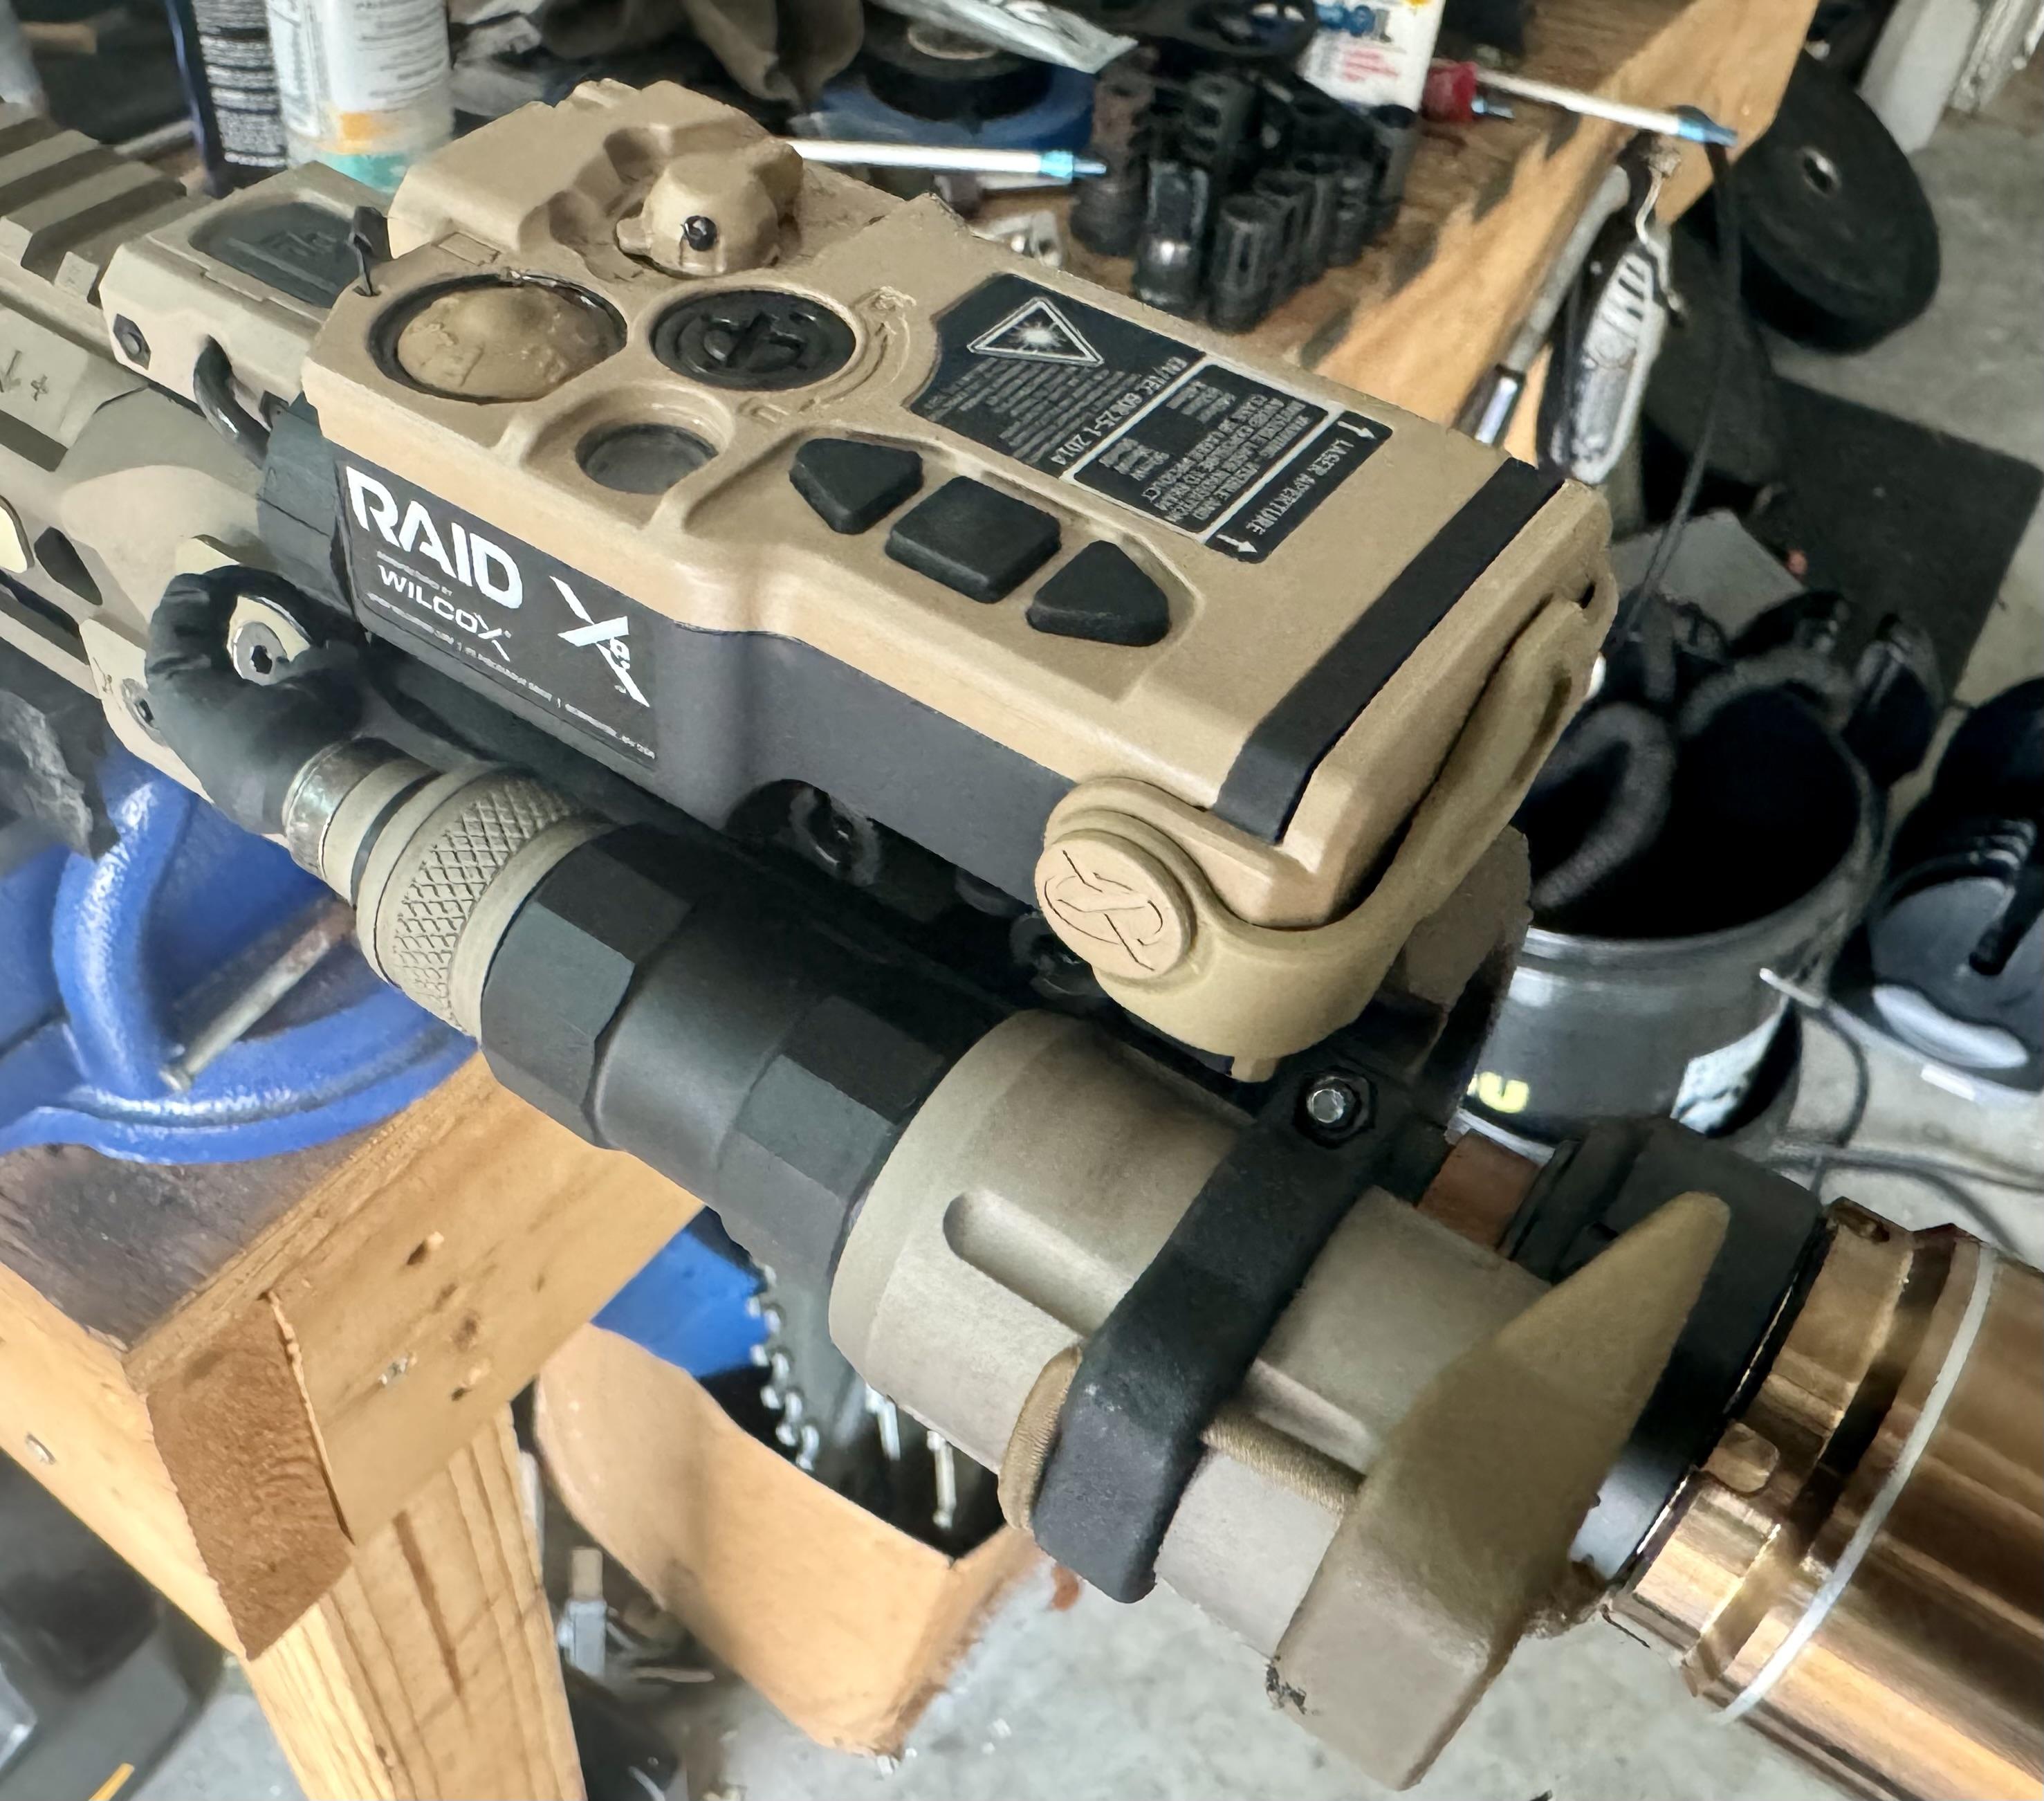
|
|
|
|
|
[Last Edit: TNVC_Will]
[#2]
That gap is a bit bigger than typical.
I would remove it and re-install, and make sure to use the paper pull tab, or any piece of paper if you don’t have the pull tab, to release any trapped air when re-installing the junction box. There is always a small gap but a quick re-install process should make it better. There is an O’ring that seals the junction box, so if no tab is used air can get trapped in it. Follow these steps. I took this from the latest RAID Xe user manual (page 28-29 revision A-2). Step 1.) Unthread the screw on the Remote Junction Box Port Plug CCW using the Xe Utility Tool and remove. Step 2.) Place the insulator pull tab along the side of the Remote Junction Box (see Figure 3.3-1). Step 3.) Seat the Remote Junction Box Port, making sure the insulator pull tab is between the Junction Box O-ring and the unit housing. Step 4.) Apply pressure to the Remote Junction Box and begin threading the screw into the unit housing. Step 5.) Once the threads have started, remove the insulator pull tab. NOTE Remove the insulator pull tab prior to fully seating the Junction Box into the Junction Box Port. This will ensure a watertight seal for the remote connection. Step 6.) Continue tightening the screw CW until fully seated. |
|
|
|
|
[#3]
Originally Posted By GunnyFitz: Damn. Always considered those who respond to inquiries so fast of men of great character. Shit.  ~Augee |
|
|
|
|
[#4]
Thank you guys.
I'll give it a whirl as soon as I have a chance. Anyone looking for an MFAL with a budget that fits into the mid 3's... Get one of these. I think you will really enjoy it. The low power units, from what i've seen are 95% of the full power units on the illuminator side. Forget the high powered pointer, its worthless. |
|
|
|
|
[#5]
Originally Posted By TNVC_Will: That gap is a bit bigger than typical. I would remove it and re-install, and make sure to use the paper pull tab, or any piece of paper if you don’t have the pull tab, to release any trapped air when re-installing the junction box. There is always a small gap but a quick re-install process should make it better. There is an O’ring that seals the junction box, so if no tab is used air can get trapped in it. Follow these steps. I took this from the latest RAID Xe user manual (page 28-29 revision A-2). Step 1.) Unthread the screw on the Remote Junction Box Port Plug CCW using the Xe Utility Tool and remove. Step 2.) Place the insulator pull tab along the side of the Remote Junction Box (see Figure 3.3-1). Step 3.) Seat the Remote Junction Box Port, making sure the insulator pull tab is between the Junction Box O-ring and the unit housing. Step 4.) Apply pressure to the Remote Junction Box and begin threading the screw into the unit housing. Step 5.) Once the threads have started, remove the insulator pull tab. NOTE Remove the insulator pull tab prior to fully seating the Junction Box into the Junction Box Port. This will ensure a watertight seal for the remote connection. Step 6.) Continue tightening the screw CW until fully seated. There's no pull tab present. I'm going to have to download the manual to get a reference regarding what you're talking about. I attempted to re-seat the junction box and it's still not seating fully. This seems like an awfully flimsy design as the box seems held in by nothing more than that REALLY small screw. I'm probably missing something as there's probably air in that recess but...yeah... Other than that, I love the unit. |
|
|
|
|
[#6]
Originally Posted By Magsz18: There's no pull tab present. I'm going to have to download the manual to get a reference regarding what you're talking about. I attempted to re-seat the junction box and it's still not seating fully. This seems like an awfully flimsy design as the box seems held in by nothing more than that REALLY small screw. I'm probably missing something as there's probably air in that recess but...yeah... Other than that, I love the unit. Use a piece of paper and you should be good to go. |
|
|
|
|
[Last Edit: GunnyFitz]
[#7]
Originally Posted By TNVC_Augee: Shit. ~Augee Hey Augee - You sayin Will isn't that reliable and doesn't have good character, or bustin my balls? Spent some time trying to figure out the TWO mounts that came with my RAID and finally realized they're meant for Pic Rails. I ditched any Quad Rails a LONG time ago so for now slapped velcro onto the back of the Wilcox 3 button switch. I do have the Crane Junction Box Will but am clueless on how to run an Axon with so many settings on RAID. Therfore I ordered a couple of these suckers to test out. WAP I'm not one who has a ton of time on my hands to read the manual and figure it out so fast. Guess I'll try out this tape switch and see how I like it first. Thanks guys! |
|
|
|
|
[Last Edit: TNVC_Will]
[#8]
Originally Posted By GunnyFitz: Hey Augee - You sayin Will isn't that reliable and doesn't have good character, or bustin my balls? Spent some time trying to figure out the TWO mounts that came with my RAID and finally realized they're meant for Pic Rails. I ditched any Quad Rails a LONG time ago so for now slapped velcro onto the back of the Wilcox 3 button switch. I do have the Crane Junction Box Will but am clueless on how to run an Axon with so many settings on RAID. Therfore I ordered a couple of these suckers to test out. WAP I'm not one who has a ton of time on my hands to read the manual and figure it out so fast. Guess I'll try out this tape switch and see how I like it first. Thanks guys! LOL No sir, he was busting his own balls. What I was mentioning in my previous reply to you with mounting the switch was to install the Wilcox switch mount at 12 o'clock on your rail which would put it essentially in the same position as the WAP in order for you to try it that way. The WAP appears to be a better solution than the Wilcox mount (haven't used one yet) so definitely worth you trying for that price |
|
|
|
|
[#9]
Originally Posted By GunnyFitz: Hey Augee - You sayin Will isn't that reliable and doesn't have good character, or bustin my balls? As Will said, I'm making a crack at myself, hahaha. While I try to respond to customers / outsiders in as timely a fashion as possible, inside of TNVC I'm notorious for taking forever to respond to anything. As probably indicated by the fact that it's taken me over 24 hours to get in here, versus Will's 22 minutes.  ~Augee |
|
|
|
|
[#10]
Originally Posted By TNVC_Augee: As Will said, I'm making a crack at myself, hahaha. While I try to respond to customers / outsiders in as timely a fashion as possible, inside of TNVC I'm notorious for taking forever to respond to anything. As probably indicated by the fact that it's taken me over 24 hours to get in here, versus Will's 22 minutes. ~Augee Dude. I know how far strechced you are. Sent you a Group Expert Badge long ago but see you do like laying low brother. Had many replies from you to take comms offline. Think I'll take you up on this! Lots to learn from the best = no sarcasm within. Will/Augee - found a real announcement about TNVC clearing all GP Units to focus on WP devices. IMO a solid move unless fulfilling CAGE code or true <il contracts. Applause! Ping you in our FB Group Aug. You on FB Will? If so, would like to reel you in as a SME as well. Augee is too proud to respond in such "hasty" terms. All good Soldier. Have a friend here whos named his Malinious after you! S/F Guns. FWIW That Fernilad Co refunded 50% of total with a brutally kind msg as well. Any Vets or current SM should seek them out if needed! GREAT CS! |
|
|
|
|
[#11]
Originally Posted By GunnyFitz: Dude. I know how far strechced you are. Sent you a Group Expert Badge long ago but see you do like laying low brother. Had many replies from you to take comms offline. Think I'll take you up on this! Lots to learn from the best = no sarcasm within. Will/Augee - found a real announcement about TNVC clearing all GP Units to focus on WP devices. IMO a solid move unless fulfilling CAGE code or true <il contracts. Applause! Ping you in our FB Group Aug. You on FB Will? If so, would like to reel you in as a SME as well. Augee is too proud to respond in such "hasty" terms. All good Soldier. Have a friend here whos named his Malinious after you! S/F Guns. FWIW That Fernilad Co refunded 50% of total with a brutally kind msg as well. Any Vets or current SM should seek them out if needed! GREAT CS! It aint laying low or pride--it's that my "facebook presence" usually amounts to little more than a "drive by," hahaha. Typically speaking if I happen to see something that I feel I can contribute to and provide value, I do--but it all just tends to depend on whatever randomly (or the algorithm and Zuck decide) pops up within the first ten posts in my feed, which is usually about as far as I get before I get distracted or pulled in another direction. That's why no one will see me for weeks, and then all of a sudden someone gets a complete essay on the development and operational and maintenance history of ANVIS systems, complete with footnotes and annexes after just trying to ask what the difference between an "anvis-6" and "anvis-9" is. As for the green tubes, it's a little bittersweet, as I have almost a wistful nostalgia about green tubes since they were what I, like many others started with, despite the fact that I know unequivocally that I prefer white phosphor in actual practical use. Beyond that, there's a lot of very cool things coming down the pike in both tubes and systems, and managing and forecasting and allocating resources to what's now become a product that appeals to a very narrow niche did not seem very practical compared to redirecting those resources and bandwidth to increasing efficiencies as well as to other products and programs that are far more potentially impactful. ~Augee |
|
|
|
|
[#12]
Ok...what is the trick to installing the barn door? I CANNOT get the little side screws to seat in their tracks.
|
|
|
|
|
[#13]
Originally Posted By GunnyFitz: You on FB Will? If so, would like to reel you in as a SME as well. FWIW That Fernilad Co refunded 50% of total with a brutally kind msg as well. Any Vets or current SM should seek them out if needed! GREAT CS! No sir, I do not participate, but appreciate the gesture ARFCOM is pretty much it for me other than the occasional You Tube video whenever I get a chance. Agreed, Fernilab is good people. |
|
|
|
|
[#14]
Originally Posted By JohnDough: Ok...what is the trick to installing the barn door? I CANNOT get the little side screws to seat in their tracks. Are you doing it this way? To Attach the Laser Safety Visor: Step 1.) Insert the Side Pivot Posts and thread CW using the Xe Utility Tool or .050” Hex Key. DO NOT overtighten. Step 2.) Slide the Laser Safety Visor over the end of the RAID Xe case so that the pin holes align with the holes in the case. Step 3.) Insert the pins into the mounting holes in the case and slide through the holes of the soft cover. Thread the screws on CW using the Xe Utility Tool or .050” Hex Key. DO NOT overtighten. |
|
|
|
|
[#15]
Originally Posted By TNVC_Will: Are you doing it this way? To Attach the Laser Safety Visor: Step 1.) Insert the Side Pivot Posts and thread CW using the Xe Utility Tool or .050” Hex Key. DO NOT overtighten. Step 2.) Slide the Laser Safety Visor over the end of the RAID Xe case so that the pin holes align with the holes in the case. Step 3.) Insert the pins into the mounting holes in the case and slide through the holes of the soft cover. Thread the screws on CW using the Xe Utility Tool or .050” Hex Key. DO NOT overtighten. Yes, but step 2 is darn near impossible. The posts from step 1 do not end up in the tracks, even when the barn door is 100% correctly aligned and I "could" install the pins in step 3, the visor is just bowed out and won't seat the pins on the side. |
|
|
|
|
[Last Edit: JohnDough]
[#16]
Update: I've destroyed the barn door, so it's a non-issue, now. The tracks where the side-screws slide are now so thoroughly marred that it's hopeless. I now see why Wilcox in their video did not install the side screws when demonstrating installation. It's near impossible, I wager. RIP.
The tolerances are so close, and the plastic soft, so the door would just "bow out" and misalign, no matter how hard you press on it, which then deformed the plastic near the tracks as the side screws gouged into it instead of fitting in the track, and further complicated the issue. Probably not the best design, but I love the rest of it! Based on posts here about "the door flopped closed when I ran" (didn't install side screws), etc. as well as posts such as "The door is insanely hard to open/close" (Side screw not in track, gouging every time the door is open/shut) I am betting noone is successfully installing this per the manual utilizing the side screws and getting them in their tracks without significant deformation, if at all. |
|
|
|
|
[Last Edit: JohnDough]
[#17]
Doublepost
|
|
|
|
|
[#18]
Originally Posted By JohnDough: Update: I've destroyed the barn door, so it's a non-issue, now. The tracks where the side-screws slide are now so thoroughly marred that it's hopeless. I now see why Wilcox in their video did not install the side screws. It's near impossible, I wager. RIP. The tolerances are so close, and the plastic soft, so the door would just "bow out" and misalign, no matter how hard you press on it, which then deformed the plastic near the tracks as the side screws gouged into it instead of fitting in the track, and further complicated the issue. Probably not the best design, but I love the rest of it! Based on posts here about "the door flopped closed when I ran", etc. as we as posts such as "The door is insanely hard to open/close" I am betting noone is successfully installing this per the manual utilizing the side screws and getting them in their tracks without significant deformation, if at all.. I never bothered with the hard cover myself and I don't currently have a RAID in my possession to try. I'll shoot you a PM to get you squared away. |
|
|
|
|
[#19]
Originally Posted By TNVC_Augee: It aint laying low or pride--it's that my "facebook presence" usually amounts to little more than a "drive by," hahaha. Typically speaking if I happen to see something that I feel I can contribute to and provide value, I do--but it all just tends to depend on whatever randomly (or the algorithm and Zuck decide) pops up within the first ten posts in my feed, which is usually about as far as I get before I get distracted or pulled in another direction. That's why no one will see me for weeks, and then all of a sudden someone gets a complete essay on the development and operational and maintenance history of ANVIS systems, complete with footnotes and annexes after just trying to ask what the difference between an "anvis-6" and "anvis-9" is. As for the green tubes, it's a little bittersweet, as I have almost a wistful nostalgia about green tubes since they were what I, like many others started with, despite the fact that I know unequivocally that I prefer white phosphor in actual practical use. Beyond that, there's a lot of very cool things coming down the pike in both tubes and systems, and managing and forecasting and allocating resources to what's now become a product that appeals to a very narrow niche did not seem very practical compared to redirecting those resources and bandwidth to increasing efficiencies as well as to other products and programs that are far more potentially impactful. ~Augee Well said brother! |
|
|
|
AZ, USA
|
[#20]
Originally Posted By JohnDough: Based on posts here about "the door flopped closed when I ran" (didn't install side screws), etc. as well as posts such as "The door is insanely hard to open/close" (Side screw not in track, gouging every time the door is open/shut) I am betting noone is successfully installing this per the manual utilizing the side screws and getting them in their tracks without significant deformation, if at all. |
|
|
|
[Last Edit: JohnDough]
[#21]
Originally Posted By Defaultmp3: I believe I was able to successfully install mine, as I was able to utilize the screw, and did not notice any deformation. The door would lock close just fine, but the problem for me appeared to be that there was no detent to really hold it open, only friction kept it open, so lots of movement would cause the door to slowly creep shut. The screws fit in detents in the door to hold it open or shut. It is not a friction fit, really, but a detent of sorts. There is a slightly deeper pocket at the open and the closed position that they fit into vs. the rest of the track. It should not have flopped, if you indeed managed to install it correctly, which I am betting few do. I sure as hell couldn't. Yes, I am salty about that, lol! *I am not talking about the 2 "post screws" that go in the bottom, but rather the two side screws which form detents that fit into the door tracks. If you only installed the post screws and not the detent screws, then yes, it is friction only, but that is not the manual stated way. |
|
|
|
AZ, USA
|
[#22]
Originally Posted By JohnDough: The screws fit in detents in the door to hold it open or shut. It is not a friction fit, really, but a detent of sorts. There is a slightly deeper pocket at the open and the closed position that they fit into vs. the rest of the track. It should not have flopped, if you indeed managed to install it correctly, which I am betting few do. I sure as hell couldn't. Yes, I am salty about that, lol! *I am not talking about the 2 "post screws" that go in the bottom, but rather the two side screws which form detents that fit into the door tracks. If you only installed the post screws and not the detent screws, then yes, it is friction only, but that is not the manual stated way. |
|
|
|
[#23]
Originally Posted By Magsz18: Couple of things. 500 rounds of rifle ammo expended through my spear LT with the Raid XE mounted. This thing is awesome. I managed to shave five ounces off of the front of the gun by switching the MAWL out to the Raid. The gun balances way better. The offset fire button is a non issue although I did find that under recoil, sometimes I wouldn't keep the button fully depressed resulting in the unit deactivating. The illuminator is absurdly powerful. When i'm not crunched for time I need to see if perhaps I can dial it down a bit, or find a setting where it's not blowing out what i'm trying to look at. The same can be said for the high power laser. It's just too much. We basically had a full moon so I spent most of the night shooting with the low power laser and low power illuminator activated. The low power laser is fantastic and worked fine out to 100 yards. The low power illuminator is mostly useless. The divergence wheel was a non issue. I can still see it being knocked around by gear. I do believe that there are better ways to skin this cat and i'm surprised that Wilcox and L3 think their solution is appropriate. I can't say this conclusively as I have no experience with an Ngal but the fact that you can dial your power levels on the RAID is absolutely awesome. That right there is forward thinking and really gives the individual user options. Options are good. Ultimately, I still hold that the MAWL is the UI king. It is easier to use than anything else on the market. Still, other units can be put into service with minimal heartache. I just think that being able to fire either a focused or an NIR simply by moving your thumb a half inch is pretty awesome. No dials, no settings, just press the button. The RAID and the NGAL can't do this unless you utilize the RAID's pressure pad which I don't have. Not a huge deal, you just have to know that there will be shortcomings. I really only have one gripe: See below: My crane junction box doesn't seem to be sitting well. I'm not sure what the deal is there. Is the gap normal? The crane plug port works as it should. I just don't trust the small ass screw that Wilcox used to hold that thing in there... https://imgdump5.novarata.net/640X480/0g53mm.jpg https://imgdump5.novarata.net/640X480/md9fdt.jpg Mine fits the same. I used the pull tab. I cannot compress it further pressing, either, and there is no way passively trapped air would resist that. Its just the joy of that single screw attachment method. |
|
|
|
|
[#24]
Originally Posted By Defaultmp3: Okay, you're absolutely right, I did not install everything necessary, as I do not recall seeing any such screws or holes for them to fit; looking at the manual again, I do not recall the short side pivot posts at all. I will need to look again at the door, though I am wondering now if there are additional revs to the door. This is a Wilcox product. They constantly evolve. For example, I have two. One was one of the first iterations of the swappable crane port. The second is a 2024 unit. The crane ports use different size screw interfaces between the two. The later one has a special allen wrench. The first one has a allen wrench interface about 25% smaller. Same body though. The barn door may be a similar silent revision. |
|
|
|
|
[Last Edit: JohnDough]
[#25]
Man pix through NODS screencapped from video are terrible, but here is Low/Low at about 100 yards, tight focus and wide focus, respectively:
The laser seems to be a TINY hair to the right of the hot-spot of the illuminator, but the Viz and IR lasers are bang-on collimated with each other. I suppose since the illumination bench slides freely for tight/wide, there is a bit of tolerance here? Certainly not a functional issue, just one of mega OCD, lol! This unit does have a bit of artifact, but it's "typical artifact" and not the "second dot" my other Raid Xe was exhibiting. In short, I am very pleased with the Raid Xe, both Civ and FP models, and think either one will serve the end user well. It's a great option for people who want a lighter, centerline mounted system vs the MAWL. Also, no, the illuminator and lasers are not misaligned. If they were, divergence would change with distance. This is a photo if them...at 1.25 mile to the hillside. I am always learning, and it seems this is just how the things do be with the system in the Raid Xe. Its an absolute powerhouse, btw. Through my nods I could see the barn at 1.25mi (per Google maps) in this video using the illuminator. Its kindof a murky night, too. Bit of fog, not horrible though. The ability to custom tune the laser and the illuminator intensity is absolutely excellent. I really am pleased to have bought this unit! It only took me about 5 years to finally buy a laser, and now I have two, lol! |
|
|
|
AZ, USA
|
[#26]
Originally Posted By JohnDough: Update: I've destroyed the barn door, so it's a non-issue, now. The tracks where the side-screws slide are now so thoroughly marred that it's hopeless. I now see why Wilcox in their video did not install the side screws when demonstrating installation. It's near impossible, I wager. RIP. The tolerances are so close, and the plastic soft, so the door would just "bow out" and misalign, no matter how hard you press on it, which then deformed the plastic near the tracks as the side screws gouged into it instead of fitting in the track, and further complicated the issue. Probably not the best design, but I love the rest of it! Based on posts here about "the door flopped closed when I ran" (didn't install side screws), etc. as well as posts such as "The door is insanely hard to open/close" (Side screw not in track, gouging every time the door is open/shut) I am betting noone is successfully installing this per the manual utilizing the side screws and getting them in their tracks without significant deformation, if at all. |
|
|
|
[#27]
Wilcox: The Sig of the NV world.
I don't care for the rubber cap at all. I guess it does what its supposed to do though. Id prefer the barn door if it actually worked. As I believe its a more expeditious method to block the lenses. |
|
|
|
|
[Last Edit: GunnyFitz]
[#28]
Originally Posted By Magsz18: Wilcox: The Sig of the NV world. I don't care for the rubber cap at all. I guess it does what its supposed to do though. Id prefer the barn door if it actually worked. As I believe its a more expeditious method to block the lenses. Interesting.. My thoughts were the same despite its easier nature. The whole "Barn Door" thing thru me for a loop at first. Thanks to Will I've mounted the tape switch and will test it out - though Green Vis only seems to activate via center button and that's it. Yeah. Alot to learn. Should I STFU? Trying to catch up with yoos guys here! |
|
|
|
AZ, USA
|
[#29]
Originally Posted By GunnyFitz: Interesting.. My thoughts were the same despite its easier nature. The whole "Barn Door" thing thru me for a loop at first. Thanks to Will I've mounted the tape switch and will test it out - though Green Vis only seems to activate via center button and that's it. Yeah. Alot to learn. Should I STFU? Trying to catch up with yoos guys here! |
|
|
 Win a FREE Membership!
Sign up for the ARFCOM weekly newsletter and be entered to win a free ARFCOM membership. One new winner* is announced every week!
You will receive an email every Friday morning featuring the latest chatter from the hottest topics, breaking news surrounding legislation, as well as exclusive deals only available to ARFCOM email subscribers.

AR15.COM is the world's largest firearm community and is a gathering place for firearm enthusiasts of all types.
From hunters and military members, to competition shooters and general firearm enthusiasts, we welcome anyone who values and respects the way of the firearm.

Subscribe to our monthly Newsletter to receive firearm news, product discounts from your favorite Industry Partners, and more.
Copyright © 1996-2024 AR15.COM LLC. All Rights Reserved.
Any use of this content without express written consent is prohibited.
AR15.Com reserves the right to overwrite or replace any affiliate, commercial, or monetizable links, posted by users, with our own.


