|
Posted: 10/22/2020 1:54:09 PM EDT
Over the last year I've taken an interest in the 1903/1903A3 Springfield drill rifles that occasionally turn up for sale and bringing those rifles back to life. I've found that it's a pretty cheap way to get into a shooter grade 1903 or 1903A3 Springfield rifle without a lot of effort. The fact that they had been welded on also doesn't make me feel bad about drilling and tapping for sniper clones, etc. Granted, with CMP prices on Springfield's lately, it's not the absolute best value these days (a shooter grade Springfield from CMP for $650 that hasn't been molested is a phenomenal price these days), but I've found that with these drill rifles, you can build out your rifle as correct as you want and be into it for $500 or less. While a recovered drill rifle will never be a collector piece, I see no reason that these won't appreciate in value any differently than all the other mil-surp stuff that's out there. Most of the work, believe it or not, can be done with a Dremel (yikes) with very acceptable results. You would need a barrel vice and action wrench for the rest of the work. These rifles were converted to drill rifles by putting a tack weld over the face of the bolt, the firing pin is clipped, the barrel is tack welded to the receiver (literally just a dab) and then the magazine cutoff is welded so that it can't be rotated and the bolt removed. These welds are usually very light and don't hardly penetrate into the receiver.
Depending on where the weld is placed makes an impact on how easy it is to clean up the mess. The first pic below, while it looks gnarly, is actually a really easy cleanup since it's all on rounded surfaces that are easily blended. 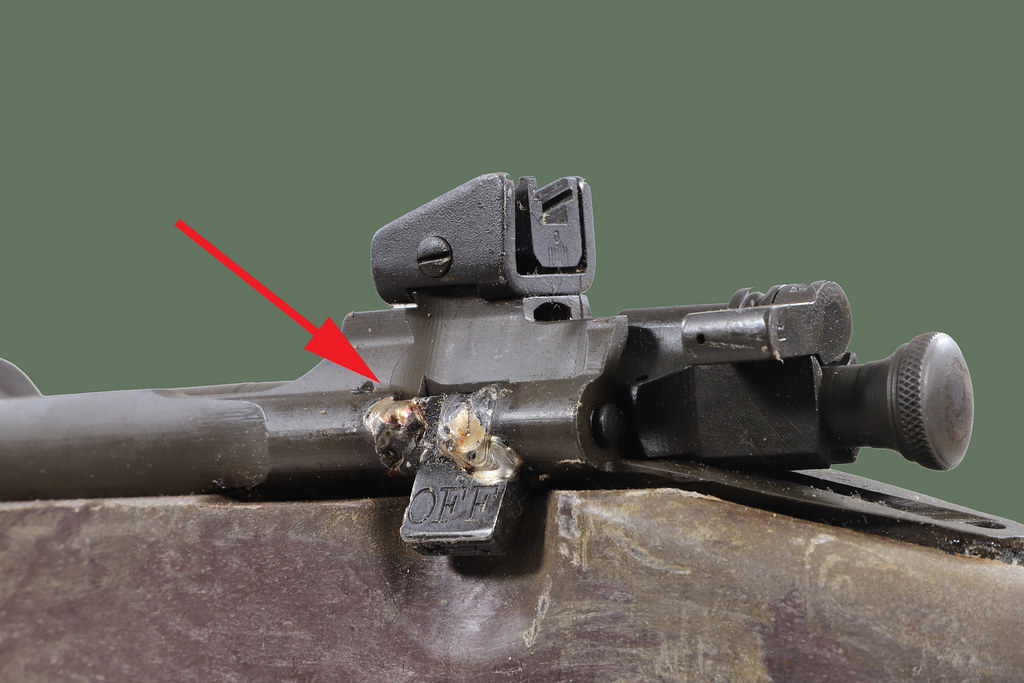 The pic below, while more aesthetically pleasing, is more of a pain in the rear that you need to take care with. The weld is in the space between the magazine cutoff and the extends over a flatter area of the receiver. Of course, someone with a mill can make some seriously easy work of this to make it really clean. We're working with a Dremel tool here, so how clean it is only depends on how steady your hand is.  So, I recently picked up 3, 1903A3 drill rifles via Dupage Trading in Arizona. What you get is the luck of the draw as far as the overall condition, but that don't matter as it's all coming apart anyway. So these 3 rifles were advertised as Remington 1903A3's and what I received I was pleasantly surprised over. I received not 1, but 2 Smith Corona 1903A3's and the real prize - a Remington 1903A3 that was actually a 1903A4 sniper rifle converted to a drill rifle. The 1903A4's were actually marked as A3's with the idea that if the rifle isn't a shooter, it's still an A3 that they could put into service. They came in the plastic "drill" stocks that a lot of ROTC/VFW organizations used and they had 3 serviceable wood A3 handguards. You're going to keep all of the hardware, with the exception of the bolt, barrel, firing pin and mag cutoff - those are trashed. You may have to buy some other miscellaneous small parts depending on how disassembly goes - if you're lucky, it'll come in a wood stock. The plastic ones can be shot, but let's face it - they're kinda lame for these rifles. Of course, I've taken no pictures of these when they arrived, but the 1903A4 barreled action is pictured below - I dub it "C3PO" and I'm really curious to know what the story is in how it received such a hideous paint job.  Looking over the rifle, I'm glad to see that when they deactivated (technically not demilled) the rifle, they didn't destroy a perfectly good 1903A4 bolt and barrel in the process. So now that you've got the action in your hands, strip it down as far as it'll go, which basically means taking the rear sight off, trigger mechanism, the pin for the ejector and the small retaining screw in the mag cutoff. If you're lucky, when you remove the retaining screw - the pin holding the cutoff will slide out. If it doesn't grab the end of the pin with a pair of needle nose pliers and see if it will rotate - if it does, this is good as it means that there isn't weld on it. If it doesn't, well...... So the primary Dremel bit that I use for this work is the small sanding drum with a course sanding band fitted. I like these because you can get to work but it's not so terribly aggressive that a slip is going to mess things up. Trust me, you can get ahead of yourself even with a sanding band, so go slow and check your work frequently. You know when you're getting into material besides the weld because you'll start to see sparks fly. The stainless weld material doesn't spark nearly as much. The first barreled action I tackled was 1 of the Smith Corona drill rifles. Smith Corona was the other manufacturer of 1903A3 Springfields for military use and there are less numbers of these than the other manufacturer - Remington. For spare parts, as long as you're not worried about correct - 1903A3 parts are often dirt cheap and they're usually Remington parts. Smith Corona specific parts, while still not terribly expensive, command a higher price than the Remington stuff. Ebay is a great source for a lot of this stuff. I didn't take a pic of the weld on the cutoff before I started, but it was in the sweet spot, right on the rounded portion of the receiver. Not only that, I could get all of the cutoff parts out, with the exception of the cutoff itself - so those are less parts to buy. And nope, not a single picture of the work in progress, but you can see the final result further down. Just go slow and constantly stop to look over your work. I like to use my fingertip/fingernail to feel for the transition from receiver to weld and sand away at that so that it's a smooth transition and blends nicely. Once you start thinning the weld, use a punch to softly start tapping at the cutoff to crack the weld. Don't get heavy handed with the hammer - you can actually crack off a piece (non critical piece) of the receiver above the cutoff that looks unsightly if it's missing but doesn't affect shootability. The pic immediately below is what happens when you get too aggressive, then you have to try and make it look decent. Ugly ain't it? Again, most of the uglyness will be hidden by keeping the magazine cutoff flipped up, but you still know it's there. You're never going to not make it look like a drill receiver - a careful eye will reveal the history, but you do want it to look nice.  Anyway, so I finished up cleaning the area around the mag cutoff of the Smith Corona and I think it didn't come out bad at all......   With the 1903A4, I used the same process - go slow and check frequently. I wanted to be especially careful with this receiver as it is an A4 receiver after all. The serial on this receiver also make it one of the earlier ones. The weld was in the crevice of the cutoff, so I had to be more careful. The sparks you see in the pic below are because I'm slowly inching forward into the weld on top of the magazine cutoff. The sparks are because I'm eating into the unwelded parts of the cutoff - it's trash anyway since you can't reuse it, so it makes a convenient "rest" to steady yourself.  Tapping at the cutoff to crack the weld:  Cracked Weld: 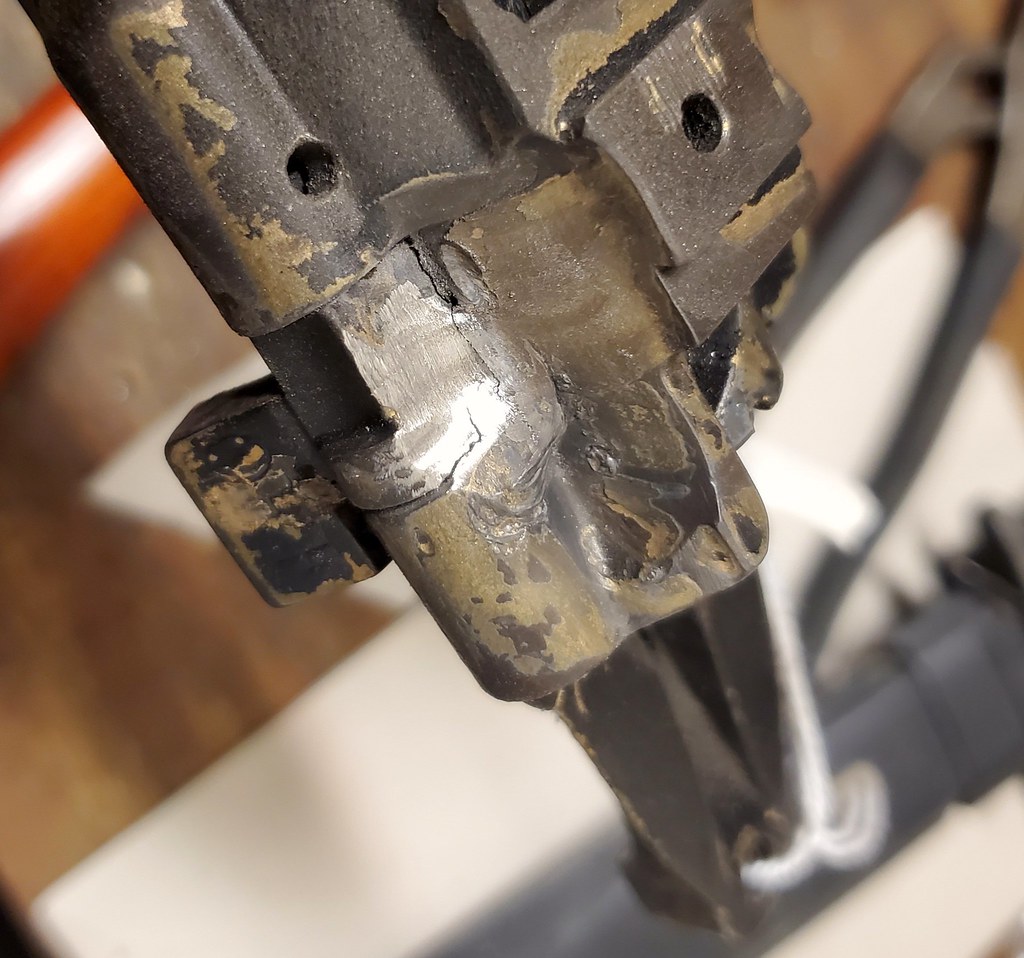 Once you get the weld cracked, you can often wiggle the cutoff with your fingertip. I'll then take a pair of vice-grips and clamp in on the end of the cutoff and wiggle it back and forth until I can get it out - assuming the pin holding it in comes out. That was not to be the case for this receiver though - the pin holding the cutoff in was stuck. It spun, but I could not pull it out for the life of me. So that lead to Plan B - the dreaded cutoff wheel. Using the cutoff wheel, I cut out the center section of the magazine cutoff. GO SLOW - you don't want to cut into the receiver, you just want to cut through the cutoff. Once I had the center cut out - I used a small punch to drive out the right half of the pin out of the hole. It's a blind hole, so it'll only go out to the right. Once the right side was out, I was able to have more room and used needle nosed pliers to pull the other half out.   Overall, I was able to blend this one pretty good. I went slow, took my time and made a pretty good cleanup of things. 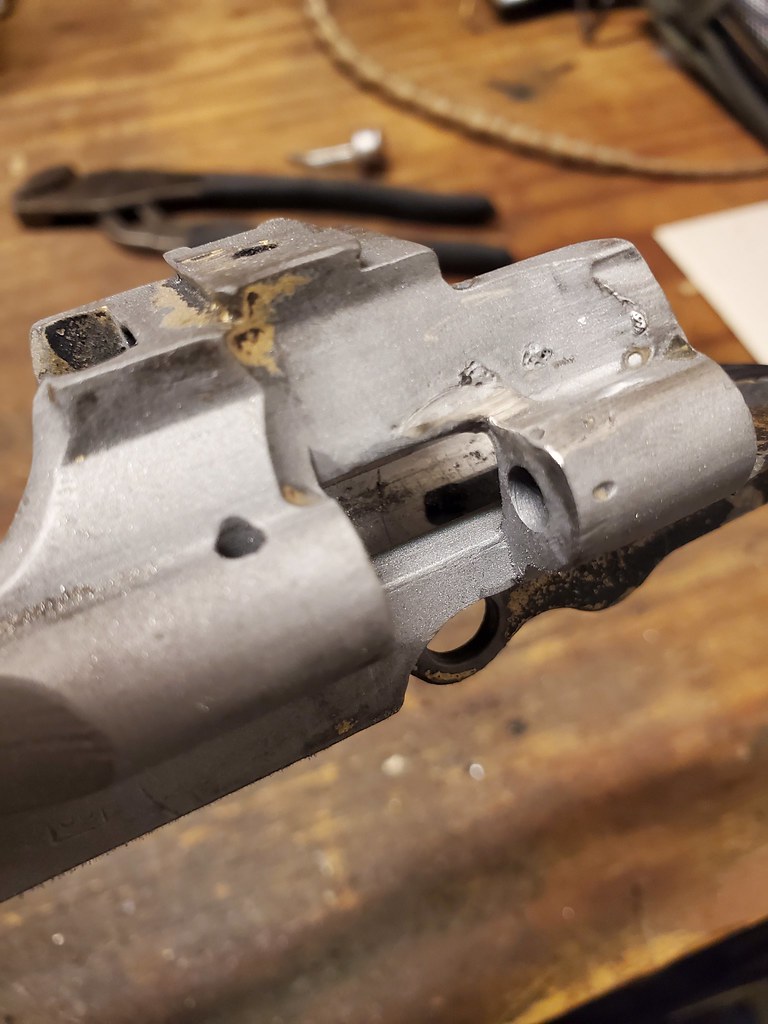  To be honest, if this was just a 1903A3 build, I probably would have called it quits for doing anymore cleanup. Again, it's never going to be perfect so you're trying to make it look not ridiculous as a range rifle. You want it to pass a 5' rule I guess would be a good way of putting it. I didn't know this before I started everything, but my friend has a mill and offered to let me use it. A hell of a damn offer, quite frankly even though he's a bit of a drive away. So at his house, we cleaned up the cutoff area even more and you can see the final result below. All we did was "kiss" the proud area where there was still weld built up. Pic is after blasting to show detail.  Remember that nasty one from earlier? We cleaned that up too and it's not nearly as ugly now.  And the Smith Corona I did with the Dremel, also after blasting.  So, the next step is getting the barrel removed. The good news is that now that the mag cutoff area is cleaned up, everything else is pretty simple and even better, it's out of sight as it'll be hidden beneath the stock anyway. I didn't mention it earlier, but the barrels get a torch cut through the chamber and then a rod is welded in place so that ammo can't be chambered. It's garbage.  I start off barrel removal by using the previously mentioned sanding drum to eat away at the tack weld that ties the barrel to the receiver. These welds are literally just a "dab" and don't penetrate very deep. Springfield receivers are hard, so you don't really need to be terribly concerned with chewing up the receiver, but follow the line between the receiver and barrel as much as possible so that you can get all of the weld, go below the surface of the weld if you need to. Obviously you want a square shoulder for as much contact area between the new barrel and receiver as possible, but it's really ok if such a small area isn't perfect.  After you've ground through the weld, carefully inspect to make sure that you got all of it (the weld). Use a magnifying glass if you need to. The next step is to get the barrel off. Now these barrels have been on for over a 100 years in some cases (regular 03's) and they can be super frickin tight. I like to use a cutoff wheel to cut into the barrel just in front of the receiver so that you can relieve some of the shoulder pressure on the receiver. Do this all the way around the barrel.  Then you'll be ready to take the barrel off. You'll need a good barrel vise and action wrench to this. For the same reason that I don't barrel my own M1's and M14's - these tools are expensive. I think everyone can use a good barrel vise, but it's a lot of money to spend on a wrench that will likely spend more time gathering dust. Fortunately, I've borrowed one from someone who is nice enough to let me make use of it.  So now that the barrel is out and let me make it clear that some barrels are easier to remove than others, just keep the vise tight and keep working at relieving the pressure on the shoulder if you have to. With the barrel out, take your sanding drum and clean up the weld that is on the receiver, to include what little bit that might be on the receiver face. If you'll notice, I'm using a pretty worn, and not a fresh sanding drum, for this. I'd rather go slow with a worn drum than dig into the receiver if I can avoid it.  Here she is after I was satisfied that the weld was smoothed out.  So now that the barrel is removed and the welds cleaned up, the receiver is now ready for the good stuff - putting it all back together. It's taken me considerably longer at this point to write out all of this than it did to do the actual work. This can literally be done in a couple of hours time after work. Here's some more pictures of the blasted 1903A4 receiver. While parkerizing makes a good base to parkerize again, I went ahead and blasted everything to even out the finish and the most obvious evidence of the work you just did.  Here's a pic from when I was in standby, waiting on parts to be refinished. 1903A3/A4's that you come across that have all the metal parkerized are 100pct rebuilt rifles. The barreled action, bayonet band and towards the end, trigger guard/bottom metal were the only things parked on factory rifles. The barrel bands, swivels, screws, mag cutoff, follower, bolt assembly and trigger parts were all blued to the point of being black with a hint of blue when delivered to the gov. I figured that I wouldn't be "undoing" military history since I'm starting this from scratch on a recovered receiver so I might as well finish as it would have been delivered from Remington. In the pic, I've got everything to finish out the 1903A4 except for the Redfield 3/4" rings for the Weaver 330 scope. I also traded my brother an early "S" stock for the scant stock and it turns out that this rifle, being an early build, would have had the pistol gripped "C" stock. The A4's were supposed to have the "C" stocks, but supply issues had them getting the scant stocks from August/September of 1943 onward. I'll need to look for a correct stock at some point.  While I was waiting on those parts to be refinished, I finished building out my USMC 1941 Sniper rifle last night though. This was also built from a recovered drill rifle. Again - the rifles have already been "messed up" when they were welded on, so I didn't feel bad about ruining any collector value by drilling and tapping this. If anything, I've increased value by turning it into this configuration.  The 1903 receivers are more finely machined than the 03A3 receivers, so it requires a really delicate hand to clean them up. The top 2 pics are of the receiver on this rifle. You can see the weld marks that were there that didn't take the parkerizing. I'm still contemplating refinishing it with MolyResin - to at least cover the weld marks, but I'm digging the used look otherwise. The bottom 2 pics are of an unmolested 03 receiver just to compare my work against what Springfield Armory put out in 1918. Again, with many of these - a lot gets hidden by keeping the mag cutoff in the "on" position (flipped up). I don't think I did a horrible job. Barrel removal process is the same as it is with the 1903A3 barrels, except that you want to be careful cutting the weld between the barrel and receiver. The weld on the 03 barrels is between the receiver and rear sight mount - you may have to salvage the rear sight mount, so try not to mess it up.    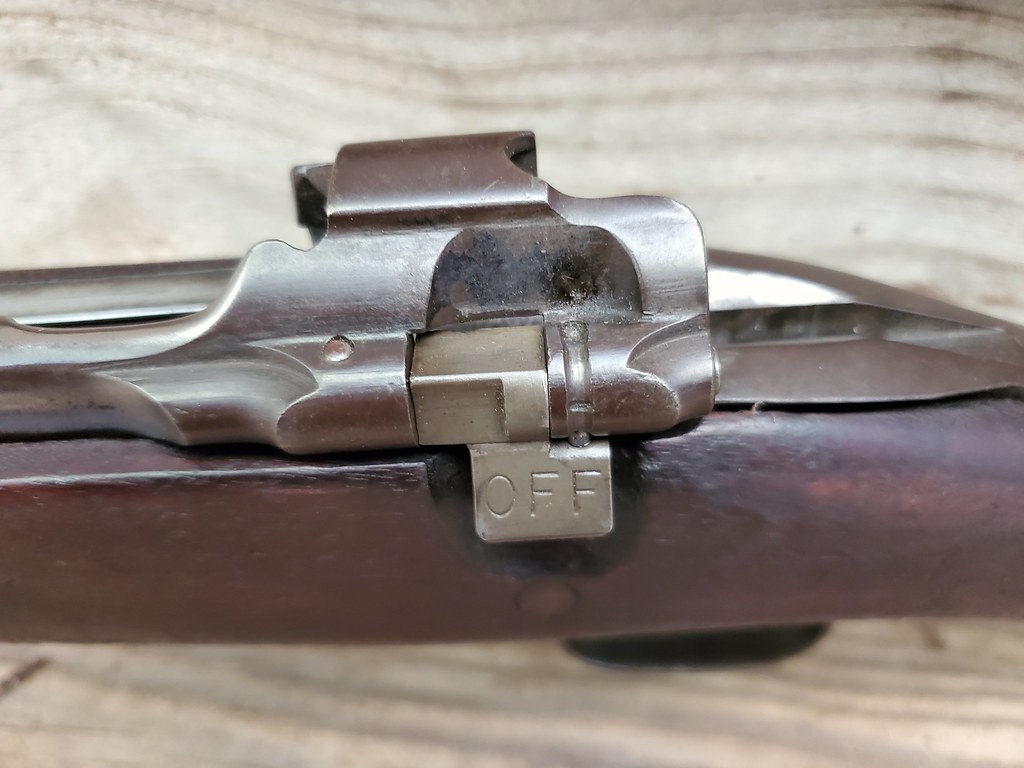 Back to the A4 build - The draw between the reference marks on the receiver and barrel was pretty wide - almost a 1/2" from hand tight. I just wasn't getting the leverage I needed to be able to close that gap, so I had to break out the big guns. Vee blocks and a 12 ton press. Fortunately my friend had them.  After anti-seize and several cycles of loosening/tightening, I was able to get it right where I needed to be. I was just about to give up too, thinking that the barrel shoulder would have to be turned to get it into position. Barrel positioning is important on these as you need to make sure that the extractor cut is lined up correctly.  Still waiting on parts to be refinished, so I finished another drill recovery while waiting. This one is also a recovered 1903 drill rifle that I built up as a USMC WW1 (and to a very limited extent, WW2) 1903-A5 sniper rifle. The serial number of the receiver has it being built in 1918 and is just barely high number - close enough to threshold that it may or may not be "safe" for those of you that worry about stuff like that (I don't) and the bolt code matches the receiver timeframe. The barrel is a Criterion. I had it around and thought that it would make for finishing out the rifle nicely. While the mag cutoff area of this rifle cleaned up nicely, there were weld marks that were clearly visible that didn't take the parkerization that was on it, so I had it refinished in Midnight Blue Cerakote. Everything on this rifle would have been rust blued and I figured the Midnight Blue would approximate it well while covering up the weld spots. It's also a hell of a lot cheaper to have something Cerakoted versus rust blued these days. Of course I put everything together and realized I forgot to get a dang front sight. So I've got to get one of those now before it's officially "done". The scope is a correct Winchester A5 scope and has the Mann-Neidner adjustments and mounts. While there's no way to verify if this is an actual USMC scope from WW1, given the limited amount of Mann-Neidner adjustments produced - there's a good chance that it is.   Anyway - I finally sourced a set of Redfield rings and I put everything together with no issues. I need to get a few coats of oil on the handguard though as it's a touch lighter than the stock. Again, the scant stock isn't correct for this particular build date, but it's what I have on hand and will do for now. I've got the scope mounted up, but fully anticipate having to take it apart and add a shim to the front of the mount - they almost always required them. Initial windage is set with the large screws on other side of the rear scope ring. The overall cost into this rifle is just under $600, that included optics, mounts, everything. Not bad for a legit 1903A4 right? 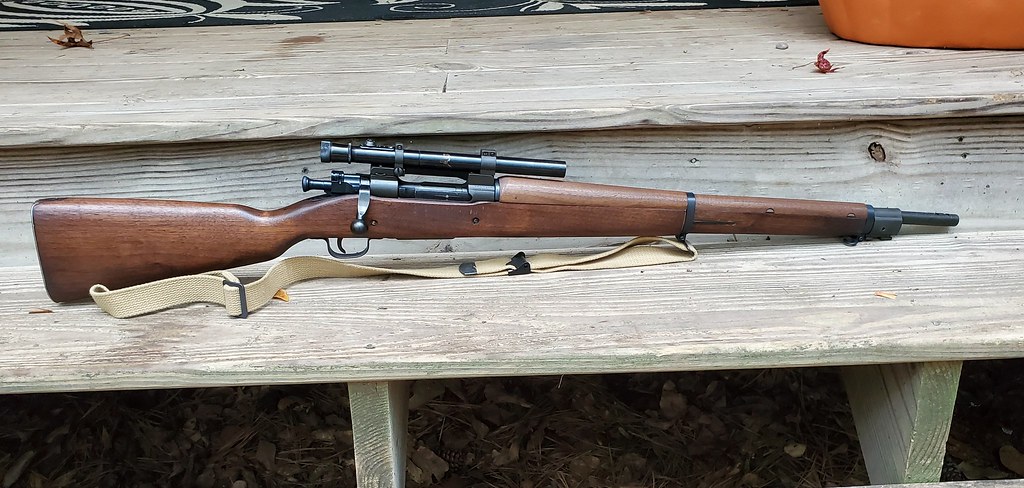  
|
|
|
|
[#1]
Came out nice. I built my A4 clone out of Drill rifle as well.
|
|
|
|
[#2]
Now I wish I had bought a few of them when they had them...
Nice work! |
|
|
|
[#3]
They've got a whole mess of them, but they're low priority items and they put them out as they have time to inspect them.
Best thing to do is just watch their website daily. |
|
|
|
[#4]
Quoted: They've got a whole mess of them, but they're low priority items and they put them out as they have time to inspect them. Best thing to do is just watch their website daily. I got mine at the north store years ago. Are they putting them on the e store or is it not the CMP? |
|
|
|
[#5]
Quoted: I got mine at the north store years ago. Are they putting them on the e store or is it not the CMP? CMP hasn't had them in a long time. They've been sold through Dupage Trading Company in AZ for a while now though.... |
|
|
|
[#6]
Quoted: CMP hasn't had them in a long time. They've been sold through Dupage Trading Company in AZ for a while now though.... |
|
|
|
[#7]
Quoted: IIRC they're considered a FFL item still. Just something to factor in if that's the case. Correct, they're not technically demilled in the sense of what the BATF requires - torch cut receiver in 3 places, etc. |
|
|
|
[#8]
Navy base Orlando fl 19hundred and 92.
I was on a working party heaving these into shipping boxes. All were fiberglass/plastic stocked. All were missing small parts. I didn't know a thing about those rifles then. Nice thread op. Good job returning them to glory. |
|
|
|
[#9]
Looking good. I need to finish mine. I have never installed a barrel before. And fix the stock. I can’t wait to get it done. I wouldn’t mind converting one to a hunting rifle in 35 whelen
|
|
|
|
[#10]
OP what scope base did you end up using for the 03A4gery? I need to pick one up too.
|
|
|
|
[#11]
Quoted: OP what scope base did you end up using for the 03A4gery? I need to pick one up too. I ended up finding a commercial post-war Redfield..... |
|
|
|
[#12]
Nice work!
|
|
|
|
[#13]
How hard is it to find barrels, stocks, etc?
I am interested in a project but I don't want to be into a gun for 1k+ when I can just buy one. |
|
|
|
[#14]
Quoted: How hard is it to find barrels, stocks, etc? I am interested in a project but I don't want to be into a gun for 1k+ when I can just buy one. |
|
|
|
[#15]
Quoted: How hard is it to find barrels, stocks, etc? I am interested in a project but I don't want to be into a gun for 1k+ when I can just buy one. Plenty of stocks out there, but a complete stock with all the hardware can easily sell for $250-300. Of course, you might get lucky and get one for $80 shipped on eBay that is being sold by someone that doesn't know what they've got. It all depends. A GI A3 barrel is approaching the $200 mark. For a GI '03 barrel, probably add another hundred to that. Unless you are into the parts real cheap, it is hard to rebuild a sporter or drill rifle and not spend more than what a complete rifle can be bought for. |
|
|
|
[#16]
Quoted: How hard is it to find barrels, stocks, etc? I am interested in a project but I don't want to be into a gun for 1k+ when I can just buy one. Most everything can be had off ebay or searching the forums (CMP forums are great for this stuff). Talking about an 03A3: - Barrels are about $200'ish. - Bolt bodies can be had for $50 or less - Other small parts - $50 or so. - You may or may not need a stock, but $200-250 ain't hard to find. If you shop around, they can be had for less. The best deal going for 03's or 03A3's at the moment is at the CMP north or south store - $650-750 depending on grade. Like I had mentioned earlier, rebuilding a drill rifle and thinking you're going to come out ahead based on those prices - ain't gonna happen. Based on the rough pricing I just posted - you're already at $700, assuming you needed all of those items. Now, compared to the typical street price you're seeing for Springfields, you likely will come out ahead and you can make this as correct as you want. Regardless, I don't totally do it for being able to do it "on the cheap", as much as they're just fun projects. With that said, like an AR, doing it this way allows you to spread the cost around some. |
|
|
|
[#17]
Good job and great pictures! I have 6 right now in various states of restoration.
Cost is relative. I'm both a collector and a shooter. I have rifles that I collect and rifles that I shoot/compete with. Most of the rifles in the $600-800 range are not true collectable grade, more shooter grade , with worn parts and barrels. A good collector grade 1903A3 is going to be over $1000, of course there are a few lucky exceptions. For a shooter/competition rifle I want the best barrel possible which I can control with the drill rifle. I can shoot as much as I want and not worry about wearing out an original or collectable barrel. If you have no plans on competing and are satisfied with minute of pie plate accuracy, look for a 1903A3 in the $600-700 range. For $600-800 you can restore a drill rifle that will be accurate and fun to shoot and have the satisfaction of building/restoring a piece of history. From the look of it, there are some nice rifles coming out of the CMP if you are able to make it to the store. Too bad I'm not close to any of the stores. |
|
|
|
[#18]
@Lemmonhead - those are actually excellent points. Everything that I've built has been with the correct parts and often of exceptional or NOS parts.
|
|
|
|
[#19]
Quoted: Barrels can be had from Criterion. Stock I'd buy from the CMP if you can't find a USGI scant or C stock that's not ridiculously priced. Best option is to get a drill rifle in a scant stock IMO, but aftermarket ones can be had. Quoted: Plenty of stocks out there, but a complete stock with all the hardware can easily sell for $250-300. Of course, you might get lucky and get one for $80 shipped on eBay that is being sold by someone that doesn't know what they've got. It all depends. A GI A3 barrel is approaching the $200 mark. For a GI '03 barrel, probably add another hundred to that. Unless you are into the parts real cheap, it is hard to rebuild a sporter or drill rifle and not spend more than what a complete rifle can be bought for. Quoted: Most everything can be had off ebay or searching the forums (CMP forums are great for this stuff). Talking about an 03A3: - Barrels are about $200'ish. - Bolt bodies can be had for $50 or less - Other small parts - $50 or so. - You may or may not need a stock, but $200-250 ain't hard to find. If you shop around, they can be had for less. The best deal going for 03's or 03A3's at the moment is at the CMP north or south store - $650-750 depending on grade. Like I had mentioned earlier, rebuilding a drill rifle and thinking you're going to come out ahead based on those prices - ain't gonna happen. Based on the rough pricing I just posted - you're already at $700, assuming you needed all of those items. Now, compared to the typical street price you're seeing for Springfields, you likely will come out ahead and you can make this as correct as you want. Regardless, I don't totally do it for being able to do it "on the cheap", as much as they're just fun projects. With that said, like an AR, doing it this way allows you to spread the cost around some. Thanks gents. Might be a project I am willing to take on if I get bored this winter. I would really like to find a drill rifle that is almost complete. |
|
|
|
[#20]
Quoted: Thanks gents. Might be a project I am willing to take on if I get bored this winter. I would really like to find a drill rifle that is almost complete. Most of them are - but there are parts on it that will have to be replaced regardless. |
|
|
|
[#21]
@Lawman734. Where did you get the A4 bolt from?
|
|
|
|
[#22]
@475hp383
I found this one eBay. With that said, there is a guy on the CMP forums (goes by "Smag") that makes them using the original jigs and they go for a really reasonable price. |
|
|
|
[#23]
Quoted: @475hp383 I found this one eBay. With that said, there is a guy on the CMP forums (goes by "Smag") that makes them using the original jigs and they go for a really reasonable price. Thanks. I made an A4 clone from a drill rifle, did the bolt work myself. It turned out ok but doesn't look like an A4 bolt. I would like one that looks more correct. |
|
|
 Win a FREE Membership!
Sign up for the ARFCOM weekly newsletter and be entered to win a free ARFCOM membership. One new winner* is announced every week!
You will receive an email every Friday morning featuring the latest chatter from the hottest topics, breaking news surrounding legislation, as well as exclusive deals only available to ARFCOM email subscribers.

AR15.COM is the world's largest firearm community and is a gathering place for firearm enthusiasts of all types.
From hunters and military members, to competition shooters and general firearm enthusiasts, we welcome anyone who values and respects the way of the firearm.

Subscribe to our monthly Newsletter to receive firearm news, product discounts from your favorite Industry Partners, and more.
Copyright © 1996-2024 AR15.COM LLC. All Rights Reserved.
Any use of this content without express written consent is prohibited.
AR15.Com reserves the right to overwrite or replace any affiliate, commercial, or monetizable links, posted by users, with our own.


