


AR Sponsor

[ARCHIVED THREAD] - Pivot Shims - fixed my rifles side to side play/wobble - super happy (Page 1 of 2)
Posted: 4/4/2024 12:07:36 AM EDT
|
So my LWRC has been a great rifle, but it has always had side to side play/wobble between the upper and lower at the front pivot pin. Intellectually I know that this play is common in the AR design, and has absolutely no effect on accuracy and reliability. But emotionally it has always diminished my perception of quality/solidness of the rifle - I'd pick it up and the first thing I'd notice was that wobble. Well, I'm happy to say that for a $12 pack of shims and 5 minutes work, that wobble is totally gone, and the rifle feels rock solid now, and just overall much more satisfying to hold / dryfire. If you've got a wobbler, I can't recommend these enough. https://triggershims.com/ar_15_shims.php#S23 (The little silver line in the pivot area is the installed shim combo)  Installation is very easy. 1. Retract front pivot pin 1/2 way, so that it is 1/2 way in upper pivot pin (this is to make room for the punch) 2. Shift the upper receiver to the right side of the lower to create space for the shims 3. Grab the thickest 0.005" shim, and press it into the gap with your thumb. If it doesn't fit in the gap, grab the .004, then .003 etc until you find what fits. On the flipside, if the .005" shim fits, you will want to then pair it with a second shim; for me I needed the .005 + .004 for a tight fit that could still be pressed into place with firm thumb pressure. 4. Press your shim combo into place, so that the hole in the shim mostly lines up with the hole in the receiver 5. Using your punch/nail/glock armorers tool (any slender metal rod), insert the rod into the receiver and shim hole, then make a slow steady circle to perfectly line up the shim hole with the receiver hole. 6. Push your receiver pin back into place; be amazed at how much more satisfying the rifle feels without the wiggle. |
|
Quoted: Not a bad idea. I know for 100% certain I'd forget about it every time I took the upper off though.  They have a solution for that too. They link a glue on thier website that is indeed good stuff. With that glue, a little patients and a magnifier lens you can glue the shims in place and not worry about fussing with them. OP, good post for those that don’t know about these, they are good people and the shims are fantastic. They also make some shims to take the annoying slop out of your bolt catch. Perfectionists rejoice! 
|
|
Quoted: They have a solution for that too. They link a glue on thier website that is indeed good stuff. With that glue, a little patients and a magnifier lens you can glue the shims in place and not worry about fussing with them. Once you determined which side and thickness, use a spare pivot pin with light grease coating or shoe polish to keep it aligned but greased to prevent bonding to the pin. After a the glue's initial setup, remove the pin.... I'd suggest setting it up so that when you remove the pin to are pulling out of the side that's opposite of where you attached so that you aren't pulling the shit away if it did stick to the pin at all. |
|
Quoted: Once you determined which side and thickness, use a spare pivot pin with light grease coating or shoe polish to keep it aligned but greased to prevent bonding to the pin. After a the glue's initial setup, remove the pin.... I'd suggest setting it up so that when you remove the pin to are pulling out of the side that's opposite of where you attached so that you aren't pulling the shit away if it did stick to the pin at all. Solid advise, it took me a couple of tries to come up with this exact method. I’m slow…
|
|
Quoted: Not a bad idea. I know for 100% certain I'd forget about it every time I took the upper off though. Well thats the beauty of the kit - they provide plenty of spares  I've taped my spare set (.005+.004) to the little floorplate of my magpul grip with a little gaffers tape just in case. That said, I doubt I'll lose the current shims; they are pretty shiny and easy to spot if dropped, and I'd miss them way too much if they were gone.  |
|
Quoted: Once you determined which side and thickness, use a spare pivot pin with light grease coating or shoe polish to keep it aligned but greased to prevent bonding to the pin. After a the glue's initial setup, remove the pin.... I'd suggest setting it up so that when you remove the pin to are pulling out of the side that's opposite of where you attached so that you aren't pulling the shit away if it did stick to the pin at all. Quoted: Quoted: They have a solution for that too. They link a glue on thier website that is indeed good stuff. With that glue, a little patients and a magnifier lens you can glue the shims in place and not worry about fussing with them. Once you determined which side and thickness, use a spare pivot pin with light grease coating or shoe polish to keep it aligned but greased to prevent bonding to the pin. After a the glue's initial setup, remove the pin.... I'd suggest setting it up so that when you remove the pin to are pulling out of the side that's opposite of where you attached so that you aren't pulling the shit away if it did stick to the pin at all. Great advice. My only concern with going the glue route would be whether the thickness of the glue + shim would put it out of spec, given the close tolerances? In terms of where to glue the shim, I think it would make more sense to glue the shim to the upper receiver rather than the lower. This would allow the lower to swap uppers, could prevent the upper from catching the edge of the shim and knocking it off the lower, and probably just be easier to glue in general. That said for now I'm quite content un-glued, as I don't remove my upper all that often. |
|
Quoted: Thank You.. Just putting an order for a 12pk (just in case) but my BHD inspired was the worse of the worse wobble.. Hope it’ll work out.. Awesome, so glad to be of help. Please let us know how it works out. For me getting rid of the wobble has been a huge 'quality of life' upgrade; I didn't fully appreciate how much I disliked the wobble until it was gone. Now that it is I'll never go back. |
|
Quoted: Thanks! I have an LWRC lower that wobbles too. It's SBR'd so not so easy to just swap out with a different, better fitting lower. Happy to be of help, especially for a fellow LWRC wobbler. FYI at least my ~2016 lower receiver comes with a plastic tipped tension screw above the grip, which can be used to remove the up/down 6-12 ocklock wobble. With that properly tensioned + the pivot shims, the rifle is rock solid - akin to say a bolt action rifle or other one piece rifle design. If your lower doesn't come with the set screw, LWRC also makes their own custom version of the accu wedge that would solve the 6-12 wobble. https://www.lwrci.com/Receiver-Fitment-Wedge-ICSIX8_p_134.html |
|
I have done the exact same with some of my rifles with excellent results as OP described. I don't separate the uppers and lowers of mine, only use a link to open and hold the upper/lower open in a gun cradle when cleaning inside...which isn't often. Works for me. |
|
As much as the gluing or other methods work...these things stay put unless you want them out.... Attached File Attached File Comes with everything you need to fit them to your specific setup. Stays put. Disassemble whenever and don't worry about losing anything. |
|
Quoted: As much as the gluing or other methods work...these things stay put unless you want them out.... https://www.ar15.com/media/mediaFiles/6045/IMG_1136_jpeg-3179766.JPG https://www.ar15.com/media/mediaFiles/6045/IMG_1137_jpeg-3179767.JPG Comes with everything you need to fit them to your specific setup. Stays put. Disassemble whenever and don't worry about losing anything. @Marksman14 What is this? Never seen it before |
|
Quoted: As much as the gluing or other methods work...these things stay put unless you want them out.... https://www.ar15.com/media/mediaFiles/6045/IMG_1136_jpeg-3179766.JPG https://www.ar15.com/media/mediaFiles/6045/IMG_1137_jpeg-3179767.JPG Comes with everything you need to fit them to your specific setup. Stays put. Disassemble whenever and don't worry about losing anything. Thats an interesting option; how does it work? I don't understand how that solves the side to side (3-9 oclock) play at the front pivot? And how is it installed / fitted? |
|
Quoted: Thats an interesting option; how does it work? I don't understand how that solves the side to side (3-9 oclock) play at the front pivot? And how is it installed / fitted? It comes with sand paper and a little holder for the shim. You simply remove material from it until you get the desired fit. Since it basically takes up all the space at the rear, I haven't noticed any side to side play after fitting one. I feel like if you fix one issue, the other isn't as noticeable? That being said, I suppose if your upper/lower fit is truly awful, both may be required to get it bank vault tight. But, I haven't felt any need to go any further than this, so I can't really speak beyond that. I fit mine so that there is still a very tiny amount of movement if I grip the upper and lower and twist. Its almost imperceptible, but the pins pop as expected, without any additional force. Beauty is, you can tailor it to your liking. |
|
[b]Quoted: ...be amazed at how much more satisfying the rifle feels without the wiggle. Agreed. I got some of these a few years ago for my then M&P Sport II (since sold) and it instantly gave the weapon a "higher end" feel. Same with a build with an Anderson lower and PSA upper. Fitment wasn't bad by any means, but throwing one of these in made it tight. |
|
Quoted: As much as the gluing or other methods work...these things stay put unless you want them out.... https://www.ar15.com/media/mediaFiles/6045/IMG_1136_jpeg-3179766.JPG https://www.ar15.com/media/mediaFiles/6045/IMG_1137_jpeg-3179767.JPG Comes with everything you need to fit them to your specific setup. Stays put. Disassemble whenever and don't worry about losing anything. AR15Accu-Shim New to me. Thanks for bringing it up here. |
|
Thanks for linking. My VPN was having fits with the website, but thats where I've gotten mine from! |
|
Quoted: It comes with sand paper and a little holder for the shim. You simply remove material from it until you get the desired fit. Since it basically takes up all the space at the rear, I haven't noticed any side to side play after fitting one. I feel like if you fix one issue, the other isn't as noticeable? That being said, I suppose if your upper/lower fit is truly awful, both may be required to get it bank vault tight. But, I haven't felt any need to go any further than this, so I can't really speak beyond that. I fit mine so that there is still a very tiny amount of movement if I grip the upper and lower and twist. Its almost imperceptible, but the pins pop as expected, without any additional force. Beauty is, you can tailor it to your liking. Thanks, never knew these existed, ordered one to check out. |
|
Quoted: It comes with sand paper and a little holder for the shim. You simply remove material from it until you get the desired fit. Since it basically takes up all the space at the rear, I haven't noticed any side to side play after fitting one. I feel like if you fix one issue, the other isn't as noticeable? That being said, I suppose if your upper/lower fit is truly awful, both may be required to get it bank vault tight. But, I haven't felt any need to go any further than this, so I can't really speak beyond that. I fit mine so that there is still a very tiny amount of movement if I grip the upper and lower and twist. Its almost imperceptible, but the pins pop as expected, without any additional force. Beauty is, you can tailor it to your liking. Quoted: Quoted: Thats an interesting option; how does it work? I don't understand how that solves the side to side (3-9 oclock) play at the front pivot? And how is it installed / fitted? It comes with sand paper and a little holder for the shim. You simply remove material from it until you get the desired fit. Since it basically takes up all the space at the rear, I haven't noticed any side to side play after fitting one. I feel like if you fix one issue, the other isn't as noticeable? That being said, I suppose if your upper/lower fit is truly awful, both may be required to get it bank vault tight. But, I haven't felt any need to go any further than this, so I can't really speak beyond that. I fit mine so that there is still a very tiny amount of movement if I grip the upper and lower and twist. Its almost imperceptible, but the pins pop as expected, without any additional force. Beauty is, you can tailor it to your liking. Thanks. So just be clear, this is shimming the up-down play (6-12 o'clock) similar to a receiver set screw or Accuwedge? *edit found this diagram of the accushim, does this seem accurate? It's an arcane bit of kit, almost nothing out there on it. I found at least with my LWRC, the built in set screw eliminated the up/down play, but didn't really solve the (to me much more irritating) side to side 3-9 play, which is where these little pivot shims were fantastic. |
|
Years ago there was a kit called X-Shims... https://fishgame.com/2016/12/x-shim-taking-slack-ar/ Those kits would accomplish about the same goal, just from a different "angle". DO NOT try to order any of these... scam sites will just hack your CC. FWIW, I have remade them from plastic sheet stock, using the same thickness sizes, And those have been fine. But I do miss the easily made "kits"... fortunately I still have a few left. 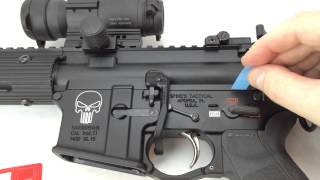 AR15 Upper/Lower Receiver Shim Kit - X-Shim Product Review & Installation And as far as the often quoted US Army test concerning "accuracy" between loose and snug upper to lower fit... well , if you read the test, the US Army had very loose parameters as to what passed for "good enough". ( Up to 7" extreme spread was considered ok ?! in the test. ) https://www.ar15.com/forums/precision-rifles/The-often-quoted-Army-test-about-loose-fitting-upper-to-lower-and-how-it-doesn-t-effect-accuracy-/4-9663/ Anyway... IMHO, tightening a fit between the upper and lower will certainly help with consistency while wielding the AR, and that will help make it easier to achieve better groups. |
|
Quoted: Thanks. So just be clear, this is shimming the up-down play (6-12 o'clock) similar to a receiver set screw or Accuwedge? *edit found this diagram of the accushim, does this seem accurate? It's an arcane bit of kit, almost nothing out there on it. https://www.68forums.com/attachments/accuwedge-shim-jpg.54503/ I found at least with my LWRC, the built in set screw eliminated the up/down play, but didn't really solve the (to me much more irritating) side to side 3-9 play, which is where these little pivot shims were fantastic. Correct. Due to the shim putting pressure on the entire width of the upper, versus just one point on the rear lug like those screws, the "rotational" wobble is eliminated, which I think would be the wobble you would feel if you had a undersized front lug, width wise of course. You are correct in that side to side could still exist, to be honest I've never noticed it though after simply using the NM shim. Could definitely still be there depending on overall tolerances, but hasn't been an issue I have come across. |
|
I’ve used the O-Ring method for years for fitment. Also done a few other things. O-ring is my preferred. Then I have a shinstock version you guys haven’t shown yet. It goes in the very front of the magwell. Heck in a pinch I have made them from business cards or card stock backing off a blister pack type package. The O rings last for a very long time and are CHEAP. As in $1.50 for three. One of two sizes generally works well that the play is gone entirely with nothing else needed. Heck. I went to the hardware store yesterday spent $10 and have a small ziplock bag of the O rings now. |
|
Quoted: I’ve used the O-Ring method for years for fitment. Also done a few other things. O-ring is my preferred. Then I have a shinstock version you guys haven’t shown yet. It goes in the very front of the magwell. Heck in a pinch I have made them from business cards or card stock backing off a blister pack type package. The O rings last for a very long time and are CHEAP. As in $1.50 for three. One of two sizes generally works well that the play is gone entirely with nothing else needed. Heck. I went to the hardware store yesterday spent $10 and have a small ziplock bag of the O rings now. @NachoDip What size O rings and where do you put them? |
|
Quoted: What size O rings and where do you put them? Around the front pivot lug on the upper receiver. #7 (?) IIRC. It's been a long while since I messed with them. https://www.spikestactical.com/collections/parts/o-ring-anti-rattle/ |
|
Quoted: Around the front pivot lug on the upper receiver. #7 (?) IIRC. It's been a long while since I messed with them. https://www.spikestactical.com/collections/parts/o-ring-anti-rattle/ Quoted: Quoted: What size O rings and where do you put them? Around the front pivot lug on the upper receiver. #7 (?) IIRC. It's been a long while since I messed with them. https://www.spikestactical.com/collections/parts/o-ring-anti-rattle/ Some stories of these snapping and getting caught in the FCG |
|
Quoted: Some stories of these snapping and getting caught in the FCG Quoted: Quoted: Quoted: What size O rings and where do you put them? Around the front pivot lug on the upper receiver. #7 (?) IIRC. It's been a long while since I messed with them. https://www.spikestactical.com/collections/parts/o-ring-anti-rattle/ Some stories of these snapping and getting caught in the FCG Definitely a short term, bandaid type fix. |
|
Quoted: @NachoDip What size O rings and where do you put them? Front lug. 16mm OD. 2mm thick. Works great. I have a few rifles that have had o rings for many years with no issues. The business card trick works really well too. Only that it doesn’t always stay when you open the gun. A small thin line of rtv as a hairline bead works great. |
|
Quoted: Correct. Due to the shim putting pressure on the entire width of the upper, versus just one point on the rear lug like those screws, the "rotational" wobble is eliminated, which I think would be the wobble you would feel if you had a undersized front lug, width wise of course. You are correct in that side to side could still exist, to be honest I've never noticed it though after simply using the NM shim. Could definitely still be there depending on overall tolerances, but hasn't been an issue I have come across. Quoted: Quoted: Thanks. So just be clear, this is shimming the up-down play (6-12 o'clock) similar to a receiver set screw or Accuwedge? *edit found this diagram of the accushim, does this seem accurate? It's an arcane bit of kit, almost nothing out there on it. https://www.68forums.com/attachments/accuwedge-shim-jpg.54503/ I found at least with my LWRC, the built in set screw eliminated the up/down play, but didn't really solve the (to me much more irritating) side to side 3-9 play, which is where these little pivot shims were fantastic. Correct. Due to the shim putting pressure on the entire width of the upper, versus just one point on the rear lug like those screws, the "rotational" wobble is eliminated, which I think would be the wobble you would feel if you had a undersized front lug, width wise of course. You are correct in that side to side could still exist, to be honest I've never noticed it though after simply using the NM shim. Could definitely still be there depending on overall tolerances, but hasn't been an issue I have come across. You sold me on it, just ordered one. The side to side (3-9) play is gone due to the front pivot shim. The up down (12-6) play is gone due to the receiver tensioning screw. But there is some 'rotational' wobble left if I grab the handguard and twist. This is the least noticeable form of play for me, but now that I know about it, my OCD demands that it must be eliminated I'll report back once it arrives and I've installed it. Thanks for the suggestion. |
|
Quoted: A small thin line of rtv as a hairline bead works great. Quoted: Quoted: @NachoDip What size O rings and where do you put them? A small thin line of rtv as a hairline bead works great. That's another cool idea; I just lack the skill to get a line of glue/rtv that fine. |
| Just measured a bunch of lower and uppers. All BCM uppers range of .493-.496, lowers are Spikes .503-.506, RGuns .503-.504, PSA ARV 9mm lower .501-.502 upper .496 for both posts. Going to get some .004, .005 and .006 shims so I can put one on both sides of the front post and tighten things up. Best fit and least wiggle was from the RGuns and BCM combo. |
|
Quoted: You sold me on it, just ordered one. The side to side (3-9) play is gone due to the front pivot shim. The up down (12-6) play is gone due to the receiver tensioning screw. But there is some 'rotational' wobble left if I grab the handguard and twist. This is the least noticeable form of play for me, but now that I know about it, my OCD demands that it must be eliminated I'll report back once it arrives and I've installed it. Thanks for the suggestion. Quoted: Quoted: Quoted: Thanks. So just be clear, this is shimming the up-down play (6-12 o'clock) similar to a receiver set screw or Accuwedge? *edit found this diagram of the accushim, does this seem accurate? It's an arcane bit of kit, almost nothing out there on it. https://www.68forums.com/attachments/accuwedge-shim-jpg.54503/ I found at least with my LWRC, the built in set screw eliminated the up/down play, but didn't really solve the (to me much more irritating) side to side 3-9 play, which is where these little pivot shims were fantastic. Correct. Due to the shim putting pressure on the entire width of the upper, versus just one point on the rear lug like those screws, the "rotational" wobble is eliminated, which I think would be the wobble you would feel if you had a undersized front lug, width wise of course. You are correct in that side to side could still exist, to be honest I've never noticed it though after simply using the NM shim. Could definitely still be there depending on overall tolerances, but hasn't been an issue I have come across. You sold me on it, just ordered one. The side to side (3-9) play is gone due to the front pivot shim. The up down (12-6) play is gone due to the receiver tensioning screw. But there is some 'rotational' wobble left if I grab the handguard and twist. This is the least noticeable form of play for me, but now that I know about it, my OCD demands that it must be eliminated I'll report back once it arrives and I've installed it. Thanks for the suggestion. Wheel Diamond - obscure shim purveyor - is beating Amazon with its order processing speed. Order ~4am PST, shipped out by 10:45PST. Installation instructions for those who ordered one. http://www.wheeldiamond.com/installationbasics.htm |
| The shim that fits in the sear recess is a problem if you have FA access. I would also be very interested to see how geometry for the bolt carrier path is impacted by essentially creating a wedge effect at the rear of the upper, against the lower. Seems like it might create some odd wear of the upper/lower/receiver extension over time. |
|
Quoted: Seastrom part A370-903-5, .251" ID, .375" OD, .005" thickness stainless steel shims, pkg of 50. Great find, thank you. Only issue is for those like myself with a weird # (.009) gap, which required 2 sizes of shim combined. For those about to buy shims, might be worth buying a Feeler Gauge and just shoving them into the pivot pin gap to see what thickness is right for your lower/upper combo. https://www.amazon.com/dp/B06XHXJG31?tag=arfcom00-20 
|
|
Quoted: Great find, thank you. Only issue is for those like myself with a weird # (.009) gap, which required 2 sizes of shim combined. For those about to buy shims, might be worth buying a Feeler Gauge and just shoving them into the pivot pin gap to see what thickness is right for your lower/upper combo. https://www.amazon.com/dp/B06XHXJG31?tag=arfcom00-20 https://m.media-amazon.com/images/I/71VDiXHmvzL._AC_SL1500_.jpg Quoted: Quoted: Seastrom part A370-903-5, .251" ID, .375" OD, .005" thickness stainless steel shims, pkg of 50. Great find, thank you. Only issue is for those like myself with a weird # (.009) gap, which required 2 sizes of shim combined. For those about to buy shims, might be worth buying a Feeler Gauge and just shoving them into the pivot pin gap to see what thickness is right for your lower/upper combo. https://www.amazon.com/dp/B06XHXJG31?tag=arfcom00-20 https://m.media-amazon.com/images/I/71VDiXHmvzL._AC_SL1500_.jpg Ordered |
|
Quoted: The shim that fits in the sear recess is a problem if you have FA access. I would also be very interested to see how geometry for the bolt carrier path is impacted by essentially creating a wedge effect at the rear of the upper, against the lower. Seems like it might create some odd wear of the upper/lower/receiver extension over time. If the upper and lower are “in spec”, all this is doing is keeping it in one consistent spot that is within said spec. You can even measure the gap between the upper and lower before and after, and my guess is it will be a remarkably small number. It’s not forcing anything any more than an accuwedge or a lower with a screw built in (aero), just doing a better job at it. |
|
Quoted: Ordered Quoted: Quoted: Quoted: Seastrom part A370-903-5, .251" ID, .375" OD, .005" thickness stainless steel shims, pkg of 50. Great find, thank you. Only issue is for those like myself with a weird # (.009) gap, which required 2 sizes of shim combined. For those about to buy shims, might be worth buying a Feeler Gauge and just shoving them into the pivot pin gap to see what thickness is right for your lower/upper combo. https://www.amazon.com/dp/B06XHXJG31?tag=arfcom00-20 https://m.media-amazon.com/images/I/71VDiXHmvzL._AC_SL1500_.jpg Ordered Nice. So what I found when shoving shims into mine, I was able to get a pretty thick combo into the initial crevice between the upper and lower front pivot pin. But then this thick combo would prove to be too thick to make it all the way to the front pivot pin hole. I had to go with a thinner combo to actually make it all the way to the pivot hole. So for using the Feeler Gauge, make sure that the Gauge can fit all the way to covering the front pivot hole, not just fit in the edge. Whatever that thickness is - the hole covering one - should be the correct thickness for the shim. |

|
Quoted: Nice. So what I found when shoving shims into mine, I was able to get a pretty thick combo into the initial crevice between the upper and lower front pivot pin. But then this thick combo would prove to be too thick to make it all the way to the front pivot pin hole. I had to go with a thinner combo to actually make it all the way to the pivot hole. So for using the Feeler Gauge, make sure that the Gauge can fit all the way to covering the front pivot hole, not just fit in the edge. Whatever that thickness is - the hole covering one - should be the correct thickness for the shim. Quoted: Quoted: Quoted: Quoted: Seastrom part A370-903-5, .251" ID, .375" OD, .005" thickness stainless steel shims, pkg of 50. Great find, thank you. Only issue is for those like myself with a weird # (.009) gap, which required 2 sizes of shim combined. For those about to buy shims, might be worth buying a Feeler Gauge and just shoving them into the pivot pin gap to see what thickness is right for your lower/upper combo. https://www.amazon.com/dp/B06XHXJG31?tag=arfcom00-20 https://m.media-amazon.com/images/I/71VDiXHmvzL._AC_SL1500_.jpg Ordered Nice. So what I found when shoving shims into mine, I was able to get a pretty thick combo into the initial crevice between the upper and lower front pivot pin. But then this thick combo would prove to be too thick to make it all the way to the front pivot pin hole. I had to go with a thinner combo to actually make it all the way to the pivot hole. So for using the Feeler Gauge, make sure that the Gauge can fit all the way to covering the front pivot hole, not just fit in the edge. Whatever that thickness is - the hole covering one - should be the correct thickness for the shim. Makes sense. Appreciate it 
|
[ARCHIVED THREAD] - Pivot Shims - fixed my rifles side to side play/wobble - super happy (Page 1 of 2)
AR Sponsor